1
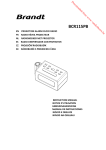
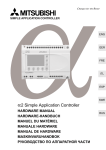
SRC 330 USER’S MANUAL NÁVOD K OBSLUZE NÁVOD NA OBSLUHU FELHASZNÁLÓI KÉZIKÖNYV INSTRUKCJA OBSŁUGI Radioclock with alarm and inner temperature Radiobudík s pokojovým teploměrem Rádiobudík s izbovým teplomerom Rádiós ébresztő szobai hőmérővel Radiobudzik z termometrem pokojowym FUNCTION AND CONTROLS 1. 2. 3. 4. 5. 6. 7. 8. 9. 10. 11. 12. 13. 14. 15. 16. 17. 18. 19. 20. 21. 22. MEMORY.SET / MEMORY+ / DISPLAY LIGHT AUTO ON/OFF / NAP ALARM 1 ON / OFF SET ALARM 2 ON / OFF SET SNOOZE / SLEEP / DIMMER CLK.ADJ. (TIME SET) / TEMP << / TUNE - / YEAR/MONTH/DAY >> / TUNE + / DST/C-F FOCUS ADJUSTMENT FOR PROJECTION UNIT PROJECTION TIME 180° FLIP BUTTON PROJECTION ON/OFF BUTTON VOLUME UP / DISPLAY AUTO CHANGE ON/OFF ON / OFF VOLUME DOWN DISPLAY BATTERY COMPARTMENT (REAR OF UNIT) RESET RATING LABEL (REAR OF UNIT) PROJECTION UNIT SPEAKER TEMPERATURE SENSOR (IN DOOR TEMPERATURE) FM ANTENNA AC POWER CORD EN - 1 LED DISPLAY POWER CONNECTION Plug the AC power cord to a household outlet AC source. This unit is equipped with a battery back up system, it requires a 3V CR2032 flat lithium battery (not included). Insert the battery in the battery compartment, making certain that the positive and negative (+ and -) battery terminals are attached to the corresponding terminals on the plate in the battery compartment. If an AC power failure occurs, the clock automatically switches to the battery power supply, the clock and timer memory continue running. When the AC power resumes, the clock switches back to AC again. GETTING STARTED Press the RESET button (16) locates on the back of unit after AC plug in. - The unit will display full segment for 2 seconds, then it will enter the normal mode. 1. TIME AND CALENDAR MANUAL SETTING A. Setting Time and Calendar – Press Time set button (5) in normal mode and keep depress over 2 seconds to enter time set mode, after enter the setting mode, press Time set button (5) to change the mode cycle as follows : Normal → Year → Month → Day → 12/24 H → Real time Hour → Real time Min → Normal Action (during data adjustment): - Press << / Tune - button (6) to adjust data backward. - Press >> / Tune + button (7) to adjust data forward. - Keep depress << or >> button for 2 seconds to enable auto forward. B. Setting Alarm 1 and Alarm 2 – Press alarm set button (2/3) during normal mode and keep depress over 2 seconds to enter alarm set mode, after enter the setting mode, press alarm set button (2/3) to change the mode cycle as follows : Normal → AL 1 Hour → AL 1 Min → AL 1 weekday Alarm → AL 1 wake beep → AL 1 wake radio → AL 1 wake radio volume → Normal Normal → AL 2 Hour → AL 2 Min → AL 2 weekday Alarm → AL 2 wake beep → AL 2 wake radio → AL 2 wake radio volume → Normal EN - 2 Select alarm weekday mode as follows 1-5 : Monday to Friday 1-7 : Whole week 6-7 : Saturday & Sunday 1-1 : One day of week Action (during data adjustment) : - Press << / Tune - button (6) to adjust data backward. - Press >> / Tune + button (7) to adjust data forward. - Keep depress << or >> button for 2 seconds to enable auto forward. 2. SETTING ALARM OUTPUT ON/OFF Press MEMORY.SET / MEMORY+ / DISPLAY LIGHT AUTO ON/OFF / NAP button (1) to the Auto off mode, alarm wake up the display is auto turn on. Press alarm 1 on/off set button (2) to toggle on and off alarm output function. Press alarm 2 on/off set button (3) to toggle on and off alarm output function. 3. ALARM DURATION AND SNOOZE FUNCTION Alarm Duration – Beep alarm or radio alarm will continue output for 30 minutes if no key press, then it will stop automatically and wait for same alarm time on next day. Action for Snooze : - During alarming, press Snooze button (4) will enable snooze function, Beep alarm or Radio alarm will stop. - Snooze interval is 9 minute (not include second offset) - Snooze will continue unless press ON/OFF button (12) to alarm off of Buzzer alarm or Radio Alarm stop automatically after 30 minutes. Press MEMORY.SET / MEMORY+ / DISPLAY LIGHT AUTO ON/OFF / NAP button (1) to the Auto off mode, during alarming display auto turn on, press snooze / sleep button (4) will enable snooze function, buzzer alarm or radio / display will stop & off. 4. CHANGE DISPLAY CONTENT Press << / Tune - / YEAR/MONTH/DAY button (6) during normal can switch to display Year / Month / Day, after 5 seconds timeout and return back to display time. YEAR Indicator MONTH Indicator EN - 3 DAY Indicator LISTENING TO RADIO Press the ON/OFF button (12) to turn the unit on. Use the Tune + or Tune – button to select the desired FM station. If you press and hold the Tune + or Tune – button for one second, then release, the unit will automatically scan to the next broadcasting station. Press the ON/OFF button (12) to turn the radio OFF. To set / recall the radio presets Press the ON/OFF button (12) to turn the unit ON. Use the Tune + or Tune - button to select the desired FM station. Press the memory / memory + button; “P01” will blink in the display. Press the memory / memory + button again to set the preset. Repeat steps 2 through 4 to set more presets. The unit can preset 10 stations totally for FM. When “P01-P10” is blinking, press the Tune+ or Tune- button to select the preset number. When recalling preset stations, press memory / memory + to select the preset number. Sleep operation When listening to radio, press Snooze / Sleep button (4) to enter sleep mode. You can just adjust the sleep timer from 90 mins to 15 mins by pressing the Snooze / Sleep button (4). The unit will automatically turn off after the selected time. NAP timer function (count down timer) During radio off mode, press MEMORY.SET / MEMORY+ / DISPLAY LIGHT AUTO ON/OFF / NAP button (1) to turn on NAP mode, the NAP time will keep by 5 seconds, within 5 seconds and press MEMORY.SET / MEMORY+ / DISPLAY LIGHT AUTO ON/OFF / NAP button (1) button can change the duration from 90 min – 10 min. The alarm buzzer will sound for 30 min and then shut off automatically. To stop the alarm buzzer, press the ON/OFF button (12). Press the MEMORY.SET / MEMORY+ / DISPLAY LIGHT AUTO ON/OFF / NAP button (1) has no effect during alarm operation. Press ON/OFF button (12) to cancel NAP function. EN - 4 SPECIFICATIONS Frequency range FM: Battery backup : Power supply : Dimensions: Weight: 87.5 – 108 MHz 3V (CR2032 Flat Lithium battery x 1) not included AC230V 50Hz 188 x 82 x 72 mm 420 g Colour options: SRC 330 GN – green display and sides SRC 330 OR – orange display and sides RESET The reset button is located on the back of unit. Use a ballpoint pen to press it whenever you change the batteries, or unit is not performing as expected. This will return all settings to default value, and you will lose any stored data (alarm and clock settings). PROJECTION UNIT Focus setting : Adjust the projection clock brightness/focus by turning the brightness/focus adjustment wheel unit the projected time is clearly shown on the ceiling or wall. To flip projected image by 180°, press 180° flip button. NOTE: PROJECTS TIME IMAGE ON THE CEILING OR WALL OF A DARKENED ROOM. MAXIMUN PROJECTION DISTANCE IS 3-9 FEET. Note: - Ensure that the FM antenna is completely unrolled and extended for best FM reception. EN - 5 WARNING 1. No naked flame sources, such as lighted candles, should be placed on the apparatus. 2. Do not place the product in closed bookcases or racks without proper ventilation. 3. Where the mains plug is used as the disconnect device, the disconnect device shall remain readily operable. 4. The ventilation should not be impeded by covering the ventilation openings with items, such as newspapers, table-cloths, curtains, etc. 5. It shall not be exposed to dripping or splashing and that no objects filled with liquids, such as vases, shall be placed on the apparatus. 6. Do not connect FM antenna to outside antenna. 7. The unit should not be exposed to direct sunlight, very high or low temperature, moisture, vibrations or placed in dusty environment. 8. Do not use abrasive, benzene, thinner or other solvents to clean the surface of the unit. To clean, wipe it with mild non-abrasive detergent solution and clean soft cloth. 9. Never attempt to insert wires, pins or other such objects into the vents or opening of the unit. 10. Disconnect device warning : Mains plug is used as the connection, so it should always remain ready operate. 11. Batteries shall not be exposed to excessive heat such as sunshine, re or the like. 12. Class 1 LED product. CAUTION Danger of explosion if battery is incorrectly replaced. Replace only with the same or equivalent type. EN - 6 INSTRUCTIONS AND INFORMATION REGARDING THE DISPOSAL OF USED PACKAGING MATERIALS Dispose of packaging material at a public waste disposal site. DISPOSAL OF USED ELECTRICAL AND ELECTRONIC APPLIANCES The meaning of the symbol on the product, its accessory or packaging indicates that this product shall not be treated as household waste. Please, dispose of this product at your applicable collection point for the recycling of electrical & electronic equipment waste. Alternatively in some states of the European Union or other European states you may return your products to your local retailer when buying an equivalent new product. The correct disposal of this product will help save valuable natural resources and help in preventing the potential negative impact on the environment and human health, which could be caused as a result of improper liquidation of waste. Please ask your local authorities or the nearest waste collection centre for further details. The improper disposal of this type of waste may fall subject to national regulations for nes. For business entities in the European Union If you wish to dispose of an electrical or electronic device, request the necessary information from your seller or supplier. Disposal in other countries outside the European Union If you wish to dispose of this product, request the necessary information about the correct disposal method from local government departments or from your seller. This product meets all the basic EU regulation requirements that relate to it. Changes to the text, design and technical specications may occur without prior notice and we reserve the right to make these changes. © Copyright 2012, FAST ČR, a. s. EN - 7 Revision 07/2012