1
de Gebrauchsanweisung Bodenstaubsauger
en Vacuum cleaner operating instructions
HS15
M.-Nr. 09 878 740
de - Inhalt
Sicherheitshinweise und Warnungen . . . . . . . . . . . . . . . . . . . . . . . . . . . . . . . . . 3
Ihr Beitrag zum Umweltschutz . . . . . . . . . . . . . . . . . . . . . . . . . . . . . . . . . . . . . . . 9
Gerätebeschreibung . . . . . . . . . . . . . . . . . . . . . . . . . . . . . . . . . . . . . . . . . . . . . . 10
Vor dem Gebrauch . . . . . . . . . . . . . . . . . . . . . . . . . . . . . . . . . . . . . . . . . . . . . . . . 12
Verwendung der Elektrobürste . . . . . . . . . . . . . . . . . . . . . . . . . . . . . . . . . . . . . . . 12
Verwendung der Bodendüse. . . . . . . . . . . . . . . . . . . . . . . . . . . . . . . . . . . . . . . . . 13
Verwendung des mitgelieferten Zubehörs . . . . . . . . . . . . . . . . . . . . . . . . . . . . 14
Gebrauch . . . . . . . . . . . . . . . . . . . . . . . . . . . . . . . . . . . . . . . . . . . . . . . . . . . . . . . 14
Anschlusskabel herausziehen . . . . . . . . . . . . . . . . . . . . . . . . . . . . . . . . . . . . . . . . 14
Ein- und Ausschalten . . . . . . . . . . . . . . . . . . . . . . . . . . . . . . . . . . . . . . . . . . . . . . . 14
Saugleistung wählen . . . . . . . . . . . . . . . . . . . . . . . . . . . . . . . . . . . . . . . . . . . . . . . 15
Elektrobürste ein- und ausschalten . . . . . . . . . . . . . . . . . . . . . . . . . . . . . . . . . . . . 15
Betrieb unterbrechen . . . . . . . . . . . . . . . . . . . . . . . . . . . . . . . . . . . . . . . . . . . . . . . 16
Abstellen, Transportieren und Aufbewahren . . . . . . . . . . . . . . . . . . . . . . . . . . 16
Park-System für Saugpausen . . . . . . . . . . . . . . . . . . . . . . . . . . . . . . . . . . . . . . . . 16
Park-System zur Aufbewahrung . . . . . . . . . . . . . . . . . . . . . . . . . . . . . . . . . . . . . . . 16
Wartung . . . . . . . . . . . . . . . . . . . . . . . . . . . . . . . . . . . . . . . . . . . . . . . . . . . . . . . . 16
Wo bekomme ich Staubbeutel und Filter? . . . . . . . . . . . . . . . . . . . . . . . . . . . . . . . 17
Welche Staubbeutel und Filter sind richtig? . . . . . . . . . . . . . . . . . . . . . . . . . . . . . 17
Wann tausche ich den Staubbeutel aus? . . . . . . . . . . . . . . . . . . . . . . . . . . . . . . . 17
Wie tausche ich den Staubbeutel aus? . . . . . . . . . . . . . . . . . . . . . . . . . . . . . . . . . 18
Wann tausche ich den Motorschutzfilter aus? . . . . . . . . . . . . . . . . . . . . . . . . . . . . 18
Wie tausche ich den Motorschutzfilter aus? . . . . . . . . . . . . . . . . . . . . . . . . . . . . . 19
Wann tausche ich den Abluftfilter aus? . . . . . . . . . . . . . . . . . . . . . . . . . . . . . . . . . 19
Wie tausche ich den Abluftfilter aus? . . . . . . . . . . . . . . . . . . . . . . . . . . . . . . . . . . 19
Abluftfilter umrüsten . . . . . . . . . . . . . . . . . . . . . . . . . . . . . . . . . . . . . . . . . . . . . . . . 20
Serviceanzeige mit Resettaste . . . . . . . . . . . . . . . . . . . . . . . . . . . . . . . . . . . . . . . 20
Wann tausche ich die Fadenheber aus? . . . . . . . . . . . . . . . . . . . . . . . . . . . . . . . . 20
Wie tausche ich die Fadenheber aus? . . . . . . . . . . . . . . . . . . . . . . . . . . . . . . . . . 20
Pflege . . . . . . . . . . . . . . . . . . . . . . . . . . . . . . . . . . . . . . . . . . . . . . . . . . . . . . . . . . 20
Störungen . . . . . . . . . . . . . . . . . . . . . . . . . . . . . . . . . . . . . . . . . . . . . . . . . . . . . . . 21
Kundendienst . . . . . . . . . . . . . . . . . . . . . . . . . . . . . . . . . . . . . . . . . . . . . . . . . . . . 21
Garantiebedingungen . . . . . . . . . . . . . . . . . . . . . . . . . . . . . . . . . . . . . . . . . . . . . 21
Nachkaufbares Zubehör . . . . . . . . . . . . . . . . . . . . . . . . . . . . . . . . . . . . . . . . . . . 22
2
de - Sicherheitshinweise und Warnungen
Dieser Staubsauger entspricht den vorgeschriebenen
Sicherheitsbestimmungen. Ein unsachgemäßer Gebrauch kann zu Schäden an Personen und Sachen führen.
Lesen Sie vor dem ersten Gebrauch des Staubsaugers
die Gebrauchsanweisung. Sie gibt wichtige Hinweise für
Sicherheit, Gebrauch und Wartung des Staubsaugers.
Dadurch schützen Sie sich und andere und vermeiden
Schäden an dem Staubsauger.
Bewahren Sie die Gebrauchsanweisung auf und geben
Sie diese an einen eventuellen Nachbesitzer weiter.
Schalten Sie den Staubsauger immer nach dem Gebrauch, vor jedem Zubehörwechsel und vor jeder Reinigung / Wartung aus. Ziehen Sie den Netzstecker aus der
Steckdose.
Bestimmungsgemäße Verwendung
~ Dieser Staubsauger ist dazu bestimmt, im Haushalt und
in haushaltsähnlichen Umgebungen verwendet zu werden.
~ Dieser Staubsauger ist für das tägliche Saugen von Teppichen, Teppichböden und unempfindlichen Hartböden
geeignet.
~ Dieser Staubsauger ist nicht für den Gebrauch im Außenbereich bestimmt.
3
de - Sicherheitshinweise und Warnungen
~ Benutzen Sie den Staubsauger ausschließlich zum Auf-
saugen von trockenem Sauggut. Menschen und Tiere dürfen Sie mit dem Staubsauger nicht absaugen. Alle anderen
Anwendungsarten, Umbauten und Veränderungen sind
unzulässig.
~ Personen, die aufgrund ihrer physischen, sensorischen
oder geistigen Fähigkeiten oder ihrer Unerfahrenheit oder
Unkenntnis nicht in der Lage sind, den Staubsauger sicher
zu bedienen, dürfen diesen Staubsauger nicht ohne Aufsicht oder Anweisung durch eine verantwortliche Person
benutzen.
Kinder im Haushalt
~ Kinder unter acht Jahren müssen vom Staubsauger ferngehalten werden, es sei denn, sie werden ständig beaufsichtigt.
~ Kinder ab acht Jahren dürfen den Staubsauger nur ohne
Aufsicht bedienen, wenn ihnen der Staubsauger so erklärt
wurde, dass sie diesen sicher bedienen können. Kinder
müssen mögliche Gefahren einer falschen Bedienung erkennen und verstehen können.
~ Kinder dürfen den Staubsauger nicht ohne Aufsicht reinigen oder warten.
~ Beaufsichtigen Sie Kinder, die sich in der Nähe des
Staubsaugers aufhalten. Lassen Sie Kinder niemals mit
dem Staubsauger spielen.
4
de - Sicherheitshinweise und Warnungen
Technische Sicherheit
~ Kontrollieren Sie den Staubsauger und alle Zubehörteile
vor der Benutzung auf sichtbare Schäden. Nehmen Sie einen beschädigten Staubsauger nicht in Betrieb.
~ Vergleichen Sie die Anschlussdaten auf dem Typen-
schild des Staubsaugers (Netzspannung und Frequenz)
mit denen des Elektronetzes. Diese Daten müssen unbedingt übereinstimmen.
~ Die Netzsteckdose muss über eine Sicherung 16 A oder
10 A träge abgesichert sein.
~ Die Steckdose am Staubsauger darf nur für die in dieser
Gebrauchsanweisung angegebenen Miele Elektrobürsten
verwendet werden.
~ Die Miele Elektrobürste ist ein motorisch angetriebenes
Zusatzgerät, speziell für Miele Staubsauger. Das Betreiben
des Staubsaugers mit einer Elektrobürste eines anderen
Herstellers ist aus Sicherheitsgründen nicht erlaubt.
~ Eine Reparatur des Staubsaugers während der Garan-
tiezeit darf nur von einem von Miele autorisierten Kundendienst ausgeführt werden, da sonst bei nachfolgenden
Schäden kein Garantieanspruch besteht.
~ Benutzen Sie den Staubsauger nicht, wenn das An-
schlusskabel beschädigt ist. Lassen Sie ein beschädigtes
Anschlusskabel nur komplett mit der Kabeltrommel austauschen. Aus Sicherheitsgründen darf der Austausch nur von
einer von Miele autorisierten Fachkraft oder vom Miele
Werkkundendienst vorgenommen werden.
5
de - Sicherheitshinweise und Warnungen
~ Benutzen Sie das Anschlusskabel nicht zum Tragen des
Staubsaugers und ziehen Sie den Netzstecker nicht am
Anschlusskabel aus der Steckdose.
Ziehen Sie das Anschlusskabel nicht über scharfe Kanten
und quetschen Sie es nicht ein.
Vermeiden Sie häufiges Überfahren des Anschlusskabels.
Anschlusskabel, Netzstecker und Steckdose können beschädigt werden und Ihre Sicherheit gefährden.
~ Beim Saugen – vor allem von Feinstaub, wie z. B. Bohr-
staub, Sand, Gips, Mehl usw. – kommt es naturgemäß zu
elektrostatischen Aufladungen, die sich in bestimmten Situationen entladen können. Um die unangenehme Wirkung
der elektrostatischen Entladungen zu vermeiden, ist an der
Unterseite des Handgriffes eine Metalleinlage eingearbeitet. Achten Sie deshalb darauf, dass Ihre Hand diese Metalleinlage beim Saugen dauerhaft berührt.
~ Tauchen Sie den Staubsauger, die Elektrobürste, das
Elektro-Teleskopsaugrohr und den Elektro-Saugschlauch
niemals in Wasser und reinigen Sie alle Teile nur trocken
oder mit einem leicht feuchten Tuch.
~ Die Elektrobürste, das Elektro-Teleskopsaugrohr und der
Elektro-Saugschlauch enthalten elektrische Leitungen. Die
Steckkontakte dürfen nicht mit Wasser in Berührung kommen - eine feuchte Reinigung dieser Teile ist deshalb nicht
erlaubt.
6
de - Sicherheitshinweise und Warnungen
~ Lassen Sie Reparaturen am Staubsauger, an der Elektrobürste, am Elektro-Teleskopsaugrohr und am Elektro-Saugschlauch nur von einer von Miele autorisierten Fachkraft
ausführen. Durch unsachgemäße Reparaturen können erhebliche Gefahren für den Benutzer entstehen.
Sachgemäßer Gebrauch
~ Vermeiden Sie beim Saugen mit einer Saugdüse oder
dem Saugrohr, in Kopfnähe zu kommen.
~ Benutzen Sie den Staubsauger nicht ohne Staubbeutel,
Motorschutzfilter und Abluftfilter.
~ Wenn kein Staubbeutel eingesetzt ist, kann der Staub-
raumdeckel nicht geschlossen werden. Wenden Sie keine
Gewalt an.
~ Saugen Sie keine brennenden oder glühenden Gegenstände, wie z. B. Zigaretten oder scheinbar verloschene
Asche bzw. Kohle, auf.
~ Saugen Sie keine Flüssigkeiten und keinen feuchten
Schmutz auf. Lassen Sie feucht gereinigte oder schampunierte Teppiche und Teppichböden vor dem Absaugen
vollständig trocknen.
~ Saugen Sie keinen Tonerstaub auf. Toner, der z. B. bei
Druckern oder Kopiergeräten verwendet wird, kann elektrisch leitfähig sein.
~ Saugen Sie keine leicht entflammbaren oder explosiven
Stoffe oder Gase auf und saugen Sie nicht an Orten, an
denen solche Stoffe gelagert sind.
7
de - Sicherheitshinweise und Warnungen
Zubehör
~ Fassen Sie beim Saugen mit einer Miele Elektro- oder
Turbobürste nicht in die laufende Bürstenwalze.
~ Achten Sie beim Saugen mit dem Handgriff ohne aufge-
stecktes Zubehör darauf, dass der Handgriff nicht beschädigt ist.
~ Verwenden Sie nur Staubbeutel, Filter und Zubehör mit
dem "Original Miele"-Logo. Nur dafür kann der Hersteller
die Sicherheit gewährleisten.
Miele haftet nicht für Schäden, die durch bestimmungswidrigen Gebrauch, falsche Bedienung und infolge von
Nichtbeachtung der Sicherheitshinweise und Warnungen verursacht werden.
8
de - Ihr Beitrag zum Umweltschutz
Entsorgung der Verkaufsverpackung
Die Verpackung schützt den Staubsauger vor Transportschäden. Die Verpackungsmaterialien sind nach umweltverträglichen und entsorgungstechnischen Gesichtspunkten ausgewählt
und deshalb recycelbar.
Das Rückführen der Verpackung in den
Materialkreislauf spart Rohstoffe und
verringert das Abfallaufkommen. Geben Sie die Verpackung zur Entsorgung in die dualen Systeme (z. B. gelber Sack / gelbe Tonne).
Entsorgung des Altgerätes
Entnehmen Sie vor der Entsorgung des
Altgerätes den Staubbeutel und die eingesetzten Filter und geben Sie diese
Teile in den Hausmüll.
Elektrische und elektronische Altgeräte
enthalten vielfach noch wertvolle Materialien. Sie enthalten aber auch schädliche Stoffe, die für ihre Funktion und Sicherheit notwendig waren. Im Restmüll
oder bei falscher Behandlung können
diese der menschlichen Gesundheit
und der Umwelt schaden. Geben Sie
Ihr Altgerät deshalb auf keinen Fall in
den Restmüll.
Entsorgung der Staubbeutel
und der eingesetzten Filter
Staubbeutel und Filter sind aus umweltverträglichen Materialien hergestellt.
Die Filter können Sie über den normalen Hausmüll entsorgen. Dies trifft auch
auf den Staubbeutel zu, sofern er keinen im Hausmüll verbotenen Schmutz
enthält.
Nutzen Sie stattdessen die von Ihrem
Wohnort eingerichtete Sammelstelle zur
Rückgabe und Verwertung elektrischer
und elektronischer Altgeräte. Informieren Sie sich gegebenenfalls bei Ihrem
Händler.
Bitte sorgen Sie dafür, dass Ihr Altgerät
bis zum Abtransport kindersicher aufbewahrt wird.
9
de - Gerätebeschreibung
10
de - Gerätebeschreibung
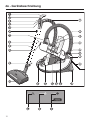
a Elektro-Saugschlauch SES 131
b Entriegelungstaste für Zubehörfach
c Staubbeutel-Wechselanzeige
d Anzeigefeld
e Fußtaste für automatische Kabelaufwicklung
f Park-System für Saugpausen
g Fußtaste Ein / Aus s
h Anschlusskabel
i Lenkrollen
j Abluftfilter
k Park-System zur Aufbewahrung (an beiden Seiten des Staubsaugers)
l Motorschutzfilter
m Original Miele Staubbeutel
n Tragegriff
o Elektrobürste (je nach Modell SEB 217 oder SEB 236)
p Entriegelungstasten
q Entriegelungstaste für Staubraumdeckel
r Elektro-Teleskopsaugrohr SET 220
s Verstellknopf für Elektro-Teleskopsaugrohr
t Saugstutzen
u Anzeige der Saugleistungsstufen
v Taste Stand-by - für kurze Saugpausen, mit LED
w Taste Ein / Aus j für Elektrobürste, mit LED
x Tasten + / - zum Einstellen der Saugleistung
y Comfort-Handgriff
z Anzeigelampe Thermoschutz §
{ Anzeigelampe Stand-by | Serviceanzeige mit Resettaste
11
de
Die in den Kapiteln angegebenen
Abbildungen finden Sie auf den Ausklappseiten am Ende dieser Gebrauchsanweisung.
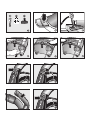
Vor dem Gebrauch
Elektro-Saugschlauch anschließen
(Abb. 1)
^ Stecken Sie den Saugstutzen positioniert in die Saugöffnung, bis er deutlich einrastet.
Elektro-Saugschlauch abnehmen
(Abb. 2)
^ Drücken Sie die Entriegelungstasten
seitlich am Saugstutzen und ziehen
Sie ihn aus der Saugöffnung.
Comfort-Handgriff und Elektro-Teleskopsaugrohr zusammenstecken
(Abb. 3)
^ Stecken Sie den Comfort-Handgriff
positioniert in das Elektro-Teleskopsaugrohr, bis er deutlich einrastet.
^ Drücken Sie die Entriegelungstaste,
wenn Sie die Teile voneinander trennen möchten.
Elektro-Teleskopsaugrohr einstellen
(Abb. 4)
Das Elektro-Teleskopsaugrohr besteht
aus zwei ineinander gesteckten Rohrteilen, die Sie auf die jeweils bequemste Länge auseinander ziehen können,
maximal jedoch bis zum Anschlag.
^ Drücken Sie den Verstellknopf und
stellen Sie das Elektro-Teleskopsaugrohr auf die gewünschte Länge ein.
12
Elektro-Teleskopsaugrohr und Elektrobürste zusammenstecken (Abb. 5)
^ Stecken Sie das Elektro-Teleskopsaugrohr positioniert in die Elektrobürste, bis es deutlich einrastet.
Weitere Informationen zu "Gebrauch"
und "Wartung" entnehmen Sie der separaten Gebrauchsanweisung Ihrer
Elektrobürste.
Verwendung der Elektrobürste
Beachten Sie in erster Linie die Reinigungs- und Pflegeanweisung Ihres
Bodenbelag-Herstellers.
Je nach Modell ist Ihr Staubsauger mit
einer der folgenden Elektrobürsten ausgestattet.
– Elektrobürste SEB 217
– Elektrobürste SEB 236
Die Elektrobürste ist besonders geeignet zur intensiven Reinigung robuster
textiler Bodenbeläge. Sie beseitigt fest
eingetretene Verschmutzungen und
verhindert die Bildung von Laufstraßen.
,Saugen Sie mit der Elektrobürste
keine hochwertigen, handgeknüpften Teppiche, z. B. Berber, Perser
usw. und keine extrem langflorigen
Teppiche und Teppichböden ab. Es
besteht die Gefahr, dass Fäden gezogen werden.
de
,Saugen Sie mit der Elektrobürste
SEB 217 keine stark strukturierten
oder unebenen Fußböden ab. Die
Bodenplatte der Elektrobürste kann
Kontakt zu diesem Fußboden bekommen und ihn beschädigen.
Verwendung der Bodendüse
Beachten Sie in erster Linie die Reinigungs- und Pflegeanweisung Ihres
Bodenbelag-Herstellers.
Zusätzlich zur Elektrobürste liegt Ihrem
Staubsauger eine Bodendüse bei.
Diese Bodendüse kann für das Saugen
von Teppichen und Teppichböden genutzt werden. Sie ist besonders geeignet zur Reinigung von Hartböden.
Das Miele Bodenpflege Sortiment bietet
für andere Bodenbeläge oder Spezialanwendungen passende Bodendüsen,
-bürsten und -vorsätze (siehe Kapitel
"Nachkaufbares Zubehör").
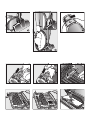
Elektro-Teleskopsaugrohr und Bodendüse zusammenstecken (Abb. 6)
^ Stecken Sie das Elektro-Teleskopsaugrohr nach links und rechts drehend in die Bodendüse, bis es deutlich einrastet.
^ Drücken Sie die Entriegelungstaste,
wenn Sie die Teile voneinander trennen möchten.
Bodendüse einstellen (Abb. 7)
Saugen Sie Teppiche und Teppichböden mit versenkten Borsten:
^ Drücken Sie die Fußtaste %.
Saugen Sie unempfindliche ebene
Hartböden und Böden mit Fugen oder
Ritzen mit herausgestellten Borsten:
^ Drücken Sie die Fußtaste ).
Aktivierung der Abluftfilter-Wechselanzeige
Je nach Modell ist serienmäßig einer
der folgenden Abluftfilter eingesetzt
(Abb. 8).
b Active AirClean 50
c HEPA AirClean 50
^ Drücken Sie die Entriegelungstaste in
der Griffmulde und klappen Sie den
Staubraumdeckel bis zum Einrasten
nach oben auf (Abb. 9).
^ Entfernen Sie den Hinweisstreifen
(Abb. 10).
^ Drücken Sie die Abluftfilter-Wechselanzeige ~ (Abb. 11).
^ Nach ca. 10 - 15 Sekunden erscheint
am linken Rand des Anzeigefeldes
ein schmaler roter Farbstreifen (Abb.
12).
^ Schließen Sie den Staubraumdeckel
bis zum Einrasten der Verriegelung
und achten Sie darauf, dass der
Staubbeutel dabei nicht eingeklemmt
wird.
Funktion der Abluftfilter-Wechselanzeige
Die Abluftfilter-Wechselanzeige zeigt
die Nutzungsdauer des Abluftfilters an.
Nach ca. 50 Betriebsstunden, was in
etwa der durchschnittlichen Nutzung eines Jahres entspricht, ist das Anzeigefeld rot ausgefüllt (Abb. 13).
13
de
Verwendung des mitgelieferten Gebrauch
Zubehörs (Abb. 14)
a Fugendüse
Zum Aussaugen von Falten, Fugen
und Ecken.
b Saugpinsel mit Naturborsten
Zum Absaugen von Profilleisten, sowie verzierten, geschnitzten oder besonders empfindlichen Gegenständen u. ä.
Der Pinselkopf ist drehbar und kann
dadurch in die jeweils günstigste
Stellung gedreht werden.
c Polsterdüse
Zum Absaugen von Polstermöbeln,
Matratzen, Kissen, Vorhängen usw.
Zubehör entnehmen (Abb. 15)
^ Drücken Sie die Entriegelungstaste.
Das Zubehörfach öffnet sich.
^ Entnehmen Sie das gewünschte Zubehör.
^ Schließen Sie das Zubehörfach, indem Sie den Deckel zudrücken.
Bodendüse (Abb. 16)
Auch geeignet zum Absaugen von
Treppenstufen.
,Saugen Sie Treppen aus Sicherheitsgründen von unten nach oben
ab.
Anschlusskabel herausziehen (Abb.
17)
^ Ziehen Sie das Anschlusskabel bis
zur gewünschten Länge heraus
(max. ca. 7,5 m).
^ Stecken Sie den Netzstecker in die
Steckdose.
,Das Anschlusskabel müssen Sie
bei einer Betriebszeit von länger als
30 Minuten komplett herausziehen.
Gefahr der Überhitzung und Schädigung.
Aufrollen (Abb. 18)
^ Ziehen Sie den Netzstecker aus der
Steckdose.
^ Treten Sie kurz die Fußtaste für die
automatische Kabelaufwicklung - das
Anschlusskabel rollt automatisch auf.
Ein- und Ausschalten (Abb. 19)
^ Treten Sie die Fußtaste Ein / Aus s.
Die Anzeigelampe Stand-by - im Anzeigefeld des Staubsaugers leuchtet
gelb, ebenso die LED - am ComfortHandgriff.
Erstinbetriebnahme (Abb. 20 + 21)
Mit Betätigen der Taste - wird direkt die
niedrigste Leistungsstufe, mit Betätigen
der Taste + direkt die höchste Leistungsstufe angewählt.
Beim nächsten Gebrauch können Sie
direkt die zuletzt gewählte Leistungsstufe aktivieren.
14
de
^ Drücken Sie dazu die Taste Stand-by
- am Comfort-Handgriff.
Saugleistung wählen (Abb. 20)
Sie können die Saugleistung des
Staubsaugers der jeweiligen Saugsituation anpassen. Durch Reduzierung der
Saugleistung verringern Sie die Schiebekraft an der Bodendüse deutlich.
Am Comfort-Handgriff sind den Leistungsstufen Symbole zugeordnet, die
beispielhaft zeigen, wofür die jeweilige
Leistungsstufe zu empfehlen ist.
Die gewählte Leistungsstufe leuchtet jeweils gelb.
# - Gardinen, Textilien
$ - Polstermöbel, Kissen
% - Hochwertige Veloursteppiche,
Brücken und Läufer
* - energiesparendes tägliches
Saugen bei geringer Geräuschentwicklung
( - Teppiche und Teppichböden aus
Schlingenware
) - Hartböden, stark verschmutzte
Teppiche und Teppichböden
Erscheint Ihnen die Schiebekraft der
Elektrobürste / Bodendüse zu hoch,
so reduzieren Sie die Saugleistung,
bis sich die Elektrobürste / Bodendüse leicht schieben lässt.
^ Drücken Sie die Taste + am ComfortHandgriff, wenn Sie eine höhere
Saugleistung wünschen.
Beim Saugen (Abb. 22)
^ Ziehen Sie den Staubsauger beim
Saugen wie einen Schlitten hinter
sich her. Sie können den Staubsauger auch aufrecht stehend benutzen,
z. B. beim Absaugen von Treppen
oder Gardinen.
,Beim Saugen – vor allem von
Feinstaub, wie z. B. Bohrstaub,
Sand, Gips, Mehl usw. – kommt es
naturgemäß zu elektrostatischen
Aufladungen, die sich in bestimmten
Situationen entladen können. Um
die unangenehme Wirkung der elektrostatischen Entladungen zu vermeiden, ist an der Unterseite des
Handgriffs eine Metalleinlage eingearbeitet. Achten Sie deshalb darauf,
dass Ihre Hand diese Metalleinlage
beim Saugen dauerhaft berührt.
Elektrobürste ein- und ausschalten
(Abb. 23)
Möchten Sie die Elektrobürste einsetzen, so müssen Sie diese - zusätzlich
zum Staubsauger - einschalten.
^ Drücken Sie dazu die Taste Ein / Aus
j am Comfort-Handgriff.
Die LED am Comfort-Handgriff leuchtet.
Die Taste ermöglicht Ihnen, die Elektrobürste im Bedarfsfall auszuschalten,
z. B. beim Wechsel von Teppichboden
auf einen hochwertigen Teppich.
^ Drücken Sie die Taste - am ComfortHandgriff, wenn Sie eine niedrigere
Saugleistung wünschen.
15
de
Betrieb unterbrechen (Abb. 21)
In kurzen Saugpausen können Sie den
Betrieb des Staubsaugers unterbrechen.
^ Drücken Sie dazu die Taste Stand-by
- am Comfort-Handgriff.
Die LED am Comfort-Handgriff leuchtet.
,Lassen Sie den Staubsauger
nicht dauerhaft im Stand-by-Modus,
sondern nur für kurze Saugpausen.
Gefahr der Überhitzung und Schädigung.
Abstellen, Transportieren und
Aufbewahren
Park-System für Saugpausen (Abb.
24)
(nicht nutzbar bei Verwendung der
Elektrobürste SEB 236)
In kurzen Saugpausen können Sie das
Saugrohr mit dem Saugvorsatz bequem
am Staubsauger abstellen.
^ Stecken Sie den Saugvorsatz mit
dem Parknocken in das Park-System.
Befindet sich der Staubsauger hierbei auf einer schrägen Fläche, z. B.
auf einer Rampe, so schieben Sie
die Rohrteile des Elektro-Teleskopsaugrohres komplett ein.
Ein- / Ausschalter im Park-System
Der Betrieb des Staubsaugers wird automatisch unterbrochen, wenn Sie den
Saugvorsatz mit dem Parknocken in
das Park-System stecken.
16
Park-System zur Aufbewahrung (Abb.
25)
,Schalten Sie den Staubsauger
nach Gebrauch aus. Ziehen Sie den
Netzstecker aus der Steckdose.
^ Stellen Sie den Staubsauger aufrecht
hin.
Es ist hilfreich, die Rohrteile des Elektro-Teleskopsaugrohres komplett einzuschieben.
^ Stecken Sie den Saugvorsatz mit
dem Parknocken von oben in einen
der beiden Saugrohrhalter (nicht
nutzbar bei Verwendung der Elektrobürste SEB 236).
So können Sie den Staubsauger bequem tragen oder zum Aufbewahren
abstellen.
Wartung
,Schalten Sie den Staubsauger
vor jeder Wartung aus und ziehen
Sie den Netzstecker aus der Steckdose.
Das Miele Filtersystem besteht aus drei
Komponenten.
– Staubbeutel
– Motorschutzfilter
– Abluftfilter
Um die einwandfreie Saugleistung des
Staubsaugers zu gewährleisten, müssen Sie diese Filter von Zeit zu Zeit austauschen.
de
Verwenden Sie nur Staubbeutel, Filter und Zubehör mit dem "Original
Miele"-Logo. Nur dann kann die
Saugleistung des Staubsaugers optimal ausgenutzt und das bestmögliche Reinigungsergebnis erreicht
werden.
,Die Verwendung von Staubbeuteln aus Papier oder papierähnlichen
Materialien sowie von Staubbeuteln
mit einer Halteplatte aus Pappe kann
ebenso zu schwerwiegenden Schäden am Staubsauger führen und einen Verlust der Garantie nach sich
ziehen wie der Einsatz von Staubbeuteln ohne "Original Miele"-Logo.
Wo bekomme ich Staubbeutel und
Filter?
Original Miele Staubbeutel und Filter erhalten Sie bei Ihrem Fachhändler oder
beim Miele Werkkundendienst sowie im
Miele Onlineshop.
Welche Staubbeutel und Filter sind
richtig?
Original Miele Staubbeutel mit blauer
Halteplatte vom Typ G/N und Original
Miele Filter erkennen Sie an dem "Original Miele"-Logo auf der Verpackung
oder direkt auf dem Staubbeutel.
In jeder Packung Miele Staubbeutel
liegt zusätzlich ein Abluftfilter AirClean
und ein Motorschutzfilter.
Möchten Sie Original Miele Abluftfilter
einzeln nachkaufen, so nennen Sie Ihrem Fachhändler oder dem Miele Werkkundendienst die Modellbezeichnung
Ihres Staubsaugers, damit Sie die richtigen Teile bekommen. Sie können diese Teile aber auch bequem im Miele
Onlineshop bestellen.
Selbstverständlich können Sie anstelle
des serienmäßig eingesetzten Abluftfilters ebenso einen der anderen Original
Miele Abluftfilter einsetzen (siehe Kapitel "Nachkaufbares Zubehör").
Wann tausche ich den Staubbeutel
aus? (Abb. 26)
Wenn die Farbskala das Anzeigefeld
der Staubbeutel-Wechselanzeige rot
ausfüllt, müssen Sie den Staubbeutel
austauschen.
Staubbeutel sind Einwegartikel.
Entsorgen Sie volle Staubbeutel.
Verwenden Sie diese nicht mehrfach.
Verstopfte Poren reduzieren die
Saugleistung des Staubsaugers.
17
de
Zur Prüfung
^ Stecken Sie die Bodendüse auf. Alle
anderen Saugdüsen beeinflussen die
Funktion der Staubbeutel-Wechselanzeige.
^ Schalten Sie den Staubsauger mit
der Fußtaste Ein / Aus s ein und stellen Sie den Saugleistungswähler am
Handgriff auf maximale Saugleistung.
^ Heben Sie die Bodendüse ein Stück
vom Fußboden ab. Wenn die Staubbeutel-Wechselanzeige jetzt einen
vollen Staubbeutel anzeigt, müssen
Sie ihn austauschen.
Funktion der Staubbeutel-Wechselanzeige
Die Funktion der Anzeige ist auf Mischstaub ausgelegt, so wie er im Haushalt
überwiegend anfällt: Staub, Haare,
Teppichfussel, Fäden, Sand usw.
Wenn Sie jedoch viel Feinstaub, wie
z. B. Bohrstaub, Sand, eventuell auch
Gips oder Mehl saugen, verstopfen die
Poren des Staubbeutels sehr schnell.
Die Staubbeutel-Wechselanzeige wird
dann bereits "voll" anzeigen, selbst
wenn der Staubbeutel noch nicht voll
ist. Er muss dann ausgetauscht werden, da die Saugleistung durch die verstopften Poren reduziert ist.
Saugen Sie aber viele Haare, Teppich-,
Wollfusseln usw., so kann die Staubbeutel-Wechselanzeige erst reagieren,
wenn der Staubbeutel bereits prall gefüllt ist.
18
Wie tausche ich den Staubbeutel
aus? (Abb. 27 + 28)
^ Heben Sie die Entriegelungstaste an
und klappen Sie den Staubraumdeckel bis zum Einrasten nach oben auf
(Abb. 9).
Dabei schließt sich der Hygieneverschluss des Staubbeutels automatisch,
so dass kein Staub entweichen kann.
^ Ziehen Sie den Staubbeutel an der
Grifflasche aus der Aufnahme.
^ Stecken Sie den neuen Staubbeutel
bis zum Anschlag in die blaue Aufnahme. Lassen Sie ihn dabei so zusammengefaltet, wie Sie ihn der Verpackung entnehmen.
^ Entfalten Sie den Staubbeutel im
Staubraum so weit wie möglich.
^ Schließen Sie den Staubraumdeckel
bis zum Einrasten der Verriegelung
und achten Sie darauf, dass der
Staubbeutel dabei nicht eingeklemmt
wird.
,Eine Leerbetriebssperre verhin-
dert das Schließen des Staubraumdeckels, wenn kein Staubbeutel eingesteckt ist. Keine Gewalt anwenden!
Wann tausche ich den
Motorschutzfilter aus?
Immer dann, wenn Sie eine neue Packung Miele Staubbeutel anbrechen.
In jeder neuen Packung Miele Staubbeutel liegt zusätzlich ein Motorschutzfilter.
de
Wie tausche ich den
Motorschutzfilter aus? (Abb. 29)
^ Öffnen Sie den Staubraumdeckel.
Je nach Modell ist serienmäßig einer
der folgenden Abluftfilter eingesetzt
(Abb. 8).
^ Ziehen Sie den Staubbeutel an der
Grifflasche aus der Aufnahme.
b Active AirClean 50
c HEPA AirClean 50
^ Klappen Sie den blauen Filterrahmen bis zum deutlichen Einrasten
auf und nehmen Sie den verbrauchten Motorschutzfilter an der sauberen
Hygienefläche heraus.
Selbstverständlich können Sie anstelle
des serienmäßig eingesetzten Abluftfilters Active AirClean 50 b oder HEPA
AirClean 50 c ebenso einen Abluftfilter
AirClean a einsetzen (siehe Kapitel
"Wartung - Abluftfilter umrüsten").
^ Setzen Sie einen neuen Motorschutzfilter ein.
^ Schließen Sie den Filterrahmen.
^ Stecken Sie den neuen Staubbeutel
bis zum Anschlag in die blaue Aufnahme.
^ Schließen Sie den Staubraumdeckel
bis zum Einrasten der Verriegelung
und achten Sie darauf, dass der
Staubbeutel dabei nicht eingeklemmt
wird.
Wann tausche ich den Abluftfilter
aus?
Tauschen Sie den Abluftfilter Active AirClean 50 oder HEPA AirClean 50 immer
dann, wenn das Anzeigefeld der Abluftfilter-Wechselanzeige am Abluftfilter rot
ausgefüllt ist (Abb. 13).
Die Anzeige leuchtet nach ca. 50 Betriebsstunden, was in etwa der durchschnittlichen Nutzung eines Jahres entspricht. Sie können dann noch weitersaugen. Bedenken Sie jedoch, dass die
Saug- und Filterleistung nachlässt.
Wie tausche ich den Abluftfilter aus?
(Abb. 30 + 31)
Achten Sie darauf, dass immer nur
ein Abluftfilter eingesetzt ist.
^ Öffnen Sie den Staubraumdeckel.
^ Heben Sie den Abluftfilter Active AirClean 50 oder HEPA AirClean 50 an
und entnehmen Sie ihn.
^ Setzen Sie den neuen Abluftfilter
Active AirClean 50 oder HEPA
AirClean 50 passgenau ein und drücken Sie ihn nach unten.
^ Drücken Sie die Abluftfilter-Wechselanzeige ~ (Abb. 11).
^ Nach ca. 10 - 15 Sekunden erscheint
am linken Rand des Anzeigefeldes ein
schmaler roter Farbstreifen (Abb. 12).
Möchten Sie aber einen Abluftfilter
AirClean einsetzen, so beachten Sie
dazu unbedingt das Kapitel "Wartung - Abluftfilter umrüsten".
^ Schließen Sie den Staubraumdeckel
bis zum deutlichen Einrasten.
19
de
Abluftfilter umrüsten (Abb. 8)
Achten Sie darauf, dass immer nur
ein Abluftfilter eingesetzt ist.
Selbstverständlich können Sie anstelle
des serienmäßig eingesetzten Abluftfilters Active AirClean 50 b oder HEPA
AirClean 50 c ebenso einen Abluftfilter
AirClean a einsetzen.
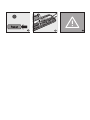
Beim Umrüsten von b oder c auf a
beachten (Abb. 32)
Wenn Sie anstelle des Abluftfilters
Active AirClean 50 b oder HEPA
AirClean 50 c einen Abluftfilter AirClean
a einsetzen, so müssen Sie diesen unbedingt in ein Filtergitter (siehe Kapitel
"Nachkaufbares Zubehör") einlegen.
Serviceanzeige mit Resettaste (Abb.
33)
Die Anzeige leuchtet nach ca. 50 Betriebsstunden, was in etwa der durchschnittlichen Nutzung eines Jahres entspricht.
Zu diesem Zeitpunkt soll der Verschmutzungszustand des Motorschutzfilters und des Abluftfilters überprüft
werden.
Die Anzeige müssen Sie nach jedem
Austausch dieser Teile zurücksetzen.
Dazu muss der Staubsauger eingeschaltet sein.
Das Zurücksetzen der Anzeige erfolgt nur, wenn Sie die Resettaste
nach dem Leuchten der Anzeige
drücken, nicht aber, wenn die Resettaste zwischendurch gedrückt
wird.
Wann tausche ich die Fadenheber
aus?
Die Fadenheber am Saugmund der Bodendüse sind austauschbar.
Erneuern Sie die Fadenheber, wenn der
Flor verschlissen ist.
Wie tausche ich die Fadenheber aus?
(Abb. 34)
^ Heben Sie die Fadenheber, z. B. mit
einem Schlitz-Schraubendreher, aus
den Einsteckschlitzen. Dazu sind jeweils zwei Einkerbungen angebracht.
^ Ersetzen Sie die Fadenheber durch
neue.
Ersatzteile bekommen Sie bei Ihrem
Miele Fachhändler oder über den
Miele Werkkundendienst.
Pflege
,Schalten Sie den Staubsauger
vor jeder Reinigung aus und ziehen
Sie den Netzstecker aus der Steckdose.
^ Drücken Sie die Resettaste.
Staubsauger und Zubehörteile
Die Serviceanzeige erlischt und befinden sich wieder in der Ausgangsposition.
Den Staubsauger und alle Zubehörteile
aus Kunststoff können Sie mit einem
handelsüblichen Kunststoffreiniger pflegen.
20
de
,Verwenden Sie keine Scheuer-
mittel, keine Glas- oder Allzweckreiniger und keine ölhaltigen Pflegemittel!
Nach Beseitigung der Ursache und einer Wartezeit von ca. 20 - 30 Minuten
hat sich der Staubsauger so weit abgekühlt, dass Sie ihn wieder einschalten
und benutzen können.
Staubraum
Kundendienst
Den Staubraum können Sie bei Bedarf
mit einem zweiten Staubsauger, falls
vorhanden, aussaugen oder einfach mit
einem trockenen Staubtuch oder
Staubpinsel reinigen.
Sollten Sie den Kundendienst benötigen, so wenden Sie sich bitte an
,Tauchen Sie den Staubsauger
niemals in Wasser! Feuchtigkeit im
Staubsauger birgt die Gefahr eines
elektrischen Schlages.
Störungen
Der Staubsauger schaltet selbsttätig
ab.
Zusätzlich leuchtet die Anzeigelampe
Thermoschutz § (Abb. 35).
Ein Temperaturbegrenzer schaltet den
Staubsauger aus, wenn er zu warm
wird. Das wird im Anzeigefeld des
Staubsaugers von der Anzeigelampe
Thermoschutz § angezeigt.
Die Störung kann auftreten, wenn z. B.
sperriges Sauggut die Saugwege verstopft oder der Staubbeutel voll bzw.
durch Feinstaub luftundurchlässig ist.
Die Ursache dafür kann auch ein stark
verschmutzter Abluftfilter oder Motorschutzfilter sein. Schalten Sie den
Staubsauger dann aus (Fußtaste Ein /
Aus s drücken) und ziehen Sie den
Netzstecker aus der Steckdose.
– Ihren Miele Fachhändler
oder
– den Miele Werkkundendienst unter
der Telefonnummer
Deutschland
0800 - 22 44 622
(kostenfrei)
Österreich
050 800 300
(österreichweit zum Ortstarif)
Luxemburg
(00352) 4 97 11-20/22
Garantiebedingungen
Die Garantiezeit des Staubsaugers beträgt 2 Jahre.
Nähere Angaben zu den Garantiebedingungen in Ihrem Land erhalten Sie
unter der oben stehenden Telefonnummer. Garantiebedingungen in Schriftform können Sie dort ebenfalls anfordern.
21
de
Nachkaufbares Zubehör
Einzelne Modelle sind bereits serienmäßig mit einem oder mehreren der
folgenden Zubehörteile ausgestattet.
Sie verfügt im Vergleich zur SEB 217-3
u. a. zusätzlich über
– eine Höhenverstellung zur Anpassung an unterschiedliche Florhöhen
– LEDs zum Ausleuchten des Arbeitsbereiches
Beachten Sie in erster Linie die Reinigungs- und Pflegeanweisung Ihres
Bodenbelag-Herstellers.
Sie können diese und viele weitere Produkte im Internet bestellen.
Sie erhalten sie aber auch bei Ihrem
Miele Fachhändler oder über den Miele
Werkkundendienst.
Elektrobürsten
Elektrobürste Electro Comfort
(SEB 217-3)
– eine Multifunktions-Kontrollleuchte.
Bodendüsen / -bürsten
Bodendüse Classic Allergotec
(SBDH 285-3)
Zur täglichen hygienischen Reinigung
aller Bodenbeläge. Beim Saugen wird
der Reinigungsfortschritt über ein Farbdisplay (Ampelanzeige) sichtbar.
Turbobürste Turbo Comfort
(STB 205-3)
Zur Aufnahme von Fasern und Haaren
von kurzflorigen textilen Bodenbelägen.
Bodenbürste Hardfloor (SBB 235-3)
Zur intensiven Reinigung robuster textiler Bodenbeläge. Sie beseitigt fest eingetretene Verschmutzungen und verhindert die Bildung von Laufstraßen.
Zum Absaugen strapazierfähiger ebener Hartböden.
Elektrobürste Electro Premium
(SEB 236)
Mit Naturborsten, zum Absaugen kratzempfindlicher ebener Hartböden.
Im Vergleich zu der SEB 217-3 ist diese
Elektrobürste 60 mm breiter, leistungsstärker und dadurch besonders für die
Reinigung großer Flächen geeignet.
Bodenbürste Hardfloor Twister mit
Drehgelenk (SBB 300-3)
22
Bodenbürste Parquet (SBB Parquet-3)
Zum Absaugen verschiedener ebener
Hartbodenflächen und kleiner Nischen.
de
Bodenbürste Parquet Twister XL mit
Drehgelenk (SBB 400-3)
Zum Absaugen großer ebener Hartbodenflächen und kleiner Nischen.
Fugendüse, 300 mm (SFD 10)
Extralange Fugendüse zum Aussaugen
von Falten, Fugen und Ecken.
Fugendüse, 560 mm (SFD 20)
Sonstiges Zubehör
Zubehörkoffer MicroSet (SMC 20)
Flexible Fugendüse zum Aussaugen
schwer zugänglicher Stellen.
Zubehör für die Reinigung kleiner Gegenstände und schwer zugänglicher
Stellen, wie z. B. Stereoanlagen, Tastaturen, Modellbau.
Polsterdüse, 190 mm (SPD 10)
Zubehörkoffer Cat&Dog (SCD 10)
Hygieneverschluss mit Aktivkohle
Zubehör für die Reinigung von Haushalten mit Haustieren.
Vermindert den Austritt von Staub und
Gerüchen bei abgenommenem Saugschlauch.
Handturbobürste Turbo Mini
Compact (STB 20)
Zum Saugbürsten von Polstermöbeln,
Matratzen oder Autositzen.
Universalbürste (SUB 20)
Zum Absaugen von Büchern, Regalböden und ähnlichem.
Extrabreite Polsterdüse zum Absaugen
von Polstermöbeln, Matratzen und Kissen.
Filter
Abluftfilter Active AirClean 50
(SF-AA 50)
Nimmt Gerüche auf, die durch den
Schmutz im Staubbeutel entstehen.
Lamellen- / Heizkörperbürste (SHB 30)
Abluftfilter HEPA AirClean 50
(SF-HA 50)
Zum Entstauben von Heizkörperrippen,
schmalen Regalen oder Fugen.
Abluftfilter für reinste Ausblasluft. Besonders für Allergiker geeignet.
Matratzendüse (SMD 10)
Filtergitter
Zum bequemen Absaugen von Matratzen und Polstermöbeln und deren Fugen.
Wird benötigt, wenn Sie anstelle des
Abluftfilters Active AirClean 50 oder
HEPA AirClean 50 einen Abluftfilter AirClean einsetzen möchten.
23
en - Contents
Warning and Safety instructions
Caring for our environment
Guide to the appliance
Preparing for use
Using the Electrobrush . . . . . . . . . . . . . . . . . . . . . . . . . . . . . . . . . . . . . . . . . . . . . 34
Using the standard floorhead . . . . . . . . . . . . . . . . . . . . . . . . . . . . . . . . . . . . . . . . 35
Using the accessories supplied
Use
To unwind the mains cable . . . . . . . . . . . . . . . . . . . . . . . . . . . . . . . . . . . . . . . . . . 36
To switch on and off. . . . . . . . . . . . . . . . . . . . . . . . . . . . . . . . . . . . . . . . . . . . . . . . 36
To regulate the suction power . . . . . . . . . . . . . . . . . . . . . . . . . . . . . . . . . . . . . . . . 37
Switching the Electrobrush on and off . . . . . . . . . . . . . . . . . . . . . . . . . . . . . . . . . . 37
Pauses in use. . . . . . . . . . . . . . . . . . . . . . . . . . . . . . . . . . . . . . . . . . . . . . . . . . . . . 38
Setting down, transportation and storage
Park system for pauses in vacuuming . . . . . . . . . . . . . . . . . . . . . . . . . . . . . . . . . . 38
Park system for storage . . . . . . . . . . . . . . . . . . . . . . . . . . . . . . . . . . . . . . . . . . . . . 38
Maintenance
Purchasing new dustbags and filters . . . . . . . . . . . . . . . . . . . . . . . . . . . . . . . . . . 39
Ordering the correct dustbags and filters . . . . . . . . . . . . . . . . . . . . . . . . . . . . . . . 39
When to change the dustbag . . . . . . . . . . . . . . . . . . . . . . . . . . . . . . . . . . . . . . . . 40
How to replace the dustbag . . . . . . . . . . . . . . . . . . . . . . . . . . . . . . . . . . . . . . . . . 40
When to change the dust compartment filter (for motor protection) . . . . . . . . . . . 41
How to change the dust compartment filter . . . . . . . . . . . . . . . . . . . . . . . . . . . . . 41
When to replace the exhaust filter . . . . . . . . . . . . . . . . . . . . . . . . . . . . . . . . . . . . . 41
How to replace the exhaust filter . . . . . . . . . . . . . . . . . . . . . . . . . . . . . . . . . . . . . . 41
Replacing one type of exhaust filter with another . . . . . . . . . . . . . . . . . . . . . . . . . 42
Maintenance indicator with reset button . . . . . . . . . . . . . . . . . . . . . . . . . . . . . . . . 42
When to change the thread lifters . . . . . . . . . . . . . . . . . . . . . . . . . . . . . . . . . . . . . 42
To replace the thread lifters . . . . . . . . . . . . . . . . . . . . . . . . . . . . . . . . . . . . . . . . . . 42
Cleaning and care
Problem solving guide
After sales service
Guarantee
Optional accessories
Electrical connection for the UK
24
en - Warning and Safety instructions
This vacuum cleaner complies with statutory safety
requirements. Improper use can, however, lead to
personal injury and damage to property.
To avoid the risk of accidents and damage to the
vacuum cleaner, please read these instructions carefully
before using it for the first time. They contain important
information on its safety, operation and maintenance.
Keep these instructions in a safe place and ensure that
new users are familiar with the content. Pass them on to
any future owner.
Always disconnect the vacuum cleaner from the mains
supply when you have finished using it, before changing
over accessories, as well as for maintenance work and
cleaning. Switch the vacuum cleaner off at the wall
socket and unplug it.
Correct application
~ This vacuum cleaner is intended for cleaning flooring in
domestic households and similar residential environments.
~ This vacuum cleaner can be used for all normal cleaning
of carpets, rugs and hard flooring which is not susceptible
to scratching.
~ This vacuum cleaner is not intended for outdoor use.
25
en - Warning and Safety instructions
~ The vacuum cleaner must only be used to vacuum dry
floor surfaces. Do not use on people or animals. Any other
usage, modification or alteration is not supported by the
manufacturer and could be dangerous.
~ This vacuum cleaner can only be used by people with
reduced physical, sensory or mental capabilities, or lack of
experience or knowledge, if they are supervised whilst
using it or have been shown how to use it in a safe way
and understand and recognise the consequences of
incorrect operation.
Safety with children
~ Children under 8 years of age must be kept away from
the vacuum cleaner unless they are constantly supervised.
~ Children 8 years and older may only use the vacuum
cleaner unsupervised if they have been shown how to use
it safely and recognise and understand the consequences
of incorrect operation.
~ Children must not be allowed to clean or maintain the
vacuum cleaner unsupervised.
~ Please supervise children in the vicinity of the vacuum
cleaner and do not let them play with it.
Technical safety
~ Before using the vacuum cleaner and its accessories,
check for any visible signs of damage. Do not use a
damaged appliance.
26
en - Warning and Safety instructions
~ Ensure that the connection data on the data plate of the
vacuum cleaner (voltage and frequency) match the mains
electricity supply exactly.
~ The mains electrical plug must be fitted with a 13 A fuse
(UK).
~ The socket on the vacuum cleaner (depending on
model) must only be used for the Miele Electrobrushes
listed in these operating instructions.
~ The Miele Electrobrush is a motor driven accessory for
use only with Miele vacuum cleaners. For safety reasons,
the cleaner must not be used with an Electrobrush
produced by another manufacturer.
~ While the vacuum cleaner is under guarantee, repairs
should only be undertaken by a Miele authorised service
technician. Otherwise the guarantee will be invalidated.
~ Do not use the vacuum cleaner if the cable is damaged.
If the cable is damaged it must be replaced together with a
complete cable rewind. For safety reasons this work must
be done by the Miele Service Department or a Miele
authorised service technician.
~ Do not pull or carry the vacuum cleaner by the cable,
and be careful not to damage the cable when withdrawing
the plug from the socket.
Keep the cable away from sharp edges and do not let it
get squashed, for example, under a door.
Avoid running the vacuum cleaner over the cable. This
could damage the cable, plug or socket. The appliance
must not be used if any of these have suffered damage.
27
en - Warning and Safety instructions
~ When vacuuming fine dust, e.g. sawdust, sand, plaster,
flour, talcum powder etc., electrostatic charges build up
naturally. Under certain conditions these charges will be
released. To avoid the unpleasant effects of these
discharges, a metal inlay has been incorporated into the
underside of the handle. Please make sure that you keep
your hand in constant contact with this metal strip during
vacuuming.
~ Do not let the vacuum cleaner, the electro telescopic
suction tube or the electro suction hose get wet. Clean only
with a dry cloth or slightly damp cloth when disconnected
from the mains supply.
~ The Electrobrush, electro telescopic suction tube and
the electro suction hose contain electrical cables. The plug
connectors must not come in contact with water. Danger of
electric shock. They should only be cleaned with a dry
cloth.
~ Repairs should only be carried out on the vacuum
cleaner, the Electrobrush, the electro telescopic suction
tube and the electro suction hose by a Miele authorised
service technician. Repairs and other work by unqualified
persons can cause considerable danger to users.
28
en - Warning and Safety instructions
Correct use
~ Floor attachments, accessories and tubes must not be
used at head level to avoid the risk of injury, e.g. to eyes
and ears.
~ To avoid the risk of damage, do not use the vacuum
cleaner without the dustbag, dust compartment filter and
exhaust filter in place.
~ The dust compartment cover will not close without a
dustbag fitted. Do not force it.
~ Do not vacuum up anything which has been burning or
is still glowing e.g. cigarettes, ashes or coal, whether
glowing or apparently extinguished.
~ Do not use the vacuum cleaner to vacuum up any water,
liquid or damp dirt. Wait until any freshly cleaned or
shampooed carpets or floor coverings are completely dry
before attempting to vacuum.
~ Do not use the vacuum cleaner to vacuum toner dust.
Toner, such as that used in printers and photocopiers, can
conduct electricity.
~ Do not vacuum up any inflammable or combustible
liquids or gases and do not vacuum in areas where such
substances are stored.
29
en - Warning and Safety instructions
Accessories
~ To avoid the risk of injury when vacuuming with a Miele
Electrobrush or Turbobrush, do not touch the rotating roller
brush.
~ It is not advisable to vacuum directly with the handle, i.e.
without an accessory attached as the rim could get
damaged and you could hurt yourself on sharp edges.
~ Only use genuine dustbags, filters and accessories with
the "Original Miele" logo on them. Otherwise the
manufacturer cannot guarantee the safety of the product.
Miele cannot be held liable for damage caused by
incorrect use or operation or by non-compliance with
these Warning and Safety instructions.
30
en - Caring for our environment
Disposal of packing material
The packaging is designed to protect
the vacuum cleaner from damage
during transportation. The packaging
materials used are selected from
materials which are environmentally
friendly for disposal and should be
recycled.
Recycling the packaging reduces the
use of raw materials in the
manufacturing process and also
reduces the amount of waste in landfill
sites.
Ensure that any plastic wrappings,
bags, etc. are disposed of safely and
kept out of the reach of babies and
young children. Danger of suffocation.
Disposing of your old
appliance
Before disposing of your old appliance
remove the dustbag and all the filters
and dispose of them with your normal
household waste.
Electrical and electronic appliances
often contain valuable materials. They
also contain materials which, if handled
or disposed of incorrectly, could be
potentially hazardous to human health
and to the environment. They are,
however, essential for the correct
functioning of your appliance. Please
do not therefore dispose of it with your
household waste.
Disposing of the dustbag and
filters
These are made from environmentally
friendly materials. The filters can be
disposed of with the normal household
waste. The dustbag can also be
disposed of in this way if it has been
used exclusively for general household
dust.
Please dispose of it at your local
community waste collection/recycling
centre, or contact your dealer for
advice.
Ensure that it presents no danger to
children while being stored for
disposal.
31
en - Guide to the appliance
32
en - Guide to the appliance
a Electro suction hose SES 131
b Release button for accessories compartment
c Dustbag change indicator
d Display
e Foot switch for automatic cable rewind
f Park system for pauses during vacuuming
g On/Off foot control s
h Mains cable
i Castor wheels
j Exhaust filter
k Park system for storage (on both sides of the vacuum)
l Dust compartment filter (for motor protection)
m Original Miele dustbag
n Carrying handle
o Electrobrush (either SEB 217-3 or SEB 236, depending on model)
p Release buttons
q Dust compartment release catch
r Electro telescopic tube SET 220
s Button for adjusting the electro telescopic tube
t Hose connection socket
u Display for power settings
v Stand-by button - for pauses in vacuuming, with LED
w On/Off button j for Electrobrush, with LED
x Suction power selector buttons + / y Comfort handle
z Overheating warning light §
{ Stand-by indicator light | Maintenance indicator with reset button
33
en
The illustrations referred to in the text
are shown on the fold-out pages at
the end of these operating
instructions.
Preparing for use
Attach the electro suction hose (dia.
1)
^ Insert the hose connector into the
suction socket until it clicks into
position.
To detach the electro suction hose
(dia. 2)
^ Press the release buttons at the side
of the hose connector, and lift the
hose from the socket.
Connect the electro telescopic
suction tube to the Electrobrush (dia.
5)
^ Insert the electro telescopic suction
tube into the Electrobrush until it
clicks into position.
For further information on use and
maintenance please refer to the
separate instructions supplied with the
Electrobrush.
Using the Electrobrush
Please observe the flooring
manufacturer's cleaning and care
instructions.
Depending on the model, your vacuum
cleaner will be fitted as standard with
one of the following Electrobrushes:
Connect the comfort handle to the
electro telescopic suction tube (dia.
3)
– Electrobrush SEB 217-3
– Electrobrush SEB 236
^ Insert the comfort handle into the
electro telescopic suction tube until it
clicks into position.
The Electrobrush is particularly suitable
for intensive vacuuming of carpets
which are subject to hard wear. It is
very effective at removing deep seated
dirt and preventing areas of frequent
use being trodden into a path.
^ To release the handle from the
suction tube, press the release
button.
To adjust the electro telescopic tube
(dia. 4)
One part of the electro telescopic tube
is packed inside the other and can be
adjusted to suit your height for
comfortable vacuum cleaning.
^ Press the release button to release
the electro tubes and adjust to the
required height.
34
,Please note that the Electrobrush
should not be used for vacuuming
deep-pile rugs and carpets or
valuable hand-knotted rugs and
carpets, e.g. Persian and oriental
rugs etc. There is a danger of the
threads being pulled out. If in doubt,
contact the carpet manufacturer/
retailer.
en
,Do not use the SEB 217-3
Electrobrush to clean highly variable
or uneven floors. The brush might
come into contact with the floor and
cause damage.
Using the standard floorhead
Please observe the flooring
manufacturer's cleaning and care
instructions.
In addition to the Electrobrush a
standard floorhead is supplied with
your vacuum cleaner.
This floorhead can be used for all
normal cleaning of carpets, rugs and
hard flooring which is not susceptible to
scratching.
Miele offer a range of other floorheads,
brushes and accessories for other
types of flooring and special
requirements (see "Optional
accessories").
Attach the telescopic suction tube to
the floorhead (dia. 6)
^ Push the electro telescopic suction
tube into the floorhead and turn it
clockwise or anti-clockwise until it
clicks into position.
^ To release the floorhead from the
suction tube, press the release
button.
To adjust the standard floorhead
(dia. 7)
Vacuum carpets and rugs with the
brush retracted:
^ Press the % foot control.
Clean hard flooring which is not
susceptible to scratching, as well as
flooring with gaps or deep crevices in it
with the brush protruding:
^ Press the ) foot control.
To activate the exhaust filter change
indicator
Depending on model, your vacuum
cleaner will be fitted as standard with
one of the following exhaust filters (dia.
8):
b Active AirClean 50
c HEPA AirClean 50
^ Press the release catch for the dust
compartment lid and raise the lid as
far as it will go (dia. 9).
^ Remove the indicator strips (dia. 10).
^ Press the exhaust filter change
indicator ~ (dia. 11).
^ After approx. 10 - 15 seconds a thin
red stripe will appear in the left hand
side of the display (dia. 12).
^ Close the dust compartment lid
securely, making sure it clicks into
position. Take care not to trap the
dustbag when doing so.
35
en
Exhaust filter change indicator
The exhaust filter change indicator
shows the remaining functional life of
the exhaust filter. After approx. 50
operating hours, or approx. one year of
average use, the display will be
completely filled with red (dia. 13).
Using the accessories
supplied (dia. 14)
a Crevice nozzle
For cleaning in folds, crevices or
corners.
b Dusting brush with natural bristles
For cleaning skirting boards, ornate
and carved objects.
The head can be swivelled to adjust
the angle.
Use
To unwind the mains cable (dia. 17)
^ Pull the mains cable out to the
required length (max. cable length
approx. 7.5 m).
^ Insert the plug into the socket
correctly and switch on.
,If vacuuming for longer than
30 minutes, the mains cable must
be pulled out to its fullest extent.
Otherwise there is a danger of
overheating and damage.
To rewind the cable (dia. 18)
^ Switch off at the wall socket and
remove the plug.
c Upholstery nozzle
For cleaning upholstery, mattresses,
cushions, curtains, covers etc.
^ Press the rewind foot switch briefly.
The cable will rewind automatically.
To open the accessories
compartment (dia. 15)
^ Press the On/Off foot control s.
^ Press the release button to open the
accessories compartment lid.
^ Take out the accessory you require.
^ Press down firmly on the lid to close
it.
Floorhead (dia. 16)
For general use and also for vacuuming
the stairs.
,For safety reasons when
vacuuming stairs it is best to start at
the bottom of the stairs and move
upwards.
36
To switch on and off (dia. 19)
The Stand-by indicator light - in the
display and the LED - on the Comfort
handle both light up yellow.
Using for the first time (dia. 20 + 21)
Pressing the - button will directly select
the lowest setting, pressing the
+ button the highest setting will be
selected.
After that the vacuum cleaner will
switch on at the setting which was used
previously.
^ To do this, press the Stand-by button
- on the Comfort handle.
en
To regulate the suction power (dia.
20)
The suction power can be regulated to
suit the type of flooring being cleaned.
Reducing the suction power reduces
the amount of effort required to
manoeuvre the floorhead.
The vacuum cleaner has symbols on
the Comfort handle which indicate the
type of use the settings are suitable for.
The selected power level will light up
yellow.
# - curtains, fabric
$ - upholstery, cushions
% - thick pile carpets, rugs and
runners
* - for energy-saving vacuuming
(this setting is also very quiet)
( - loop pile carpet
) - heavily soiled hard flooring and
intensive cleaning of carpets
When using the Electrobrush /
floorhead, if the suction seems too
high, reduce the suction until the
Electrobrush / floorhead is easier to
manoeuvre.
^ Press the + button on the Comfort
handle to select a higher suction
power level.
^ Press the - button on the Comfort
handle to select a lower suction
power level.
During vacuuming (dia. 22)
^ When vacuuming, pull the cleaner
behind you on its wheels. You can
stand it upright for vacuuming stairs
and curtains etc.
,When vacuuming fine dust, e.g.
sawdust, sand, plaster, flour, talcum
powder etc., electrostatic charges
build up naturally. Under certain
conditions these charges will be
released. To avoid the unpleasant
effects of these discharges, a metal
inlay has been incorporated into the
underside of the handle. Please
make sure that you keep your hand
in constant contact with this metal
strip during vacuuming.
Switching the Electrobrush on and
off (dia. 23)
To use the Electrobrush, this must be
switched on additionally to the vacuum
cleaner.
^ To do this, press the On/Off button
j on the Comfort handle.
The LED on the Comfort handle will
light up.
This means that you can switch the
Electrobrush off during vacuuming and
the vacuum cleaner will continue to
operate using suction only. This is
useful when moving from vacuuming a
fitted carpet to a rug, for example.
37
en
Pauses in use (dia. 21)
To pause the appliance during
operation:
Switching on and off with the Park
system
^ To do this, press the Stand-by button
- on the Comfort handle.
The vacuum cleaner switches off
automatically when the floorhead is
slotted into the park system with the
park attachment.
The LED on the Comfort handle will
light up.
Park system for storage (dia. 25)
,The Stand-by button is designed
to pause the vacuum cleaner for
short periods of time whilst
vacuuming. After vacuuming the
vacuum cleaner must be switched
off and unplugged from the mains
electricity supply. Otherwise there is
a risk of overheating and damage.
Setting down, transportation
and storage
,Always disconnect the vacuum
cleaner from the electrical supply
when you have finished using it.
Switch it off at the wall socket and
unplug it.
^ Stand the vacuum cleaner upright.
Retract the electro telescopic tubes
fully so that the vacuum cleaner takes
up less room for storage.
Park system for pauses in
vacuuming (dia. 24)
(cannot be used with the SEB 236
Electrobrush)
^ Slot the floorhead downwards into
one of the parking attachments on
either side of the vacuum cleaner
(the parking attachments cannot be
used with the SEB 236 Electrobrush).
The Park system allows you to
conveniently park the suction tube and
floorhead during pauses.
This makes the vacuum cleaner easier
to carry or store.
^ Slot the floorhead into the parking
attachment at the back of the
vacuum cleaner.
If your vacuum cleaner is on a
sloping surface, e.g. a ramp, retract
the electro telescopic tube fully.
38
en
Maintenance
,Always disconnect the vacuum
cleaner from the electrical supply for
maintenance work and for cleaning.
Switch off at the wall socket and
unplug it.
The Miele filtration system consists of
three filters.
– Dustbag
– Dust compartment filter (for motor
protection)
– Exhaust filter
These will need to be replaced from
time to time to ensure that your vacuum
cleaner performs efficiently.
Only use genuine dustbags, filters
and accessories with the "Original
Miele" logo on them. This will ensure
that the suction power of the
vacuum cleaner is maintained,
giving the best possible cleaning
results.
,The use of dustbags made from
paper or paper-based materials, or
dustbags with a cardboard collar, or
dustbags that do not carry the
"Original Miele" logo, can seriously
damage the vacuum cleaner and
invalidate the warranty.
Purchasing new dustbags and filters
Original Miele dustbags and filters can
be ordered from Miele, your Miele
dealer or online at:
Ordering the correct dustbags and
filters
Only use original Miele G/N dustbags
with a blue collar and original Miele
filters. These are identified by the
"Original Miele" logo on the packaging
or directly on the dustbag.
An AirClean filter and a dust
compartment filter are supplied with
every packet of Miele dustbags.
These can also be purchased
separately from your Miele Dealer, from
Miele or from the online shop. Please
quote the model number of your
vacuum cleaner when ordering to make
sure you get the correct filter.
You can replace the exhaust filter fitted
in the vacuum cleaner with one of the
other Miele exhaust filters if you wish
(see "Optional accessories").
39
en
When to change the dustbag (dia. 26)
Change the dustbag when the colour
marker in the dustbag change indicator
turns red, or sooner if it is no longer
effective (see possible reasons for this
below).
Miele dustbags are disposable and
designed for single use only.
Dispose of the dustbag when full.
Do not attempt to reuse. Blocked
pores in used dustbags will reduce
the suction power of the vacuum
cleaner.
To check the dustbag change
indicator
^ Attach the standard floorhead to the
suction tube. Do not use any of the
other floorheads or attachments as
they will cause the dustbag change
indicator to give a false reading.
^ Switch the vacuum cleaner on using
the On/Off foot control s and select
the highest power setting on the
Comfort handle.
^ Lift the floorhead off the floor a little.
If the marker completely fills the
dustbag change indicator, you
should replace the dustbag with a
new one.
How the dustbag change indicator
works
The dustbag change indicator is set for
normal household dust. this generally
contains a mixture of dust, hair, carpet
fluff, threads, grit etc.
40
However, if the cleaner has been used
to vacuum up fine dust, such as
plaster, brick dust, cement or flour, the
pores of the dustbag will become
blocked very quickly. This affects the
air permeability of the bag, and the
marker will indicate that the bag is "full"
even when it is not. If this happens you
must still change the dustbag because
suction power will be greatly reduced
by blocked pores in the dustbag.
If, on the other hand, a large amount of
hair and carpet fluff which typically
contains a lot of air is vacuumed up, the
indicator may fail to react even though
the bag is full. You should still change
it. Both these extremes can occur.
How to replace the dustbag (dia. 27 +
28)
^ Lift the release catch for the dust
compartment lid and raise the lid as
far as it will go (dia. 9).
The dustbag has a closing flap which
closes automatically when the dust
compartment lid is raised to prevent
any dust escaping.
^ Pull the dustbag out by the grip on
the collar.
^ Fit the new dustbag into the blue
holder as far as it will go. Leave it
folded up when you take it out of the
box.
^ It should be unfolded as far as
possible in the dust compartment.
en
^ Close the dust compartment lid
securely, making sure it clicks into
position. Take care not to trap the
dustbag when doing so.
,The lid will not close without a
dustbag in place. Do not force it!
When to change the dust
compartment filter (for motor
protection)
Replace this filter every time you start a
new packet of dustbags. A dust
compartment filter is supplied with
every packet of Miele dustbags.
How to change the dust
compartment filter (dia. 29)
^ Open the dust compartment lid.
^ Pull the dustbag out by the grip on
the collar.
^ Open the blue filter frame fully and
remove the old filter. Hold by the
clean, unsoiled section to remove it.
^ Replace with a new dust
compartment filter.
^ Close the filter frame.
^ Fit the new dustbag into the blue
holder as far as it will go.
^ Close the dust compartment lid
securely, making sure it clicks into
position. Take care not to trap the
dustbag when doing so.
When to replace the exhaust filter
Replace the Active AirClean 50 or
HEPA AirClean 50 exhaust filter if the
display for the exhaust filter change
indicator is completely filled with red
(dia. 13).
This occurs after approx. 50 hours of
operation which is equivalent to about a
year of average use. The vacuum
cleaner can still be used. However, the
suction power will be reduced as will
the effectiveness of the filter if it is not
replaced in good time.
Depending on model, your vacuum
cleaner will be fitted as standard with one
of the following exhaust filters (dia. 8):
b Active AirClean 50
c HEPA AirClean 50
You can of course replace the Active
AirClean 50 b or HEPA AirClean 50 c
fitted as standard with an AirClean a
filter (see "Maintenance - Replacing one
type of exhaust filter with another").
How to replace the exhaust filter
(dia. 30 + 31)
Do not use more than one exhaust
filter at a time.
^ Open the dust compartment lid.
^ Lift the Active AirClean 50 or HEPA
AirClean 50 exhaust filter and remove
it.
^ Insert the new Active AirClean 50 or
HEPA AirClean 50 exhaust filter
making sure it goes in properly, then
push it down into position.
41
en
^ Press the exhaust filter change
indicator ~ (dia. 11).
^ After approx. 10 - 15 seconds a thin
red stripe will appear in the left hand
side of the display (dia. 12).
If you wish to fit an AirClean filter,
see "Maintenance - Replacing one
type of exhaust filter with another".
^ Close the dust compartment lid so
that it clicks into place.
Replacing one type of exhaust filter
with another (dia. 8)
Do not use more than one exhaust
filter at a time.
You can of course replace the Active
AirClean 50 b or HEPA AirClean 50 c
fitted as standard with an AirClean a
filter.
When replacing an Active AirClean 50
or a HEPA AirClean 50 filter with an
AirClean filter, please note (dia. 32):
If you wish to replace exhaust filter b or
c with filter a, it is essential that you also
fit the filter grille (see "Optional
accessories").
Maintenance indicator with reset
button (dia. 33)
The indicator lights up after
approximately 50 hours of operation
which is equivalent to about a year of
average use.
The level of soiling of the dust
compartment filter and the exhaust filter
must be checked at this point.
42
If the filters are replaced, the indicator
must be reset. To do this the vacuum
cleaner must be switched on.
^ Press the reset button.
The maintenance indicator will go out
and reset to zero.
The indicator can only be reset by
pressing the reset button after the
light has come on. Pressing the
button at any other time will have no
effect.
When to change the thread lifters
The thread lifters on the suction inlet to
the floorhead can be replaced.
Check them from time to time and
replace them if the pile has worn down.
To replace the thread lifters (dia. 34)
^ To remove the thread lifters from the
slots, use a suitable screwdriver in
the two grooves provided.
^ Fit new thread lifters.
Replacement parts are available from
your Miele Dealer or from Miele (see
end of booklet for contact details).
en
Cleaning and care
,Always disconnect the vacuum
cleaner from the electrical supply
before cleaning it. Switch off at the
wall socket and unplug it.
Vacuum cleaner and accessories
The vacuum cleaner and all plastic
accessories can be cleaned with a dry
or a slightly damp cloth, or with a
proprietary cleaner suitable for plastic.
,Do not use abrasive cleaning
agents, glass cleaning agents,
all-purpose cleaners or oil-based
conditioning agents.
Dust compartment
The dust compartment can, if necessary, be cleaned using a dry duster,
brush or, if available, a second vacuum
cleaner to vacuum the dust out.
,Do not let the vacuum cleaner
get wet. If moisture gets into the
appliance, there is a risk of electric
shock.
Problem solving guide
The vacuum cleaner switches off
automatically.
The overheating warning light also
comes on § (dia. 35).
A temperature limiter switches the
vacuum cleaner off automatically if it
gets too hot. The overheating warning
light § in the vacuum cleaner display
comes on to indicate that it has
overheated.
This can occur if, for instance, large
articles block the suction tube or when
the dustbag is full or contains particles
of fine dust. A heavily soiled exhaust or
dust compartment filter can also be the
cause of overheating. Switch the
vacuum cleaner off immediately using
the On/Off foot control s. Disconnect
from the electrical supply. Switch off at
the wall socket and unplug it.
After removing the cause, wait for
approximately 20 - 30 minutes to allow
the vacuum cleaner to cool down. It
can then be switched on again.
43
en
After sales service
In the event of a fault that you cannot
easily remedy, please contact
– your Miele Dealer
or
– Miele (see end of booklet for contact
details)
Please note that telephone calls may
be monitored or recorded for training
purposes (UK only).
Guarantee
The appliance is guaranteed for a
period of 2 years from date of
purchase. In the UK you must activate
your cover by calling 0845 365 6640 or
registering online at www.miele.co.uk.
For information on the appliance
guarantee specific to your country
please contact Miele. See end of
booklet for contact details.
They can also be purchased from your
Miele Dealer or the Miele Spare Parts
Department.
Electrobrushes
Electrobrush Electro Comfort
(SEB 217-3)
This Electrobrush is particularly suitable
for intensive vacuuming of carpets
which are subject to hard wear. It is
very effective at removing deep seated
dirt and preventing areas of frequent
use being trodden into a path.
Electrobrush Electro Premium
(SEB 236)
In comparison to the SEB 217-3 this
Electrobrush is 60 mm wider and is
more powerful making it ideal for
cleaning large areas.
It has the following additional features
compared to the SEB 217-3:
– Adjustable height settings
Optional accessories
Certain models are supplied as
standard with one or more of the
following accessories.
– LEDs to light up the area being
vacuumed
– A multi-function indicator light.
Floorheads / brushes
Please observe the flooring
manufacturer's cleaning and care
instructions.
You can order these and many other
products on the internet at:
44
Classic Allergotec floorhead
(SBDH 285-3)
This floorhead is suitable for daily
hygienic cleaning of all floor surfaces.
The level of cleanliness of the floor
shows in a colour "traffic light" display
when vacuuming.
en
Turbo Comfort turbobrush
(STB 205-3)
This brush is ideal for cleaning cut pile
carpet.
Hard floor brush (SBB 235-3)
This brush is designed for use on hard
flooring such as tiled or stone floors.
Cat & Dog set (SCD 10)
For households with pets.
Turbo Mini Compact turbobrush
(STB 20)
For vacuuming upholstery, mattresses
or car seats etc.
Universal brush (SUB 20)
Parquet floor brush (SBB Parquet-3)
This brush has natural bristles and is
designed for use on parquet floors and
other surfaces which are susceptible to
scratching such as laminate flooring.
Hard floor Twister floor brush with
swivel action (SBB 300-3)
This brush is suitable for a variety of
hard floor surfaces and has a swivel
joint enabling it to get into awkward
corners.
Parquet Twister XL floor brush with
swivel action (SBB 400-3)
This brush is extra wide making it
suitable for large areas of flooring and
has a swivel joint enabling it to get into
awkward corners.
For dusting books, shelves, etc.
Radiator brush (SHB 30)
For dusting radiators, narrow shelves
and crevices.
Mattress nozzle (SMD 10)
For vacuuming upholstery, mattresses,
cushions, curtains, covers etc.
Crevice nozzle, 300 mm (SFD 10)
Extra long crevice nozzle for cleaning in
folds, crevices and corners.
Crevice nozzle, 560 mm (SFD 20)
Flexible crevice nozzle for vacuuming
hard to reach places.
Upholstery nozzle, 190 mm (SPD 10)
Other accessories
MicroSet (SMC 20)
This set is specially designed for
cleaning small objects and difficult to
reach areas (such as PC keyboards,
stereo equipment, intricately carved
furniture and ornaments, models etc).
Extra wide upholstery nozzle for
cleaning upholstered furniture,
mattresses and pillows.
Hygiene seal with active charcoal
Prevents dust and odours from
escaping when the suction hose is
taken off.
45
en
Filters
Active AirClean 50 exhaust filter
(SF-AA 50)
Absorbs odours from the dirt in the
dustbag.
HEPA AirClean 50 exhaust filter
(SF-HA 50)
Excellent filtration level for very clean
exhaust air. This filter is particularly
suitable for allergy sufferers.
Filter grille
The filter grille is required if you wish to
use an AirClean filter instead of an
Active AirClean 50 filter or HEPA
AirClean 50 filter.
Electrical connection for the UK
All electrical work should be carried out
by a suitably qualified and competent
person in strict accordance with current
national and local safety regulations
(BS 7671 in the UK).
The voltage and frequency are given on
the data plate located underneath the
vacuum cleaner. Please ensure that
these match the household mains
supply. The fuse rating is quoted on the
plug.
The appliance is supplied with a cable
and moulded plug ready for connection
to a 230-240 V/50 Hz a.c. single phase
supply.
Non-rewireable plugs BS 1363
The fuse cover must be re-fitted when
changing the fuse, and if the fuse cover
is lost the plug must not be used until a
suitable replacement is obtained. The
colour of the correct replacement cover
is that of the coloured insert in the base
of the plug, or the colour that is
embossed in words on the base of the
plug, (as applicable to the design of
plug fitted).
Replacement fuses should be ASTA
approved to BS1362 and have the
correct rating. Replacement fuses and
fuse covers may be purchased from
your local electrical supplier.
46
8QLWHG.LQJGRP
-IELE#O,TD
&AIRACRES-ARCHAM2OAD
!BINGDON/XON/847
4EL
#USTOMER#ONTACT#ENTRE4EL
%MAILINFO MIELECOUK
)NTERNETWWWMIELECOUK
$XVWUDOLD
-IELE!USTRALIA0TY,TD
!".
'ILBERT0ARK$RIVE+NOXFIELD6)#
4EL&AX
)NTERNETWWWMIELECOMAU
&KLQD
-IELE3HANGHAI4RADING,TD
&LOOR.O3HI-EN9I2OAD
*INGgAN$ISTRICT
3HANGHAI02#
4EL&AX
%MAILINFO MIELECN)NTERNETWWWMIELECN
0LHOH+RQJ.RQJ/LPLWHG
&-ANHATTAN0LACE
7ANG4AI2OAD
+OWLOON"AY(ONG+ONG
4EL&AX
%MAILMIELEHK MIELECOMHK
,QGLD
-IELE)NDIA0VT,TD
'ROUND&LOOR#OPIA#ORPORATE3UITES
0LOT.O*ASOLA
.EW$ELHI
4EL&AX
%MAILCUSTOMERCARE MIELEIN)NTERNETWWWMIELEIN
,UHODQG
-IELE)RELAND,TD
"IANCONI!VENUE
#ITYWEST"USINESS#AMPUS$UBLIN
4EL&AX
%-AILINFO MIELEIE)NTERNETWWWMIELEIE
0DQXIDFWXUHU -IELE#IE+'
#ARL-IELE3TRAE'àTERSLOH'ERMANY
Alteration rights reserved
0DOD\VLD
-IELE3DN"HD
3UITE,EVEL
-ENARA3APURA+ENCANA0ETROLEUM
3OLARIS$UTAMAS.O*ALAN$UTAMAS
+UALA,UMPUR-ALAYSIA
0HONE
&AX
1HZ=HDODQG
-IELE.EW:EALAND,IMITED
#OLLEGE(ILL
&REEMANS"AY!UCKLAND.:
4EL&AX
)NTERNETWWWMIELECONZ
6LQJDSRUH
-IELE3OUTHEAST!SIA
-IELE0TE,TD
0ENANG2OAD
¬7INSLAND(OUSE))
3INGAPORE
4EL&AX
%-AILINFOSEA MIELECOMSG
)NTERNETWWWMIELESG
6RXWK$IULFD
-IELE0TY,TD
0ETER0LACE"RYANSTON
0/"OX"RYANSTON
4EL&AX
%MAILINFO MIELECOZA
)NTERNETWWWMIELECOZA
8QLWHG$UDE(PLUDWHV
-IELE!PPLIANCES,TD
0/"OX
'OLD$IAMOND0ARK
3HEIKH:AYED2OAD
"UILDING/FFICES.OSTO
$UBAI
4EL
&AX
%-AILINFO MIELEAE
)NTERNETWWWMIELEAE
Änderungen vorbehalten
Complete C3 Electro / 1214
M.-Nr. 09 878 740 / 00