1
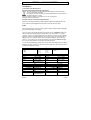
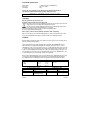
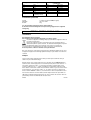
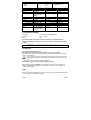
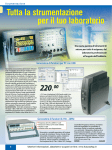
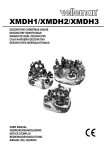
VTTEST15
AUDIO CABLE TESTER
TESTER VOOR AUDIOKABELS
TESTEUR DE CÂBLE AUDIO
COMPROBADOR DE CABLES AUDIO
TESTGERÄT FÜR AUDIOKABEL
USER MANUAL
GEBRUIKERSHANDLEIDING
NOTICE D’EMPLOI
MANUAL DEL USUARIO
BEDIENUNGSANLEITUNG
VTTEST15 – AUDIO CABLE TESTER
1.Introduction
To all residents of the European Union
Important environmental information about this product
This symbol on the device or the package indicates that disposal of the device after its
lifecycle could harm the environment.
Do not dispose of the unit (or batteries) as unsorted municipal waste; it should be taken to a
specialized company for recycling.
This device should be returned to your distributor or to a local recycling service.
Respect the local environmental rules.
If in doubt, contact your local waste disposal authorities.
Thank you for choosing Velleman! Please read the manual thoroughly before bringing this device into
service. If the device was damaged in transit, don't install or use it and contact your dealer.
2.Use
Turn the rotary switch fully clockwise to test the strength of a battery. The battery LED will light bright
green if the internal battery is fully charged.
Plug one end of the cable into the appropriate jack on the left side of your VTTEST15. Plug the other
end of the cable into the appropriate jack on the right. Now, set the rotary switch to “1” to test the
connection of contact “1” on the plug inserted into the left. If there is a connection, the green LED will
light below “1” while a yellow LED will light above the contact of the plug connected to the right. If no
LED lights, there is no connection: the left connection will either be floating or open. Set the rotary
switch to “2” to test contact “2” etc. until all contacts have been checked. If the GROUND LED lights,
there is a connection between the corresponding contacts and the chassis.
To test a cable with banana plugs, just plug each end of the cable into the banana jacks. The LED will
light and the unit will beep if there is a connection between the plugs. These jacks can also be used for
continuity tests using two probe leads.
1 = Sleeve
2 = Tip
3 = Ring
Jack
1 = -1
2 = +1
3 = -2
4 = +2
Speakon®
5 = -3
6 = +3
7 = -4
8 = +4
¼” TS Mono to ¼” Mono
1 Sleeve, 3 Ring
2 Tip
1 Sleeve, 3 Ring
(shorted with sleeve)
XLR Balanced to XLR Balanced
Pin 1
Pin 1
Pin 2
Pin 2
Pin 3
Pin 3
¼” TS Mono to XLR Unbalanced
1 Sleeve
Pin 1, Pin 3
2 Tip
Pin 2
3 Ring
Pin 1, Pin 3
(shorted with sleeve)
1 Sleeve
2 Tip
3 Ring
VTTEST15
1 Sleeve
2 Tip
3 Ring
1 = Screen
2 = Hot
Phono
¼” TRS to ¼” TRS
1 Sleeve, 3 Ring
2 Tip
1 Sleeve, 3 Ring
XLR Unbalanced to XLR Unbalanced
Pin 1
Pin 1, Pin 3
Pin 2
Pin 2
Pin 3
Pin 1, Pin 3
¼” TRS to XLR Balanced
1 Sleeve
Pin 1
2 Tip
Pin 2
3 Ring
Pin 3
-2-
VELLEMAN
3.Technical Specifications
1 x 9V E-block (order code 6LR61, incl.)
120 x 210 x 70mm
900g
Power Supply
Dimensions
Total Weight
For more info concerning this product, please visit our website www.velleman.eu.
The information in this manual is subject to change without prior notice.
VTTEST15 – TESTER VOOR AUDIOKABELS
1.Inleiding
Aan alle ingezetenen van de Europese Unie
Belangrijke milieu-informatie betreffende dit product
Dit symbool op het toestel of de verpakking geeft aan dat, als het na zijn levenscyclus wordt
weggeworpen, dit toestel schade kan toebrengen aan het milieu.
Gooi dit toestel (en eventuele batterijen) niet bij het gewone huishoudelijke afval; het moet
bij een gespecialiseerd bedrijf terechtkomen voor recyclage.
U moet dit toestel naar uw verdeler of naar een lokaal recyclagepunt brengen.
Respecteer de plaatselijke milieuwetgeving.
Hebt u vragen, contacteer dan de plaatselijke autoriteiten inzake verwijdering.
Dank u voor uw aankoop! Lees deze handleiding grondig voor u het toestel in gebruik neemt. Werd
het toestel beschadigd tijdens het transport, installeer het dan niet en raadpleeg uw dealer.
2.Gebruik
Draai de draaiknop volledig naar rechts om de batterij te testen. De groene led voor de batterij licht op
wanneer de batterij volledig is geladen.
Steek een kabeleinde in de gepaste aansluiting aan de linkerzijde van uw VTTEST15. Steek het
andere kabeleinde in de gepaste aansluiting aan de rechterkant. Plaats nu de knop op ‘1’ om de
aansluiting met contact ‘1’ op de plug links te testen. Is er een aansluiting, dan zal de groene led onder
‘1’ oplichten terwijl de gele led oplicht boven het contactpunt van de plug rechts. Licht geen enkele led
op, dan is er geen aansluiting. De aansluiting links is dan open. Plaats de draaiknop vervolgens op ‘2’
om contactpunt ‘2’ te testen, enz. tot u alle contactpunten hebt getest. Licht de GROUND-led op, dan
is er aansluiting tussen de overeenkomstig contacten en de behuizing.
Om een kabel met banaanpluggen te testen, steek elk kabeleinde in de banaaningangen. De led licht
op en het toestel zal een geluidssignaal voortbrengen als er een aansluiting tussen de pluggen is.
Deze ingangen kunnen ook gebruikt worden om de continuïteit te testen met behulp van sondes.
1 = Huls
2 = Tip
3 = Ring
1 Huls
2 Tip
3 Ring
VTTEST15
Jack
1 = -1
2 = +1
3 = -2
4 = +2
Speakon®
5 = -3
6 = +3
7 = -4
8 = +4
¼” TS mono naar ¼” mono
1 Huls, 3 Ring
2 Tip
1 Huls, 3 Ring
(kortsluiting met huls)
1 Huls
2 Tip
3 Ring
-3-
Phono
1 = Afscherming
2 = Hot
¼” TRS naar ¼” TRS
1 Huls, 3 Ring
2 Tip
1 Huls, 3 Ring
VELLEMAN
XLR gebalanceerd naar XLR gebalanceerd
XLR niet-gebalanceerd naar XLR nietgebalanceerd
Pin 1
Pin 1, Pin 3
Pin 2
Pin 2
Pin 3
Pin 1, Pin 3
¼” TRS naar XLR gebalanceerd
1 Huls
Pin 1
2 Tip
Pin 2
3 Ring
Pin 3
Pin 1
Pin 1
Pin 2
Pin 2
Pin 3
Pin 3
¼” TS mono naar XLR niet-gebalanceerd
1 Huls
Pin 1, Pin 3
2 Tip
Pin 2
3 Ring
Pin 1, Pin 3
(kortsluiting met huls)
3.Technische specificaties
1 x 9V E-blok (ordercode 6LR61, meegelev.)
120 x 210 x 70mm
900g
Voeding
Afmetingen
Gewicht
Voor meer informatie omtrent dit product, zie www.velleman.eu.
De informatie in deze handleiding kan te allen tijde worden gewijzigd zonder voorafgaande
kennisgeving.
VTTEST15 – TESTEUR DE CÂBLE AUDIO
1.Introduction
Aux résidents de l'Union européenne
Des informations environnementales importantes concernant ce produit
Ce symbole sur l'appareil ou l'emballage indique que l’élimination d’un appareil en fin de vie
peut polluer l'environnement.
Ne pas jeter un appareil électrique ou électronique (et des piles éventuelles) parmi les
déchets municipaux non sujets au tri sélectif ; une déchèterie traitera l’appareil en question.
Renvoyer les équipements usagés à votre fournisseur ou à un service de recyclage local.
Il convient de respecter la réglementation locale relative à la protection de l’environnement.
En cas de questions, contacter les autorités locales pour élimination.
Nous vous remercions de votre achat ! Lire la présente notice attentivement avant la mise en service
de l’appareil. Si l’appareil a été endommagé pendant le transport, ne pas l’installer et consulter votre
revendeur.
2.Emploi
Tourner le bouton rotatif complètement vers la droite pour tester la pile. La LED verte de la pile
s’allume si la pile est entièrement chargée.
Brancher une fiche sur la connexion appropriée sur le côté gauche de votre VTTEST15. Brancher
l’autre fiche sur la connexion appropriée sur le côté droit. À présent, placer le bouton rotatif sur « 1 »
pour tester la connexion du contact « 1 » sur la fiche insérée dans la connexion gauche. S’il y a
connexion, la LED verte sous « 1 » s’allume et la LED jaune correspondant au contact de la fiche
insérée dans la connexion droite s’allume. Si aucune LED ne s’allume, il n’y pas de connexion. Placer
le bouton rotatif sur « 2 » pour tester le contact « 2 », etc. jusqu’à ce que tous les contacts soient
testés. Si la LED « GROUND » s’allume, il y a connexion entre le contact correspondant et le boîtier.
Pour tester des câbles avec des fiches banane, brancher chaque fiche dans une prise banane. La
LED s’allume et l’appareil émettra un signal sonore en cas de connexion entre les fiches. Utiliser les
prises banane pour tester la continuité à l’aide des deux sondes.
VTTEST15
-4-
VELLEMAN
1 = Manche
2 = Pointe
3 = Bague
Jack
1 = -1
2 = +1
3 = -2
4 = +2
Speakon®
5 = -3
6 = +3
7 = -4
8 = +4
¼” TS mono vers ¼” mono
1 Manche, 3 Ring
2 Pointe
1 Manche, 3 Bague
(court-circuit avec
manche)
XLR symétrique vers XLR symétrique
Broche 1
Broche 1
Broche 2
Broche 2
Broche 3
Broche 3
¼” TS mono vers XLR asymétrique
1 Manche
Broche 1, Broche 3
2 Pointe
Broche 2
3 Bague
Broche 1, Broche 3
(court-circuit avec
manche)
1 Manche
2 Pointe
3 Bague
1 Manche
2 Pointe
3 Bague
Phono
1 = Blindage
2 = Point chaud
¼” TRS vers ¼” TRS
1 Manche, 3 Ring
2 Pointe
1 Manche, 3 Bague
XLR asymétrique vers XLR asymétrique
Broche 1
Broche 1, Broche 3
Broche 2
Broche 2
Broche 3
Broche 1, Broche 3
¼” TRS vers XLR symétrique
1 Manche
Broche 1
2 Pointe
Broche 2
3 Bague
Broche 3
3.Spécifications techniques
Alimentation
Dimensions
Poids
1 pile 9V type E (référence 6LR61, incl.)
120 x 210 x 70mm
900g
Pour plus d’information concernant cet article, visitez notre site web www.velleman.eu.
Toutes les informations présentées dans cette notice peuvent être modifiées sans notification
préalable.
VTTEST15 – COMPROBADOR DE CABLES AUDIO
1.Introducción
A los ciudadanos de la Unión Europea
Importantes informaciones sobre el medio ambiente concerniente este producto
Este símbolo en este aparato o el embalaje indica que, si tira las muestras inservibles, podrían dañar
el medio ambiente.
No tire este aparato (ni las pilas eventuales) en la basura doméstica; debe ir a una empresa
especializada en reciclaje. Devuelva este aparato a su distribuidor o a la unidad de reciclaje
local.
Respete las leyes locales en relación con el medio ambiente.
Si tiene dudas, contacte con las autoridades locales para residuos.
¡Gracias por haber comprado el VTTEST15! Lea atentamente las instrucciones del manual antes de
usarlo. Si el aparato ha sufrido algún daño en el transporte, no lo conecte a la red y póngase en
contacto con su distribuidor.
2.Uso
Gire el botón giratorio completamente hacia la derecha para comprobar la pila. El LED verde de la pila
se ilumina si la pila está completamente cargada.
VTTEST15
-5-
VELLEMAN
Conecte un conector a la conexión adecuada del lado izquierdo del VTTEST15. Conecte el otro
conector a la conexión adecuada del lado derecho. Ahora, ponga el botón giratorio en la posición “1”
para comprobar la conexión del contacto “1” del conector introducido en la conexión izquierda. Si hay
una conexión, el LED verde bajo “1” se ilumina y el LED amarillo se ilumina encima del contacto del
conector derecho. Si ningún LED se ilumina, no hay conexión. Ponga el botón giratorio en la posición
“2” para comprobar el contacto “2” etc. hasta que todos los contactos hayan sido comprobados. Si el
LED “GROUND” se ilumina, hay una conexión entre el contacto correspondiente y la caja.
Para comprobar cables con conector banana, conecte cada conector a una entrada de banana. El
LED se ilumina y el aparato emitirá una señal en caso de conexión entre los conectores. Utilice las
entradas banana para comprobar la continuidad con la ayuda de las dos sondas.
1 = Manga
2 = Punta
3 = Anillo
Jack
1 = -1
2 = +1
3 = -2
4 = +2
Speakon®
5 = -3
6 = +3
7 = -4
8 = +4
¼” TS mono a ¼” mono
1 Funda , 3 Anillo
2 Punta
1 Funda , 3 Anillo
(cortocircuite con funda)
XLR equilibrado a XLR equilibrado
Polo 1
Polo 1
Polo 2
Polo 2
Polo 3
Polo 3
¼” TS mono a XLR no equilibrado
1 Funda
Polo 1, Polo 3
2 Punta
Polo 2
3 Anillo
Polo 1, Polo 3
(cortocircuite con funda)
1 Funda
2 Punta
3 Anillo
1 Funda
2 Punta
3 Anillo
Phono
1 = Blindaje
2 = Punta caliente
¼” TRS a ¼” TRS
1 Funda , 3 Ring
2 Punta
1 Funda , 3 Anillo
XLR equilibrado a XLR no equilibrado
Polo 1
Polo 1, Polo 3
Polo 2
Polo 2
Polo 3
Polo 1, Polo 3
¼” TRS a XLR equilibrado
1 Funda
Polo 1
2 Punta
Polo 2
3 Anillo
Polo 3
3.Especificaciones
1 pila 9V (referencia 6LR61, incl.)
120 x 210 x 70mm
900g
Alimentación
Dimensiones
Peso
Para más información sobre este producto, visite nuestra página web www.velleman.eu.
Se pueden modificar las especificaciones y el contenido de este manual sin previo aviso.
VTTEST15 – TESTGERÄT FÜR AUDIOKABEL
1. Einführung
An alle Einwohner der Europäischen Union
Wichtige Umweltinformationen über dieses Produkt
Dieses Symbol auf dem Produkt oder der Verpackung zeigt an, dass die Entsorgung dieses
Produktes nach seinem Lebenszyklus der Umwelt Schaden zufügen kann.
Entsorgen Sie die Einheit (oder verwendeten Batterien) nicht als unsortiertes Hausmüll; die
Einheit oder verwendeten Batterien müssen von einer spezialisierten Firma zwecks
Recycling entsorgt werden.
Diese Einheit muss an den Händler oder ein örtliches Recycling-Unternehmen retourniert werden.
Respektieren Sie die örtlichen Umweltvorschriften.
Falls Zweifel bestehen, wenden Sie sich für Entsorgungsrichtlinien an Ihre örtliche Behörde.
VTTEST15
-6-
VELLEMAN
Danke für den Kauf des VTTEST15! Bitte lesen Sie diese Bedienungsanleitung vor Inbetriebnahme
sorgfältig durch. Überprüfen Sie, ob Transportschäden vorliegen. Sollte dies der Fall sein, verwenden Sie
das Gerät nicht und wenden Sie sich an Ihren Händler.
2.Anwendung
Drehen Sie den Drehschalter völlig im Uhrzeigersinn um die Stärke einer Batterie zu prüfen. Die
Batterie-LED wird grün aufleuchten wenn die Batterie völlig aufgeladen ist.
Stecken Sie das Kabel in die geeignete Buchse an der linken Seite des VTTEST15. Stecken Sie das
andere Kabelende in die geeignete Buchse an der rechten Seite. Stellen Sie jetzt den Drehschalter
auf “1” um die Verbindung des Kontaktes “1” auf dem Stecker angeschlossen an der linken Seite, zu
prüfen. Wenn es eine Verbindung gibt, wird die grüne LED unter "1” aufleuchten während eine gelbe
LED über dem Kontakt des Steckers an der rechten Seite aufleuchten wird. Wenn keine LEDs
aufleuchten, gibt es keine Verbindung. Der linke Anschluss wird entweder erdfrei oder offen sein.
Stellen Sie den Drehschalter auf “2” um Kontakt “2” usw. zu prüfen bis alle Kontakte geprüft worden
sind. Wenn die GROUND LED aufleuchtet, gibt es eine Verbindung zwischen den Kontakten und dem
Chassis.
Um ein Kabel mit Bananensteckern zu prüfen, schließen Sie jedes Kabelende an die
Bananenbuchsen an. Die LED wird aufleuchten und die Einheit wird piepsen wenn es zwischen den
Steckern eine Verbindung gibt. Diese Buchsen können Sie auch verwenden zur Durchgangsprüfung
mit 2 Messleitungen.
1 = Hülse
2 = Spitze
3 = Ring
Jack
1 = -1
2 = +1
3 = -2
4 = +2
Speakon®
5 = -3
6 = +3
7 = -4
8 = +4
¼” TS Mono auf ¼” Mono
1 Hülse, 3 Ring
2 Spitze
1 Hülse, 3 Ring
(gekürzt mit Hülse)
XLR symmetrisch auf XLR symmetrisch
Pin 1
Pin 1
Pin 2
Pin 2
Pin 3
Pin 3
¼” TS Mono auf XLR unsymmetrisch
1 Hülse
Pin 1, Pin 3
2 Spitze
Pin 2
3 Ring
Pin 1, Pin 3
(gekürzt mit Hülse)
1 Hülse
2 Spitze
3 Ring
1 Hülse
2 Spitze
3 Ring
Phono
1 = Abschirmung
2 = Hot
¼” TRS auf ¼” TRS
1 Hülse, 3 Ring
2 Spitze
1 Hülse, 3 Ring
XLR unsymmetrisch auf XLR unsymmetrisch
Pin 1
Pin 1, Pin 3
Pin 2
Pin 2
Pin 3
Pin 1, Pin 3
¼” TRS auf XLR symmetrisch
1 Hülse
Pin 1
2 Spitze
Pin 2
3 Ring
Pin 3
3.Technische Daten
Stromversorgung
Abmessungen
Gesamtgewicht
1 x 9V Batterie (Bestell-Nr. 6LR61, mitgeliefert)
120 x 210 x 70mm
900g
Für mehr Informationen zu diesem Produkt, siehe www.velleman.eu.
Alle Änderungen vorbehalten.
VTTEST15
-7-
VELLEMAN