1
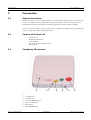
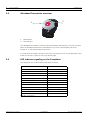
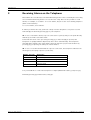
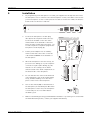
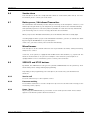
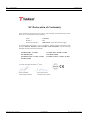
Carephone 10
en User Manual
Carephone 10
| en
3
Table of Contents
1
Identification
5
1.1
Document
5
1.2
Customer support addresses
6
2
Presentation
7
2.1
General description
7
2.2
Content of the basic kit
7
2.3
Carephone 10 overview
7
2.4
Wristband Transmitter overview
8
2.5
LED indicator signaling on the Carephone
8
3
Receiving Alarms on the Telephone
9
4
Testing and Programming
10
4.1
Start
10
4.2
Range test
10
4.3
Installation of a radio unit
10
4.4
Erase all radio units
10
4.5
End
10
5
Installation
11
6
Functions
12
6.1
Issue an alarm
12
6.2
Cancel an alarm
12
6.3
Telephone line monitoring
12
6.4
Power failure
12
6.5
Panic alarm
12
6.6
Smoke alarm
13
6.7
Battery error / Wristband Transmitter
13
6.8
Miscellaneous
13
6.9
SERVICE and STOP buttons
13
6.9.1
Service call
13
6.9.2
Presence marking
13
6.9.3
Home / Away
13
7
Appendix
14
7.1
EC-Declaration of conformity
14
Bosch Security Systems
User Manual
953.43d | v2.0 | 2009.01
4
en |
953.43d | v2.0 | 2009.01
Carephone 10
User Manual
Bosch Security Systems
Carephone 10
Identification | en
1
Identification
1.1
Document
Name
No.
User Manual
953.43d
5
Table 1.1 Document No.
Version
Description
v2.0 | 2009.01
Second Edition
Table 1.2 Version Management
Bosch Security Systems
User Manual
953.43d | v2.0 | 2009.01
6
en | Identification
1.2
Carephone 10
Customer support addresses
TeleAlarm SA Bosch Group
Bosch Security Systems BV
Rue du Pont 23
Postbus 80002
CH-2300 La Chaux-de-Fonds
NL-5600 JB Eindhoven
Switzerland
Netherlands
Phone: +41 32 327 25 40
Phone: 0900 8212499
Bosch Security Systems France
Bosch Security Systems nv/sa
Atlantic 361
Torkonjestraat 21F
361, avenue du Général de Gaulle
B-8510 Marke
F-92147 Clamart
Belgium
France
Phone: +32 (0)56 20 02 40
Phone: + 33 (0)825 12 8000
Bosch Sicherheitssysteme GmbH
Bosch Security Systems AB
Haus-ServiceRuf
Vestagatan 2
Ingersheimer Straße 16
416 64 Göteborg
D-70499 Stuttgart
Sweden
Germany
Phone: +46 (0)31 722 5300
Phone: 01805-47726724
Bosch Security Systems Ltd
Broadwater Park
North Orbital Road
Denham
UB9 5HN
United Kingdom
Phone: 01 895-878088
953.43d | v2.0 | 2009.01
User Manual
Bosch Security Systems
Carephone 10
Presentation | en
2
Presentation
2.1
General description
7
With the Carephone 10, you have the ability to contact an Alarm Monitoring Center at any time
in case of emergency. When an alarm is issued, the Carephone calls the pre-programmed
Alarm Monitoring Center and gives information about who issued the alarm, and why.
In case of assistance alarm, a speech connection is established, enabling you to speak directly
to the operator of the Alarm Monitoring Centre.
2.2
2.3
Content of the basic kit
–
Carephone 10
–
Wristband Transmitter
–
Power adapter
–
Telephone plug and modular cord
–
User manual
Carephone 10 overview
1
Fig. 2.1
Bosch Security Systems
2
3
4
5
6
Top view
1.
Loudspeaker
2.
LED indicator
3.
Yellow SERVICE button
4.
Green STOP button
5.
Microphone
6.
Red ALARM button
User Manual
953.43d | v2.0 | 2009.01
8
en | Presentation
2.4
Carephone 10
Wristband Transmitter overview
2
1
1.
Alarm button
2.
LED Indicator
Your Wristband Transmitter is a wireless alarm transmitter with which you can issue an alarm.
When the Wristband Transmitter’s alarm button is pressed, it automatically orders the
Carephone to call an Alarm Monitoring Centre.
It is small and can easily be carried on your wrist or around your neck. You should always carry
it with you at home or place it next to the bed at night.
2.5
LED indicator signaling on the Carephone
Your Carephone has a LED indicator that shows its status.
Status
LED
Standby mode (normal operation)
GREEN (permanent)
Passive alarm off
GREEN (slow blinking)
Presence marking
GREEN (fast blinking)
Power failure
GREEN (slow flash)
Carephone battery failure
GREEN with RED flashes
Carephone not programmed
RED / GREEN (slow blink)
Programming / test mode
RED / GREEN (fast blink)
Speech connection alive
RED (permanent)
Line error
RED (slow blinking)
Active alarm
RED (fast blinking)
Power and battery failure
RED (slow flash)
Radio button failure
RED (fast flash)
Table 2.1
953.43d | v2.0 | 2009.01
LED Indicator
User Manual
Bosch Security Systems
Carephone 10
3
Receiving Alarms on the Telephone | en
9
Receiving Alarms on the Telephone
Most alarms are sent directly to an Alarm Monitoring Centre. This is normally the safest way,
since an Alarm Monitoring Centre is in use 24 hours a day. But it is also possible to send
alarms, for example, to a relative. To receive alarms, all you need is a tone dialing telephone
(with * and # buttons).
To receive alarms, act as follows:
1 When you answer the call, you’ll hear a beep from the Carephone every other second.
Acknowledge the alarm by pressing [4] on your telephone.
2A In case of assistance alarm, a speech connection is opened, and you can speak directly
with the person who issued the alarm.
Control the direction of the speech by pressing [7] to listen and [8] to speak (if the
Carephone is equipped with a duplex unit, this is done automatically). The Carephone
automatically terminates the call 3 minutes after the last time you pressed a button. By
pressing [4], you prolong the call by an extra 3 minutes.
2B In case of a technical alarm without a speech connection, the Carephone indicates the
alarm type by a beeping sequence (see below).
Number of beeps
Alarm type
1
radio battery
2
central unit battery
4
power failure
5
power normal
3 If you would like to control the Carephone’s output (additional feature), just press [9].
4 End by pressing [0] and thereafter, hang up.
Bosch Security Systems
User Manual
953.43d | v2.0 | 2009.01
10
en | Testing and Programming
4
Carephone 10
Testing and Programming
Your Carephone has a built-in function that enables you to perform a range test of a radio unit,
e.g. your Wristband Transmitter, without issuing an alarm. You can also install new radio units
and erase old ones, e.g. when replacing your Wristband Transmitter. Your Carephone has
allocations for four radio units with the following basic functions (if you want other functions,
contact your supplier).
1.
Assistance alarm
2.
Assistance alarm
3.
Panic alarm
4.
Smoke alarm
Proceed as follows.
4.1
Start
Press the STOP button while turning the power switch from OFF to ON. The Carephone now
enters the test/programming mode, the LED indicator switches between green and red. Now,
choose among the following alternatives: range test, installation of a radio unit, or erase all
radio units.
4.2
Range test
Walk around in the apartment and press the Wristband Transmitter. When the Carephone
recognizes the radio signal from your Wristband Transmitter, it beeps. Check that the covered
area is acceptable.
4.3
Installation of a radio unit
1.
Choose which radio unit to install by pressing the ALARM button 1 to 4 times. The Carephone indicates chosen unit with 1 to 4 beeps.
2.
Press the button of your radio unit, e.g. your Wristband Transmitter. If the Carephone
accepts the new radio unit, the LED indicator turns green and the Carephone beeps continuously. If the LED indicator turns red, the radio unit is already installed in another
place.
3.
4.4
Accept the installation by pressing the ALARM button.
Erase all radio units
1.
Press the ALARM button for more than 3 seconds. The LED indicator turns green and a
continuous beep starts.
2.
4.5
Accept the erasing by pressing the ALARM button.
End
Quit and return to normal mode by pressing the STOP button. The LED indicator returns to
green.
i
953.43d | v2.0 | 2009.01
NOTICE!
After an installation, you should always test the new radio unit by activating an alarm with it.
User Manual
Bosch Security Systems
Carephone 10
5
Installation | en
11
Installation
1.
No programming of the Carephone is needed; your supplier has already done this. Place
the Carephone close to a mains socket and a telephone socket, it should be connected to
your first telephone socket. It can be placed on a table or mounted on a wall, the distance
between the screw holes is 135 mm.
OFF
2.
ON
POWER
TELE
AUX
Connect the Carephone’s modem plug
directly into the telephone wall socket (a).
Connect the modular cord to the outlet
marked TELE on the backside of the Carephone and the modem plug. Thereafter, connect the telephone’s telephone plug into the
Carephone’s modem plug (b).
3.
Put the power adapter into an ordinary
mains socket and connect the cord to the
outlet marked POWER on the backside of
the Carephone.
4.
When the Carephone leaves the factory, it’s
preset for tone dialing (1). If your telephone
connection requires pulse dialing (2), this
must be set. The setting is done with a
switch located in the small compartment on
the bottom side of the Carephone.
5.
Be sure that the wire aerial on the backside
of the Carephone (not on all models) hangs
freely, and that nothing covers the micro-
2
1
phone on the front of the Carephone.
6.
a
Turn on the switch (ON) on the backside of
the Carephone (it must always be OFF when
the Carephone is not in use). The Carephone
is now ready for use. The LED indicator
should be green.
7.
b
Make a test alarm by pressing your Wristband Transmitter. If you don’t get in contact with
an Alarm Monitoring Centre, contact your supplier immediately.
Bosch Security Systems
User Manual
953.43d | v2.0 | 2009.01
12
en | Functions
Carephone 10
6
Functions
6.1
Issue an alarm
An assistance alarm is issued by pressing the red ALARM button on the Carephone or by
pressing your Wristband Transmitter.
When an alarm is active, the LED indicator blinks red and the Carephone beeps. After a prealarm time of 10 seconds, the Carephone dials up an Alarm Monitoring Centre. When a
connection is established, the LED indicator turns to a steady red and you are now able to
speak directly to the operator of the Alarm Monitoring Centre. Explain what you want, and the
operator of the Alarm Monitoring Centre will help you.
When the operator of the Alarm Monitoring Centre has handled your alarm, your Carephone
goes back into normal mode and the LED indicator turns green.
If the Carephone has failed to contact the Alarm Monitoring Centre, it automatically tries again
until it has succeeded. If your telephone is in use when an alarm is issued, the telephone is
automatically cut off and the alarm has first priority (this is only valid if your Carephone is
connected before your first telephone).
6.2
Cancel an alarm
If by mistake you activate an alarm, you can cancel it by pressing the STOP button. Some
automatic alarms can’t be cancelled, e.g. battery alarms.
6.3
Telephone line monitoring
Your Carephone automatically monitors your telephone line. If an error occurs on the line, the
Carephone beeps every other second, and the LED indicator slowly blinks red until the error
has been eliminated.
The beep can be silenced by pressing the STOP button on your Carephone.
6.4
Power failure
If a power failure should occur, the internal battery is automatically activated, and your
Carephone continues to work properly for up to 5 days. When a power failure occurs, the
Carephone beeps continuously for 10 seconds, and the LED indicator starts to blink red
(short blink).
When a power failure lasts more than 1 hour, an alarm is activated. If this occurs, a message is
also issued when the power returns to normal. When about 20% of the battery’s capacity
remains an alarm is activated that states that the battery is weak.
When the power returns to normal, the battery is being recharged. After a long power failure,
it can take up to 24 hours for the battery to regain full charge.
6.5
Panic alarm
Your Wristband Transmitter can also function as a panic alarm (radio unit 3). Panic alarm means
that the Carephone is totally quiet when an alarm is issued, and the Alarm Monitoring Center
can only listen to what’s happening through your Carephone.
953.43d | v2.0 | 2009.01
User Manual
Bosch Security Systems
Carephone 10
6.6
Functions | en
13
Smoke alarm
Your Carephone can also be completed with a wireless smoke alarm (radio unit 4). For more
information, please contact your local dealer.
6.7
Battery error / Wristband Transmitter
The alarm button automatically sends a daily test message to the Carephone. Therefore, even
without pressing the button, your Carephone permanently monitors the transmitter battery
and optionally supervises a function problem (available for radio unit 1 and 2). Afterwards,
your monitoring center receives a message about the detected failure.
When you press the Wristband Transmitter, the LED indicator will emit a steady light.
If nothing happens when you press the Wristband Transmitter, you have to activate the alarm
by pressing the ALARM button on your Carephone.
In this case, you must contact your local dealer immediately.
6.8
Miscellaneous
Your Carephone can also handle functions such as periodical test alarms, activity monitoring
and presence control.
It can also, as an option, be equipped with an IO-board for wired alarms, e.g. a pull cord. The
functions mentioned here are just a few examples of the functions your Carephone is
equipped with. For more information, please contact your local dealer.
6.9
SERVICE and STOP buttons
By default, the STOP button is the green key and the SERVICE button is the yellow key. Their
functionality can be changed through programming.
Depending on the programming of the Carephone, the function key can allow different
functions.
6.9.1
Service call
Press the function key to call a separate service.
6.9.2
Presence marking
Pressed when staff arrives. Sets the carephone in presence mode and sends a message to the
monitoring center (option).
6.9.3
Home / Away
On pressing the SERVICE button, you activate or turn off the passive alarm. An acoustical
signal is sent when the passive alarm is turned off.
Bosch Security Systems
User Manual
953.43d | v2.0 | 2009.01
14
en | Appendix
Carephone 10
7
Appendix
7.1
EC-Declaration of conformity
953.43d | v2.0 | 2009.01
User Manual
Bosch Security Systems
Carephone 10
Bosch Security Systems
Appendix | en
User Manual
15
953.43d | v2.0 | 2009.01
16
en | Appendix
Carephone 10
EC Declaration of Conformity
We, TeleAlarm SA, Rue du Nord 176, 2300 La Chaux-de-Fonds, Switzerland, hereby declare
under our sole responsibility that the product(s):
Name:
TeleAlarm
Model(s):
S37
Product description(s):
Radio button (social alarm wireless trigger)
to which this declaration relates, is (are) in conformity with the essential requirements of the
Directives R&TTE 1999/5/EC, LVD 73/23/EEC, EMC 89/336/EEC, and the following
Standards and other Normative Documents:
EN 60950-1:2001 / A11:2004
EN 55022:1998 / A1:2000 / A2:2003
ETS 300220-2:2000
ETS 300220-3:2000
EN 61000-4-2:1995 / A1:1998 / A2:2001
EN 61000-4-3:1996 / A1:1998 / A2:2001
EN 50134-2:2001
La Chaux-de-Fonds, December 12th, 2005.
Ludovic Stauffer
Pierre-Alain Nicati
Chief Technical Officer
Chief Executive Officer
953.43d | v2.0 | 2009.01
User Manual
Bosch Security Systems
TeleAlarm SA Bosch Group
Rue du Pont 23
CH-2300 La Chaux-de-Fonds
Switzerland
Phone
+41 32 327 25 40
Fax
+41 32 327 25 41
ch.securitysystems@bosch.com
www.telealarm.com
Bosch Security Systems France
Atlantic 361
361, avenue du Général de Gaulle
F-92147 Clamart
France
Phone
+ 33 (0)825 12 8000
(0, 15 € TTC/Min)
Fax
+ 33 (0)820 900 960
(0, 12 € TTC/Min)
fr.securitysystems@bosch.com
www.boschsecurity.fr
Bosch Security Systems Ltd
Broadwater Park
North Orbital Road
Denham
UB9 5HN
United Kingdom
Phone
01895-878088
Fax
01895-878089
uk.securitysystems@bosch.com
www.boschsecurity.co.uk
Bosch Sicherheitssysteme GmbH
Haus-ServiceRuf
Ingersheimer Straße 16
D-70499 Stuttgart
Germany
Phone
01805 231232*)
Fax
0711 811-5125 294
*)0,14 € pro Minute aus dem Festnetz der Deutschen Telekom
Haus-Service.Ruf@de.bosch.com
www.bosch-sicherheitsprodukte.de
Bosch Security Systems BV
Postbus 80002
NL-5600 JB Eindhoven
Netherlands
Phone
+31 40 25 77 200
Fax
+31 40 25 77 202
nl.securitysystems@bosch.com
www.boschsecurity.nl
Bosch Security Systems AB
Vestagatan 2
SE-416 64 Göteborg
Sweden
Phone
+46 (0)31 722 5300
Fax
+46 (0)31 722 5340
se.securitysystems@bosch.com
www.boschsecurity.se
Bosch Security Systems nv/sa
Torkonjestraat 21F
B-8510 Marke
Belgium
Phone
+32 (0)56 20 02 40
Fax
+32 (0)56 20 26 75
be.securitysystems@bosch.com
www.boschsecurity.be