1
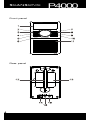
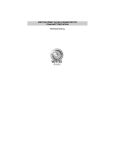
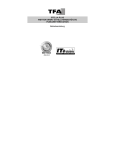
P4000
UK User Manual
P4000
Contents
02 CONTENTS
03 INFORMATION
04 FRONT AND REAR PANEL OVERVIEW
06 CONNECTING YOUR RADIO
06 OPERATING YOUR RADIO – DAB
07 SELECTING A STATION – DAB
07 INFORMATION SERVICES – DAB
08 OPERATING YOUR RADIO – FM
08 DISPLAY MODES – FM
08 AUX MODE, CONNECT YOUR IPOD
09 MANUAL CLOCK SETTING
09 SETTING THE ALARM
09 SLEEP TIMER
10 SNOOZE SETTING, EQ SETTING
10 CONTRAST SETTING, RESETING THE RADIO
11 SPECIFICATION
2
P4000
Information
Congratulations on your new radio.
Please take a moment to read this manual
Enjoy.
Safety Instructions.
Please store this instruction manual for future reference.
• Place the unit on a solid surface
• Do not expose Scansonic P4000 to high humidity, direct
sunlight, dirt, heavy vibration or extreme temperatures.
• Do not open the cabinet. Only qualified technicians are allowed
to handle this Scansonic radios internal parts.
• If service or repair is required, this must also be done by
qualified technicians.
• User a duster or a slightly damp, soft and Non-fluffy rag to
clean the cabinet, Do not use corrosive or strong cleaning
agents.
• Make sure no liquids or moisture penetrates the radio during
cleaning. Unplug the radio before cleaning it.
Unplug the radio in following cases;
• Foreign objects or liquids has penetrated the radio
• The radio cannot be operated properly.
• The cabinet has been damaged.
• The mains plug or the mains cable is defective
• If the radio is not to be used for a longtime.
Disclaimer
Despite our best efforts we cannot guarantee that the technical data indicated are
correct, complete and updated, We, Scansonic, reserve the right to make technical
changes without prior notice.
3
P4000
Front panel
Rear panel
4
P4000
01 Display
OLED display showing all information
on the radio.
02 MODE
Press to select DAB radio, FM radio or
AUX input.
03 SCAN
Press to Scan radio channels.
04 TUNE
Press to scan radio downwards.
05 STANDBY
Press to go to STANDBY mode, Press
Longer to Shut down radio.
06 ROTARY
Volume Control / SELECT / SNOOZETaste
07 MENU
Press to setup System Utilities / EQ /
Alarm / Clock / Contrast etc.
08 PRESET
Press to preset radio stations 1- 10.
09 TUNE +
Press to scan radio upwards.
10 INFO
Press to retrieve information from
Radio Stations.
11 SPEAKER
3” Full range loudspeaker
12 ANTENNA
The radio comes with a telescopic
antenna. To Improve FM reception,
adjust the antenna for best reception.
13 BATTERY
This radio can also be played with
batteries (AA size x 6).
14 DC9V IN
Use this input to to the enclosed DC
Power supply.
15 AUX IN
Connect a stereo or mono audio
source (iPod, iPhone, iPad, MP3
Player, TV etc). Use 3.5mm jack
enclosed to connect to devices.
16 HEADPHONE
Connect a separate stereo headset to
this input to listen to the radio.
Connecting headset will disable the
main speaker.
5
P4000
Connecting your radio
01 Your radio is supplied with a Mains Adaptor.
02 Place your radio on a flat surface.
03 Insert the adaptor plug into the DC socket on the back of
your radio.
04 Plug the adaptor into the 230 volts mains socket outlet.
Important:
The AC adaptor should be disconnected from the mains supply
and the radio when not in use. The mains adaptor is used as
the means of connecting the radio to the mains supply, do not
connect the radio to the mains outlet socket in any other way.
Operating your radio – DAB
01 Carefully extend the telescopic antenna.
02 Press the STANDBY button to switch on radio, the display will show “SCANSONIC” and the radio will come into DAB mode automatically.
03 First time the radio is used a QUICK SCAN will be
carried out,
if the radio has been and turned back ON from STANDBY mode, the last used station will be selected.
04 For a full SCAN please press “SCAN” button for 2 seconds.
05 When scanning is completed the display shall indicate the number of found stations.
06 You may PRESET your favorite stations by pressing
PRESET button and scroll to the position you would like
to save and then press SELECT button for 2 seconds.
07 When signal indicator is low is because of weak station signal or bad reception location.
08 If no Stations are found after scanning the display will show NO STATIONS AVAILABLE and it is necessary
to relocate the radio to a position with better reception.
6
P4000
Selecting a station – DAB
01 The display show the name of the station selected.
02 Press the TUNE – or TUNE + button to scroll the station list
and find the station.
03 Press down ROTARY KNOB to select the desired station.
Information services – DAB
Your radio shall display different info which can be selected by
pressing the INFO button.
01 Signal strength
02
03
04
05
06
07
Shows a graph of the signal strength
for the selected station.
Date
Shows the current date and time.
Ensemble
Displays the name of broadcaster of
the DAB Station.
Genre
Displays the type of the selected station;
Pop,Rock,News,Jazz Etc.
Data Speed
Display the digital bit rate and mono/
stereo of selected station.
Radio text (DLS)
Displays text messages from the station.
Station Frequency Displays the frequency of the selected
station.
7
P4000
Operating your radio – FM
01 Carefully extend the telescopic antenna.
02 Press ON/OFF to power on the radio
(Use MODE to select to FM).
03 Press TUNE+ button 2 seconds to automatically scan
upwards.
04 Press TUNE- button 2 seconds to automatically scan
downwards.
05 You may PRESET your favorite stations by pressing
PRESET button and scroll to the position you would like
to save and then press SELECT button for 2 seconds.
Display modes – FM
Your radio shall display below information by pressing the INFO
button.
01 Signal strength
02 Date
03 Station Name
04 Audio
05 Program
06 Radio text
Shows a graph of the signal strength for
the selected station.
Shows the current date and time.
Shows the name of the station or the
frequency of the station.
Displays Mono or Stereo.
displays the name of Program If not
available “Prog Type N/A” shall be
displayed.
displays text messages from the station.
Note that these FM display mode information are only available when the radio is able to receive RDS information from the
broadcaster.
AUX mode
CONNECT TO YOUR IPOD, IPHONE, IPAD
& OTHER AUDIO SOURCES
The radio has an auxiliary input. This input can be used to
connect an external source such as iPod, iPhone, iPad, MP3
Players and other audio sources by using the included 3.5mm
mini jack cable.
To connect please connect the 3.5mm mini jack cable to
your radio and to your other device.
Press MODE button to select the AUX mode.
8
P4000
Manual clock setting
The radio clock can be set manually as below.
01 Press MENU > Utility > Clock Setup.
02 With Rotary please select Date Setting : YYYY : MM : DD.
03 With Rotary please select Time Setting : HH : MM.
Setting the alarm
The radio alarm allows you to wake up to your desired radio
station or a buzz.
01
02
03
04
05
06
Press MENU > Utility > Alarm Setup.
With Rotary Select Alarm number : 1 or 2.
With Rotary Select Alarm Status : ON or OFF.
With Rotary Select Alarm mode : Buzz or Radio.
With Rotary Select Alarm Time : 00 : 00.
Press SELECT Button to end.
Sleep timer
The radio has a sleep timer function that allows your radio to
shut off automatically after a selected number of minutes.
01 Press MENU > Utility > Sleep Setup.
02 With Rotary please select Sleep: ON / OFF.
03 With Rotary please select Cound down : 15, 30, 45, 60, 75
or 90 mins.
04 Press SELECT Button to end.
9
P4000
Snooze setting
The radio has a Snooze function that allows your radio to Alarm
after a certain number of minutes.
01 Press MENU > Utility > Snooze Setup.
02 With Rotary please select : 5, 10, 15 or 20 mins.
03 Press SELECT button to end.
EQ setting
The radio has a EQ function that allows your radio to play with
different Equalizer settings.
01 Press MENU > Setup > EQ Setting.
02 With Rotary please select : Flat, News, Classic, Pop or
Rock.
03 Press SELECT button to end.
Contrast Setting
The radio is capable on having different brightness of contrast according to your environment.
01 Press MENU > Setup > Contrast.
02 With Rotary please select : 1/8 ~ 8/8
(Factory Setting is 8/8).
Reseting the radio
If you encounter problems with your radio you may reset the radio
to Factory Setting as follows.
01 Press MENU > Setup > Factory Default.
02 Press Select and shall go into “System Reset”.
10
P4000
Specifications
Band (Mode)
DAB,DAB+ & FM & (AUX)
Output Power
5 Watts RMS
Loudspeaker
3” Full Range
Antenna
FM & DAB telescopic
Power / Battery
DC 9V / 6 x AA sized Alkaline
Batteries
Inputs
DC 9V
Aux Input
Outputs
Headphones
Dimensions
95mm(W) x 100mm(D) x 192mm(H)
Weight (Net)
985 g
11
P4000
en j oy
www.scansonic.dk