1
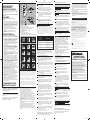
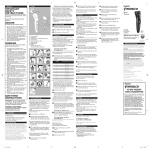
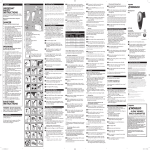
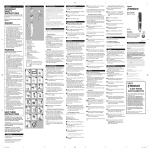
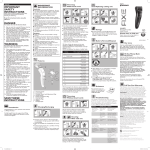
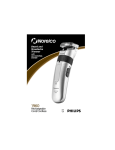
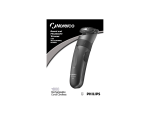
3 Slide the comb into the guiding grooves on
both sides of the Clipper swivel head and
push until you hear it ‘click’ into place (Fig. 2).
Make sure the comb locks properly into position.
Features
ENGLISH
ENGLISH
A
IMPORTANT
SAFETY
INSTRUCTIONS
When using an electrical appliance, basic safety
B
E
C
precautions should always be followed, including
the following:
F
D
Read all instructions before using this
appliance.
DANGER
To reduce the risk of electric shock:
1. Do not reach for a corded clipper that has
fallen into water. Unplug immediately.
2. Do not use while bathing or in a shower.
3. Do not place or store clipper where it can
fall or be pulled into a tub or sink. Do not
place in or drop into water or other liquid.
4. Always unplug this clipper from the electrical
outlet immediately after using.
5. Unplug and remove power supply cord from
clipper before cleaning.
WARNING
To reduce the risk of burns, fire, electric
shock or injury to persons:
1. Close supervision is necessary when
this appliance is used by, on, or near children
or invalids.
2. Use this clipper for its intended household
use as described in this manual. Do not use
attachments not recommended by Philips
Electronics North America Corporation.
3. Never operate this clipper if it has a
damaged cord or plug, if it is not working
properly, if it has been dropped, damaged, or
dropped into water. For assistance call
1-800-243-3050.
4. Do not rinse or immerse the clipper in
water or any other liquid.
5. Keep the clipper, cord and any attachments
away from heated surfaces.
6. Never drop or insert any object into any
opening.
7. Do not operate or plug in clipper outdoors
or where aerosol (spray) products are being
used or where oxygen is being administered.
8. Always check cutters, cutting unit and comb
before using the clipper. Do not use the
clipper if cutters, cutting unit or comb are
damaged, as injury may occur.
9. Always attach plug to clipper first, then to
outlet. To disconnect, turn on/off switch to
“OFF” position, then remove plug from
outlet.
10. To prevent possible damage to the cord, do
not wrap cord around the clipper.
11. Never put clipper in direct sunlight or store
at a temperature above 140°F.
12. This clipper is for use on human hair only.
Do not use this clipper for any other
purpose.
13. Always store your clipper, attachments and
power plug in a moisture-free area. Make
sure the cord is disconnected from the
clipper.
14. Only use the power plug and other
accessories supplied with the appliance.
SAVE THESE
INSTRUCTIONS
IMPORTANT: The power plug contains
a transformer. Do not cut off the power
plug to replace it with another plug as this
will cause a hazardous condition.
Registration
Congratulations on your purchase and welcome
to Philips Norelco!
To fully benefit from the support that Philips
Norelco offers, register your product at
www.norelco.com/register
5 The arrowhead on the Clipper indicates
which setting has been selected.
When you are clipping for the first time, start at
the maximum clipping length setting (#5) of the
comb to familiarize yourself with the appliance
and prevent accidentally trimming hairs too short.
As you become familiar with the settings, adjust
the Hair Length Selector to desired trimming
length.
G
H
Table 1 Comb Settings
A
B
C
D
E
F
G
H
Cutting Element
180° Rotating Head
Hair Length Setting Adjustment Ring
ON/OFF Switch
Regular Comb
Hair Length Setting Indicator
Adapter
Cleaning Brush
Full Two-Year Warranty
45-Day Money-Back Guarantee
1
Comb
Barber
Setting
#1
2
3
– 5
– 7
– 9
– 11
– 15
– 3 mm
– 5
– 7
– 9
– 11
– 15
Remaining
Hair Length
1/8 in./3mm
3/16 in./5mm
#2
9/32 in./7mm
#3
3/8 in./9mm
#4
#5
7/16 in./11mm
1/2 in./13mm
5/8 in./15mm
TIP: Use different settings to create a natural and
smooth transition between various hair lengths from
your neckline to the top of your head (Fig. 5).
Using the rotating head
4
#5
#3
#2
#1
#1
#2
#3
#4
#5
#1
#2
#3
#4
5
6
90º
45º
0º
90º
18
0º
45º
7
8
9
– 3 mm
– 5
– 7
10
12
11
– 3 mm
– 5
– 7
– 9
– 11
– 15
1
13
15
14
1
2
2
Put It To The Test
Like many new products, your Philips Norelco
Hair Clipper may take a little getting used to. If you
are using an electric Clipper for the first time, or if
you’ve been using a different brand, take the time
to acquaint yourself with your new Hair Clipper.
w At the starting clipping position of 0˚ (pointing
forward), turn the rotating head 45˚ or 90˚ to
the left or right to adjust the position of the
cutting element to the part of your head you
are clipping (Fig. 6).
1 Turn the rotating head left or right to the
desired clipping position. At each position
you will hear a ‘click’ (Fig. 7).
Always adjust the position of the cutting element
by turning the rotating head. Do not turn the
rotating head by holding the cutting element or
the comb attachment.
2 The rotating head allows you to hold and use
the Clipper like a styling comb (Fig. 8).
Do not turn the rotating head more than 90° to
the left or right.
3 Push the ON/OFF switch up to turn on the
appliance.
4 Make sure that the flat part of the comb is
always in full contact with the scalp to obtain
an even result.
5 Since all hairs do not grow in the same
direction, move the Clipper slowly over the
crown from different directions (i.e. upwards,
downwards and across) to achieve an even
result (Fig. 9).
6 Always move the Clipper slowly against the
direction of hair growth.
Your Hair Clipper features a 180° pivoting head to
comfortably clip even hard-to-reach areas of your
head.
7 Make overlapping passes over the head to
ensure that all hairs that should be cut are
cut.
Throw your scissors away and put your new
Hair Clipper to the test. We guarantee precise,
professional results or Philips Norelco will refund
you the full purchase price as long as the request
is received within 45 days of purchase.
8 As you clip different areas of your head,
adjust the position of the rotating head
so that the rotating head position is most
comfortable for you.
Hair Clipping
wUse this Clipper for its intended household
Clipping with comb attachment
1 Be certain the Clipper is in the OFF position.
2 Insert the appliance plug directly into the
Clipper and plug the adapter into any 120V
AC outlet. Use only the cord provided.
3 Push the ON/OFF switch up to turn on the
appliance.
4 Tilt the Clipper in such a way that only one
edge of the cutting element touches the hair
ends. Be careful not to trim too much. The
hairline should be close to the ear (Fig. 11).
9 For best results with curly, sparse or long
hair, use a styling comb to guide the hair
towards the Clipper.
6 Adjust the position of the rotating head to
make contouring easier.
Cleaning
power supply cord from Clipper before
cleaning.
w Do not use compressed air, abrasive cleaning
agents, scourers or aggressive liquids such as
gasoline, acetone or ethereal oils to clean
the Clipper and attachments.
w Never clean, replace or remove Clipper
attachments with motor ON.
w Do not use Clipper if cutter or cutting
element are damaged or broken as injury may
occur.
w Use a soft, dry cloth to clean Clipper handle.
During Use:
w If cut hairs have accumulated in the comb
area, remove hairs by shaking, blowing or using
cleaning brush provided.
Cleaning the Cutting Element and
Comb After Each Use:
1 Make sure the Clipper is switched OFF
and disconnected from the electrical outlet.
2 Remove comb (Fig. 10).
3 Blow and/or shake out any hair that may
have accumulated in the comb.
4 Rinse the comb under the tap or clean it
with the cleaning brush supplied.
5 Put your thumb on the center of the cutting
element and put your index finger on the
teeth of the cutting element. Lift your index
finger (1) so the cutting element releases
from the swivel head (2) (Fig. 13).
Be careful that the cutting element does not fall to
the floor.
7 Clean the inside of the swivel head with the
brush supplied.
8 Clean the handle and the adapter with the
cleaning brush supplied or with a dry cloth.
comb as when the Clipper is turned on it will
remove every hair it touches.
Question?
Contact
Philips
Norelco
www.norelco.com/register
4222 002 8310 2
Full Two-Year Warranty
Philips Electronics North America Corporation warrants each new Philips
Norelco product, Model QC5560 (except cutters and comb) against
defects in materials or workmanship for a period of two years from the
date of purchase, and agrees to repair or replace any defective product
without charge.
IMPORTANT: This warranty does not cover damage resulting from
accident, misuse or abuse, lack of reasonable care, the affixing of any
attachment not provided with the product or loss of parts or subjecting
the product to any but the specific voltage.* Use of unauthorized
replacement parts will void this warranty.
PHILIPS ELECTRONICS NORTH AMERICA CORPORATION
WILL NOT PAY FOR WARRANTY SERVICE PERFORMED BY
A NON-AUTHORIZED REPAIR SERVICE AND WILL NOT
REIMBURSE THE CONSUMER FOR DAMAGE RESULTING FROM
WARRANTY SERVICE PERFORMED BY A NON-AUTHORIZED
REPAIR SERVICE.
NO RESPONSIBILITY IS ASSUMED FOR ANY SPECIAL,
INCIDENTAL OR CONSEQUENTIAL DAMAGES.
In order to obtain warranty service, simply go to www.philips.com/
norelco or call 1-800-243-3050 for assistance. It is suggested that for
your protection you return shipments of product by insured mail,
insurance prepaid. Damage occurring during shipment is not covered by
this warranty. NOTE: No other warranty, written or oral, is authorized
by Philips Electronics North America Corporation. This warranty gives
you specific legal rights, and you may also have other rights which vary
from state to state. Some states do not allow the exclusion or limitation
of incidental or consequential damages, so the above exclusion and
limitations may not apply to you.
*Read enclosed instructions carefully.
Manufactured for:
Philips Consumer Lifestyle
A Division of Philips Electronics North America Corporation
P.O. Box 10313, Stamford, CT 06904
This symbol on the product’s nameplate means it is
listed by Underwriters’ Laboratories, Inc.
Norelco is a Registered Trademark of Philips Electronics
North America Corporation.
PHILIPS is a Registered Trademark of Koninklijke Philips Electronics N.V.
© 2013 Philips Electronics North America Corporation. All Rights Reserved.
45-DAY MONEYBACK GUARANTEE
www.philips.com/support or
call toll free: 1-800-243-3050
To obtain money-back guarantee return
authorization form, call 1-800-243-3050 for
assistance.
This Clipper has no other user-serviceable parts.
For assistance call 1-800-243-3050.
Assistance
from outlet and Clipper before storing in a
safe, dry location where it will not be crushed,
banged, or subject to damage.
w Do not wrap cord around Clipper when
storing.
w Store cord in a safe location where it will not
be cut or damaged.
w Do not place or store Clipper where it can fall
or be pulled into a tub or sink, water or other
liquid while plugged in.
close to the skin (1/32 in/0.5mm).
Always here to help you
Register your product and get support at
For assistance, visit our website:
9 Insert the notch of the cutting element into
the slot on the swivel head and push until the
cutting element ‘clicks’ into place (Fig. 15).
TIP: Write down the settings you have used to create
a certain hairstyle as a reminder for future clipping
sessions.
wBe careful when you are clipping without a
Corded
If you are not fully satisfied with your Philips Norelco
Clipper send the product back and we’ll refund you the
full purchase price.
The Clipper must be shipped prepaid by insured
mail, insurance prepaid, have the original sales
receipt, indicating purchase price and date of
purchase, and the money-back guarantee return
authorization form enclosed. We cannot be
responsible for lost mail.
The Clipper must be postmarked no later than
45 days after the date of purchase. Philips
Norelco reserves the right to verify the purchase
price of the product and limit refunds not to
exceed suggested retail price.
Online information is available 24 hours a day,
7 days a week.
wUse the Clipper without a comb to clip very
QC5560
6 Clean the cutting element under the tap
or with the brush supplied (Fig. 14).
Make sure the cutting element is thoroughly dry
before reattaching to Clipper.
10 Turn the Clipper off regularly during clipping
and remove the hair comb to blow and/or
shake out hair that has accumulated.
When you remove the comb, the selected setting
does not change.
Contouring without a comb
attachment
Headgroom
5 To contour the neckline and the sideburns,
turn the Clipper and make downward
strokes (Fig. 12).
NOTE: Move the Clipper slowly and smoothly.
Simply follow the natural hairline.
w Clean the Clipper after each use.
w Always switch Clipper OFF, unplug and remove
•
•
use as described in this manual.
wUse and store the Clipper at a temperature
between 40°F and 95°F.
wIf the appliance is subjected to a major change
in temperature, pressure or humidity, let the
Clipper acclimatize for 30 minutes before using.
w If you are clipping someone else's hair, make
sure that the head of the person is at the same
level as your chest so that all parts of his/her
head are clearly visible and within easy reach.
w Only use the appliance on clean, dry hair.
w Do not use on freshly washed hair.
w Before you begin, comb the hair in the direction
of growth (Fig. 1).
w To achieve optimal clipping results, always move
the appliance slowly through the hair against
the direction of hair growth.
13_QC5560.indd 1
4 Turn the Hair Length Setting Adjustment Ring
to set the comb to the desired setting (Fig. 3)
as indicated on the comb (Fig. 4). See Table 1
for settings.
Do not turn the length setting adjustment ring
beyond the highest hair length setting.
2 To contour the hairline around the ears,
comb the hair ends over the ears.
Delivery of refund check will occur 6–8 weeks AFTER
receipt of returned product.
Storage
w Be sure Clipper is turned OFF. Remove cord
1 Remove the comb by pulling it off the
rotating head (Fig. 10).
Never pull at the flexible top of the comb. Always
pull at the bottom part.
1/25/13 1:51 PM
ESPAÑOL
ENGLISH
IMPORTANTE
SEGURIDAD
INSTRUCCIONES
Cuando utilice un artefacto eléctrico siempre
tome medidas de seguridad básicas, entre las que
se incluyen:
Características
1La cortadora debe estar en la posición de
apagado (OFF).
A
B
E
C
F
D
PELIGRO
Para reducir el riesgo de descarga
G
H
A Elemento de corte
B Cabezal giratorio 180°
C Anillo de ajuste para el largo del cabello
D Interrupter de encendido/apagado
E Peine regulare
F Indicador de ajuste de largo
GAdaptador
H Cepillo de limpieza
Garantía total durante dos años
Garantía de devolución del importe de 45 días
CONSERVE ESTAS
INSTRUCCIONES
IMPORTANTE: el conector de
alimentación contiene un transformador.
Para evitar situaciones de riesgo, no lo
sustituya por otro.
Registro
Bienvenido a Philips Norelco. Felicitaciones por
su compra.
Para acceder a los servicios de asistencia técnica
de Philips Norelco, registre su producto en
www.norelco.com/register
5 La punta en forma de flecha de la cortadora
indica el ajuste seleccionado.
Para utilizar la unidad por primera vez, configure la
cortadora en la máxima longitud de corte (5) del
peine común para familiarizarse con el artefacto y
evitar cortar el cabello demasiado corto de forma
accidental. Cuando se familiarice con los ajustes,
configure el selector de longitud de la cortadora
según el largo deseado.
1
2
3
– 5
– 7
– 9
– 11
– 15
– 3 mm
– 5
– 7
– 9
– 11
– 15
4
#1
#2
#3
#4
#5
#1
#2
#3
#4
5
#5
#3
#2
#1
Longitud de
pelo restante
#1
1/8 in./3mm
wUtilice la cortadora sin el peine accesorio para realizar cortes bien al ras (0.5mm - 1/32 pulg).
wTenga cuidado cuando utilice la unidad sin un
peine porque la cortadora cortará todo el
cabello que toque.
1 Tire del peine del cabezal giratorio para extraerlo (Fig. 10).
Tire siempre de la parte inferior, nunca desde la
punta flexible.
2Antes de modelar la zona alrededor de las
orejas, peine las puntas del cabello sobre las
orejas.
3Empuje el interrupter de encendido/apagado
hacia arriba para encender el artefacto.
4Incline la cortadora de forma tal que sólo
uno de los bordes del elemento de corte
toque las puntas del cabello. Solo corte las
puntas. La línea del cabello debe quedar cerca
de la oreja (Fig. 11).
5 Para modelar la nuca y las patillas, gire la cortadora y deslícela hacia abajo (Fig. 12).
NOTA: Mueva la cortadora de forma lenta y
suave. Simplemente siga la línea natural del cabello.
6Ajuste la posición del cabezal giratorio para
facilitar el modelado.
9/32 in./7mm
#3
3/8 in./9mm
#4
#5
90º
0º
45º
7
8
9
10
11
12
– 3 mm
– 5
– 7
7/16 in./11mm
1/2 in./13mm
5/8 in./15mm
Uso del cabezal giratorio
wEn la posición de corte inicial 0˚ (hacia
adelante), gire el cabezal giratorio 45˚ o 90˚
hacia la izquierda o la derecha para ajustar la
posición del elemento de corte a la zona de
corte durante el uso (Fig. 6).
– 3 mm
– 5
– 7
– 9
– 11
– 15
1
13
15
14
1
2
2
Compruébelo usted misma
Como ocurre con muchos productos nuevos,
se necesita tiempo para acostumbrarse a esta
cortadora Philips Norelco. Si es la primera vez
que utiliza una cortadora eléctrica o si ha utilizado
una cortadora de otra marca, tómese el tiempo
necesario para acostumbrarse con el producto.
Su cortadora de cabello ofrece un cabezal de
afeitado giratorio de 180° que le permite recortar
fácilmente hasta las zonas más difíciles de alcanzar.
Olvídese de las tijeras y pruebe la nueva cortadora
de cabello. Le aseguramos resultados precisos y
profesionales. De lo contrario, le devolveremos su
dinero dentro de los 45 días posteriores a la compra.
Corte del cabello
wUtilice esta cortadora para el uso doméstico
que se describe en este manual.
wUtilice y almacene la cortadora a una
temperatura entre 4.5°C o 35°C.
wSi la unidad queda expuesta a un cambio
drástico de temperatura, presión o humedad,
espere 30 minutos antes de utilizarla.
wSi recorta el cabello de otra persona, asegúrese
de que la cabeza de esta se encuentre a la
altura de su pecho, para que todas las zonas se
vean con total claridad y se encuentren dentro
de su alcance.
wUtilice el artefacto solo sobre el cabello limpio
y seco.
wNo utilice la unidad sobre el cabello húmedo
recién lavado.
wAntes de comenzar, peine el cabello según el
sentido de crecimiento de este (Fig. 1).
wPara obtener resultados óptimos en el corte,
siempre mueva el artefacto lentamente por la
cabeza, en sentido contrario al crecimiento del
cabello.
Limpieza
wLimpie la cortadora después de cada uso.
wSiempre apague la cortadora y desenchufe
SUGERENCIA: utilice diferentes ajustes de corte
para crear una transición natural y suave entre los
distintos largos de cabello, desde la nuca hasta la
punta de la cabeza (Fig.5).
•
3/16 in./5mm
#2
•
90º
45º
18
Modelado sin peine accesorio
el cable de alimentación de la unidad y del
tomacorriente antes de limpiarla.
wNo utilice aire comprimido, productos de
limpieza abrasivos, esponjas abrasivas ni
líquidos agresivos como gasolina, acetona o
aceites etéreos para limpiar la cortadora y los
accesorios.
wNunca limpie, reemplace ni extraiga los
accesorios de la cortadora cuando está
encendida.
wPara evitar lesiones, no utilice la cortadora
si las cuchillas o el elemento de corte se
encuentran dañados o rotos.
wPara limpiar el mango de la cortadora, utilice
un paño seco y suave.
6
0º
Peine de
ajuste de
barbero
1 Gire el cabezal giratorio hacia la izquierda o
la derecha hasta la posición de corte deseada.
En todas las posiciones escuchará un «clic»
(Fig. 7).
Siempre gire el cabezal giratorio para ajustar
la posición del elemento de corte. No gire el
elemento de corte ni el peine accesorio.
2 El cabezal giratorio le permite sostener y
utilizar la cortadora como un peine de
modelado (Fig. 8).
No gire el cabezal giratorio más de 90° hacia la
izquierda o la derecha.
3Pulse el botón de encendido/apagado para
encender el artefacto.
4Asegúrese de que la parte plana del peine siempre esté en pleno contacto con el
cuero cabelludo para obtener un resultado
uniforme.
5Como no todos los cabellos crecen en
la misma dirección, mueva la cortadora
lentamente desde la coronilla en diferentes
direcciones (es decir, hacia arriba, abajo y
a lo ancho) para obtener un resultado parejo
(Fig. 9).
6Siempre mueva la cortadora en sentido
contrario al crecimiento del cabello.
7 V
uelva a pasar la cortadora por las zonas ya
recortadas para asegurarse de cortar todo el
pelo que desea.
8A medida que recorta diferentes zonas de la
cabeza, ajuste la posición del cabezal giratorio
para tener mayor comodidad.
9Para obtener mejores resultados en cabellos
rizados, dispares o largos, utilice un peine
de modelado para guiar el cabello hacia la
cortadora.
10 Apague la cortadora regularmente durante el uso y extraiga el peine para soplar o sacudir el cabello acumulado.
Cuando extraiga el peine, la conFig.ción
seleccionada no se modificará.
SUGERENCIA: anote las posiciones de longitud de
corte que ha utilizado para poder volver a crear el
mismo estilo de corte en futuras ocasiones.
13_QC5560.indd 2
Table 1 Configuración de peine
incendios, descargas eléctricas o lesiones:
1.Es necesaria una estricta supervisión cuando
el artefacto es utilizado por personas con
discapacidad y por niños o cerca de ellos.
2.La cortadora ha sido diseñada para uso
doméstico, tal como se describe en este
manual. Sólo utilice accesorios recomendados
por Philips Electronics North America
Corporation.
3.Nunca utilice esta cortadora si el cable o
el conector están dañados, si no funciona
correctamente, si ha sufrido caídas, daños o
si ha sido sumergida en agua. Para obtener
asistencia llame al 1-800-243-3050.
4. No enjuague la cortadora en agua o otro
liquido.
5.Mantenga esta cortadora, el cable de
alimentación y todos los accesorios lejos de
superficies que irradien calor.
6.No deje caer ni introduzca ningún objeto en
las aberturas.
7.No utilice, cargue ni enchufe la cortadora
al aire libre o en lugares donde se utilizan
aerosoles (spray) o se administre oxígeno.
8.Siempre verifique el estado de las cuchillas,
la unidad de corte y el peine antes de usar la
cortadora. Para evitar lesiones, no utilice la
unidad si las cuchillas, la unidad de corte o el
peine se encuentran dañados.
9.Siempre enchufe el conector en la cortadora
en primer lugar y luego en la toma. Para
desconectar la cortadora, coloque el
interruptor de encendido/apagado en la
posición "OFF" y, a continuación, extraiga el
conector de la toma.
10.Para evitar posibles daños en el cable, no lo
enrolle alrededor de la cortadora.
11.Nunca exponga la cortadora a la luz
solar directa ni la guarde en lugares con
temperaturas superiores a 60°C (140°F).
12.Esta cortadora está indicada exclusivamente
para uso en personas. No la utilice para
otros fines.
13.Siempre almacene la cortadora, los
accesorios y el conector de alimentación en
un lugar sin humedad. Asegúrese de que el
cable esté desconectado de la cortadora.
14.Utilice únicamente el conector de
alimentación y los accesorios suministrados
con el artefacto.
Introduzca el conector de la unidad directamente en la cortadora y conecte el adaptador en cualquier toma de 120 V de
CA. Utilice solo el cable suministrado.
4 G
ire el anillo de ajuste para el largo del
cabello para regular el peine (Fig. 3) tal como
lo desea (Fig. 4). Consulte los ajustes en la
Tabla 1.
No gire el anillo de ajuste para el largo del cabello
más allá de la longitud máxima disponible.
eléctrica:
ADVERTENCIA
Para reducir el riesgo de quemaduras,
2
3 Deslice el peine dentro de las ranuras de
guía en ambos lados del cabezal giratorio
de la cortadora y empújelo hasta oír un
«clic» (Fig. 2).
Trabe el peine adecuadamente en la posición
correcta.
Lea las instrucciones antes de utilizar este
producto.
1.No toque una cortadora con cable que haya
caído al agua. Desenchúfela inmediatamente.
2. No la utilice mientras se baña ni en la ducha.
3.No coloque ni guarde la cortadora en un
lugar donde pueda caerse en la bañera o el
lavabo. No sumerja la cortadora ni la deje
caer al agua u otros líquidos.
4.Siempre desconecte la cortadora del
tomacorriente inmediatamente después de
usarla.
5.Desenchufe y extraiga el cable de
alimentación de la cortadora antes de
limpiarla.
Corte de pelo con peine accesorio
Durante el uso:
wPara extraer el cabello recortado acumulado
en el peine, sóplelo, sacúdalo o utilice el cepillo
de limpieza suministrado.
Limpieza del elemento de corte y los
peines después de cada uso:
1Asegúrese de que la cortadora esté apagada
y desenchufada del tomacorriente.
2Extraiga el peine (Fig. 10).
3Sople o sacuda los cabellos que puedan
haberse acumulado en el peine.
4Enjuague el peine con agua corriente
o límpielo con el cepillo de limpieza
suministrado.
5 Ponga su pulgar en el centro del elemento de corte y poner su dedo indice en los
dientes del elemento de corte. Levante el
dedo indice (1) de manera que el elemento
de corte se libera de la cabeza de eslabón
giratorio (2) (Fig. 13).
No deje caer el elemento de corte al suelo.
Almacenamiento
wLa cortadora debe estar apagada. Desenchufe
el cable del tomacorriente y de la cortadora
antes de guardarla en un lugar seguro y seco,
donde no se aplaste, golpee ni pueda sufrir
daños.
wNo enrolle el cable alrededor de la cortadora
cuando la guarde.
wGuarde el cable en un lugar seguro donde no
sufra cortes ni daños.
wNo coloque ni guarde la cortadora en un lugar
donde pueda caerse en la bañera, el lavabo, el
agua o en otro tipo de líquidos mientras está
enchufada.
Garantía total durante dos años
Philips Electronics North America Corporation garantiza cada nuevo
producto Philips Norelco, modelo QC5560 (excepto cuchillas y peine)
contra defectos de materiales o de fabricación durante un período de dos
años desde la fecha de compra, y se compromete a reparar o sustituir sin
cargo cualquier producto defectuoso.
IMPORTANTE:esta garantía no cubre los daños provocados por
accidentes, uso inapropiado o maltrato, falta de mantenimiento razonable,
uso de accesorios no suministrados con el producto, pérdida de piezas
o uso del artefacto con un voltaje distinto del especificado.* El uso de
piezas de repuesto no autorizadas anulará esta garantía.
PHILIPS ELECTRONICS NORTH AMERICA CORPORATION
NO PAGARÁ LAS REPARACIONES REALIZADAS POR UN
SERVICIO TÉCNICO NO AUTORIZADO NI REEMBOLSARÁ
AL CONSUMIDOR POR LOS DAÑOS DERIVADOS DE TALES
REPARACIONES.
LA EMPRESA NO SE ASUME RESPONSABILIDAD ALGUNA POR
NINGÚN DAÑO ESPECIAL, ACCIDENTAL NI EMERGENTE.
Para obtener el servicio de garantía, simplemente ingrese en www.philips.
com o comuníquese al 1-800-243-3050 para solicitar asistencia. Para su
protección, se recomienda enviar el producto por correo asegurado y
seguro prepago. La garantía no cubrirá los daños que ocurran durante el
envío NOTA: Philips Electronics North America Corporation no autoriza
ninguna otra garantía escrita o verbal. Esta garantía le otorga derechos
legales específicos sin perjuicio de la existencia de otros derechos
que pueden variar de un estado a otro. Algunos estados prohíben la
exclusión o limitación de daños incidentales o emergentes, por lo que las
limitaciones y exclusiones anteriores pueden quedar sin efecto.
*Lea atentamente las instrucciones adjuntas.
Fabricado para:
Philips Consumer Lifestyle
Una división de Philips Electronics North America Corporation
P.O. Box 10313, Stamford, CT 06904
Este símbolo en la placa del nombre del producto indica que
está registrado en Underwriters' Laboratories, Inc.
Norelco es una marca comercial registrada de Philips Electronics
North America Corporation.
PHILIPS es una marca registrada de Koninklijke Philips Electronics N.V.
© 2013 Philips Electronics North America Corporation. Todos los
derechos reservados.
GARANTÍA DE
DEVOLUCIÓN DE
DINERO POR 45 DÍAS.
Si no está satisfecho con los resultados de su cortadora
Philips Norelco, puede devolver el producto y le
reembolsaremos el importe que pagó.
La cortadora se debe enviar prepagada por
medio de correo certificado, prepago de seguros,
con el recibo de venta original, indicando el
precio de compra y la fecha de compra y el
formulario adjunto de autorización de reembolso
garantizado del dinero. No nos hacemos
responsables por correo extraviado.
La fecha de envío de la cortadora no debe
superar los 45 días posteriores a la compra.
Philips Norelco se reserva el derecho de verificar
el precio de compra del producto y limitar
los reembolsos para que no superen el precio
minorista sugerido.
Para obtener el formulario de autorización de
garantía de devolución del importe, comuníquese
al 1-800-243-3050.
La entrega del cheque con el reembolso se realizará de 6
a 8 semanas DESPUÉS del recibo del producto devuelto.
6Limpie el elemento de corte bajo agua
corriente o con el cepillo suministrado
(Fig. 14).
Asegúrese de que el elemento de corte esté
completamente seco antes de volver a colocar la
cortadora.
7Limpie el interior del cabezal giratorio bajo el
agua corriente o con el cepillo suministrado.
8Limpie el mango y el adaptador con el cepillo de limpieza o con un paño seco.
9Inserte la orejeta del elemento de corte en
la ranura en el cabezal giratorio y presione
hasta ír un clic (Fig. 15).
Esta cortadora no contiene ninguna otra pieza que
pueda ser reparada por el usuario. Para solicitar
asistencia, llame al 1-800-243-3050.
Ayuda
Para obtener asistencia, ingrese en nuestro sitio
web:
www.philips.com/support o
llame al número gratuito: 1-800-243-3050
La información en línea está disponible las 24
horas, los 7 días de la semana.
1/25/13 1:51 PM