1
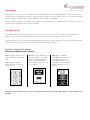
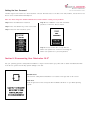
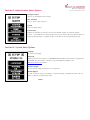
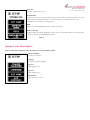
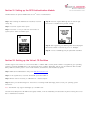
The DL3 User Guide
Introduction
Congratulations on your purchase of the DataLocker DL3™Encrypted Hard Drive. The DataLocker DL3™ stands alone as the only
external hard drive equipped with a patented, on board, LCD touch screen. This feature allows the user to conveniently perform all
processes directly through the LCD Interface, making it truly 100% platform independent.
Although the DataLocker DL3™ is extremely user friendly, it is recommended that you review this guide to ensure you become fully
acquainted with the DataLocker DL3™ and all its features.
Getting Started
The DataLocker DL3™ has a minimum power requirement of 5 Volts and 1A of current that is drawn from the USB port. The
DataLocker DL3™ utilizes 256 bit AES encryption operating in XTS mode to fully encrypt your drive’s contents.
The DataLocker DL3™ comes preformatted with Windows NFTS file system. All major file systems are supported (HFS, NTFS, EXT,
FAT). Please consult your operating system for initialization and formatting instructions.
Section I: Setting Passwords
Setting the Administrative Password
Step 1: Connect the DL3 to your
computer with the included USB
Cable
Step 2: Enter the default
password “000000” and press
the return key.
Step 3: Press the “SETUP” key on
the touch screen. If the “SETUP”
key is not selected within 3
seconds, the DataLocker DL3™
will automatically connect to the
host computer.
Step 4: Press “CHANGE
PASSWORD” and follow the
onscreen instructions. It is
recommended that you use a
combination of both alpha and
numeric characters for your
password.
WARNING: Your password cannot be reset or recovered without losing all the stored data. Make sure you remember your
password.
Setting the User Password
The DL3 supports the creation of a “User Password”. The user will have access to all data on the drive; however, the user will not be
able to access certain Administrative Options.
Note: You must change the default Administrator Password before creating a user password.
Step 1: Enter the Administrator Password.
Step 4: Press “CREATE”. A user with the default
password of “000000” will be created.
Step 2: Press the “SETUP” key on the touch screen.
Step 3: Select the “User Password” option
Step 5: The user should then re-login with the
default user password of “000000” and change the
default user password to a personal password.
Section II: Disconnecting Your DataLocker DL3™
Use your operating system’s “Safely Remove Hardware” or “Eject” function before you power down or detach the DataLocker DL3™
from the host system. This will help prevent damage to the disk.
Windows Users
Left click the “Safely Remove Hardware” icon located on the right side of the tool bar.
MAC Users
Click the eject button that corresponds with the DataLocker DL3™ on your MAC operating
system.
Section III: Administrative Menu Options
Change Password
Used to set the Administrator Password
User Password
Used to create a User Password
System
Enter the System Menu
Self Destruct
Enables the Self Destruct Function and sets the maximum number of password attempts
counter. The “Self Destruct” feature prevents brute force attacks. Once the defined number of
failed password attempts is reached, all data on the DL3 will be irrecoverably destroyed.
Section IV: System Menu Options
Language
Set the menu language
Virtual CD
The DL3 supports the creation of an UNENCRYPTED Read Only partion which is recognized as
a CD-ROM. The Virtual CD is created by using the VCD Utility availabe on the
www.datalockerdrive.com website.
Password Length
Set the minimum length requirement for the password.
Random Keypad
In order to prevent finger print reading or “shoulder hacking”, the DataLocker DL3™ has the
ability to generate rotating numeric keys.
Menu 1
Key Tone
Turn the keypad tone on / off
Zeroize Drive
Initiates the destruction of all encryption keys and user passwords, making the data on the drive
unretrievable. The DL3 will be reset to factory original state. The DL3 will need to be
reinitialized and formatted to be redeployed.
RFID
Enters the optional RFID Authentication module setup menu.
Data Locker Link
Enable the DL Link remote management system. For more information about this feature, please
contact us directly at www.datalockerdrive.com
Menu 2
Section V: User Menu Options
Users created by the administror will only have access to the following options:
Change Password
Set the user password.
Language
Set the menu system language.
Key Tone
Enable keypad tones.
Key Tone
Enable keypad tones.
LCD Contrast
Adjust the screen contrast.
Section VI: Setting up the RFID Authentication Module
The DL3 features an optional RFID module for a 2nd factor of authentication.
Step 1: After entering the Administrator Password, touch the
“Setup” key
Step 4: Place the supplied RFID tag near the bottom right
hand corner of the DL3 until you hear a “beep”.
Step 2: Touch the “System” menu option.
Step 3: Touch the “=>” key to enter the second menu of
system options. Select the “RFID” option.
Step 5: After registering, the RFID tag value will be displayed.
Record this number in case the tag is lost or damaged.
Step 6: A total of 3 RFID tags may be paired with each DL3.
Section VII: Setting up the Virtual CD Partition
The DL3 supports the creation of custom “Virtual CDs” or VCD. A VCD is a drive partition which is recognized by your operating
system as a physical CD-ROM with its own unique drive letter. A VCD is “Read Only” and can only be overwritten with the VCD
Utility. VCD are commonly used to store virtual machines, documentation, and executable programs.
Step 1: Download the VCD Creation utility from www.datalockerdrive.com
Step 2: In the System menu, touch the “Virtual CD” option and enable it.
Step 3: Extract and run the utility on a Windows XP + based computer.
Step 4: Select your ISO drive image. For instructions on creating an ISO disk image, please consult your operating system
instructions.
Note: The DL3 will only support ISO images up to 4.7GB in size.
The new Virtual CD partition will NOT be encrypted; however, it will be “Read Only” and accessible only after entering the correct
User or Administrator Password.
FCC DECLARATION OF CONFORMANCE
This device complies with Part 15 of the FCC Rules. Operation is subject to the following two conditions: (1) This device may not cause harmful interference, and
(2) this device must accept any interference received, including interference that may cause undesired operation.
NOTE: This equipment has been tested and found to comply with the limits for a Class B digital device, pursuant to Part 15 of the FCC Rules. These
limits are designed to provide reasonable protection against harmful interference in a residential installation. This equipment generates, uses and can
radiate radiofrequency energy and, if not installed and used in accordance with the instructions, may cause harmful interference to radio
communications. However, there is no guarantee that interference will not occur in a particular installation. If this equipment does cause harmful
interference to radio or television reception, which can be determined by turning the equipment off and on, the user is encouraged to try to correct the
interference by one or more of the following measures:
• Reorient or relocate the receiving antenna
• Increase the separation between the equipment and receiver
• Connect the equipment into an outlet on a circuit different from that to which the receiver is connected to
• Consult the dealer or an experienced radio/TV technician for help
DATA LOCKER WARRANTY, DISCLAIMER OF WARRANTY
LIMITED DEVICE WARRANTY. Data Locker warrants our Product to be free of any defects in materials or workmanship that would prevent the Data Locker product
from performing to the published hardware specifications for one (1) year from the date of purchase.
If any Data Locker Device Product fails to so conform, or proves to have any such defects during said one (1) year period, Data Locker, at its option, will provide
a new or refurbished Data Locker Product at no charge to you. The foregoing warranty (i) applies only to the original user with proof of purchase, and (ii) will
not apply to Data Locker Products that have been damaged as a result of negligent handling, modification, disassembly or misuse.
Data Locker's products are not warranted to operate without failure.
Data Locker products should only be incorporated in systems designed with appropriate redundancy, fault tolerance or back-up features. Accordingly, Data Locker
does not recommend the use of Data Locker products in life support systems or other applications where failure could cause injury or loss of life. Therefore if
you decide to use Data Locker products in life support
applications you assume all risk of such use and indemnify Data Locker, Data Locker employees, Data Locker investors against all potential damages and liabilities.
LIMITATION OF OUR WARRANTY. EXCEPT AS EXPLICITLY SET FORTH ABOVE, THE DATA LOCKER PRODUCT IS PROVIDED "AS-IS" AND DATA LOCKER MAKES
AND YOU RECEIVE NO WARRANTY (EXPRESS, IMPLIED OR STATUTORY) WITH RESPECT TO THE DATA LOCKER PRODUCT. DATA LOCKER EXPRESSLY
DISCLAIMS ALL WARRANTIES OF MERCHANTABILITY, FITNESS FOR A PARTICULAR PURPOSE AND NONINFRINGEMENT. YOU UNDERSTAND AND ACKNOWLEDGE
THAT, EXCEPT AS EXPLICITLY SET FORTH ABOVE, DATA LOCKER DOES NOT WARRANT THAT THE DATA LOCKER PRODUCT WILL MEET YOUR REQUIREMENTS,
OR THAT OPERATION OF THE DATA LOCKER PRODUCT WILL BE UNINTERRUPTED OR ERROR FREE. NO ORAL OR WRITTEN INFORMATION OR ADVICE GIVEN BY
DATA LOCKER, ITS EMPLOYEES, DISTRIBUTORS, DEALERS OR AGENTS SHALL CREATE ANY WARRANTY OF ANY KIND. SOME STATES DO NOT ALLOW THE
EXCLUSION OF IMPLIED WARRANTIES, SO THE ABOVE EXCLUSION MAY NOT APPLY TO YOU. IN THAT EVENT, ANY IMPLIED WARRANTIES ARE LIMITED IN
DURATION TO ONE (1) YEAR FROM THE DATE OF
PURCHASE OF THE DATA LOCKER PRODUCT. THIS WARRANTY GIVES YOU SPECIFIC LEGAL RIGHTS. LIMITATION ON INTERNATIONAL USE. DATA LOCKER DOES
NOT MAKE ANY REPRESENTATION THAT ANY CONTENT OR USE OF THE DATA LOCKER PRODUCT IS APPROPRIATE OR AVAILABLE FOR USE IN
LOCATIONS OUTSIDE OF THE UNITED STATES OR WHERE IT IS ILLEGAL OR PROHIBITED BY LAW.