1
ESPAÑOL
, Distinguido cliente
es
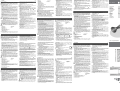
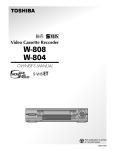
7 Pulsador de aire frío
Le felicitamos por haber elegido un producto de la marca SOLAC.
Nuestros productos se diseñan y fabrican para satisfacer ampliamente
las expectativas de nuestros clientes más exigentes durante mucho
tiempo. Los electrodomésticos SOLAC, además, proporcionan la
tranquilidad de haber superado las más exigentes normas de calidad y
seguridad.
Electrodomésticos SOLAC, en su afán de mejora continua, se reserva el
derecho a introducir modificaciones sin previo aviso.
• Lea completamente estas instrucciones antes de utilizar su aparato.
• Este manual es parte integrante del producto. Consérvelo en un
lugar seguro para futuras consultas.
• Este aparato es sólo para uso doméstico, no industrial. Cualquier uso
diferente al indicado podría ser peligroso.
• Los niños deberían ser supervisados para asegurar que no juegan con
el aparato.
• Este aparato no está destinado para ser utilizado por personas
(incluidos niños) cuyas capacidades físicas, sensoriales o mentales
estén reducidas, o carezcan de experiencia o conocimiento, salvo si
han tenido supervisión o instrucciones relativas al uso del aparato por
una persona responsable de su seguridad.
• No realice ninguna modificación ni reparación en el aparato. Ante
cualquier anomalía en el cable u otra parte del aparato, no lo use y
acuda a un servicio de asistencia autorizado.
• Si el cable de alimentación está dañado, debe ser sustituido por el
fabricante, por su servicio post-venta o por personal cualificado similar
con el fin de evitar un peligro.
• No utilice piezas o accesorios no suministrados o recomendados por
SOLAC.
• Antes de enchufar el aparato a la red eléctrica, compruebe que el
voltaje indicado coincide con el de su hogar.
• Desenchufe el aparato siempre después de su uso y antes de
desmontar o montar piezas y realizar cualquier tarea de mantenimiento
o limpieza. Desenchúfelo también en caso de apagón. Cuando enchufe
o desenchufe el aparato, debe estar desconectado.
• No tire nunca del cable ni cuelgue el aparato por él. Desenchufe el
aparato tirando siempre de la clavija, nunca del cable.
No debe utilizar el secador de pelo cerca de bañeras, lavabos,
duchas u otros recipientes que contengan agua. Si cayera al
agua, NO intente cogerlo. Desenchúfelo inmediatamente.
No introduzca nunca el aparato en agua u otro líquido, ni en el
lavavajillas. No permita que el aparato entre en contacto con el
agua durante su limpieza.
Evite posibles salpicaduras en el aparato o cable de conexión.
• No deje el aparato expuesto a agentes atmosféricos.
• No toque el aparato con las manos húmedas cuando esté en
funcionamiento.
• Nunca deje el aparato funcionando sobre una superficie o trapo
húmedo.
• Si utiliza el secador en el cuarto de baño, desenchúfelo después de su
uso ya que la proximidad del agua puede presentar un peligro incluso
cuando el secador está desconectado.
• Para una mayor protección complementaria, se recomienda instalar en
el circuito eléctrico que alimenta el cuarto de baño, un dispositivo de
corriente diferencial residual (RCD) que no exceda de 30mA. Solicite
consejo a un instalador.
¡¡ATENCIÓN!!: Cuando desee desprenderse del aparato,
NUNCA lo deposite en la basura, sino que acuda al PUNTO
LIMPIO o de recogida de residuos más cercano a su domicilio,
para su posterior tratamiento. De esta manera, está
contribuyendo al cuidado del medio ambiente.
d
b
2 Descripción
Partes principales
Cuerpo principal
Cable de conexión a la red
Tapa de entrada de aire
Salida de aire
Mandos e indicadores
5 Selector de temperatura (3 posiciones)
6 Pulsador de puesta en marcha y regulador de caudal de aire
(2 posiciones)
DEUTSCH
, Werte Kundin/Werter Kunde
Herzlichen Glückwunsch zum Kauf eines Produktes aus dem Hause SOLAC.
Design und Herstellung unserer Produkte sind darauf ausgerichtet, die
Erwartungen
unserer
anspruchsvollsten
Kunden
für
viele
Jahre
zufriedenzustellen. Überdies erfüllen die Haushaltsgeräte von SOLAC die
strengsten Qualitäts- und Sicherheitsnormen.
Im Bemühen um eine ständige Verbesserung seiner Produkte behält sich
Electrodomésticos SOLAC das Recht vor, Änderungen ohne vorherige Ankündigung
vorzunehmen.
1 Sicherheitshinweise
• Lesen Sie diese Anweisungen vor Inbetriebnahme des Geräts gründlich
durch.
• Diese Bedienungsanleitung ist Bestandteil des Produkts. Bewahren Sie
sie an einem sicheren Ort zum späteren Nachlesen auf.
• Dieses Gerät ist ausschließlich für den Hausgebrauch und nicht für den
gewerblichen Gebrauch bestimmt. Jede andere Verwendung als vorgesehen
kann gefährlich sein.
• Lassen Sie Kinder nicht mit diesem Gerät spielen.
• Dieses Gerät ist nicht für den Gebrauch durch Personen (einschließlich
Kindern) mit einer körperlichen, sensitiven oder geistigen Behinderung oder
durch Personen, die nicht über die notwendige Erfahrung oder Kenntnisse
verfügen, geeignet, es sei denn, sie werden von der für ihre Sicherheit
zuständigen Person beaufsichtigt bzw. in die Benutzung des Gerätes
eingewiesen.
• Nehmen Sie keine Änderungen oder Reparaturen am Gerät vor. Benutzen
Sie das Gerät im Falle eines Defektes am Netzkabel oder einem anderen
Geräteteil nicht, sondern bringen Sie es zu einem autorisierten
Kundendienst.
• Sollte das Netzkabel beschädigt sein, darf es vorsichtshalber nur vom
Hersteller, einem autorisierten Kundendienst oder ähnlichem Fachpersonal
ausgetauscht werden, um Gefahren zu vermeiden.
• Verwenden Sie ausschließlich von SOLAC gelieferte oder empfohlene Teile
bzw. Zubehör.
• Vergewissern Sie sich vor dem Netzanschluss des Gerätes, dass die
angegebene Netzspannung mit jener Ihres Haushalts übereinstimmt.
• Trennen Sie das Gerät nach dem Gebrauch, vor dem Abnehmen bzw.
Aufsetzen eines Teils sowie vor jeder Reinigung oder Wartung stets vom
Netz. Bei Stromausfall ebenfalls vom Netz trennen. Das Gerät muss
ausgeschaltet sein, wenn Sie es an das Netz anschließen oder vom Netz
trennen.
• Ziehen Sie nicht am Kabel bzw. hängen Sie das Gerät nicht am Kabel auf.
Ziehen Sie stets am Stecker, nicht am Kabel, wenn Sie das Gerät vom Netz
trennen.
Der Haartrockner darf nicht in der Nähe von Badewannen,
Waschbecken, Duschen oder sonstigen Behältern mit Wasser
verwendet werden. Sollte das Gerät ins Wasser gefallen sein,
versuchen Sie NICHT, es herauszunehmen. Ziehen Sie sofort den
Netzstecker. Das Gerät nicht in Wasser oder andere Flüssigkeiten
tauchen und nicht in der Spülmaschine reinigen. Während der
Reinigung darf das Gerät nicht mit Wasser in Berührung kommen.
Schützen Sie das Gerät bzw. Netzkabel vor Wasserspritzern.
• Das Gerät nicht der Witterung aussetzen.
• Das Gerät während des Betriebs nicht mit feuchten Händen berühren.
• Legen Sie das eingeschaltete Gerät niemals auf eine feuchte Unterlage oder
ein feuchtes Tuch.
• Ziehen Sie nach der Verwendung den Netzstecker, wenn Sie den
Haartrockner im Bad benutzen. Die Nähe zum Wasser stellt auch bei
ausgeschaltetem Gerät eine Gefahr dar.
• Als zusätzlichen Schutz empfehlen wir die Installation einer
Fehlerstromschutzeinrichtung (RCD) mit einem Bemessungsstrom von
maximal 30mA im Stromkreis, der das Badezimmer versorgt. Wenden Sie
sich hierfür an einen Installateur.
ACHTUNG: Das Gerät KEINESFALLS über den Hausmüll entsorgen,
sondern zum nächstgelegenen WERTSTOFFHOF oder zur
Abfallannahmestelle zur Weiterverwertung bringen. So leisten Sie
einen Beitrag zum Umweltschutz.
d
b
2 Beschreibung
Hauptbestandteile
1 Gehäuse
2 Netzkabel
3 Abdeckung Lufteintritt
4 Luftaustritt
de
Schalter und Anzeigen
5 Temperaturwahlschalter (3 Stufen)
6 EIN-Taste und Luftstromregler (2 Stufen)
7 Taste für Kaltluft
Zubehör
8 Zentrierdüse
9 Diffusoraufsatz
Schutz vor Überhitzung
) Dieses
Gerät ist mit einem Thermostat, der bei Überhitzung die Temperatur
regelt, ausgestattet (wenn Lufteintritt oder -austritt verstopft sind). Trennen Sie in
diesem Fall das Gerät vom Netz und warten Sie 5 Minuten. Entfernen Sie die
Verstopfungsursache und schließen Sie das Gerät wieder an.
Elektrische Daten
• Netzspannung: 220-240V, 50/60Hz
• Nennleistung: 2000W
3 Verwendung
) Dieses Gerät ist zum Trocknen, Stylen und Hydrieren des Haares vorgesehen.
n Vergewissern Sie sich vor dem Anschluss des Gerätes an das Netz, dass
Ihre Hände sowie das Gerät vollständig trocken sind.
n ACHTUNG: Das Gerät nicht in der Nähe von Wasser verwenden.
n Stellen Sie sicher, dass der Lufteintritt und -austritt nicht verstopft sind.
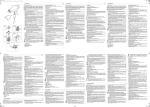
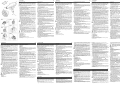
1 Setzen Sie je nach Wunsch die Zentrierdüse (8) oder den Diffusor (9) auf.
Setzen Sie das gewünschte Zubehörteil auf den Luftaustritt auf (Abb. 1)
2 Schließen Sie den Haartrockner ans Netz an und stellen Sie den
-Max. (Abb.
Luftstromregler (6) auf die gewünschte Stufe: 0 -Aus, -Min.,
2).
3 Stellen Sie den Temperaturwahlschalter (5) auf die gewünschte Stufe (Abb.
3): 0 – niedrigste Temperatur, I – mittlere Temperatur, II – höchste
Temperatur.
4 Befolgen Sie die Anweisungen zum Trocknen des Haares je nach
verwendetem Zubehörteil.
5 Möchten Sie einen Luftstrom ohne Hitze, so drücken Sie die Kaltlufttaste (7).
6 Stellen Sie den Luftstromregler (6) nach der Verwendung des Haartrockners auf
O.
Verwendung der Zentrierdüse (8)
) Mit
der Profi-Zentrierdüse (8) können Sie den Luftstrom auf eine bestimmte
Haarpartie richten, z.B. auf den Ansatz für einen tollen Glatteffekt oder auf die
Rundbürste für fülliges Volumen.
Für ein superglattes Ergebnis ohne Volumen am Ansatz empfehlen
professionelle Stylisten, den Heißluftstrom vom Ansatz zu den Spitzen hin zu
richten. So wird die Schuppenschicht versiegelt und unerwünschte Kräuselungen
vermieden.
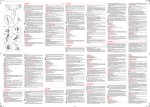
1 Richten Sie den Luftstrom auf die gewünschte Stelle (Abb. 4).
Verwendung des Diffusoraufsatzes (9)
1 Tragen Sie nach dem Haarewaschen wie gewohnt Haarschaum oder –gel
auf.
2 Legen Sie die Haare auf den Diffusor und bewegen Sie diesen langsam in
kreisförmigen Bewegungen (Abb. 5).
, Tipp vom Stylisten:
• Für definiertere Locken halten Sie den Diffusor so nahe wie möglich an die
Kopfhaut, so dass die Locken beim Trocknen in Form gelegt werden.
• Stellen Sie den Luftstromregler (6) auf Stufe
, um eine natürliche
Lockenformung ohne Kräuseln zu erzielen.
Verwendung der Kaltlufttaste (7)
) Nach dem Stylen mit dem Heißluftstrom fixiert der Kaltluftstrom die Frisur und
verleiht dem Haar seidigen Glanz. Profis empfehlen, für mehr Halt und Dauer
stets mit Kaltluft abzuschließen.
1 Nach dem Trocknen und Formen der Strähne schalten Sie für ein perfektes
Ergebnis ca.15-20 Sekunden auf Kaltluft (7) um.
4 Reinigung und Aufbewahrung
) Das
8 Concentrador
9 Difusor
Seguridad contra sobrecalentamientos
) Este aparato está equipado con un termostato que regula la temperatura
en caso de sobrecalentamiento (si la entrada o salida de aire quedan
bloqueadas). Si esto ocurriera, desconecte el aparato y espere durante 5
minutos. Elimine la causa del bloqueo y vuelva a conectar el aparato.
Características eléctricas
1 Indicaciones de Seguridad
1
2
3
4
Accesorios
Gerät muss vor jeder Reinigung vollständig ausgekühlt sein.
Keine
Lösungs-, Reinigungs- oder Scheuermittel verwenden.
1 Gerät vom Netz trennen.
2 Mit einem trockenen Tuch reinigen.
3 Sollte der Lufteintritt verstopft sein, reinigen Sie ihn.
Dazu drehen Sie die Kappe kräftig gegen den Uhrzeigersinn und nehmen sie
ab (3) (Abb. 6).
4 Reinigen Sie die Kappe (3) mit einer kleinen Bürste.
5 Setzen Sie die Kappe wieder auf den Lufteintritt (3). Hierzu lassen Sie
Ansätze der Kappe in die Kerben des Gehäuses einrasten und drehen die
Kappe im Uhrzeigersinn.
) Verwenden Sie den Haartrockner niemals ohne korrekt aufgesetzte Kappe.
• Tensión de alimentación: 220-240V, 50/60Hz
• Potencia consumida: 2000W
3 Utilización
) Este aparato ha sido diseñado para secar, moldear e hidratar el cabello.
n Antes de enchufar el aparato a la red, asegúrese de que sus manos
y el aparato están completamente secos.
n ATENCIÓN: no utilice el aparato cerca del agua.
n Asegúrese de que la entrada y salida de aire no están obstruidas.
1 Si lo desea, coloque el concentrador (8) o el difusor (9). Para ello
coloque el accesorio sobre la salida de aire (fig. 1)
2 Enchufe el aparato a la red y coloque el regulador de caudal de aire (6) en
la posición deseada: 0-apagado, -velocidad mínima,
-velocidad
máxima (fig. 2).
3 Coloque el selector de temperatura (5) en la posición deseada (fig. 3):
0- calentamiento mínimo, I- calentamiento medio, II-calentamiento
máximo.
4 Siga las indicaciones de secado según el accesorio utilizado.
5 Si desea aire sin calentar, pulse el pulsador de aire frío (7).
6 Cuando termine de utilizar el secador, coloque el regulador de caudal
de aire (6) en la posición 0.
Uso del concentrador (8)
) El concentrador de aire profesional (8) le permitirá orientar el flujo de aire
sobre un punto determinado, por ejemplo sobre la raíz para conseguir un
efecto liso o sobre el cepillo redondo para conseguir volumen.
Los profesionales aconsejan orientar el flujo de aire caliente desde la raíz
hacía las puntas cuando se persigue un look muy liso y sin volumen en
la raíz. Esta orientación del aire favorece el sellado de la cutícula y evita
el encrespamiento.
1 Dirija el flujo de aire hacia el lugar deseado (fig. 4).
Uso del difusor (9)
1 Después de lavar el pelo aplique su espuma/gel habitual.
2 Introduzca el pelo dentro del difusor. Mueva el difusor lentamente de
forma circular (fig. 5).
, Los profesionales aconsejan:
• Para un rizo más definido acerque el difusor lo máximo posible a la
cabeza, de manera que el rizo quede plegado mientras lo seca.
• Emplee el regulador de caudal de aire (6) en la posición
para
favorecer la formación natural del rizo sin encresparlo.
Utilización del pulsador de aire frío (7)
) El aire frío fija el peinado conseguido con el calor, y aporta brillo al
peinado. Los profesionales recomiendan su uso para conseguir un
peinado más duradero.
1 Una vez haya secado y fijado la forma del mechón, pulse el aire frío
(7) durante 15 o 20 segundos para un resultado perfecto.
4 Limpieza y Conservación
) Limpie el aparato sólo cuando esté frío. No utilice disolventes,
detergentes ni productos abrasivos.
1 Desenchufe el aparato.
2 Utilice un paño seco.
3 Si se bloqueara la entrada de aire, proceda a su limpieza.
Para ello gire con fuerza la tapa en sentido contrario a las agujas del
reloj y extraiga la tapa (3) hacia fuera (fig. 6).
4 Limpie la tapa (3) con un cepillo pequeño.
5 Coloque de nuevo la tapa de entrada de aire (3). Para ello haga
coincidir las pestañas de la tapa con los orificios del cuerpo y gire la
tapa en el sentido de las agujas del reloj.
) No utilice el secador sin la tapa de entrada de aire colocada
correctamente.
PORTUGUÊS
, Caro cliente
Parabéns por ter escolhido um produto da marca SOLAC. Os nossos produtos
são desenhados e fabricados para satisfazer ampliamente as expectativas dos
nossos clientes mais exigentes durante muito tempo.
Além disso, os
electrodomésticos SOLAC proporcionam a tranquilidade de ter superado as mais
exigentes normas de qualidade e segurança.
Electrodomésticos SOLAC, em seu afã de melhora contínua, se reserva o direito
de introduzir modificações sem aviso prévio.
1 Indicações de segurança
• Leia completamente estas instruções antes de utilizar o aparelho.
• Este manual é parte integrante do produto. Guarde-o em lugar seguro
para eventual consulta posterior.
• Este aparelho destina-se apenas à utilização doméstica, não industrial.
Qualquer utilização diferente da indicada poderia ser perigosa.
• Deve evitar-se que as crianças brinquem com este aparelho.
• Este aparelho não é indicado para utilização por parte de pessoas (crianças
incluídas) com alguma limitação física, sensitiva ou mental, nem por pessoas
sem a experiência ou conhecimentos necessários, a menos que a pessoa
responsável pela sua segurança os supervisione ou lhes proporcione
instruções sobre a utilização do aparelho.
• Não realize qualquer modificação nem reparação no aparelho. Perante
qualquer anomalia no cabo ou outra parte do aparelho, não o utilize e
contacte um serviço de assistência autorizado.
• Se o cabo de alimentação estiver danificado, deve ser substituído pelo
fabricante, pelo seu serviço de pós-venda ou por pessoal semelhante
qualificado com o fim de evitar riscos.
• Não utilize peças ou acessórios que não tenham sido fornecidos ou
recomendados pela SOLAC.
• Antes de ligar o aparelho à rede eléctrica, verifique se a voltagem indicada
coincide com a da residência.
• Desligue o aparelho sempre depois da utilização e antes de desmontar ou
montar peças e realizar qualquer tarefa de manutenção ou limpeza.
Desligue-o também em caso de corte de energia. Quando ligar ou desligar o
aparelho da tomada, deve estar desligado.
• Nunca puxe pelo cabo nem segure o aparelho através dele. Desligue o
aparelho da tomada puxando sempre pela ficha, nunca pelo cabo.
Não deve utilizar o secador de cabelo perto de banheiras, lavatórios,
duches ou outros recipientes que contenham água. Se cair na água,
NÃO tente apanhá-lo. Desligue-o imediatamente. Não coloque nunca
o aparelho na água ou em outro líquido, nem no lava-loiça. Não permita
que o aparelho esteja em contacto com a água durante a sua limpeza.
Evite possíveis salpicos no aparelho ou no cabo de ligação.
• Não deixe o aparelho exposto a agentes atmosféricos.
• Não toque no aparelho com as mãos húmidas quando este estiver a
funcionar.
• Nunca deixe o aparelho a funcionar sobre uma superfície ou um pano
húmido.
• Se utilizar o secador na casa de banho, desligue-o depois de utilizá-lo, uma
vez que a proximidade da água representa um perigo, inclusive quando o
secador está desligado.
• Para uma maior protecção complementar, recomendamos que se instale no
circuito eléctrico que alimenta a casa de banho um dispositivo de corrente
diferencial residual (DDR) que não exceda 30mA. Solicite conselho a um
instalador.
ATENÇÃO!!: Quando pretender desfazer-se do aparelho, NUNCA o
deite no caixote do lixo, faça-o no seu ECOPONTO ou no ponto de
recolha de resíduos mais perto de sua casa, para o seu posterior
tratamento. Desta forma, está a contribuir para a protecção do meio
ambiente.
d
b
2 Descrição
Partes principais
1 Corpo principal
2 Cabo de ligação à rede
3 Tampa de entrada de ar
4 Saída de ar
Comandos e indicadores
5 Selector de temperatura (3 posições)
6 Botão para ligar e regular o caudal do ar (2 posições)
ITALIANO
, Stimato Cliente,
Congratulazioni per aver scelto un prodotto SOLAC. I nostri prodotti vengono
progettati e costruiti allo scopo di soddisfare appieno e durevolmente le
aspettative dei nostri clienti più esigenti. Inoltre, gli elettrodomestici SOLAC
offrono la garanzia della conformità con le più rigorose norme di sicurezza e
qualità.
Nel perseguire la sua politica di miglioramento continuo, Electrodomésticos
SOLAC si riserva il diritto di apportare modifiche senza alcun preavviso.
1 Indicazioni di sicurezza
• Leggere con attenzione le presenti istruzioni prima di utilizzare l'apparecchio.
ENGLISH
, Dear Customer
en
We congratulate you on choosing a SOLAC product. Our products are
designed and manufactured with a view to comfortably meeting the
expectations of our most demanding customers for a long time. You can
feel safe with SOLAC electrical appliances in the knowledge that they
comply with the strictest standards of quality and safety.
In its desire for ongoing improvement, SOLAC reserves the right to
introduce modifications without prior notice.
6 On/Off and airflow control button (2 positions)
7 Cold air button
Attachments
8 Concentrator
9 Diffuser
Overheat protection
) This device has a thermostat that regulates the temperature to prevent it
from overheating (if the air intake or outlet are blocked). If this happens,
disconnect the device and wait for five minutes. Remove the cause of the
obstruction, and switch the appliance back on.
1 Safety Instructions
• Read these instructions fully before using the appliance.
• This manual is an integral part of the product. Keep it in a safe
place for future reference.
• This appliance is for domestic use only, not industrial. Any use other
than specified could be dangerous.
• Children should be supervised to ensure that they do not play with the
appliance.
• This appliance is not intended for use by persons (including children)
with reduced physical, sensory or mental capabilities, or lack of
experience and knowledge, unless they have been given supervision or
instructions concerning use of the appliance by a person responsible for
their safety.
• Do not modify or repair the appliance in any way. If you detect any
anomalies in the cord or any other part of the appliance, do not use it
and take it to an authorised service centre.
• If the power cord is damaged, it should be replaced by the manufacturer
or by your after-sales service shop or similar qualified personnel to
prevent possible hazards.
• Do not use parts or accessories that have not been supplied or
recommended by SOLAC.
• Before plugging the appliance into the mains, check that the specified
voltage matches your home voltage.
• Always unplug the appliance after use and before installing or removing
parts or performing any maintenance and cleaning tasks. Also unplug it
in the event of a power cut. The appliance must be switched off when
plugging it in or unplugging it.
• Never pull on the cord or hang the appliance from it. Always unplug the
appliance by pulling on the plug, never on the cord.
Do not use the hair dryer near baths, washbasins, showers or
other water containers. If it falls into water, do NOT try to pick it up.
Unplug it immediately. Never submerge the appliance in water or
any other liquids and do not put it in the dishwasher. Do not allow
the appliance to come into contact with water during cleaning.
Avoid splashing the appliance or the power cord.
• Never leave the appliance outdoors exposed to the elements.
• Do not touch the appliance with wet hands when in operation.
• Never leave the appliance working on a wet surface or cloth.
• When using the hairdryer in the bathroom, unplug it after use, since it is
dangerous for the appliance to be near water, even when the hair dryer
is switched off.
• For extra protection we recommend installing a residual current device
(RCD) not exceeding 30mA in the electrical circuit supplying the
bathroom. Ask your installer for advice.
IMPORTANT: When you want to dispose of the appliance,
NEVER throw it in the rubbish bin. Take it to your nearest CLEAN
POINT or the waste collection centre closest to your home for
processing. You will thus be helping to take care of the
environment.
d
b
2 Description
Main components
1
2
3
4
Main body
Power cord
Air intake cover
Air outlet
Controls and indicators
Electrical specifications
• Input voltage: 220-240V, 50/60Hz
• Power consumption: 2000W
3 Use
) This appliance is designed for drying, styling and moisturising hair.
n Before plugging the appliance into the mains, make sure your hands
and the appliance are completely dry.
n WARNING: do not use the appliance near water.
n Be sure that the air inlet and outlet are not obstructed.
1 If you want, attach the concentrator (8) or the diffuser (9). To do so,
install the accessory on the air outlet (fig. 1)
2 Plug the appliance into the mains and set the airflow regulator (6) to the
desired position: O-off, -minimum speed, -maximum speed (fig. 2).
3 Set the temperature selector (5) to the desired position (fig. 3):
0- minimum heat, I- medium heat, II- maximum heat.
4 Follow the drying instructions according to the accessory used.
5 If you want air without heat, press the cold air button (7).
6 After using the dryer, set the airflow regulator (6) to the O position.
Using the concentrator (8)
) The professional nozzle (8) allows you to direct the air flow to a specific
point, for example to the roots for a straight effect, or onto a round brush
for volume. Professionals advise aiming the hot air flow from root to tip for
a very straight look with no volume at the roots. This helps to seal the
cuticle and prevent frizz.
1 Point the airflow at the desired area (fig. 4).
Using the diffuser (9)
1 After washing your hair, apply mousse/gel as usual.
2 Place the hair in the diffuser. Make circular movements with the
diffuser (fig. 5).
, Professionals advise:
• For more defined curls, keep the diffuser as close as possible to the
head, so that the curl is kept tight while it dries.
• Use the air flow regulator (6) in position , to encourage curls to form
naturally without frizzing.
Using the cold air button (7)
) Cold air sets the style achieved using heat and gives shine to the hair.
Professionals recommend using it for a longer lasting style.
1 Once you have dried and set the shape of the lock of hair, press the
cold air button (7) for 15 or 20 seconds for a perfect result.
4 Cleaning and Storage
) Only clean the appliance when it is cold. Do not use any solvents,
detergents or abrasive products.
1 Unplug the appliance.
2 Use a dry cloth.
3 If the air intake becomes blocked, clean it.
To do so, turn the cover counter-clockwise and pull the cover (3) off
(fig. 6).
4 Clean the cover (3) using a small brush.
5 Replace the air intake cover (3). To do so, line up the tabs on the
cover with the holes in the drier and turn the cover clockwise.
) Do not use the dryer without the air intake cover correctly attached.
5 Temperature selector (3 positions)
FRANÇAIS
fr
, Cher client
Accessoires
Nous vous remercions d’avoir choisi un produit de la marque SOLAC.
Nos produits sont conçus et fabriqués pour satisfaire largement les
attentes de nos clients les plus exigeants pendant longtemps. Avec les
appareils électroménagers SOLAC, vous avez l’assurance d’un produit
qui remplit les normes de qualité et de sécurité les plus exigeantes.
Electroménagers SOLAC, dans son souci d’amélioration continue, se
réserve le droit d’introduire des modifications sans préavis.
• Lisez attentivement ce mode d'emploi avant d'utiliser l'appareil.
• Ce manuel fait partie du produit. Conservez-le dans un lieu sûr afin
de pouvoir le consulter ultérieurement.
• Cet appareil est uniquement destiné à un usage domestique, non
industriel. Toute utilisation différente de celle indiquée peut être
dangereuse.
• Veillez à ce que les enfants ne jouent pas avec cet appareil.
• Il est recommandé de ne pas laisser cet appareil à la portée de
personnes (y compris d’enfants) ayant un handicap physique, sensitif
ou mental, ni par des personnes ne disposant pas de l'expérience ou
des connaissances nécessaires, à moins que la personne responsable
de leur sécurité les supervise ou leur apporte des instructions
concernant l'utilisation de l'appareil.
• Ne modifiez ni ne réparez jamais l’appareil. Si vous constatez une
anomalie sur le câble ou sur une autre partie de l’appareil, ne l’utilisez
pas et portez-le à un centre de service technique agréé.
• Si le cordon d’alimentation est endommagé, il doit être remplacé par le
fabricant, par son service après vente ou par du personnel qualifié
équivalent, afin d’éviter tout danger.
• N’utilisez pas de pièces ni d'accessoires non fournis ou recommandés
par SOLAC.
• Avant de brancher l’appareil au réseau électrique, vérifiez que le
voltage indiqué correspond à celui de votre logement.
• Débranchez toujours l’appareil après usage et avant de démonter ou de
monter des pièces et d'effectuer toute opération d’entretien ou de
nettoyage. Débranchez-le également en cas de panne de courant.
Lorsque vous branchez ou débranchez l’appareil, celui-ci doit être en
position « arrêt ».
• Ne tirez jamais sur le câble et ne suspendez pas l’appareil par le câble.
Débranchez l’appareil en tirant toujours sur la fiche, jamais sur le câble.
N’utilisez jamais le sèche-cheveux près d’une baignoire, un
lavabo, une douche ou un autre récipient contenant de l’eau. S'il
tombe dans l'eau, N'ESSAYEZ PAS de le rattraper. Débranchezle immédiatement. Ne mettez jamais l’appareil dans de l’eau ou
dans un autre liquide, ni dans le lave-vaisselle. Ne permettez pas
que l’appareil entre en contact avec l’eau lors du nettoyage. Evitez
d'éclabousser l'appareil ou le cordon d'alimentation.
• Ne laissez pas l’appareil aux intempéries.
• Ne touchez pas l’appareil avec les mains humides lorsqu’il est en
marche.
• Ne laissez jamais l'appareil fonctionner sur une surface ou un chiffon
humide.
• Si vous utilisez le sèche-cheveux dans la salle de bain, débranchez-le
après l’usage, car la proximité de l’eau peut présenter un danger même
si l’appareil est à l’arrêt.
• Pour plus de sécurité, il est recommandé d’installer sur le circuit
électrique qui alimente la salle de bain un dispositif de courant
différentiel résiduel (DDR) ne dépassant pas 30mA. Demandez conseil
à un professionnel.
ATTENTION ! Pour mettre l’appareil au rebut, NE LE JETEZ
JAMAIS à la poubelle ; déposez-le dans un POINT DE
RECYCLAGE ou à la déchetterie la plus proche afin qu’il y soit
recyclé. Vous contribuerez ainsi à la protection de
l’environnement.
d
b
2 Description
Parties principales
Corps principal
Cordon d'alimentation
Cache d'entrée d'air
Sortie d’air
Commandes et témoins
5 Sélecteur de température (3 positions)
6 Bouton de mise en marche et régulateur de débit d’air (2 positions)
7 Bouton d’air froid
pt
7 Botão de ar frio
Acessórios
8 Concentrador
9 Difusor
Segurança contra sobreaquecimento
) Este aparelho está equipado com um termóstato que regula a temperatura em
caso de sobreaquecimento (caso a entrada ou a saída de ar estejam
bloqueadas). Nesse caso, desligue o aparelho e aguarde 5 minutos. Eliminada a
causa do bloqueio, volte a ligar o aparelho.
Características eléctricas
• Tensão de alimentação: 220-240V, 50/60Hz
• Potência consumida: 2000W
3 Utilização
) Este aparelho foi desenhado para secar, moldear e hidratar o cabelo.
n Antes de ligar o aparelho à rede eléctrica, certifique-se de que suas mãos
e o aparelho estejam completamente secos.
n ATENÇÃO: não utilize o aparelho perto d'água.
n Certifique-se de que a entrada e a saída de ar não estão obstruídas.
1 Se desejar, coloque o concentrador (8) ou o difusor (9). Para isso, coloque o
acessório na saída de ar (fig. 1)
2 Ligue o secador à rede eléctrica e coloque o regulador de caudal de ar (6) na
posição desejada: O- desligado, -velocidade mínima,
-velocidade máxima
(fig. 2).
3 Coloque o selector de temperatura (5) na posição desejada (fig. 3):
0- aquecimento mínimo, I- aquecimento médio, II- aquecimento máximo.
4 Siga as indicações de secagem segundo o acessório utilizado.
5 Se deseja ar sem aquecimento, prima o botão de ar frio (7).
6 Quando termine de utilizar o secador, coloque o regulador do caudal de ar
(6) na posição O.
Uso do concentrador (8)
) O concentrador de ar profissional (8) permitir-lhe-á orientar o fluxo de ar para um
determinado ponto, por exemplo, para a raiz para conseguir um efeito liso ou
para uma escova redonda para conseguir volume.
Os profissionais aconselham que se oriente o fluxo de ar quente desde a raiz até
às pontas quando se pretende um “look” muito liso e sem volume na raiz. Esta
orientação do ar favorece o fecho da cutícula capilar e reduz o encrespamento.
1 Dirija o fluxo de ar para o lugar desejado (fig. 4).
Uso do difusor (9)
• Se il cavo di alimentazione è danneggiato farlo sostituire dal produttore, da
un servizio di assistenza post-vendita o da personale qualificato per evitare
pericoli.
• Non utilizzare componenti o accessori non forniti o non consigliati da SOLAC.
• Prima di collegare l'apparecchio alla rete elettrica, verificare che la tensione
riportata sulla targhetta corrisponda a quella dell'abitazione.
• Scollegare l'apparecchio dalla rete elettrica dopo l'uso e prima di rimuovere o
aggiungervi componenti ed eseguire attività di manutenzione o pulizia.
Scollegarlo inoltre in caso di spegnimento improvviso. Spegnere
l'apparecchio prima di collegarlo e scollegarlo dalla rete elettrica.
• Non tirare il cavo, né appendere l'apparecchio per il cavo. Scollegare
l'apparecchio tirando la spina, mai il cavo.
Non utilizzare l'asciugacapelli vicino a vasche, lavabi, docce o altri recipienti
che contengono acqua. Se cade in acqua, NON provare a prenderlo.
Scollegarlo immediatamente. Non immergere mai l'apparecchio in acqua, in
altri liquidi o in lavastoviglie. L'apparecchio non deve entrare in contatto con
acqua quando viene pulito. Evitare possibili spruzzi sull'apparecchio o sul
cavo di connessione.
• Non lasciare l'apparecchio esposto ad agenti atmosferici.
• Non toccare l'apparecchio con le mani umide quando è in funzione.
• Non lasciare mai l'apparecchio in funzione su una superficie o panno umido.
• Quando si utilizza l'asciugacapelli in bagno, scollegarlo dalla rete elettrica
dopo l'uso, poiché la vicinanza dell'acqua può rappresentare un pericolo
anche quando l'apparecchio è spento.
• Per una maggiore protezione si consiglia di installare nel circuito elettrico di
alimentazione del bagno un dispositivo di corrente differenziale residua
(RCD) che non superi i 30 mA. Allo scopo chiedere il parere di un installatore.
ATTENZIONE! Non smaltire MAI l'apparecchio insieme ai rifiuti
domestici. Portarlo presso il CENTRO DI SMALTIMENTO o di raccolta
più vicino perché possa essere smaltito adeguatamente. In questo
modo si contribuirà alla tutela dell'ambiente.
d
b
2 Descrizione
Componenti principali
1
2
3
4
Corpo principale
Cavo di collegamento alla rete
Coperchio di ingresso dell'aria
Uscita dell'aria
Comandi e indicatori
5 Selettore di temperatura (3 posizioni)
6 Pulsante di avviamento e regolatore del flusso d'aria (2 posizioni)
7 Bottone dell'aria fredda
Accessori
1 Depois de lavar o cabelo aplique a sua espuma/gel habitual.
2 Introduza o cabelo dentro do difusor. Mova o difusor lentamente, de forma
circular (fig. 5).
, Os profissionais aconselham que:
• Para uns caracóis mais definidos, aproxime o difusor o máximo possível da
cabeça, de modo a que os caracóis fiquem dobrados enquanto os seca.
• Utilize o regulador de caudal de ar (6) na posição , para favorecer a formação
natural dos caracóis, sem o encrespar.
Utilização do botão de ar frio (7)
) O ar frio fixa o penteado conseguido com o calor e traz brilho ao penteado. Os
profissionais recomendam a sua utilização para conseguir um penteado mais
duradouro.
1 Após secar e fixar a forma da mecha, pressione no ar frio (7) durante 15 ou
20 segundos para um resultado perfeito.
4 Limpeza e Conservação
) Limpe
o aparelho somente quando esteja frio. Não utilize dissolventes,
detergentes e nem produtos abrasivos.
1 Desligue o aparelho.
2 Utilize um pano seco.
3 Se a entrada de ar ficar bloqueada, proceda à sua limpeza.
Para isso, rode com força a tampa no sentido contrário ao dos ponteiros do
relógio e tire a tampa (3) para fora (fig. 6).
4 Limpe a tampa (3) com uma escova pequena.
5 Coloque de novo a tampa de entrada de ar (3). Para isso, faça coincidir as
patilhas da tampa com os orifícios do corpo e rode a tampa no sentido dos
ponteiros do relógio.
) Não utilize o secador sem a tampa de entrada de ar estar colocada
correctamente.
it
• Il presente manuale è parte integrante del prodotto. Conservarlo in un
luogo sicuro per poterlo consultare in futuro.
• Questo apparecchio è stato creato per uso domestico, non industriale. È
pericoloso utilizzarlo in modo diverso da quello indicato.
• Tenere lontano dalla portata dei bambini.
• L'apparecchio non è adatto a essere utilizzato da persone (bambini
compresi) con menomazioni fisiche, sensoriali o psichiche, né da persone
sprovviste dell'esperienza o delle conoscenze necessarie, a meno che non
siano seguite o istruite da un responsabile che ne illustri il funzionamento.
• Non modificare né riparare in alcun modo l'apparecchio. In caso di problemi
con il cavo di alimentazione o con altri componenti, non utilizzarlo e portarlo
presso un servizio di assistenza autorizzato.
8 Concentratore
9 Diffusore
Sicurezza contro il surriscaldamento
) Questo apparecchio è dotato di un termostato che regola la temperatura in caso
di surriscaldamento, ovvero quando i fori di ingresso o di uscita dell'aria risultano
ostruiti. In questo caso, scollegare l'apparecchio e attendere 5 minuti. Eliminata
la causa dell'ostruzione, ricollegare l'apparecchio.
Specifiche elettriche
• Alimentazione: 220-240V, 50/60Hz
• Potenza di consumo: 2000W
NEDERLANDS
, Geachte klant,
We willen u gelukwensen met uw keuze voor een product van het merk SOLAC.
Onze producten worden ontworpen en vervaardigd om lang en ruimschoots aan
de hoogste verwachtingen van onze klanten te voldoen. De huishoudelijke
apparaten van SOLAC geven u het geruste gevoel dat aan de hoogste kwaliteitsen veiligheidsnormen voldaan wordt.
In zijn continue verbeteringsdrang behoudt Electrodomésticos SOLAC zich het
recht voor zonder voorafgaande kennisgeving wijzigingen in zijn producten door
te voeren.
1 Veiligheidsinstructies
• Lees deze gebruiksaanwijzingen helemaal door alvorens het apparaat in
gebruik te nemen.
• Deze gebruiksaanwijzing is onderdeel van het product. Bewaar de
gebruiksaanwijzing op een veilige plek om deze in de toekomst na te
kunnen slaan.
• Het apparaat is uitsluitend bedoeld voor huiselijk gebruik; niet voor
bedrijfsmatig gebruik. Elk ander gebruik dan het boven vermelde kan
gevaarlijk zijn.
• Dit apparaat is niet geschikt om gebruikt te worden door personen (m.i.v.
kinderen) met een lichamelijke, zintuiglijke of geestelijke handicap, noch door
personen zonder de nodige ervaring of kennis, tenzij er iemand die voor hun
veiligheid verantwoordelijk is toezicht houdt en hen aanwijzingen geeft over
het gebruik van dit apparaat.
• Laat kinderen niet met dit apparaat spelen.
• Voer geen enkele wijziging of reparatie aan het apparaat uit. Bij een afwijking
van het netsnoer of een ander deel van het apparaat, dit niet gebruiken maar
naar een erkende Technische Servicedienst brengen.
3 Utilizzo
) L'apparecchio è progettato per asciugare, modellare e idratare i capelli.
n Prima di collegare l'apparecchio alla rete, verificare che le proprie mani e
l'apparecchio siano completamente asciutti.
n ATTENZIONE: non utilizzare l'apparecchio in prossimità dell'acqua.
n Accertarsi che l'ingresso e l'uscita dell'aria non siano ostruiti.
1 Installare il concentratore (8) o il diffusore (9) in base alle preferenze. A tal
fine, inserire l'accessorio sulla bocchetta di uscita dell'aria (fig. 1).
2 Collegare l'apparecchio alla rete elettrica e collocare il pulsante di regolazione del
flusso d'aria (6) sulla posizione desiderata: 0 (spento), (velocità minima) o
(velocità massima) (fig. 2).
3 Portare il selettore di temperatura (5) sulla posizione desiderata (fig. 3):
0 (riscaldamento minimo), I (riscaldamento medio) o II (riscaldamento
massimo).
4 Seguire le indicazioni per l'asciugatura in base all'accessorio utilizzato.
5 Se si desidera aria fredda, premere il pulsante aria fredda (7).
6 Una volta terminato l'uso dell'asciugacapelli, portare il dispositivo di
regolazione del flusso d'aria (6) sulla posizione O.
Uso del concentratore (8)
) Il concentratore di aria professionale (8) consentirà di orientare il flusso dell'aria
su un punto specifico, ad esempio, sulla radice, al fine di ottenere un effetto liscio,
oppure sulla spazzola rotonda, per ottenere un effetto voluminoso.
I professionisti consigliano di orientare il flusso dell'aria calda dalla radice verso
le punte quando si vuole ottenere un look molto liscio e senza volume alla radice,
perché così si favorisce la chiusura della cuticola e si evita l'effetto crespo.
1 Indirizzare il flusso di aria verso la zona desiderata (fig. 4).
Uso del diffusore (9)
1 Dopo aver lavato i capelli, applicarvi la schiuma o il gel utilizzato di solito.
2 Introdurre i capelli nel diffusore. Spostare il diffusore lentamente con
movimenti circolari (fig. 5).
, I professionisti consigliano:
• Per un riccio più definito, avvicinare quanto più possibile il diffusore alla testa,
in modo che il riccio rimanga piegato mentre viene asciugato.
• di impostare il regolatore del flusso d'aria (6) sulla posizione , per favorire
la formazione di ricci senza l'effetto crespo.
Uso del pulsante per l'aria fredda (7)
) L'aria fredda fissa la pettinatura ottenuta con il calore e le conferisce brillantezza.
I professionisti ne consigliano l'uso per ottenere una pettinatura più duratura.
1 Una volta asciugata e fissata la forma della ciocca, premere il pulsante dell'aria
fredda (7) per 15 o 20 secondi per un risultato perfetto.
4 Pulizia e conservazione
) Pulire l'apparecchio solo quando è freddo. Non utilizzare solventi, detergenti o
prodotti abrasivi.
1 Scollegare l'apparecchio.
2 Servirsi di un panno asciutto.
3 Se l'ingresso dell'aria dovesse ostruirsi, pulirlo.
A tal fine, ruotare con forza il coperchio in senso antiorario e tirare il coperchio
(3) verso l'esterno (fig. 6).
4 Pulire il coperchio (3) con una spazzola piccola.
5 Chiudere di nuovo il coperchio di ingresso dell'aria (3). A tal fine, far
coincidere le linguette del coperchio con i fori presenti sul corpo e ruotare il
coperchio in senso orario.
) Non utilizzare l'asciugacapelli senza il coperchio di ingresso dell'aria posizionato
correttamente.
nl
• Laat als het netsnoer beschadigd is, dit door de fabrikant, zijn klantenservice
of door vergelijkbaar opgeleid personeel vervangen, om evt. risico’s te
vermijden.
• Gebruik geen onderdelen of hulpstukken die niet door SOLAC geleverd of
aanbevolen zijn.
• Kijk, alvorens het apparaat op het lichtnet aan te sluiten, of het aangegeven
voltage overeenkomt met de netspanning bij u thuis.
• Trek altijd na gebruik de stekker uit het stopcontact en ook vóórdat u
o n d e r d e le n v e r w ij d e r t o f a a n br e n g t o f o n d e rh o u d s - o f
reinigingswerkzaamheden aan het apparaat verricht. Trek de stekker er ook
bij stroomuitval uit. Als u de stekker in of uit het stopcontact doet, dient het
apparaat uit te staan.
• Trek nooit aan het snoer of laat het apparaat nooit aan het snoer hangen.
Neem de stekker uit het stopcontact door aan de stekker, nooit aan het snoer,
te trekken.
De haardroger mag niet in de nabijheid van badkuipen, wasbakken,
douches of teilen, emmers e.d. met water erin gebruikt worden.
Probeer als hij in het water valt IN GEEN GEVAL hem eruit te pakken.
Haal meteen de stekker uit het stopcontact. Dompel dit apparaat niet in
water of in andere vloeistoffen onder en stop het evenmin in de
vaatwasser. Laat dit apparaat bij het reinigen niet met water in
aanraking komen. Vermijd spetters op het apparaat en het netsnoer.
• Stel het apparaat niet aan stoffen in de buitenlucht bloot.
• Raak het apparaat niet met natte handen aan als het aan staat.
• Laat het apparaat nooit aan staan als het op een vochtige ondergrond of doek
ligt.
• Haal als u de haardroger in de badkamer gebruikt de stekker uit het
stopcontact omdat de nabijheid van water gevaarlijk kan zijn, zelfs wanneer
het apparaat uit staat.
d
Sûreté contre surchauffes
) Cet appareil est équipé d’un thermostat qui régule la température en cas
de surchauffe (si l’entrée ou la sortie d’air sont bloquées). Si cela se
produit, débranchez l’appareil et attendez cinq minutes. Éliminez la cause
du blocage puis rallumez l'appareil.
Caractéristiques électriques
1 Indications de sécurité
1
2
3
4
8 Concentrateur
9 Diffuseur
• Tension d’alimentation : 220-240V, 50/60Hz
• Puissance consommée : 2000W
3 Utilisation
) Cet appareil a été conçu pour sécher, coiffer et hydrater les cheveux.
n Avant de brancher l’appareil au secteur, assurez-vous que vos
mains et l’appareil sont bien secs.
n ATTENTION : ne pas utiliser l’appareil près de l’eau.
n Vérifiez que l’entrée et la sortie d’air ne sont pas bouchées.
1 Si vous le souhaitez, montez le concentrateur (8) et le diffuseur (9). À
cette fin, fixez l’accessoire au niveau de la sortie d’air (fig. 1)
2 Branchez l’appareil et mettez le régulateur du souffle d’air (6) sur la
position souhaitée : 0-éteint,
-vitesse minimale,
-vitesse
maximale (fig. 2).
3 Placez le sélecteur de température (5) sur la position souhaitée (fig.
3) : 0- chauffage minimum, I- chauffage intermédiaire, II- chauffage
maximum.
4 Référez-vous aux instructions de séchage en fonction de l’accessoire
utilisé.
5 Si vous ne souhaitez pas d’air chaud, appuyez sur le bouton d’air froid
(7).
6 Lorsque vous terminez d’utiliser le sèche-cheveux, placez le
régulateur de débit d’air (6) sur la position O.
Utilisation du concentrateur (8)
) Le concentrateur d’air professionnel (8) vous permettra d’orienter le flux
d’air sur un point précis, par exemple sur la racine pour obtenir un effet
lisse ou sur la brosse ronde pour obtenir du volume.
Les professionnels conseillent d’orienter le flux d’air chaud de la racine
vers les pointes lorsque l’effet recherché est un look très lisse et sans
volume à la racine. Cette orientation d’air favorise le resserrement de la
cuticule et évite les frisottis.
1 Dirigez le souffle d’air dans la direction souhaitée (fig. 4).
Utilisation du diffuseur (9)
1 Après avoir lavé vos cheveux, appliquez votre mousse ou votre gel
habituel.
2 Introduisez vos cheveux dans le diffuseur. Déplacez lentement le
diffuseur de manière circulaire (fig. 5).
, Les professionnels conseillent :
• Pour des boucles plus définies, approchez le diffuseur le plus près
possible de la tête, de sorte que la boucle soit pliée pendant que
l’appareil la sèche.
• D’utiliser le régulateur de débit d’air (6) sur la position pour favoriser
la formation naturelle des boucles sans les crêper.
Utilisation du bouton d’air froid (7)
) L’air froid fixe la coiffure obtenue avec la chaleur et apporte de la brillance
aux cheveux. Les professionnels recommandent d’utiliser l’air froid pour
obtenir une coiffure plus durable.
1 Après avoir séché et fixé la forme de la mèche, appuyez sur air froid
(7) pendant 15 à 20 secondes pour un résultat parfait.
4 Nettoyage et entretien
) Ne nettoyer l’appareil que lorsqu’il est froid. N’utilisez pas de solvants, de
détergents ni de produits abrasifs.
1 Débranchez l’appareil.
2 Utilisez un chiffon sec.
3 Si l’entrée d’air est bloquée, nettoyez-la.
Pour ce faire, faites tourner le cache (3) dans le sens contraire à celui
des aiguilles d’une montre et retirez-le (fig. 6).
4 Nettoyez le cache (3) à l’aide d’une petite brosse.
5 Replacez le cache au niveau de l’entrée d’air (3). Pour ce faire, faites
coïncider les repères du cache avec les orifices de la structure, et
faites tourner le cache dans le sens des aiguilles d’une montre.
) N’utilisez pas le sèche-cheveux si le cache d’entrée d’air n’est pas
correctement positionné.
• Voor een nog veiliger gebruik van het apparaat raden we aan de
stroomtoevoer naar de badkamer te voorzien van een aardlekschakelaar met
een uitschakelstroom van ten hoogste 30 mA. Vraag uw installateur om
advies.
LET OP!! Wanneer u het apparaat wilt weggooien, deponeer het dan IN
GEEN GEVAL bij het huisvuil, maar breng het voor verdere verwerking
naar het dichtstbijzijnde recyclingcentrum of vuilophaalpunt. Op deze
wijze draagt u bij aan het behoud van het milieu.
b
2 Beschrijving
Belangrijkste onderdelen
1 Romp
2 Netsnoer
3 Luchtinlaatdeksel
4 Luchtuitlaat
Bedienings- en indicatie-elementen
5 Temperatuurkeuzeknop (3 standen)
6 Drukknop voor aan/uit en blaaskrachtregeling (2 standen)
7 Drukknop voor koude lucht
Hulpstukken
8 Blaasmond
9 Luchtverspreider
Beveiliging tegen oververhitting
) Dit apparaat is uitgerust met een thermostaat die de temperatuur regelt ingeval
van oververhitting (als de luchtinlaat of blaasuitgang geblokkeerd raken). Als dit
gebeurt, zet het apparaat dan uit en wacht 5 minuten. Verhelp de oorzaak van de
blokkering en zet het apparaat weer aan.
Elektrische eigenschappen
• Voedingspanning: 220-240V, 50/60Hz
• Vermogensverbruik: 2000W
3 Gebruik
) Dit apparaat is ontworpen om het haar te drogen, vorm te geven en te
bevochtigen.
n Controleer voordat u het apparaat op het lichtnet aansluit of uw handen en
het apparaat helemaal droog zijn:
n WAARSCHUWINGEN: gebruik het apparaat nooit in de buurt van water.
n Zorg ervoor dat luchtingang en blaasuitgang niet geblokkeerd zijn.
1 Breng als u dat wilt de blaasmond (8) of de luchtverspreider (9) aan. Zet
daarvoor het hulpstuk op de luchtuitgang (afb. 1)
2 Steek de stekker in het stopcontact en zet de blaaskrachtregelaar (6) in de
gewenste stand: 0 - uit, - minimumsnelheid, - maximumsnelheid (afb. 2).
3 Zet de temperatuurkeuzeknop (5) in de gewenste stand (afb. 3):
0- lage temperatuur, I- gemiddelde temperatuur, II- maximumtemperatuur.
4 Volg de aanwijzingen voor het föhnen met het gekozen hulpstuk.
5 Als u onverwarmde lucht wilt, druk dan op de knop voor koude lucht (7).
6 Zet wanneer u ophoudt met de haardroger te werken, de blaaskrachtregelaar
(6) in de stand O.
De blaasmond gebruiken (8)
) Met de professionele blaasmond (8) kunt u de luchtstroom naar een bepaald punt
richten, b.v. op de haarwortel voor een glad effect, of op de ronde borstel voor
meer volume.
Professionals raden aan de warmteluchtstroom te richten van de wortel naar de
punten, wanneer een zeer steile look zonder volume in de wortel beoogd wordt.
Deze oriëntatie van de lucht draagt bij tot de afsluiting van de haarschubben en
voorkomt krulvorming.
1 Richt de luchtstroom op het gewenste gedeelte van het haar (afb. 4).
De luchtverspreider gebruiken (9)
1 Breng na het wassen van uw haar uw gebruikelijke stylingmousse of -gel aan.
2 Plaats de diffuser tussen de haren. Beweeg de diffuser met langzaam
cirkelende bewegingen (afb. 5).
, De professionals raden het volgende aan:
• Voor een meer gemarkeerde krul de diffuser zo dicht mogelijk bij het hoofd
houden, zodat de krul aangedrukt blijft tijdens het drogen.
• Zet de luchtstroomregelaar (6) op stand , om de natuurlijke vorming van de
krul te bevorderen zonder dat het haar kroezig wordt.
Drukknop voor koude lucht (7)
) De koude lucht fixeert het kapsel dat met de warmte verkregen wordt en zorgt
voor glans. De professionals raden het gebruik ervan aan voor een duurzaam
kapsel.
1 Nadat de haarlok gedroogd en de vorm ervan vastgelegd is, drukt u op de koude
lucht (7) gedurende 15 tot 20 seconden voor een perfect resultaat.
4 Reiniging en onderhoud
) Reinig
het apparaat alleen als het afgekoeld is. Gebruik geen oplos-,
schoonmaak- of schuurmiddelen.
1 Trek de stekker uit het stopcontact.
2 Gebruik voor het reinigen een droge doek.
3 Als de luchtinlaat geblokkeerd is, maak deze dan schoon.
Draai hiervoor het beschermkapje van de luchtinlaat naar links (tegen de
wijzers van de klok in) en trek het kapje (4) naar buiten toe (afb. 6).
4 Reinig het kapje (3) met een borsteltje.
5 Plaats het kapje weer terug op de luchtinlaat (3). Zorg ervoor dat de palletjes
van het kapje samenvallen met de openingen van de romp van de
haardroger. Draai daarna het kapje rechtsom vast (met de wijzers van de klok
mee).
) Gebruik de haardroger niet zonder dat het beschermkapje op de juiste manier op
de luchtinlaat geplaatst is.
ESKY
, Vážený zákazníku
Gratulujeme vám k výbru produktu SOLAC. Naše produkty jsou navrhnuté a
vyrobené s úmyslem dlouhodobého pohodlí a splnní oekávání našich
nejnáronjších zákazník. S elektrickými zaízeními SOLAC se mžete cítit
v bezpeí s vdomím, že odpovídají nejpísnjším standardm kvality a
bezpenosti.
V touze nepetržitého vylepšování si spolenost SOLAC vyhrazuje právo na
zmny bez pedchozího oznámení.
1 Bezpenostní pokyny
• Ped použitím zaízení si pozorn pette tento návod.
• Tento návod na použití je nedílnou souástí výrobku.Uschovejte jej pro pozdjší
potebu.
• Toto zaízení je urené k použití v domácnosti, ne k prmyslovému použití. Jakékoli
jiné použití než to, co je uvedené v tchto instrukcích mže být nebezpené.
• Dti byste mli mít pod dozorem, nehrají-li si se zaízením.
• Toto zaízení není vhodné k použití lidmi (vetn dtí) se sníženými tlesnými,
smyslovými nebo mentálními schopnostmi, nebo s nedostatkem zkušeností a znalostí
bez dozoru nebo bez pedchozího vyškolení ohledn použití zaízení osobou, která je
odpovdná za jejich bezpenost.
• Zaízení žádným zpsobem neupravujte ani neopravujte. Když zjistíte na pívodním
kabelu nebo jiné ásti zaízení jakékoli poškození, nepoužívejte jej a obrat’te se
prosím na specializované servisní stedisko.
• Aby nedošlo k eventuálním rizikm, pokud je poškozena napájecí šra, mla by být
vymnna ve výrobním závod, nebo v servisní opravn poskytující náš poprodejní
servis nebo by to ml provést obdobn kvalifikovaný pracovník.
• ásti nebo píslušenství, které není dodávané anebo doporuené výrobcem SOLAC,
nepoužívejte.
• Ped pipojením zaízení ke zdroji elektrické energie zkontrolujte, že jmenovité naptí
odpovídá naptí u vás doma.
• Zaízení po použití, ped instalací nebo výmnou ástí, ped vykonáním jakékoli
údržby a ped ištním odpojte od zdroje elektrické energie. Zaízení také odpojte v
pípad výpadku elektrického proudu. Pi pipojení a odpojení musí být zaízení
vypnuté.
• Nikdy netahejte za kabel ani za nj zaízení nezavšujte. Vždycky tahejte za zástrku,
nikdy netahejte za napájecí kabel.
Vysouše nepoužívejte v blízkosti van, umyvadel, sprch nebo jiných nádob s
vodou. Pokud spotebi spadne do vody, NEPOKOUŠEJTE se jej vytáhnou.
Okamžit jej odpojte od napájení. Zaízení nenamáejte do vody ani do jiné
kapaliny a nedávejte jej do myky na nádobí. Bhem ištní nedovolte, aby se
pístroj dostat do kontaktu s vodou. Na zaízení ani na napájecí kabel
nestíkejte vodu.
• Zaízení nikdy nenechávejte venku a nevystavujte jej tím pírodním živlm.
• Nemanipulujte se zaízením s mokrýma rukama.
• Zaízení nikdy nenechejte v innosti na mokrém povrchu nebo látce.
• Když fén používáte v koupeln, odpojte jej po každém použití od zdroje elektrické
energie, protože je nebezpené nechávat pístroj v blízkosti vody, i když je vypnutý.
• Kvli mimoádné ochran vám doporuujeme do elektrického obvodu, který zásobuje
koupelnu, nainstalovat pojistné zaízení (RDD), které nepekrauje 30mA. Zeptejte se
vašeho instalatéra.
DLEŽITÉ: Když chcete pístroj odstranit, NIKDY jej nevyhazujte do
odpadu. Odneste jej na nejbližší MÍSTO SBRU nebo prodejci nebo do
autorizovaného servisu Solac. Pomžete tím životnímu prostedí.
d
b
2 Popis
Hlavní souásti
Píslušenství
Hlavní tleso
8 Koncentrátor
Napájecí kabel
9 Difuzér
Kryt pívodu vzduchu
Odvod vzduchu
Ovladae a kontrolky
5 Regulátor teploty (3 polohy)
6 Vypína a ovládací tlaítko proudní
vzduchu (2 polohy)
7 Tlaítko studeného vzduchu
Ochrana proti pehátí
) Toto zaízení je vybavené bezpenostním systémem, který se v pípad pehátí
vypne (napíklad když je vstup nebo výstup vzduchu blokovaný). Když se
1
2
3
4
cz
zaízení bhem použití vypne, odpojte jej od zdroje elektrické energie a pt minut
pokejte. Odstrate píinu ucpání a zaízení optovn zapnte.
Elektrické specifikace
• Vstupní naptí: 220-240V, 50/60Hz
• Spoteba energie: 2000W
3 Použití
) Toto zaízení je doporuené k sušení, tvarování a zvlhování vlas.
n Ped pipojením pístroje k síti se ujistte, že vaše ruce a zaízení jsou úpln
suché.
n UPOZORNNÍ: zaízení nepoužívejte v blízkosti vody.
n Ujistte se, že pívod a vývod vzduchu není zablokovaný.
1 Pokud chcete, pipojte koncentrátor (8) nebo difuzér (9). Provedete to tak, že
píslušenství nasadíte na výstup vzduchu (obr. 1)
2 Zaízení pipojte ke zdroji elektrické energie a nastavte regulátor proudní
vzduchu (6) do požadované polohy: O-off, -minimální rychlost,
-maximální
rychlost (obr. 2).
3 Regulátor teploty (5) posute do požadované polohy (obr. 3):
0-minimální ohev, I-stední ohev, II-maximální ohev.
4 Postupujte podle pokyn pro vysoušení v závislosti na použitém
píslušenství.
5 Chcete-li pouze studený vzduch bez ohevu, stisknte tlaítko studeného
vzduchu (7)
6 Po použití sušie nastavte regulátor proudní vzduchu (6) do polohy O.
Použití koncentrátoru (8)
) Profesionální hubice (8) umožuje nasmrování proudu vzduchu na urité místo,
napíklad na koínky pro efekt rovných vlas, nebo na kulatý kartá pro získání
objemu.
Pro získání velmi rovného úesu bez objemu u koínk radí profesionálové
klouzat proudem horkého vzduchu od koínk ke konekm vlas. Tím se uzavírá
vlasová pokožka a pedchází se krabacení vlas.
1 Proud vzduchu nasmrujte do požadované oblasti (obr. 4).
Použití difuzéru (9)
1 Po umytí vlas použijte pnu/gel jako obyejn.
2 Položte vlasy na difuzér. Dlejte jím kruhové pohyby (obr. 5).
, Rady profesionál:
• Pro výraznjší formování kadeí držte difuzér tak blízko k hlav, jak je to
možné. Kade tak bude bhem vysoušení sevena pevnji.
• Používejte regulátor proudní vzduchu (6) v pozici . Kadee se tak zformují
pirozen a bez zkrabatní.
Použití tlaítka studeného vzduchu (7)
) Chladný vzduch ustálí úes vytvarovaný horkým vzduchem a dodá vlasm lesk.
Profesionálové doporuují jeho použití pro dosažení vtší stálosti úesu.
1 Perfektních výsledk dosáhnete tak, že po vysušení a natvarování pramene
vlas stisknete na 15 až 20 sekund tlaítko chladného vzduchu (7).
4 ištní a uskladnní
) Zaízení istte pouze když je studené. Nepoužívejte žádné rozpouštdla, istící
prostedky ani abrazivní produkty.
1 Zaízení odpojte od sít.
2 Použijte suchou látku.
3 Je-li pívod vzduchu zablokovaný, vyistte jej.
Provedete to tak, že otoíte krytem (3) proti smru hodinových ruiek a
sejmete jej (obr. 6).
4 Kryt (3) oistte kartákem.
5 Kryt pívodu vzduchu (3) vrate zpt na místo. Provedete to tak, že jazýky
na krytu vyrovnáte s otvory ve vysoušei a otoíte krytem ve smru
hodinových ruiek.
) Nepoužívejte vysouše bez správn nasazeného krytu pívodu vzduchu.
POLSKI
, Szanowni Klienci
Gratulujemy zakupu produktu firmy SOLAC. Nasze produkty zostay opracowane i s
produkowane w sposób zapewniajcy zaspokojenie oczekiwa nawet najbardziej
wymagajcych klientów, przez dugi okres czasu. Korzystanie z urzdze
elektrycznych firmy SOLAC jest cakowicie bezpieczne, poniewa speniaj one
najbardziej rygorystyczne wymogi jakociowe i normy bezpieczestwa. Starajc si
wci udoskonala swoje produkty, firma SOLAC zastrzega sobie prawo
wprowadzenia modyfikacji bez wczeniejszego powiadomienia.
1 Instrukcje bezpieczestwa
• Przed uruchomieniem urz
dzenia zapozna si z instrukcj
obsugi.
• Niniejsza instrukcja stanowi nierozczn cz produktu. Nale
y j
przechowywa w bezpiecznym miejscu, w celu ponownego u
ytku.
• Jeli przewód zasilaj
cy jest uszkodzony, naley go wymieni u producenta, w
punkcie serwisowym lub u wykwalifikowanego specjalisty w celu uniknicia
ewentualnych zagroe.
• Nie uywa czci ani akcesoriów, które nie s
dostarczane lub zalecane przez firm
SOLAC.
• Przed w
czeniem urz
dzenia do pr
du naley upewni si, e napicie znamionowe
odpowiada napiciu w domowej instalacji zasilania.
• Naley od
czy urz
dzenie od zasilania po zakoczeniu pracy, a take przed
zamontowaniem lub usuniciem jakichkolwiek czci rozpoczciem czyszczenia lub
prac konserwacyjnych. W przypadku przerw w dostawie pr
du urz
dzenie naley
od
czy od róda zasilania. Przed wkadaniem lub wyjmowaniem wtyczki z gniazda
zasilania naley wy
czy urz
dzenie za pomoc
wy
cznika.
• Nie ci
gn
za przewód zasilaj
cy i upewni si, e urz
dzenie nie zwisa na
przewodzie. Od
czaj
c urz
dzenie od róda zasilania, ci
gn
za wtyczk, a nie za
przewód.
Nie uywa suszarki w pobliu wanny, umywalki, prysznica lub jakiegokolwiek
zbiornika z wod
. Jeeli urz
dzenie wpadnie do wody, NIE wyjmowa go.
Natychmiast wyj
wtyczk z gniazda. Nie zanurza urz
dzenia w wodzie ani
innych pynach i nie wkada do zmywarki. Podczas czyszczenia urz
dzenie
nie powinno mie kontaktu z wod
. Unika chlapania wod
na urz
dzenie lub
przewód zasilaj
cy.
• Nigdy nie naley wystawia urz
dzenia na dziaanie czynników atmosferycznych.
• Nie dotyka w
czonego urz
dzenia mokrymi rkami.
• Nie zostawia w
czonego urz
dzenia na mokrej powierzchni lub materiale.
• Jeeli urz
dzenie jest uywane w azience, po zakoczeniu pracy naley od
czy je
od zasilania, pamitaj
c, e obecno wody stanowi due zagroenie, nawet jeeli
urz
dzenie jest wy
czone.
• Dla dodatkowej ochrony zaleca si wyposaenie instalacji elektrycznej w azience w
wy
cznik rónicowopr
dowy, nie przekraczaj
cy 30 mA. Naley zasign
opinii
elektryka.
WANE: Chc
c pozby si urz
dzenia, NIGDY nie naley wyrzuca go
do kosza. Naley odda je do najbliszego PUNKTU SKADOWANIA I
UTYLIZACJI odpadów. W ten sposób chronimy rodowisko naturalne.
d
b
2 Opis urzdzenia
Gówne podzespoy
Akcesoria
Korpus
8 Koncentrator
Przewód zasilaj
cy
9 Dyfuzor
Obudowa wlotu powietrza
Wylot powietrza
Elementy regulacyjne i kontrolne
5 Regulator temperatury (3 pooenia)
6 Wy
cznik gówny z regulatorem
nawiewu (2 pooenia)
7 Przycisk zimnego powietrza
Ochrona przed przegrzaniem
) Urz
dzenie jest wyposaone w termostat, który reguluje temperatur w celu
ochrony przed przegrzaniem (jeli wlot lub wylot powietrza jest zablokowany).
Jeli tak si dzieje, naley od
czy urz
dzenie i odczeka 5 minut. Usun
przyczyny zatkania otworów i ponownie w
czy urz
dzenie.
Parametry elektryczne
• Napicie wejciowe: 220-240V, 50/60Hz
1
2
3
4
SLOVENINA
, Vážený zákazník
Gratulujeme vám k výberu výrobku spolonosti SOLAC. Naše výrobky sú
navrhnuté a vyrobené s úmyslom dlhodobého pohodlného sp!ania oakávaní
našich najnáronejších zákazníkov. S elektrickými zariadeniami SOLAC sa
môžete cítit’ v bezpeí s vedomím, že zodpovedajú najprísnejším štandardom
kvality a bezpenosti. V túžbe nepretržitého vylepšovania si spolonost’ SOLAC
vyhradzuje právo na zmeny bez predchádzajúceho upozornenia.
1 Bezpenostné pokyny
• Pred použitím zariadenia si pozorne preítajte tento návod.
• Táto príruka je neoddelitenou súasou výrobku. Odložte si ju na bezpené
miesto pre prípad potreby v budúcnosti.
• Toto zariadenie je urené na použitie v domácnosti, nie na priemyslové použitie.
Akékovek iné použitie ako to, ktoré je uvedené v týchto pokynoch môže byt’
nebezpené.
• Deti by ste mali mat’ pod dozorom, aby ste sa uistili, že sa so zariadením nehrajú.
• Toto zariadenie nie je urené na používanie osobami (vrátane detí) so zníženými
telesnými, zmyslovými alebo mentálnymi schopnost’ami, alebo s nedostatkom
skúseností a znalostí bez dozoru alebo bez predchádzajúceho vysvetlenia ohadom
použitia zariadenia osobou, ktorá je zodpovedná za ich bezpenost’.
• Zariadenie žiadnym spôsobom neupravujte ani neopravujte. Ak na napájacom kábli
alebo na inej asti zariadenie zistíte akékovek poškodenie obrát’te sa prosím na
špecializované servisné stredisko.
• Ak je poškodené elektrické vedenie, malo by byt’ vymenené výrobcom alebo vo
vašom popredajnom servise alebo podobne kvalifikovanou osobou aby sa predišlo
možným rizikám.
• asti alebo príslušenstvo, ktoré nebolo dodané alebo odporuené výrobcom SOLAC,
nepoužívajte.
pl
• Produkt ten przeznaczony jest do uytku domowego; nie nadaje si do uytku
przemysowego. Wykorzystanie urz
dzenia do jakichkolwiek innych celów poza
opisanymi w niniejszej instrukcji moe by niebezpieczne.
• Naley uniemoliwi dzieciom wykorzystanie urz
dzenia do zabawy.
• Urz
dzenie nie powinno by obsugiwane przez osoby (w tym dzieci) o obnionej
sprawnoci fizycznej, czuciowej, psychicznej, niedowiadczone lub nieposiadaj
ce
odpowiedniej wiedzy, chyba e bd
one nadzorowane lub zostan
odpowiednio
przeszkolone przez osoby odpowiedzialne za ich bezpieczestwo.
• Nie naley w aden sposób przerabia lub naprawia urz
dzenia na wasn
rk. W
przypadku stwierdzenia jakichkolwiek uszkodze przewodu zasilaj
cego b
d
elementów urz
dzenia, nie naley go uywa, lecz skontaktowa si z
autoryzowanym serwisem naprawczym.
• Pobór mocy: 2000W
3 Zastosowanie
) Urz
dzenie jest przeznaczone do suszenia, ukadania i nawilania wosów.
n Przed pod
czeniem urz
dzenia do gniazda zasilania wysuszy dokadnie
rce. Upewni si, e urz
dzenie jest cakowicie suche.
n UWAGA: nie uywa urz
dzenia w pobliu wody.
n Upewni si, e otwory wlotu i wylotu powietrza nie s
zablokowane.
1 Mona podczy koncentrator (8) lub dyfuzor (9). W tym celu naley
zamontowa przystawk na wylocie powietrza (rys. 1).
2 Podczy urzdzenie do gniazda zasilania i dopasowa ustawienie regulatora
nawiewu (6): O - wy., - prdko minimalna,
- prdko maksymalna (rys.
2).
3 Przestawi regulator temperatury (5) do wybranego pooenia (rys. 3):
0- temperatura minimalna, I - temperatura rednia, II - temperatura maksymalna.
4 Naley stosowa si do instrukcji suszenia odpowiednich dla danej przystawki.
5 Jeli powietrze nie ma by ogrzewane, nacisn przycisk zimnego powietrza (7).
6 Po zakoczeniu korzystania z suszarki, ustawi regulator nawiewu (6) w pooeniu O.
Korzystanie z koncentratora (8)
) Profesjonalna dysza (8) umoliwia skierowanie powietrza w okrelony punkt, na
przykad na korzenie wosa dla efektu prostowania lub na okr
g
szczotk w celu
uzyskania objtoci. Profesjonalici zalecaj
kierowanie gor
cego powietrza od
korzeni po kocówki w celu uzyskania prostoci i braku objtoci przy korzeniach.
Pomaga to zasklepi naskórek i zapobiec skrcaniu si wosów.
1 Strumie powietrza naley skierowa na w danym kierunku (rys. 4).
Korzystanie z dyfuzora (9)
1 Po umyciu wosów naoy tradycyjnie piank/el.
2 Umieci wosy w dyfuzorze. Wykonywa koliste ruchy dyfuzorem (Rys. 5).
, Profesjonalici radz
:
• Aby uzyska mocniejsze loki, utrzymywa dyfuzor jak najbliej gowy, dziki
czemu lok jest ciasny po wyschniciu.
• Uywa regulatora przepywu powietrza (6) w pooeniu
, aby loki
formoway si naturalnie, bez skrcania.
Korzystanie z przycisku zimnego powietrza (7)
) Zimne powietrze ustawia fryzur uzyskan
podczas suszenia gor
cym
powietrzem i nadaje poysk wosom. Profesjonalici zalecaj
jego uywanie dla
uzyskania trwalszej fryzury.
1 Po wysuszeniu wosów i ustaleniu ich ksztatu nacinij przycisk zimnego
powietrza (7) na 15 do 20 sekund, aby uzyska doskonay rezultat.
4 Czyszczenie i przechowywanie
) Urz
dzenie moe by czyszczone wy
cznie, kiedy jest schodzone. Do czyszczenia
nie naley uywa rozpuszczalników, detergentów lub produktów cieraj
cych.
1 Odczy urzdzenie od zasilania.
2 Uywa suchej ciereczki.
3 Jeli wlot powietrza zostanie zablokowany, naley go udroni.
W tym celu naley obróci oson (3) w kierunku przeciwnym do ruchu
wskazówek zegara i pocign j (rys. 6).
4 Wyczyci pokryw (3) za pomoc maej szczoteczki.
5 Zaoy oson (3) na miejsce. W tym celu naley przyoy pokryw do
suszarki tak, aby zatrzaski pokryway si z otworami i przekrci pokryw
zgodnie z kierunkiem ruchu wskazówek zegara.
) Nie uywa suszarki bez prawidowo pod
czonej pokrywy wlotu powietrza.
sk
• Pred pripojením zariadenia ku zdroju elektrickej energie skontrolujte, i menovité
napätie zodpovedá napätiu u vás doma.
• Zariadenie po použití, pred inštaláciou alebo výmenou astí, pred vykonaním
akejkovek údržby a pred istením odpojte od zdroja elektrickej energie. Zariadenie
odpojte aj v prípade výpadku elektrického prúdu. Pri pripájaní a odpájaní musí byt’
zariadenie vypnuté.
• Nikdy net’ahajte za kábel, ani za zariadenie nevešajte. Vždy t’ahajte za zástrku,
nikdy nie za napájací kábel.
Suši nepoužívajte v blízkosti vaní, umývadiel, sprchy alebo iných nádob s
vodou. Ak spadne do vody, NEPOKÚŠAJTE sa ho vytiahnut’. Okamžite ho
odpojte od napájania. Zariadenie nenamáajte ani neponárajte do vody ani inej
tekutiny a nedávajte ho do umývaky na riad. Poas istenia by sa prístroj
nemal dostat’ do kontaktu s vodou.
• Zariadenie nikdy nenechávajte vonku a nevystavujte ho tým prírodným živlom.
• Nemanipulujte so zariadením s mokrými rukami.
• Zariadenie nikdy nenechajte v innosti na mokrom povrchu alebo látke.
• Ke fén používate v kúpelni, odpojte ho po každom použití od zdroja elektrickej
energie, pretože je nebezpené nechávat’ prístroj v blízkosti vody, aj ke je vypnutý.
• Kvôli mimoriadnej ochrane vám odporúame do elektrického obvodu, ktorý zásobuje
kúpelu, nainštalovat’ poistné zariadenie (RDD), ktoré neprekrauje 30mA. Opýtajte
sa vášho inštalatéra.
DÔLEŽITÉ: Ak chcete prístroj odstránit’, NIKDY ho nevyhadzujte do
odpadu. Odneste ho na najbližšie MIESTO ZBERU alebo do najbližšieho
centra zberu odpadkov na alšie spracovanie. Pomôžete tým životnému
prostrediu.
d
b
2 Hlunos
Deklarovaná hodnota emisie hluku tohto spotrebia je 72 dB (A), o predstavuje
hladinu A akustického výkonu vzh"adom na referenný akustický výkon 1pW.
3 Popis
Hlavné asti
Príslušenstvo
1 Hlavné teleso
8 Koncentrátor
2 Napájací kábel
9 Difuzér
3 Kryt prívodu vzduchu
4 Vývod vzduchu
Ovládae a kontrolky
5 Regulátor teploty (3 polohy)
6 Vypína a ovládacie tlaidlo prúdenia
vzduchu (2 polohy)
7 Tlaidlo studeného vzduchu
Ochrana proti prehriatiu
) Toto zariadenie má termostat, ktorý reguluje teplotu, aby sa predišlo jeho
prehriatiu (v prípade, že prívod alebo vývod vzduch sú blokované). Ak sa to stane,
zariadenie odpojte a pokajte pä minút. Odstráte príinu upchatia a zariadenie
opätovne zapnite.
Elektrické špecifikácie
• Vstupné napätie: 220-240V, 50/60Hz
• Spotreba energie: 2000W
4 Použitie
) Toto zariadenie je odporúané na sušenie, tvarovanie a zvlhovanie vlasov.
n Pred zapojením prístroja sa ubezpete, že vaše ruky a zariadenie sú úplne suché.
n UPOZORNENIE: zariadenie nepoužívajte v blízkosti vody.
n Uistite sa, že prívod a vývod vzduchu nie je zablokovaný.
1 Ak chcete, pripojte koncentrátor (8) alebo difuzér (9). Urobte to nasledujúcim
spôsobom: pripojte príslušenstvo na výstup vzduchu (obr. 1)
2 Zariadenie pripojte do elektrickej siete a nastavte regulátor prúdenia vzduchu (6)
do požadovanej polohy: O - vypnuté
- minimálna rýchlos,
- maximálna
rýchlos (obr. 2).
3 Regulátor teploty (5) posute do požadovanej polohy (obr. 3):
0 - minimálna teplota, I - stredná teplota, II - maximálna teplota.
4 Pri sušení sa ria#te pokynmi pod"a typu používaného príslušenstva.
5 Ak nechcete teplý vzduch, stlate tlaidlo studeného vzduchu (7).
6 Po použití sušia nastavte regulátor prúdenia vzduchu (6) do polohy O.
Použitie koncentrátora (8)
) Profesionálny nástavec (8) vám umožní nasmerova prúd vzduchu na konkrétne
miesto, napríklad ku korienkom pre vyrovnanie vlasov alebo na okrúhlu kefu pre
dosiahnutie objemu.
Pre dosiahnutie vemi rovného vzhadu bez objemu pri korienkoch odborníci radia
nasmerova prúd horúceho vzduchu od korienkov po koneky. To umožuje
zaceli vlasovú kutikulu a zabráni kuerám.
1 Nasmerujte prúd vzduchu na požadovanú oblas (obr. 4).
Použitie difuzéra (9)
1 Po umytí aplikujte na vlasy penové tužidlo alebo gél ako obyajne.
2 Vlasy umiestnite do difuzéra. S difuzérom robte krúživé pohyby (obr. 5).
, Odborné rady:
• Pre výraznejšie kuery držte difuzér o najbližšie k hlave, aby sa kuera
poas sušenia neuvo"nila.
• Nastavte regulátor prúdu vzduchu (6) do polohy , aby sa kuery vyformovali
prirodzene, bez kaderenia.
Použitie tlaidla studeného vzduchu (7)
) Studeným vzduchom zafixujete úes získaný pomocou teplého vzduchu, o
vlasom dodá lesk. Odborníci odporúajú využi tento postup pre dlhšie trvajúci
úes.
1 Po vysušení vlasov a úprave tvaru pramea vlasov stlate tlaidlo na studený
vzduch (7) na 15 alebo 20 sekúnd pre dosiahnutie dokonalého výsledku.
5 istenie a uskladnenie
) Zariadenie istite iba ak je studené. Nepoužívajte žiadne rozpúšt’adlá, istiace
prostriedky ani abrazívne výrobky.
1 Zariadenie odpojte od siete.
2 Používajte suchú látku.
3 Ak sa prívod vzduchu upchá, vyistite ho.
Urobte to nasledujúcim spôsobom: otote kryt (3) proti smeru hodinových
ruiiek a vyberte ho (obr. 6).
4 Malou kefkou kryt (3) vyistite.
5 Vymete kryt prívodu vzduchu (3). Urobte to nasledujúcim spôsobom:
zarovnajte jazýky na kryte s dierkami v sušii a otote kryt v smere
hodinových ruiiek.
) Ak nie je kryt prívodu vzduchu pripevnený správne, suši nepoužívajte.
MAGYAR
, Használati Utasítás
Köszönjük, hogy megvásárolta a termékünket. Reméljük, hasznos társa lesz
úton és otthonában egyaránt. A megfelel$ m%ködés alapfeltétele a szakszer%
használat, ezért kérjük, figyelmesen olvassa át a használati utasítást.
A SOLAC a folyamatos fejlesztés jegyében fenntartja a jogot a termék el$zetes
értesítés nélküli módosítására.
1 Biztonsági elírások
• A készülék használatba vétele eltt figyelmesen olvassa el az alábbi utasításokat.
• A kézikönyv elválaszthatatlan részét képezi a terméknek. rizze meg biztos
helyen, mert késbb még szüksége lehet rá.
• Ez a termék nem ipari, hanem otthoni használatra lett tervezve. Az útmutatóban
leírtakon kívüli bármilyen alkalmazás veszélyes lehet.
• A készülékkel gyermekek nem játszhatnak.
• A fizikai, érzékszervi vagy lelki értelemben korlátozott személyek (beleértve a
gyermekeket is), illetve a készülék használatát nem ismerk kizárólag a
biztonságukért felels személy felügyelete mellett használhatják a készüléket.
• Ne módosítsa, és ne javítsa saját kezleg a készüléket. Ha a készülék tápkábelének
vagy egyéb alkatrészének meghibásodását észleli, hagyja abba a készülék
használatát, és forduljon szakszervizhez.
• Ha a hálózati kábel sérült, akkor a lehetséges veszélyek megelzése érdekében a
gyártónak vagy a vevszolgálati szervizállomásnak vagy hasonló meghatalmazott
személyzetnek ki kell cserélnie azt a lehetséges kockázatok elkerülése érdekében.
• Ne használjon a SOLAC által nem jóváhagyott alkatrészeket és kiegészítket.
• Az elektromos hálózathoz való csatlakoztatás eltt ellenrizze, hogy a hálózati
feszültség megfelel a készülék specifikációjának.
• Alkatrészek felhelyezése, vagy leválasztása, illetve tisztítás és karbantartás eltt
mindig válassza le a készüléket az elektromos hálózatról. Áramszünet esetén húzza
ki a készülék dugaszát a csatlakozóaljzatból. Mindig kapcsolja ki a készüléket,
mieltt azt az elektromos hálózathoz csatlakoztatná, vagy arról leválasztaná.
• Ne húzza a tápkábelt, és ne lógassa a készüléket a tápkábelnél fogva. A dugaszt az
aljzatból soha ne a vezetéknél, hanem a dugasznál fogva húzza ki.
Ne használja a hajszárítót vizet tartalmazó fürdkád, mosdókagyló, zuhanyozó
vagy bármilyen más víztartály mellett. Amennyiben a készülék vízbe esne, NE
próbálja meg kivenni. Ehelyett azonnal húzza ki a készülék dugaszát a hálózati
aljzatból. Soha ne merítse a készüléket vízbe vagy más folyadékba, illetve ne
helyezze mosogatógépbe. A készülék a tisztítás során sem érintkezhet vízzel. A
készüléket és a tápkábelt óvja mindenfajta folyadéktól.
• Soha ne hagyja a készüléket szabad térben, kitéve a különböz természeti
viszonyoknak.
• Ne fogja meg nedves kézzel a bekapcsolt készüléket.
• A bekapcsolt készüléket soha ne helyezze nedves felületre vagy nedves ruhára.
• A hajszárítót a fürdszobában való használat után csatlakoztassa le a hálózatról, mivel
a hajszárító kikapcsolt állapotban is veszélyt jelent, amennyiben víz közelében van.
• Kiegészít védelemként javasoljuk egy 30 mA-t nem meghaladó áramersség
maradékáram-mködtetés megszakító telepítését a fürdszobát ellátó áramkörre.
Az üzembe helyezéssel kapcsolatosan villanyszereltl kérhet tanácsot.
d
irányába alkalmazza, ha egyenes, sima hajat szeretne, mely nem emelkedik fel
a hajtnél. Ezzel lezárja a hámréteget és megakadályozza a göndörödést.
1 A leveg$t irányítsa a kívánt területre (4. ábra).
A levegelosztó (9) használata
1 Hajmosást követ$en a szokványos módon alkalmazzon habot/zselét.
2 Helyezze be haját a légelosztóba. Tegyen körkörös mozdulatokat a
légelosztóval (5. ábra).
,
Professzionális tanács:
• A jobb tartású fürtök érdekében a légelosztót tartsa a fejéhez legközelebb,
így száradás közben szorosan tartja a fürtöt.
• Használja I állásban a légáram szabályzót (6), mely segíti a fürtök
természetes göndörségének kialakulását.
A hideg leveg gomb (7) használata
) A hideg leveg fixálja a hvel kialakított stílust, és fényessé teszi a hajat. A
professzionális fodrászok javasolják a használatát a hosszabban tartó frizuráért.
1 Ha megszárította és beállította a frizurát, nyomja a hideg leveg$ gombot
(17) 15 vagy 20 másodpercen keresztül a tökéletes eredmény érdekében.
4 Tisztítás és tárolás
)A
hajszárítót csak lehlt állapotban tisztítsa. Ne használjon oldó-,
mosogató- vagy súrolószert.
1 Húzza ki a készüléket.
2 Használjon száraz törl$kend$t.
3 Ha a légbeszívó nyílás elzáródik, tisztítsa ki. Ehhez forgassa el óra járásával
ellenkez$ irányba a burkolatot (3) és vegye le azt (6. ábra).
4 Egy kis kefe használatával tisztítsa meg a burkolatot (3).
5 Helyezze vissza a beszívó burkolatát (3). Ehhez a burkolat füleit illessze be a
szárító nyílásaiba és forgassa el a burkolatot óra járásával egyez$ irányba.
) Ne használja a hajszárítót megfelelen rögzített légbeszívó nyílás-burkolat nélkül.
, !" "#$",
*+<=>?@?>[\ ?] +> ]+^*=> _> `=*<{|} _> SOLAC. >~]}\ `=*<{|}] >
`=*\|}]=>_] ] `=*]+?\<\_] \ {<*^_* <> *}*?*=@} _> *>|?>_]@}> _>
_>-?+]|>}\_]}\ |]\_}] +> <* ?=\[\. *\}\ <> \ {?}?>}\
]{=_] \\|}=*{=\<]}\ _> SOLAC, +_>\|], \ }\ *}*?>=@} _> _>}=*]}\ }>_<>=}] +> |>\}?* ] ^\+*`>_*}.
}=\[\> ] +> `*}*@__* `*<*^=\_]\, SOLAC ] +>`>+?> `=>?*}* <>
??\<> `=*[\_] ^\+ `=\<?>=]}\_* {?\<*[\_]\.
1 &#$*
+"" . .:;#:$
• "#$%&" *# #"+<=>##, ?@# @% *%?" @%
#*?&*% <@%.
• ! .
"#$%&' ( )% #* &.
• X*# <@ +%$ *% @$%[", % " *% ?$#[&" ?&*%". \+]=% @<^%
<?_% #*`" ?+"%% ${ @% _`@ ?%+"%.
• |>%% ]_% @% + "%_&}@%% # @% " #$ + ?*&]% @% +# #^%] +
<@%.
• X*# <@ " ?@"%*"%" *% <?_% &#>% + "%$%&"# ~#*#+=#,
+#"# # <$+"# `*${"+# (=&}#&" @>%) "?#"# #
"^%$"# &#>% +", %= " +% "%_&}@%%"# #&# " +% #$ @%@"#
#"+<=>## &#>, ^%] *% ]"%% _*?%+"+.
• ?$"] # " $"#% <@% ? "#=%=` "%#". = <+%"#
?@# ? =%_&% #&# @<^% %+ "% <@%, " ^ #*?&*% # ^ "+
#*#%" +#*.
• = *%%"%#] =%_& ?@", ]_% @% + *%$"# ?#*@#&] #&# %[#] +#* *% +&@?@%{_" _+&<{%", #&# ?@_" =%&#~#>#%" ?+"%&, *% @% + #*_^"% "<%&"# *&?&<=#.
• #*?&*% %+# #&# ?#"%@&{"+#, =# " +% @_"# #&#
??`%"# SOLAC.
• @# =&}%" "% <@% &=#+=%% #"+%&%>#], ? @%&#
?+" "%?{"# "% <@% +`?%@% + % @$% #.
• \#"%^# #*=&}% <@% +&@ <?_% # ?@# ?+%]" #&# +%&]" "%
%+# #&# #*`[%" "% @"+# ? ?@@`{=% # ?#+%". # +?#%"
"% =%, #*=&} <@% ${%%.
@` ]_% @% + #*=&}# ?@#
=&}%" #&# #*=&}%" "% ?+&% ="%=%.
• #=^% " @`?% =%_&% # " @?<+=% <@` @% #+# "% =%_&%.
\#"%^# #*=&}% <@% =% @`?% ?+&%, "#=^% =%_&%.
#*?&*% +[%% _&#*+ @ _%"#, $#=#, @<[ #&# @<^#
@"# =""#. = <@` ?%@" ` @%, + ?#% @% ^
#*%@#. *=&} ^ "*%_%" *%%"%". #=^% "
?%?] <@% ` @% #&# @<^% "+, =%= # " ^
?+%] $#]&"%% $%[#"%.
@` " ]_% @% &#*% ="%= + @% ? $ "% ?#+%". *_]^% "%?`+=%"
"% <@% #&# *%%"%#] =%_&.
• #=^% " +%] <@% "% =#, #*&{" "% `*@+# "%
=&"%% +@%.
• @?#% %_#] <@ + $=# `>.
• #=^% " +%] <@% @% %_# `< $=% ?`"+ #&# `=%".
• # #*?&*%" "% +[%% _%"]%, #*=&} ?+&% ="%=%, `
=% _&#*+% @ @% ?%+"%, @# # ?# "%_ <@.
• % @?`&"#&"% *%#%, ??`%$ $"#%" "% %"+~$%,
" "%@#[%% 30 mA, &=#+=%% #^%, *%%"%% _%"]%.
_`" *% +` =`$ &="#=.
d
#*?%]" #&# `< =`^&% =% *% _$.
~+#"%&#+# +`% @% "%+# ^%% +<] ="# =`$ =%#%% *% $"^ #*?%"% =+% _* _$ ="#.
X% ?$%^% @% *%^&%@# ?#@$#+% # @% ?@%#
"%=`@]".
1 >*\}\ ?+<{~_>}> }={@ ? \>_>}> `**|> (].4).
&.;:.# # X"Q*. (9)
1 \< |>}* ]+[]\}\ |*>}> ], *\}\ `@_>/\, |>|}* *^]|_*?\_*.
2 *}>?\}\ |*>}> ? <]{+\=>. =>?\}\ |=**^=>+_] <?]\_]@
<]{+\=> (].5).
, ~+#"%&" +`:
• > `*-<*^=\ **=[\_] |<=]] <=}\ <]{+\=> ?+[*_* _>-^]+*
<* >?>}>, +> <> [*\ |<=]>}> <> \ +<=>?* `=]}]_>}>, <*|>}* @
]+{~>?>}\.
• +`*+?>}\ =\{>}*=> _> ?+<{~\_ `*}*| (6) ? `*+]]@ , +> <>
**=[] |<=]]}\ \}\}?\_* ^\+ ]|>}*=].
&.;:.# # *$:# . $*X# .X*\ (7)
) <@"#] `*@< ~#=+#% ?+#^"%% * ?&#] `*@< ?#+=% #
?#@%% _&]+`= "% =+%%. ~+#"%&#+# +`% @% ^
#*?&*% *% ?-@`&^%"% ?#+=%.
hu
b
FONTOS: Amennyiben már nincs szüksége a készülékre, SOHA ne
dobja azt a háztartási hulladékba. A készülék szakszer
ártalmatlanítása
érdekében
keresse
fel
a
legközelebbi
HULLADÉKHASZNOSÍTÁSSAL FOGLALKOZÓ SZOLGÁLTATÓT.
Ilyen módon is hozzájárulhat környezete megóvásához.
2 Leírás
A készülék alkatrészei
Tartozékok
A készülék háza
8 Levegkoncentrátor
Tápkábel
9 Diffúzor
Légbeszívó nyílás fedele
Légkimenet
Vezérl elemek és jelzfények
5 Hmérséklet-választó (3 fokozat)
6 Be-/kikapcsolás és légáram
szabályozó gomb (2 fokozat)
7 Hideg leveg gomb
Túlmelegedés elleni védelem
) A berendezés beépített termosztáttal rendelkezik, mely szabályozza a
hmérsékletet, így megakadályozza a túlhevülést (amennyiben a
légbeszívó, vagy kifúvó nyílás eldugul). Amennyiben ez történik, válassza le
a készüléket a hálózatról és várjon öt percet Távolítsa el az akadályt, majd
kapcsolja be ismét a készüléket.
1
2
3
4
3 Használat
)A
készülék a haj szárítására, formázására és nedvességének fenntartására
alkalmas.
n Az elektromos hálózathoz való csatlakoztatás eltt ellenrizze, hogy mind
kezei, mind a készülék teljesen szárazok-e.
n FIGYELMEZTETÉS: ne használja a készüléket víz közelében.
n Ellenrizze, hogy a légbeszívó és kifúvó nyílás nincs eltakarva.
5 Karbantartás
A készülék tisztításához használjon enyhén megnedvesített törl$kend$t és amennyiben szükséges - enyhe tisztítószert. A hajszárítót semmilyen
körülmények között ne merítse vízbe.
6 Megfelelségi nyilatkozat
„A HTM Kft. mint a termék forgalmazója kijelenti, hogy a termék a 79/1997.
(XII.31.) IKIM rendeletnek megfelel."
• Névleges feszültség: 220-240V, 50/60Hz; 2000W
• Érintésvédelmi osztály: Class II
• Zajszint: 72 dBA
7 Forgalmazza
HTM Nemzetközi Kereskedelmi Kft. 1046 Budapest, Kiss Ern$ u. 3.
Fax:
(1) 369-0403
Tel.:
(1) 370-4074/ (1) 370-1041
• A garancia minden gyártási vagy anyaghibából ered$ m%ködési
rendellenességgel kapcsolatban egy év.
• A jótállás nem terjed ki a helytelen használatból ered$ hibákra.
• A garancia nem érvényes, ha az üzletben nem teljesen vagy helytelenül töltötték
ki ill. pecsételték le a garanciajegyet.
• Nem vonatkozik a garancia az olyan károsodásokra, amelyek a helytelen
használatból vagy szállításból erednek. Ez olyan esetekre is érvényes, amikor
a készüléket nem megfelel$ földelés% dugaljhoz csatlakoztatták.
• Ugyancsak érvénytelen a garancia, ha a készüléket illetéktelen (hozzá nem
ért$ személy) próbálja javítani, aki nem tartozik a vev$szolgálathoz vagy
hivatalos szervizhez.
• A meghibásodott készüléket - beleértve a hálózati csatlakozó vezetéket is - csak
szakember, szerviz javíthatja.
bg
b
\: ^% #+=% @% #*`&# <@%, ^ #*`&] _#="" ="" *% _=&<=. %"+ ^ "%-_&#*=#]
X
#&# X X\ X| *% @% _`@ _%_". X%=%
?$%^% *% ?%*%" "% =&"%% +@%.
2 <;"#"
<#:#" :!;:##$"
["$
"
?<+
8 ">"%
%%"% =%_&
9 |#~<*
%?%= "% % *% ?#= "% `*@<
\`*@<[" :#$:" " "#X"
$:"
5 ^<&% "% $?%<%% (3
?&{"#])
6 <" *% =&}%"/#*=&}%" "%
`*@<["%% +<] (2 ?&{"#])
7 <" *% +<@" `*@<
=>"$ >* ;?#
)
@` +"%_@" + $+%, = ^<&#% $?%<%%, *% @%
?@%# ?^]%", (%= +% _&=#%"# ` "% ?#= "%
`*@< # @<["#=`). = % + +&<#, %*=% <@% # #*%=%
? $#"<#. +%" ?##"%% *% *%?<[%" # =&}
" <@%.
@
$"J
" ;+"Q"
+""
• *<_* _>`=\\_]\: 220-240V, 50/60Hz
• >+*< _> \_\=]@: 2000W
1
2
3
4
3 ;:$
) X*# <@ ?@"%*"%" *% ?@+<[%%", ~$]" # &%{"]%" "%
=+%%.
n @# =&}%" "% <@% &=#+=%% ${%, < +, `> # # <@` +% "%?`&" +<#.
n \: " #*?&*% <@% _&#*+ @ @%.
n
+ # *% ?#= # #*?<+=%" "% `*@< " +%
*%?<["#.
1 |* \>\}\, `=]|=\`\}\ |*_\_}=>}*=> (8) ]] <]{+\=> (9). > <>
_>`=>?]}\ }*?>, `=]|=\`\}\ `=]}>?|>}> |[ *}?*=> +> ?+<{ (]. 1)
2 |\}\ {=\<> ? \\|}=]\|>}> [=\> ] `*}>?\}\ =\{>}*=> _>
?+<{~_>}> }={@ (6) ? \>_*}* `**\_]\: O-]+|\_*, -[]_][>_>
|*=*}, -[>|][>_> |*=*} (]. 2).
3 *}>?\}\ }\[`\=>}{=_]@ \\|}*= (5) ? \>_*}* `**\_]\ (]. 3):
0- []_][>_* _>=@?>_\, I- =\<_* _>=@?>_\, II-[>|][>_*
_>=@?>_\.
4 \<?>}\ ]_}={|]]}\ +> ]+{~>?>_\ `*=\< `=]}>?|>}>, |*@}*
]+`*+?>}\.
5 |* ]|>}\ ?+<{~_> }={@ ^\+ _>=@?>_\, _>}]_\}\ ^{}*_> +> }{<\_
?+<{ (7).
6 \< ]+`*+?>_\ _> \~*>=>, `*}>?\}\ =\{>}*=> _> ?+<{~_>}>
}={@ (6) ? `**\_]\ O.
&.;:.# # :#+#$$: (8)
) ~+#"%&"#] "%=%"#= (8) # ?*&]% @% "%+# `*@<["%%
+<] =`$ +?>#~#"% =%, "%?#$ =`$ ="# *% ~= "%
<@% +%$ =^% +<@". #*?&*%
%*#&# #&# %_%*#"# +% *% ?#+%".
1 +|\}\ {=\<> *} |*_}>|}>.
2 +`*+?>}\ {> |=`>.
3 |* *}?*=} +> `=]}*| _> ?+<{ \ ^*|]=>_, `*]}\}\ *. > \}>,
+>?=}\}\ |>`>|> *^=>}_* _> >*?_]|*?>}> }=\|> ] [>_\}\ |>`>|>
(3) (]. 6).
4 *]}\}\ |>`>|> (3) [>|> \}|>.
5 *}>?\}\ *^=>}_* |>`>|> _> ?+<{~_]@ *}?*= (3). > \}>, ]+=>?_\}\
]}*?\}\ _> |>`>|> <{`|]}\ ? \~*>=> ] +>?=}\}\ |>`>|> `*
`**|> _> >*?_]|*?>}> }=\|>.
) #*?&*% +[%%, %= =%?%=` "% % *% ?#= "% `*@< "
?#=?" ?%#&".
,Poštovani korisnie!
estitamo Vam na odabiru proizvoda tvrtke SOLAC. Naši proizvodi razvijeni su i
proizvedeni kako bi dugotrajno ispunili oekivanja naših najzahtjevnijih korisnika.
Uz elektrine aparate tvrtke SOLAC, koji ispunjavaju najstrože zahtjeve kakvoe i
sigurnosti, uvijek ete se osjeati sigurno. Neprestano tražei naine unaprjeenja
svojih proizvoda, SOLAC pridržava pravo na izmjene bez prethodne obavijesti.
1 Sigurnosne upute
• Temeljito proitajte ove upute prije uporabe aparata.
• Ovaj je prirunik neizostavan dio proizvoda. Sauvajte ga na sigurnom mjestu
za buduu uporabu.
• Ovaj aparat namijenjen je za uporabu u kuanstvu. Nije namijenjen za industrijske
potrebe. Uporaba izvan navedene namjene može predstavljati opasnost.
• Djeca se ne smiju igrati s aparatom te moraju biti pod nadzorom.
• Ovaj aparat ne smiju koristiti osobe (ukljuujui djecu) smanjenih fizikih, osjetilnih ili
mentalnih sposobnosti, neiskusne osobe i osobe koje ne poznaju aparat, osim uz
nadzor ili upute osoba odgovornih za njihovu sigurnost.
• Ni na koji nain nemojte mijenjati niti popravljati aparat. Ako primijetite kvar na kabelu
ili bilo kojem drugom dijelu aparata, prestanite ga koristiti i odnesite ga u ovlašteni
servis.
• Zamjenu ošteenog mrežnog kabela prepustite proizvoau, servisnoj radionici ili
slinom strunom osoblju kako biste izbjegli mogue opasnosti.
• Ne koristite dijelove ili pribor koje ne isporuuje ili preporua SOLAC.
• Prije prikljuivanja aparata na elektrinu mrežu provjerite odgovara li napon s natpisne
ploice aparata naponu mreže u vašem kuanstvu.
• Uvijek izvucite kabel iz utinice nakon uporabe, prije namještanja ili uklanjanja dijelova
te prije išenja i održavanja aparata. U sluaju nestanka struje iskljuite aparat.
Aparat mora biti iskljuen prilikom prikljuivanja i iskljuivanja na elektrinu mrežu.
• Nikada ne povlaite kabel i ne vješajte aparat na njega. Nikada ne iskljuujte aparat
povlaenjem kabela - izvucite utika.
Ne koristite aparat u blizini kada, sudopera, tuševa i drugih spremnika s vodom.
Ako aparat padne u vodu, NE pokušavajte ga izvaditi. Odmah ga iskljuite iz
napajanja. Nikada ne uranjajte aparat u vodu ili druge tekuine i ne perite ga u
perilici za sue. Prilikom išenja aparat ne smije doi u kontakt s vodom.
Nemojte vodom poprskati aparat ni kabel za napajanje.
• Nikada ne ostavljajte aparat na otvorenom izložen vremenskim utjecajima.
• Ne dirajte ukljueni aparat mokrim rukama.
• Nikada ne ostavljajte ukljueni aparat na vlažnoj površini ili tkanini.
• Prilikom uporabe sušila u kupaonici, iskljuite ga iz napajanja nakon uporabe budui
da blizina vode predstavlja opasnost ak i kada je sušilo iskljueno.
• Za dodatnu zaštitu preporuena je ugradnja zaštitne diferencijalne sklopke (RDD)
ispod 30 mA u elektrini krug kupaonice. Obratite se elektroinstalateru za savjet.
VAŽNO: NIKADA ne bacajte aparat u kantu za otpatke. Odnesite ga u
najbliže ODLAGALIŠTE ili deponij u blizini vašeg doma. Time
pomažete u zaštiti okoliša.
d
b
Glavni dijelovi
Dodatna oprema
1 Kuište
8 Koncentrator
2 Kabel za napajanje
9 Raspršivaa
3 Poklopac otvora za ulaz zraka
4 Izlaz zraka
Kontrole i kontrolne lampice
5 Regulator temperature (3 položaja)
6 Gumb za uklj./isklj. i regulaciju strujanja
zraka (2 položaja)
7 Gumb za hladni zrak
Zaštita od pregrijavanja
) Ovaj aparat sadrži termostat za regulaciju temperature kako bi se sprijeilo
pregrijavanje aparata (u sluaju da su otvori za ulaz ili izlaz zraka zaepljeni). U
Mod. SP7149
Secador de pelo
INSTRUCCIONES DE USO
Hair dryer
INSTRUCTIONS FOR USE
Sèche-cheveux
MODE D’EMPLOI
Haartrockner
GEBRAUCHSANLEITUNG
Secador de cabelo
INSTRUÇÕES DE USO
Asciugacapelli
ISTRUZIONI PER L’USO
Haardroger
GEBRUIKSAANWIJZING
Fén
NÁVOD K POUZITÍ
Suszarka
INSTRUKCJA OBSUGI
Suši vlasov
NÁVOD NA POUŽITIE
) Aparat je namijenjen za sušenje, oblikovanje i vlaženje kose.
n Prije prikljuivanja aparata na napajanje ruke i aparat moraju biti potpuno
Hajszárító
HASZNÁLATI UTASÍTÁS
}:
n UPOZORENJE: Ne koristite aparat u blizini vode.
n Otvori za ulaz i izlaz zraka ne smiju biti blokirani.
Sušilo za kosu
UPUTE ZA UPOTREBU
Usc`tor de p`r
INSTRUCIUNI DE UTILIZARE
hr
tom sluaju iskljuite aparat i priekajte pet minuta. Uklonite predmet koji je
prouzroio zaepljenje i ponovno ukljuite aparat.
Elektrini podaci
• Ulazni napon: 220-240V, 50/60Hz
• Potrošnja energije: 2000W
3 Primjena
suhi.
1 Ako želite, namjestite koncentrator (8) ili raspršiva (9). Da biste to uinili,
montirajte dodatak na izlaz zrak (sl. 1)
2 Prikljuite aparat u napajanje i namjestite gumb za regulaciju strujanja zraka (6) u
željeni položaj: O-iskljueno, -minimalna brzina, -maksimalna brzina (sl. 2).
3 Namjestite regulator temperature (5) u željeni položaj (sl. 3):
I-minimalna toplina, I-srednja toplina, II-maksimalna toplina.
4 Slijedite upute za sušenje u skladu s uporabljenim dodatkom.
5 Ukoliko ne želite topli zrak, pritisnite gumb za hladni zrak (7).
6 Nakon uporabe aparata, namjestite regulator strujanja zraka (6) u položaj O.
Uporaba koncentratora (8)
) Profesionalni nastavak (8) omoguuje vam da usmjerite protok zraka prema
odreenoj toci, na primjer, prema korijenu za ravnanje kose ili prema okrugloj
etki za dobivanje volumena. Strunjaci savjetuju usmjeravanje protoka vrueg
zraka od korijena prema vrhu za potpuno ravnu kosu bez imalo volumena na
korijenu. Time korijen biva zaštien i smanjuje se mogunost uvijanja kose.
1 Usmjerite zrak prema željenom podruju (sl. 4).
Uporaba raspršivaa (9)
1 Nakon pranja kose nanesite pjenu ili gel za kosu.
2 Kosu stavite u raspršiva. Kružnim pokretima pomiite raspršiva (sl. 5).
, Savjet strunjaka:
• Za izraženije kovre raspršiva držite što bliže vlasištu tako da je kovra
vrsto omotana dok se suši.
• Koristite gumb protoka zraka (6) u položaju
kako biste postigli prirodno
oblikovane kovre.
Korištenje gumba za hladni zrak (7)
) Hladan zrak utvruje izgled postignut vruim zrakom i daje sjaj kosi. Strunjaci
preporuuju njegovo korištenje za dugotrajniji izgled.
1 Nakon što ste osušili i odredili oblik pramena kose, pritisnite gumb za hladni
zrak (7) i držite ga 15 do 20 sekundi za savršene rezultate.
INSTRUCIUNI DE UTILIZARE
4 iš^enje i pohrana
) Aparat istite samo kad je potpuno hladan. Ne koristite otapala, deterdžente ni
abrazivna sredstva za išenje.
1 Izvucite kabel iz napajanja.
2 Koristite suhu krpu.
3 Ukoliko je otvor za ulaz zraka zaepljen, oistite ga.
Da biste to uinili, okrenite pokrov u smjeru obrnutom od kazaljke na satu i
izvucite pokrov (3) (sl. 6).
4 Oistite poklopac (3) etkicom.
5 Ponovno montirajte pokrov otvora za ulaz zraka (3). Da biste to uinili,
poravnajte jezike na pokrovu s rupama u sušilu i okrenite pokrov u smjeru
kazaljke na satu.
) Nemojte koristiti sušilo dok poklopac otvora za ulaz zraka nije ispravno
privršen.
Solac is a registered Trade Mark
ROMÂN
,Stimate client
ro
• Citii în întregime aceste instruciuni înainte de a utiliza aparatul.
• Acest manual reprezint+ o parte integrant+ a produsului. P+stra/i-l la loc
sigur, pentru a putea fi consultat în viitor.
• Acest aparat este destinat exclusiv utilizrii casnice; nu se va folosi în scopuri
industriale. Orice alt utilizare decât cea descris în prezentele instruciuni poate
fi periculoas.
• Copiii trebuie supravegheai pentru a fi siguri c nu se joac cu aparatul.
• Acest aparat nu a fost proiectat pentru a fi utilizat de ctre persoane (inclusiv copii)
cu capaciti fizice, senzoriale sau psihice reduse, sau care nu au experien i
cunotine, decât sub supravegherea unei persoane rspunztoare pentru
sigurana lor sau dup ce au primit instruciuni cu privire la folosirea aparatului de
la acea persoan.
• Nu modificai i nu reparai aparatul în nici un fel. Dac identificai orice fel de
anomalii la cablul de alimentare sau la oricare alt component a aparatului, nu îl
mai folosii i contactai o unitate service autorizat.
• În cazul deteriorrii cablului de alimentare, acesta trebuie înlocuit de productor
sau de unitatea de service post-vânzare sau de ctre personal calificat, pentru a
preveni posibilele accidente.
• Nu folosii componente sau accesorii care nu au fost furnizate sau recomandate
de SOLAC.
• Înainte de a introduce aparatul în priz, verificai dac tensiunea indicat pe aparat
este aceeai cu cea din locuina dumneavoastr.
• Întotdeauna scoatei aparatul din priz dup utilizare, înainte de a monta sau de a
scoate piese ale acestuia i înainte de a efectua operaiuni de întreinere i de
curare. De asemenea, scoatei aparatul din priz în cazul întreruperii alimentrii
cu energie electric. Înainte de a scoate sau de a introduce aparatul în priz,
asigurai-v c acesta este oprit.
• Nu tragei niciodat de cablul de alimentare i nici nu agai aparatul de cablul de
alimentare. Scoatei întotdeauna aparatul din priz trgând de techer, niciodat
de cablul de alimentare.
Nu utilizai usctorul de pr în apropierea bilor, spltoarelor, duurilor sau
a altor recipiente care conin ap. Dac acesta cade în ap, NU încercai s
îl scoatei. Scoatei-l imediat din priz.Nu introducei niciodat aparatul în
ap i în nici un alt lichid i nu îl introducei în maina de splat vase. În timp
ce curai aparatul, acesta nu trebuie s intre în contact cu apa. Evitai s
stropii aparatul i cablul de alimentare.
• Nu lsai niciodat aparatul în afara locuinei, expus fenomenelor naturale.
• Nu atingei aparatul cu mâinile ude atunci când acesta este în funciune.
• Nu lsai niciodat aparatul în funciune pe o suprafa umed sau pe materiale
textile.
• Atunci când folosii usctorul de pr în baie, scoatei-l din priz, deoarece este
periculos s apropiai aparatul de ap chiar când acesta este oprit.
• Pentru o protecie suplimentar, v recomandm s montai, pe circuitul electric
ce deservete baia, un dispozitiv de protecie prin detectarea diferenial a
curenilor reziduali (RDD) care s nu depeasc 30mA. Pentru detalii consultai
electricianul dumneavoastr.
IMPORTANT: Atunci când dorii s aruncai aparatul, NU îl aruncai
niciodat la gunoi. Ducei-l la cel mai apropiat PUNCT DE
COLECTARE a materialelor uzate, pentru a fi prelucrat
corespunztor. Astfel, vei contribui la îngrijirea mediului înconjurtor.
d
b
2 Descriere
Componentele principale
Unitate principal
Cablu de alimentare
Capacul intrrii de aer
Ieirea de aer
Dispozitive de control xi indicatoare
5 Comutator pentru selectarea temperaturii (3 poziii)
6 Comutator Pornit/Oprit i pentru controlul
jetului de aer (2 poziii)
7 Buton pentru aer rece
1
2
3
4
12/10
Protec_ie la supraînc`lzire
V felicitm pentru c ai ales un produs Solac. Produsele noastre sunt
proiectate i fabricate pentru a îndeplini cât se poate de bine ateptrile celor
mai exigeni clieni ai notri, pe o perioad lung de timp. V putei simi în
siguran cu aparatele electrice SOLAC, tiind c acestea respect cele mai
stricte standarde de calitate i siguran. În dorina de a îmbunti în mod
continuu produsele, SOLAC îi rezerv dreptul de a face modificri fr
notificare prealabil.
1 Instruc_iuni privind siguran_a
8 Garanciafeltételek
) #+%
HRVATSKA
2 Opis
1 Ha kívánja, csatlakoztassa a koncentrátort (8) vagy a leveg$elosztót (9).
Ehhez helyezze fel a tartozékot a leveg$kimenetre (1. ábra).
2 Csatlakoztassa a készüléket az elektromos hálózathoz, és állítsa a légáram
szabályozót (6) a kívánt állásba: O-ki, -minimális sebesség,
-maximális
sebesség (2. ábra)
3 Állítsa a h$mérséklet-választót (5) a kívánt állásba (3. ábra)
0 - minimális h$mérséklet, I - közepes h$mérséklet, II - maximális
h$mérséklet.
4 A használt tartozéknak megfelel$en tartsa be a szárítási útmutatásokat.
5 Ha felf%tetlen leveg$t kíván nyomja meg a hideg leveg$ gombot (7).
6 A szárítás végeztével állítsa a kapcsolót (6) O állásba.
A levegkoncentrátor (8) használata
) A professzionális fúvóka (8) lehetvé teszi, hogy a levegt közvetlenül egy
pontra irányítsa, például hajsimítás esetén hajthöz, vagy körkefére.
A professzionális fodrászok javaslata szerint a forró levegt a hajttl a végek
1 *[ ?\<_ }\ ]+{~]] ] ]|]=>] *=[>}> _> |]{= |*>,
_>}]_\}\ ^{}*_> +> }{<\_ ?+<{ (7) +> 15 ]] 20 \|{_<] +>
`\=\|}\_ =\+{}>}.
4 \##" " ;:J"$#
Accesorii
8 Accesoriul pentru
concentrarea jetului de
aer
9 Difuzor
) Acest dispozitiv are un termostat care regleaz temperatura pentru a preveni
supraînclzirea acestuia (dac intrarea sau ieirea de aer este blocat). Dac
acest lucru se întâmpl, deconectai dispozitivul i ateptai cinci minute.
Îndeprtai cauza care a determinat blocarea i pornii din nou aparatul.
Specifica_ii electrice
• Tensiune de alimentare: 220-240V, 50/60Hz
• Putere consumat: 2000W
3 Utilizare
) Acest aparat a fost proiectat pentru uscarea, aranjarea i hidratarea prului.
n Înainte de a introduce aparatul în priz, asigurai-v v atât mâinile
dumneavoastr cât i aparatul sunt complet uscate.
n AVERTISMENT: nu folosii aparatul în apropierea apei.
n Asigurai-v c admisia pentru aer i ieirea pentru
aer nu sunt
obstrucionate.
1 Dac dorii, ataai accesoriul pentru concentrarea jetului de aer (8) sau
accesoriul pentru difuzare (9). Pentru aceasta, montai accesoriul pe
evacuarea aerului (fig. 1)
2 Introducei aparatul în priz i plasai comutatorul pentru jetul de aer (6) în
poziia dorit: O-oprit, -vitez minim, -vitez maxim (fig. 2).
3 Reglai comutatorul pentru selectarea temperaturii (5) în poziia dorit (fig.
3):
0- temperatur minim, I- temperatur medie, II-temperatur maxim.
4 Consultai instruciunile de uscare conform accesoriului utilizat.
5 Dac nu dorii ca jetul de aer s fie cald, apsai butonul pentru aer rece (7).
6 Dup ce ai terminat de folosit usctorul, plasai comutatorul pentru
controlul jetului de aer (6) pe poziia O.
Utilizarea accesoriului pentru concentrarea jetului de aer (8)
) Duza profesional (8) v permite s îndreptai fluxul de aer spre un anumit
punct, de exemplu, spre rdcini, pentru un efect de îndreptare sau spre o
perie rotund, pentru volum.
Profesionitii recomand direcionarea fluxului de aer cald de la rdcin
ctre vârfuri pentru un pr foarte drept, fr volum la rdcini. Aceasta ajut
la închiderea cuticulelor i reducerea buclelor.
1 Îndreptai jetul de aer spre zona dorit (fig. 4).
Utilizarea accesoriului pentru difuzare (9)
1 Dup splarea prului, aplicai spum/gel ca de obicei.
2 Introducei prul în difuzor. Micai circular difuzorul (fig. 5).
, Profesionitii recomand:
• Pentru bucle mai bine definite, apropiai difuzorul de cap cât de mult
posibil, astfel încât bucla s fie bine fixat în timp ce se usuc.
• Folosirea comutatorului fluxului de aer (6) în poziia pentru a încuraja
formarea natural a buclelor fr a le încrei.
Folosirea butonului pentru aer rece (7)
) Aerul rece fixeaz coafura obinut i ofer prului strlucire. Profesionitii
recomand folosirea acestuia pentru o coafur care rezist mai mult.
1 Dup ce ai uscat prul i ai fixat forma buclelor, apsai pe butonul pentru
aer rece (7) timp de 15 sau 20 de secunde pentru un rezultat perfect.
es
en
fr
de
pt
it
nl
cs
pl
sk
hu
bg
hr
ro
•
•
•
•
•
•
•
•
•
•
•
•
•
•
ESPAÑOL
ENGLISH
FRANÇAIS
DEUTSCH
PORTUGUÊS
ITALIANO
NEDERLANDS
ESKY
POLSKI
SLOVENINA
MAGYAR
HRVATSKA
ROMÂN
4 Cur`_are xi depozitare
) Curai usctorul de pr numai atunci când acesta este rece. Nu utilizai nici
un fel de solveni, detergeni sau produse abrazive.
1 Scoatei aparatul din priz.
2 Folosii o cârp uscat.
3 Dac intrarea de aer se blocheaz, curai-o.
Pentru aceasta, rotii capacul în sens antiorar i tragei-l (3) în afar (fig. 6).
4 Curai capacul (3) utilizând o perie mic.
5 Înlocuii capacul intrrii de aer (3). Pentru aceasta, aliniai ghidajele de pe
capac cu gurile din usctorul de pr i rotii capacul în sens orar.
) Nu folosii usctorul de pr în cazul în care capacul intrrii aerului nu este
corect ataat.
}
100% Recycled Paper