1
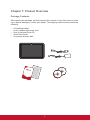
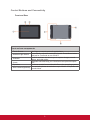
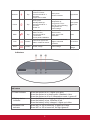
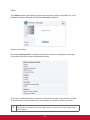
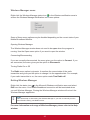
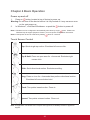
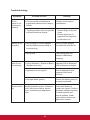
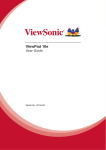
ViewPad 10pi
User Guide
Model No. VS14406
Compliance Information
FCC Statement
The following statement applies to all products that have received FCC approval.
Applicable products bear the FCC logo, and/or an FCC ID in the format FCC ID:
GSS-VS14406 on the product label.This device complies with part 15 of the FCC
Rules. Operation is subject to the following two conditions: (1) This device may
not cause harmful interference, and (2) This device must accept any interference
received, including interference that may cause undesired operation. This
mobiledevice has been tested and found to comply with the limits for a Class B
digital device, pursuant to Part 15 of the FCC Rules. These limits are designed
to provide reasonable protection against harmful interference in a residential
installation. This equipment generates, uses and can radiate radio frequencyenergy
and, if not installed and used in accordance with the instructions, may cause
harmful interferenceto radio communications. However, there is no guarantee that
interference will not occur in a particular installation. If this equipment does cause
harmful interference to radio or television reception, which can be determined
by turning the equipment off and on, the user is encouraged to try to correct the
interference by one or more of the following measures
• Reorient or relocate the receiving antenna.
• Increase the separation between the equipment and receiver.
• Connect the equipment into an outlet on a circuit different from that to which the
receiver
is connected.
• Consult the dealer or an experienced radio/TV technician for help.
Changes or modifications not expressly approved by the party responsible for
compliance couldvoid theuser’s authority to operate the equipment.The antenna(s)
used for this transmitter must not be colocated or operating in conjunction with any
otherantenna or transmitter.
FCC SAR information
FCC Radiation Exposure Statement
This equipment complies with FCC RF radiation exposure limits set forth an
uncontrolled environment. This transmitter must not be co-located or operating in
conjunction with any other antenna or transmitter.
The device was tested and complies to measurement standards and procedures
specified in FCC OE Bulletin 65, Supplement C.
i
Important Safety Instructions
1.
2.
3.
4.
5.
6.
7.
8.
9.
10.
11.
12.
13.
14.
15.
16.
17.
18.
19.
20.
DO NOT place objects on top of the ViewPad, as objects may scratch the
screen.
DO NOT expose the ViewPad to dirty or dusty environments.
DO NOT place the ViewPad on an uneven or unstable surface.
DO NOT insert any foreign objects into the ViewPad.
DO NOT expose the ViewPad to strong magnetic or electrical field.
DO NOT expose the ViewPad to direct sunlight as it can damage the LCD
Screen.
Keep it away from heat sources.
SAFE TEMPERATURE: This ViewPad should only be used in environments
with ambient temperatures between 0°C (32°F) and 40°C(104°F).
DO NOT use the ViewPad in the rain.
Please check with your Local Authority or retailer for proper disposal of
electronic products.
The ViewPad and the adapter may produce some heat during normal operation
or charging. DO NOT leave the ViewPad on your lap to prevent discomfort or
injury from heat exposure.
POWER INPUT RATING: Refer to the rating label on the ViewPad and be sure
that the power adapter complies with the rating. Only use accessories specified
by the manufacturer.
DO NOT use a pen or any sharp object to tap the screen.
Clean the touch screen with a soft cloth. If needed, dampen the cloth slightly
before cleaning. Never use abrasives or cleaning solutions.
Always power off the ViewPad to install or remove external devices that do not
support hot-plug.
Disconnect the ViewPad from an electrical outlet and power off before cleaning
the ViewPad.
DO NOT disassemble the ViewPad, only a certified service technician should
perform repair.
The ViewPad has apertures to disperse heat. DO NOT block the ViewPad
ventilation, the ViewPad may become hot and malfunction as a result.
Risk of explosion if battery replaced by an incorrect type. Dispose of used
batteries according to the instructions.
Users have to use the connection to USB interfaces with USB 2.0 version or
higher.
PLUGGABLE EQUIPMENT, the socket-outlet shell be installed near the
equipment and shall be easily accessible.
ii
Copyright Information
Copyright © ViewSonic® Corporation, 2011. All rights reserved.
ViewSonic®, the three birds logo, On View®, ViewMatch™, and ViewMeter® are
registered trademarks of ViewSonic® Corporation.
All products use in this device and trademarks mentioned herein are trademarks or
registered trademarks of their respective owners.
Microsoft®, Windows®, Windows NT®, and the Windows® logo are registered
trademarks of Microsoft® Corporation in the United States and other countries.
Intel®, Pentium®, and Atom™ are registered trademarks of Intel Corporation.
Wi-Fi and the Wi-Fi CERTIFIED logo are registered trademarks of the Wireless
Fidelity Alliance.
SD, SDHC are trademarks of SD Card Association.
Bluetooth and the Bluetooth logo are trademarks owned by Bluetooth SIG, Inc.
The prediction engine of the input method is TOUCHPAL, provided by COOTEK.
Disclaimer: ViewSonic Corporation shall not be liable for technical or editorial errors
or omissions contained herein; nor for incidental or consequential damages resulting
from furnishing this material, or the performance or use of this product.
In the interest of continuing product improvement, ViewSonic Corporation reserves
the right to change product specifications without notice. Information in this document
may change without notice.
No part of this document may be copied, reproduced, or transmitted by any means,
for any purpose without prior written permission from ViewSonic Corporation.
Product Registration
To meet your future needs, and to receive any additional product information as it
becomes available, please register your product on the Internet at: www.viewsonic.
com.
For Your Records
Product Name:
Model Number:
Document Number:
Serial Number:
Purchase Date:
ViewPad 10pi
VS14406
ViewPad 10pi_UG_ENG Rev. 1A 09-02-11
_______________________________
_______________________________
Product disposal at end of product life
ViewSonic respects the environment and is committed to working and living green. Thank you for
being part of Smarter, Greener Computing. Please visit ViewSonic website to learn more.
USA & Canada: http://www.viewsonic.com/company/green/recycle-program/
Europe: http://www.viewsoniceurope.com/uk/kbase/article.php?id=639
Taiwan: http://recycle.epa.gov.tw/recycle/index2.aspx
iii
Table of Contents
Chapter 1: Product Overview---------------------------------------------------- 2
Package Contents--------------------------------------------------------------------------2
Control Buttons and Connectivity-------------------------------------------------------3
Front and Rear---------------------------------------------------------------------------3
Side view----------------------------------------------------------------------------------4
Navigation, Control Buttons----------------------------------------------------------4
Indicators----------------------------------------------------------------------------------5
Chapter 2: Setup--------------------------------------------------------------------- 6
Battery Replacement-------------------------------------------------------------------6
Charging Battery------------------------------------------------------------------------6
Memory Card-----------------------------------------------------------------------------7
Touch Panel Setup----------------------------------------------------------------------7
Connect to a wireless networks-----------------------------------------------------8
Bluetooth----------------------------------------------------------------------------------9
Chapter 3: Cellular Data Network (3G Data) Setup---------------------- 11
Starting Wireless Manager --------------------------------------------------------- 11
PIN --------------------------------------------------------------------------------------- 12
PUK -------------------------------------------------------------------------------------- 12
Multiple Profiles ----------------------------------------------------------------------- 13
Settings---------------------------------------------------------------------------------- 15
Auto Start ------------------------------------------------------------------------------- 16
SIM --------------------------------------------------------------------------------------- 16
Radio ------------------------------------------------------------------------------------ 17
Networks-------------------------------------------------------------------------------- 21
Connection ----------------------------------------------------------------------------- 23
Wireless Manager menu ------------------------------------------------------------ 25
Exiting Wireless Manager ---------------------------------------------------------- 25
Chapter 4 Basic Operation-------------------------------------------------------26
Power up and off---------------------------------------------------------------------- 26
Touch Screen Control---------------------------------------------------------------- 26
Virtual Keyboard----------------------------------------------------------------------- 27
ViewScene------------------------------------------------------------------------------ 27
1
Chapter 1: Product Overview
Package Contents
After opening the package, carefully inspect the contents. If any of the items is missing or appear damaged, contact your dealer. The shipping carton should contain the
following:
•
•
•
•
•
A ViewPadpi tablet.
An AC adapter with power cord
User Guide and Driver CD
Quick Start Guide
An system recovery disk
User Guide and
Installation Software
ViewPad Series Tablet
View
Pa
Quick d 10pi
Star
t Gu
ide
PC System Requirements
Intel® Pentium® processor or
greater running on Windows®
Platform, 4x CD-ROM drive;
64MB or more of available
RAM; 800x600 color display.
Microsoft Windows 7 Professional
®
®
For distribution only with
a new ViewSonic® PC.
This disc contains 32-bit software only.
External Recovery Media Disc 1 of 1
Copyright © 2011, ViewSonic Corporation. All rights reserved. All trademarks,
registered or otherwise, are the property of their respective companies. Disclaimer:
Support for these products
ViewSonic Corporation shall not be liable for technical or editorial reeors or
®
contained herein; nor for incidental or consequential damages resulting
.
provided by ViewSonicomissions
from furnishing this meterial, or the performance or use of this product. In the
For technical support interest of continuing product improvement, ViewSonic Corporation reserves the
right to change product specifications without notice. Information in this CD-ROM
information, visit
may change without notice, No part of this CD-ROM may be copied, reproduced, or
transmitted by any means, for any purpose without prior written permission of
www.viewsonic.com ViewSonic
Corporation.
03/14/11 • ViewPad_CD • Made in China
Portions © 2011 Microsoft
Corporation. All rights reserved.
© 2011 ViewSonic
Part No. 03/14/11_VPD_Ver.1
Copyright © 2011, ViewSonic Corporation. All rights reserved. All trademarks,
registered or otherwise, are the property of their respective companies. Disclaimer:
ViewSonic Corporation shall not be liable for technical or editorial reeors or
omissions contained herein; nor for incidental or consequential damages resulting
from furnishing this meterial, or the performance or use of this product. In the
interest of continuing product improvement, ViewSonic Corporation reserves the
right to change product specifications without notice. Information in this CD-ROM
may change without notice, No part of this CD-ROM may be copied, reproduced, or
transmitted by any means, for any purpose without prior written permission of
ViewSonic Corporation.
03/14/11 • ViewPad_CD • Made in China
2
Control Buttons and Connectivity
Front and Rear
Front and rear components
1. Touch Screen
Use finger to control system & applications.
Automatically adjust the backlight of panel. Press Menu button
2. Ambient Light Sensor
and last for 3 seconds to turn on/off it.
A built-in webcam that allows you to capture images, record
3. Webcam
videos, and chat online.
Dissipate heat and keep your ViewPad at an optimal tempera4. Vents
ture.
5. Speakers
Produces sounds from multimedia files or the operating system.
You can take photos at resolutions up to 2048 x 1536 pixels and
6. Rear camera(Optional)
record videos.
3
Side view
Side components
1. Lock slot
7. Back button
13. Docking connector
2. Home button
8. Power jack
14. MIC
3. Menu button
9. Audio output jack
15. Lock switch
4. Volume/brightness buttons
10. USB ports
16. Reset eject hole
5. Indicators
11. Memory card slot
6. Power switch
12. 3G SIM card slot(Optional)
Navigation, Control Buttons
The external buttons have different function in different OS.
Button
Icon Location
Function in Windows
ANDROID
Function
in DOS
Home
Top
Short press:
Go to desktop
Press and hold for 3
seconds:
Turn on/off light sensor
Menu
Top
Ctrl+Alt+Delete
Open Menu
Down Arrow
Top
Short press:
volume decrease;
Press and hold for 3
seconds:
brightness decrease.
Short press:
volume decrease
Left Arrow
Volume-
4
Go to home screen
UP Arrow
Top
Short press:
volume increase;
Press and hold for 3
seconds:
brightness increase.
Short press:
volume increase
Right Arrow
Top
Short press:
standby/Wake up;
Press and hold for 4
seconds:
Power off
Short press<2.5s:
sleep/wake up;
Long press 2.5~7s:
pop-up power off dialog;
Long Press>7s:
Power outage.
Short press:
Power On/
Off
Back
Top
Short press:
ESC Function;
Press and hold for
10 seconds:
Touch panel Calibration
Back function;
Press 10s to H/W
Calibration
Enter
Lock
Bottom
Turn left or right to disable or enable G-sensor
Left to locked G-Sensor ;
Right to unlocked
G-Sensor
No function
Reset
Bottom
Power outage
Power outage
Power
outage
Volume+
Power
Indicators
Indicators
1. Power indicator
2. Battery status
indicator
3.Wireless LAN
indicator
When the system is on, it lights up in blue.
When the system is in sleep mode, it flashes in blue.
When the system is off or in Hibernation mode, it goes off.
When the battery is in charging, it lights up in red.
When the battery is low, it flashes in red.
When the battery is fully charged, it lights up in blue.
When WiFi or 3G is turned on, it lights up in blue.
When WiFi or 3G is turned off, the light goes off.
5
Chapter 2: Setup
Battery Replacement
Battery is permanently fixed to the device. Battery replacement should be performed
by an authorized ViewSonic service center. Please contact local ViewSonic customer
service for more information.
Charging Battery
The new battery is only partially charged out of box. To fully charge the battery,
please follow the below instruction.
1.
2.
Connect one end of the AC adapter to the charger jack.
Plug the other end of the AC adapter to the wall outlet to start charging.
When the battery is charging, the charge indicator LED will be flashing in amber; the
battery icon is also displayed in the status bar. When battery is fully charged, the
charge indicator LED will change to blue; if device is turned on, the battery icon will
be displayed as fully charged.
Note: Use only the provided AC power adapter for battery charging. The battery life may vary
depending on actual usage.
6
Memory Card
SD memory card provides additional data storage space.
To install SD/SDHC card
1. Open card door.
2. Insert SD/SDHC card following the indicative mark.
3. Close the card door.
To remove the SD/SDHC card
1. For safe removal, go to Windows task bar and right mouse click on icon. Select
eject SD card option.
2. After Windows prompts, “The device is now safe to remove” open the card cover.
3. Push to eject the SD card from the slot.
NOTE!
Do not remove the memory card while it’s being accessed. Sudden removal of the memory
card may cause data loss or unpredictable system behavior.
Touch Panel Setup
The touch panel of this device has been factory calibrated. In most cases,
recalibration is not necessary. However, due to the nature of capacitive touch panel,
change of geographical location may require recalibration for the new environment
conditions.
If touch panel is experiencing improper behavior, please perform touch panel
calibration procedure as below.
1. Tap on
(ILITEK) icon to open touch panel calibration menu.
2. Place the device on a flat table top. Avoid any touch contact to the touch panel
while performing the calibration.
7
3. Tap on “Calibration” to start the process.
4. When calibration is completed, message “Calibration OK” will be shown.
Hardware calibration:
You can also calibrate the touch panel by pressing and hold the Back button for 10
seconds until the battery indicator flashes in red.
Connect to a wireless networks
1. Make sure you are located within the wireless network service area. Press the
Wi-Fi button to turn on Wi-Fi, and the Wi-Fi indicator light up in blue. ( If insert a
SIM card, and turn on 3G, you also can conncect to a 3G networks)
in the notication area, a list of available wireless
2. Click the network icon
networks will be displayed.
( Wi-Fi hotspots and 3G networks will show up
together in the same list. Windows 7 also virtualises
the Wi-Fi card so you can use it twice, for example to
connect WPS device to a non-WPS access point.)
(To connect to some networks that require security
authentication, you may have to undergo another
authorization process and enter username and
password. For details, please consult your network
administrator.)
(For data security, it is strongly recommended
to connect to security-enabled wireless networks
whenever possible.)
(When travelling by air, please be sure to turn o
wireless networking to avoid any possible risks to ight
safety.)
3. Choose a network and then click Connect. If security authentication is not
required by the network you are using, there will be a successful message
showing that you have connected to the network.
The configurations may vary depending on the model number. Check the actual
model for specifics.
8
Bluetooth
1. Right-click
in the notification area (located at the lowerright corner of the
to access
from the hidden icons) and select Open
desktop or clicking
Settings.(If adapter off, please turn on.)
2. In the Options tab, select Allow Bluetooth devices to find this computer, and click
OK. So, other Bluetooth devices can find your ViewPad and make the Bluetooth
connection.
(You also need to activate the Bluetooth connection feature of the device that you
want to connect to.)
3. Right-click and select Add a Device. Wait for a while and the found active
Bluetooth devices will show.
(For details about how to activate the device's Bluetooth function, please refer to
its documentation.)
(The maximum effective range of connection between your ViewPad and the
Bluetooth device is about 10 meters.)
9
4. Select a Bluetooth device and click Next.
5. Windows generates a random code number shown on the screen. Type in this
code number into the Bluetooth device your ViewPad is trying to connecting to.
10
Chapter 3: Cellular Data Network (3G Data) Setup
CAUTION!
The 3G does not support hot-plug detect. Please make sure the device is powered down
when inserting or removing the SIM. Inserting or removing SIM while the device’s power is
ON may cause system shutdown.
NOTE!
Your ViewPadpi may not have an SIM slot. The configurations may vary depending on the
model number. Check the actual model for specifics.
To install SIM card, you need to turn off the tablet first, then insert SIM card following
the indicative mark.
To remove SIM card, you also need to turn off the tablet first, then push to reject the
SIM card from the slot.
Starting Wireless Manager
Your Mobile Broadband Module is supplied with the Wireless Manager software
application. Wireless Manager provides a set of tools that you can use to configure
and manage mobile broadband connections on your ViewPad. When you open
Wireless Manager, the Wireless Manager main window is displayed. The main
window provides important status information and allows you to connect and
disconnect.
At Windows desktop, tap on
icon to open Wireless Manager. If Wireless Manager
is running but no Wireless Manager Window is open, double-click the status icon
in the Windows notification area, or right-click the icon and select Open Wireless
Manager.
11
PIN
When starting the Wireless Manager, you may need to enter a PIN for your SIM
card to continue. Enter your PIN in the field and then click OK. Refer to your network
subscription for PIN information.
PUK
You are allowed a limited numbers of attempts to enter the correct PIN. If you fail to
enter the SIM card’s PIN correctly, you will be locked from accessing the SIM card
and you will need a PUK to unlock the SIM card.
12
After entering the correct PUK, you will be prompted to change the PIN.
NOTE!
The PIN only protects your subscription and not your Mobile Broadband Module from
unauthorized use. If you change your PIN, the module will still work with another SIM card..
Multiple Profiles
A SIM card can have multiple pre-defined profiles. The first time the Wireless
Manager starts, a dialog will appear with a question prompting you to set a
connection profile. Select a suitable profile from the list and click Set profile to
continue.
13
Connection
The Connection section tab enables you to connect or disconnect from an operator
network and provides information about your current Mobile Broadband Connection
(for example, signal strength and service type). From the Wireless Manager Main
Window it is also possible to open the following Wireless applications or Help:
• SMS link. Opens the SMS Utility.
• Help link. Opens the help window.
The following information is displayed in the Connection section tab:
• Your network operator’s name or icon or both. If roaming, the roaming
network name may also be shown. Roaming enables automatic use of
another network when travelling outside the geographical coverage area of
the home network. Roaming is marked with an R, next to the signal strength
bars.
NOTE!
If roaming, traffic charges may be higher than normal. Check with your
service provider for more details.
• Signal strength is indicated on a scale of five bars, from zero to five. The
bars also show if a connection is established or not. A filled bar symbolizes
a connection and an empty bar symbolizes that there is no connection.
• Type of service available (for example, GPRS and UMTS).
• Connection status messages, such as Connected/Disconnected and
Acquiring IP.
• Connect/Disconnect button.
• Status Image showing if a connection is established.
14
The Status Window
Some of the information displayed in the Connection section tab is also visible in
the status window. The status window is visible when the mouse pointer is held over
the status icon in the Windows notification area.
Connecting to a Corporate Network
Mobile access to a corporate network may require a special configuration to keep the
data secure. VPN software may be used to encrypt the data so that it can be safely
be sent over an Internet connection. Some corporations may also have a dedicated
APN enabling data to pass directly from the service provider to the corporate
servers.
Usage
The Usage section tab enables you to view Session and History information.
Settings
The Settings section tab enables you to change Wireless Manager settings.
15
Auto Start
Automatically launch Wireless Manager at Microsoft Windows startup. Click Apply
after changing the Auto Start settings.
Advanced Settings
Further settings can be found by clicking Advanced...:
• SIM
• Radio
• Profiles
• Networks
• Connection
SIM
Most SIM cards are protected by a Personal Identity Number (PIN) at the time of
purchase. If PIN lock is activated for your SIM card, you have to enter the PIN when
you start Wireless Manager. You are allowed a limited numbers of attempts to enter
the correct PIN. If you fail to enter the SIM card’s PIN correctly, you will be locked
from accessing the SIM card and you will need a PUK to unlock the SIM card.
Make sure that the GSM/UMTS services that you require are included on your SIM
card subscription. The SIM tab contains information about the SIM state. It is also
possible to activate or deactivate the Request PIN at startup functionality and
change the PIN from this tab.
16
Radio
The Radio tab contains Radio Status information and radio settings.
Radio State
The radio needs to be turned on before you can make a connection or send and
receive text messages. Choose between On and Off.
Keep radio state during sleep/hibernate
The radio can be always on, even when the ViewPad is in power saving mode.
Choose between Yes and No.
CAUTION!
Within areas where no radio transmission or reception is allowed, the radio has to be turned
off to prevent disturbances.
Type of network
Automatic
The Automatic mode uses 3G networks where available, and if supported by current
subscription, otherwise switches to 2G. This is the recommended setting.
17
3G(WCDMA)
The Mobile Broadband Module will only use 3G where available. If you are outside
of 3G coverage, the module will not switch to 2G. It will enter search mode until 3G
coverage is found.
2G(GSM)
The Mobile Broadband Module will only use 2G service where available. It may limit
your possibility to fully use the Wireless Manager applications.
Frequency Band
It is possible to choose which frequency band/bands to use for mobile
communication by clicking the Frequency band button. All bands are selected as
default.
CAUTION!
Deselecting frequency bands may lead to connection problems. It is not recommended to
change the Frequency Band settings.
18
Profiles
A profile contains the information necessary to enable your Mobile Broadband
Module to connect to the Internet or to a corporate network. A profile is the same for
all services: 2G and 3G. Obtain the APN, user name and password and any further
advanced settings such as DNS server addresses from your network operator or
network administrator.
The Wireless Manager has a large database of operator profiles which are used to
establish an Internet connection. These profiles are also, in most cases, suitable for
use with VPN software. The first time you start the Wireless Manager it will by default
use Automatic selection of profile.
It is possible to manually select the profile. Multiple Profiles may be available for your
SIM card.
If you later insert a different network operator’s SIM card in your ViewPad and start
Wireless Manager, a new profile will be selected for this network operator.
Automatic Profile Selection
When automatic selection is chosen the operator profile database is searched to
find a profile matching the network operator’s details on your SIM card. If the correct
profile for your operator is found it will be selected as your automatic selection.
19
Manual Profile Selection
It is possible to manually select which profile to use from the profile database or to
create a new profile.
Selecting a Profile
1. Select the Manual selection option from Profile Selection.
2. In the Profile list, select the profile you want to use and then click Apply. Your
new connection profile is defined and selected.
NOTE!
If a manual profile is selected from the list, automatic profile selection will not be actived until
re-selected.
Creating a Profile
Select the Manual selection option from Profile Selection.
Click New.
Enter the Profile name of your choice. For example, “My Profile.”
Enter the Access Point Name (APN).
Enter the User name and Password if required. These are often left blank.
If needed, enter IP address, DNS server information and Protocols under the
corresponding tab.
7. Save the profile by clicking Save.
1.
2.
3.
4.
5.
6.
NOTE!
The new profile settings will be used the next time you connect.
Deleting a Profile
1. Select the Manual selection option from Profile Selection.
2. Select the profile you want to delete from the Profile list.
3. Click Delete.
Modifying a Profile
1.
2.
3.
4.
Select the Manual selection option from Profile Selection.
Select the profile you want to modify from the Profile list.
Click Edit. Change the settings as required.
Save the profile by clicking Save.
NOTE!
Only user defined profiles can be modified. In order to change a operator defined profile a
copy has to be made.
20
Copying a Profile
1.
2.
3.
4.
Select the Manual selection option from Profile Selection
Select the profile you want to copy from the Profile list.
Click Copy. Change the settings if required.
Save the profile by clicking Save.
Networks
The mobile network list displays the networks available at your location. You can also
select what network you want to connect to.
NOTE!
Disconnect any ongoing connection before changing the mobile network or update the list of
networks.
Viewing Available Networks
1. If connected, click the Disconnect button.
2. Switch the Mobile Networks Selection mode to Manual Selection.
3. Update the list by clicking Update list. When the search is completed, the
networks that are currently available are displayed.
21
The available networks will fall into one of the following three categories:
• The Home network: this is the network selected by default.
• Available networks: These are networks that your home network operator has a
roaming agreement with.
• Forbidden networks: Normally, you will not be able to access these networks.
If your home network has reached an agreement that allows you to use the
forbidden network, you might be able to access it.
Networks are also categorized as:
• 2G networks
• 3G networks
NOTE!
If you select a 2G network but the service provider also has 3G services, then the Mobile
Broadband Module will switch to the 3G network automatically.
Selecting Another Network
1. Set the Selection Mode to Manual.
2. Click Update List.
3. When the search is completed, the networks that are currently available are
displayed in the Select a Network list box.
4. In the Select a Network list box, select the network that you want to use.
5. Click Apply. If you are not allowed to use the network that you have chosen,
Forbidden is displayed.
NOTE!
Manual selection may be restricted, even on a network that is listed as Available. Check
your subscription to determine the appropriate roaming networks to use.
22
Connection
The Connection tab contains information about the connection.
Autoconnect
It is possible to set Wireless Manager to connect automatically at Microsoft Windows
startup, when resuming from sleep/hibernate and after turning on the Mobile
Broadband device through the WWAN switch. Autoconnect requires the radio to be
on.
• Always connect automatically allows Wireless Manager to connect
automatically, whenever a network is available.
• Connect automatically except when roaming allows Wireless Manager to
connect automatically to your operator’s network (home network). If only roaming
networks are available, Wireless Manager will not connect automatically.
• Never connect automatically disallows Wireless Manager to connect
automatically.
Click the Apply button to apply the change. The default settings can be retrieved by
clicking Default.
CAUTION!
Be aware that some applications automatically transmit data when you are connected.
Depending on subscription you may be charged for the data transfer. Be aware that
automatic connection can lead to roaming costs.
23
About
The About section tab displays system and program version information for your
Mobile Broadband Module and Wireless Manager software.
System Information
By clicking System Info the System Information window is displayed containing
information about the mobile broadband system.
The Copy to clipboard button copies the information shown in the window, as text.
The information can be pasted into, for example, an email or a text document.
NOTE!
IMEI Number and Subscriber Number (IMSI) might be omitted due to legal requirements in
some countries.
24
Wireless Manager menu
Right-click the Wireless Manager status icon
in the Windows notification area to
access the Wireless Manager Notification icon menu options:
Some of these menu options may be disabled depending on the current state of your
Mobile Broadband Module.
Opening Wireless Manager
The Wireless Manager window does not need to be open when the program is
running. Use the Open menu option if you want to open the window.
Connecting/Disconnecting
If you are currently disconnected, the menu gives you the option to Connect. If you
are connected, the menu gives you the option to Disconnect.
Turning Radio On or Off
The Radio menu option is dynamic. It monitors the current state of the radio
transmitter and gives you the option to change it to the opposite state. For example,
if your radio transmitter is on, the menu option reads Turn Radio off.
Exiting Wireless Manager
Right-click the status icon
in the Microsoft Windows notification area and select
Exit from the menu. Your Mobile Broadband connection will be terminated when
you exit Wireless Manager. Closing the Wireless Manager window will not exit the
Wireless Manager application.
NOTE!
Radio will be kept on after exiting the Wireless Manager. If you wish to manually turn the
radio off before exiting, see Radio section.
For more information and usage of Wireless Manager, please refer to the Help
window.
25
Chapter 4 Basic Operation
Power up and off
1.
Press on
button located at top of device to power up.
Warning: Do not turn off the device before it is fully booted or it may cause an error
on the next power up.
2. In Windows 7, click Start>Shutdown> or push the
button to power off.
Note 1: Windows can be configured to automatically shut down by single
press. Please use
Windows help & support (Keyword “Power”) for more power configuration information.
Note 2: Hard power off can be achieved by holding
down for 4 second.
Touch Screen Control
Tap: Quick single tap motion. Emulates left mouse click.
Tap & Hold: Press on open area for >4 seconds. Emulates right
mouse click.
Slide: Quick directional motion. Emulates scrolling.
Drag: Press on icon for >4 seconds then perform directional motion.
Emulates left mouse button hold.
Pinch: Two-points inward motion. Zoom in.
Spread: Two-points outward motion. Zoom out.
Note: An application can defines more complex hand gestures, availability based on application
support.
26
Virtual Keyboard
ViewPad includes the Swype input method as the default on-screen keyboard.
The keyboard will appear automatically when you select a text input field. You can
show and hide the keyboard manually by pressing the Swype icon in the taskbar or
the Hide button in the lower right corner of the keyboard.
Press the lock button in the lower right part of the keyboard to enable Lock or
Manual mode. In this mode, the keyboard only appears and hides when you press
the Swype icon.
The re-size icon in the lower left corner of the keyboard toggles between large and
small sizes. Next to that is the Swype settings button. Press that to adjust settings or
to view the Swype tutorial.
Using Swype is as easy as sliding your finger from one letter to the next – no tapping
required. View the built-in tutorial to learn more.
To use the standard Windows on-screen keyboard instead, go to Control Panel,
select Ease of Access Center, and check “Start On-Screen Keyboard.”
To make the Windows keyboard appear at start up, scroll down in the Ease of
Access Center and select “Use the computer without a mouse or keyboard.” Check
“Use On-Screen Keyboard” to bring up the Windows keyboard automatically
whenever you turn on the tablet.
ViewScene
The ViewPad comes equipped with the ViewScene user interface, powered by Thinix
Touch technology. ViewScene is your touch friendly, tablet optimized dashboard. Just
tap the ViewScene shortcut on your desktop to experience Windows in a whole new
way.
The ViewScene user interface offers seven customizable tabs for one-touch access
to your favorite applications and web sites and important tools and utilities. You will
see a Home screen, Office resources, My Stuff for your documents and media files,
Windows Accessories, ViewSonic ViewTools and Support documentation.
The ViewTools menu includes powerful utilities such as vsPresenter, which lets you
log on to your ViewSonic projector. ViewSonic has made it easy to integrate your
ViewPad with your ViewSonic projector, to deliver your tablet display right on to the
big screen.
ViewDraw gives you the ability to annotate, draw and highlight right on screen –
perfect for delivering presentations in the conference room or classroom. You can
even save your work for later.
The Support tab includes a variety of documentation including the Quick Start Guide,
User Guide, Frequently Asked Questions and this tutorial video.
Quick Edit makes it easy to customize your layout. Just turn on Quick Edit mode, tap
the button you wish to change, and choose a new item from the drop-down menu.
See the user guide to learn about advanced customization options, including creating
your own tabs and buttons with the ViewScene Configuration Utility.
ViewScene also includes the Thinix Tablet Browser, which you can launch from the
ViewScene home screen or from your Windows desktop. Tablet Browser offers a fullscreen browsing experience designed just for touch tablets.
27
Troubleshooting
Symptom
Touch
panel is not
functioning
properly
Battery is not
charging
Multi Touch
not working
System locks
up
Possible Causes
1. Environmental conditions are
significantly different from factory
default.
Remedy
Perform touch screen
recalibration.
2. Touching surface does not provide - Ensure finger is dry and
sufficient electrical charge.
clean.
- Ensure stylus pen is
approved for capacitive
touch panel use.
1.Using wrong AC power adapter
with insufficient power rating or
incorrect plug.
Use AC power adapter
provided with this device.
2.Using USB.
This device does not
support USB battery
charging.
1. Using Windows 7 Starter or Basic
(Single touch only)
Upgrade OS to Windows 7
Home Premium or higher.
2.Application is not support
Use an application that
supports multi touch
function.
3.Improper hand gesture
Ensure the hand gesture is
properly performed.
Multiple possible causes: Windows
code, Intel device failure, device
driver, overheating or application
code.
Push reset button to
restart the system. Perform
Windows updates regularly
for latest system and
device updates, install
latest device drivers and
application version.
28
Customer Support
For technical support or product service, see the table below or contact your reseller.
NOTE: You will need the product serial number.
Country/Region
Website
T = Telephone
F = FAX
Email
Australia/New Zealand
www.viewsonic.com.au
AUS= 1800 880 818
NZ= 0800 008 822
service@au.viewsonic.com
Canada
www.viewsonic.com
T (Toll-Free)= 1-866-463-4775
T (Toll)= 1-424-233-2533
F= 1-909-468-3757
service.ca@viewsonic.com
Europe
www.viewsoniceurope.
com
www.viewsoniceurope.com/uk/support/call-desk/
Hong Kong
www.hk.viewsonic.com
T= 852 3102 2900
service@hk.viewsonic.com
India
www.in.viewsonic.com
T= 1800 266 0101
service@in.viewsonic.com
Ireland (Eire)
www.viewsoniceurope.
com/uk/
www.viewsoniceurope.com/uk/
support/call-desk/
service_ie@viewsoniceurope.com
Korea
www.kr.viewsonic.com
T= 080 333 2131
service@kr.viewsonic.com
Latin America
(Argentina)
www.viewsonic.com/la/
T= 0800-4441185
soporte@viewsonic.com
Latin America (Chile)
www.viewsonic.com/la/
T= 1230-020-7975
soporte@viewsonic.com
Latin America
(Columbia)
www.viewsonic.com/la/
T= 01800-9-157235
soporte@viewsonic.com
Latin America (Mexico)
www.viewsonic.com/la/
T= 001-8882328722
soporte@viewsonic.com
Renta y Datos, 29 SUR 721, COL. LA PAZ, 72160 PUEBLA, PUE. Tel: 01.222.891.55.77 CON 10 LINEAS
Electroser, Av Reforma No. 403Gx39 y 41, 97000 Mérida, Yucatán. Tel: 01.999.925.19.16
Other places please refer to http://www.viewsonic.com/la/soporte/index.htm#Mexico
Latin America (Peru)
www.viewsonic.com/la/
T= 0800-54565
soporte@viewsonic.com
Macau
www.hk.viewsonic.com
T= 853 2870 0303
service@hk.viewsonic.com
Middle East
ap.viewsonic.com/me/
Contact your reseller
service@ap.viewsonic.com
Puerto Rico & Virgin
Islands
www.viewsonic.com
T= 1-800-688-6688 (English)
T= 1-866-379-1304 (Spanish)
F= 1-909-468-3757
service.us@viewsonic.com
soporte@viewsonic.com
Singapore/Malaysia/
Thailand
www.ap.viewsonic.com
T= 65 6461 6044
service@sg.viewsonic.com
South Africa
ap.viewsonic.com/za/
Contact your reseller
service@ap.viewsonic.com
United Kingdom
www.viewsoniceurope.
com/uk/
www.viewsoniceurope.com/uk/
support/call-desk/
service_gb@viewsoniceurope.com
United States
www.viewsonic.com
T (Toll-Free)= 1-800-688-6688
T (Toll)= 1-424-233-2530
F= 1-909-468-3757
service.us@viewsonic.com
29
Limited Warranty
VIEWSONIC® ViewPad
What the warranty covers:
ViewSonic warrants its products to be free from defects in material and workmanship,
under normal use, during the warranty period. If a product proves to be defective in
material or workmanship during the warranty period, ViewSonic will, at its sole option,
repair or replace the product with a like product. Replacement product or parts may
include remanufactured or refurbished parts or components.The replacement unit will
be covered by the balance of the time remaining on the customer’s original limited
warranty. ViewSonic provides no warranty for the third-party software included with
the product or installed by the customer.
How long the warranty is effective:
ViewSonic ViewPad are warranted for at least 1 year for labor from the date of the
first customer purchase.
User is responsible for the back up of any data before returning the unit for service.
ViewSonic is not responsible for any data lost.
Who the warranty protects:
This warranty is valid only for the first consumer purchaser.
What the warranty does not cover:
1. Any product on which the serial number has been defaced, modified or
removed.
2. Damage, deterioration or malfunction resulting from:
a. Accident, misuse, neglect, fire, water, lightning, or other acts of nature,
unauthorized product modification, or failure to follow instructions supplied
with the product.
b. Repair or attempted repair by anyone not authorized by ViewSonic.
c. Causes external to the product, such as electric power fluctuations or failure.
d. Use of supplies or parts not meeting ViewSonic’s specifications.
e. Normal wear and tear.
f. Any other cause which does not relate to a product defect.
3. Any product exhibiting a condition commonly known as “image burn-in” which
results when a static image is displayed on the product for an extended period
of time.
4. Removal, installation, insurance, and set-up service charges.
How to get service:
1. For information about receiving service under warranty, contact ViewSonic
Customer Support (Please refer to the web site and Customer Support pages).
You will need to provide your product’s serial number.
2. To obtain warranty service, you will be required to provide (a) the original dated
sales slip, (b) your name, (c) your address, (d) a description of the problem, and
(e) the serial number of the product.
3. Take or ship the product freight prepaid in the original container to an authorized
ViewSonic service center or ViewSonic.
4. For additional information or the name of the nearest ViewSonic service center,
contact ViewSonic.
30
Limitation of implied warranties:
There are no warranties, express or implied, which extend beyond the description
contained herein including the implied warranty of merchantability and fitness for a
particular purpose.
Exclusion of damages:
ViewSonic’s liability is limited to the cost of repair or replacement of the product.
ViewSonic shall not be liable for:
1. Damage to other property caused by any defects in the product, damages
based upon inconvenience, loss of use of the product, loss of time, loss of
profits, loss of business opportunity, loss of goodwill, interference with business
relationships, or other commercial loss, even if advised of the possibility of such
damages.
2. Any other damages, whether incidental, consequential or otherwise.
3. Any claim against the customer by any other party.
4. Repair or attempted repair by anyone not authorized by ViewSonic.
Effect of state law:
This warranty gives you specific legal rights, and you may also have other rights
which vary from state to state. Some states do not allow limitations on implied
warranties and/or do not allow the exclusion of incidental or consequential damages,
so the above limitations and exclusions may not apply to you.
Sales outside the U.S.A. and Canada:
For warranty information and service on ViewSonic products sold outside of the
U.S.A. and Canada, contact ViewSonic or your local ViewSonic dealer. The warranty
period for this product in mainland China (Hong Kong, Macao and Taiwan Excluded)
is subject to the terms and conditions of the Maintenance Guarantee Card.
For users in Europe and Russia, full details of warranty provided can be found in
www.viewsoniceurope.com under Support/Warranty Information.
4.3: ViewSonic TPC Warranty
TPC_LW01 Rev. 1A 06-20-08
31