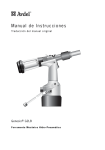
Transcript
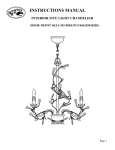
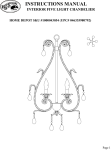
P1
P2
P3
ENGLISH
To install a bulb or replace a burned-out bulb, please note the followings :
1. Press the Light ON/OFF button on the base unit to the OFF,
2. Unplug the light from the power source. Do not unplug the light by
pulling on cord directly.
3. Gently turn the light bulb in counter-clockwise direction to unlock it,
then unplug it from the light bulb holder.
WARNING : DO NOT ATTEMPT TO REPLACE BULB IMMEDIATELY
AFTER IT HAS BURNT-OUT AS BULB AND LAMP COVER ARE HOT.
BEFORE REPLACING THE BULB, TURN OFF THE LIGHT AND
ENSURE THAT THE AC CORD IS UNPLUGGED.
4. Insert one E14 (Medium screw) maximum 60 watts standard / light
bulb on top of bulb holder. Gently turn this bulb leftward to look firmly
into the lamp holder or gently turn it right firmly to unlock it from the
lamp holder. Make sure to use correct size and watts when replacing
the bulb.
CRL-290
NOTE:- Max 60 watts light bulb (E14 medium screw type for normal or
halogen energy saving type - not included).
REMARK:- IF ENERGY SAVING BULB ARE USED, ONLY HALOGEN
TYPE IS SUPPORTED.
INSTRUCTION
MANUAL
BRUKSANVISNING
BETJENINGSVEJLEDNING
BEDIENUNGSANLEITUNG
MANUAL DE INSRUCCIONES
MANUAL DE INSTRUÇÕES
INSTRUZIONI PER L'USO
K Ä Y T T Ö O H D E
1.
2.
3.
4.
5.
6.
7.
8.
9.
10.
11.
12.
13.
Natural sound selector
Memory Up
Alarm 1 On/Set
To set the Light intensity High
To set the Light intensity Low
Light ON/OFF
Clock set / memory
Snooze / Sleep
Function
ON/OFF
Volume Down
Volume Up
Alarm 2 On/Set
14.
15.
16.
17.
18.
19.
20.
21.
22.
23.
24.
25.
26.
Tune –
Tune +
Light bulb
Light Bulb holder
Line In
Display
AC Power Cord
Rating label (rear of unit
FM Antenna
Battery compartment (rear of unit)
Display High/Low dimmer
Speaker
Opening the Lamp shade
www.denver-electronics.com
P6
Line in
The Line in Jack can be used to playback alternate audio signal sources
on the unit speakers.
This Line in jack requires a 3.5 mm audio cable for input signal.
Note : The 3.5 mm audio cable is not included.
SPECIFICATIONS
Frequency range : FM 87.3 – 108 MHz
Battery backup : 3V (CR2032 Flat lithium battery x 1) not included.
Power Source :
AC230V ~ 50 Hz (65W)
P6
WARNING : TO REDUCE THE RISK OF LIGHT BULB DAMAGE, BE
CAREFUL NO TO GRIP THE LIGHT BULB TOO TIGHTLY.
5. Connect the AC plug into a household outlet AC source.
6. Press the Light ON/OFF again to the ON as needed.
POWER CONNECTION
Plug the AC power cord to a householder outlet AC source. This unit is
equipped with a battery back up system, it requires a 1pc 3V “CR2032”
lithium battery (not included). Insert the battery in the battery
compartment, making certain that the positive and negative (+ and -)
battery terminals are attached to the corresponding terminals on the
plate in the battery compartment. If an AC power failure occurs, the
clock automatically switches to the battery power supply, the clock and
timer memory continue running. When the AC power resumes, the clock
switches back to AC again.
P7
WARNING
1. No naked flame sources, such as lighted candles, should be placed
on the apparatus.
2. Do not place the product in closed bookcases or racks without proper
ventilation.
3. Where the mains plug is used as the disconnect device, the disconnect
device shall remain readily operable.
4. The ventilation should not be impeded by covering the ventilation
openings with items, such as newspapers, table-cloths, curtains, etc..
5. It shall not be exposed to dripping or splashing and that no objects filled
with liquids, such as vases, shall be placed on the apparatus.
6. Do not connect FM antenna to outside antenna.
7. The unit should not be exposed to direct sunlight, very high or low
temperature, moisture, vibrations or placed in a dusty environment.
8. Do not use abrasive, benzene, thinner or other solvents to clean the
surface of the unit. To clean, wipe it will mid non-abrasive detergent
solution and clean soft cloth.
9. Never attempt to insert wires, pins or other such objects into the vents
or opening of this unit.
10. For indoor use only.
11. If the external flexible cord of this luminaire is damaged, it shall be
exclusively replaced by the manufacturer or his service agent or a
similar qualified person in order to avoid a hazard.
12. Disconnect device warning : Main plug is used as the connection, so
it should always remain ready operate.
13. Batteries shall not be exposed to excessive heat such as sunshine,
fire or the like.
CAUTION
Danger of explosion if battery is incorrectly replaced
Replace only with the same or equivalent type
English
Setting Alarm Time
P4
P5
OPERATING INSTRUCTIONS
Setting Clock Time
With the OFF mode, press and hold the clock set / memory button; “12 Hr”
will blink. Press the Tune + or Tune – button to set the unit to the “24 Hr”
mode or “12 Hr” mode. Press the Clock set / memory button and the hours
will blink. Press the Tune + or Tune – to set the current hour, then press
the clock set / memory button again the minute digits will blink. Press the
Tune + or Tune – to set the current minutes.
When done and you press clock set/memory button once again and the
display time will blink to indicate the current time is set.
To stop the alarm from coming on the following day, hold the ALARM
button to turn it off. The alarm icon or will disappear to indicate the
alarm is disarmed.
Setting the light intensity level
1. Use the light adjustment button 4 & 5 to set the light intensity level.
2. The light intensity level between 1 to 20 for alarm function.
Listening to Radio
Press the ON/OFF button to turn the unit on.
Press the FUNCTION button to select the Radio mode.
Use the Tune + or Tune – button to select the desired FM station. If you
press and hold the Tune + or Tune – button for one second, then release,
the unit will automatically scan to the next broadcasting station.
Press the ON/OFF button to turn the radio OFF.
Setting Alarm Time
When you set the alarm, you choose the light intensity level, the type of
sound and the sound level. The alarm is set when the light ring round the
ALARM button burns. The light intensity slowly increases to the chosen
level during the last 20 minutes before the set alarm time.
*For example, if you set the alarm time on 8:30 am, the light will
slowly increase to max level 20 started from 8:10 am.
To set / recall the radio presets
Press the ON/OFF button to turn the unit on.
Press the FUNCTION button to select the Radio mode.
Use the Tune + or Tune – button to select the desired FM station.
Press the Clock set/memory button; “M02” will blink in the display.
Press the Clock set/memory button again to set the preset.
Repeat steps 2 through 4 to set more presets.
The unit can preset 10 stations totally for FM.
When “M01-M10” is blinking, press the Tune + or Tune – button to select
the preset number.
When recalling preset stations, press Memory Up to select the preset
number.
To preview the alarm time, press the ALARM button once.
While the display is showing the alarm time and hold the ALARM button
for 3 seconds and the hours will blink.
Press the Tune + or Tune – to set the alarm hour.
Press the ALARM button again; the minute digits will blink. Press the
Tune + or Tune – to set the alarm minutes.
Press the ALARM button and you can change the sound mode (Buzzer,
Radio, Nature) for the alarm.
Press the Tune + or Tune – to choose different sound mode.
Press the ALARM button again; the volume digits will blink, press the
Tune + or Tune – to set the alarm sound level.
Press the ALARM button again; the light digits will blink, press the
Tune + or Tune – to set the alarm light level.
Then press the ALARM button when done.
To delay the alarm, press SNOOZE, it will come on again in approx.
9 minutes. You may repeat this cycle several times during the alarm cycle.
To stop the alarm, press ALARM button or ON/OFF button.
P8
Sleep operation
When listening to radio, press Snooze / Sleep button to enter sleep
mode. You can just adjust the sleep timer from 90 mins to 10 mins by
pressing the Snooze / Sleep button. The unit will automatically turn off
after the selected time.
If holding the Snooze / Sleep button for 4 seconds, sleep mode will turn
off.
P8
Electric and electronic equipment contains materials, components and
substances that can be hazardous to your health and the environment,
if the waste material (discarded electric and electronic equipment) is
not handled correctly.
Electric and electronic equipment is marked with the crossed out trash
can symbol, seen below. This symbol signifies that electric and electronic
equipment should not be disposed of with other household waste, but
should be disposed of separately.
All cities have established collection points, where electric and electronic
equipment can either be submitted free of charge at recycling stations
and other collection sites, or be collected from the households. Additional
information is available at the technical department of your city.
ALL RIGHTS RESERVED
COPY RIGHT DENVER ELECTRONICS A/S
www.denver-electronics.com