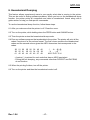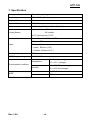
1
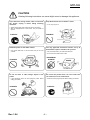
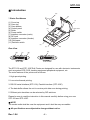
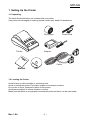
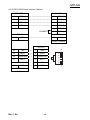
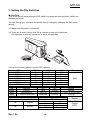
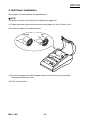
User’s Manual
STP-103
Thermal Printer
Rev. 1.04
PO
WE
R
ER R
OR
FE E
D
ON
LIN
E
http://www.bixolon.com
STP-103
■ Safety Precautions
In using the present appliance, please keep the following safety regulations in order to
prevent any hazard or material damage.
WARNING
Violating following instructions can cause serious injury or death.
Do not plug several products in one multi-outlet.
•
•
•
•
You must use only the supplied adapter.
This can provoke over-heating and a fire.
If the plug is wet or dirty, dry or wipe it before usage.
If the plug does not fit perfectly with the outlet, do not plug in.
Be sure to use only standardized multi-outlets.
• It is dangerous to use other adapters.
ONLY SUPPLIED ADAPTER
PROHIBITED
PROHIBITED
Do not pull the cable to unplug.
Keep the plastic bag out of children’s reach.
• This can damage the cable, which is the origin of a fire or a
breakdown of the printer.
• If not, a child may put the bag on his head.
PROHIBITED
PROHIBITED
Do not plug in or unplug with your hands wet.
Do not bend the cable by force or leave it under any
heavy object.
• You can be electrocuted.
PROHIBITED
Rev. 1.04
• A damaged cable can cause a fire.
PROHIBITED
-2-
STP-103
CAUTION
Violating following instructions can cause slight wound or damage the appliance.
If you observe a strange smoke, odor or noise from
the printer, unplug it before taking following
measures.
Keep the desiccant out of children’s reach.
• If not, they may eat it.
• Switch off the printer and unplug the set from the mains.
• After the disappearance of the smoke, call your dealer to
repair it.
TO UNPLUG
PROHIBITED
PRINTER
Install the printer on the stable surface.
• If the printer falls down, it can be broken and you can hurt
yourself.
Use only approved accessories and do not try to
disassemble, repair or remodel it for yourself.
• Call your dealer when you need these services.
• Do not touch the blade of auto cutter.
PRINTER
DISASSEMBLING
PROHIBITED
PROHIBITED
PRINTER
Do not let water or other foreign objects in the
printer.
Do not use the printer when it is out of order. This
can cause a fire or an electrocution.
• If this happened, switch off and unplug the printer before
calling your dealer.
• Switch off and unplug the printer before calling your dealer.
PROHIBITED
TO UNPLUG
PRINTER
PRINTER
DEALER
Rev. 1.04
-3-
STP-103
■ Warning - U.S.A
This equipment has been tasted and found to comply with the limits for a Class A digital
device, pursuant to Part 15 of the FCC Rules. These limits are designed to provide
reasonable protection against harmful interference when the equipment is operated in a
commercial environment. This equipment generates, uses, and can radiate radio
frequency energy and, if not installed and uses in accordance with the instruction manual,
may cause harmful interference to radio communications. Operation of this equipment in a
residential area is likely to cause harmful interference in which case the user will be
required to correct the interference at his own expense.
This equipment has been tasted and found to comply with the limits for a Class B digital
device, pursuant to Part 15 of the FCC Rules. These limits are designed to provide
reasonable protection against harmful interference in a residential installation. This
equipment generates, uses and can radiate radio frequency energy and, if not installed
and used in accordance with the instructions, may cause harmful interference to radio
communications. However, there is no guarantee that interference will not occur in a
particular installation. If this equipment does cause harmful interference to radio or
television reception, which can be determined by turning the equipment off and on, the
user is encouraged to try to correct the interference by one or more of the following
measures:
- Reorient or relocate the receiving antenna.
- Increase the separation between the equipment and receiver.
- Connect the equipment into an outlet on a circuit different from that to which
the receiver is connected.
- Consult the dealer or an experienced radio/TV technician for help.
■ Notice - Canada
This Apparatus complies with class "A" limits for radio interference as specified in the
Canadian department of communications radio interference regulations.
■ Waste Electrical and Electric Equipment (WEEE)
This marking shown on the product or its literature, indicates that is should not
be disposed with other household wastes at the end of its working life, To
prevent possible harm to the environment or human health from uncontrolled
waste disposal, please separate this from other types of wastes and recycle it
responsibly to promote the sustainable reuse of material resources. Household
users should contact either the retailer where they purchased this product, or
their local government office, for details of where and how they can take this item for
environmentally safe recycling. Business users should contact their supplier and check the
terms and conditions of the purchase contract. This product should not be mixed with other
commercial wastes for disposal.
■ Label Material : PET
Rev. 1.04
-4-
STP-103
■ Introduction
(10)
(5)
* Printer Part Names
(1)
(1) Cover top
(2) Case top
(3) Case bottom
(4) Control panel
(5) Roller
(6) Power switch
(7) Interface connector (male)
(8) DC Jack
(9) Interface connector (female)
(10) Roll paper
(11) Detector switch
Rear View
(11)
(2)
(4)
Rear View
(6)
(7)
(9)
(8)
STP-103S
STP-103
(3)
STP-103P
STP-103P
The STP-103 and STP-103P Roll Printer are designed for use with electronic instruments
such as system ECR, POS, banking equipment peripheral equipment, etc.
The main features of the printer are as follows:
1. High speed printing.
2. Low noise thermal printing.
3. RS-232 serial interface (STP-103), Parallel interface (STP-103P).
4. The data buffer allows the unit to receive print data even during printing.
5. Different print densities can be selected by DIP switches.
Please be sure to read the instruction in this manual carefully before using your new
STP-103 and STP-103P.
※ NOTE
The socket-outlet shall be near the equipment and it shall be easy accessible.
※ All specifications are subjected to change without notice.
Rev. 1.04
-5-
STP-103
■ Table of Contents
1. Setting Up the Printer ................................................................................................... 7
1-1 Unpacking.................................................................................................................. 7
1-2 Locating the Printer.................................................................................................... 7
1-3 Functions ................................................................................................................... 8
2. Connecting the cables.................................................................................................. 9
2-1 Connecting the AC adapter to the printer .................................................................. 9
2-2 Connecting the printer to your Computer................................................................. 10
2-2-1 STP-103 Serial Interface ..............................................................................11
2-2-2 STP-103 Parallel Interface............................................................................11
2-2-3 STP-103DK Serial Interface (Option) .......................................................... 12
2-2-4 STP-103DK Parallel Interface (Option)........................................................ 13
3. Setting the Dip Switches ............................................................................................ 14
4. Roll Paper Installation ................................................................................................ 15
5. Self Test....................................................................................................................... 16
6. Hexadecimal Dumping ............................................................................................... 17
7. Specification ............................................................................................................... 18
Rev. 1.04
-6-
STP-103
1. Setting Up the Printer
1-1 Unpacking
The items illustrated below are included with your printer.
If any items are damaged or missing, please contact your dealer for assistance.
Roll paper
Power cord
Adaptor
Printer
Cable
Manual
CD
1-2 Locating the Printer
Avoid location in direct sunlight or excessive heat.
Avoid or storing the printer in the place subject to excessive moisture.
Do not use or store, horizontal surface for the printer.
Avoid places subject to intense vibration or shock.
Make sure that there is enough space around the printer so that it can be used easily.
Rev. 1.04
-7-
STP-103
1-3 Functions
The control panel has two buttons and two lights
POWER ERROR
FEED
ON LINE
Buttons
The control panel buttons perform paper feeding and on line function.
ON LINE
Press the ON LINE button to ready to receive data from the computer.
FEED
Press the FEED button once to advance paper one line.
You can also press the FEED button continuously to feed paper continuously.
Feed button is valid when ON LINE button is off.
Indicator Lights
The control panel lights provide information on printer conditions.
POWER (green)
The POWER light is on when the printer power is on.
ERROR (red)
The error LED blinks fast when paper is out.
The error LED blinks when the Near End Sensor triggered.
Rev. 1.04
-8-
STP-103
2. Connecting the cables
2-1 Connecting the AC adapter to the printer
When the printer is used, use the optional AC adapter.
※ WARNING
Using an incorrect power supply may cause fire or electrical.
※ CAUTION
When connecting or disconnecting the power supply from the printer, make sure that the
power supply is not plugged into an electrical outlet ; otherwise you may damage the
power supply or the printer
2-1-1 Make sure that the printer's power switch is turned off, and that the power
supply's power cord is unplugged from the electrical outlet.
2-1-2 Check the label on the power supply to make sure that the required voltage matches
that of your electrical outlet.
2-1-3 Plug the power supply's DC cable connector into the printer's power connector as
shown below.
STP-103
/ STP-103P
STP-103S
/ STP-103P
2-1-4 Plug the AC adapter's power cord into an electrical outlet.
※ NOTE
To remove the DC cable connector grasp the connector at the arrow and pull it straight out.
Make sure that the main unit's power cord is unplugged before you disconnect the DC
cable connector
Rev. 1.04
-9-
STP-103
2-2 Connecting the printer to your Computer
You need an appropriate serial or parallel interface cable to connect your computer to the
printer's built-in interface.
- Make sure that both the printer and computer are turned off :
then plug the cable connector securely into the printer's interface connector.
- Tighten the screws on both sides of the cable connector.
- Plug the other end of the cable into the computer.
25 Pin Female Type
Rev. 1.04
- 10 -
STP-103
2-2-1 STP-103 Serial Interface
PRINTER
HOST
20
TXD (O)
---------------------
2
RXD (I)
19
RXD (I)
---------------------
3
TXD (O)
21
CTS (I)
---------------------
7
RTS (O)
22~25
GND
---------------------
5
GND
18
RTS (O)
---------------------
8
CTS (I)
4
DTR (O)
6
DSR (I)
FGND
25 PINE MALE
CONNECT
FGND
9 PINE FEMALE
2-2-2 STP-103 Parallel Interface
PRINTER
HOST
1
/STROBE (I/O)
1
/STROBE (I/O)
2
DATA0 (I/O)
2
DATA0 (I/O)
3
DATA1 (I/O)
3
DATA1 (I/O)
4
DATA2 (I/O)
4
DATA2 (I/O)
5
DATA3 (I/O)
5
DATA3 (I/O)
6
DATA4 (I/O)
6
DATA4 (I/O)
7
DATA5 (I/O)
7
DATA5 (I/O)
8
DATA6 (I/O)
8
DATA6 (I/O)
9
DATA7 (I/O)
9
DATA7 (I/O)
10
/ACK (I)
10
/ACK (I)
11
BUSY (I)
11
BUSY (I)
12
PE (I)
12
PE (I)
13
SLCT
13
SLCT
15
/ERROR (I)
15
/ERROR (I)
16~21
N.C
16
/INIT (O)
22~25
GND
18~25
GND
FGND
FGND
25 PINE MALE
25 PINE MALE
Rev. 1.04
- 11 -
STP-103
2-2-3 STP-103DK Serial Interface (Option)
PRINTER
HOST
19
RXD (I)
-----------------------------------
3
TXD (O)
20
TXD (O)
-----------------------------------
2
RXD (I)
18
RTS (O)
-----------------------------------
8
CTS (I)
21
CTS (I)
-----------------------------------
7
RTS (O)
4
DTR (O)
6
DSR (I)
CONNECT
FGND
22~25
SG
FGND
-----------------------------------
5
SG
9 PINE FEMALE
* RJ11 6P
22
SG
----
1
GND
14
SOL1
----
2
SOL1
16
COMPS/W
----
3
COMPS/W
17
SLCT
----
4
SLCT
5
NC
6
GND
22
SG
----
25 PINE MALE
Rev. 1.04
- 12 -
6
1
STP-103
2-2-4 STP-103DK Parallel Interface (Option)
PRINTER
HOST
1
/STROBE (I/O)
1
/STROBE (I/O)
2
DATA0 (I/O)
2
DATA0 (I/O)
3
DATA1 (I/O)
3
DATA1 (I/O)
4
DATA2 (I/O)
4
DATA2 (I/O)
5
DATA3 (I/O)
5
DATA3 (I/O)
6
DATA4 (I/O)
6
DATA4 (I/O)
7
DATA5 (I/O)
7
DATA5 (I/O)
8
DATA6 (I/O)
8
DATA6 (I/O)
9
DATA7 (I/O)
9
DATA7 (I/O)
10
/ACK (I)
10
/ACK (I)
11
BUSY (I)
11
BUSY (I)
12
PE (I)
12
PE (I)
13
SLCT
13
SLCT
15
/ERROR (I)
15
/ERROR (I)
16
/INIT (O)
18~25
GND
22~25
GND
FGND
FGND
25 PINE MALE
* RJ11 6P
22
SG
----
1
GND
14
SOL1
----
2
SOL1
16
COMPS/W
----
3
COMPS/W
17
SLCT
----
4
SLCT
5
NC
6
GND
22
SG
----
25 PINE MALE
Rev. 1.04
- 13 -
6
1
STP-103
3. Setting the Dip Switches
※ CAUTION
Turn off the printer while setting the DIP switch to prevent an electrical short, which can
damage the printer.
You can change your interface and printer density settings by changing the DIP switch
setting.
3-1 Make sure the printer is turned off.
3-2 There are a switch. Notice that ON is marked on each set of switches.
Use tweezers or another narrow tool to move the switches.
1
3-3 Use the following tables to set the DIP switches.
BPS
2400 bps
4800 bps
9600 bps
19200 bps
38400 bps
57600 bps
115200 bps
SW
SW4
SW5
SW8
SW1
On
Off
Off
On
On
Off
On
Function
Density
Handshaking
Firmware Download
SW2
Off
On
Off
Off
On
On
On
On
Dark
Xon/Xoff
Download
SW7
Language
Off
Normal
RTS/CTS
Printing
English
Off
Korean
On
Off
On
Off
- 14 -
Default
9600
Default
Normal
RTS/CTS (DTR/DSR)
Printing
SW6
CPL
On
Rev. 1.04
SW3
Off
Off
On
On
Off
On
On
Default
24
32
Johap
Wansung
English
32CPL
STP-103
4. Roll Paper Installation
Use a paper roll that matches the specifications.
※ NOTE
The printer must be turned off before installing the paper roll.
4-1 Open the printer cover and remove the used paper roll core if there is one.
4-2 Insert the paper roll as shown below.
4-3 Pull out the paper roll until the paper comes out from the top of the printer.
Then close the printer cover.
4-4 Turn on the Printer.
Rev. 1.04
- 15 -
STP-103
5. Self Test
5-1 Self-test printing
* Starting the self test
To start printing the self-test on a paper roll, hold down the PAPER FEED
button and turn on the printer with the cover closed. The self-test prints the
current printer settings, which provide the following information :
- control software version
- dip switch state
* Standby state
After printing the current printer status, the printer prints the message
"Please press the FEED BUTTON.". The LED indicator blinks and the
printer enter the test printing standby state.
Press the FEED BUTTON to start test printing.
5-2 Ending the self-test
After a number of lines are printed, the printer indicates the end of the
self-test by printing " ** TEST COMPLETED ** ".
If the self-test is not completed, then you must reboot your printer.
Rev. 1.04
- 16 -
STP-103
6. Hexadecimal Dumping
This feature allows experienced users to see exactly what data is coming to the printer.
This can be useful in finding software problems. When you turn on the hexadecimal dump
function, the printer prints all commands and data in hexadecimal format along with a
guide section to help you find specific commands.
To use the hexadecimal dump function, follow these steps:
6-1 After you make sure that the printer is off. Close the cover.
6-2 Turn on the printer, while holding down the FEED button and ONLINE button.
6-3 Then the printer enters the hexadecimal dump mode.
6-4 Run any software program that sends data to the printer. The printer will print all the
codes it receives in a two-column format. The first column contains the hexadecimal
codes and the second column gives the ASCII characters that corresponds to the
codes.
1B 21 00 1B 26 02 40 40
1B 25 01 1B 63 34 00 1B
41 42 43 44 45 46 47 48
. ! . . & . @ @
. % . . c4 . .
ABCDEFGH
- A period (.) is printed for each code that has no ASCII equivalent.
- During the hex dumping, any commands other than DEL EOT and DLE ENQ
do not function.
6-5 When the printing finishes, turn off the printer.
6-6 Turn on the printer and then the hexadecimal mode is off.
Rev. 1.04
- 17 -
STP-103
7. Specification
Printing method
Thermal line printing
Dot density
203 x 203 Dpi (8 dot/mm)
Printing width
48mm
Paper width
58.0±0.5mm
Characters per line
32 (Font A) (12x24) , 42 (Font B) (9x24)
Approximately
Printing Speed
1.97 inches / sec
50 mm/sec
at 25℃/printing duty 12.5%
Paper thickness : 0.062 ~ 0.075mm
Roll size : Ø60mm
Paper
Roll spool diameter
- Inside : Ø12mm (0.47”)
- Outside : Ø18mm (0.71”)
Receive buffer size
15K bytes
SMPS Supply voltage
100~240 VAC
5 ~ 40℃ (operating)
Temperature
-10 ~ 50℃ (storage)
Environmental conditions
30 ~ 80% RH (operating)
Humidity
MCBF
Rev. 1.04
10 ~ 90% RH (storage)
Mechanical
30,000,000 line
Head
100km
- 18 -