1
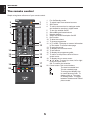
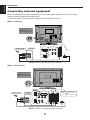
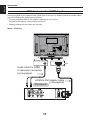
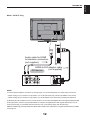
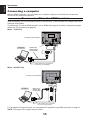
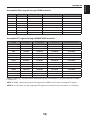
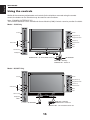
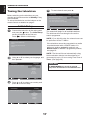
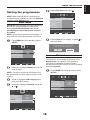
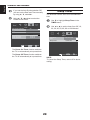
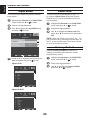
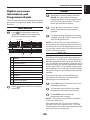
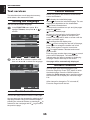
AV61*D*
DIGITAL
Series
Contents
Safety Precautions ....................................... 3
Installation and important information ....... 4
Stable Sound® ....................................23
The remote control ....................................... 5
Audio Description ................................... 23
Inserting batteries and effective range of
the remote ................................................. 6
Visually Impaired .................................... 23
Widescreen viewing ................................... 24
Connecting external equipment .................. 7
Picture controls .......................................... 26
Connecting an HDMI™ or DVI device to the
HDMI input ..................................................... 9
Picture Mode ........................................... 26
To connect an HDMI device ..................... 9
Brightness, Contrast, and Colour ......... 26
DVI device to the HDMI Input ................. 11
Tint ........................................................... 26
Connecting a computer.............................. 13
Sharpness .............................................. 26
To connect a PC to the HDMI terminal .. 13
Colour Temperature ................................ 26
Using the controls ...................................... 15
Cinema mode .......................................... 26
Switching on ........................................... 16
DNR .......................................................... 27
Using the remote control ....................... 16
CTI ............................................................ 27
Using the controls .................................. 16
Flesh Tone ............................................... 27
Tuning the television .................................. 17
Adaptive Luma Control .......................... 27
Initial Setup ............................................. 17
Active Backlight ...................................... 27
Setting the programmes ............................ 18
Blue Screen ............................................. 27
Auto Scan ................................................ 18
Back Light ............................................... 28
Manual scan ............................................ 18
H. and V. Position.................................... 28
Channel Skip ........................................... 19
Timer control ............................................... 28
Update scan ............................................ 20
Time Zone ................................................ 28
Digital Channel Range Scan .................. 20
Time ......................................................... 28
Channel Sort ........................................... 20
Sleep Timer ............................................. 29
Channel Edit ........................................... 20
Input selection and AV connections ......... 30
Channel Decode ..................................... 21
Input selection ........................................ 30
Analogue Channel Fine Tune................. 21
Input signal selection ............................. 30
Common Interface .................................. 21
Function control ......................................... 31
Reset Default ........................................... 21
Analogue Subtitle ................................... 31
General controls ......................................... 21
Digital Subtitle ......................................... 31
Selecting programme positions ............ 21
Subtitle Type............................................ 31
Stereo and Bilingual transmissions ...... 21
Logo LED ................................................. 31
Audio Description ................................... 21
4:3 Stretch ............................................... 31
Quick Access Menu ................................ 22
Parental control .......................................... 31
Favourite List .......................................... 22
Channel Block ........................................ 31
Sound controls ........................................... 22
Programme Block ................................... 32
Volume ..................................................... 22
Input Block .............................................. 33
Balance, Bass, Treble ............................. 22
Panel Lock ............................................... 33
Surround Sound...................................... 23
Factory Default ........................................ 33
Bass Boost .............................................. 23
1
Digital on-screen information and
Programme Guide....................................... 34
Information .............................................. 34
Guide ........................................................ 34
EPG Timer................................................ 34
Text services ............................................... 35
Setting the Language ............................. 35
Text Information ...................................... 35
Control buttons ....................................... 35
Teletext Favourite ................................... 35
Questions and Answers ............................. 36
Specifications and accessories ................ 38
Exhibit A................................................... 41
Exhibit B .................................................. 41
Notes ............................................................ 42
2
English
SETTING UP
Safety Precautions
DO be careful with glass panels on equipment.
This equipment has been designed and
manufactured to meet international safety
standards but, like any electrical equipment,
care must be taken to obtain the best results
and for safety to be assured. Please read the
points below for your own safety. They are of a
general nature, intended to help with all electronic
consumer products and some points may not
apply to the goods you have just purchased.
The Class I apparatus shall be connected to a
mains socket outlet with a protective earthing
connection.
DO NOT REMOVE ANY FIXED COVERS AS
THIS WILL EXPOSE DANGEROUS AND 'LIVE'
PARTS.
THE MAINS PLUG IS USED AS A
DISCONNECTING DEVICE AND THEREFORE
SHOULD BE READILY OPERABLE.
Do not
DO NOT obstruct the ventilation openings of
the equipment with items such as newspapers,
tablecloths, curtains, etc. Overheating will cause
damage and shorten the life of the equipment.
Air Circulation
Leave more than 10cm clearance around the
television to allow adequate ventilation. This will
prevent overheating and possible damage to the
television. Dusty places should also be avoided.
DO NOT allow electrical equipment to be
exposed to dripping or splashing or objects filled
with liquids, such as vases, to be placed on the
equipment.
Heat Damage
DO NOT place hot objects or naked flame
sources, such as lighted candles or nightlights
on, or close to equipment. High temperatures can
melt plastic and lead to fires.
Damage may occur if the television is left in direct
sunlight or near a heater. Avoid places subject to
extremely high temperatures or humidity. Place
in a location where the temperature remains
between 5°C (41°F) min. and 35°C (94°F) max.
DO NOT use makeshift stands and NEVER
fix legs with wood screws. To ensure complete
safety, always fit the manufacturers’ approved
stand, bracket or legs with the fixings provided
according to the instructions.
Mains Supply
The mains supply required for this equipment is
220-240v AC 50/60Hz. Never connect to a DC
supply or any other power source. DO ensure
that the television is not standing on the mains
lead. Use only the supplied lead.
DO NOT cut off the mains plug from this
equipment, this incorporates a special Radio
Interference Filter, the removal of which will impair
its performance. In the UK, the fuse fitted in this
plug is approved by ASTA or BSI to BS1362.
It should only be replaced by a correctly rated
and approved type and the fuse cover must be
refitted.
IF IN DOUBT PLEASE CONSULT A
COMPETENT ELECTRICIAN.
DO NOT leave equipment switched on when it
is unattended, unless it is specifically stated that
it is designed for unattended operation or has
a standby mode. Switch off by withdrawing the
plug, make sure your family know how to do this.
Special arrangements may need to be made for
people with disabilities.
DO NOT continue to operate the equipment if you
are in any doubt about it working normally, or it
is damaged in any way – switch off, withdraw the
mains plug and consult your dealer.
WARNING – excessive sound pressure from
earphones or headphones can cause hearing
loss.
Do
DO read the operating instructions before you
attempt to use the equipment.
DO ensure that all electrical connections
(including the mains plug, extension leads and
inter-connections between pieces of equipment)
are properly made and in accordance with the
manufacturers’ instructions. Switch off and
withdraw the mains plug before making or
changing connections.
DO consult your dealer if you are ever in doubt
about the installation, operation or safety of your
equipment.
ABOVE ALL – NEVER let anyone, especially
children, push or hit the screen, push anything
into holes, slots or any other openings in the
case.
NEVER guess or take chances with electrical
equipment of any kind – it is better to be safe
than sorry.
3
SETTING UP
Where to install
Sturdy tie
Locate the television away from direct sunlight and
strong lights, soft, indirect lighting is recommended for
comfortable viewing. Use curtains or blinds to prevent
Hook
direct sunlight falling on the screen.
Place the TV set on a stable, level surface that can
support the weight of the TV.
As an additional safety measure you can secure the
Top View
Side View
TV to the level surface or a wall, as shown in the
illustration, using a sturdy strap.
The LCD display panels are manufactured using an
extremely high level of precision technology, however sometimes some parts of the screen may be
missing picture elements or have luminous spots. This is not a sign of a malfunction.
Make sure the television is located in a position where it cannot be pushed or hit by objects, as pressure
will break or damage the screen, and that small items cannot be inserted into slots or openings in the
case.
Wall mounting of the TV should only be performed by qualified servicing personnel. Use only with the
wall mount bracket specified by the manufacturer.
Please take note
EXCLUSION CLAUSE
Toshiba shall under no circumstances be liable for loss and/or damage to the product caused by:
i)
fire;
ii)
earthquake;
iii)
accidental damage;
iv) intentional misuse of the product;
v)
use of the product in improper conditions;
vi) loss and/or damage caused to the product whilst in the possession of a third party;
vii) any damage or loss caused as a result of the owner’s failure and/or neglect to follow the
instructions set out in the owner’s manual;
viii) any loss or damage caused directly as a result of misuse or malfunction of the product when
used simultaneously with associated equipment;
Furthermore, under no circumstances shall Toshiba be liable for any consequential loss and/or
damage including but not limited to the following, loss of profit, interruption of business, the loss of
recorded data whether caused during normal operation or misuse of the product.
NOTE:
A Toshiba wall bracket or stand, where available must be used. If a non Toshiba wall bracket or
stand is used the product's BEAB approval will become void and the equipment is then used at the
consumers own risk.
• The digital reception function of this television is only effective in the countries listed in the "Country"
section of the "SETUP" menu. Depending on country/area, some of this television's function may not be
available. Reception of future additional or modified services can not be guaranteed with this television.
• If stationary images generated by 4:3 broadcasts, text services, channel identification logos, computer
displays, video games, on screen menus, etc. are left on the television screen for any length of time they
could become conspicuous, it is always advisable to reduce both the brightness and contrast settings.
• Very long, continuous use of the 4:3 picture on a 16:9 screen may result in some retention of the image at
the 4:3 outlines, this is not a defect of the LCD TV and is not covered under the manufacturers warranty.
Regular use of other size modes (eg: Superlive) and varying the “side panel” brightness (if available on
the model) will prevent permanent retention.
4
English
Installation and important information
English
SETTING UP
The remote control
Simple at-a-glance reference of your remote control.
2
3
4
1
2
3
4
1
5
6
5
6
7
8
9
10
11
12
7
8
9
12
10
11
14
16
13
15
18
17
19
13
14
15
16
17
18
19
20
20
5
For On/Standby mode
To select input from external sources
Still Picture
To call up text services in analogue mode
and interactive services in digital mode
To turn the subtitle On/Off
Stereo/Bilingual transmissions
Number buttons
Switch the Audio Description On/Off
No Function
To alter the volume
To change programme
In TV mode: To display on screen information
In Text mode: To access index page
To mute the sound
To display Quick access menu
To exit menus
To display the programme guide
To return to the previous level of the onscreen menu
To display the on-screen menu
▲, ▼, ◄, ►: To move Up, down, left or right
in the on-screen menu
OK: To confirm the selection
Colour button: Text control buttons
To reveal concealed text
To hold a wanted page
To enlarge text display size
In normal picture mode: To
display clock on TV screen.
In Teletext mode: To toggle
between Telextext and normal
picture mode
SETTING UP
English
Inserting batteries and
effective range of the remote
Remove the back
cover to reveal the
battery compartment
and make sure the
batteries are inserted
the right way round.
Suitable battery
types for this remote
are AAA, IEC R03
1.5V.
Do not combine a used, old battery with a new
one or mix battery types. Remove dead batteries
immediately to prevent acid from leaking into
the battery compartment. Dispose of them in
accordance with instructions on page 42 of this
manual. Warning: batteries must not be exposed
to excessive heat such as sunshine, fire or the
like.
The performance of the remote control will
deteriorate beyond a distance of five metres or
outside an angle of 30 degrees from the centre
of the television. If the operating range becomes
reduced the batteries may need replacing.
6
English
SETTING UP
Connecting external equipment
Before connecting any external equipment, turn off all main power switches. If there is no switch
remove the mains plug from the wall socket.
Connect the power cord into the AC IN socket found at the back of the TV.
Model : 19/22 Only
*a decoder could
be Digital Satellite or any
other compatible decoder.
AC IN
RGB/PC
media recorder
(1) COMPONENT
Y
decoder*
PB/CB
PR/CR
L
R
PC/HDMI (AUDIO)
AUDIO
HDMI
(3)
NOTE: SCART can support Canal+ decoder.
Model : 26/32/37 Only
*a decoder could
be Digital Satellite or any
other compatible decoder.
AC IN
media recorder
decoder*
RGB/PC
PC/
HDMI 1
(AUDIO)
NOTE:
SCART1 :
SCART2 :
1
Y
PB/CB
PR/CR
2
L AUDIO
HDMI 1/2
R
(1) COMPONENT
(3)
(4)
NOTE: SCART1 can support Canal+ decoder.
7
(3) (INPUT/TV
OUT)
OUT)
(4) (INPUT/Monitor
SETTING UP
English
Aerial cables: - - - - - - - - - - - - - - - - Connect the aerial to the ANT socket on the rear of the television.
If you use a decoder and/or a media recorder it is essential that the aerial cable is connected through
the decoder and/or through the media recorder to the television.
SCART leads: - - - - - - - - - - - - - - - - Connect the video recorder IN/OUT or decoder TV socket to the television. Connect the media recorder
SAT socket to the decoder MEDIA REC. socket.
Before running Auto Scan put your decoder and media recorder to Standby.
The phono sockets alongside the COMPONENT VIDEO INPUT sockets will accept L and R audio
signals.
The phono sockets alongside the VIDEO INPUT socket will accept L and R audio signals. These
sockets are located on the side of the TV. (See page 15.)
HDMI™ (High-Definition Multimedia Interface) is for use with a DVD, decoder or electrical equipment
with digital audio and video output. It is designed for best performance with 1080i high-definition video
signals but will also accept and display VGA, SVGA, XGA, WXGA, SXGA, 480i, 480p, 576i, 576p, and
720p signals.
NOTE: Although this television is able to connect to HDMI equipment it is possible that some equipment
may not operate correctly.
A wide variety of external equipment can be connected to the back of the television, therefore
the relevant owners manuals for all additional equipment must be referred to.
If the television automatically switches over to monitor external equipment, return to normal television
to select.
by pressing the desired programme position button. To recall external equipment, press
HDMI, the HDMI logo, and High-Definition Multimedia Interface are trademarks or registered trademarks of HDMI Licensing, LLC.
8
English
SETTING UP
Connecting an HDMI™ or DVI device to the HDMI input
The HDMI input on your television receives digital audio and uncompressed digital video from an HDMI
source device, or uncompressed digital video from a DVI (Digital Visual Interface) source device.
This input is designed to accept HDCP (High-Bandwidth Digital- Content Protection) programme material
in digital form from EIA/CEA-861-D–compliant [1] consumer electronic devices (such as a set-top box or
DVD player with HDMI or DVI output). For acceptable video signal formats, see page 14.
NOTE:
• Some early HDMI equipment may not work properly with your latest HDMI TV, due to the adoption of
a new standard.
• Supported Audio format: Linear PCM, sampling rate 32/44.1/48kHz
To connect an HDMI device
Connect an HDMI cable (type A connector) to the HDMI terminal.
For proper operation, it is recommended that you use an HDMI cable with the HDMI Logo (
).
• HDMI cable transfers both video and audio. Separate analogue audio cables are not required (see
illustration).
Model : 19/22 Only
HDMI
HDMI
cable
(not supplied)
HDMI device
HDMI out
9
SETTING UP
English
Model : 26/32/37 Only
1
HDMI device
2
HDMI 1/2
HDMI out
To view the HDMI device video, press
to select the mode.
10
HDMI
cable
(not supplied)
English
SETTING UP
DVI device to the HDMI Input
Connect an HDMI-to-DVI adapter cable (HDMI type A connector) to HDMI1 terminal and audio cables
to the PC/HDMI1 Audio socket (see illustration).
• The recommended HDMI-to-DVI adapter cable length is 6.6 ft (2m).
An HDMI-to-DVI adapter cable transfers video only.
• Separate analogue audio cables are required.
Model : 19/22 Only
PC/HDMI (AUDIO)
HDMI
Audio cable for HDMI
to television connection
(not supplied)
HDMI-to-DVI adapter cable
(not supplied)
DVI device
11
SETTING UP
English
Model : 26/32/37 Only
PC/
HDMI 1
(AUDIO)
Audio cable for HDMI
to television connection
(not supplied)
1
2
HDMI 1/2
HDMI-to-DVI adapter cable
(not supplied)
DVI device
NOTE:
To ensure that the HDMI or DVI device is reset properly, it is recommended that you follow these procedures:
• When turning on your electronic components, turn on the television first, and then the HDMI or DVI device.
• When turning off your electronic components, turn off the HDMI or DVI device first, and then the television.
[1] EIA/CEA-861-D compliance covers the transmission of uncompressed digital video with high-bandwidth digital
content protection, which is being standardized for reception of highdefinition video signals. Because this is an
evolving technology, it is possible that some devices may not operate properly with the television.
HDMI, the HDMI logo and High-Definition Multimedia Interface are trademarks or registered trademarks of HDMI
Licensing LLC.
12
English
SETTING UP
Connecting a computer
With the HDMI connection, you can watch your computer’s display on the television and hear the
sound from the televisions speakers.
To connect a PC to the HDMI terminal
When connecting a PC to the HDMI terminal on the television, use an HDMI-to-DVI adapter cable and
analogue audio cables.
If connecting a PC with an HDMI terminal, use an HDMI cable (type A connector). Separate analogue
cables are not necessary (see page 9).
Model : 19/22 Only
the back of your television
PC/HDMI (AUDIO)
Computer
HDMI-to-DVI
adapter cable
(not supplied)
HDMI
Audio cable for PC to television
connection (not supplied)
Model : 26/32/37 Only
the back of your television
PC/
HDMI 1
(AUDIO)
Computer
HDMI-to-DVI
adapter cable
(not supplied)
1
2
HDMI 1/2
Audio cable for PC to television
connection (not supplied)
For acceptable PC signal formats, see “Acceptable PC signals through HDMI terminals” on page 14.
NOTE: The edges of the images may be hidden.
13
SETTING UP
English
Acceptable Video signals through HDMI terminals
Format
Resolution
V. Frequency
H. Frequency
Pixel Clock Frequency
480i
720 x 480i
60.000Hz
15.734kHz
27.000MHz
480p
720 x 480p
60.000Hz
31.500kHz
27.000MHz /27.030MHz
576i
720 x 576i
50.000Hz
15.625kHz
27.000MHz
576p
720 x 576p
50.000Hz
31.250kHz
54.000MHz
720p
1280 x 720p
50.000Hz
37.500kHz
74.250MHz
720p
1280 x 720p
59.940 Hz / 60.000Hz
44.960kHz / 45.000kHz
74.170MHz /74.250MHz
1080i
1920 x 1080i
59.940 Hz / 60.000Hz
33.720kHz / 33.750kHz
74.170MHz /74.250MHz
1080i
1920 x 1080i
50.000Hz
28.125kHz
74.250MHz
Acceptable PC signals through HDMI/D-SUB terminals
Format
Resolution
V. Frequency
H. Frequency
Pixel Clock Frequency
VGA
640x480
59.940Hz
31.469kHz
25.175MHz
VGA
640x480
72.809Hz
37.861kHz
31.500MHz
VGA
640x480
75.000Hz
37.500kHz
31.500MHz
VGA
720x400
70.087Hz
31.469kHz
28.322MHz
SVGA
800x600
56.250Hz
35.156kHz
36.000MHz
SVGA
800x600
60.317Hz
37.879kHz
40.000MHz
SVGA
800x600
72.188Hz
48.077kHz
50.000MHz
SVGA
800x600
75.000Hz
46.875kHz
49.500MHz
XGA
1024x768
60.004Hz
48.363kHz
65.000MHz
XGA
1024x768
70.069Hz
56.476kHz
75.000MHz
XGA
1024x768
75.029Hz
60.023kHz
78.750MHz
WXGA
1280x720
59.855Hz
44.772kHz
74.250MHz
WXGA
1280x768
59.870Hz
47.776kHz
79.500MHz
WXGA
1360x768
60.015Hz
47.712kHz
85.500MHz
SXGA
1280x1024
60.020Hz
63.981kHz
108.000MHz
HDMI, the HDMI logo, and High-Definition Multimedia Interface are trademarks or registered trademarks of HDMI
Licensing, LLC.
NOTE 1: HDMI 1 terminals supports PC signal input, HDMI 2 and 3 does not support PC signal.
NOTE 2: For PC input, for only supported PC signal can show the correct resolution on TV display.
14
Using the controls
Whilst all the necessary adjustments and controls for the television are made using the remote
control, the buttons on the television may be used for some functions.
Note: COMMON INTERFACE (CI)
The common interface is for a Conditional Access Module (CAM) Contact a service provider for details.
Model : 19/22 Only
DVB
COMMON
INTERFACE
CI Card
Power
Programme up
Programme down
R
VIDEO INPUT
L
Volume up
R
AUDIO
English
SETTING UP
Volume down
MENU
L
Menu
Video
VIDEO
Input
OK
(2)
Service Only
SERVICE
ONLY
Headphone
GREEN LED - On Timer/EPG Timer On
IR SENSOR
RED LED - Standby
GREEN LED - Power on
Model : 26/32/37 Only
DVB
COMMON
INTERFACE
CI Card
Power
Programme up
Programme down
R
L
L
Volume up
AUDIO
VIDEO INPUT
R
Volume down
MENU
Menu
Video
VIDEO
OK
(2)
Input
Service Only
SERVICE
ONLY
Headphone
HDMI 3
HDMI 3
RED LED - Standby
GREEN LED - Power on
IR SENSOR
GREEN LED - On Timer/EPG Timer On
15
SETTING UP
English
Switching on
If the RED LED is unlit check that the mains plug is connected to the power supply. If the picture does
not appear press on the remote control, it may take a few moments.
To put the television into Standby press on the remote control. To view the television press again.
The picture may take a few seconds to appear.
Using the remote control
To set up the television you will now need to use the on screen menus. Press
to see the menus.
on the remote control
The on-screen menu appears as a list of five topics. As each symbol is selected by pressing ◄ or ►on
the navigation ring on the remote control, its respective options will appear below.
To use the options, press or on the navigation ring to move up and down through them and use
, ◄ or ► to select the required choice. Follow the on-screen instructions. The functions of each menu
are described in detail throughout the manual.
Using the controls
To alter the volume press –
+.
To alter the programme position press
P
.
Press
and , , ◄ or ► to control the sound and picture options.
Press
to finish.
and then use
To select the external input, press
or to move through the list until the
appropriate input source is selected as described on page 30.
Please always refer to the owner’s manual of the equipment to be connected for full details.
Please note: Inserting the headphone plug will mute the sound from all speakers.
16
English
TUNING THE TELEVISION
4
Tuning the television
To start channel scan press ►.
Initial Setup
Before switching on the television put your
decoder and media recorder to Standby if they
are connected.
To set up the television use the buttons on the
remote control as detailed on page 5.
Channel Scan
First, please connect antenna.
If you skip this step, the channel
scan can be performed in the TV Menu.
Initial Setup
0%
Back
Connect the television to the main power
and press the button. The Initial Setup
screen will appear at the first use.
Press to start the initial setup
Initial Setup
Using ▲ or ▼ to select your language, and
then press ►.
Initial Setup
Exit
NOTE: The time will be set automatically using
the broadcaster data but can be advanced or
decreased by up to 12 hours using Time Zone in
Timer. (See page 28)
PLEASE NOTE
Language
Please select your language:
The Factory Default menu can also be accessed
at any time in the Parental from the FUNCTION menu.
English
Español
Français
Deutsch
Italiano
Ελληνικά
Български
Next
EXIT
Exit
Press ▲ or ▼ to select your country and
press ► to the next step.
Initial Setup
Country
Please select your country:
United Kingdom
Italy
Luxembourg
Netherlands
Norway
Sweden
Bulgaria
Select
EXIT
If the television cannot be connected to a media
recorder/decoder with a SCART lead or if a
station on another system is required, use
Manual Scan to allocate a programme position,
see page 18.
Please press [OK] to start the
wizard.
Back
Next
NOTE: If you skip this step, the channel scan can
be performed in the TV Menu.
Welcome
Select
Select
The search will begin for all available stations.
The slide bar will move along the line as the
search progresses.
Welcome to the initial Setup
wizard.
Back
Scan
Skip Scan
Start channel scan now ?
Next
EXIT
Exit
17
TUNING THE TELEVISION
Setting the programmes
NOTE: When Channel Block is activated, the
4-digit password is needed to enter the Channels
submenu under SETUP menu.
English
Select Auto Scan and press
.
Channels
Auto Scan
Update Scan
Digital Channel Range Scan
Analogue Manual Scan
Channel Skip
Channel Sort
Channel Edit
Channel Decode
Analogue Channel Fine Tune
Auto Scan
Auto Scan will completely re-tune the television
and can be used to update the channel list.
It is recommended that Auto Scan is run
periodically to ensure that all new services
are added.
OK
Scan
Select
RETURN
Back
EXIT
Exit
NOTE: All current programmes and settings, i.e.
favourites and locked programmes, will be lost.
Press Cancel for no change, or press
start Auto Scan.
Press MENU and use ◄ or ► to select
SETUP.
.to
Previous setting will be lost ! Press Cancel for
no change, Press OK to start Auto scan.
SETUP
Country
United Kingdom
OSD Language
English
Audio Language
English
Audio Language 2nd
English
Channels
Common Interface
Reset Default
OK
Enter
Select
RETURN
Back
OK
Manual scan
EXIT
Exit
Press ▼ to highlight Country and use ◄
or ► to select.
The television can be tuned-in manually using
Manual scan. For example: if the television
cannot be connected to a media recorder/
decoder with a SCART lead or to tune-in a station
on another System.
Press MENU and using ◄ or ► to select
SETUP.
NOTE: In order to receive the information from
the broadcaster correctly, please set the correct
country.
Use ▼ to highlight OSD Language and
press ◄ or ► to select.
4
SETUP
Country
United Kingdom
OSD Language
English
Audio Language
English
Audio Language 2nd
English
Channels
Common Interface
Reset Default
Press ▼ to highlight Channels and press
► or .
SETUP
United Kingdom
Country
OSD Language
English
Audio Language
English
Audio Language 2nd
English
Channels
Common Interface
Reset Default
OK
Enter
Select
RETURN
Back
EXIT
Cancel
OK
Exit
18
Enter
Select
RETURN
Back
EXIT
Exit
English
TUNING THE TELEVISION
Press ▼ to highlight Channels and press
► or .
In the SETUP menu press ▼ to highlight
Channels and press ► or to select.
SETUP
Country
United Kingdom
OSD Language
English
Audio Language
English
Audio Language 2nd
English
Channels
Common Interface
Reset Default
SETUP
United Kingdom
Country
OSD Language
English
Audio Language
English
Audio Language 2nd
English
Channels
Common Interface
Reset Default
Enter
OK
OK
Enter
Select
RETURN
Back
EXIT
4
Select
Back
EXIT
Exit
Channels
Auto Scan
Update Scan
Digital Channel Range Scan
Analogue Manual Scan
Channel Skip
Channel Sort
Channel Edit
Channel Decode
Analogue Channel Fine Tune
Channels
Auto Scan
Update Scan
Digital Channel Range Scan
Analogue Manual Scan
Channel Skip
Channel Sort
Channel Edit
Channel Decode
Analogue Channel Fine Tune
Enter
RETURN
Press ▼ to highlight Channel Skip and
press ► or to select.
Select Analogue Manual Scan and press
► or to confirm it.
OK
Select
Exit
OK
RETURN
Back
EXIT
Enter
Select
RETURN
Back
EXIT
Exit
Use ▲ or ▼ to select the channels you
want to skip, then press to set.
Exit
Using number buttons 0~9 to enter the
Start Frequency. Use ▲ or ▼ to select
Scan Up or Scan Down and press ► or
to start scan. Press to stop scanning.
1
Digital
Channel Skip
TF1
Channel Skip
To prevent certain programmes from being
viewed, the programme position can be skipped.
The remote control must be removed as the
channels will still be available using the number
buttons. Programmes can then be watched
as normal using the controls on the television,
but the television will not show the skipped
programme position.
OK
Set
Select
RETURN
Back
EXIT
Exit
Skipped programme positions cannot be
selected by P
and P
or by the controls on
the television, but can still be accessed by the
number buttons on the remote control.
19
TUNING THE TELEVISION
Channel Sort
Search the new channels that are not in the
programme list.
Change the order of the programme list.
Select Channels from the SETUP menu.
Press MENU and use ◄ or ► to select
SETUP.
Highlight Channel Sort and press ► or
to select.
Press ▼ to highlight Channels and press
► or .
Select Update Scan and press
scan.
Pressing
to check two channels to
swap the positions.
to start
Digital Channel Range Scan
1
2
3
4
5
6
7
8
9
10
Scan channels from certain range. You can set
the range before you scan the channels.
Select Channels from the SETUP menu.
Highlight Digital Channel Range Scan
and press ► or to select.
Digital
Digital
Digital
Digital
Digital
Digital
Digital
Digital
Digital
Digital
OK
Using ▲, ▼, ◄ and ► to set the range,
then press to scan.
Set
Channel Sort
TF1
TMC
NRJ12
LCI
Eurosport France
24HTVE
CLANTVE
La2
TVE1
RNE1
Select
RETURN
Back
EXIT
Exit
Channel Edit
Edit the channel number and channel name.
Digital Channel Range Scan
Select Channels from the SETUP menu.
Scan with a range of channels.
Highlight Channel Edit and press ► or
to select.
0%
From Channel
To Channel
Using ▲ or ▼ to highlight the channel and
press to select.
21
69
OK
Scan
RETURN
Back
EXIT
4
Exit
Change the Channel Number by using the
number buttons 0~9. Change the Channel
Name by pressing the number buttons 0~9
to enter numbers and letters.
NOTE: Colour System/Sound System can be
changed only in Analogue TV.
Channels Edit
Network Name:
R seau Num rique Terre
Channel Number:
1
Channel Name:
TF1
Frequency
490
Colour system
Auto
Sound system
B/G
OK
20
Set
Select
RETURN
Back
EXIT
Exit
English
Update scan
English
TUNING THE TELEVISION
Reset Default
Channel Decode
Selecting Reset Default will reset all TV settings
to their original factory values, excludes Country,
Language OSD, and Channels.
Channel Decode support the Canal+ (paid
television channel); however, the channel also
broadcast some un-encrypted programmes.
These programmes without encryption can be
viewed free of charge.
In the SETUP menu press ▼ to highlight
Channels and press ► or to select.
Select OK to confirm or select Cancel to
exit.
Select Channels from the SETUP menu.
Highlight Channel Decode and press ► or
to select.
General controls
Selecting programme
positions
Use ▲or ▼ to highlight the channel and
press to set.
Analogue Channel Fine Tune
When the reception is poor, you can use this
function to do the fine tuning.
Programme positions can also be selected using
P
P .
In the SETUP menu press ▼ to highlight
Channels and press ► or to select.
To display on-screen information i.e. programme
position, input mode or stereo/mono signal,
press
. Press again to cancel.
Press ▼ to highlight Analogue Channel
Fine Tune and press to select.
Highlight and press
channel.
4
To select a programme position use the
numbered buttons on the remote control.
Stereo and Bilingual
transmissions
to select the
Use ◄ or ► to adjust the frequency. Press
◄ to decrease and ► to increase the
frequency.
Common Interface
This function enables you to watch some pay
services (encrypted services). When the module
is inserted into the CI slot, you can access the
module menu. To purchase a module and smart
card, contact your dealer. Common Interface
functions may not be possible depending upon
the country broadcasting circumstances.
Press MENU and use ◄ or ► to select
SETUP.
Press ▼ to highlight Common Interface
and press ► or .
Press to select the CI card to view the
Module information.
If stereo or dual language broadcasts are
transmitted the word Stereo or Dual will appear
on the screen each time programme positions
are changed, disappearing after a few seconds. If
the broadcast is not in stereo the word Mono will
appear.
Stereo…
Press to select Stereo or Mono.
Bilingual… Bilingual transmissions are rare. If
they are transmitted the word Dual will display.
Choose the required programme number and
if the word Dual appears press
to select
Dual 1, Dual 2 or Mono.
Audio Description
Audio description is an additional narration
describing on-screen action, body language,
expressions and movements for people with
visual disabilities. Press AD button to switch the
audio description On or Off.
21
CONTROLS AND FEATURES
Quick access menu helps you access some
options quickly, such as Picture Mode, Picture
Size, Sleep and Favourite List. Press QUICK
button to display the Quick access menu and
use ▲ or ▼ to select the option.
Sound controls
Volume
Volume
Press
or
to adjust the volume.
Sound Mute
Quick access
Picture Mode
Picture Size
Sleep
Favourite List
Press
cancel.
once to turn the sound off and again to
Balance, Bass, Treble
Favourite List
Press MENU and ◄ or ► to select
SOUND.
You can save your favourite channels in the
Favourite List.
Press QUICK button and use ▲ or ▼ to
select Favourite List.
SOUND
OK
Use ▲ or ▼ to select a channel and press
to erase the channel from the Favourite
list.
10
HERCULE POIROT : Le mort avait les dents blanches
French Stereo
576i SD
RICK HUNTER : De sacrés partenaires
15:24
Favourite List
1 TF1
10 TMC
ENTER
Enter
Off
Off
Off
Normal
Select
RETURN
Back
EXIT
Exit
Press ▼ to highlight Bass, Treble or
Balance and ◄ or ► to change the
setting.
Use ▲ or ▼ to select a space and press
to add the channel to the Favourite list.
15:22 - 16:16
4+
16:23 - 17:10
0
0
0
Balance
Bass
Treble
Surround Sound
Bass Boost
Stable Sound
Audio Description
Visually Impaired
Quick access
Picture Mode
Picture Size
Sleep
Favourite List
TMC
English
Quick Access Menu
Select
22
English
CONTROLS AND FEATURES
Surround Sound
Audio Description
This function enriches (expending and deepening)
the sound quality.
Audio Description is an additional narration during
the TV watching. This function enables you to
choose the type of narrations.
In the SOUND menu press ▼ to select
Surround Sound.
Press MENU and use ◄ or ► to select
SOUND.
Using ◄ or ► to switch function On or Off.
Press ▼ to highlight Audio Description
and use ◄ or ► to select from Normal,
Hard of Hearing, and Visually Impaired.
Bass Boost
Bass Boost enhances the depth of the sound
on the TV speakers. The difference will only be
noticeable on sound with a strong bass.
NOTE: Press AD button on the remote control to
switch the audio description On or Off.
Hard of Hearing: This function provides narration
to deaf and hard of hearing viewers.
In the SOUND menu press ▼ to highlight
Bass Boost.
Visually Impaired: This function provides
descriptive narration of key visual elements making television programmes, feature films,
home video and other visual media accessible to
people who are visually blind or visually impaired.
Using ◄ or ► to switch function On or
Off.
Stable Sound®
Visually Impaired
Stable Sound reduces the volume level
differences between channels. It automatically
remains on the same volume level when you
change channels.
When the Audio Description is set to “Visually
Impaired”, you can adjust the volume of the audio
description.
In the SOUND menu press ▼ to select
Stable Sound.
Using ◄ or ► to switch function On or Off.
Press MENU and use ◄ or ► to select
SOUND.
Press ▼ to highlight Audio Description
and use ◄ or ► to select Visually
Impaired.
Using ◄ or ► to adjust the volume.
23
CONTROLS AND FEATURES
English
Widescreen viewing
Depending on the type of broadcast being transmitted, programmes can be viewed in a number of
formats.
Native
WIDE
This setting is available when
watching video signal source via HDMI,
and will show the picture without over scan
Use this setting when watching a
widescreen DVD, widescreen video tape
or a 16:9 broadcast (when available). Due
to the range of widescreen formats (16:9,
14:9, 20:9 etc.) black bars may be visible
on the top and bottom of the screen.
SUPER LIVE 2
If a side panel format signal is being
received this setting will enlarge the image
to fit the screen by stretching the image
horizontally and vertically, holding better
proportions at the centre of the image.
Some distortion may occur.
CINEMA 2
When watching all sides panel format
films/video tapes, this setting will eliminate
or reduce the black bars at all sides of the
screen by zooming in and selecting the
image without distortion.
4:3
Use this setting to view a true 4:3
broadcast.
SUPER LIVE 1
This setting will enlarge a 4:3 image to
fit the screen by stretching the image
horizontally and vertically, holding better
proportions at the centre of the image.
Some distortion may occur.
24
English
CONTROLS AND FEATURES
CINEMA 1
When watching letterbox format’ films/
video tapes, this setting will eliminate or
reduce the black bars at the top and bottom
of the screen by zooming in and selecting
the image without distortion.
When subtitles are included on a letterbox
format broadcast, this setting will raise
the picture to ensure that all the text is
displayed.
SUBTITLE
SUBTITLE
Use this setting when watching a 14:9
broadcast.
14:9
Press QUICK to display the Quick access menu and use or to select the Picture Size and
press .
Quick access
Picture Mode
Picture Size
Sleep
Favourite List
You can choose the picture size from Native, Wide, Super Live 2, Cinema 2, 4:3, Super Live 1, Cinema 1,
Subtitle, 14:9 and Auto.
NOTE: If you set the Picture Size to AUTO, the format will be set automatically.
Using the special functions to change the size of the displayed image (i.e. changing the height/width
ratio) for the purposes of public display or commercial gain may infringe on copyright laws.
Available Picture Size
Screen Mode
SD (up to 480p)
HD (up to 1080i)
PC Mode
Super Live1
Yes
No
No
Super Live2
Yes
No
No
Cinema1
Yes
No
No
Cinema2
Yes
No
No
14:9
Yes
Yes
No
Wide
Yes
Yes
Yes
4:3
Yes
Yes
Yes
Subtitle
Yes
No
No
Auto
Yes
No
No
Native
Yes(only in HDMI)
Yes(only in HDMI)
No
25
CONTROLS AND FEATURES
Picture Mode
You can adjust the best picture appearance by
selecting the preset value in picture mode based
on the programme category.
Colour Temperature increases the ‘warmth’ or
‘coolness’ of a picture by increasing the red or
blue tint.
In the PICTURE menu press ▼ to highlight
Colour Temperature and press ► or to
select.
Press MENU and use ◄ or ► to select
PICTURE.
Press ▼ to highlight Picture Mode and
use ◄ or ► to select from Dynamic,
Standard, Mild, Movie or User.
PICTURE
Picture Mode
Standard
Brightness
Contrast
Colour
Tint
Sharpness
Back Light
Wide
Picture Size
Colour Temperature
Advanced Video
Select RETURN Back
English
Colour Temperature
Picture controls
PICTURE
Picture Mode
Standard
Brightness
Contrast
Colour
Tint
Sharpness
Back Light
Wide
Picture Size
Colour Temperature
Advanced Video
Select RETURN Back
50
70
50
0
50
70
EXIT
50
70
50
0
50
70
EXIT
Exit
Using ◄ or ► to select from Cool,
Medium, Warm or User to suit your
preference.
Exit
Colour Temperature
Colour Temperature
Medium
R Gain
G Gain
B Gain
Brightness, Contrast, and
Colour
0
0
0
In the PICTURE menu press ▼ to select
Brightness, Contrast, or Colour.
Using ◄ or ► to adjust your preference.
Tint
It just can adjust at NTSC system, so when the
input system is PAL or SECAM, it will be grayed.
Select
In the PICTURE menu press ▼ to select
Sharpness.
Using ◄ or ► to adjust your preference.
Back
EXIT
Exit
NOTE: R/G/B Gain: Increase or decrease the
red/green/blue values in the picture.
Sharpness
This function increase or decrease the sharpness
of the picture. The picture shows the clear edge
when you increase the values.
RETURN
Cinema mode
The frame rate of a movie film is generally 24
frames a second whereas the movie software
such as DVD, etc. that you enjoy watching on
television at home is 30 or 25 frames a second.
The difference in frame rate may cause flickers
whilst viewing the films on television; set the
Cinema Mode to convert the signal to reproduce
a smooth motion and picture quality.
26
English
CONTROLS AND FEATURES
In the PICTURE menu press ▼ to highlight
Advanced Video and press ► to select.
You can adjust the skin colour to be more natural.
Press ▼ to highlight Cinema Mode, and
using ◄ or ► select from On or Off.
Advanced Video
Cinema Mode
On
DNR
Low
CTI
Off
Flesh Tone
Off
Adaptive Luma Control
Off
Active Backlight
Off
Blue Screen
On
H.Position
V.Position
Select
RETURN
Flesh Tone
In the PICTURE menu press ▼ to highlight
Advanced Video and press ► or to
select.
Press ▼ to highlight Flesh Tone and use
◄ or ► to select On or Off
Adaptive Luma Control
Automatically adjusts the brightness and contrast
after analyzing the input signal. This function
enriches the colours and the depth of the picture.
0
0
Back
EXIT
In the PICTURE menu press ▼ to highlight
Advanced Video and press ► or to
select.
Exit
DNR
Press ▼ to highlight Adaptive Luma
Control and use ◄ or ► to select On or
Off.
DNR (Digital Noise Reduction) enables you to
‘soften’ the screen representation of a weak
signal to reduce the noise effect.
In the PICTURE menu press ▼ to highlight
Advanced Video and press ► or to
select.
Select DNR and using ◄ or ► to select
from Low, Middle, High, Auto or Off.
Active Backlight
When Active backlight control is activated, it will
automatically optimise the backlighting levels for
dark scenes.
In the PICTURE menu press ▼ to highlight
Advanced Video and press ► to select.
CTI
Press ▼ to highlight Active backlight and use
◄ or ► to select On or Off.
The colour transient improvement (CTI) involves
the detection and sharpening of edges around
colour objects on the screen.
In the PICTURE menu press ▼ to highlight
Advanced Video and press ► or to
select.
Select the CTI, and using ◄ or ► to select
from Low, Middle, High or Off.
NOTE: When Active Backlight is set to On, the
Back Light in PICTURE menu will be grayed out.
Blue Screen
When Blue Screen is selected the screen will
turn blue and the sound will be muted when no
signal is received.
In the PICTURE menu press ▼ to highlight
Advanced Video and press ► or to
select.
Press ▼ to highlight Blue Screen and use ◄
or ► to select On or Off.
27
CONTROLS AND FEATURES
English
Back Light
Timer control
Time Zone
Adjusting the Back Light can improve the clarity
of the screen when viewing.
When you select a Time Zone, the TV time is
set by the time offset information based on Time
Zone and GMT (Greenwich Mean Time) which is
received with the broadcast signal and the time is
set automatically by a digital signal.
Press MENU and use ◄ or ► to select
PICTURE.
Press ▼ to highlight Back Light and use
◄ or ► to adjust.
Select the Time Zone in the TIMER.
PICTURE
Picture Mode
Standard
Brightness
Contrast
Colour
Tint
Sharpness
Back Light
Wide
Picture Size
Colour Temperature
Advanced Video
Select RETURN Back
Press ◄ or ► to select your viewing area
or “As Broadcaster".
50
70
50
0
50
70
EXIT
Time
The time is set automatically when receiving a
digital signal. (You can set the time manually only
if the TV has no DTV signal.)
You must set the time correctly before using
Power On/Off Timer function.
Exit
H. and V. Position
Highlight the Time in the TIMER menu and
press ► or to select.
Adjust the horizontal and vertical position of the
picture.
NOTE: This function is only available in PC mode.
Use ◄ or ► to set the Auto
Synchronization On/Off.
Selecting the Advanced Video in the
PICTURE menu and press ► or to
select.
Time
Press ▼ to highlight H. Position or V.
Position and use ◄ or ► to adjust.
Advanced Video
On
Cinema Mode
DNR
Low
CTI
Off
Flesh Tone
Off
Adaptive Luma Control
Off
Active Backlight
Off
Blue Screen
On
H.Position
V.Position
OK
Enter
Select
RETURN
Auto Synchronization
Date
Time
On
Timer
Power On Timer
Power Off Timer
Off
Select
0
0
Back
EXIT
Exit
NOTE: For PC input, V. Position adjustment is
not linear. In another words, when you adjust
V. Position, the OSD value will change by 2 or
greater value depending TV's calibration process.
28
RETURN
Back
EXIT
Exit
English
CONTROLS AND FEATURES
If you set the Auto Synchronization Off,
you can set the Date and Time manually
by using ▲, ▼, ◄ and ►.
4
Sleep Timer
The television can be set to turn itself Off after
time.
Using ▲, ▼, ◄ and ► to select the
Power On/Off Timer.
Use ▼ to highlight Sleep Timer in the
TIMER menu.
Use ◄ or ► to set the timer from Off, 10,
20, 30, 40, 50, 60, 90 or 120 Minutes.
Time
Auto Synchronization
Date
Time
On
Timer
Power On Timer
Power Off Timer
Both On
00:00:00
00:00:00
Select
RETURN
Back
Time Zone
Time
Sleep Timer
EXIT
TIMER
As Broadcaster
10 Minutes
Exit
The Power On Timer function switches
the TV on automatically at a preset time.
The Power Off Timer function switches
the TV off automatically at a preset time.
Select
RETURN
Back
EXIT
Exit
NOTE:
To cancel the Sleep Timer, select Off in above
setting.
29
CONTROLS AND FEATURES
This specifies the type of signal going into SCART
on the back of the television. Please refer to the
manufacturers instructions for the connected
equipment.
Defining the INPUT and OUTPUT sockets so that
the television recognises connected equipment.
See page 7 for a clear view of the back
connection recommendations.
In the SETUP menu press ▼ to highlight
SCART, then press ► or to select.
Most media recorders and decoders send a
signal through the SCART lead to switch the
television to the correct Input socket.
Country
OSD Language
Audio Channel
Channels
SCART
Common Interface
Reset Default
Alternatively press the external source selection
button
until the picture from connected
equipment is shown.
SETUP
United Kingdom
English
Stereo
Input selection
Use the Input Selection if the television does not
switch over automatically.
OK
Enter
Select
RETURN
Back
EXIT
Exit
Model 19/22:
Press ◄ or ► to select from Auto, Mixed,
RGB, Composite, or S-Video.
Pressing
a list will appear on screen
showing all stored external equipment. Use
▲ and ▼to highlight and to select.
SCART
SCART
Model 19/22
Main
TV
1C
2
3
PC
HDMI
S-Video
Select
RETURN
Back
EXIT
Exit
Model 26/32/37:
• Use ▲ or ▼ to select SCART 1 and press
◄ or ► to select from Auto, Mixed, RGB,
Composite, or S-Video.
• Use ▲ or ▼ to select SCRAT 2 and press
◄ or ► to select from Auto, Composite,
or S-Video.
Model 26/32/37
Main
TV
1C
2
3
4
PC
HDMI 1
HDMI 2
HDMI 3
SCART
SCART 1
SCART 2
HDMI™ displays equipment connected to Input
HDMI on the back or side of the television. It is
designed for best performance with 1080i high
definition signals.
S-Video
Auto
Select
RETURN
Back
EXIT
Exit
Check the signal output of the DVD or compatible
device, please select the correct setting for
“SCART input”.
30
English
Input signal selection
Input selection and AV
connections
English
CONTROLS AND FEATURES
Logo LED
Function control
You can set the Logo LED on or off on the
bottom of the front panel of your TV.
Analogue Subtitle
In the FUNCTION menu press ▼ to
highlight Logo LED.
You can set the subtitle on or off whilst watching
TV.
Use ◄ or ► to switch the function On or
Off.
Highlight the Subtitle in the FUNCTION
menu, and press ► or to select.
NOTE: The Logo LED is for size 32/37 only.
Use ▲ or ▼ to select the Analogue
Subtitle and press ◄ or ► to select from
On, Mute, or Off.
4:3 Stretch
If the 4:3 stretch is On, the picture size will auto
stretch to 4:3 aspect ratio in Widescreen format.
Subtitle
Analogue Subtitle
Digital Subtitle Language
Digital Subtitle Language 2nd
Subtitle Type
NOTE: 4:3 Stretch is only activated when Picture
Size is set to "Auto" mode.
On
English
English
Normal
Parental control
Select
RETURN
Back
EXIT
Exit
NOTE: When Analogue subtitle is selected to
“Mute”, the Analogue subtitle will be displayed on
the screen but the speaker muted simultaneously.
Digital Subtitle
Use the Digital Subtitle function when two or
more subtitle languages are broadcast. If subtitle
data in a selected language is not broadcast, the
default language subtitle will be displayed
Highlight the Subtitle in the FUNCTION
menu, and press ► or
to select.
This function blocks channels or programmes that
you do not want to or that you do not want your
children to watch.
A password is required to gain access to this
function. The factory default password is “0000”.
NOTE: When Channel Block, Programme Block
and Input Block are activated, you will need to
enter the 4-digit password before you enter the
channels submenu under the SETUP. After auto
scan, all the channel blocks will be cleared
Channel Block
This function blocks channels that you do not
want to or that you do not want your children to
watch.
Highlight the Parental in the FUNCTION
menu, and press ► or to select.
Use ▲ or ▼ to select the Digital Subtitle
Language or Digital Subtitle Language
2nd and use ◄ or ► to select the
language.
NOTE: If the language in the Digital Subtitle
Language is not available, the Digital Subtitle
Language 2nd will be displayed.
FUNCTION
Parental
Teletext
Sublitle
Logo LED
4:3 Stretch
Subtitle Type
You can choose the Subtitle Type from Normal
or Hearing Impaired. If the "Hearing Impaired"
is selected, it provides subtitle services to deaf
and hard of hearing viewers with additional
descriptions
OK
31
Enter
On
On
Select
RETURN
Back
EXIT
Exit
CONTROLS AND FEATURES
Enter the 4-digit password.
This function prevents children from watching
certain TV programmes, according to the rating
limit set.
FUNCTION
Password
This function operates according to information
from the broadcasting station.Therefore if the
signal has no information, this function does not
operate.
*
Highlight the Parental in the FUNCTION
menu, and press ► or to select.
Enter the 4-digit password.
RETURN
Back
EXIT
Use ▼ to highlight the Programme Block
and press ► or to select.
Exit
Use ▼ to highlight the Channel Block and
press ► or to select.
FUNCTION
Channel Block
Programme Block
Input Block
Change Password
Panel Lock
Factory Default
FUNCTION
Channel Block
Programme Block
Input Block
Change Password
Panel Lock
Factory Default
Off
OK
4
OK
4
Enter
On
Select
Back
RETURN
EXIT
Exit
Enter
Select
Back
RETURN
EXIT
Exit
Use ◄ or ► to set the Age Rating from
age 4~18 or select None to turn this
function off.
Use ▼ to highlight the channels you want
to block, then press to set.
Programme Block
Age Rating
1
4
6
9
10
1
12
14
24
31
Digital
Digital
Digital
Digital
Digital
Digital
Digital
Digital
Digital
Digital
OK
Set
Channel Block
TF1
TV4 Stockholm
M6
W9
TMC
NT1
NRJ12
TV4 Film
TV4 Fakta
PARIS PREMIERE
Select
RETURN
Back
18
Select
EXIT
Exit
RETURN
Back
EXIT
Exit
NOTE: This function is available for the
programme with Age Rating information.
32
English
Programme Block
English
CONTROLS AND FEATURES
Input Block
Panel Lock
This function can disable the specific external
input signals.
Highlight the Parental in the FUNCTION
menu, and press ► or to select.
You can lock the control buttons on your TV
by using this Panel Lock. When this function
enables, the TV can be controlled only by the
remote control.
Highlight the Parental in the FUNCTION
menu, and press ► or to select.
Enter the 4-digit password.
Use ▼ to highlight the Input Block and
press ► or to select.
FUNCTION
Channel Block
Programme Block
Input Block
Change Password
Panel Lock
Factory Default
Enter the 4-digit password.
Use ▼ to highlight the Panel Lock and
press ◄ or ► to switch the function On or
Off.
NOTE: When the Panel Lock is set to “On”, TV
can be turned off by pressing the power keys on
the TV or the remote control, but can be turned
on only by the remote control.
On
Factory Default
OK
4
Enter
Select
RETURN
Back
EXIT
Exit
Selecting Factory Default will reset all TV
settings, including stored channels, to their
original factory values.
Highlight the Parental in the FUNCTION
menu, and press ► or to select.
Use ▲ or ▼ to highlight the input that you
want to disable and press
to lock.
Enter the 4-digit password.
Model 19/22
Use ▼ to highlight the Factory Default
and press ► or to select.
Input Block
1
2
3
4
5
6
TV
Component
AV
SCART
PC
HDMI
OK
Set
Select
RETURN
Back
EXIT
Exit
Back
EXIT
Exit
Model 26/32/37
Input Block
1
2
3
4
5
6
7
8
9
TV
Component
AV
SCART 1
SCART 2
PC
HDMI 1
HDMI 2
HDMI 3
OK
Set
Select
RETURN
33
CONTROLS AND FEATURES
Select the on-screen guide by pressing
GUIDE, the guide screen will appear
highlighting details of the programme and
event currently being viewed. This may
take a few moments to appear.
The on-screen information and programme guide
give access to programme details for all available
channels.
Press ◄ or ► for information on other
events scheduled for the programme
selected.
Information
Press
, the information screen will
appear giving details of the programme
and event currently being viewed.
1
1110 9 8
7
La 2
803
2
Mil Años De Romanico (Las Claves Del Rom
3
11:15 - 11:50
10+
11:50 - 12:30
4
For details of other programmes currently
available, press ▲ and ▼ to scroll up and
down the programme list.
TTX
1/2 Spanish Stereo
576i SD
STTL
12:41
Vive La Via
Serie de 25 minutos de duración que no sólo tratará del Románico, desde el
punto de vista arquitectónico, sino que este estilo servirá de hilo conduct
(Carlos Garzón)
5
1/4
EPG Timer
6
1
Station
2
Current Programme and Time
3
Parental rating
4
Next Programme and Time
5
Programme description
6
Video format
7
Audio info
8
Subtitle
9
Teletext
10 Audio Description
11
NOTE: In order for the recording operation to
work properly, the media recorder must be set to
the same time as the TV. Regarding the process
for recording, please refer to the owner's manual
of the recording equipment.
EPG (Electronic Programme Guide) supports 8
sets of timers. You can set or cancel a timer for a
selected programme within the guide. When the
TV is on and the timer activates, a dialogue box is
shown informing you that the programme is about
to start. When the TV is in standby mode and the
timer activates, the TV will wake up with backlight
off, speaker mute on, and change to the channel
selected.
You must set the time correctly before using
this function. All set timers are cleared when
performing a new channel scan.
Favourite
Press
screen.
Press OK button to set/unset Timer in the
selected programme.
again to close the information
The indicator will be shown in the detail
information area if timer function is set.
Press BLUE button to enter the
programme timer list page.
NOTE: Time can be set manually in the Menu/
Timer/Time OSD menu.
After adjustment, the TV clock will not match
the time in the EPG Program Guide. The EPG
Program Guide time follows the broadcast stream
time which can not be adjusted.
34
English
Guide
Digital on-screen
information and
Programme Guide
English
TEXT SERVICES
Control buttons
Text services
Below is a guide to the functions of the remote
control text buttons.
To display the index/initial page:
Press
to access the index/initial page. The one
displayed is dependant on the broadcaster.
To reveal concealed text:
To discover the solutions on quiz and joke pages
press the
button.
To hold a wanted page:
At times it is convenient to hold a page of text.
Press
and
will appear in the top of the
screen. The page will be held on screen until the
button is pressed again.
To enlarge the text display size:
Press
once to enlarge the top half of the page,
press again to enlarge the bottom half of the
page. Press again to revert to normal size.
To toggle between Telextext and normal
picture mode:
Enter the page number then press
, a normal
picture will be displayed. The television will
indicate when the page is present by displaying
the page number at the top of the screen.
Sub page will be automatically displayed.
This television has a multi-page text memory,
which takes a few moments to load.
Setting the Language
You can set the teletext language.
In the FUNCTION menu press ▼ to
highlight Teletext, then press ► or
confirm.
to
FUNCTION
Parental
Teletext
Subtitle
Logo LED
4:3 Stretch
OK
Enter
On
On
Select
RETURN
Back
EXIT
Exit
Use ▲ and ▼ to select the options, and
then use ◄ and ► to select the language.
Teletext Favourite
Teletext
Digital Teletext Language
Decoding Page Language
You can save your favourite pages to your
Favourite Page List. Press TEXT button to enter
the teletext page. Press the QUICK button to
display the Quick access menu, and then select
the Favourite List to display the Favourite Page
List.
English
West EUR
After channel is changed or TV is turned off,
Favourite Page List will be lost.
Select
RETURN
Back
EXIT
Exit
Text Information
The first text page shown will be the index page.
Any text page can be accessed by entering the 3
digit page number using the numbered buttons,
to
pressing the coloured buttons or pressing P
advance to the next page and P
to go back to
the previous page.
35
PROBLEM SOLVING
English
Questions and Answers
Below are the answers to some of the most
common queries.
Q
A
Q
A
Q
A
Q
A
Q
A
Q
A
Q
A
Q
A
Q
A
Why is there no sound or picture?
Check the television is not in standby mode.
Check the mains plug and all mains
connections.
Why is there incorrect or no sound when in DTV
mode?
Press
to ensure the hard of hearing
option has not been selected.
Why doesn’t the video/DVD being played show on
screen?
Make sure the VCR or DVD player is
connected to the television as shown on page
7, then select the correct input by pressing .
Why is there a good video picture but no sound?
Check all lead connections.
Why is there a picture but no sound?
Check the volume has not been turned down
or that sound mute has not been selected.
Why is the VCR/DVD picture in black and white?
Check the correct input has been chosen,
S-VIDEO or AV. See AV connections page
30.
What else can cause a poor picture?
Interference or a weak signal. Try a different
television station. Analogue Manual Scan
may help.
Why doesn’t the remote control work?
Check the batteries aren’t dead or inserted
incorrectly.
Why is there a message permanently on the
screen?
Remove it by pressing
.
Q
A
Q
A
Q
A
Why are there problems with analogue text?
Good performance of text depends on a
good strong broadcast signal. This normally
requires a roof or loft aerial. If the text is
unreadable or garbled, check the aerial. Go
to the main index page of the text service and
look for the User Guide. This will explain the
basic operation of text in some detail.
Why are the four coloured text numbers visible but
no text?
Text has been selected whilst viewing an
external source i.e. DVD or VCR. No text
will appear on screen or a box may appear
stating no information is available. Select a
broadcasting channel and press
to access.
Why don't the devices connected via HDMI
operate properly?
Make sure to use cables with the HDMI logo
(see page 9).
Some early HDMI equipment may not work
properly with the latest HDMI TV products,
due to new standard adoption.
HDMI, the HDMI logo, and High-Definition Multimedia Interface
are trademarks or registered trademarks of HDMI Licensing, LLC.
Q
A
Q
A
Q
A
Q
A
36
Why when digital subtitles have been selected are
they not showing on screen?
Subtitles are not currently being transmitted
by the broadcaster.
Why is there no digital text service?
The digital programme being viewed is not
broadcasting digital text. Try another digital
programme.
When you forget the user-defined password?
Use the universal password which is 1276.
Why did TV turns off by itself?
After roughly 15 minutes without any input
video signal at TV mode, the TV will turn off to
save power.
English
PROBLEM SOLVING
Q
A
Q
A
Does this TV support the DPMS?
This is equipped with a function for saving energy
which supports the VESA Display Power Management
Signaling (DPMS) standard. This means that the
monitor must be connected to a computer which
supports VESA DPMS. To exit DPMS mode, press
button on the remote control to wake up the TV.
Why some on-screen information appears some strange
symbols?
Please make sure your “Country” setting is correct.
37
IMFORMATION
English
Specifications and accessories
• This television complies with the specification listed below.
• Design and specifications are subject to change without notice.
DVB-T Broadcast systems/channels
Broadcast systems/channels
UK
UHF 21-68
PAL-I
France
VHF 05-10 (VHF 01-05) PAL-B/G
UHF 21-69
UHF E21-E69
VHF E2-E12, S1-S41
Germany
VHF 05-12
UHF 21-69
SECAM-L
UHF F21-F69
VHF F1-F10, B-Q
Austria
VHF 05-12
UHF 21-69
SECAM-D/K UHF R21-R69
VHF R1-R12
Stereo
UHF UK21-UK69
Visible Screen Size Model 19
22
(approx.)
26
32
37
Display
Switzerland VHF 05-12
UHF 21-69
Sound output
(at 10% distortion)
Italy
VHF 05-12 (D,E,F,G,H,H1,H2)
UHF 21-69
Spain
UHF 21-69
Nicam
2 carrier system
Nederlands VHF 05-12
UHF 21-69
409.80x230.40mm
477.41x268.41mm
575.77x323.71mm
697.69x392.26mm
877.00x518.00mm
16:9
Model 19
22
26
32
37
3W + 3W
3W + 3W
5W + 5W
10W + 10W
10W + 10W
Sweden
VHF 05-12
UHF 21-69
Power consumption Model 19
as specified in
22
EN60107-1 : 1997
26
32
37
50W
65W
120W
160W
200W
Finland
VHF 05-12
UHF 21-69
Standby (approx.)
Greece
VHF 05-12
UHF 21-69
Model 19
22
26
32
37
0.5W
0.5W
0.5W
0.5W
0.5W
Dimensions
(approx.)
Model 19
35.9cm(H)47.2cm(W)19.2cm(D)
22
39.9cm(H)54.3cm(W)21.9cm(D)
26
49.4cm(H)66.7cm(W)24.0cm(D)
32
57.1cm(H)78.6cm(W)27.1cm(D)
37
63.7cm(H)90.2cm(W)29.3cm(D)
(Height dimension includes foot stand)
Weight (approx.)
Model 19
22
26
32
37
Video Input PAL, SECAM, NTSC 3.58/4.43
External connections
MODEL 19/22
EXT1
Input
Phono jacks
Phono jacks
Y, PB/CB, PR/CR
Audio L + R
EXT2
Input
Phono jack
Phono jacks
Video
Audio L + R
EXT3
Input/Output 21-pin SCART
HDMI
Input
Auto, Mixed, RGB,
Composite, S-video
/Monitor out
5.3 kg
6.5 kg
10.5 kg
13.8 kg
17.1 kg
HDMI™
HDMI Audio
Phono jacks
Audio L + R
Component
Phono jacks
Audio L + R
Headphone socket
R3.5mm stereo
Operating condition
Temperature 5°C - 35°C (41°F - 94°F)
Humidity 20 - 80% (non-condensing)
Accessories
Remote control
2 batteries (AAA, IEC R03 1.5V)
Power cord
User Manual
Cleaning Cloth
MODEL 26/32/37
EXT1
Input
Phono jacks
Phono jacks
Y, PB/CB, PR/CR
Audio L + R
EXT2
Input
Phono jack
Phono jacks
Video
Audio L + R
EXT3
Input/Output 21-pin SCART 1
Auto, Mixed, RGB,
Composite, S-video/TV out
EXT4
Input/Output 21-pin SCART 2
Auto, Composite, S-video
/Monitor out
PC
Input
RGB
HDMI1/2/3
Input
D-sub
HDMI™
PC/HDMI1 Audio
Phono jacks
Audio L + R
Component
Phono jackS
Audio L + R
38
English
IMFORMATION
DVB is a registered trademark of the DVB Project
HDMI, the HDMI logo, and High-Definition Multimedia Interface are trademarks or registered
trademarks of HDMI Licensing, LLC.
Printed on recycled paper. 100% Chlorine free.
© Toshiba Information Systems (U.K.) Limited
All rights reserved.
Reproduction in whole or part without written permission is strictly prohibited.
Toshiba Information Systems (UK) Ltd
Consumer Products Division,
Weybridge Business Park,
Addlestone Rd,
Weybridge, Surrey, UK
KT15 2UL.
Specification is subject to change without notice.
39
IMFORMATION
The software pre-installed in the TOSHIBA Digital Televisions consists of multiple,
independent software components. Each software component is copyrighted by TOSHIBA
or a third party.
The TOSHIBA Digital Televisions uses software components that are distributed as freeware
under a third-party end-user license agreement or copyright notice (hereinafter referred to
as a “EULA”). Some EULAs require that the source code of the applicable component be
disclosed as the condition for distributing the software component in executable format.
You can check the software components subject to such EULA requirements on the
following Home Page:
URL : http://tesc.toshiba.co.uk/Web/Website.nsf/ContentFrameSet?OpenFrameset
In addition, some of the software components which are used in Toshiba Digital Televisions include
the software that are made or developed originally by TOSHIBA. These software and accompanied
documents are copyrighted by TOSHIBA, and protected by Copyright Act, an international treaty's
articles and other governing laws. The software components which are made or developed originally by
TOSHIBA and not subject to EULAs are not a target of source code offering.
The Toshiba warranty provided in respect of the Digital TV is the only warranty provided and no
additional warranties are provided in respect of the software components subject to EURAs.
Some of the software components distributed under EULAs are made available for use by the user
on the premise that they are not copyrighted or warranted by TOSHIBA or any third party. These
software components are licensed to the user free of charge and therefore not covered by any warranty
within the scope of the applicable laws. These software components are provided in “as is” condition
without any warranty, whether express or implied. “Warranty” here includes, but not limited to, an
implied warranty for marketability or fitness for specific uses. All risks associated with the quality or
performance of these software components are assumed by the user. TOSHIBA shall not be liable
whatsoever for any cost of repair or correction or other incidental expense incurred in connection with
a defect found in any of these software components. Unless specified under the applicable laws or in
a written agreement, a party who changes or redistributes the software with consent from the copyright
holders or based on the aforementioned licenses shall not be held liable whatsoever for any loss
arising from the use of or inability to use such software components. The same applies even when the
copyright holders or relevant third parties have been informed of the possibility of such loss. “Loss” here
includes normal, special, incidental and indirect loss (including, but not limited to, the loss of data or its
accuracy; loss incurred by the user or any third party; and interface incompatibility with other software).
Please read each EULA for details on the use conditions and items that must be observed regarding
these software components.
The table below lists the software components pre-installed in the TOSHIBA Digital Televisions, which
are subject to EULAs. The user should read the applicable EULAs carefully before using these software
components. The EULAs are exhibited in their original text (English) as exactly written by the respective
parties other than TOSHIBA.
Pre-Installed Software
EULA
FreeType
Exhibit A
ICU
Exhibit B
40
English
• License Information used with Toshiba Televisions
English
IMFORMATION
Exhibit A
Portions of this software are copyright © <2007> The FreeType Project (www.freetype.org).
All rights reserved
Exhibit B
ICU License - ICU 1.8.1 and later
COPYRIGHT AND PERMISSION NOTICE
Copyright © 1995-2006 International Business Machines Corporation and others
All rights reserved.
Permission is hereby granted, free of charge, to any person obtaining a copy of this software and
associated documentation files (the "Software"), to deal in the Software without restriction, including
without limitation the rights to use, copy, modify, merge, publish, distribute, and/or sell copies of the
Software, and to permit persons to whom the Software is furnished to do so, provided that the above
copyright notice(s) and this permission notice appear in all copies of the Software and that both the
above copyright notice(s) and this permission notice appear in supporting documentation.
THE SOFTWARE IS PROVIDED "AS IS", WITHOUT WARRANTY OF ANY KIND, EXPRESS
OR IMPLIED, INCLUDING BUT NOT LIMITED TO THE WARRANTIES OF MERCHANTABILITY,
FITNESS FOR A PARTICULAR PURPOSE AND NONINFRINGEMENT OF THIRD PARTY RIGHTS.
IN NO EVENT SHALL THE COPYRIGHT HOLDER OR HOLDERS INCLUDED IN THIS NOTICE BE
LIABLE FOR ANY CLAIM, OR ANY SPECIAL INDIRECT OR CONSEQUENTIAL DAMAGES, OR ANY
DAMAGES WHATSOEVER RESULTING FROM LOSS OF USE, DATA OR PROFITS, WHETHER IN
AN ACTION OF CONTRACT, NEGLIGENCE OR OTHER TORTIOUS ACTION, ARISING OUT OF OR
IN CONNECTION WITH THE USE OR PERFORMANCE OF THIS SOFTWARE.
Except as contained in this notice, the name of a copyright holder shall not be used in advertising or
otherwise to promote the sale, use or other dealings in this Software without prior written authorization
of the copyright holder.
ICU License - ICU 1.8.1 and later
COPYRIGHT AND PERMISSION NOTICE
Copyright © 1995-2006 International Business Machines Corporation and others
All rights reserved.
THE SOFTWARE IS PROVIDED "AS IS", WITHOUT WARRANTY OF ANY KIND, EXPRESS
OR IMPLIED, INCLUDING BUT NOT LIMITED TO THE WARRANTIES OF MERCHANTABILITY,
FITNESS FOR A PARTICULAR PURPOSE AND NONINFRINGEMENT OF THIRD PARTY RIGHTS.
IN NO EVENT SHALL THE COPYRIGHT HOLDER OR HOLDERS INCLUDED IN THIS NOTICE BE
LIABLE FOR ANY CLAIM, OR ANY SPECIAL INDIRECT OR CONSEQUENTIAL DAMAGES, OR ANY
DAMAGES WHATSOEVER RESULTING FROM LOSS OF USE, DATA OR PROFITS, WHETHER IN
AN ACTION OF CONTRACT, NEGLIGENCE OR OTHER TORTIOUS ACTION, ARISING OUT OF OR
IN CONNECTION WITH THE USE OR PERFORMANCE OF THIS SOFTWARE.
41
IMFORMATION
English
Notes
For your own records
Cleaning the screen and cabinet…
Turn off the power, clean the screen and cabinet with a soft, dry cloth. We recommend that you do not
use any proprietary polishes or solvents on the screen or cabinet as this may cause damage.
Disposal…
The following information is only for EU-member states:.
Disposal of products The crossed out wheeled dust bin symbol indicates that products must
be collected and disposed of separately from household waste. Integrated batteries and
accumulators can be disposed of with the product. They will be separated at the recycling
centres.
The black bar indicates that the product was placed on the market after August 13, 2005.
By participating in separate collection of products and batteries, you will help to assure the proper
disposal of products and batteries and thus help to prevent potential negative consequences for the
environment and human health.
For more detailed information about the collection and recycling programmes available in your country,
please contact your local city office or the shop where you purchased the product.
Disposal of batteries and/or accumulators.
The crossed out wheeled dust bin symbol indicates that batteries and/or accumulators must
be collected and disposed of separately from household waste.
If the battery or accumulator contains more than the specified values of lead (Pb), mercury
(Hg), and/or cadmium (Cd) defined in the Battery Directive (2006/66/EC), then the chemical
symbols for lead (Pb), mercury (Hg) and/or cadmium (Cd) will appear below the crossed out wheeled
dust bin symbol.By participating in separate collection of batteries, you will help to assure the proper
disposal of products and batteries and thus help to prevent potential negative consequences for the
environment and human health.
For more detailed information about the collection and recycling programmes available in your country,
please contact your local city office or the shop where you purchased the product.
42