1
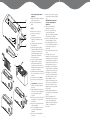
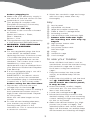
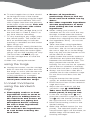
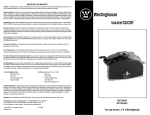
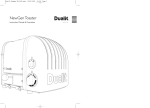
6
7
5
8
4
3
2
1
TTM310 series
Kenwood Limited, New Lane, Havant, Hampshire PO9 2NH, UK
www.kenwoodworld.com
18247/2
●
●
●
safety
●
6
●
●
●
7
5
8
4
3
●
2
1
●
●
●
●
●
6
7
5
8
4
3
2
1
●
●
6
7
●
5
8
4
3
2
1
6
●
7
5
8
4
3
2
1
●
before using your Kenwood
appliance
Read these instructions carefully and
retain for future reference.
Remove all packaging and any
labels.
●
Burnt food can catch fire, so:
never leave your toaster on
unattended;
keep your toaster away from
anything (eg curtains) that could
catch fire;
set the browning control lower for
thin or dry bread;
never warm food with a topping
eg pizza: if it drips into the toaster, it
could catch fire. If warming food
items with a filling always use the
sandwich cage and follow the
instructions provided.
Clean the removable crumb tray
regularly: crumbs can smoke or
burn. Pay particular attention to
cleaning melted cheese and other
ingredients from sandwiches etc that
may fall onto the crumb tray.
Sandwich fillings could melt and drip
into the toaster. Take care as it could
catch fire.
To avoid electric shocks, never:
let the toaster, cord or plug get wet;
or
put your hand or anything metal,
other than the sandwich cage, into
the toaster.
Always unplug the toaster when not
in use, before cleaning or attempting
to clear any jammed sandwich
cage/food.
Never cover your toaster with a plate
or anything else - it could overheat
and catch fire.
Never let the cord hang down where
a child could grab it.
We recommend that you do not use
your toaster directly under wall
cupboards.
Do not move the toaster whilst it is
in operation.
●
●
●
●
●
●
●
●
●
2
Never touch hot surfaces especially
the metal top area and the sandwich
cage.
CAUTION: The fascia panel
does get particularly hot
during use.
Never use an unauthorised
attachment or accessory.
Do not force food items into the
toaster as difficulty may be
experienced in removing them. Never
insert broken pieces of bread.
Never use a damaged toaster. Get it
checked or repaired: see 'Service'.
Select the appropriate power level
for the food item being toasted. See
the ‘hints & tips on using your
toaster’ table.
This toaster will not cook raw meat
or fish.
Thoroughly cook or re-heat
ingredients such as meat or fish prior
to adding them to the food item and
ensure all ingredients are piping hot
throughout before serving. Do not reheat ingredients more than once.
This appliance is not intended to be
operated by means of external timer
or separate remote-control system.
This appliance is not intended for
use by persons (including children)
with reduced physical, sensory or
mental capabilities, or lack of
experience and knowledge, unless
they have been given supervision or
instruction concerning use of the
appliance by a person responsible
for their safety.
Children should be supervised to
ensure that they do not play with the
appliance.
Only use the appliance for its
intended domestic use. Kenwood
will not accept any liability if the
appliance is subject to improper use,
or failure to comply with these
instructions.
●
●
●
●
●
●
●
3 Wash the sandwich cage and tongs
with hot soapy water, then dry
thoroughly.
before plugging in
Make sure your electricity supply is
the same as the one shown on the
underside of your toaster.
This appliance complies with
European Economic Community
Directive 89/336/EEC.
key
Important – UK only
The wires in the cord are coloured
as follows:
Green and Yellow = Earth,
Blue = Neutral,
Brown = Live.
The appliance must be protected by
a 13A approved (BS1362) fuse.
WARNING: THIS APPLIANCE
MUST BE EARTHED.
Note:
For non-rewireable plugs the fuse
cover MUST be refitted when
replacing the fuse. If the fuse cover
is lost then the plug must not be
used until a replacement can be
obtained. The correct fuse cover is
identified by colour and a
replacement may be obtained from
your Kenwood Authorised Repairer
(see Service).
If a non-rewireable plug is cut off it
must be DESTROYED
IMMEDIATELY. An electric shock
hazard may arise if an unwanted
non-rewireable plug is inadvertently
inserted into a 13A socket outlet.
fascia panel
adjustable slot lever
large removable crumb tray
Peek & View™ carriage lever
browning control
cancel button with indicator light
button with indicator light
for toasting one side only eg
bagels
high power button with
indicator light
low power button with
indicator light
tongs
sandwich cage
cord storage
to use your toaster
1
2
before using for the first time
1 Clip excess cord into the cord
storage clips in the base .
2 Set the browning control to setting 5
and operate the toaster once on
high power without bread. Repeat
for low power.
Note: this will take longer on low
power.
● As with all new heating elements,
your toaster may emit a slight
burning smell when it is first
switched on. This is normal and not
a cause for concern.
3
4
5
6
3
Note: All filled food items such as
sandwiches should be toasted using
the sandwich cage see ‘to toast
food items using the sandwich
cage’.
Plug the toaster into the power
supply, an audible beep will be
heard.
Adjust the slot width to suit the food
item . CAUTION: Take care
not to touch the fascia panel,
it may be hot.
Insert the bread, muffins, bagels,
croissants etc. Do not force food
items into the toaster.
Lower the carriage lever .
Move the browning control to the
desired setting. Use a low browning
control setting for light toasting and
for thin or dry bread.
Select the desired button (i.e. high
power, low power or bagel). The
selected button and cancel button
lights will illuminate, an audible beep
will be heard and toasting will begin.
●
●
To toast bagels the cut face should
be facing the front of the toaster.
● Note: when toasting using the bagel
button, the front element will toast
with a higher heat than the element
at the back of the toaster. This will
result in only one side of the
item being toasted.
● You can use the carriage lever to lift
the food item to Peek & View™ at
any time without cancelling.
7 To stop toasting at any stage, press
the cancel button. The toaster will
emit an audible beep to indicate
toasting is cancelled and the button
lights will go out.
8 When toasting is nearly finished the
toaster will emit an audible beep and
after a slight delay the button lights
will go out and the toasting will stop.
The food item will NOT pop up.
9 Use the carriage lever to raise the
food item.
10 After use, unplug the toaster.
●
●
●
●
●
using the tongs
●
Unplug the toaster, use the carriage
lever to raise the food item and use
the tongs to assist with the removal
of particularly small items such as
scotch pancakes or crumpets.
CAUTION: Avoid touching the
metal parts with the tongs.
●
●
1
2
to toast food items
using the sandwich
cage
●
●
3
Thoroughly cook or re-heat
ingredients such as meat or
fish prior to adding them to
the food item and ensure all
ingredients are piping hot
throughout before serving.
Do not re-heat ingredients
more than once.
Do not leave hot ingredients
to cool before toasting the
food item.
4
5
6
4
Ensure all ingredients
particularly meat or fish are
fresh and used within use-by
dates.
Use other vegetable ingredients
at room temperature to avoid
them chilling the hot cooked
ingredients.
When cutting your paninis or
ciabattas etc do not cut all the way
through, instead leave the bottom
side uncut so that it prevents melted
cheese from dripping into the toaster.
Cut ingredients thinly - do not use
large chunks.
Take care when using ingredients
that could melt and run out of the
food item. We do not recommend
the use of high fat or similar fillings
that may drip into the toaster as this
will be difficult to clean.
Lightly butter the outside surface of
sandwiches and place the filling in
between the unbuttered sides. This
helps prevent the outside from
burning. Do not use low fat spreads,
which are not suitable for toasting.
Ensure the food item is evenly filled.
Always use food items that are a
suitable size for the sandwich cage.
Do not force food items into the
toaster.
Plug the toaster into the power
supply, an audible beep will be heard.
Place the food item in the sandwich
cage and close.
Adjust the slot width to suit the
sandwich cage . CAUTION:
Take care not to touch the
fascia panel, it may be hot.
Lower the carriage lever and
place the sandwich cage into the
slot with the handle pointing to
the opposite end to the controls.
Move the browning control to the
desired setting.
Select the desired button (i.e. low
power). The selected button and
cancel button lights will illuminate, an
audible beep will be heard and
toasting will begin.
●
10 Remove the sandwich cage then
open it up and tip the food item onto
a plate.
11 After using, unplug the toaster.
CAUTION:
● The sandwich cage will be
very hot, ensure it is placed
on a heat resistant surface
and take care when handling.
● Ensure ingredients are piping
hot throughout before serving.
● Take care when biting into the
food items as the fillings can
be very hot.
In order to monitor the progress of
the toasting, the sandwich cage can
be lifted up without cancelling.
7 To stop toasting at any stage, press
the cancel button. The toaster will
emit an audible beep to indicate
toasting is cancelled and the button
lights will go out.
8 When toasting is nearly finished the
toaster will emit an audible beep and
after a slight delay the button lights
will go out and the toasting will stop.
The food item will NOT pop up.
9 Leave the toasted food item to stand
for 1 minute inside the toaster before
serving.
hints & tips on using your toaster
These are recommendations only. After a short period of use, experience will
teach you which setting is the right one for your needs. It is advisable to initially
start off with a lower setting until you become familiar with the toaster.
power level
food item examples
Bagel
For toasting one
side only
•
•
•
•
•
•
•
•
•
•
•
•
High
Low
setting range
recommended
Bagels
4-6
Crumpets
6-8
Hot cross buns
3-5
Teacakes
3-5
Pre-sliced shop bought bread 4-6
Toasting waffles
4-6
Filled half size ciabattas
9-10
Pains au chocolat
3-5
Unsliced bread
4-6
Scotch pancakes
2-4
Filled croissants
4-6
Filled sandwiches
6-8
hints & tips:
make the slot width too narrow or close the sandwich cage too tightly
and squash the food item.
● Slices should be cleanly cut and not have ragged edges.
● For frozen bread use a browning control setting higher than you would
normally use for the type of bread.
● Cut ingredients thinly - do not use large chunks.
● Dry/stale bread toasts more quickly than fresh bread and thinly sliced bread
toasts more quickly than thickly sliced bread. Therefore the browning control
should be set at a lower setting than usual.
● For best results ensure that the bread slices are of an even thickness,
freshness and size.
● In order to achieve uniform browning, we recommend you wait a minimum of
30 seconds between each toasting so that the control can automatically
reset. Alternatively select a lower browning control setting when additional
toasting is carried out.
● Don’t
5
food safety:
● Thoroughly
cook or re-heat ingredients such as meat or fish
prior to adding them to the food item and ensure all
ingredients are piping hot throughout before serving. Do not
re-heat ingredients more than once.
● Do not leave hot ingredients to cool before toasting the food
item.
● Ensure all ingredients particularly meat or fish are fresh and
used within use-by dates.
● Use other vegetable ingredients at room temperature to avoid
them chilling the hot cooked ingredients.
care and cleaning
1 Before cleaning, unplug your toaster
and let it cool down. Allow the
sandwich cage and tongs to cool
down completely before cleaning.
2 Wash the sandwich cage and tongs
with hot soapy water, then dry
thoroughly.
3 Slide out the crumb tray . Clean,
then replace. Do this regularly:
crumbs can smoke or even burn.
Pay particular attention to cleaning
melted cheese and other ingredients
from sandwiches etc that may fall
onto the crumb tray.
4 Wipe the outside of the toaster with
a damp cloth, then dry.
● Do not wash any part in the
dishwasher.
IMPORTANT INFORMATION FOR
CORRECT DISPOSAL OF THE
PRODUCT IN ACCORDANCE
WITH EC DIRECTIVE
2002/96/EC.
At the end of its working life, the product
must not be disposed of as urban
waste.
It must be taken to a special local
authority differentiated waste collection
centre or to a dealer providing this
service.
Disposing of a household appliance
separately avoids possible negative
consequences for the environment and
health deriving from inappropriate
disposal and enables the constituent
materials to be recovered to obtain
significant savings in energy and
resources. As a reminder of the need to
dispose of household appliances
separately, the product is marked with
a crossed-out wheeled dustbin.
service
●
If the cord is damaged it must, for
safety reasons, be replaced by
KENWOOD or an authorised
KENWOOD repairer.
If you need help with:
using your toaster or
● servicing or repairs (in or out of
guarantee)
call Kenwood customer care on 023
9239 2333. Have your model
number ready - it's on the
underside of your toaster.
● spares and attachments
call 0870 2413653.
other countries
● Contact the shop where you bought
your toaster.
●
6
●
●
●
●
●
●
guarantee (UK only)
If your toaster goes wrong within one
year from the date you bought it, we
will repair or replace it free of charge
provided:
you have not misused, neglected or
damaged it;
it has not been modified (unless by
Kenwood);
it is not second-hand;
it has not been used commercially;
you have not fitted a plug incorrectly;
and
you supply your receipt to
show when you bought it.
This guarantee does not affect your
statutory rights.
7