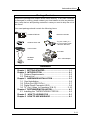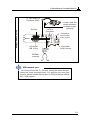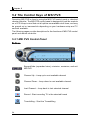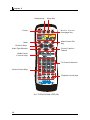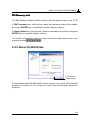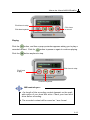
1
USER’S GUIDE Version 4.0 January 2004 G52-V1TVX04 i FCC-B Radio Frequency Interference Statement This equipment has been tested and found to comply with the limits for a class B digital device, pursuant to part 15 of the FCC rules. These limits are designed to provide reasonable protection against harmful interference when the equipment is operated in a commercial environment. This equipment generates, uses and can radiate radio frequency energy and, if not installed and used in accordance with the instruction manual, may cause harmful interference to radio communications. Operation of this equipment in a residential area is likely to cause harmful interference, in which case the user will be required to correct the interference at his own expense. Notice 1 The changes or modifications not expressly approved by the party responsible for compliance could void the user’s authority to operate the equipment. Notice 2 Shielded interface cables and A.C. power cord, if any, must be used in order to comply with the emission limits. VOIR LA NOTICE D’INSTALLATION AVANT DE RACCORDER AU RESEAU. MICRO-STAR MS-8606 ii MICRO-STAR MS-8876 MICRO-STAR MS-8928 MICRO-STAR MS-8953 Copyright Notice The material in this document is the intellectual property of MICRO-STAR INTERNATIONAL. We take every care in the preparation of this document, but no guarantee is given as to the correctness of its contents. Our products are under continual improvement and we reserve the right to make changes without notice. Trademarks All trademarks are the properties of their respective owners. h Intel® and Pentium® are registered trademarks of Intel Corporation. h PS/2 and OS/2 are registered trademarks of International Business Machines Corporation. h Windows® 95/98/2000/NT/XP are registered trademarks of Microsoft Corporation. h Open GL® / DirectX® / DirectDraw® / Direct3D® / DirectVideo® / DirectActiveX® are registered trademarks of Microsoft Corporation. h Netware® is a registered trademark of Novell, Inc. h Award® is a registered trademark of Phoenix Technologies Ltd. h AMI® is a registered trademark of American Megatrends Inc. h nVIDIA® / nfiniteFXTM is a registered trademark of nVIDIA Corporation. Macrovision Corporation Product Notice This product incorporates copyright protection technology that is protected by method claims of certain U.S. patents and other intellectual property rights owned by Macrovision Corporation and other right owners. Use of this copyright protection technology must be authorized by Macrovision Corporation, and is intended for home and other limited viewing uses only unless otherwise authorized by Macrovision Corporation. Reverse engineering or disassembly is prohibited. Revision History Revision Date Release Note V 1.0 V 2.0 V 3.0 V 4.0 TV@nywhere/MS-8884 TV@nywhere series only TV@nywhere series/MS-8928 TV@nywhere series/MS-8928/MS-8953 Aug 2002 May 2003 Sep 2003 Jan 2004 iii Important Safety Precautions Always read and follow these basic safety precautions carefully when handling any piece of electronic component. 1. Keep this User’s Manual for future reference. 2. Keep this equipment away from humidity. 3. Lay this equipment on a stable, flat surface before setting it up. 4. The openings on the enclosure are for air convection, hence they protect the equipment from overheating. 5. Make sure the voltage of the power source and adjust properly 110/220V before connecting the equipment to the power inlet. 6. Place the power cord in a way that people are unlikely to step on it. Do not place anything on the power cord. 7. Always Unplug the Power Cord before inserting any add-on card or module. 8. All cautions and warnings on the equipment should be noted. 9. Never pour any liquid into the opening that could damage the equipment or cause an electrical shock. 10. If any of the following situations arise, get the equipment checked by a service personnel: h The power cord or plug is damaged h h h h h Liquid has penetrated into the equipment The equipment has been exposed to moisture The equipment has not functioned properly or in accordance with the User’s Guide The equipment was dropped and damaged The equipment has obvious signs of breakage 11. DO NOT LEAVE THE EQUIPMENT IN AN UNCONDITIONED ENVIRONMENT WITH A STORAGE TEMPERATURE OF 600 C (1400F) OR ABOVE. IT MAY DAMAGE THE EQUIPMENT. iv CONTENTS Chapter 1 GETTING STARTED ................................................................ 1-1 1.1 How to Use this Guide .................................................................. 1-2 1.2 Conventions of this Guide ............................................................ 1-3 Chapter 2 INTRODUCTION ..................................................................... 2-1 2.1 System Requirements .................................................................. 2-2 2.2 Jumper Setting Table .................................................................... 2-3 2.3 Product List ................................................................................... 2-4 Chapter 3 HARDWARE INSTALLATION .................................................. 3-1 3.1 Card Installation ............................................................................ 3-2 3.2 D-Sub Port (DB 15-Pin) ................................................................ 3-7 3.3 Digital Panel Connector (DVI) ....................................................... 3-8 3.4 Video_In Connector (C) ................................................................ 3-9 3.5 Video_In Connector (S) ................................................................ 3-9 3.6 TV_Out / Video_In Connector (S & C) ......................................... 3-10 Chapter 4 SOFTWARE INSTALLATION ................................................... 4-1 4.1 Installing the TV5700/TV5200-VTDF128 ...................................... 4-2 4.1.1 Installing MSI VGA Driver ................................................... 4-2 4.1.2 Installing MSI Capture Driver ............................................ 4-3 4.1.3 Installing InterVideo MSI PVS ............................................ 4-4 4.1.4 Installing Philips TeleText ................................................. 4-5 4.2 Installing the TV@nywhere Series ............................................... 4-8 4.2.1 Installing MSI PVS Driver .................................................. 4-8 4.2.2 Installing InterVideo MSI PVS ............................................ 4-9 4.2.3 Installing Conexant TeleText ............................................. 4-9 Chapter 5 HOW TO USE MSI PVS ......................................................... 5-1 5.1 Launching MSI PVS for the First Time .......................................... 5-2 5.2 The Control Keys of MSI PVS ........................................................ 5-4 5.2.1 MSI PVS Control Panel ...................................................... 5-4 5.2.2 Remote Controller ............................................................ 5-7 5.2.3 The Right-Click Menu ........................................................ 5-9 5.2.4 Keyboard Shortcuts ......................................................... 5-11 5.3 Customizing MSI PVS ................................................................. 5-12 5.3.1 Channel Property ............................................................ 5-13 5.3.2 Display Property .............................................................. 5-15 5.3.3 Device Property ............................................................... 5-17 5.3.4 TV Property ...................................................................... 5-18 v CONTENTS (Continued) 5.3.5 Record Property .............................................................. 5-21 5.3.6 Storage Property ............................................................. 5-29 5.3.7 Timeshifting Property ..................................................... 5-30 5.4 Using MSI PVS ............................................................................ 5-31 5.4.1 TV@nywhere ................................................................... 5-31 5.4.2 Channel Surfing ............................................................. 5-34 5.4.3 Channel Browsing .......................................................... 5-35 5.4.4 Timeshifting .................................................................... 5-35 5.4.5 Volume Adjusting ............................................................ 5-36 5.4.6 Channel Recording ........................................................ 5-36 5.4.7 Playback ......................................................................... 5-37 5.4.8 Scheduled Channel Recording and Reminding ........... 5-37 5.4.9 Still Image Capturing ...................................................... 5-40 5.4.10 iAccess ........................................................................... 5-40 5.4.11 Teletext ............................................................................ 5-40 Chapter 6 HOW TO USE MSI RADIO ...................................................... 6-1 6.1 Introduction to the MSI Radio ........................................................ 6-2 6.1.1 How to Launch the MSI Radio .......................................... 6-2 6.1.2 What Are the Buttons on the MSI Radio ............................ 6-2 6.2 How to Program the MSI Radio .................................................... 6-6 6.2.1 Configuration ..................................................................... 6-6 6.2.2 Radio Setting ..................................................................... 6-7 6.2.3 Advance Setting ................................................................. 6-8 6.2.4 FM Memory List ................................................................. 6-8 6.2.5 About the MSI Radio .......................................................... 6-9 6.3 How to Enjoy the MSI Radio ........................................................ 6-10 6.3.1 How to Tune a Station .................................................... 6-10 6.3.2 How to Memorize a Station ............................................. 6-11 6.3.3 How to Adjust the Volume ............................................... 6-11 6.3.4 How to Activate the Visual Effec ...................................... 6-11 6.3.5 How to Use the Recorder ............................................... 6-12 6.3.6 How to Use the Language Learning Machine ................ 6-14 6.3.7 How to Make the MSI Radio More Fun ............................ 6-15 6.3.8 How to Minimize and Simplify the MSI Radio ................. 6-16 vi 1 GETTING STARTED This user’s guide is a compound designing for a series of cards with TV tuner function. Read this chapter first, and it will give you a clear instruction on how to use this guide. 1-1 Chapter 1 1.1 How to Use this Guide This user’s guide is a compound designing for a series of cards with TV tuner function. Before you start reading this guide, find out the product name of the card on the packing box, and look for the specification and function description in chapter 2. Chapter 2, INTRODUCTION, provides some brief specification and function of each card. For detailed description of all functions, you may need to refer to Chapter 3 ~ Chapter 6, the rest of the chapters. Note that the card you purchased may not cover all functions mentioned herein; therefore, it is recommended that you read the “Reference” information first, which indexes the correspoding founction description to each different card, and then find the proper function description for your card in other chapters. Chapter 3, HARDWARE INSTALLATION, tells you how to install your card into your computer correctly and how to use the connectors on the card. Note that your card may not cover all functions mentioned in this chapter. Check on Chapter 2, INTRODUCTION, for the specification of the card you purchased if you have any problem in finding the proper function description for your card. Chapter 4, SOFTWARE INSTALLATION, describes how to install software for Windows XP, 2000, ME, 98SE, including the driver and useful utilities. Chapter 5, HOW TO USE MSI PVS, describes how to use MSI PVS. The MSI PVS is a powerful software which provides the functions of TV channels browsing, reminding, recording, image capturing, time shifting, quality setting, remote controlling, and so on. Chapter 6, HOW TO USE MSI RADIO, describes how to use the MSI Radio. The MSI Radio that comes with a modern designed panel is a handy utility for receiving broadcasts. The changeable skins of the MSI Radio can make your taste more unique and personalized. The record function can instantly record your favorite broadcast content; otherwise, the language learning function can repeatly play a specified section of the recorded broadcast content as you like. 1-2 Getting Started 1.2 Conventions of this Guide Read the conventions of this guide, and it will give you an idea about how this guide is designed and how this guide should be used. The product name of this card G4Ti4200- DT Layout The layout of this card The components on this card nVIDIA GeForce4 Ti4200 GPU 128MB DDR RAM VGA Flash BIOS DVI-I connector TV_Out Connector (S & C) VGA port The package contents of this card AGP Interface Fan connector Features Package Contents General Features The specifications of this card Important information that you should pay attention to The nVIDIA nfiniteFXTM II Engine enable a virtually infinite Unpack the package number of special effects that deliver the next leap in realism to and inspect all the items carefully. If any item contained is damaged or missing, please contact your local dealer 3D graphics as soon as possible. Also, keep the box and packing materials in Dual programmable Vertex Shaders case you need to ship the unit in the future. Advanced programmable Pixel Shaders nVIDIA Lightspeed Memory ArchitectureTM II Your VGA card package should contain the following items: nVIDIA AccuviewTM Antialiasing 3D Textures Shadow Buffers 4 dual-rendering pipelines VGA Card 8 texels per clock cycle Dual cube environment mapping High-Definition Video Processor (HDVP) AGP 4X with Fast Writes Software Pack Cds AGP 4X / 2X and AGP Texturing support MSI reminds you... Users' Manual The Display Modes listed above are for your reference; the actual settings may be different on your system because of using different monitors. Corrosponding function for each particular card Reference 2. Introduction...........................................................1-1 3. Hardware Installation 3.1 Card Installation............................................3-1 3.2 VGA Connector (DB 15-Pin).............................3-3 3.3 Digital Panel Connector (DB 15-PIN).................3-5 3.5 TV_Out Connector (S)..................................... 4-5 4. Software Installation............................................... 4-1 5. MSI Live Update Series 5.1 Installing MSI Live Update Series....................... 5-1 5.2 Using MSI Live Update Series............................ 5-2 5.3 Live VGA Drive Update.....................................5-2 5.4 Live VGA BIOS Update......................................5-7 8. Troubleshooting......................................................8-1 1-3 Chapter 1 Νοτε 1-4 2 INTRODUCTION This chapter provides some brief specification and function of each card. For detailed description of all functions, you may need to refer to Chapter 3 ~ Chapter 6, the rest of the chapters. Note that the card you purchased may not cover all functions mentioned herein; therefore, it is recommended that you read the “Reference” information first, which indexes the correspoding founction description to each different card, and then find the proper function description for your card in other chapters. 2-1 Chapter 2 2.1 System Requirements To install the card, your system needs to meet the following requirements: Computer Intel® Pentium II/III/4 processor, Intel® Celeron processor, or compatible system Expansion Slot PCI slot for TV@nywhere(-Master) * AGP slot for TV5700/TV5200-VTDF128 Monitor VGA support, minimum 640 x 480 resolution Operating System Windows® XP/2000/ME/98SE CD-ROM Drive Double Speed or Higher * Although the TV5700/TV5200-VTDF128 is an AGP interface card, its large bracket would occupy the adjacent PCI slot (the 1st PCI slot). Thus, before installing the TV5700/TV5200, please move the existing PCI interface card from the 1st PCI slot to any other available one. 2-2 Introduction 2.2 Jumper Setting Table The following table lists all TV system standards used in the world. Find the proper standard to set the jumper on your TV tuner card, or consult your dealer for more information (for TV@nywhere only). TV Tuner Card – Jumper Setting Table TV System NTSC Jumper Setting 1 2 3 4 5 6 Countries Antigua and Barbuda, Antiles, Argentina, Aryenuna, Azores (US Forces), Bahamas, Barbados, Belize, Bermuda, Bolivia, Brazil, Burma, Cambodia, Canada, Chile, Colombia, Costa Rica, Cuba, Curacao, Diego Garcia, Dominica, Dominican Republic, Ecuador, El Salvador, Guam, Guatemala, Haiti, Hawaii, Honduras, Jamaica, Japan, Kampuchea, Korea South, Leeward Islands, Mexico, Micronesia, Midway Islands, Montserrat, Nicaragua, Okinawa, Panama, Paraguay, Peru, Philippines, Puerto Rico, Samoa, St. Kitts & Nevis, Surinam, Taiwan, Trinidad& Tobago, Uruguay, USA, Venezuela, Virgin Islands. PAL B/G 1 2 3 4 5 6 Abu Dhabi, Afghanistan, Albania, Algeria, Andorra, Angola, Australia, Austria Azores, Bahrain, Bangladesh, Belgium, Bhutan, Bosnia Herzegovina, Brunei, Gameroon, Canary Islands, Croatia, Cyprus, Denmark, Dubai, Equatorial Guinea, Ethiopia, Faroe Islands, Femando Po, Fuji, Finland, Germany, Ghana, Gibraltar, Greece, Iceland, India, Indonesia, Israel, Italy, Jordan, Kenya, Kuwait, Liberia, Liechtenstein, Luxembourg, Macedonia, Madeira, Malawi, Malaysia, Maldives, Malta, Monaco, Montenegro, Mozambique, Nepal, Netherlands, New Zealand, Nigeria, Norway, Oman, Pakistan, Papua New Guinea, Portugal, Qatar, Saba and Sarawak, San Marino, Saudi Arabia, Serbia, Seychelles, Sierra Leone, Singapore, Slovenia, Somalia, Spain, Sri Lanka, Sudan, Swaziland, Sweden Switzerland, Tanzania, Thailand, Tunisia, Turkey, Uganda, united Arab Emirates, Vatican City, Vietnam, Yemen, Yugoslavia Zambia Zimbabwe. PAL D/K 1 2 3 4 5 6 China P. R., Czech Republic, Poland, Romania, Tibet, PAL I 1 2 3 4 5 6 Angola, Botswana, United Kingdom, Falkland Islands, Gambia, Guinea Bissau, Hong Kong, Ireland, Lesotho, Macao, Namibia, South Africa, United Kingdom, Zanzibar 2-3 Chapter 2 2.3 Product List TV5700-VTDF128 Layout CATV FM VIDEO nVIDIA GeForce FX GPU 128MB DDR RAM AGP Interface Flash BIOS Decoder Fan Connector D-Sub Port (DB 15-Pin) 14 DVI Connector TV-Out / Video_In Connector (S&C) FM Radio Antenna Connector CATV In Connector Audio Line In / Out Connector TV and FM Silicon Tuner Power Connector VGA Features CPU Features & Specifications NVIDIA UltraShadow™ technology NVIDIA® CineFX™ 2.0 engine - NVIDIA® UltraShadow™ technology for next-generation games - True 128-bit precision computation - Delivers 2x the floating-point pixel shader power over previous generation Advanced pixel shaders 128-bit studio-precision computation NVIDIA® Intellisample™ high-resolution compression technology (HCT) NVIDIA® ForceWare™ unified software environment (USE) - NVIDIA® Unified Driver Architecture (UDA) - Compatibility, Stability, Reliability - NVIDIA® nView™ multi-display technology 2-4 Introduction - Continual performance and feature updates over life of the product NVIDIA Unified Driver Architecture (UDA) DirectX 9.0 Optimizations and Support OpenGL 1.5 Optimizations and Support NVIDIA® nView™ multi-display technology NVIDIA® Digital Vibrance Control™ (DVC) 3.0 AGP 8X Dual 400 MHz RAMDACs DVI Support Integrated TV encoder Integrated full hardware MPEG-2 decoder 64-phase video scaler .13u process technology Architected for Cg Designed for high-performance gaming - Utilizes advanced memory technology—including DDR2—for blazing performance - NVIDIA® Intellisample™ HCT (texture, color and z compression) for screaming performance at high resolutions - Delivers 3x the vertex processing power over previous generation CPU Performance Core Clock: 425MHz Graphics Core: 256-bit Memory Interface: 128-bit Memory Bandwidth: 8.8GB/sec. (This value is for reference only, depending on the type of memory implemented) Fill Rate: 1.7 billion pixels/sec. Vertices/sec. 356 million Memory Data Rate: 550MHz Pixels per clock (peak): 4 pixels per clock Textures per pixel (max in a single rendering pass): 16 tetures per pixel Dual RAMDACs: 400MHz Advanced Display Pipeline with Full nView Capabilities Dual, 400MHz RAMDACs for display resolutions up to and including 2048x1536@85Hz Integrated NTSC/PAL TV encoder support resolutions up to 1024x768 without the need for panning with built-in Macrovision copy protection Video Mixing Renderer (VMR) supports multiple video windows with full quality and features in each window DVD and HDTV-ready MPEG-2 decoding up to 1920x1080i resolutions Dual DVO ports for interfacing to external TMDS transmitters and external HDTV encoders Support for dual-link DVI for compatibility with next-generation flat panel displays with resolutions greater than 1600x1200 without the need for reduced blanking 2-5 Chapter 2 Tuner Features Digital Vibrance control (DVC) 3.0 DVC color controls DVC image sharpening controls Operation Systems and API support Windows® XP / 2000 / Me/ 98SE Complete DirectX support, including DirectX 9.0 and lower Full OpenGL 1.4 and lower Compatibility NVIDIA Unified Driver Architecture (UDA) Fully compliant professional OpenGL 1.4 API with NVIDIA extensions, on all Linux and Windows operating systems WHQL-certified for Windows XP, Windows Me, Windows 2000 Hardware Invincible video quality supported by Silicon Tuner Enable to perform excellent adjustable IF output Global video standards support, including NTSC-M/J, PAL-B/G/D/K/H/I, SECAM-D/K/L/L’/B/G Adaptive 2-D Comb Filter FM Radio Tuner built-in Remote Transiver/Receiver Support Software Remote Function Support MSI Remote Controller TV Function TV@nywhere-MPEG4 link, distanceless and real-time TV browsing and controlling Real time TV recording to MPEG1, MPEG2 and MPEG4 TV AutoScan, FreeScan Support 256 Level Fine Tune in TV Quality Schedule recording and prerecording Time-Shifting Crystal video display Support Global Video/Audio standards FM Radio function Changable skins Visual effects Instant radio recording Language Learning Machine 6 station memories Support stereo/mono FM Audio Support FM channel seek function 2-6 Introduction Package Contents Unpack the package and inspect all the items carefully. If any item contained is damaged or missing, please contact your local dealer as soon as possible. Also, keep the box and packing materials in case you need to ship the unit in the future. Your card package should contain the following items: M TS TV TV5700-VTDF128 D VD Software Pack CD Remote Controller TV_Out / Video_In 1to-4 Connecting cable + Remote Receiver User’s Guide S-S Cable FM Radio Antenna DVI / VGA Adapter Power Cable Reference Chapter 1 GETTING STARTED ............................................ 1-1 Chapter 2 INTRODUCTION ................................................. 2-1 2.1 System Requirements .............................................. 2-2 2.3 Product List ............................................................... 2-4 Chapter 3 HARDWARE INSTALLATION .............................. 3-1 3.1 Card Installation ........................................................ 3-2 3.2 D-Sub Port (DB 15-Pin) ............................................ 3-7 3.3 Digital Panel Connector (DVI) ................................... 3-8 3.6 TV_Out / Video_In Connector (S & C) ..................... 3-10 Chapter 4 SOFTWARE INSTALLATION ............................... 4-1 4.1 Installing the TV5700/TV5200-VTDF128 .................. 4-2 Chapter 5 HOW TO USE MSI PVS ..................................... 5-1 Chapter 6 HOW TO USE MSI RADIO .................................. 6-1 2-7 Chapter 2 TV5200-VTDF128 Layout nVIDIA GeForce FX GPU 128MB DDR RAM AGP Interface Flash BIOS Decoder Fan Connector D-Sub Port (DB 15-Pin) DVI Connector TV-Out / Video_In Connector (S&C) FM Radio Antenna Connector CATV In Connector Audio Line In / Out Connector TV and FM Silicon Tuner VGA Features CineFX Shading Architecture Support for DX 9.0 Pixel/Vertex Shader 2.0+ Very long pixel programs up to 1024 instructions Very long vertex programs with up to 256 static instructions and up to 65536 instructions executed before termination Looping and subroutines with up to 256 loops per vertex program Subroutines in shader programs Dynamic flow control Conditional write masking Conditional execution Procedural shading Full instruction set for vertex and pixel programs Z-correct bump-mapping Hardware-accelerated shadow effects with shadow buffers Two-sided stencil 2-8 Introduction Programmable matrix palette skinning Keyframe animation Custom lens effects: fish eye, wide angle, fresnel effects, water refraction High-Performance, High-Precision, 3D Rendering Engine 4 pixels per clock rendering engine 128-bit, studio-quality floating point precision through the entire graphics pipeline Native support for 128-bit floating point, 64-bit floating point and 32-bit integer rendering modes Up to 16 textures per pass Support for sRGB texture format for gamma textures DirectX and S3TC texture compression High-Performance 2D Rendering Engine Optimized for 32-, 24-, 16-, 15- and 8-bpp modes True-color, 64x64 hardware cursor with alpha Multi-buffering (double, triple or quad) for smooth animation and video playback Advanced Display Pipeline with Full nView Capabilities Dual, 400MHz RAMDACs for display resolutions up to and including 2048x1536@85Hz Integrated NTSC/PAL TV encoder support resolutions up to 1024x768 without the need for panning with built-in Macrovision copy protection Video Mixing Renderer (VMR) supports multiple video windows with full quality and features in each window Digital Vibrance control (DVC) 3.0 DVC color controls DVC image sharpening controls Operation Systems and API support Windows® XP / 2000 / Me / 98SE Complete DirectX support, including DirectX 9.0 and lower Full OpenGL 1.4 and lower Compatibility NVIDIA Unified Driver Architecture (UDA) Fully compliant professional OpenGL 1.4 API with NVIDIA extensions, on all Windows operating systems WHQL-certified for Windows® XP, Windows® Me, Windows® 2000 Performance Graphics Core: 256-bit Memory Bandwidth: 10.4GB/sec. (This value is for reference only, depending on the type of memory implemented) Fill Rate: 1.3 billion texels/sec. Vertices per second: 81 million 2-9 Chapter 2 Tuner Features Hardware Invincible video quality supported by Silicon Tuner Enable to perform excellent adjustable IF output Global video standards support, including NTSC-M/J, PAL-B/G/D/K/H/I Supports 10 bit video AD converter Adaptive 2-D Comb Filter FM Radio Tuner built-in Software *MPEG4 link *Changable skins *Visual effects *Instant radio recording *Language Learning Machine Crystal video display *Programmable and minimized bandwidth requirement Distanceless and real-time TV function control -*Client user can real-time change TV channel and any software setting on the Server side -Time-Shifting -Scheduled, real-time and programmable recording -Supports conversion to all formats: MPEG1, MPEG2 and MPEG4 -Instant channel preview “ * ” MSI unique feature 2-10 Introduction Package Contents Unpack the package and inspect all the items carefully. If any item contained is damaged or missing, please contact your local dealer as soon as possible. Also, keep the box and packing materials in case you need to ship the unit in the future. Your card package should contain the following items: M TS TV TV5200-VTDF128 D VD Remote Controller TV_Out / Video_In 1to-4 Connecting cable + Remote Receiver Software Pack CD User’s Guide S-S Cable FM Radio Antenna DVI / VGA Adapter Reference Chapter 1 GETTING STARTED ............................................ 1-1 Chapter 2 INTRODUCTION ................................................. 2-1 2.1 System Requirements .............................................. 2-2 2.3 Product List ............................................................... 2-4 Chapter 3 HARDWARE INSTALLATION .............................. 3-1 3.1 Card Installation ........................................................ 3-2 3.2 D-Sub Port (DB 15-Pin) ............................................ 3-7 3.3 Digital Panel Connector (DVI) ................................... 3-8 3.6 TV_Out / Video_In Connector (S & C) ..................... 3-10 Chapter 4 SOFTWARE INSTALLATION ............................... 4-1 4.1 Installing the TV5700/TV5200-VTDF128 .................. 4-2 Chapter 5 HOW TO USE MSI PVS ..................................... 5-1 Chapter 6 HOW TO USE MSI RADIO .................................. 6-1 2-11 Chapter 2 TV@nywhere-Master Layout Decoder Silicon Tuner PCI Interface Video_In Connector (S) Video_In Connector (C) Audio Line In Audio Line Out Remote Receiver Connector FM Radio Antenna Connector CATV In Connector FM Radio Chipset Internal Audio Connector Tuner Features Hardware Invincible video quality supported by Silicon Tuner Enable to perform excellent adjustable IF output Global video standards support, including NTSC-M/J, PAL-B/G/D/K/H/I Supports 10 bit video AD converter Adaptive 2-D Comb Filter FM Radio Tuner built-in Software 2-12 *MPEG4 link *Changable skins *Visual effects *Instant radio recording *Language Learning Machine Crystal video display *Programmable and minimized bandwidth requirement Distanceless and real-time TV function control -*Client user can real-time change TV channel and any software setting on the Server side -Time-Shifting Introduction Package Contents Unpack the package and inspect all the items carefully. If any item contained is damaged or missing, please contact your local dealer as soon as possible. Also, keep the box and packing materials in case you need to ship the unit in the future. Your TV tuner card package should contain the following items: TV Cable connector MicroTuner Radi o Anten na Connecto r Radi o Chip se t AUD IO-OUT AUD IO-IN J8 WHA1 20025U Remote Receiver CONEXANT TV Tuner Card Remote Controller Software Pack CD Remote Receiver Cable CX23800-17 VI DEO-IN (C) VI DEO-IN (S) User’s Guide S-S Cable FM Radio Antenna Audio Cable Reference Chapter 1 GETTING STARTED ............................................ 1-1 Chapter 2 INTRODUCTION ................................................. 2-1 2.1 System Requirements .............................................. 2-2 2.3 Product List ............................................................... 2-4 Chapter 3 HARDWARE INSTALLATION .............................. 3-1 3.1 Card Installation ........................................................ 3-2 3.4 Video_In Connector (C) ............................................ 3-9 3.5 Video_In Connector (S) ............................................ 3-9 Chapter 4 SOFTWARE INSTALLATION ............................... 4-1 4.2 Installing the TV@nywhere Series ........................... 4-8 Chapter 5 HOW TO USE MSI PVS ..................................... 5-1 Chapter 6 HOW TO USE MSI RADIO .................................. 6-1 2-13 Chapter 2 TV@nywhere Layout Decoder Silicon Tuner PCI Interface Video_In Connector (S) Video_In Connector (C) Audio Line In Audio Line Out Remote Receiver Connector CATV In Connector Setting Jumper (see 2.2) Tuner Features Hardware Features Invincible video quality supported by Silicon Tuner & Conexant CX23881 audio/video decoder Enable to perform excellent adjustable IF output Offers global video standards support, including NTSC- M/J, PAL-B/G/ D/K/H/I Supports 10-bit video AD converter Adaptive 2-D Comb Filter Software Features *MPEG4 link Crystal video display *Programmable and minimized bandwidth requirement Distanceless and real-time TV function control -*Client user can real-time change TV channel and any software setting on the Server side -Time-Shifting -Scheduled, real-time and programmable recording -Supports conversion to all formats: MPEG1, MPEG2 and MPEG4 -Instant channel preview “ * ” MSI unique feature 2-14 Introduction Package Contents Unpack the package and inspect all the items carefully. If any item contained is damaged or missing, please contact your local dealer as soon as possible. Also, keep the box and packing materials in case you need to ship the unit in the future. Your TV tuner card package should contain the following items: TV Cable connector MicroTuner Radi o Anten na Connecto r Radi o Chip se t AUD IO-OUT AUD IO-IN J8 WHA1 20025U Remote Receiver CONEXANT TV Tuner Card Remote Controller Software Pack CD Remote Receiver Cable User’s Guide S-S Cable CX23800- 17 VI DEO-IN (C) VI DEO-IN (S) Audio Cable Reference Chapter 1 GETTING STARTED ............................................ 1-1 Chapter 2 INTRODUCTION ................................................. 2-1 Chapter 3 HARDWARE INSTALLATION .............................. 3-1 3.1 Card Installation ........................................................ 3-2 3.4 Video_In Connector (C) ............................................ 3-9 3.5 Video_In Connector (S) ............................................ 3-9 Chapter 4 SOFTWARE INSTALLATION ............................... 4-1 4.2 Installing the TV@nywhere Series ........................... 4-8 Chapter 5 HOW TO USE MSI PVS ..................................... 5-1 2-15 Chapter 2 Νοτε 2-16 3 HARDWARE INSTALLATION This chapter tells you how to install your card into your computer correctly and how to use the connectors on the card. Note that your card may not cover all functions mentioned in this chapter. Check on Chapter 2, INTRODUCTION, for the specification of the card you purchased if you have any problem in finding the proper function description for your card. 3-1 Chapter 3 3.1 Card Installation Connecting the Power Cable TV5700VTDF128 comes with a power connetor, and it is necessary to have the offered power cable attached to both the power connector of the card and the power supply connector of the computer to ensure the card working properly. Attach one end of the power cable to the power connecter located on TV5700VTDF128. Attach the other ends of the power cable to the power supply connector of the computer. MSI reminds you... The supplied power cable must be attached to ensure the card working properly. Always connect or disconnect the supplied power cable when the system power is switch off 3-2 Hardware Installation Installing the Card To install the card into your computer, please follow the steps below: 1. Follow the Windows® shut down procedure to turn off your computer. MSI reminds you... Warning: Always remember to turn off your computer before installing or removing hardware to or from your computer. Neither the manufacturer nor the dealer is responsible for damages if the user ignores this warning!!! 2. Remove the cover from your computer. 3. Put the card directly over the AGP slot (TV5700/TV5200-VTDF128) / PCI slot (TV@nywhere series) and press one end of the card into the slot first. Gently but firmly press the other end until it is fully seated in the slot. Secure the card with a bracket screw. 3-3 Chapter 3 4. Install the computer cover. 5. Connect all necessary cables. TV_Out / Video_In Connector (S&C) For TV5700-VTDF128 DVI/VGA Adapter DVI Port D-Sub Port (DB 15-Pin) CATV In Connector Locate it near the remote controller for better signal receiving Connect to sound card Line_In port Input Other Audio Source FM Radio Antenna MSI reminds you... When the DVI/VGA Adapter is attached to the DVI port, this DVI port becomes another D-Sub port. Note that this D-Sub port and the TV_Out / Video_In Connector (S&C) next to it share the same encoder, and cannot be used simultaneously. 3-4 Hardware Installation TV_Out / Video_In Connector (S&C) For TV5200-VTDF128 DVI Port CATV In Connector Locate it near the remote controller for better signal receiving Connect to sound card Line_In port D-Sub Port (DB 15-Pin) Input Other Audio Source FM Radio Antenna MSI reminds you... The D-Sub port and the TV_Out port, sharing the same encoder, cannot be used simultaneously. For applying the dual-view function, please transfer the DVI port to VGA port with the offered DVI / VGA adapter. 3-5 Chapter 3 For TV@nywhere Video_In Connector (S) Audio Line In CATV In Connector Locate it near the remote controller for better signal receiving Video_In Connector(C) Connect to sound card Line_In port For TV@nywhere-Master 3-6 Video_In Connector (S) Video_In Connector(C) Connect to sound card Line_In port Audio Line In Locate it near the remote controller for better signal receiving CATV In Connector FM Radio Antenna Hardware Installation 3.2 D-Sub Port (DB 15-Pin) The VGA card provides a standard D-Sub Port, which allows you to connect a CRT or LCD monitor. Simply plug your monitor cable into the D-Sub Port on your VGA card, and make sure that the other end of the cable is properly connected to your monitor (refer to your monitor manual for more information.) LCD Monitor CRT Monitor OR D-Sub Port D-Sub Port Pin Definition Pin 1 2 3 4 5 6 7 8 9 10 11 12 13 14 15 5 1 15 11 D-Sub Port (DB15-S) Signal Description Red Green Blue Not used Ground Ground Ground Ground 5V Ground Not used SDA Horizontal Sync Vertical Sync SCL 3-7 Chapter 3 3.3 Digital Panel Connector (DVI) The VGA card provides a DVI (Digital Visual Interface) connector which allows you to connect an LCD monitor. The DVI connector provides a highspeed digital interconnection between the computer and its display device. To connect a LCD monitor, simply plug your monitor cable into the DVI connector on the VGA card, and make sure that the other end of the cable is properly connected to your monitor. (refer to your monitor manual for more information.) DVI connector LCD Monitor DVI Connector Pin Definition 1 17 8 24 DVI Connector Pin 1 2 3 4 5 6 7 8 9 10 11 12 C1 C2 C3 Signal Assignment T.M.D.S.* Data2T.M.D.S. Data2+ T.M.D.S. Data2/4 Shield T.M.D.S. Data4T.M.D.S. Data4+ DDC Clock DDC Data N/C T.M.D.S. Data1T.M.D.S. Data1+ T.M.D.S. Data1/3 Shield T.M.D.S. Data3- Pin 13 14 15 16 17 18 19 20 21 22 23 24 Analog Red Analog Green Analog Blue C4 C5 Signal Assignment T.M.D.S. Data3+ +5V GND (for +5V) Hot Plug Detect T.M.D.S. Data0T.M.D.S. Data0+ T.M.D.S. Data0/5 Shield T.M.D.S. Data5T.M.D.S. Data5+ T.M.D.S. Clock Shield T.M.D.S. Clock+ T.M.D.S. ClockAnalog Horizontal Sync Analog Ground (analog R, G & B return *T.M.D.S. Technology The graphics data sent to the digital monitor use Transition Minimized Differential Signaling (T.M.D.S.)technology. TMDS uses an encoding algorithm to 8-bits of data into a 10-bit transition minimixed, DC balanced character, which are transitionminimized to reduce EMI with copper cables and DC-balanced for transmission over fiber optic cables. The TMDS algorithm also provides robust clock recovery for greater skew tolerance with longer cables or low cost short cables. 3-8 Hardware Installation 3.4 Video_In Connector (C) The TV tuner card provides a Video _In connector for video-in function which allows you to input the image from video devices. Simply plug one end of the RCA cable into the Video_In connector on the TV tuner card, and the other end to the video output connector on your video devices. Most video devices support such kind of output connector. For the correct connection, please refer to the video devices' manuals for more information. DVD/VCD player Video_In Connector (C) Video player Video camera Digital camera 3.5 Video_In Connector (S) The TV tuner card provides a Video_In connector for video-in function which allows you to input the image from video devices. Simply plug one end of the S_Video cable into the Video_In connector on the TV tuner card, and the other end to the video output connector on your video devices. Some video devices may support such kind of output connector. For the correct connection, please refer to the video devices' manuals for more information. Video_In Connector (S) DVD/VCD player Video player Video camera 3-9 Chapter 3 3.6 TV_Out / Video_In Connector (S & C) The VGA card provides a 9-pin TV_Out / Video_In connector (S & C) for videoout / video-in function which allows you to output / input the image to / from a TV or video device. This type of connector can be used for either RCA cable or S_Video cable if the attached TV-Out / Video_In 1-to-4 connector is plugged in. Simply plug one end of the RCA cable or S_Video cable into the proper connector provided by the TV-Out / Video_In 1-to-4 connector, and the other end to the video input / output connector on your TV or video device. Most TVs and video devices support such kind of input / output connector. For the correct connection, please refer to the TV’s and video devices' manuals for more information. DVD/VCD player TV_Out Connector (S & C) Video player Video camera Digital camera TV-Out / Video_In 1-to-4 connector TV Projector 3-10 4 SOFTWARE INSTALLATION This chapter describes how to install software for Windows XP, 2000, ME, 98SE, including the driver and useful utilities . 4-1 Chapter 4 4.1 Installing the TV5700/TV5200-VTDF128 Besides the necessary VGA and TV tuner driver, there are some other utilites for your optional installation. All installation procedures will be introduced below. 4.1.1 Installing MSI VGA Driver 1. Turn on the computer. 2. Insert the CD provided into the CD-ROM drive. The Autorun program will start the Setup program and show the setup screen as follows. 3. Click Install MSI VGA Driver. It will automatically install the drivers for both VGA card and integrated chipsets. MSI reminds you... Ø If, on your computer, the “Autorun” program does not execute automatically, please 1) enable the CD-ROM drive’s auto-detect function from Control Panel; or 2) find and run the setup.exe manually from the CD-ROM. Ø The figures in this section are based on the tested platform and for reference only; the actual displays and information (such as settings, driver’s version, etc.) on your system may be different. 4-2 Software Installation 4. Click Yes to continue. 5. Follow the on-screen instructions to complete the installation. 6. After finishing the installation, reboot the computer as instructed. 4.1.2 Installing MSI Capture Driver If you want to input any optional video source, including the cable TV, to the VT5200-VTDF128, you must click Install MSI Capture Driver. Follow the onscreen instructions to complete the installation. 1 Click Install MSI Capture Driver. 2. Follow the on-screen instructions to complete the installation. 4-3 Chapter 4 4.1.3 Installing InterVideo MSI PVS The MSI PVS is a powerful software utility which provides the functions of TV channels browsing, reminding, reocrding, image capturing, time shifting, quality setting, remote controlling... 4-4 1. Turn on the computer. 2. Insert the CD provided into the CD-ROM drive. The Autorun program will start the Setup program and show the setup screen as follows. 3. Click Install InterVideo MSI PVS. 4. Follow the on-screen instructions to complete the installation. Software Installation 4.1.4 Installing Philips TeleText Teletext consists of pages of information, such as news and sport, which are viewed on a television set capable of viewing these pages. Its roots lie in the 70s, when the BBC and Oracle started the first test services. The actual teletext pages are broadcast in a hidden part of the television signal (the Vertical Blanking Interval), and decoded by the television. Teletext pages are accessed by a 3-figure number; on most channels, the front page is on page 100. Except news and sport, teletext contains financial information, such as the latest share prices, recipes, entertainment listings, holiday adverts, cinema, music and TV reviews, back-up information for certain TV programmes, and themed magazines, e.g. for kids. Teletext also broadcasts subtitles (better known in the United States as 'closed captions') on certain programmes, and news flashes which are overlaid on top of the TV picture. MSI reminds you... Ø Teletext installation is needed only when TV system providers support teletext service. Please consult your TV system provider. 1. Turn on the computer. 2. Insert the CD provided into the CD-ROM drive. The Autorun program will start the Setup program and show the setup screen as follows. 3. Click Install Philips TeleText. 4-5 Chapter 4 4-6 4. Click Next to continue. 5. Enter user’s information and click Next to continue. 6. Select a destination location and click Next to continue. Software Installation 7. Select components to be installed and click Next to continue. 8. Select program folder and click Next to continue. 9. Click Finish to finish the installation. 4-7 Chapter 4 4.2 Installing the TV@nywhere Series To install the driver and utilities of the TV tuner card to your computer, please follow the steps below. 4.2.1 Installing MSI PVS Driver 1. Turn on the computer. 2. Insert the CD provided into the CD-ROM drive. The Autorun program will start the Setup program and show the setup screen as follows. 3. Click Install MSI PVS Driver. MSI reminds you... Ø If, on your computer, the “Autorun” program does not execute automatically, please 1) enable the CD-ROM drive’s auto-detect function from Control Panel; or 2) find and run the setup.exe manually from the CD-ROM. Ø The figures in this section are based on the testing platform and are for reference only; the actual displays and information (such as settings, driver’s version, etc.) on your system may be different. 4-8 Software Installation 4. The status bar shows the installation procedure. 5. Click Next to continue. 6. Follow the on-screen instructions to complete the installation. 7. After finishing the installation, reboot the computer as instructed. 4.2.2 Installing InterVideo MSI PVS Please refer to 4.1.3. 4.2.3 Installing Conexant TeleText Please refer to 4.1.4. The pictures used in 4.1.4 are for reference only. 4-9 Chapter 4 Νοτε 4-10 5 HOW TO USE MSI PVS This chapter describes how to use MSI PVS. The MSI PVS is a powerful software which provides the functions of TV channels browsing, reminding, recording, image capturing, time shifting, quality setting, remote controlling, and so on. 5-1 Chapter 5 5.1 Launching MSI PVS for the First Time When launching MSI PVS for the first time, you must input some information to set up MSI PVS. You can also modify these information later. Please follow the steps below: 1. Click the MSI PVS icon on the desktop. 2. The Device dialogue box will show your video and audio input source. 3. Click Next. Input Source Country or Region Audio Mode 5-2 4. The TV dialogue box will show the input source, region and audio mode. The default input source of the tuner is from Antenna. 5. Click Next. How to Use MSI PVS Auto scan Invalid Channel Available Channel 6. In Channel dialogue box, click Auto scan, and then the MSI PVS will scan and list the avaiable channels in the channel table. MSI reminds you... Ø While MSI PVS is scanning for channels, each channel will briefly appear in the display window. At any point, you can interrupt the scanning process by clicking Stop auto scan. Ø When Auto scan is finished, available channels are automatically enabled and marked with a icon. Channels, where valid content could not be detected, are disabled and icon. marked with a 7. Click Next. 8. In Storage dialogue box, you can change the location of the files recorded. Click Finish to complete the initial settings. 5-3 Chapter 5 5.2 The Control Keys of MSI PVS Operating MSI PVS is done by using the MSI PVS control panel or attached remote controller. The MSI PVS control panel is designed to look like controls on a VCR. Keep in mind that not all options are available at all times, and may be grayed out or inaccessible depending on your hardware setup and TV services available. The following pages provide descriptions for the functions of MSI PVS control panel and remote controller. 5.2.1 MSI PVS Control Panel Buttons Expand/hide (expanded view), minimize, maximize, and exit MSI PVS Channel Up - Jump up to next available channel Channel Down - Jump down to next available channel Last Channel - Jump back to last selected channel Record - Start recording TV in the selected format Timeshifting - Start the Timeshifting 5-4 How to Use MSI PVS Play - Begin playback of recorded program Stop - Stop current action (e.g. recording, playback, Timeshifting, etc.) Pause - Suspend current action (e.g. playback, live TV, recording, etc.) Surfing - Browse WM Streaming - Activate and set TV@nywhere (Browsing TV via the Internet) MSI Radio - Launching MSI Radio Schedule - Open window for scheduling recordings, or reminders for program times Still Capture - Capture still images of current program Properties - Open MSI PVS properties window Mute - Press to mute or restore sound Online Help System - Open HTML help file iAccess - A direct link to online product and upgrade information Volume Control - Increase or decrease volume intensity 5-5 Chapter 5 Time Monitoring Bar Time control shuttle - Shows general elapsed time or time remaining, also jump to specific time in program Instant Replay - Replay a preset amount of time Skip Commercial - Skip ahead a preset amount of time Go To Live - When Timeshifting, returns to current time in program Display Area Displays the current process, e.g. TV/video feed or recording mode. Displays the selected video input source. Displays currently selected TV channel. Displays current time. 5-6 How to Use MSI PVS Playback / Record Displays the current process, e.g. playback or record. Displays the program currently being played, total program time, and how much time remaining. Displays the elapsed time. Displays channel information 5.2.2 Remote Controller Audio Type Selection: You c an select the MTS / Stereo / Mono audio type. Full Screen Switch OSD Function Adjustment: You can adjust the Brightness / Contrast / Hue... Power Channel Selection: Yo u c a n u s e t h e ch an ne l bo tt om or input the chan nel num ber to go to the channel you w ant. Volume A djustment: Time Shif ting Adjus t the volume to your desire. Return: You can go bac k to the last channel. Mute Play Control (For TV@nywhere-Master or TV@nywhere) 5-7 Chapter 5 Suspend Key Sleep Key Power Media Center Homepage Key Menu Media Center Exit Key Direction Keys MTS Closed Caption / Teletext Audio Type Selection TV Media Center Function Keys DVD TV Channel Selection Volume Control Keys Playback Control Keys (For TV5700/TV5200-VTDF128) 5-8 How to Use MSI PVS 5.2.3 The Right-Click Menu At any time while running MSI PVS, you can put the cursor on the display window and right click to see a pop-up text menu. This menu will also appear when you press the “B” key on your keyboard. The commands on this rightclick menu are the same as those on the MSI PVS control panel, along with some extra options added. The right-click menu is explained below. Instant Replay - Replay a preset amount of time Skip Commercial - Skip ahead a preset amount of time 5-9 Chapter 5 Go to Live - When Timeshifting, returns to current time in program Play - Begin playback of recorded program Pause - Suspend current action (e.g. playback, live TV, recording, etc.) Stop - Stop current action (e.g. recording, playback, Timeshifting, etc.) Record - Start recording TV and encoding it into MPEG-2 format Mute - Press to mute or restore sound Channel Up - Jump up to next available channel Channel Down - Jump down to next available channel Last channel - Jump back to last selected channel Surfing - Browse thumbnail images of available channels Schedule - Open window for scheduled recordings or reminders for program times Zoom and Pan - Zoom in and out on the playing channel Timeshifting - Start Timeshifting Still Capture - Capture still images of current program Setup - Open MSI PVS properties window Panel - Display or hide the MSI PVS control panel Aspect Ratio - Set the aspect ratio of the display window Screen Size - Set the display window to your choice of default values WM Streaming - Active and set TV@nywhere (Browsing TV via the Internet) About - Shows version and copyright information Exit - Close MSI PVS 5-10 How to Use MSI PVS 5.2.4 Keyboard shortcuts Each button on the MSI PVS control panel has an equivalent keyboard shortcut. These are also called hot keys. These keyboard shortcuts are only active when MSI PVS is the active program. When two keys are shown, hold down the first key and press the second key at the same time. Function Keyboard Function Shortcut Auto Scan for available Keyboard Shortcut A Schedule V Pop-up the right-click menu. B Exit X Show or hide Closed C Change Display window from Z channels. Captions EPG ( Electronic Program full screen or window E Channel Up [PgUp] Open the online help system H Channel Down [PgDn] Select the video input source I Direct jump to channel numeric Guide) keypad Channel surf K Play/Pause Last channel L Record [spacebar] Mute or restore sound M Stop Go to Live N Select [Enter] Open the Properties window O Increase volume [Shift] Capture still image P Decrease volume [Shift] Instant Replay R Increase brightness + Skip Commercial S Decrease brightness - Start Timeshifting T [Home] [end] 5-11 Chapter 5 5.3 Customizing MSI PVS Use the Property settings to control how MSI PVS looks and functions. Click the Properties button to open the Properties dialog box. The Properties dialog box is composed of tabbed pages, each with its own group of featurespecific settings. 5.3.1 Channel Property The Channels property page allows you to customize and configure your TV channels. MSI PVS can automatically scan your cable or antenna signal for available channels. Here you can label and identify your favorite channels, as well as include or exclude channels from the channel surfing list. Parental Control Auto scan Invalid Channel Lock Available Channel Mark Favorite Channel Click to rename Auto Scan Use the Auto Scan feature to automatically scan for available TV channels. 1. Press the Auto scan button. 2. MSI PVS will automatically scan all available channels for content. The number of channels available varies depending on whether you are using an antenna or cable TV, along with the country settings supported by your TV tuner. 5-12 How to Use MSI PVS 3. While MSI PVS is scanning for channels, each channel will briefly appear in the display window. At any point, you can interrupt the scanning process by pressing the Stop auto scan button. 4. When Auto scan is finished, available channels are automatically icon. Channels, where valid content enable and marked with a could not be detected, are enable and marked with a icon. 5. After you are finished scanning for available channels, you may select OK to return to the display window, or customize the channel list according to your preferences. Channel Naming When MSI PVS is finished scanning for valid content, all channels will initially be named and numbered using the following convention: CBL001, CBL002, etc. for cable input or alternatively ANT001, ANT002, etc. when using an antenna input. You can customize the channel names using the following steps. 1. Click the channel you want to rename. 2. Type a new name in the text box. 3. Repeat steps above for any additional channels you want to rename. 4. Click Apply and OK to confirm the modifications you made. Set Favorite During the Auto scan process, MSI PVS automatically detects and enables channels with valid content. These channels will be marked with a By default, every available channel will be set as a favorite and marked with the icon. You might want to create a shorter list of your favorite channels to reduce channel browsing time. You can customize your list by enabling or disabling channels as favorites from the channel list by using the following steps. There are two ways to enable or disable channels from the favorites list. 1. Highlight the channel you want to enable or disable as a favorite. 5-13 Chapter 5 2. The current name and channel number appear on the right side of the property page. Below the name of the channel is a checkbox labeled Favorite. 3. Mark the checkbox to set the channel as a favorite, or unmark to disable. 4. Repeat steps above for any additional channels you want to modify. Alternatively, you can click directly in the first column, under Channel ID, next to the channel you are targeting. Parental Control The parents can prevent their children from watching some unsuitable channels such as adult or violent movies by setting the Parent Control. Once the channel has been set as parental control, the icon will appear. When you use [PgUp] or [PgDn] to browse channles, these channels which have been set as parental control will be skipped. If you browse these channles with the remote controller or double click these channels on the channel list, the parental control dialog box will show and ask you to enter password. There is only one set of parental control password for all channels. Use the password that you have preset for any channels that you want to lock. Leave blank for the first setting. If you want to change the password later, enter the previous password that you have set. 1. Click the channel you want to lock, and then click Parental Control. 2. When setting password for the first time, leave the Old Password box blank and enter new password. Please remember the password!!! (If you want to change the password later, you must enter the previous password in the Old Password box.) 3. Confirm the password and click OK. 4. Click Lock column in the channel list and enter password to lock another channel. 5-14 How to Use MSI PVS 5.3.2 Display Property The Display properties page allows you to configure the way MSI PVS displays video. Display Aspect Ratio Commercial Skip Display Options Instant Replay Video Sliders Default Display Aspect Ratio The size of the display window is determined by choosing between three aspect ratio formats. Free - Unlocked aspect ratio 4:3 - Standard 16:9 - Wide screen If you set the aspect ratio to one of the two fixed options, 4:3 or 16:9, the display window will always preserve and adjust to that aspect ratio. If you set the aspect ratio to Free, you can freely resize and stretch the display window. MSI reminds you... Ø If the aspect ratio of the display window does not correspond with the actual aspect ratio of the video input, the video image may appear stretched or deformed. 5-15 Chapter 5 Always on Top When you select the checkbox next to Always on top, the display window will always be visible, even when you are running other programs. Turn on OSD When you select the checkbox next to Turn on OSD (On-screen Display), channel information such as channel numbers, channel names, and audio quality will be displayed as you switch channels. When this box is unmarked, no information will be displayed. Video Desktop Selecting the checkbox next to Video Desktop, the display window will become the desktop when your watch TV program with full screen mode. However, under video Desktop mode, you cannot do any control or modific action on it. You can only click the icon on taskbar to active it as partial windows mode. Video Sliders Use the sliders in this area to adjust: Brightness - Adjusts the amount of white in the image. Hue - Adjusts whether the image looks red, green, blue, yellow, orange, etc. Contrast - Adjusts the gradation of tone between the image highlights, mid-tones, and shadows. Saturation - Adjusts the color intensity of the image. Pressing the Default button will reset the slider values to their original positions. Commercial Skip Select the amount of time to jump forward when using the commercial skip feature. Instant Replay Select the amount of time to jump back when using the instant replay feature. 5-16 How to Use MSI PVS 5.3.3 Device Property The Device properties page, allows you to configure the device that MSI PVS displays is using. Video Input Device Video Input Source Video Input Standard Audio Input Device Audio Input Source Record Level Slider Video Input Device This item will show the chipset that your tuner card is using. Video Input Standard Select the proper video standard for your area from the dropdown menu. The options available depend on the standards supported by the input source. Usually you don’t have to select the standard for MSI PVS because this item will change automatically according to the region or country you choose. A brief explanation for the different standards is given below. When the National Television Systems Committee (NTSC) prepared the standards for commercial television broadcasting in the United States, Canada, Japan, and parts of Central and South America, they decided on 525 lines of display at thirty frames per second. In most of Europe, Australia, and parts of Central and South America, however, the Phase Alteration Line (PAL) standard, using 625 lines at 25 frames per second, was used. In addition, each TV system uses a slightly different range of TV frequencies. 5-17 Chapter 5 Video Input Soruce You can choose the source of video from TV cable, video device with S-Video connector or video device with RCA connector. TV S-Video AV-Video - Video source from TV cable - Source from device which supports S-Video output - Source from device which supports AV-Video output Audio Input Device This item will show the chipset that your audio card is using. Audio Input Source This item will show the audio source that your audio card is using. The options in this item may vary according to the hardware of your audio card. Record Level This slider allows you to adjust the volumn of audio that you are recording. 5.3.4 TV Property The TV properties page allows you to configure the specifications of your TV tuner and TV audio settings. Some functions on this page may vary according to the different region, countries or TV system providers. Tuner Input Country Audio Mode Sleep Timer Audio Language Taiwan / NTSC 5-18 How to Use MSI PVS Country Tuner Input Caption Audio Mode Caption U.S.A. / NTSC In some area, the TV programs come with hided caption. Check the box next to Closed Caption, and then you can see the caption. If you want to see the caption only when the TV program is muted, check the box next to Turn on CC on Mute. Tuner Input Country Audio Mode Teletext Teletext Germany / PAL Teletext consists of pages of information, such as news and sports, which are viewed on a TV set capable of viewing these pages. This function is available only when the TV system privider supports teletext service. 5-19 Chapter 5 Tuner Input Select the source for your TV tuner. Define whether you are using an Antenna or Cable TV. Country Select the country where you are currently using MSI PVS from the dropdown menu. This will allow MSI PVS to detect the correct set of frequencies for your location. Audio Mode Choose the audio quality, stereo or mono, by clicking on the appropriate radio box. Audio Language In some countries, a secondary audio channel might be available. This channel has a wide variety of uses, e.g. broadcasting language translations, reading services for the visually impaired, and weather forecasts. Select which language channel you want to use by clicking the appropriate radio box. Sleep Timer MSI PVS will close automatically when the time that you set expires. You can input time directly in the box or click +15 min to set the sleep timer. To active this function, you must select the checkbox next to Close Application. MSI reminds you... Ø Stereo sound is supported in most, but not all countries, and may be unavailable for selection. 5-20 How to Use MSI PVS 5.3.5 Record Property The Record property page allows you to set the recording quality. Record Quality Record Quality Information Customized Quality Profile Record Quality Here you can select the output quality of recorded programs. During installation, MSI PVS will automatically detect crucial system hardware components, and set a recommended recording quality level based on your configuration. You can adjust the recording quality by choosing one of the preset levels, or define your own customized settings. The record settings related with each quality level are displayed on the right. Below is an example of values that MSI PVS might propose for each record level, when using a system with a Intel Pentium III 550MHz installed. Record Quality Capture Size Video bitrate Audio bitrate * ** ** Good Better Best 320x240 pixels 640x480 pixels 640x480 pixels 2000 kbit/sec 5000 kbit/sec 6000 kbit/sec 224 kbt/sec MPEG4 Record Quality If you want to record TV program in MPEG4 format, select radio box next to Customized and choose MPEG4 from the dropdown menu. 5-21 Chapter 5 Customized Record Quality Click the radio button next to Customized, and click Profile to setup a customized recording quality. You can highlight the file in the profiles list, and then click Modify to modify the content of the record quality. You can also duplicate the selected file by clicking Duplicate. If you want to create a new record quality, you can click Create, and then another property window will become available, allowing the following customizations. 1. In the Name tab, enter a name for the new profile. 2. In the Comments tab, enter the description for the new profile 3. Set the record Mode by selecting the radio box next to MPEG-1 or MPEG-2. The MPEG Format specifies whether the video files are to be recorded in MPEG-1 or MPEG-2 format. In general, you would use MPEG-2 if you are making files that will be played by on this machine or published with InterVideo’s MyDVD authoring software. MPEG-2 combines high-quality with compact file sizes. Since an MPEG-1 decoder is included with current Windows operating systems, use it for making lower resolution recordings for playback on many PCs. 5-22 How to Use MSI PVS Name Comments Mode 4. Click Apply to confirm the modifications you made, and then click System tab. Bitstream Mode File Split Size Advanced 5. Set up the Bitstream Mode by selecting the available radio box. 6. In the File Split Size tab, you can enter the size of reocrding file. When the reocrding file size expires the value, it will be stored into another new file. 7. Click Apply to confirm the modifications you made, and then click Advanced tab. 5-23 Chapter 5 System Format Bit Stream MSI reminds you... Ø The System Format settings control the packing of the video and audio data in the MPEG program stream. These settings would only be changed to meet the needs of a specific media format. These settings are for genuine experts only! If you are not familiar with these settings, don’t change them! The Bit Stream allows you to determine whether the recorded stream contains both video and audio (System) or only one of these. This may be useful, for example, if you want to capture background music for a movie in the MPEG audio format. Of if you are transferring some video content that does not have an audio soundtrack, such as a dub from an old home movie. 8. Set up System Format if necessary. 9. Set up Bit Stream by selecting the radio box. 10. Click OK, and then in System tab click Apply to confirm the modifications you made. Click Video tab for next setting. 5-24 How to Use MSI PVS Video Format Width x Height Bit Rate Advanced The Video tab allows you specify the MPEG Video settings. Video Format Sets the Video record format. Use the down arrow to select on of the video format options: COMP, PAL, NTSC, SECAM, MAC or Unspecified. Width x Height specifies the Video recording resolution. Only resolutions supported by the currently-selected video input device are included in this drop-down menu. When making changes to a Transcode Profile, this setting is grayed out, as the resolution of the file is not changed by the transcode operation. The Bit Rate sets the Video bit rate, which can be set between 100 and 10, 000 kb/sec. Settings below 1000 or over 6000 are generally not recommended. Keep in mind that the bit rate is the thing that determines the size of the output file. For reference, typical MPEG-2 settings are 2000 Kbit/sec for a 320x240 image, and 6000 Kbit/sec for a 640x480 stream. At any given resolution, if you see excessive ‘blockiness’ in the recorded image, try increasing the bit rate to reduce this effect. If your files are larger than you want, try reducing the bit rate the lowest setting that gives you acceptable image quality. 11. Choose the Video Format from the dropdown menu. 12. Set up Width x Height and Bit Rate. 13. Click Apply to confirm the modifications you made, and then click Advanced tab. 5-25 Chapter 5 Frame Rate Motion Vector Aspect Ratio GOP This allows you to change the following advanced MPEG Video settings: The recording Frame Rate can be set between 23.97 and 60 frames per second. Selecting the down arrow in the Frame Rate box lists the available frame rates. The standard frame rate for NTSC video is 29.97 fps and for PAL is 25 fps. Aspect Ratio sets the MPEG aspect ratio for the captured video. Use the down arrow to select one of the aspect ratio options: Square, 4 : 3, 16 : 9, 211 : 1. Note that this is different from the display aspect ratio setting in the Display tab of the Properties dialog box. GOP (Group of Pictures) can be set between 1 and 15 by using the up and down arrows in the GOP box. The GOP size is the number of frames between I-frames in the MPEG stream. The larger the GOP size, the more compression is done on the video. Sub GOP can be set between 1 and 3 by using the up and down arrows in the Sub GOP box. The Sub GOP is the number of frames between the B-frames in the MPEG stream. Motion Vector Horizontal Sets the Horizontal motion search range. Vertical Sets the Horizontal motion search range. Larger values for the motion vector reduce artifacts on rapidly moving objects, but require more CPU power. 5-26 How to Use MSI PVS MSI reminds you... Ø DANGER!!! Unless you are technically familiar with the settings in this dialog, it is unlikely that you will achieve better overall performance than the default settings. 14. Choose the Fram Rate and Aspect Ratio from the dropdown menu. 15. Set up GOP and Sub GOP. 16. Set up Motion Vector. 17. Click OK, and then in Video tab click Apply to confirm the modifications you made. Click Audio tab for next setting. Audio Format Sample Rate Advanced In Audio Format option, at present, only Layer II of the MPEG audio encoding is supported by MSI PVS. 18. Choose the Sample Rate from the dropdown menu. 19. Click Apply to confirm the modifications you made, and then click Advanced tab. 5-27 Chapter 5 Bit Rate Mode Bit Rate - Audio bitrate is expressed in kilobits per second. The higher the bitrate, the more processing power is required to record or playback a file. Mode - Select the audio quality mode. Stereo - For stereo, all audio channels are mixed down to 2 channels. Join Stereo - Finds redundancies between left and right channels, and achieves a higher compression ratio. Dual channel - Dual-channel processing allows control of completely independent effects on the left and right channels. Mono - If you select mono, the two channels will be mixed into one. 20. Select proper radio box for audio recording. 21. Choose Bit Rate from the dropdown menu. 22. Click OK, and then in Audio tab click Apply to confirm the modifications you made. Click OK to finish the customized record quality settings. 5-28 How to Use MSI PVS 5.3.6 Storage Property The Storage properties page allows you to assign the amount of space and location, for storing recorded programs and captured still images. Storage Location Storage Slider Storage Location Click the icon to browse for the drive and folder path where you want to store recorded programs and captured still images. Storage Slider Next, use the slider to set the maximum amount of disk space you want to assign for recorded files. The total amount of recording time is limited by the drive space available. The top section of the page provides a quick overview of the drives in your system, and available free space. 5-29 Chapter 5 5.3.7 Timeshifting Property The Timeshifting properties page allows you to configure the Timeshifting mode. The Timeshifting mode can either be set to Normal or Record mode. These options are described below. Normal Mode Record Mode Normal Mode Normal Mode allows you to use the Timeshifting feature without recording the complete program. Using this mode provides faster performance, but you are restricted to using the Timeshifting feature within a limited time buffer. You can adjust the buffering time to optimize performance with your hardware. Record Mode Record the program in real time, while using the Timeshifting feature. This mode requires more system resources, and may perform slower during recording and playback, depending on your hardware. By using this mode for Timeshifting, you are not limited by the buffering time. 5-30 How to Use MSI PVS 5.4 Using MSI PVS 5.4.1 TV@nywhere This function allows you to browse TV programs and control MSI PVS from the remote site through the Internet. Click the icon on the control panel to active the TV@nywhere setting window. Setting items for Host Server Station (Stream Out) Must press Start after all settings Setting items for Remote Station (Stream In) Entitle a station name and MUST input the IP address of the Host Server Station Host Server Station Status You can change the settings from the Remote Station Setting the Host Server Station (Stream Out) The equipment of the host server station must meet the following: z Broadband Internet Access > 64 kbps (Upload) z TV Tuner Card z MSI PVS installed z Static IP Address 5-31 Chapter 5 1. Click Streaming Profile to set streaming quality. MSI reminds you... Ø The higher the value of profile is, the better the image quality will be; however, the more resources of your Internet will be occupied. 2. Click OK. 3. Click Start. Setting the Remote Station (Stream In) The equipment of the host server station must meet the following: 1. 5-32 z Broadband Internet Access > 64 kbps (Download) z MSI PVS installed z The access of the Host Server Station’s IP Address Double click a Host Server Station from the list. You can also click Add or Edit to set up a new Host Server Station. How to Use MSI PVS 2. The Host Server Station status will be showned. Then click Play. 3. Click OK. 4. Wait for the image sent from the Host Server Station. MSI reminds you... Ø Keep your Host Server Station running, or you cannot use TV@nywhere on the Remote Station. Ø When you change channel from the Remote Station, the channel on the Host Server Station will follow. Ø The Property, Timeshifting and Recording will be void while TV@nywhere is using. Ø There is a short bit delay when you do any changes to the Host Server Station; for example, channel switching, transfer rate changing, and so on. 5-33 Chapter 5 5.4.2 Channel Surfing Before you can use the channel surfing feature, you must configure TV properties (see 5.3.4). When watching TV, use the channel surfing feature to display a 4x4 grid of channel images in the display window for a quick overview of available programs. To start the channel surfing feature, press on the MSI PVS control panel. Thumbnail images will begin to appear in the display window. You may preview a program by clicking once on the image. The program will be displayed for three seconds, then surfing will resume. If you decide you would like to jump to that program, double click on the image. To return to normal view, end channel surfing by pressing 5-34 again. How to Use MSI PVS 5.4.3 Channel Browsing When watching TV, you can browse channels by clicking and to scroll up and down through the available channels. The keyboard shortcuts PgUp and PgDn, can also be used to perform this function. You can also jump directly to the channel number you wish to watch by using your numeric keypad. Click to jump back to the last selected TV channel. When the On-screen Display function is enabled on the Display Proper page, relevant channel information will appear briefly in the top-left corner of the display window as you switch channels. 5.4.4 Timeshifting The Timeshifting feature allows you to pause, replay, or skip commercials during live TV, without interrupting an ongoing recording session. Timeshifting gives you absolute control over how you watch television. You can take a break watching a live show, and pick up where you left off, or instantly jump back to live view. First, choose the Timeshifting mode using the Timeshifting property page. You can decide whether to use the Timeshifing feature within a limited buffer time frame, or record a show without any time limits. Click Use , the Time Monitoring bar will appear. to jump to a specific time in the program. Click to replay a preset amount of time. Click to jump ahead a preset amount of time. Click to instantly jump back to Live mode. Timeshifting and Playback mode differ, in that Timeshifting allows you to pause and replay live TV then resume watching it after a delay or return to real time. Playback only allows you to replay a previously recorded program. 5-35 Chapter 5 5.4.5 Volume Adjusting Use the volume slider to adjust the volume intensity. Click on the display area of the control panel to mute or restore sound. Alternatively, use keyboard to control the volume. Press “Shift”+”Up” to increase volume. Press “Shift”+”Down” to decrease volume. Press M to mute or restore sound. 5.4.6 Channel Recording MSI PVS is a digital video recording tool. You can use MSI PVS to record a stream of full-motion video plus audio from your video source and save it in real-time using MPEG-2 encoding directly to a designated location on your hard disk. To instantly start recording: Recording Click here to record 1. Click to start recording. 2. Click to stop recording. 3. When you stop recording, MSI PVS prompts you to name the new recording. Type the name and press OK. 5-36 How to Use MSI PVS 5.4.7 Playback Playback of recorded programs is performed by using the playback feature. This page describes how to playback recorded programs. 1. Click to open the Play dialog box. 2. Highlight the file name in the program list, double-click or press Play to start playback. Once a file is playing, the display area of the control panel provides information on the program currently playing. To rename a recorded program, highlight the file name on the program list and click Rename. Type in the new name and select ok. To delete a recorded program, highlight the file name on the program list and click Delete or Delete All to erase all recorded programs. 5.4.8 Scheduled Channel Recording and Reminding MSI PVS can be scheduled to record a TV program or remind you of an upcoming program. The schedule can be set for a one-time or a reoccurring session. Click to open the Schedule dialog box. 5-37 Chapter 5 1. Click Create, a schedule wizard will guide you through the set up process. Task Name Task Type Video Source TV Channel 2. Enter a task name. 3. Select the Task Type, i.e. Recording or Reminding. 4. Select the Video Source, e.g. TV capture card. 5. Select the TV Channel, if applicable. 6. Click Next. 5-38 How to Use MSI PVS Duration Record Quality Program Name 7. If you are scheduling a recording session, the Record Settings page will appear. Select a radio box for recording quality. 8. Set the Duration of the program to be recorded. 9. Enter the Program Name. 10. Click Next. 11. Set the time for the task to occur. 12. Click Next. When a new task is scheduled, it is added to the Schedule task list. An icon in front of each item indicates whether it is a Channel Recording task, indicated by the icon or a Channel Reminding task indicated by the icon . 5-39 Chapter 5 5.4.9 Still Image Capturing MSI PVS also allows you to capture individual still images during program playback or live TV. Click the capture icon on the control panel or press the keyboard shortcut “P” at any time, to capture an image of the display window. Check the Record property page for screen capture size. Captured bitmaps are stored in the folder that you assigned for storing recorded and captured files. Check the Storage Property page for more information. Captured files are automatically named and numbered cap001.bmp, cap002.bmp, etc. 5.4.10 iAccess Click to link to http://www.intervideo.com for online product information and upgrades. 5.4.11 Teletext In some areas where PAL TV system is used, the local TV system prividers support teletext service. Follow the instruction on page 5-18 to active teletext service. The teletext page will show, and you can change pages by entering page number on your keyboard. 5-40 6 HOW TO USE MSI RADIO This chapter describes how to use the MSI Radio. The MSI Radio that comes with a modern designed panel is a handy utility for receiving broadcasts. The changeable skins of the MSI Radio can make your taste more unique and personalized. The record function can instantly record your favorite broadcast content; otherwise, the language learning function can repeatly play a specified section of the recorded broadcast content as you like. 6-1 Chapter 6 6.1 Introduction to the MSI Radio 6.1.1 How to Launch the MSI Radio The MSI Radio utility will be installed simultaneously when you install the MSI PVS (also refer to Chapter 4). The MSI Radio icon will show on the desktop. Double click the icon or click MSI Radio icon on MSI PVS panel, and then the MSI Radio panel will appear. MSI Radio icon 6.1.2 What Are the Buttons on the MSI Radio The MSI Radio comes with 3 kinds of skins; however, we will introduce the default one here. The operations for other skins will be mentioned later. The default MSI Radio consists of three parts: Main Panel, Recorder Panel and Visual Effect Panel. Main Panel Click this button to activate the setting window (see 6.2) SETTING <--- ---> TV SKIN Click this button to simplfy the MSI Radio (see 6.3.8) Click this button to launch the MSI PVS and close MSI Radio (see Chapter 5) Click this button to activate skin select window (see 6.3.7) Drag this button to tune the station frequency (see 6.3.1) 6-2 How to Use MSI Radio Click this button to tune backward to an available station (see 6.3.1) Click this button to tune backward with a programmable frequency scale (see 6.3.1) Click this button to tune forward to an available station (see 6.3.1) Click this button to tune forward with a programmable frequency scale (see 6.3.1) Click this button to turn off the MSI Radio Click this button to minimize the MSI Radio (see 6.3.8) Click this button to mute the MSI Radio; click again to cancel (see 6.3.3) Click this button to link to the MSI website (http://www.msi. com) Click the button to quick access the memorized station (see 6.3.2) Drag the slider to adjust the volume (see 6.3.3) This section shows the current time This section shows some information about what you are doing on the MSI Radio This section shows the frequency value of the station This section shows the station memory status This section shows the frequency signal level 6-3 Chapter 6 Recorder Panel Click this button to play the recorded content Click this button to pause recording or playing Click this button to stop recording or playing Click this button to record Language Learning Machine - Click this button while playing to instant repeat backward with a pre-programmed time length (see 6.3.6) This section shows the playing or recording time 6-4 How to Use MSI Radio Visual Effect Panel Click this button to activate the visual effect menu (see 6.3. 4) Click this button to close or open the visual effect panel 6-5 Chapter 6 6.2 How to Program the MSI Radio You may encounter some problems in receiving stations when first launching the MSI Radio. That is not the bug of the MSI Radio. Because the broadcast frequency range may vary in different countries, you are probably unable to receive the interference-free quality broadcasts. Please click the setting to solve the problems. icon 6.2.1 Configuration Area Scan Precision Frequency Scale Area Each area has its proprietary frequency range. If you are unable to receive some stations in your area, there might be the inporper setting in this option. Check the porper radio box to correct the problem. The range for each area is listed below: Others(Europe) --- 87.5 ~ 108.0 MHz USA --- 87.9 ~ 107.9 MHz Japan --- 76.0 ~ 91.0 MHz Scan Precision The scan precision is the threshold for your MSI Radio to determine whether it should receive a station. The higher the scan precision is set, the less stations will be received for many stations with weak signal are skipped automatically. 6-6 How to Use MSI Radio Frequency Scale The frequency scale allows you to program the scale of each tune. There are 4 values in each drop-down list box: 0.01, 0.02, 0.05 and 0.10 MHz. The value and of Fine tune frequency scale will function to the that of Scan frequency scale to the and buttons while buttons. 6.2.2 Radio Setting Left/Right Mute FM Stereo/Mono (Disabled for TV5700/ TV5200-VTDF128) FM Noise Reduction (Disabled for Improve Audio Quality (Disabled for TV5700/TV5200VTDF128) TV5200-VTDF128) Left / Right Mute You can mute the left or right channel by checking the square box. FM Stereo / Mono You can activate the stereo or mono sound effect by checking the radio box. FM Noise Reduction You can reduce the FM noise by checking the square box. Imporve Audio Quality You can improve the audio quality by checking the square box. 6-7 Chapter 6 6.2.3 Advance Setting Language Learning Simple mode Always on Top Language Learning You can set the repeat time length for language learning. There are 4 values in the drop-down list box: 1, 2, 4 and 8 second(s). (see 6.3.6) Simple mode Always on Top You can set the MSI Radio to be on the top of the desktop when it is in simple mode. (see 6.3.8) 6.2.4 FM Memory List FM Frequency Station Name 6-8 How to Use MSI Radio FM Memory List The MSI Radio provides 6 station memory sets for quick access. (see 6.3.2) In FM Frequency box, click the box, enter the frequency value of the station, and press ENTER key to complete a station memory setting. In Station Name box, click the box, name for the station as you like, and press ENTER key to complete station naming. The station information that you input will shows when the mouse over memory buttons . 6.2.5 About the MSI Radio Click here to finish setting This window shows the MSI Radio version that you are using. Click the web address to contact us if you want to inquire more information about our products. 6-9 Chapter 6 6.3 How to Enjoy the MSI Radio Congratulations! You have just set the MSI Radio to the best condition. Now let’s enjoy it. 6.3.1 How to Tune a Station There are 3 ways to tune a station. Way 1: Click the section of frequency value and input a frequency value in the pop-up window. Click OK, and the MSI Radio will tune to the station. Click here Input here Way 2: Use the tune buttons Way 3: Drag the shuttle button to tune a station. to tune a station. MSI reminds you... Ø The frequency value that you input will be analyzed and transferred into an acceptable format according to the frequency range. Any value out of the frequency range will be deemed as invalid input. 6-10 How to Use MSI Radio 6.3.2 How to Memorize a Station When you find a station, you can memorize the station as an quick access with the following 2 ways. Way 1: Left-click the station memory button that you want and hold for one second. This button will become a quick access for the station. Otherwise, you can right-click the button and click OK in the pop-up window to erase the station memory. Way 2: Activate the FM Memory List window and program your favorite stations directly. (see 6.2.4) 6.3.3 How to Adjust the Volume Please adjust the proper volume for the MSI Radio by dragging the slider. Drag here High Low You can click the button the mute signal to mute. The button will become ,and then will appear. Click the button again to cancel. 6.3.4 How to Activate the Visual Effect Just like the Windows® Media Player®, the MSI Radio also has visual effects with fancy shapes and colours. Four effects are built-in for your preference. Click the button to open visual effect panel. Click button on the right-top of the visual effect panel, and a pop-up window appears. Click here Effect list 6-11 Chapter 6 Click Play or Stop to control the visual effect. There are 4 visual effects for your preference. Once you close the panel, the visual effect will stop automatically. Visual Effect1 Visual Effect2 Visual Effect3 Wave Peak 6.3.5 How to Use the Recoder First, you should click the button to open the recoder panel. Recording Click the button to record the current station content and the pause or again to continue recording. Click the button anytime to stop. A pop-up window appears asking to save the recorded content. 6-12 button to How to Use MSI Radio Click here to stop Click here to record Click here to pause Playing Click the button, and then a pop-up window appears asking you to play a recorded content. Click the Click the button to pause or again to continue playing. button anytime to stop. Click here to stop Click here to play Click here to pause MSI reminds you... Ø The length of the recording content depends on the available space of your hard disk drive. Check your hard disk drive before recording. Ø The recorded content will be saved as *.wav format. 6-13 Chapter 6 6.3.6 How to Use the Language Learning Machine While playing a recorded content, you can click the button to instant repeat backward with a pre-programmed time length. Please refer to 6.2.3 Advance Setting. This unique function of MSI Radio would be a great help for foreign language learners. The repeat length can be 1, 2, 4 or 8 second(s). (see 6.2.3) If your setting is... Total reocrded time length --- 20 seconds Repeat time length --- 4 seconds 0 12 Repeat this section If your setting is... Total reocrded time length --- 3 seconds Repeat time length --- 4 seconds 0 2 Repeat this section only 6-14 3 You click repeat section button at the point of the 2nd second 16 20 You click repeat section button at the point of the 16th second How to Use MSI Radio 6.3.7 How to Make the MSI Radio More Fun Maybe you are tired of the current style of the MSI Radio. Please click the skin icon to select your favorite one. These buttons on each skin are introduced briefly here. Modermism-Miro Visual Effect Skin Close Minimize Setting Simplify MSI PVS Station Tuner Memory sets Website Volume Control Submarine Minimize Close Visual Effect MSI PVS Memory sets Simplify Setting Skin Website Volume Control Station Tuner 6-15 Chapter 6 6.3.8 How to Minimize and Simplify the MSI Radio You can click the button to minimize or the simplify icon to simplify the MSI Radio. In simplified mode, some functions will be hidden. Back to Standard mode Minimize Close Website Volume Control Station Tuner MSI reminds you... Ø You can always set the simplfied MSI Radio on the top of the desktop when using any utilities. (see 6.2.3) 6-16