1
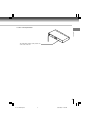
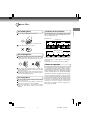
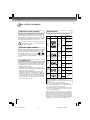
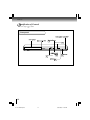
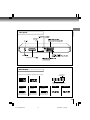
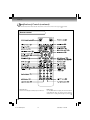
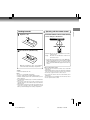
Introduction
SAFETY PRECAUTIONS
WARNING:
TO REDUCE THE RISK OF FIRE OR ELECTRIC SHOCK, DO NOT EXPOSE THIS APPLIANCE
TO RAIN OR MOISTURE. DANGEROUS HIGH VOLTAGES ARE PRESENT INSIDE THE
ENCLOSURE. DO NOT OPEN THE CABINET. REFER SERVICING TO QUALIFIED PERSONNEL
ONLY.
CAUTION:
This Digital Video Disc Player employs a Laser System.
To ensure proper use of this product, please read this owner’s manual carefully and retain for
future reference. Should the unit require maintenance, contact an authorized service location.
Use of controls or adjustments or performance of procedures other than those specified herein
may result in hazardous radiation exposure.
To prevent direct exposure to laser beam, do not try to open the enclosure.
Visible and invisible laser radiation when open and interlocks defeated.
DO NOT STARE INTO BEAM.
CLASS 1
LASER PRODUCT
In the spaces provided below, record the Model and Serial No. located on the rear panel of your DVD video player.
Model No.
Serial No.
Retain this information for future reference.
The following information applies only to the model for U.K.
General Information
If the socket outlets in your home are not suitable for the plug supplied with this unit,
the plug must be cut off and an appropriate one fitted.
The plug severed from this mains lead must be destroyed as it is hazardous if
inserted into a live socket.
IMPORTANT
The wires in this mains lead are coloured accordance with the following code:
BLUE: NEUTRAL
BROWN: LIVE
As the colours of the wires in the mains lead of this unit may not correspond with
the coloured markings identifying the terminals in your plug, proceed as follows:
The wire that is coloured blue must be connected to the terminal in the plug which
is marked with the letter N or coloured black.
The wire that is coloured brown must be connected to the terminal which is marked
with the Letter L or coloured red.
Do not connect either wire to the earth terminal which is marked by the letter E or
by the safety earth symbol
or coloured green or green-and-yellow.
Use a 5A fuse which is approved by ASTA or BSI to BS1362.
Always replace the fuse cover after changing the fuse.
2
E-2-15 ESE-R.pmd
2
3/10/2006, 11:19 AM
Location of the required label
Introduction
The rating plate and the safety caution are
on the rear of the unit.
3
E-2-15 ESE-R.pmd
3
3/10/2006, 11:19 AM
Introduction
IMPORTANT SAFETY INSTRUCTIONS
1. Read these instructions.
2. Keep these instructions.
3. Heed all warnings.
4. Follow all instructions.
5. Do not use this apparatus near water.
6. Clean only with dry cloth.
7. Do not block any ventilation openings. Install in accordance with the manufacturer’s instructions.
8. Do not restrict the air flow of the unit by placing it in a place with poor air flow, by covering it with a cloth,
or by placing it on carpeting.
4
E-2-15 ESE-R.pmd
4
3/10/2006, 11:19 AM
NS
9. Do not install near any heat sources such as radiators, heat registers, stoves, or other apparatus (including
amplifiers) that produce heat.
Introduction
10. Protect the power cord from being walked on or pinched particularly at plugs, convenience receptacles,
and the point where they exit from the apparatus.
11. Only use attachments/accessories specified by the manufacturer.
12. Unplug this apparatus during lightning storms or when unused for long periods of time.
13. Refer all servicing to qualified service personnel. Servicing is required when the apparatus has been
damaged in any way, such as power-supply cord or plug is damaged, liquid has been spilled or objects
have fallen into the apparatus, the apparatus has been exposed to rain or moisture, does not operate
normally, or has been dropped.
5
E-2-15 ESE-R.pmd
5
3/10/2006, 11:19 AM
Introduction
IMPORTANT SAFETY INSTRUCTIONS
ADDITIONAL SAFETY INSTRUCTIONS
14. When you use headphones, keep the volume at a moderate level. If you use the headphones continuously
with high volume sound, it may cause hearing damage.
15. Do not overload wall outlets; extension cords, or integral convenience receptacles as this can result in a
risk of fire or electric shock.
16. Keep your fingers well clear of the disc tray as it is closing. Neglecting to do so may cause serious
personal injury.
17. Do not place a heavy object on or step on the apparatus. The object may fall, causing serious personal
injury and serious damage to the apparatus.
18. Do not use a cracked, deformed, or repaired disc. These discs are easily broken and may cause serious
personal injury and apparatus malfunction.
19. Be sure to use the unit near the wall outlet. If a malfunction occurs, disconnect the plug from the wall
outlet at once.
20. The mains plug is used as the disconnect device, the disconnect device shall remain readily operable at
any time.
6
E-2-15 ESE-R.pmd
6
3/10/2006, 11:19 AM
NS
SOME DOS AND DON’TS ON THE SAFE USE OF EQUIPMENT
Introduction
This equipment has been designed and manufactured to meet international safety standards but, like
any electrical equipment, care must be taken if you are to obtain the best results and safety is to be
assured. So, please read the points below for your own safety. They are of a
general nature, intended to help you with all your electronic consumer products and some points may
not apply to the goods you have just purchased.
**************
DO read the operating instructions before you attempt to use the equipment.
DO ensure that all electrical connections (including the mains plug, extension leads and inter- connections
between the pieces of equipment) are properly made and in accordance with the manufacturer’s
instructions. Switch off and withdraw the mains plug before making or changing connections.
DO consult your dealer if you are ever in doubt about the installation, operation or safety of your equipment.
DO be careful with glass panels or doors on equipment
**************
DON’T remove any fixed cover as this may expose dangerous voltages.
DON’T obstruct the ventilation openings of the equipment with items such as newspapers, tablecloths,
curtains, etc. Overheating will cause damage and shorten the life of the equipment.
DON’T allow electrical equipment to be exposed to dripping or splashing, or objects filled with liquids,
such as vases, to be placed on the equipment.
DON’T place hot objects or naked flame sources such as lighted candles or nightlights on, or close to
equipment. High temperatures can melt plastic and lead to fires.
DON’T use makeshift stands and NEVER fix legs with wood screws - to ensure
complete safety always fit the manufacturer’s approved stand or legs with the fixings provided according
to the instructions.
DON’T use equipment such as personal stereos or radios so that you are distracted from the requirements
of traffic safety. It is illegal to watch television whilst driving.
DON’T listen to headphones at high volume, as such use can permanently damage your hearing.
DON’T leave equipment switched on when it is unattended unless it is specifically stated that it is
designed for unattended operation or has a stand-by mode. Switch off using the switch on the equipment
and make sure that your family know how to do this. Special arrangements may need to be made for
infirm or handicapped people.
DON’T continue to operate the equipment if you are in any doubt about it working
normally, or if it is damaged in any way -switch off, withdraw the mains plug and consult your dealer.
ABOVE ALL
—NEVER let anyone especially children push anything into holes, slots or any other opening in
the case - this could result in a fatal electrical shock;
—NEVER guess or take chances with electrical equipment of any kind
—it is better to be safe than sorry!
*************
7
E-2-15 ESE-R.pmd
7
3/10/2006, 11:19 AM
Introduction
Precautions
Notes on handling
Notes on moisture condensation
When shipping the DVD video player, the original
shipping carton and packing materials come in handy.
For maximum protection, repack the unit as it was
originally packed at the factory. Take care not to give it
a shock or shake when carrying.
Do not use volatile liquids, such as insect spray, near
the DVD video player. Do not leave rubber or plastic
products in contact with the DVD video player for a long
time. They will leave marks on the finish.
The top and rear panels of the DVD video player may
become warm after a long period of use. This is not a
malfunction.
When the DVD video player is not in use, be sure to
remove the disc and turn off the power.
If you do not use the DVD video player for a long period,
the unit may not function properly in the future. Turn on
and use the DVD video player occasionally.
Notes on locating
Place the DVD video player on a level surface. Do not
use it on a shaky or unstable surface such as a wobbling
table or inclined stand. The loaded disc may come off
the proper position and cause damage to the DVD video
player.
When you place this DVD video player near a TV, radio,
or VCR, the playback picture may become poor and
the sound may be distorted. In this case, place the DVD
video player away from the TV, radio, or VCR.
Moisture condensation damages the DVD video player.
Please read the following carefully.
Moisture condensation occurs, for example, when you pour
a cold drink into a glass on a warm day. Drops of water
form on the outside of the glass. In the same way, moisture
may condense on the optical pick-up lens inside this unit,
one of the most crucial internal parts of the DVD video
player.
Moisture condensation occurs during the following
cases.
When you bring the DVD video player directly from a
cold place to a warm place.
When you use the DVD video player in a room where
you just turned on the heater, or a place where the cold
wind from the air conditioner directly hits the unit.
In summer, when you use the DVD video player in a hot
and humid place just after you move the unit from an
air conditioned room.
When you use the DVD video player in a humid place.
Notes on cleaning
Use a soft, dry cloth for cleaning.
For stubborn dirt, soak the cloth in a weak detergent
solution, wring well and wipe. Use a dry cloth to wipe it
dry.
Do not use any type of solvent, such as thinners and
benzene, as they may damage the surface of the DVD
video player.
If you use a chemical saturated cloth to clean the unit,
follow that product’s instructions.
Inspection and Maintenance
This DVD video player is a high technology, precision
device. If the optical pick-up lens and disc drive parts
become dirty or worn down, the picture quality may be
reduced. To avoid reduction in picture quality, it is
recommended that regular inspection and maintenance
(cleaning or parts replacement) be performed every 1,000
hours of use. For further details, contact your nearest
consumer electronics dealer.
Do not use the DVD video player when moisture
condensation may occur.
If you use the DVD video player in such a situation, it
may damage discs and internal parts. Remove the disc,
connect the power cord of the DVD video player to the
wall outlet, turn on the DVD video player, and leave it
for two or three hours. After two or three hours, the DVD
video player will have warmed up and evaporated any
moisture. Keep the DVD video player connected to the
wall outlet and moisture condensation will seldom occur.
8
E-2-15 ESE-R.pmd
8
3/10/2006, 11:19 AM
Notes on Discs
Structure of disc contents
Do not touch the playback side of the disc.
Introduction
On handling discs
Normally, DVD video discs are divided into titles, and the
titles are sub-divided into chapters. VIDEO CDs and audio
CDs are divided into tracks.
DVD video disc
DVD video disc
Title 1
Playback side
Chapter 1
Title 2
Chapter 2
Chapter 1
Chapter 2
Chapter 3
Do not attach paper or tape to discs.
VIDEO CD/audio CD
VIDEO CD/audio CD
Track 1
Track 2
Track 3
Track 4
Track 5
On cleaning discs
Fingerprints and dust on the disc cause picture and
sound deterioration. Wipe the disc from the center
outwards with a soft cloth. Always keep the disc clean.
Each title, chapter or track is assigned a number, which is
called “title number”, “chapter number” or “track number”
respectively.
There may be discs that do not have these numbers.
Notes on copyright
If you cannot wipe off the dust with a soft cloth, wipe
the disc lightly with a slightly moistened soft cloth and
finish with a dry cloth.
Do not use any type of solvent such as thinner, benzine,
commercially available cleaners or antistatic spray for
vinyl LPs. It may damage the disc.
On storing discs
Do not store discs in a place subject to direct sunlight
or near heat sources.
Do not store discs in places subject to moisture and
dust such as a bathroom or near a humidifier.
Store discs vertically in a case. Stacking or placing
objects on discs outside of their case may cause
warping.
The unauthorized recording, use, distribution, or revision
of copyrighted materials including, without limitation,
television programs, videotapes, and DVDs, is prohibited
under the Copyright Laws of the United States and other
countries, and may subject you to civil and criminal liability.
This product incorporates copyright protection technology
that is protected by method claims of certain U.S. patents
and other intellectual property rights owned by Macrovision
Corporation and other rights owners. Use of this copyright
protection technology must be authorized by Macrovision
Corporation, and is intended for home and other limited
viewing uses only unless otherwise authorized by
Macrovision Corporation. Reverse engineering or
disassembly is prohibited.
9
E-2-15 ESE-R.pmd
9
3/10/2006, 11:19 AM
Introduction
Notes on Discs (continued)
About this owner’s manual
Playable discs
This owner’s manual explains the basic instructions of this
DVD video player. Some DVD video discs are produced in
a manner that allows specific or limited operation during
playback. As such, the DVD video player may not respond
to all operating commands. This is not a defect in the DVD
video player. Refer to instruction notes of discs.
This DVD video player can play the following discs.
Disc Mark
Contents
Disc
Size
Maximum
playback time
Approx. 4 hours
(single sided disc)
12 cm
” may appear on the TV screen during operation.
“
” means that the operation is not permitted by the
A“
DVD video player or the disc.
Audio
+
video
(moving
pictures)
DVD
video
discs
Approx. 8 hours
(double sided disc)
Approx. 80 minutes
(single sided disc)
8 cm
Notes on region numbers
Approx. 160 minutes
(double sided disc)
The region number of this DVD video player is 2. If region
numbers, which stand for their playable area, are printed
on your DVD video disc and you do not find
or
,
disc playback will not be allowed by the player. (In this
case, the DVD video player will display a message onscreen).
VIDEO
CDs
DIGITAL VIDEO
Audio
+
video
(moving
pictures)
On VIDEO CDs
This DVD video player supports VIDEO CDs equipped with
the PBC (Version 2.0) function. (PBC is the abbreviation
of Playback Control.) You can enjoy two playback variations
depending on types of discs.
• VIDEO CD not equipped with PBC function (Version 1.1)
Sound and movie can be played on this DVD video player
in the same way as an audio CD.
• VIDEO CD equipped with PBC function (Version 2.0)
In addition to operation of a VIDEO CD not equipped
with the PBC function, you can enjoy playback of
interactive software with search function by using the
menu displayed on the TV screen (Menu Playback).
Some of the functions described in this owner’s manual
may not work with some discs.
Audio
CDs
SUPER
VIDEO
CDs
DivX®
12 cm
Approx. 74 minutes
8 cm
Approx. 20 minutes
12 cm
Approx. 74 minutes
8 cm
(CD
single)
Approx. 20 minutes
12 cm
35 min.
8 cm
10 min.
Audio
Audio
+
video
(moving
pictures)
Audio
+
video
(moving
pictures)
12 cm
It depends on DivX®
quality
8 cm
The following discs are also available.
DVD-R/DVD-RW discs of DVD video format
CD-R/CD-RW discs of CD-DA, Video CD, MP3 or JPEG
format
Some of these discs may be incompatible.
• You cannot play discs other than those listed above.
• You cannot play DVD-RAM discs or non-standardized discs,
etc., even if they may be labeled as above.
• This DVD video player uses the NTSC/PAL colour system,
and cannot play DVD video discs recorded in any other
colour system (SECAM, etc.).
Because of problems and errors that can occur during the
creation of DVD and CD software and/or the manufacture of
DVD and CD discs, Toshiba cannot assure that this DVD video
player will successfully play every disc bearing the DVD and
CD logos. As one of the creators of DVD technology, Toshiba
DVD players are manufactured using the highest standards
of quality, and as a result, such incompatibilities are rare.
10
E-2-15 ESE-R.pmd
10
3/10/2006, 11:19 AM
Table of Contents
Advanced playback
SAFETY PRECAUTIONS ............................ 2
IMPORTANT SAFETY INSTRUCTIONS .... 4
Precautions ................................................. 8
Notes on Discs ........................................... 9
Notes on region numbers ................................. 10
Table of Contents ....................................... 11
Identification of Controls .......................... 12
Front panel ..................................................... 12
Rear panel ...................................................... 13
DVD display ....................................................... 13
Remote control ............................................... 14
Loading batteries ........................................... 15
Operating with the remote control .................. 15
Connections
Connecting to a TV .................................... 18
Connecting to a TV (Using the SCART socket)
.......................................................................... 18
Connecting to a TV (Using the phono type jacks)
.......................................................................... 18
Connecting to a TV (Using the component video
jacks) ............................................................... 19
Connecting to a display (Using a HDMI cable) 20
Connecting to Optional Equipment ........ 22
Connecting to an amplifier equipped with a
Dolby® Digital decoder .................................... 23
Connecting to an amplifier equipped with
Dolby Surround Pro Logic ............................ 23
Connecting to an amplifier equipped with a
DTS decoder ................................................ 24
Connecting to an amplifier equipped with an
MPEG2 audio decoder ................................. 24
Connecting to an amplifier equipped with a
digital audio input ......................................... 24
Introduction
Introduction
Accessing a Specific Location Directly ... 34
Entering the time counter of the desired
location ......................................................... 34
Repeating a Specific Segment .............. 35
Repeating a specific segment ........................ 35
Playing in a Varied Order ....................... 36
Playing titles, chapters or tracks in a varied
order ............................................................. 36
Playing in a Favourite Order .................. 37
Setting titles, chapters, or tracks in a favourite
order ............................................................. 37
Zooming a Picture .................................. 38
Zooming a picture .......................................... 38
Selecting the Picture Enhancement
(E.P.M.) .................................................... 39
Selecting the picture enhancement ................ 39
Selecting the Sound Enhancement
(E.A.M.) ................................................... 40
Selecting the sound enhancement ................. 40
Selecting the Camera Angle .................. 41
Changing the camera angle ........................... 41
Selecting Subtitles ................................. 42
Selecting a subtitle language ......................... 42
Selecting a Language ............................ 43
Selecting a playback audio setting ................. 43
On-screen Display Operation ................ 44
On-screen display operation .......................... 44
Playing MP3 Files ................................... 46
Playing MP3 files ............................................ 46
Viewing JPEG Files ................................ 48
Viewing JPEG files ......................................... 48
Viewing a thumbnail view ............................... 49
Playing DivX®/MPEG-4 Files .................. 51
Basic playback
Playing DivX®/MPEG-4 files ........................... 51
Playing a Disc ......................................... 26
Basic playback ............................................... 26
Function setup
Variable Speed Playback ....................... 28
Customizing the Function Settings ...... 54
Playing in fast reverse or fast forward
directions ...................................................... 28
Playing frame by frame .................................. 28
Playing in slow-motion ................................... 29
Resuming playback from the same location .. 29
Table of Languages ................................ 64
Locating a Desired Section ................... 30
Locating a title using the top menu ................ 30
Locating a desired section by entering the
corresponding number ................................. 31
Locating a specific chapter or track ............... 31
Setting procedure ........................................... 54
Setting details ................................................. 55
Others
Before Calling Service Personnel ......... 66
Specifications ......................................... 67
11
E-2-15 ESE-R.pmd
11
3/10/2006, 11:19 AM
Introduction
Identification of Controls
See the page in
for details.
Front panel
26
26
13
15
SKIP buttons 31
HDMI indicator
20
26
26
27
12
E-2-15 ESE-R.pmd
12
3/10/2006, 11:19 AM
Introduction
Rear panel
18
HDMI OUT
jack 20
19
AV
22
23
24
AV (SCART) socket 18
18
19
DVD display
Chapter/Track
number Indicator
The indicators vary depending on the kinds of discs you play.
Bad disc
No disc
Multifunctional indicator (indicates
operating status or messages, etc.)
DVD video disc
VIDEO CD
Audio CD
• During playback:
Example
• During playback:
Example
• During playback:
Example
Some discs may only
display track numbers.
Some discs may only
display track numbers.
Some discs may only
display chaper numbers.
OPEN
LOAD/CLOSE
13
E-2-15 ESE-R.pmd
13
3/10/2006, 11:19 AM
Introduction
Identification of Controls (continued)
The instructions in this manual describe the functions on the remote control. See the page in
for details.
Remote control
* RETURN button
Return to menu display for VCD (2.0) discs with menu.
* MENU button
Use the MENU button to display the menu included on
many DVD video discs. To operate a menu, follow the
instructions in “Locating a title using the top menu.” 30
14
E-2-15 ESE-R.pmd
14
3/10/2006, 11:19 AM
Operating with the remote control
1
Open the cover.
2
Insert batteries (R03/AAA size).
Introduction
Loading batteries
Point the remote control at the remote
sensor and press the buttons.
Distance: About 7 m (23 feet) from the front of the
remote sensor
Angle:
About 30° in each direction of the front of
the remote sensor
* Do not expose the remote sensor of the DVD video
player to a strong light source such as direct sunlight
or other illumination. If you do so, you may not be
able to operate the DVD video player via the remote
control.
Make sure to match the + and – on the batteries
to the marks inside the battery compartment.
Caution
• Never throw batteries into fire.
Notes
• Be sure to use R03/AAA size batteries.
• Dispose of batteries in a designated disposal area.
• Attention should be drawn to the environmental aspects of
battery disposal.
• Do not mix different battery types or combine used batteries
with new ones.
• If the remote control does not operate correctly, or if the
operating range becomes reduced, replace both batteries
with new ones.
• If the batteries are dead or if you will not be using the remote
control for a long time, remove the batteries to prevent
battery acid from leaking into the battery compartment.
Notes on the remote control
• Direct the remote control at the remote sensor of the DVD
video player.
• When using the remote control, press the buttons at intervals
of about 1 second to ensure the correct mode of operation.
• Do not drop or give the remote control a shock.
• Do not leave the remote control near an extremely hot or
humid place.
• Do not spill water or put anything wet on the remote control.
• Do not open the remote control.
15
E-2-15 ESE-R.pmd
15
3/10/2006, 11:19 AM