1
CV_KH6502_LB3_V2.qxd
07.12.2007
8:54 Uhr
Seite 1
3
DVD PLAYER/RADIO
KH 6502
DVD PLAYER/RADIO
Operating instructions
DVD-SPILLER/RADIO
Bruksanvisning
KOMPERNASS GMBH · BURGSTRASSE 21 · D-44867 BOCHUM
www.kompernass.com
ID-Nr.: KH6502/16-10/07-V2
CV_KH6502_LB3_V2.qxd
07.12.2007
8:54 Uhr
Seite 5
KH 6502
A
q w e
y u
t
r
i
o
C
2^
2% 2$
d
s
a
2)
q
w
;
e
r
l
t
k
f
2# 2@ 2!
2)
; l k j h
g
y
f
B
u
i
o
a
j
s
d
h
f
g
2&
2*
2(
3) 3! 3@
3#
2&
IB_KH6502_EN_LB3.qxd
07.12.2007
8:46 Uhr
Seite 1
INDEX
PAGE
1.
2.
3.
4.
5.
6.
7.
8.
9.
10.
11.
12.
Technical Data
Applications and functions
Package contents
Operating elements
Setting up of the DVD player
Safety instructions
Inserting batteries into the remote control and DVD player
Connecting to a television via the video output (Composite Video)
Connecting audio components to the DVD player
Operation
Radio functions
DVD player functions
Setup menu in DVD mode
13. Initial operation of the DVD player
14. Playing back DVDs, VCDs or S-VCDs
Playback start, stop, pause
12
SKIP function (Chapter/Title forward/backward)
12
Search forward/backwards
12
Slow motion function (DVD, VCD, S-VCD and DivX only)
12
Image enlargement (Zoom)
13
Camera position (DVD only)
13
Repeat function for DVDs, VCDs, S-VCDs and Audio CDs
13
Direct Title/Track selection
13
Direct chapter,title or time selection via the search function
13
Display functions
14
Display disc information
14
Accessing the DVD menu
14
Playback Control (PBC) with VCDs/S-VCDs
14
Superimpose and fade out subtitles (DVDs/VCDs/S-VCDs only)
14
Changing playback language (DVDs/VCDs/S-VCDs only)
15
Programme function
15
15. Display of MP3/WMA/JPEG/AVI/MPEG and DivX data
16.
17.
18.
19.
20.
21.
2
2
2
3
3
3
4
5
5
6
7
7
7
10
11
15
Playback of MP3/ WMA/MPEG and DivX discs
16
Repeat function with MP3/WMA/MPEG/ JPEG/DivX discs
16
Playback of JPEG discs
16
Cleaning of the DVD player
Disposal
Troubleshooting
Glossary / Key Word Index
Warranty & Service
Importer
17
177
17
18
19
19
Read these operating instructions carefully before using the appliance for the first time and preserve this manual for later reference. Pass this manual on to
whoever might acquire the appliance at a future date.
-1-
IB_KH6502_EN_LB3.qxd
07.12.2007
8:46 Uhr
Seite 2
DVD-PLAYER/RADIO KH6502
2. Applications and functions
The SilverCrest KH 6502 DVD player is intended exclusively for stationary
use in enclosed spaces. The device is intended exclusively for private, noncommercial use.
This device is intended for use as an electronic entertainment device for the
playback …
• ...of DVD videos in 12 cm and 8 cm (diameter) formats with Country/
Regional code 2 or
, designated by the Logo
.
...of MPEG-4/MPEG-4 ASP video formats and with DivX 3.11, DivX 4.x,
DivX 5.x, DivX 6.x, multichannel DivX and DivX Pro.
• ... of video-CDs (VCDs) and Super video-CDs (S-VCDs) in 12 cm and
8 cm (diameter) formats, designated by the Logo
.
• ... of audio-CDs in 12 cm and 8 cm (diameter) formats, designated by
the Logo
.
• ... generally of the data formats CD Audio (.cda), MP3 (.mp3), Windows
Media Audio (.wma), DivX (.avi), Nero Digital (.mp4) und JPEG (.jpg)
on the storage mediums CD-R, CD-RW, USB memory sticks as well as
memory cards of the types SD and MMC.
For image output with the playback of DVDs, VCDs, S-VCDs, Audio CDs and
the data format MP3, Windows Media Audio and JPEG you can connect to
the SilverCrest KH 6502 DVD player …
• Stereo and Mono televisions with the formats PAL or NTSC and the
picture formats 4:3/16:9.
• LCD/Plasma picture screens or video-projectors, if for this the corresponding
connection potential is available and the connection of a DVD player is
provided for/allowed by the manufacturer of the playback device
1. Technical Data
This device has been tested and approved in accordance with the basic
requirements and other relevent regulations of the EMC guidelines
2004/108/EG as well as the guidelines for low voltage appliances
2006/95/EG.
Power supply:
AC 220 V - 240 V ~50 Hz
Power consumption :
25 Watt
Power consumption:
Standby:
0,7 W
TV standard:
PAL/NTSC
Output level:
2 x 2,5 W
Operating temperature:
+5 ~ +35°C
Humidity:
5 ~ 90% (no condensation)
Measurements
(L x W x H):
241 x 430 x 50 mm
Weight :
2,1 kg approx.
Protection class: II
Frequency range radio:
MW (AM):
UHF (FM):
540 – 1600 kHz
88 – 108 MHz
Battery operation
8 x 1,5 V, Type CR14/LR14 (Button cell)
For the output of sound and/or music you can use and/or connect to the
Silvercrest KH 6502 DVD-Player …
• from the speaker of one of the televisions connected to the DVD player
• external audio components such as a HiFi system or receiver
Remote Control
Batteries :
Type AAA/R03 (Micro cell)
Video Output
Composite video cinch socket
Attention!
Audio Output
No liability/warranty will be assumed for damage resulting from improper
use of the device!
2 Stereo audio cinch sockets
3. Package contents
Audio input
3,5 mm Stereo jack
–
–
–
–
–
Microphone input
3,5 mm Stereo jack
USB slot
Readable
USB memory sticks:
USB1.1 and 2.0 up to a capacity of 1 GB
Memory card slot
Readable memory cards: SD (1 GB), MMC (1 GB)
-2-
DVD-Player
Power cord
Infrared remote control
2 Batteries for remote control, type AAA/R03 (Micro cells)
Operating manual
IB_KH6502_EN_LB3.qxd
4.
07.12.2007
8:46 Uhr
Seite 3
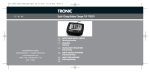
Operating elements
l SKIP UP: move forward a title/chapter, fast forward
SKIP DOWN: move back a title/chapter, fast rewind
; TITLE: Access the title menu
2) SCREEN ON/OFF: Switch the LCD display on and off/
A. DVD player front panel
q Volume control
w Headphone output 3,5 mm
e FUNCTION switch: Switch the device off, switch to DVD or radio operation
r DISPLAY button: Display playback information
t LCD display
y STOP button
set the brightness and colour
5.Setting up of the DVD player
1. Carefully remove the DVD player and the supplied accessories from
USB/SD/MMC CARD button: Stop playback/Display USB/
the packing.
2. Remove the protective foil from the LCD display.
3. Place the DVD player on a flat, even and firm base.
4. Plug the DVD player's power cord in the power cord connector on
Memory card contents
u
i
o
a
s
d
f
g
h
j
k
l
;
2)
2!
2@
2#
2$
2%
2^
Carrying handle
Band selection switch
Frequency control
PLAY/PAUSE button
SKIP UP button: move forward a title/chapter, fast forward
SKIP DOWN button: move back a title/chapter, fast rewind
Loud speaker
IR sensor for the remote control
Memory card slot for SD and MMC cards
Disc tray
USB slot
OPEN/CLOSE: Open/Close the disc tray
MIC VOL: Microphone volume control
MIC: Microphone input 3,5 mm
AUDIO IN: Stereo audio input 3,5 mm
FM ST.: Indicator for FM stereo reception (green light shows stereo reception)
POWER: Power indicator (green light shows when device is switched on)
AUDIO button: Set the audio language/channel
REPEAT button: Set the repeat function
MENU button: Access disc menu
the rear panel of the DVD player.
Attention!
If you want to connect the DVD player to other devices do not plug the
power cord into the mains power at this time. Wait until you have connected the other devices.
In the event that you wish to change the type of video or audio connection you must first pull the power plug from the power socket! Otherwise
the DVD player and possibly equipment connected to it could become
irreparably damaged through voltage peak strikes!
6. Safety instructions
•
•
B. DVD player rear panel
2& Rear speaker
2* Telescopic antenna
2( Battery compartment
3) VIDEO: Composite video output
3! AUDIO OUT R: Right audio output
3@ AUDIO OUT L: Left audio output
3# Power cable connector
•
•
This device is not suitable for children or other persons, whose physical,
sensorial or mental abilities, without assistance or supervision, impede the
safe operation of the device. Children should be watched-over to ensure
that they do not play with the device
To avoid unintentionally switching on the device pull the power cord
from the mains supply after use and before cleaning.
Check the appliance and all parts for visible damage.The safety concept
can work only if the appliance is in a faultless condition.
The power plug must always be easily accessible, so that the appliance
can be quickly separated from the mains in the event of an emergency.
Risk of electrical shocks.
•
C. Remote control
q OPEN/CLOSE: Open/Close the disc tray
w MENU: Access disc menu
e SETUP: Access the OSD menu
r DISPLAY: Superimpose disc information
t STOP: Stop playback
y PLAY/PAUSE button, OK button: Start/Pause playback, confirm input
u SUBTITLE: Set the sub-title
i Number buttons
o AUDIO: Set the audio language/channel
a SEARCH: Access the search function
s REPEAT: Set the repeat function
d ZOOM/SLOW: Set image enlargement, slow motion function
f USB/CARD: Playback of USB or memory cards
g Battery compartment (on the rear panel)
h MUTE: Switch the sound on/off
j ANGLE/PROGRAM: Change the camera perspective/
•
•
Connect the appliance only to correctly installed and earthed mains sockets.
Ensure that the rating of the local power supply tallies completely with
the details given on the rating plate of the appliance.
Arrange for defective power plugs and/or cables to be replaced at
once by qualified technicians or our Customer Service Department.
Arrange for customer service to repair or replace connecting cables
and/or appliances that are not functioning properly or have been
damaged.
NEVER submerse the appliance in water. Wipe it only with a slightly
damp cloth.
•
•
•
•
Access the programme function
k Control buttons
-3-
Do not expose the appliance to rain and never use it in a humid or wet
environment.
Ensure that the power cable never becomes wet during operation.
You must not open the housing or repair the appliance yourself. Should
you do so, appliance safety can no longer be assured and the warranty
will become void.
Protect the appliance against drip and spray water. Do not place any
water-filled vessels (e.g. flower vases) on or near the appliance.
IB_KH6502_EN_LB3.qxd
07.12.2007
8:46 Uhr
Seite 4
Risk of fire!
•
•
•
•
•
Information regarding the handling of batteries
Do not use the appliance in the vicinity of hot surfaces.
Do not locate the appliance in places exposed to direct sunlight, If you
do, it may overheat and become irreparably damaged.
Do not leave the appliance unattended when in use.
Never cover the ventilation slots of the appliance while it is being used.
Do not place open fire sources, such as candles, on or near the device.
The device and the remote control are operated by batteries. For the handling of
batteries please observe the following:
Risk of explosion!
Do not throw batteries into a fire. Do not recharge the batteries.
•
Injury hazard
•
•
•
•
•
Keep children away from the connecting cable and the appliance. Children
frequently underestimate the dangers of electrical appliances.
Ensure that the appliance stands with a safe and secure positioning.
Do not operate the appliance if it has sustained a fall or is damaged.
Arrange for the appliance to be checked and/or repaired by qualified
technicians.
Keep batteries away from children. Children can put batteries into their
mouths and swallow them.
•
•
•
Never open batteries, never solder or weld batteries.
The risk of explosions and injuries exists!
Regularly check the condition of the batteries. Leaking batteries can
cause damage to the appliance.
If you do not intend to use the appliance for an extended period, remove
the batteries.
In the event of the batteries leaking acids, wear protective gloves.
Clean the battery compartment and the battery contacts with a dry
cloth.
Attention!
Danger! Laser radiation!
No liability/warranty will be considered for damage to the DVD player
caused by the effects of moisture, water penetration or overheating!
The appliance is fitted with a „Class 1 Laser“.
• Never open the device.
• Never attempt to repair the device.
7. Inserting batteries into the remote control
and DVD player
• There is invisible laser radiation inside the device.
Do not expose yourself to the laser beam.
Note:
7.1. Inserting the Batteries into the Remote Control
Some aggressive furniture finishes can have a destructive influence on
the device's rubber feet. If necessary, place the device on a nonslip pad.
1. Open the battery compartment on the rear of the remote control.
2. Place the two, supplied in the package, batteries type AAA/R03
Thunderstorms!
(Micro cells) in the battery compartment. Make sure that the batteries
are inserted in accordance with the correct polarity.
3. Replace the battery compartment cover.
Equipment connected to a power supply can be damaged during a
thunderstorm. You should therefore always pull the power plug from the
power socket when there is a storm.
Using the remote control
In order to guarantee faultless operation when using the remote control…
• Always point the remote control, during use, directely at the DVD player
• Make sure that there are no obstructions between the remote control
and the DVD player that will hinder reception
• When using the remote control place yourself not more than 5 metres
from the DVD player
Otherwise interferences can occur during operation of the DVD player functions
with the remote control.
Notice regarding surge voltages
(FEO / fast electrical overloads):
In a case of malfunction due to an electrical fast transient (power surge)
the product must be returned to default settings in order to re-establish
normal operation. Possibly the power supply must be separated and then
reconnected. The batteries (if present) must be removed and then reinserted.
Notice regarding separation from mains-power
7.2 Inserting the batteries into the DVD player
The FUNCTION switch for this appliance does NOT completely separate
it from the mains-power source. Additionally, the appliance consumes
power when in standby-mode. To completely separate the appliance
from mains-power, the power plug MUST be removed from the wall socket.
The DVD player can be operated by batteries. As soon as the DVD player is
connected to a power source via the power cable, power supply from the
batteries is switched off.
1. Open the battery compartment on the underside of the DVD player.
2. Now place 8 batteries type CR14/LR14 (Button cells) into the battery
compartment. Make sure that the batteries are inserted in accordance
with the correct polarity.
3. Replace the battery compartment cover.
7.3. Replacing the batteries
If the operation of the DVD player via the remote control does not function
properly or does not function at all the batteries must be replaced
• Always renew all batteries in order to return the DVD player and the
remote control to their full performance ability.
-4-
IB_KH6502_EN_LB3.qxd
07.12.2007
8:46 Uhr
Seite 5
8. Connecting to a television via the video
output (Composite Video)
9. Connecting audio components to the DVD
player
For this connection variant the television must be equipped with Audio/Video
cinch sockets (Composite Video).
To connect the DVD player to a television via composite video you will need
an audio/video RCA (cinch) cable.
9.1 Connecting a HiFi system or receiver to the DVD player
Besides sound playback of DVDs, VCDs/S-VCDs and audio and MP3 CDs
via the speaker of the television, to which the DVD player is connected,
sound can also be played back via external audio components such as
a HiFi system or receivers.
Requirements for the connection of a HiFi system
•
•
In order to enjoy a full sound experience when playing DVDs with the DVD
player you can connect a HiFi system to the player. Before connecting check
with the HiFi system's instruction manual to verify...
• if the HiFi system is suitable for connection to a DVD player. If yes…
• if the HiFi system is equipped with cinch sockets; if yes, you can connect
the HiFi system to the DVD player via cinch cables.
Connect the yellow socket marked VIDEO-OUT to the television's yellow
VIDEO socket via an audio/video cinch cable.
Insert the white audio/video cinch cable plug into the cinch socket inscribed
AUDIO OUT L on the rear panel of the DVD player.
•
•
•
•
Connecting a HiFi system:
Then insert the white plug on the other end of the audio/video cinch cable
into the left channel audio socket on the television.
Insert the red audio/video cinch cable plug into the cinch socket inscribed
AUDIO OUT R on the rear panel of the DVD player.
Then insert the red plug on the other end of the audio/video cinch cable
into the right channel audio socket on the television
For playback select the matching channel on your television Check with
the television's instruction manual on how you can set the AV channel.
•
Insert the white audio/video cinch cable plug into the cinch socket inscribed
AUDIO OUT L on the rear panel of the DVD player.
•
•
•
•
Then insert the white plug on the other end of the audio/video cinch
cable into the left channel audio socket of the HiFi system.
Insert the red audio/video cinch cable plug into the AUDIO OUT R inscribed
cinch socket on the rear panel of the DVD player.
Then insert the red plug on the other end of the audio/video cinch cable
into the right channel audio socket of the HiFi system.
Check with the instruction manual which settings on the HiFi system may
be necessary in order to reproduce sound via the HiFi system during the
playback of a DVD, VCD/S-VCD, Audio or MP3 CD from the DVD player.
Note:
For an optimal sound experience place your HiFi's speakers to the left
and right of the DVD player.
-5-
IB_KH6502_EN_LB3.qxd
07.12.2007
8:46 Uhr
Seite 6
10. Operation
9.2 Playback of external devices sound signals
You can playback the sound signals of external devices, for example a portable
CD/MP3 player, via the DVD player's speaker.
For this you connect the right and left audio outputs of the external device with
a 3.5 mm jack plug to the AUDIO IN socket on the front panel of the DVD player.
As soon as you have inserted the jack plug into the AUDIO IN socket set the DVD
player to playback the sound signals from the external device.
• Insert the jack plug into the AUDIO IN socket.
• To play the sound of the DVD player pull the jack plug from the AUDIO IN socket.
10.1 Switching the appliance on/off and sound source
selection
You switch the device on by selecting a sound source with the FUNCTION
switch:
• DVD/USB/CARD
• OFF
• RADIO
1. Slide the FUNCTION switch to the position of the sound source that you
want.
2. To switch the device off slide the FUNCTION switch to the OFF position.
Note:
As soon as you have inserted the jack plug into the AUDIO IN socket, the
LCD display switches off automatically.
9.3 Using headphones
10.2 Adjusting the volume
You can connect headphones with a 3.5 mm stereo jack plug to the DVD
player. The headphone connection PHONES is located on the top panel of the
DVD player.
When you have connected the headphones, the loudspeakers are disconnected
and you will only hear sound via the headphones.
• Before you connect headphones turn the volume down to the lowest level.
• Insert the jack plug of the headphones into the headphone connection.
You can adjust the sound volume with the volume regulator.
1. To increase the sound level, turn the volume controller clockwise.
2. To reduce the sound level, turn the volume controller counterclockwise.
10.3 Switch off sound
1. Press the MUTE button to switch the sound off. The message MUTE appears
on the display.
2. To switch the sound on again press the MUTE button once more.
Important!
Note:
Listening to music with headphones for long periods and at high
volume levels can lead to hearing damage!
During operation of the radio the sound can not be switched off with
the MUTE button.
9.4 Connecting a microphone
10.4 Display functions
You can connect a microphone with a 3.5 mm stereo jack plug to the DVD
player. The microphone connection is located on the front panel of the DVD
player. When you have connected the microphone you can control the volume of
the microphone via the MIC VOL control on the front panel of the DVD player.
With the microphone you can, for example, use the karaoke function of
DVDs.
• Insert the microphones jack plug into the socket MIC.
• You set the display up by flipping it open.
The display can be turned 270° by means of the swivel joint.
Switching the display on and off
1. Hold the SCREEN ON button down briefly to switch off the LCD display.
2. To switch the LCD display back on hold the SCREEN ON button down briefly
once more.
Display settings
1. Press the SCREEN ON button several times to alternate between the messages
BRI (Brightness) and COL (Colour).
2. With the control buttons you can set the brightness and colour
values.
3. If you do not press any button for a period of 5 seconds the display
settings will again fade out.
-6-
IB_KH6502_EN_LB3.qxd
07.12.2007
8:46 Uhr
Seite 7
11. Radio functions
12. DVD player functions
The LCD display remains switched off during operation of the radio.
1. Set the FUNCTION switch to the RADIO position.
2. Lift the telescopic antenna and pull apart. Adjust the antenna positioning
so that radio reception is optimal.
A reception antenna for receiving MW (AM) transmissions is built into the
unit. In radio operation, turn the whole appliance to a position where the
best radio reception is obtained.
3. Adjust the reception range (AM/FM/FM ST.) with the waveband selector.
With the adjustment to FM ST FM ST, radio programmes transmitted in
stereo will be played back in stereo. If the programme is received in
stereo with full signal strength the FM stereo message FM ST. lights up.
• Set the FUNCTION switch to the DVD/USB/CARD position.
The LCD display switches on and the background image appears.
Setup menu in DVD mode
Note:
In these instructions the English setup menu is described. At any time
you can set the menu to your countrys language as described in
"Language Setup > OSD Language".
Note:
In the DVD mode you can access a settings menu, in which you can implement
image and sound settings as well as activate other functions. When you carry
out changes in the setup menu, these changes are saved even when the device
is switched off.
• You can set the default settings at any time in the SYSTEM SETUP > DEFAULT
menu.
• The setup menu can be accessed during playback.
The setup menu subdivides into the following menus:
• SYSTEM SETUP
• LANGUAGE SETUP
• VIDEO SETUP
• SPEAKER SETUP
Should the stereo signal in the reception range FM ST be too weak,
you can improve it by selecting the adjustment FM. In this adjustment
the sound is played in Mono.
4. Set to the desired radio station by turning the frequency knob.
Navigating in the menu
1. Press the SETUP button to access the Setup menu. The main menu
SYSTEM SETUP appears.
SYSTEM SETUP
TV SYSTEM
LCD MODE
TV TYPE
PASSWORD
RATING
DEFAULT
EXIT SETUP
• With the control buttons and the OK button you can carry
out all the settings in the menu.
2. With the control buttons you can select a menu by moving the yellow
mark under the corresponding menu symbol.
3. With the control buttons you can select an input in a menu by moving
the yellow bar over an input.
4. With the control button you can alternate in the sub menu of an input and with the control button you can move back a menu level.
5. To confirm a selection press the OK button.
All navigation possibilities in a current menu are displayed at the lower edge
of the menu.
Exiting the Setup menu (EXIT SETUP)
• You can exit the Setup menu at any time by pressing the SETUP button again.
-7-
IB_KH6502_EN_LB3.qxd
07.12.2007
8:46 Uhr
Seite 8
SYSTEM SETUP menu
The open lock symbol
appears behind the input position. You can now
set the age release class in the menu item RATING.
When you operate the device for the first time the password lock is already
switched off.
When you access the Setup menu of the disc drive with the button SETUP the
SYSTEM SETUP menu appears. Here you can set the video output and video
format.
You switch the password lock on as follows:
1. With the control button move to the input position.
2. With the number buttons enter the factory default password 8200 and
confirm with the OK button.
SYSTEM SETUP
TV SYSTEM
LCD MODE
TV TYPE
PASSWORD
RATING
DEFAULT
The closed lock symbol
appears behind the input position. The age release
class in the menu item RATING now can not be set again.
You change the password as follows:
EXIT SETUP
In order to change the password the password lock must be switched off.
1. With the control button move to the input position.
2. With the number buttons enter a new four figure password and confirm
with the OK button.
The closed lock symbol appears behind the input position. With the new
password you can again switch off the password lock.
In the event that you forget the new password you can switch the password
lock on or off at any time with the factory default password.
TV SYSTEM
Here you set the television standard for the video output.
PAL
PAL television standard.
NTSC
NTSC television standard.
AUTO
Automatic setting.
LCD MODE
RATING
In this menu you can set height and width image settings of the LCD display.
4:3:
Playback in 4:3 format
16:9:
Playback in 16:9 format
Some DVDs and CDs (predominantly DVDs obtained on the US market) are
coded with encryption signals. In this way DVDs can be divided into eight
different approval classes.
TV TYPE
Here you can match the vertical and horizontal image display to the playback
device in use.
4:3/PS:
Select this setting to display broadcasts in the usual 4:3 format
on a 4:3 television set. Broadcasts in the 16:9 format will be
displayed in full screen without the distracting bars although the
side edges of the image will be trimmed.
4:3/LB:
Display of a film in 16:9 format on a traditional 4:3 format
television. The image is displayed with black bars on the lower
and upper edges of the screen.
16:9:
This setting is recommended when using the built in LCD display
or for the output of the image on a wide screen television in
the 16:9 format.
SYSTEM SETUP
TV SYSTEM
LCD MODE
TV TYPE
PASSWORD
RATING
DEFAULT
EXIT SETUP
1 KID SAFE
2G
3 PG
4 PG13
5 PG-R
6R
7 NC-17
8 ADULT
Note:
In order to change the age release class the password lock must be
switched off.
PASSWORD
1. With the control button move to the right column.
2. Select one of the following age release classes to safeguard the playback
of this type of media with a password request and confirm with the OK
Select this menu item to switch the password lock on and off. To set the child
lock in the next menu item RATING the password lock must be switched off.
• When the password lock is switched off the open lock symbol
appears
behind the four input positions.
• When the password lock is switched on the closed lock symbol
appears
behind the four input positions.
button:
8 ADULT:
7 NC -17:
6 R:
5 PG-R:
SYSTEM SETUP
TV SYSTEM
LCD MODE
TV TYPE
PASSWORD
RATING
DEFAULT
4 PG 13:
3 PG:
2 G.:
1 KID SAFE:
for adults only;
not for teenagers under 18 years of age;
for teenagers under 16, adult supervision is strongly
recommended;
for teenagers under 16, adult supervision is recommended;
adult supervision strongly recommended; some scenes
are not suitable for children under 12;
adult supervision recommended;
for all age groups;
also suitable for small children.
EXIT SETUP
Example
You switch the password lock off as follows:
1. With the control button move to the input position.
2. With the number buttons enter the factory default password 8200 and
confirm with the OK button.
If a DVD was encoded with, for example, approval class 7 or 8 and you
have an approval class setting between 1 and 6 then a message follows
and the password must be entered.
Also only parts of the DVD, that is to say certain film scenes, may be
encoded with an approval class or various approval classes.
-8-
IB_KH6502_EN_LB3.qxd
07.12.2007
8:46 Uhr
Seite 9
VIDEO SETUP menu
3. Subsequently switch the password lock on in the menu item PASSWORD.
The age release class is now set and can be changed only if the password
lock is previously switched off.
In this menu you set the Brightness, Contrast, Hue and Saturation for disc
playback.
DEFAULT
VIDEO SETUP
BRIGHTNESS
CONTRAST
HUE
SATURATION
Select the menu item DEFAULT and confirm with the OK button to reset the
DVD mode settings to the factory default settings.
EXIT SETUP
EXIT SETUP
Select this menu item to exit the Setup menu.
LANGUAGE SETUP menu
BRIGHTNESS
With the help of the control buttons you can set the brightness.
• Subsequently press the OK button to continue.
LANGUAGE SETUP
OSD LANGUAGE
AUDIO LANG
SUBTITLE LANG
MENU LANG
CONTRAST
With the help of the control buttons you can set the contrast.
• Subsequently press the OK button to continue.
EXIT SETUP
HUE
In this menu you can set the language settings for menus and subtitles.
Here you set the language, in which the OSD Menu will be shown on the display.
With the help of the control buttons you can set the hue.
The further the controller is pushed up the warmer the entire image becomes.
On the other hand when pushed down the image radiates a cooler mood.
• Subsequently press the OK button to continue.
AUDIO LANG
SATURATION
Set the audio language here, which should be used as standard when playing
back the film.
With the help of the control buttons you can set the colour saturation.
• Subsequently press the OK button to continue.
SUBTITLE LANG
EXIT SETUP
Set the subtitle language here, which should be used as standard when playing
back the film.
Select this menu item to exit the Setup menu.
OSD LANGUAGE
SPEAKER SETUP menu
In this menu you set the stereo output for the system's loud speaker.
MENU LANG
Set the disc menu language here, which should be used as standard when playing
back the film.
SPEAKER SETUP
DOWNMIX
EXIT SETUP
Select this menu item to exit the Setup menu.
EXIT SETUP
DOWNMIX
LT/RT:
Select this setting if the film was recorded in Pro Logic Dolby
Digital and you want to hear the sound in cinema quality.
STEREO:
Select this option to output the left and right sound channels of the
DVD. The output with CD playback is a traditional stereo signal.
EXIT SETUP
Select this menu item to exit the Setup menu.
-9-
IB_KH6502_EN_LB3.qxd
07.12.2007
8:46 Uhr
Seite 10
13. Initial operation of the DVD player
After you have …
• placed the DVD player in a suitable location
• connected the DVD player, if desired, to a television by one of the
designated connection options
• connected the DVD player, if desired, to a HiFi system and/or a receiver
• made the remote control ready for operation by inserting the batteries
• and know how to activate and operate the OSD menu with the remote
control
… the DVD player is ready for operation.
13.1 Inserting the DVD
To play a disc with the DVD player:
• Make sure that the DVD player is ready for operation.
• Switch the DVD player on.
When the DVD player and other potentially connected devices (i.e. an audio
component) are ready for operation and are switched on you will now see
the Silvercrest logo in the display.
If no disc is inserted into the DVD player's disc tray:
No Disc will appear in the display.
• Open the disc tray by pressing the button "Open/Close" on the remote
control or on the front panel of the DVD player. Open will appear in
the display.
• Insert the disc in the disc tray with the inscribed/labled side up.
For twin-sided discs: The side you would like to play must face down.
• After you have inserted the disc press the button "Open/Close" on
the remote control or on the front panel of the DVD player again to close
the disc tray.
• The contents of the disc will now be loaded; this may take a few seconds.
In the meantime Loading will appear in the display.
13.2 Inserting memory cards/USB memory sticks with
MP3/WMA/ DivX/JPEG data
Note:
The DVD-Player always starts in DVD mode. In order to read memory
cards press the button USB/CARD several times on the remote control or
the button USB/SD/MMC CARD on the device until the message READ
CARD appears in the display. The DVD player recognizes the data
formats JPEG, MP3, WMA und MPEG4 (DivX).
In order to insert memory cards of the types SD and MMC into the DVD player:
• Make sure that the DVD player is ready for operation.
• Switch the DVD player on.
When the DVD player is switched on and ready for operation you will see
the Silvercrest logo in the display.
If no disc is inserted into the DVD player's disc tray: No Disc will appear in
the display.
• Slide the memory card into the memory card slot. Then proceed with
the following steps depending on the type of memory card that you
want the device to read.
Warning!
Always make sure that you insert memory cards into the memory card
slot as described hereafter! Under no circumstances bend or buckle the
memory card when inserting into the memory card slot! Slide the memory
card up to the stop in the memory card slot, with a light pressure.
Allow the memory card to slide in without force:
• Check to make sure that the memory card is one that the DVD player is
capable of reading.
Do not attempt to insert memory cards of another type in the memory
card slot!
• Make sure that you have inserted the memory card into the memory
card slot in the correct manner.
• Under no circumstances attempt to force the memory card into the memory
card slot!
Otherwise the DVD player, memory card and the data on the memory card
could be damaged!
Supported memory card types and capacities
Memory cards of the types SD (1 GB) and MMC (1 GB) can be played
back.
Supported file structure and file formats
–
–
–
–
–
- 10 -
2 file levels are supported
The total file count should be not more than 10
(max. 5 files on each of the 2 file levels)
A max. of 100 files are supported on the memory media
Files with mixed file formats are not supported
A JPEG file larger than 1 MB can lead to faulty images
IB_KH6502_EN_LB3.qxd
07.12.2007
8:46 Uhr
Seite 11
MultiMediaCard- /SecureDigital memory cards (MMC/SD)
MultiMediaCard/SecureDigital memory cards must be inserted into the memory
card slot. Insert the MMC/SD memory cards with the contacts forward and
slide them straight into the memory card slot.
Thereby...
- the side of the memory card with the contacts must face down and
the slanted corner of the memory card must be on the right side
14. Playing back DVDs, VCDs or S-VCDs
To play back a DVD/VCD/S-VCD with the DVD player...
• Make sure that the DVD player is ready for operation.
• Switch the DVD player on.
When the DVD player and other potentially connected devices (i.e. an audio
component) are ready for operation and are switched on you will now see
the Silvercrest logo in the display.
USB memory sticks (USB)
The DVD player supports USB memory sticks 1.1 and 2.0 up to a capacity
of 1GB.
USB memory sticks must be inserted into the USB port.
•
Open the disc tray on the front panel of the DVD player by pressing the
button "Open/Close" on the front panel of the DVD player or on the
remote control.
Open will appear in the display.
•
Insert a DVD/VCD/S-VCD disc in the disc tray with the inscribed/labled
side up.
• Press the OPEN/CLOSE button on the front panel of the DVD player or on
the remote control again to close the disc tray.
Close shows in the display while the disc tray is closing.
Press the USB/CARD button on the remote control or the USB/SD/MMC CARD
button on the device until the message READ USB appears in the display.
This procedure also applies to particular memory cards.
•
•
•
The contents of the inserted DVD/VCD/S-VCD will now be loaded; this
may take a few seconds. In the meantime Loading will appear in the
display.
Playback of the inserted DVD/VCD/S-VCD starts automatically.
Note:
Note:
If the memory card or USB memory stick does not contain any playable
data the memory card and/or USB function is not selectable.
DVDs, VCDs and S-VCDs, that you want to playback with the DVD player
possibly have a country code, which is printed on the DVD cover.
13.3 Removing memory cards/USB memory sticks
The DVD player can only playback DVDs/VCDs/S-VCDs with the country
code 2.
Memory cards/USB Memory sticks should only be removed after the memory
card/USB slot is deactivated. Thus avoiding the possibility of damage or
data loss.
• Press the USB/CARD button on the remote control several times or the
USB/SD/MMC CARD button on the device until the message DVD appears
in the display to return to the DVD mode.
• You can now remove the memory card/USB memory stick from the
memory card/USB slot.
If no country code is printed on the cover of a DVD/VCD/S-VCD...
• but instead the symbol
, then the DVD/VCD/S-VCD can be played
back with the DVD player
• then the DVD/VCD/S-VCD can possibly not be played back with the
DVD player. You can check this by attempting to play back the DVD.
Depending on the inserted DVD/VCD/S-VCD it is possible that the contents
of the DVD/VCD/s-VCD will not playback immediately, rather first a selection
menu appears in the display.
In this event select the menu option which will start the playback of the film
with the control button
on the remote control.
• To begin playback of the film press the PLAY/PAUSE button.
Play is shown briefly in the display.
- 11 -
IB_KH6502_EN_LB3.qxd
07.12.2007
8:46 Uhr
Seite 12
Playback start, stop, pause
SKIP function (Chapter/Title forward/backward)
Depending on the inserted disc it is possible that the contents do not immediately
play back, but first a selection menu appears in the display.
• In this case select with the control buttons the menu item,
which starts playback of the film.
• To start playback of the film press the PLAY/PAUSE button.
Pause playback
To pause the playback:
• During playback press the button PLAY/PAUSE. The message PAUSE
appears in the display.
The display shows a freeze frame of the scene you have just paused.
• To contine playback of the film press the PLAY/PAUSE button.
Stop playback (STOP)
To stop playback press the STOP button.
Note:
This function may not be available on all DVDs/VCDs/S-VCDs! If you
attempt to carry out functions that are not available the message
"INVALID KEY“ appears in the display.
• With the buttons SKIP DOWN/SKIP UP you can skip, during playback, within
the film on the inserted DVD/VCD/S-VCD backwards to the previous chapter/
title or to the start of the next chapter/title. The display will show PREV
and/or NEXT.
The respectively selected chapter/title will playback immediately.
Search forward/backwards
• Hold the SKIP DOWN/SKIP UP button down briefly during playback to start
a backwards/forwards search.
• Hold the SKIP DOWN/SKIP UP button down repeatedly to apply the following
search speeds:
Resume function
If you have cancelled playback of the inserted DVD/VCD/S-VCD by pressing the STOP button once the DVD automatically saves the position where
playback was interrupted. This function is called the "resume function".
PRE STOP (Preliminary Stop) is shown in the display.
• As soon as you press the PLAY/PAUSE button again, playback will continue
from the saved position.
• If you press the STOP button a second time the saved position, at which
you stopped playback, is deleted.
• As soon as you press the PLAY/PAUSE button again playback of the inserted
DVD/VCD/S-VCD will start from the beginning.
Note:
During the search no sound will play.
• To continue playback of the film at normal speed from the selected position
press the PLAY/PAUSE button during the search.
Note:
With playback of MPEG4 files the speed of search forward and search
backwards can be limited. This is data dependent and not a device malfunction.
Slow motion function (DVD, VCD, S-VCD and DivX only)
• Hold the ZOOM/SLOW, button down briefly during playback to set playback
to slow motion. Hold the ZOOM/SLOW button down repeatedly to apply the
following slow motion speeds:
Note:
During slow motion playback no sound will be played.
• To continue playback at normal speed press the PLAY/PAUSE button during
slow motion playback.
Note:
With VCDs, S-VCDs and MPEG4 files slow motion backwards is not
supported.
- 12 -
IB_KH6502_EN_LB3.qxd
07.12.2007
8:46 Uhr
Seite 13
REP ALL
Image enlargement (Zoom)
Note:
REP DIR
This function may not be available on all DVDs/VCDs/S-VCDs! If you
attempt to carry out functions that are not available the message
"INVALID KEY“ appears in the display.
OFF
During playback of an inserted DVD/VCD/S-VCD you can enlarge and reduce
the image in the display in three stages.
• Press the ZOOM/SLOW button repeatedly to apply the following enlargements and/or reductions:
REP A-
REP A-B
Sections of the enlarged image can be shunted with the control buttons
.
A-B CANCEL
Camera position (DVD only)
Select REP ALL to continuously repeat all available titles on the
disc, thus the entire disc, until playback repeat is switched off
or playback is stopped by pressing the STOP button twice.
When you have inserted a disc that contains folders, with this
option you can endlessly repeat the contents of the current
folder.
To switch off repeat playback press the REPEAT button several
times during playback until the message OFF appears in
the display.
With this function you can repeat playback of a favourite
sequence within a chapter of the current playback disc.
Select this input as soon as the desired sequence begins
to play back.
Select this input as soon as the end of the desired sequence
has played back. With this, bear in mind that the beginning
and end of the sequence must fall within the same chapter.
Repeat playback of the selected sequence starts immediately.
The sequence will continuously repeat until you select the
input A-B CANCEL.
Note:
Direct Title/Track selection
This function may not be available on all DVDs/VCDs/S-VCDs! If you
attempt to carry out functions that are not available the message
"INVALID KEY“ appears in the display.
To select a title/track on the disc directly, during playback, enter the title/
track number via the number buttons .
If there is more than 9 titles enter the corresponding title/track number by
pressing the two numbers one after the other.
Many films on DVD contain chapters, which were recorded from different
viewing angles simultaneously. Films that have such chapters available allow
you to observe these chapters from various perspectives.
• For this, during playback of the inserted DVD, hold the ANGLE/PROGRAM button
on the remote control down briefly. With each further brief hold down of
the ANGLE/PROGRAM button you can switch to one of the available camera
angles.
Example
Enter the number 1 followed by the number 2 to playback title/track 12.
Direct chapter,title or time selection via the search function
Note:
This function may not be available on all DVDs/VCDs/S-VCDs! If you
attempt to carry out functions that are not available the message
"INVALID KEY“ appears in the display.
Repeat function for DVDs, VCDs, S-VCDs and Audio CDs
With the repeat function you can…
... with DVDs selectively repeat title or chapter.
... with VCDs/S-VCDs you can repeat individual titles, a folder and/or the
entire VCD/S-VCD.
... with audio CDs you can repeatedly playback individual titles and/or the
entire CD.
If you do not want to playback the entire disc you can select a particular
chapter/time position.
• To do this press the SEARCH button during playback to superimpose, depending
on the medium, the following messages:
Repeat function
• Press the REPEAT button several times during playback.
REP appears in the display with one of the following messages:
CHAPTER
Select CHAPTER to continuously repeat the currently playing
back chapter until playback repeat is switched off or playback is stopped by pressing the STOP button twice.
TITLE
Select TITLE to continuously repeat the currently playing back
title until playback repeat is switched off or playback
is stopped by pressing the STOP button twice.
REP1
Select REP1 to continuously repeat the currently playing
back track until playback repeat is switched off or playback
is stopped by pressing the STOP button twice.
With the control buttons select one of the following input fields
and then with the number buttons enter the chapter, title or track number
and/or a time.
Subsequently confirm your input with the OK button.
DVD
TT:
Enter here a title number from where playback should start.
CH:
Enter here a chapter number from where playback should start.
Enter here a time position for the currently playing back title from
where playback should start.
CD/VCD/SVCD
Trk :
Enter here a track number from where playback should start.
Enter here a time position for the currently playing back title from
where playback should start.
- 13 -
IB_KH6502_EN_LB3.qxd
07.12.2007
8:46 Uhr
Seite 14
Display functions
Accessing the DVD menu
Note:
Display disc information
This function may not be available on all DVDs/VCDs/S-VCDs! If you
attempt to carry out functions that are not available the message
"INVALID KEY“ appears in the display.
Note:
This function may not be available on all DVDs/VCDs/S-VCDs! If you
attempt to carry out functions that are not available the message
"INVALID KEY“ appears in the display.
With this function you can, during playback, superimpose in the display the
total available information from a DVD/VCD/S-VCD inserted in the disc tray.
• During playback press repeatedly the DISPLAY button to superimpose, one
after the other, the following information:
With DVDs:
With many films on DVD there is a main menu on the disc that apart from
the option of playing the main film enables you, for example...
• to choose the language for subtitles and film dialogue
• direct chapter selection
• to playback the films bonus material (Background information,
"Making of" etc.)
If such a menu is present on the DVD that is inserted in the disc tray then you
can access it during playback by pressing the MENU button.
• The individual menu items can be selected by pressing the control buttons
; to confirm the selected menu item press the PLAY/PAUSE BUTTON.
To return to playback press the MENU button again.
• The played back so far time of the current chapter
Note:
• Audio language, Dolby settings, subtitle language and camera position
If you cancel playback by pressing the STOP button twice (Playback stop
without resume function), activation of the main menu from the disc is not
possible.
Playback Control (PBC) with VCDs/S-VCDs
• The remaining time of the current chapter
• The played back so far time of the current title
• The remaining time of the current title
With VCDs/S-VCDs/DivX/MPEG CDs
Many VCDs/S-VCDs have Playback Control (in short "PBC"). Playback
Control indicates a main menu that allows operation of several functions
of the VCD/S-VCD.
If PCB is available on a VCD/S-VCD inserted in the disc tray you must first
activate it in order to be able to superimpose the menu.
To activate PBC...
• During playback or when playback is stopped press the MENU button.
The message PBC:OFF appears in the display.
• Press the MENU button again. The message PBC ON: appears in the display.
PBC is now switched on the discs main menu can be accessed with the
MENU or TITLE buttons.
• The played back so far time of the current title/track
Note:
If you switch on PBC during playback then it is possible that playback
will stop and start again from the beginning and/or with the main menu.
• The remaining time of the current title
Fading out disc information
Superimpose and fade out subtitles
(DVDs/VCDs/S-VCDs only)
• To fade out the disc information press the DISPLAY button again.
Note:
This function may not be available on all DVDs/VCDs/S-VCDs! If you
attempt to carry out functions that are not available the message
"INVALID KEY“ appears in the display.
If the film on the inserted DVD/VCD/S-VCD has subtitles available you can
superimpose these, during playback, in the display by pressing the SUBTITLE
button.
• With the first press of the SUBTITLE button the subtitle of the first available
language is superimposed in the display.
• With each further press of the SUBTITLE button other available subtitle languages,
one after the other, are superimposed in the display.
In the display the number of the currently superimposed subtitle is superimposed
(i.e. "6" for the sixth available subtitle language).
• When the last of the available subtitle languages is superimposed then
you can switch off the subtitle function by pressing the SUBTITLE button
again. OFF is superimposed in the display.
- 14 -
IB_KH6502_EN_LB3.qxd
07.12.2007
8:46 Uhr
Seite 15
15 Display of MP3/WMA/JPEG/AVI/MPEG
and DivX data
Changing playback language (DVDs/VCDs/S-VCDs only)
Note:
• Place a memory medium, on which MP3, WMA, JPEG, AVI, MPEG or
DivX data is present, in the disc tray.
The contents of the data medium will be shown on the display:
This function may not be available on all DVDs/VCDs/S-VCDs! If you
attempt to carry out functions that are not available the message
"INVALID KEY“ appears in the display.
Display of MP3 data
• With many films on DVD/VCD/S-VCD you can select another playback
language, during playback, by pressing the AUDIO button.
• With the first press of the AUDIO button the first available playback language
will be switched on. With each further press of the AUDIO button other available
playback languages, one after the other, are switched on.
The respectively switched on playback language and the sound format
(i.e. 5.1CH) are superimposed in the display.
Programme function
SUB FOLDER
You can programme a playback sequence for the titles and chapters that are
available on the DVD, VCD, S-VCD disc.
For this, during playback, press the ANGLE/PROGRAM button to superimpose the
following window:
Display of JPEG data
Programming window
SUB FOLDER
Display of AVI, MPEG and DivX data
The programme positions 1-16 are listed. Each programme position contains
the input field for a title (T) and a chapter (C).
1. Select with the control buttons in the first programme position
the input field T for the title.
2. With the number buttons enter the number of the title that is to be played
back first.
3. Select with the control buttons in the first programme position
the input field C for the chapter.
4. With the number buttons enter the number of the chapter that is to be played
back.
5. Select with the control buttons further programme positions
and enter title and chapter numbers for the programme position.
• To delete the programme list select the input Clear and press the OK button.
• To cancel the programming function press the ANGLE/PROGRAM button.
6. You start playback of the programme positions by selecting the Play
field and pressing the OK button.
During the programmed playback the message PROGRAM PLAY appears
in the display.
The programme list will be deleted as soon as you press the STOP button.
SUB FOLDER
• Folders are listed on the left (folder window) and data on the right (data
window). Folders will be depicted with the symbol
.
• At the bottom right the available formats on the data carrier (MP3, JPEG
or MPEG/AVI/DivX) are shown.
• Select with the control buttons a folder and press the PLAY/PAUSE button.
The contents of the folder appears in the data window.
• To reach a higher folder level select the symbol
with the input ".." and
press the PLAY/PAUSE button.
• With the button move to the area on the right select with the control buttons
a data and press the PLAY/PAUSE BUTTON. The music/video data will
playback and/or the JPEG image will be displayed.
- 15 -
IB_KH6502_EN_LB3.qxd
07.12.2007
8:46 Uhr
Seite 16
Selection of slide show transitions:
Playback of MP3/ WMA/MPEG and DivX discs
• Select a data with the help of the control buttons . By pressing
the PLAY/PAUSE button you confirm your selection. Playback starts immediately.
With the playback of music or video data the following functions can be
used:
You can select different transitions for changing from one image to the next.
• During the slide show press the ANGLE/PROGRAM button until the name of the
transition appears in the top left corner of the screen.
Enlargement and reduction of the image display
• With the ZOOM button you can enlarge or reduce the image.
Play/Pause
See "14 Playing back DVDs, VCDs or S-VCDs"
Stop
See "14 Playing back DVDs, VCDs or S-VCDs"
Skip
See "14 Playing back DVDs, VCDs or S-VCDs"
Search
See "14 Playing back DVDs, VCDs or S-VCDs"
Slow (with MPEG and DivX data only)
See "14 Playing back DVDs, VCDs or S-VCDs"
Zoom (with JPEG, MPEG and DivX data only)
See "14 Playing back DVDs, VCDs or S-VCDs"
AB Repeat
See "14 Playing back DVDs, VCDs or S-VCDs"
Repeat function with MP3/WMA/MPEG/ JPEG/DivX
discs
During playback press the REPEAT button several times to apply the following
repeat functions (the set function appears in the display):
REPEAT 1
Endless repeat of the current title/image.
FOLDER
REPEAT
Repeat the current folder.
REPEAT
ALL
Repeat all titles on the disc and/or data carrier.
Playback of JPEG discs
• With the control buttons mark an image and press the PLAY/PAUSE
button to open that image.
The image is shown on the display
Subsequently change the view to the next available image on the disc/in the
folder.
• To show the currently displayed image longer press the PLAY/PAUSE button.
• To continue with playback press the PLAY/PAUSE button.
• You can access an image direct by entering the image data number with
the number buttons and then confirm by pressing the PLAY/PAUSE button.
• With the control buttons you can rotate the image in increments of
90° during playback.
• With the control buttons you can mirror the image horizontally and
vertically during playback.
- 16 -
IB_KH6502_EN_LB3.qxd
07.12.2007
8:46 Uhr
Seite 17
16. Cleaning of the DVD player
Clean the housing of the DVD player with a slightly damp cloth and a mild
cleanser only. When cleaning, make sure that no moisture gets into the DVD
player!
Clean the inside of the disc tray, if necessary, exclusively with a clean dry
brush (i.e. a lens brush obtainable from a photographic dealer). Never clean
the inside of the disc tray with anything moist!
18. Troubleshooting
Display is blank/DVD player shows no functions even though it is
switched on
A Check to see that the power cord is properly plugged into the power
B
Warning!
Moisture penetrating into the DVD player creates the risk of an electric
shock! The DVD player may also be irreparably damaged!
17. Disposal
Disposing of the appliance
Do not, under any circumstances, discard the appliance in the household
refuse.
This product is subject to the European directive 2002/96/EC.
Dispose of the appliance through an approved disposal centre or at your
community waste facility.
Observe the currently applicable regulations. In case of doubt, please
contact your waste disposal centre.
Disposing of batteries!
Do not dispose of the batteries with household waste. Every consumer is legally
obliged to dispose of batteries at a collection site of his community/city district
or at a retail store.
This obligation is intended to ensure that batteries are disposed of in an environmentally safe fashion.
Only dispose of batteries when they are fully discharged.
C
D
The display shows "No Disc" even though there is a disc inserted
A The disc is dirty, scratched or damaged.
B The Country/Region code on the inserted DVD/VCD/S-VCD does not
correspond to the Country/Region code of the DVD player. In this case
the DVD/VCD/S-VCD cannot be played with the DVD player.
Inserted disc will not playback
It is possible that a layer of condensation has built up on the DVD players laser
scan lens. This can be the case especially if the DVD player has been subjected
to strong temperature fluctuations.
If this is the case place the DVD player in a dry environment at normal room
temperature. First remove the currently inserted disc from the disc tray. Then
leave the DVD player switched off for at least one hour without using until
the condensation film has evaporated.
No image or Black/White image only
A Check to make sure that all connection cables between the DVD player
Disposal of packaging
Dispose of the packaging materials in an environmentally responsible
manner.
socket.
Check to make sure that there is power at the power socket, in which
you have plugged the DVD players power cord, by connecting another
appliance to the socket. If necessary plug the DVD players power cord
into another power socket.
Check to see if the display is switched off. For this press the SCREEN
ON/OFF button on the remote control.
Switch off the DVD player with the FUNCTION switch and then wait ten
seconds. Subsequently switch the DVD player back on with the FUNCTION
switch.
B
and the television (or Video projector) are firmly inserted into the
corresponding sockets
Check to make sure that the settings in the OSD menu match the connections variant, with which you have connected the DVD player to the television (or Video projector).
For this see chapter 8. „Connecting the DVD player to a television“.
C
Check by means of the televisions (or Video projectors) operating instructions to see if settings to the television (or Video projector) may be
necessary in order to use the DVD player with the television.
No sound
A Check to see if the DVD player is possibly switched to mute.
B Check to see that all connecting cables between the DVD player and
C
potentially connected audio components are firmly plugged into the
corresponding sockets
Check to make sure that the settings in the OSD menu match the connections
variant, with which you have connected the audio component to the
DVD player.
For this see chapter 9. „Connecting an audio component to the DVD
player“.
- 17 -
IB_KH6502_EN_LB3.qxd
07.12.2007
8:46 Uhr
Seite 18
D Check by means of the televisions operating instructions to see if settings to
E
the television may be necessary in order to use the DVD player with the
television.
Check by means of the operating instructions for a potential connected
audio component if settings to it are necessary in order to use it with the
DVD player.
19. Glossary / Key Word Index
What are DVDs, VCDs and S-VCDs?
DVDs
No 4:3 or 16:9 image
A Check by means of the televisions operating instructions, which image
B
formats the television has at its disposal.
Check to see if the settings in the OSD menu match the available image
format of the television.
Remote control not functioning
A Check to make sure that the remote control batteries have been inserted
DVD is the short form for "Digital Versatile Disc". DVDs are a storage medium
for audio and video data; they are available in 8 cm and 12 cm (Diameter)
formats. Because of the much higher storage capacity as compared to CD-Rs/
CD-RWs DVDs can provide a playback duration of up to eight hours for the
audio and video data stored on them.
VCDs/S-VCDs
Playback language/ Subtitle language do not correspond to the
settings in the OSD menu
"Video CD" (VCD) and "Super Video CD" (S-VCD) are designations for two
processes of compressed storage, thus space saving, of films on CDs. VCDs
and S-VCDs are available in 8 cm and 12 cm (Diameter) formats. Their storage
capacity is a great deal lower than that of DVDs. For this reason they only
offer a playback duration, for the saved audio and video data on them, of
20 minutes (8 cm format) and/or 74 minutes (12 cm format).
VCDs are available in two versions:
• Only audio and video data can be played back on version 1.1
VCDs/S-VCDs.
• PBC (Playback control) functions are available on version 2.0 VCDs/
S-VCDs. In addition still images can be played back in a higher resolution.
The playback language/Subtitle language setting in the OSD menu is not
available on the inserted disc.
Playback Control (PBC)
B
C
D
into the battery compartment with the correct polarity.
Check to see if the remote control batteries are exhausted and, if necessary, change both batteries.
Make sure that there are no obstacles located between the remote control
and the DVD player.
Be situated no more than five meters from the DVD player when using
the remote control.
One or several functions can not be switched on
The selected function may not be available on all DVDs/VCDs/S-VCDs!
If you attempt to carry out a function that is not available the message
"INVALID KEYappears in the display.
None of the buttons on the appliance or on the remote control
are functioning/other malfunctions
A Switch the DVD player off with the FUNCTION switch. Wait ten seconds
and then switch the DVD player back on with the FUNCTION switch.
B If the malfunction is still present: Reset the DVD player to its default
settings.
Contact one of our service partners in your area if …
• the stated function defect can not be resolved as described or
• other functional defects arise.
For this see chapter 20 "Warranty and service".
Version 2.0 VCDs/S-VCDs have Playback Control (in short "PBC") at their
disposal. Then on the VCD/S-VCD a main menu is available, by which
various functions of the VCD/S-VCD are allowed to be operated.
What are Title and Chapter?
Title is the name given to the largest units of image and sound units on DVDs;
on many DVDs the (Main) film has the title number 01. For bonus material
(i.e. Film trailer, background information etc.), that is available on many
DVDs, other possible title numbers can be used.
Chapter is the name given to the next smaller image and sound units beneath
title. If the DVD/VCD/S-VCD or its title is divided into chapters, numbers are
assigned to you, through the input of which the chapter can be selected direct.
Bear in mind that not on all DVDs …
• are the DVD or the title divided into (numbered) chapters
• Chapters are also designated as "Scenes" (i.e. in the main menu of DVDs)
What is composite video?
Composite video
Video signal or FBAS signal; thereby it involves an image signal, in which
colour and brightness information are included at the same time.
What are PAL, NTSC and SECAM?
PAL
PAL is the abbreviation for "Phase Alternation Line". PAL is the mid and west
Europe (Exception: France, see the heading "SECAM") customary and most
wide spread colour television standard.
NTSC
NTSC is the abbreviation for "National Television System Committee". NTSC
is a colour television standard that is primarily used in the USA and Japan.
- 18 -
IB_KH6502_EN_LB3.qxd
07.12.2007
8:46 Uhr
Seite 19
SECAM
SECAM is the abbreviation for the french "système en couleur avec mémoire".
SECAM is the customary colour television norm in France and many east
European countries and at present still the most widely spread system in
those countries.
Audio CDs
Audio CDs contain exclusively audio data; they are also available in 8 cm
and 12 cm (Diameter) formats. The playback duration for the audio data stored
on them amounts to 20 minutes (8 cm format) and/or 74 minutes (12 cm format).
Audio data is stored on audio CDs in CDA format.
MP3
20. Warranty & Service
The warranty for this appliance is for 3 years from the date of purchase.
Should you have grounds for complaint, despite our high quality standards,
please contact our Service Hotline.
In the event that your complaint cannot be resolved over the telephone, you
will receive from them
• a processing number (RMA number) as well as
• an address, to which you can send your product for warranty processing.
In the case of a mail-in shipment please enclose a copy of the purchase receipt
(sales slip). The appliance must be securely packed and rhe RMA number
clearly visible. Shipments without an RMA number can not be processed.
MP3 denotes a process and/or format developed by the Fraunhofer Institute
for the compression of audio data. In the MP3 format compressed music pieces
are only a fraction of their original size, which, for example, on CD-Rs/CD-RWs
allows for storage of a considerably greater volume of music than on commercially available audio CDs, on which audio data is stored in the CDA format.
Note:
The warranty provisions cover only material or factory defects.
The warranty provisions do not cover
• worn out parts
• damage to breakable parts like switches or rechargeable batteries.
WMA
JPEG
This product is for private use only and is not intended for commercial use.
The warranty is void in the case of abusive and improper handling, use of force
and internal tampering not carried out by our authorized service branch.
Your statutory warranty claims are not restricted by this warranty.
JPEG ("Joint Photographics Expert Group") denotes a wide spread graphic
format, developed by the organization with the same name, with which image
data of the colour and grey scales are compressed.
21. Importer
WMA ("Windows® Media Audio") is a data format developed by Microsoft®
for audio data.
DivX
DivX is a coding format for videos and multimedia data, invented by the DivX
Networks, Inc company.
KOMPERNASS GMBH
BURGSTRASSE 21
D-44867 BOCHUM
MPEG
www.kompernass.com
MPEG ("Moving Picture Experts Group") refers to a video compression format.
USB memory sticks
The term USB memory stick refers to a plugable USB device, which is approximately the size of a cigarette lighter. The expression is only colloquial and
not a designation for a type of product. For the most part with this expression
is meant a USB device that serves as an interchangeable storage media.
What are files?
As opposed to audio CDs the title on a CD-R/CD-RW with MP3-, WMA- or
JPEG data can be stored in files, for example, in order to file titles from different
genres.
The structure of an MP3-CD can, for example, appear as follows, if the MP3
data is stored in files:
MP3-CD
ORDNER
FOLDER
MP3
- 19 -
IB_KH6502_EN_LB3.qxd
07.12.2007
8:46 Uhr
Seite 20
- 20 -
Completely fill out this section and enclose with the appliance!
IB_KH6502_EN_LB3.qxd
07.12.2007
Seite 21
Warranty
DVD-Player/Radio KH6502
In order to guarantee a cost free repair procedure please
get in touch with the service hotline. Make sure you have
your sales slip handy.
Irish Connection
Tel.: 00353 (0) 87 99 62 077
Fax: 00353 18398056
www.mysilvercrest.de
Sender, please write clearly:
Last name
First name
Street
City/Town
Country
Telephone
Date/Signature
Description of fault:
✄
8:46 Uhr
IB_KH6502_EN_LB3.qxd
07.12.2007
8:46 Uhr
Seite 22
- 22 -
IB_KH6502_NO_LB3.qxd
07.12.2007
8:35 Uhr
Seite 23
INNHOLDSFORTEGNELSE
SIDE
1.
2.
3.
4.
5.
6.
7.
8.
9.
10.
11.
12.
Tekniske spesifikasjoner
Påregnet bruk og funksjon
Leveringsomfang
Kontrollelementer
Sette opp DVD-spilleren
Sikkerhetshenvisninger
Legge batterier inn i fjernkontrollen og DVD-spilleren
Koble til et TV-apparat via videoinngang (Composite Video)
Tilkobling av audiokomponenter til DVD-spilleren
Betjening
Radiofunksjoner
DVD-spillerfunksjoner
Setup-meny i DVD-modus
13. Ta DVD-spilleren i bruk
14. Spille DVD-er, VCD-er eller S-VCD-er
Starte, stoppe og avbryte avspilling
34
SKIP-funksjon (kapittel/tittel fram/tilbake)
34
Søk forover/bakover
34
Slow-motion-funksjon (kun DVD, VCD, SVCD og DivX)
34
Bildeforstørrelse (zoom)
35
Kameraposisjon (kun DVD)
35
Repetisjonsfunksjon for DVD, VCD, SVCD og audio-CD
35
Direkte tittel-/sporvalg
35
Direkte kapittel-, tittel- eller tidsvalg med søkefunksjonen
35
Anvisningsfunksjoner
36
Vise plateinformasjon
36
Starte DVD-meny
36
Playback Control (PBC) for VCD/SVCD-er
36
Blende inn og ut undertittel (kun DVD/VCD/SVCD)
36
Endre avpillingsspråk (kun DVD/VCD/SVCD)
37
Programmeringsfunksjon
37
15. Vise MP3-/WMA-/JPEG-/AVI-/MPEG-/ og DivX-filer
16.
17.
18.
19.
20.
21.
24
24
24
25
25
25
26
27
27
28
29
29
29
32
33
37
Avspilling av MP3-/ WMA-/MPEG- og DivX-plater
38
Repetisjonsfunksjon for MP3-/WMA-/MPEG-/ JPEG/DivX-plater
38
Avspilling av JPEG-plater
38
Rengjøring av DVD-spilleren
Deponering
Reparering av feil og forstyrrelser
Ordliste/stikkordfortegnelse
Garanti & service
Importør
38
38
39
40
41
41
Les bruksanvisningen nøye før første gangen apparatet tas i bruk og oppbevar den for senere bruk.
Dersom apparatet gis videre til andre, lever også bruksanvisningen videre.
- 23 -
IB_KH6502_NO_LB3.qxd
07.12.2007
8:35 Uhr
Seite 24
DVD-SPILLER/RADIO KH6502
1. Tekniske spesifikasjoner
Dette apparatet er kontrollert og godkjent i overensstemmelsene med de
grunnleggende kravene og de relevante forskriftene i EMC-direktivet
2004/108/EF og lavspenningsdirektivet 2006/95/EF.
Strømforsyning:
AC 220 V - 240 V ~50 Hz
Wattforbruk :
25 Watt
Wattforbruk
Standby:
0,7 W
TV-standard:
PAL/NTSC
Utgangseffekt:
2 x 2,5 W
Driftstemperatur:
+5 ~ +35 °C
Fuktighet:
5 ~ 90 % (ingen kondensasjon)
Mål
(L x B x H):
241 x 430 x 50 mm
Vekt :
ca 2,1 kg
Beskyttelsesklasse :
II
Frekvensområde radio:
MW (AM):
FM:
540 – 1600 kHz
88 - 108 MHz
2. Påregnet bruk og funksjon
Silvercrest KH 6502 DVD-spiller er utelukkende ment for stasjonær bruk i lukkede
rom. Apparatet er utelukkende ment for privat, ikke-kommersiell bruk.
Apparatet er ment for bruk som et underholdningsapparat for avspilling…
• ... av DVD-videoer i formatene 12 cm (diameter) og 8 cm (diameter)
med land-/regionalkode 2 eller
kjennetegnet med logoen
.
• ...av videoformatene MPEG-4/MPEG-4 ASP og video som er komprimert
med DivX 3.11, DivX 4.x, DivX 5.x, DivX 6.x, multichannel DivX og DivX Pro.
• ... av video-CD-er (VCD-er) og Super Video-CD-er (S-VCD-er) i formatene
12 cm (diameter) og 8 cm (diameter) kjennetegnet med logoen
.
• ... av audio-CD-er i formatene 12 cm (diameter) og 8 cm (diameter)
kjennetegnet med logoen
.
• ... generelt av filformatene CD Audio (.cda), MP3 (.mp3), Windows
Media Audio (.wma), DivX (.avi), Nero Digital (.mp4) og JPEG (.jpg)
på minnemediene CD-R og CD-RW, USB-minnepinner og minnekort av
typene SD og MMC.
For bildeavspilling av DVD, VCD, S-VCD, audio-CD og avspilling av filformatene
MP3, Windows Media Audio og JPEG kan du tilkoble det etterfølgende til
DVD-spilleren SilverCrest KH 6502 …
• Stereo- og mono-TV med TV-formatene PAL eller NTSC og bildeformatene
4:3/16:9.
• LCD/plasmaskjermer eller videoprojektorer hvis disse har de tilsvarende
tilkoblingsmulighetene og tilkobling av en DVD-spiller er tilsiktet/tillatt av
produsenten av avspillingsenheten.
Batteridrift
8 x 1,5 V, type C R14/LR14 (lite cellebatteri)
Fjernkontroll
Batterier :
type AAA/R03 (mikrocellebatteri)
For avspilling av lyd eller musikk kan man benytte eller koble til Silvercrest
KH 6502 DVD-spilleren…
• høyttalere til et TV-apparat som er koblet til DVD-spilleren
• eksterne audiokomponenter som Hi-Fi-anlegg eller mottakere
Videoutgang
Advarsel!
Composite Video cinchterminal
For skader som oppstår av uhensiktsmessig bruk av apparatet overtar
vi intet ansvar og ingen garanti!
Audio-utgang
2 stereo-audio cinchterminaler
3. Leveringsomfang
Audio-inngang
3,5 mm stereojack
–
–
–
–
–
Mikrofoninngang
3,5 mm stereojack
USB-port
Lesbare
USB-minnepinner:
USB1.1 og 2.0 opp til en kapasitet på 1 GB
Minnekortspor
Lesbare minnekort:
SD (1 GB), MMC (1 GB)
- 24 -
DVD-spiller
Strømledning
Infrarødfjernkontroll
2 batterier for fjernkontroll, type AAA (microceller)
Bruksanvisning
IB_KH6502_NO_LB3.qxd
07.12.2007
8:35 Uhr
Seite 25
4. Kontrollelementer
l SKIP UP: en tittel/et kapittel fram, rask spoling framover
SKIP DOWN: en tittel/et kapittel tilbake, rask spoling bakover
A. DVD-spiller forside
q Volumkontroll
w Hodetelefonutgang 3,5 mm
e Bryter FUNCTION: Slå av apparatet, slå over til DVD- eller radiodrift
r Tast DISPLAY: Vise avspillingsinformasjoner
t LCD-display
y Tast STOP,
u
i
o
a
s
d
f
g
h
j
k
l
;
2)
2!
2@
2#
2$
2%
2^
Tast USB/SD/MMC CARD: Stoppe avspillingen/USB/vise minnekortinnhold
Bærehåndtak
Båndvalgbryter
Frekvensbryter
Tast PLAY/PAUSE
Tast SKIP UP: en tittel/et kapittel fram, rask spoling framover
Tast SKIP DOWN: en tittel/et kapittel tilbake, rask spoling bakover
Høyttaler
IR-sensor for fjernkontroll
Minnekortspor for SD- og MMC-kort
Plateskuff
USB-port
OPEN/CLOSE: Åpne/lukke plateskuffen
MIC VOL: Volumkontroll for mikrofon
MIC: Mikrofoninngang 3,5 mm
AUDIO IN: Stereo-audioinngang 3,5 mm
FM ST.: Anvisning for FM-stereomottak (lyser grønt ved stereomottak)
POWER: Power-anvisning (lyser grønt når apparatet er slått på)
Tast AUDIO: Stille inn audiospråk/-kanal
Tast REPEAT: Stille inn repetisjonsfunksjon
Tast MENU: Starter platemenyen
; TITLE: Starte tittelmeny
2) SCREEN ON/OFF: Slå av/på LCD-displayet/stille inn lyshet og farge
5. Sette opp DVD-spilleren
1.
2.
3.
4.
Ta DVD-spilleren og det medleverte tilbehøret forsiktig ut av emballasjen.
Dra beskyttelsesforlien av LCD-displayet.
Plasser DVD-spilleren på et jevnt, flatt og sklisikkert underlag.
Stikk strømledningen på DVD-spilleren inn i tilkoblingen for strømledningen
på baksiden av DVD-spilleren.
Advarsel!
Dersom du ønsker å koble DVD-spilleren til andre apparater, må du vente
med å plugge støpselet i stikkontakten. Vent med det til du har koblet til
de andre apparatene.
Hvis du vil endre type video- eller audiotilkobling, må du først dra støpselet ut av stikkontakten, ellers kan det skje at DVD-spilleren og eventuelt
apparater som er koblet til den får uopprettelige skader på grunn av
spenningstopper!
6. Sikkerhetshenvisninger
•
•
B. DVD-spiller bakside
2& Høyttaler bakside
2* Teleskopantenne
2( Batterihus
3) VIDEO: Composite-videoutgang
3! AUDIO OUT R: Høyre audioutgang
3@ AUDIO OUT L: Venstre audioutgang
3# Tilkobling for strømledning
•
C. Fjernkontroll
q OPEN/CLOSE: Åpne/lukke plateskuffen
w MENU: Starte platemenyen
e SETUP: Starte OSD-meny
r DISPLAY: Blende inn plateinformasjon
t STOP: Avslutte avspilling
y Tast PLAY/PAUSE ,Tast OK: Starte/avbryte avspilling, bekrefte inntasting
u SUBTITLE: Stille inn undertitler
i Talltaster
o AUDIO: Stille inn audiospråk/-kanal
a SEARCH: Starte søkefunksjon
s REPEAT: Stille inn repetisjonsfunksjon
d ZOOM/SLOW: Stille inn bildeforstørring, slow-motion-funksjon
f USB/CARD: USB- eller minnekortavspilling
s Batterihus (på baksiden)
h MUTE: Slå lyden av/på
j ANGLE/PROGRAM: Endre kameraperspektiv/
•
•
Dette apparatet er ikke egnet for barn eller andre personer som har forminskete fysiske, sensoriske eller mentale evner som gjør det nødvendig at
de overvåkes og understøttes når de bruker apparatet. Barn skal overvåkes
slik at de ikke bruker apparatet som et leketøy.
For å unngå at apparatet slås på uforvarende skal du dra støpselet ut av
stikkontakten etter hver bruk og før hver rengjøring.
Undersøk apparatet og alle deler med hensyn til synlige skader. Sikkerhetskonseptet til apparatet kan bare fungere når apparatet er i feilfri tilstand.
Støpselet må alltid være lett tilgjengelig slik at apparatet kan kobles
raskt fra elektrisitetsnettet i nødstilfeller.
Fare for elektriske støt!
•
•
Apparatet må kun kobles til en forskriftsmessig installert og jordet stikkontakt. Nettspenningen må stemme overens med opplysningene på
identifikasjonsskiltet.
Skadete støpsler eller strømledninger må med en gang skiftes ut av autorisert fagpersonale eller kundeservice for å unngå farer.
Ledninger eller apparater som ikke fungerer feilfritt eller har blitt skadet
må med en gang repareres eller skiftes ut av kundeservice.
Aldri dypp apparatet i vann. Bare rengjør det med en lett fuktet
klut.
•
•
•
•
starte programmeringsfunksjonen
k Piltaster
- 25 -
Apparatet må aldri utsettes for regn og må aldri brukes i fuktige eller
våte omgivelser.
Sørg for at strømledningen aldri blir fuktig eller våt under drift.
Apparathuset må ikke åpnes eller repareres. Skjer dette, eksisterer ingen
sikkerhetsgaranti og garantien forfaller.
Beskytt apparatet mot dryppende eller sprutende vann. Derfor må du
ikke plassere væskefylte beholdere (f.eks. blomstervaser) oppå eller ved
siden av apparatet.
IB_KH6502_NO_LB3.qxd
07.12.2007
8:35 Uhr
Seite 26
Brannfare!
•
•
•
•
•
•
•
•
•
Henvisninger for omgang med batterier
Ikke benytt apparatet i nærheten av varme overflater.
Ikke plasser apparatet på steder som er utsatt for direkte sollys, ellers
kan det bli overopphetet og få uopprettelige skader.
Aldri la apparatet stå uten oppsikt mens det er i drift.
Dekk aldri til lufteslissene på apparatet når det er i drift.
Ikke plasser åpne flammekilder, f.eks. stearinlys, oppå eller ved siden
av apparatet.
Apparatet og fjernkontrollen drives med batterier. I omgang med
batterier/akkumulatorer må du observere følgende:
Fare for personskader
•
Eksplosjonsfare!
Kast ingen batterier inn i ild. Batteriene må ikke lades opp.
•
Hold barn unna strømledningen og apparatet. Barn undervurderer ofte
farene som går ut fra elektriske apparater.
Pass på at apparatet står stødig.
I tilfelle apparatet har falt ned eller har blitt skadet, må det ikke tas i bruk
igjen. Apparatet må da sjekkes av kvalifisert personale og repareres
hvis nødvendig.
Batterier må ikke havne i hendene på barn. Barn kan ta batteriene i
munnen og svelge dem.
Fare! Laserstråling!
Apparatet inneholder en "Klasse 1 laser".
• Apparatet må aldri åpnes.
•
•
•
Batteriene må aldri åpnes, loddes eller sveises.
Det er stor fare for eksplosjoner og skader!
Batterier må kontrolleres regelmessig. Tomme batterier kan gi skader
på apparatet.
Ta ut batteriene når du ikke skal bruke apparatet på lengre tid.
Bruk beskyttelseshansker hvis batterier er lekket ut.
Rengjør batterihuset og batterikontaktene med en tørr klut.
Advarsel!
Vi overtar ingen ansvar/garanti for skader på DVD-spilleren som oppstår
på grunn av fuktighetspåvirkning, vanninntrenging eller overoppheting!
7. Legge batterier inn i fjernkontrollen og
DVD-spilleren
• Prøv aldri å reparere apparatet.
• På innsiden av apparatet finnes det usynlig laserstråling. Aldri utsett
deg for laserstrålen.
Henvisning:
7.1. Innlegning av batteriene i fjernkontrollen
1. Åpne batterihuset på baksiden av fjernkontrollen.
2. Legg nå inn de to batteriene av type AAA (mikroceller) som er medlevert
Noen aggressive møbellakker kan angripe gummiføttene til apparatet.
Hvis det er nødvendig må du plassere apparatet på et sklisikkert underlag.
med apparatet inn i batterihuset. Sørg for at batteriene legges inn med
riktig polaritet.
3. Lukk batterihusdekselet igjen.
Uvær!
Bruk av fjernkontrollen
Ved uvær kan apparater som er koblet til strømnettet skades. Derfor er
det viktig alltid å dra støpselet ut av stikkontakten når det er uvær.
For å få feilfri funksjon ved bruk av fjernkontrollen…
• Alltid pek fjernkontrollen rett mot DVD-spilleren når du bruker den.
• Vær sikker på at det ikke er noen hindringer mellom fjernkontrollen og
DVD-spilleren som kan forstyrre mottakingen.
• Aldri bruk fjernkontrollen med mer enn 5 meters avstand fra DVD-spilleren,
ellers kan forstyrrelser oppstå ved bruk av DVD-spiller-funksjonen med fjernkontrollen.
Henvisning angående støtspenninger (EFT/elektrisk
rask overgangsbegivenhet):
I tilfelle en feilfunksjon opptrer på grunn av en elektrisk rask overgangsbegivenhet (støtspenning), må apparatet settes tilbake til forhåndsinnstillinger for å fortsette normal drift. Muligens må strømforsyningen frakobles
og så tilkobles igjen. Batteriene (dersom det er noen i apparatet) må tas
ut og settes inn igjen.
Henvisning om frakobling
FUNCTION-bryteren på dette apparatet vil ikke skille apparatet fullstendig
fra elektrisitetsnettet. Utover dette forbruker apparatet elektrisitet i standbydrift. Hvis apparatet skal skilles fra nettet fullstendig må støpselet trekkes
ut av stikkontakten.
7.2. Legge batterier inn i DVD-spilleren
DVD-spilleren kan drives av batterier. Så snart DVD-spilleren er koblet til
strømnettet med strømledningen, kobles strømforsyningen via batteriene ut.
1. Åpne batterihuset på undersiden av DVD-spilleren.
2. Legg nå 8 batterier av typen C R14/LR14 (lite cellebatteri) inn i batterihuset. Sørg for at batteriene legges inn med riktig polaritet.
3. Lukk batterihusdekselet igjen.
7.3 Bytte batteriene
Hvis kontroll av DVD-spilleren via fjernkontrollen ikke fungerer riktig eller
overhodet ikke fungerer, må batteriene byttes ut.
• Alle batteriene må alltid fornyes for å kunne bruke DVD-spilleren og
fjernkontrollen igjen med full funksjonalitet.
- 26 -
IB_KH6502_NO_LB3.qxd
07.12.2007
8:35 Uhr
Seite 27
8 Koble til et TV-apparat via videoinngang
(Composite Video)
9. Tilkobling av audiokomponenter til
DVD-spilleren
For denne tilkoblingsvarianten må TV-apparatet ha audio/video-cinchterminaler
(Composite Video).
For å kunne koble DVD-spilleren til TV-apparatet via Composite Video, trenger du
en audio/video-RCA (cinch)-ledning.
9.1 Koble Hi-Fi-anlegg eller mottaker til DVD-spilleren
I tillegg til å spille av musikk fra DVD-er, VCD-er/S-VCD-er og audio- og MP3CD-er over høyttalerne på TV-apparatet som DVD-spilleren er koblet til, kan
du også spille av lyd over eksterne audiokomponenter som Hi-Fi-anlegg eller
mottakere.
Krav for tilkoblingen av et Hi-Fi-anlegg
•
•
•
•
Koble den gult markerte VIDEO-OUT-terminalen til den gule VIDEO-terminalen
på TV-apparatet ved hjelp av en audio/video-cinchledning.
Stikk den hvite kontakten på audio/video-cinchledningen inn i cinchterminalen
som er merket AUDIO OUT L på baksiden av DVD-spilleren.
Stikk så den hvite stikkontakten på den andre enden av audio/videocinch-ledningen inn i audioterminalen for den venstre kanalen på TVapparatet.
Stikk den røde kontakten på audio/video-cinchledningen inn i cinchterminalen som er merket AUDIO OUT R på baksiden av DVD-spilleren.
Stikk så den røde stikkontakten på den andre enden av audio/videocinch-ledningen inn i audioterminalen for den høyre kanalen på
TV-apparatet.
Velg passende AV-kanal på TV-en din for avspillingen. Les i bruksanvisningen til TV-apparatet hvordan du stiller inn AV-kanalen.
For å kunne nyte en full lyd ved avspilling av DVD med DVD-spilleren kan
du koble et Hi-Fi-anlegg til DVD-spilleren. Før tilkobling må det med hjelp av
bruksanvisningen til Hi-Fi-systemet undersøkes...
• om Hi-Fi-systemet er egnet for tilkobling til en DVD-spiller; hvis dette er
tilfellet…
• om Hi-Fi-systemet disponerer cinchkontakter; hvis dette er tilfellet kan du
tilkoble Hi-Fi-systemet til DVD-spilleren med en cinchledning.
Koble til et Hi-Fi-anlegg:
•
•
•
•
•
Stikk den hvite kontakten på audio/video-cinchledningen inn i cinchterminalen
som er merket AUDIO OUT L på baksiden av DVD-spilleren.
Stikk så den hvite stikkontakten på den andre enden av audio/videocinch-ledningen inn i audioterminalen for den venstre kanalen på Hi-Fianlegget.
Stikk den røde kontakten på audio/video-cinchledningen inn i cinchterminalen som er merket AUDIO OUT R på baksiden av DVD-spilleren.
Stikk så den røde stikkontakten på den andre enden av audio/videocinch-ledningen inn i audioterminalen for den høyre kanalen på Hi-Fianlegget.
Se etter i bruksanvisningen for opplysninger om hvilken justeringer eventuelt er nødvendige å foreta på Hi-Fi-systemet for å gjengi lyden av en
DVD, VCD/S-VCD, audio- eller MP3-CD via Hi-Fi-systemet.
Henvisning:
For optimal lydopplevelse må du plassere høyttalerne til Hi-Fi-anlegget
til venstre og høyre for DVD-spilleren.
- 27 -
IB_KH6502_NO_LB3.qxd
07.12.2007
8:35 Uhr
Seite 28
10. Betjening
9.2 Spille av lydsignaler fra eksterne apparater
Du kan spille av lydsignaler fra eksterne apparater, f.eks. en bærbar CD/MP3spiller, over høyttalerne på DVD-spilleren.
Koble den høyre og venstre audioutgangen på det eksterne apparatet ved hjelp
av en 3,5 mm stereo-jack til AUDIO IN-terminalen på forsiden av DVD-spilleren.
Når du har koblet stereo-jacken til AUDIO IN-terminalen, slår DVD-spilleren over til
avspilling av lydsignalet fra det eksterne apparatet.
• Plugg stereo-jacken inn i AUDIO IN-terminalen.
• For å gå tilbake til å spille av lyden fra DVD-spilleren, må du trekke stereojacken ut av AUDIO IN-terminalen.
10.1 Aktivere/deaktivere apparatet/Velge lydkilde
Du slår på apparatet når du velger en lydkilde med bryteren FUNCTION:
• DVD/USB/CARD
• OFF
• RADIO
1. Skyv bryteren FUNCTION til posisjonen for ønsket lydkilde.
2. For å slå av apparatet igjen må du skyve bryteren FUNCTION til posisjonen
OFF.
Henvisning:
10.2 Stille inn volumet
Når du har koblet stereo-jacken til AUDIO IN-terminalen, slås LCD-displayet av.
Du kan justere volumet med volumbryteren.
1. For å øke lydstyrken må du skru volumbryteren med klokken.
2. For å redusere volumet må du skru volumbryteren mot klokken.
9.3 Bruke hodetelefoner
Du kan tilkoble hodetelefoner til DVD-spilleren med 3,5 mm stereo-jack.
Hodetelefonterminalen PHONES befinner seg på oversiden av DVD-spilleren.
Hvis du har tilkoblet hodetelefonen, deaktiveres høyttalerne automatisk og
du vil kun høre lyden via hodetelefonene.
• Før du kobler til hodetelefoner må du justere volumet ned til minimum.
• Stikk jackkontakten til hodetelefonene inn i hodetelefonterminalen.
10.3 Slå av lyden
1. Trykk på tasten MUTE for å slå av lyden. På displayet står det MUTE.
2. For å slå på lyden igjen må du trykke på tasten MUTE igjen.
Henvisning:
Forsiktig!
Du kan ikke slå av lyden med tasten MUTE i radiomodus.
Hvis du hører på musikk gjennom hodetelefoner over lengre tid
og med full lydstyrke, kan hørselen din bli skadet!
10.4 Displayfunksjoner
• Rett ut displayet ved å klappe det ut.
Displayet kan dreies 270° med dreieleddet.
9.4 Koble til mikrofon
Du kan koble hodetelefoner til DVD-spilleren med 3,5 mm stereo-jack. Mikrofonterminalen befinner seg på forsiden av DVD-spilleren. Når du har koblet til
mikrofonen, kan du justere volumet til mikrofonen med bryteren MIC VOL på forsiden av DVD-spilleren.
Med mikrofonen kan du f.eks. bruke karaokefunksjonen på DVD-er.
• Plugg jackkontakten på mikrofonen inn i MIC-terminalen.
Slå displayet på og av
1. Hold tasten SCREEN ON trykt inn en liten stund for å slå av LCD-displayet.
2. Hold tasten SCREEN ON trykt inn på ny for å slå på LCD-displayet igjen.
Displayinnstillinger
1. Trykk flere ganger på tasten SCREEN ON for å bytte mellom anvisningene
BRI (Brightness=lyshet) og COL (Color=farge).
2. Med piltastene kan du stille inne lyshets- og fargeverdiene.
3. Dersom du ikke trykker på en tast i løpet av 5 sekunder, blendes displayinnstillingene ut igjen.
- 28 -
IB_KH6502_NO_LB3.qxd
07.12.2007
8:35 Uhr
Seite 29
11. Radiofunksjoner
12. DVD-spillerfunksjoner
LCD-displayet forblir avslått i radiomodus.
• Still bryteren FUNCTION inn på posisjonen DVD/USB/CARD.
LCD-displayet aktiveres og bakgrunnbildet vises.
1. Still bryteren FUNCTION inn på posisjonen RADIO.
2. Rett opp teleskopantennen og trekk den ut. Juster teleskopantennen slik at
Setup-meny i DVD-modus
mottakingen er optimal.
For mottaking av AM-kanaler er en mottakerantenne bygd inn i apparatet.
I radiodrift må hele apparatet dreies helt til mottakingen er best.
3. Still inn mottaksområdet (AM/FM/FM ST.) med båndvalgbryteren.
I innstillingen FM ST. spilles radioprogrammer som kringkastes i stereo
av i stereo. Når radioprogrammet mottas i stereo med full signalstyrke
vil FM stereo-indikatoren FM ST. lyse.
Henvisning:
Hvis stereosignalet er for svak i mottakingsområdet FM ST kan du muligens
forbedre mottaket ved å velge innstillingen FM. I denne innstillingen spilles
lyden av i mono.
4. Still inn den ønskete radiokanalen ved å skru på frekvensbryteren.
Henvisning:
I denne bruksanvisningen er den engelske setup-menyen beskrevet. Du
kan når som helst stille inn menyen på ditt eget språk, slik det er beskrevet
under "Language Setup > OSD Language".
I DVD-modus kan du starte innstillingsmenyen der du foretar bilde- og lydinnstillinger samt aktiverer videre funksjoner. Dersom du foretar endringer i
Setup-menyen, blir disse lagret, selv når apparatet blir slåt av.
• Du kan når som helst stille inn grunninnstillingene i menyen SYSTEM
SETUP > DEFAULT.
• Setup-menyen kan startes under avspilling.
Setup-menyen er delt inn i følgende menyer:
• SYSTEM SETUP
• LANGUAGE SETUP
• VIDEO SETUP
• SPEAKER SETUP
Navigere i menyene
1. Trykk på tasten SETUP for å starte setup-menyen. Hovedmenyen SYSTEM
SETUP vises.
SYSTEM SETUP
TV SYSTEM
LCD MODE
TV TYPE
PASSWORD
RATING
DEFAULT
EXIT SETUP
• Med piltastene og tasten OK foretar du alle innstillingene i
menyene.
2. Med piltastene velger du en meny ved å bevege den gule markeringen under det tilsvarende menysymbolet.
3. Med piltastene velger du i menyen ved å bevege den gule baren
over det du ønsker å velge.
4. Med piltastene bytter du valg i undermenyen og med piltasten går du tilbake et menynivå.
5. Trykk på tasten OK for å bekrefte et valg.
Alle navigasjonsmulighetene innenfor en aktuelt meny angis på den nedre
menykanten.
Gå ut av setup-menyen (EXIT SETUP)
• Du kan når som helst gå ut av setup-menyen ved å trykke på tasten SETUP igjen.
- 29 -
IB_KH6502_NO_LB3.qxd
07.12.2007
8:35 Uhr
Seite 30
Meny SYSTEM SETUP
Det åpne låssymbolet
vises bak inntastingsplassene. Du kan nå stille inn
aldersgrensene i menypunktet RATING.
Når du tar apparatet i bruk for første gang, er passordsperren allerede slått av.
Når du starter setup-menyen for platedrift med tasten SETUP, vises menyen
SYSTEM SETUP.Her kan du stille inn videoutgang og videoformater.
Sånn slår du på passordsperren:
1. Bruk piltasten for å bytte inntastingsplass.
2. Bruk talltastene for å taste inn det fabrikkinnstilte passordet 8200 og
bekreft med tasten OK.
SYSTEM SETUP
TV SYSTEM
LCD MODE
TV TYPE
PASSWORD
RATING
DEFAULT
Det låste låssymbolet
vises bak inntastingsplassene. Nå kan du ikke stille
inn aldersgrensene i menypunktet RATING lenger.
Sånn endrer du passordet:
EXIT SETUP
For å kunne endre passordet må passordsperren være slått av.
1. Bruk piltasten for å bytte inntastingsplass.
2. Bruk talltastene for å taste inn et nytt firesifret passord og bekreft med
tasten OK.
Det låste låssymbolet vises bak inntastingsplassene. Med det nye passordet
kan du slå av passordsperren igjen.
Dersom du har glemt det nye passordet, kan du når som helst slå passordsperren av eller på med det fabrikkinnstilte passordet.
TV SYSTEM
Her stiller du inn TV-normen for videoutgangen.
PAL
TV-norm PAL.
NTSC
TV-norm NTSC.
AUTO
Automatisk innstilling
LCD MODE
RATING
I denne menyen kan du stille inn høyden og bredden til bildevisningen på
LCD-displayet.
4:3:
Avspilling i formatet 4:3
16:9:
Avspilling i formatet 16:9
Noen DVD-er og CD-er (overveiende DVD-er man får tak i på det amerikanske
markedet) er kodet med forvrengte signaler. Ved dette kan DVDer inndeles i
åtte forskjellige klasser for frigivelse.
TV TYPE
SYSTEM SETUP
Her kan du stille inn høyden og bredden for bildevisningen og tilpasse avspillingsenheten som brukes.
4:3/PS:
Velg denne innstillingen for å vise programmer i regulær 4:3
format på en 4:3 TV-skjerm. Programmer i 16:9-format vises uten
forstyrrende linjer på full skjerm, men sidene kappes på venstre
og på høyre side.
4:3/LB:
Viser en film i 16:9 format på en tradisjonell skjerm med 4:3format. Bildet gjengis med svarte bjelker på den øver og den
nedre skjermkanten.
16:9:
Denne innstillingen anbefales hvis du bruker det innebygde
LCD-displayet eller for å vise bildet på en widescreen-TV i
16:9-format.
PASSWORD
Velg dette menypunktet for å slå av eller på passordsperren. For å kunne stille
inn barnesikringen i neste menypunkt RATING, må du ha slått av passordsperren.
• Når passordsperren er slått av, vises det åpne låssymbolet
bak de
fire inntastingsplassene.
• Når passordsperren er slått på, vises det låste låssymbolet
bak de
fire inntastingsplassene.
SYSTEM SETUP
TV SYSTEM
LCD MODE
TV TYPE
PASSWORD
RATING
DEFAULT
TV SYSTEM
LCD MODE
TV TYPE
PASSWORD
RATING
DEFAULT
EXIT SETUP
Anvisning:
For å kunne endre aldersgrensen må passordsperren være slått av.
1. Bruk piltaster for å bytte til høyre spalte.
2. Velg en av de følgende aldersgrensene for å beskytte avspilling av
medier i denne gruppen med et passord og bekreft med tasten OK:
8 ADULT:
7 NC -17:
6 R:
5 PG-R:
4 PG 13:
3 PG:
2 G.:
1 KID SAFE:
kun for voksne;
ikke for ungdommer under 18 år;
for ungdommer under 16 anbefales streng oppsikt
av foreldre.
for ungdommer under 16 anbefales oppsikt av
foreldre.
oppsikt av foreldre anbefales strengt; noen scener
er ikke egnet for ungdommer under 12;
oppsikt av foreldre anbefales;
for alle aldersgrupper;
også egnet for små barn.
Eksempel
Hvis en DVD f.eks. er tildelt klasse 7 eller 8 og du har innstilt klasse 1
til 6 for frigivelse, så vil apparatet gi melding om at passordet må tastes inn.
EXIT SETUP
Sånn slår du av passordsperren:
1. Bruk piltasten for å bytte inntastingsplass.
2. Bruk talltastene for å taste inn det fabrikkinnstilte passordet 8200 og
bekreft med tasten OK.
1 KID SAFE
2G
3 PG
4 PG13
5 PG-R
6R
7 NC-17
8 ADULT
Det er mulig at bare deler av DVD-en, dvs. bestemte scener, er kodet
med en klasse for frigivelse.
3. Slå deretter på passordsperren i menypunktet PASSWORD.
Aldersgrensene er nå stilt inn og kan kun endres dersom passordsperren først
slås av.
- 30 -
IB_KH6502_NO_LB3.qxd
07.12.2007
8:35 Uhr
Seite 31
DEFAULT
Meny VIDEO SETUP
Velg menypunktet DEFAULT og bekreft med tasten OK for å gå tilbake til
fabrikkinnstillingene i DVD-modus.
I denne menyen stiller du inn Brightness (lyshet), Contrast (kontrast), Hue
(fargetone) og Saturation (metning) for plateavspillingen.
EXIT SETUP
VIDEO SETUP
Velg dette menypunktet for å gå ut av setup-menyen.
BRIGHTNESS
CONTRAST
HUE
SATURATION
Meny LANGUAGE SETUP
LANGUAGE SETUP
EXIT SETUP
OSD LANGUAGE
AUDIO LANG
SUBTITLE LANG
MENU LANG
BRIGHTNESS
Bruk piltastene for å stille inn lysheten.
• Trykk deretter på tasten OK for å gå videre.
EXIT SETUP
I denne menyen kan du stille inn språkinnstillingene for menyer og undertitler.
CONTRAST
Bruk piltastene for å stille inn kontrasten.
• Trykk deretter på tasten OK for å gå videre.
OSD LANGUAGE
Her stiller du inn språket som OSD-menyen skal vises i på displayet.
HUE
AUDIO LANG
Bruk piltastene for å stille inn fargetonen.
Jo lenger opp du skyver bryteren, desto varmere blir totalfremstillingen.
Nedover utstråler derimot bildet en kjøligere stemning.
• Trykk deretter på tasten OK for å gå videre.
Her stiller du inn audiospråket som skal brukes standardmessig ved avspilling av
film.
SUBTITLE LANG
Her stiller du inn undertittelspråket som skal brukes standardmessig ved avspilling
av film.
SATURATION
Bruk piltastene for å stille inn fargemetningen.
• Trykk deretter på tasten OK for å gå videre.
MENU LANG
Her stiller du inn diskmenyspråket som skal brukes standardmessig ved avspilling
av film.
EXIT SETUP
EXIT SETUP
Velg dette menypunktet for å gå ut av setup-menyen.
Meny SPEAKER SETUP
I denne menyen stiller du inn stereoutgangen for anleggets høyttalere.
Velg dette menypunktet for å gå ut av setup-menyen.
SPEAKER SETUP
DOWNMIX
EXIT SETUP
DOWNMIX
LT/RT:
Velg denne innstillingen hvis filmen ble opptegnet i Pro Logic
Dolby Digital og du vil høre lyden i kinokvalitet.
STEREO:
Velg dette alternativet for å gjengi den venstre og den høyre lydkanalen på DVD-en. Ved avspilling av CDer gjengis et tradisjonelt
stereosignal.
EXIT SETUP
Velg dette menypunktet for å gå ut av setup-menyen.
- 31 -
IB_KH6502_NO_LB3.qxd
07.12.2007
8:35 Uhr
Seite 32
13. Ta DVD-spilleren i bruk
Etter at du nå…
• har satt opp DVD-spilleren på et egnet sted
• har koblet DVD-spilleren til et TV-apparat med et av de nevnte
tilkoblingsalternativene, dersom dette er ønskelig
• har koblet DVD-spilleren til et Hi-Fi-anlegg eller en mottaker, dersom
dette er ønskelig
• har gjort fjernkontrollen klar til drift ved å legge inn batteriene
• og vet hvordan du starter og betjener OSD-menyen med fjernkontrollen
…er DVD-spilleren nå klar til bruk..
13.1 Legge inn DVD-en
For å spille av en plate med DVD-spilleren:
• Sørg for at DVD-spilleren er klar til bruk.
• Slå på DVD-spilleren.
Når DVD-spilleren og eventuelt tilkoblete apparater (f.eks. en audiokomponent) er klare til bruk og slått på, ser du Silvercrest-logoen på displayet.
Hvis ingen plate er lagt inn i plateskuffen til DVD-spilleren:
På displayet står det No Disc.
• Åpne plateskuffen ved å trykke på tasten OPEN/CLOSE på fjernkontrollen
eller på forsiden av DVD-spilleren. På displayet står det Open.
• Legg platen inn i plateskuffen med den merkete/etiketterte siden oppad.
For dobbeltsidige plater: Siden som du vil spille må vise nedover.
• Etter at du har lagt inn platen, må du igjen trykke på tasten OPEN/CLOSE
på fjernkontrollen eller på forsiden av DVD-spilleren for å lukke plateskuffen.
• Innholdet på platen blir nå lastet; dette kan ta et par sekunder. Imens
står det Loading på displayet.
13.2 Legge inn minnekort/USB-minnepinner med MP3-/
WMA-/DivX-/JPEG-filer
Henvisning:
DVD-spilleren starter alltid i DVD-modus. For å lese minnekort, må du
trykke flere ganger på tasten USB/CARD på fjernkontrollen eller tasten
USB/SD/MMC CARD på apparatet, helt til det står READ CARD på displayet.
DVD-spilleren kjenner igjen filformatene JPEG, MP3, WMA og MPEG4
(DivX).
For å legge inn minnekort av typen SD og MMC i DVD-spilleren:
• Sørg for at DVD-spilleren er klar til bruk.
• Slå på DVD-spilleren.
Når DVD-spilleren er slått på og klar til bruk, ser du Silvercrest-logoen på
displayet.
Hvis ingen plate er lagt inn i plateskuffen på DVD-spilleren: På displayet står
det No Disc.
• Skyv minnekortet inn i minnekortleseren. Følg de følgende trinnene avhengig av typen minnekort du vil spille av.
Advarsel!
Pass alltid på at minnekort skyves inn i minnekortleseren slik det er beskrevet her! Ikke knekk minnekort når de skyves inn i minnekortleseren!
Skyv minnekortene med et lett trykk inn i minnekortleseren så langt det
går.
Hvis ikke minnekortet lar seg skyve inn uten bruk av kraft:
• Kontroller at det virkelig er et minnekort som kan spilles av med DVDspilleren.
Forsøk aldri å skyve minnekort av andre typer inn i minnekortleseren!
• Kontroller om minnekortet er skjøvet inn i minnekortsporet riktige vei.
• Forsøk aldri å skyve minnekort inn i minnekortsporet med vold,
ellers kan DVD-spilleren, minnekortet og data som er på minnekortet ta
skade!
Støttete minnekorttyper og kapasiteter.
Minnekort av typen SD (1 GB) og MMC (1 GB) kan spilles av.
Mappestrukturer og filformater som støttes
- 2 mappenivåer støttes
- I det hele må det ikke være mer enn 10 mapper (maks. 5 mapper på det
andre mappenivået)
- Maksimum 100 filer på lagringsmediet støttes
- Mapper med forskjellige filformater støttes ikke
- For JPEG-filer med en størrelse på over 1 MB kan det oppstå feilaktige
gjengivelser på skjermen.
- 32 -
IB_KH6502_NO_LB3.qxd
07.12.2007
8:35 Uhr
Seite 33
MultiMediaCard-/SecureDigital-minnekort (MMC/SD)
MultiMediaCard-/SecureDigital-minnekort må skyves inn i minnekortleseren.
Skyv MMC-/SD-minnekort rett fram inn i minnekortleseren med kontaktene
foran.
Derved må...
siden til minnekortet der kontaktene er vende nedover og
det skjeve hjørnet på minnekortet peke til høyre.
14. Spille DVD-er, VCD-er eller S-VCD-er
For å bruke DVD-spilleren til å spille en DVD/VCD/S-VCD…
• Sørg for at DVD-spilleren er klar til bruk.
• Slå på DVD-spilleren.
Når DVD-spilleren og eventuelt tilkoblete apparater (f.eks. en audiokomponent)
er klare til bruk og slått på, ser du Silvercrest-logoen på displayet:
USB-minnepinner (USB)
DVD-spilleren støtter USB-minnepinner 1.1 og 2.0 opp til en kapasitet på 1 GB.
USB-minnepinner må skyves inn i USB-porten.
•
Åpne plateskuffen på forsiden av DVD-spilleren ved å trykke på tasten
OPEN/CLOSE på forsiden av DVD-spilleren eller på fjernkontrollen.
På displayet står det Open.
•
Legg en DVD/VCD/S-VCD inn i plateskuffen med den merkete/etiketterte siden opp.
• Trykk igjen på OPEN/CLOSE på forsiden av DVD-spilleren eller på fjernkontrollen for å lukke plateskuffen.
Det står Close på displayet mens plateskuffen lukkes.
•
Trykk på tasten USB/CARD på fjernkontrollen eller tasten USB/SD/MMC CARD
på apparatet, helt til det står READ USB på displayet.
Denne fremgangsmåten gjelder også for de enkelte minnekortene.
•
•
Innholdet av DVD/VCD/S-VCD-en som er lagt inn blir nå lastet; dette
kan ta et par sekunder. Imens står det Loading på displayet.
Gjengivelsen av DVD/VCD/S-VCDen som er lagt inn starter automatisk.
Henvisning:
Henvisning:
DVD-, VCD- og S-VCD-er som skal spilles av med DVD-spilleren har
muligens en landkode. Denne er trykt på DVD-omslaget.
Dersom et minnekort eller en USB-minnepinne ikke inneholder noen
lesbare filer, kan du ikke velge minnekort- eller USB-funksjonen.
Kun DVD/VCD/S-VCD-er med landkoden 2 kan spilles av på DVD-spilleren.
13.3 Ta ut minnekort/ USB-minnepinner
Hvis ingen landkode er trykt på omslaget til en DVD/VCD/S-VCD…
Minnekort/USB-minnepinner skal bare fjernes når minnekortleseren/USB-porten
er deaktivert. Slik kan eventuelle skader eller datatap unngås.
• For å gå tilbake til DVD-modus må du trykke flere ganger på tasten
USB/CARD på fjernkontrollen eller tasten USB/SD/MMC CARD på apparatet,
helt til det står DVD på displayet.
• Fjern nå minnekortet/USB-minnepinnen fra minnekortleseren/USB-porten.
• men symbolet
spilleren
, så kan DVD/VCD/S-VCD-en spilles av på DVD-
• så kan DVD/VCD/S-VCD-en eventuelt ikke spilles av på DVD-spilleren.
Dette kan du sjekke ved å forsøke å spille DVD-en.
Avhengig av DVD/VCD/S-VCD-en som er lagt inn er det mulig at innholdet
på DVD/VCD/S-VCD-en ikke spilles av med en gang, og at en valgmeny
vises på skjermen først.
I dette tilfellet bruker du piltastene
på fjernkontrollen for å velge
menypunktet som starter avspilling av filmen.
• Trykk på tasten PLAY/PAUSE for å starte avspillingen av filmen.
På displayet blendes det raskt inn Play.
- 33 -
IB_KH6502_NO_LB3.qxd
07.12.2007
8:35 Uhr
Seite 34
Starte, stoppe og avbryte avspilling
SKIP-funksjon (kapittel/tittel fram/tilbake)
Avhengig av den innlagte platen er det mulig at innholdet ikke spilles av med
en gang, men at du ser en valgmeny på displayet
• I så fall bruker du piltastene for å velge menypunktet som starte
avspillingen av filmen.
• Trykk på tasten PLAY/PAUSE for å starte avspillingen av filmen.
Henvisning:
Denne funksjonen er muligens ikke tilgjengelig for alle DVD/VCD/S-VCD-er!
Dersom du forsøker å utføre utilgjengelige funksjoner, vises meldingen
"INVALID KEY" på displayet.
• Med tasten SKIP DOWN/SKIP UP kan du innenfor filmen på den innlagte
DVD/VCD/ S-VCD-en under avspillingen bytte tilbake til forrige kapittel/
tittel eller til begynnelsen av neste kapittel/tittel. På displayet står det PREV
eller NEXT.
Det valgte kapittelet/den valgte tittelen spilles av med en gang.
Stoppe avspillingen (PAUSE)
For å stanse avspillingen:
• Under avspillingen trykker du på tasten PLAY/PAUSE. På displayet står det
PAUSE.
På displayet ser du stillbildet av scenen som nettopp har blitt stanset.
• For å fortsette avspillingen av filmen trykker du på tasten PLAY/PAUSE.
Søk forover/bakover
• Hold tasten SKIP DOWN/SKIP UP trykt en liten stund under avspillingen for å
starte et søk bakover/framover.
• Trykk på tasten SKIP DOWN/SKIP UP flere ganger for å bruke følgende søkehastigheter:
Stoppe avspillingen (STOP)
Trykk på tasten STOP for å stoppe avspillingen.
Resume-funksjon
Når du har stoppet avspillingen av DVD/VCD/S-VCD-en som er lagt inn ved
å trykke på tasten STOP en gang, vil DVD-spilleren automatisk lagre stedet der
avspillingen ble avbrutt. Denne funksjonen heter „Resume-funksjon“.
Det står PRE STOP (Preliminary Stop=foreløpig stopp) på displayet.
• Så snart du igjen trykker på tasten PLAY/PAUSE, fortsetter avspillingen på
det lagrede stedet.
• Når du trykker på tasten STOP for andre gang, sletter du det lagrede stedet
der avspillingen ble avbrutt.
• Så snart du trykker på tasten PLAY/PAUSE igjen, vil avspillingen av
DVD/VCD/S-VCD-en som er lagt inn begynne på begynnelsen.
Henvisning:
Mens apparatet er i søkemodus vil ingen lyd gjengis.
• For å fortsette avspillingen av filmen på det valgte stedet i normal hastighet må du trykke på tasten PLAY/PAUSE under søket.
Henvisning:
Ved avspilling av MPEG4-filer kan hastigheten på fram- og tilbakespolingen
være innskrenket. Dette er filavhengig og ingen feilfunksjon på apparatet.
Slow-motion-funksjon (kun DVD, VCD, SVCD og DivX)
• Hold tasten ZOOM/SLOW raskt inne under avspillingen for å stille avspillingen
inn på slow-motion. Trykk på tasten ZOOM/SLOW flere ganger for å bruke
følgende slow-motion-hastigheter:
Henvisning:
Under slow motion-avspilling vil ingen lyd gjengis.
• For å fortsette avspillingen i vanlig hastighet trykker du på tasten PLAY/PAUSE
under den langsomme avspillingen.
Henvisning:
For VCD-er, SVCD-er og MPEG4-filer er ikke slow-motion-funksjonen
bakover støttet.
- 34 -
IB_KH6502_NO_LB3.qxd
07.12.2007
8:36 Uhr
Seite 35
Bildeforstørrelse (zoom)
REP ALL
Henvisning:
Denne funksjonen er muligens ikke tilgjengelig for alle DVD/VCD/S-VCD-er!
Dersom du forsøker å utføre utilgjengelige funksjoner, vises meldingen
"INVALID KEY" på displayet.
REP DIR
OFF
Under avspillingen av en innlagt DVD/VCD/S-VCD kan du forstørre og forminske bildet på displayet i tre nivåer.
• Trykk flere ganger på tasten ZOOM/SLOW for å bruke følgende forstørrelser
eller forminskinger:
REP A-
REP A-B
Med piltastene kan utsnittet av forstørrelsen forskyves.
Kameraposisjon (kun DVD)
A-B CANCEL
Velg REP ALL for å repetere alle titlene på platen - altså hele
platen - helt til repetisjonen blir slått av eller avbrytes med to
trykk på tasten STOP.
Når du har lagt inn en plate som inneholder mapper, kan du
med dette valget repetere innholdet i den aktuelle mappen så
lenge du ønsker.
For å slå av den repeterte avspillingen må du trykke flere
ganger på tasten REPEAT under avspillingen helt til det står
OFF på displayet.
Med denne funksjonen kan du repetere en valgt sekvens
innenfor et kapittel på en aktuell avspilt plate. Velg denne
muligheten når den ønskede begynnelsen på sekvensen blir
avspilt.
Velg denne muligheten når slutten på den ønskede sekvensen blir avspilt. Pass på at begynnelsen og slutte på sekvensen
må ligge innenfor samme kapittel. Den repeterte avspillingen
av den valgte sekvensen begynner med en gang.
Sekvensen blir repetert helt til A-B CANCEL velges bort.
Henvisning:
Denne funksjonen er muligens ikke tilgjengelig for alle DVD/VCD/S-VCD-er!
Dersom du forsøker å utføre utilgjengelige funksjoner, vises meldingen
"INVALID KEY" på displayet
Mange filmer på DVD inneholder kapitler ble tatt opp samtidig fra ulike synsvinkler. På filmer med slike kapitler, kan du betrakte dette kapittelet fra ulike
perspektiver.
• Da må du under avspillingen av den innlagte DVD-en trykke raskt på tasten
ANGLE/PROGRAM på fjernkontrollen. Med ethvert videre trykk på tasten
ANGLE/PROGRAM byttes det til en av de tilgjengelige synsvinklene.
Direkte tittel-/sporvalg
For å velge en tittel/et spor på platen direkte må du taste inn tittel-/spornummeret med talltastene.
Dersom det er mer enn 9 titler, taster du inn de tilsvarende tallene etter hverandre.
Eksempel:
Tast inn tallet 1 og deretter tallet 2 for å spille av tittel/spor 12.
Direkte kapittel-, tittel- eller tidsvalg med søkefunksjonen
Repetisjonsfunksjon for DVD, VCD, SVCD og audio-CD
Henvisning:
Med repetisjonsfunksjonen kan du …
...på DVD-er repetere enten tittel eller kapittel.
...på VCD/S-VCD-er repetere enkelte titler, en mappe eller hele VCD/S-VCD-en.
... på audio-CD-er repetere enkelte titler eller hele CD-en.
Denne funksjonen er muligens ikke tilgjengelig for alle DVD/VCD/S-VCD-er!
Dersom du forsøker å utføre utilgjengelige funksjoner, vises meldingen
"INVALID KEY" på displayet.
Repetisjonsfunksjon
• Under avspillingen må du trykke flere ganger på tasten REPEAT.
På displayet står det REP med en av de følgende anvisningene:
CHAPTER
Velg CHAPTER for å repetere det kapittelet som spilles av i
det øyeblikket helt til repetisjonen blir slått av eller avbrytes
med to trykk på tasten STOP.
TITLE
Velg TITLE for å repetere den tittelen som spilles av i øyeblikket
helt til repetisjonen blir slått av eller avbrytes med to trykk på
tasten STOP.
REP1
Velg REP1 for å repetere det sporet som spilles av i øyeblikket
helt til repetisjonen blir slått av eller avbrytes med to trykk på
tasten STOP.
Dersom du ikke ønsker å spille av hele platen, kan du velge ut et bestemt
kapittel/en tidsposisjon.
• Trykk under avspillingen på tasten SEARCHfor å blende inn følgende anvisning, avhengig av medium:
Med piltastene velger du et av de følgende inntastingsfeltene og
taster så inn kapittel-, tittel- eller spornummer, alternativt et tidspunkt inn med
talltastene.
Bekreft inntastingen med tasten OK .
DVD
TT:
CH:
Skriv her inn et tittelnummer, der avspillingen skal starte.
Skriv her inn et kapittelnummer der avspillingen skal starte.
Skriv her inn en tidsposisjon for den aktuelle tittelen der avspillingen
skal starte.
CD/VCD/SVCD
Trk :
Skriv her inn et spornummer der avspillingen skal starte.
Skriv her inn en tidsposisjon for den aktuelle tittelen der avspillingen
skal starte.
- 35 -
IB_KH6502_NO_LB3.qxd
07.12.2007
8:36 Uhr
Seite 36
Anvisningsfunksjoner
Starte DVD-meny
Henvisning:
Vise plateinformasjon
Denne funksjonen er muligens ikke tilgjengelig for alle DVD/VCD/S-VCD-er!
Dersom du forsøker å utføre utilgjengelige funksjoner, vises meldingen
"INVALID KEY" på displayet.
Henvisning:
Denne funksjonen er muligens ikke tilgjengelig for alle DVD/VCD/S-VCD-er!
Dersom du forsøker å utføre utilgjengelige funksjoner, vises meldingen
"INVALID KEY" på displayet.
Med denne funksjonen kan du blende inn samtlige tilgjengelige informasjoner
på displayet for den innlagte DVD/VCD/S-VCD-en under avspillingen.
• Trykk flere ganger på tasten DISPLAY under avspilling for å blende inn
følgende informasjoner etter hverandre:
For DVD-er:
I mange filmer på DVD finnes det en hovedmeny på platen som, ved siden
av valget å spille av hovedfilmen, f.eks. gjør det mulig å...
• velge språk for undertittel og filmlyd
• velge kapitler direkte
• spille av bonusmaterialer til filmen (bakgrunnsinformasjoner, "Filmen blir
til" osv.)
Dersom en slik meny er tilgjengelig på DVD-en du har lagt inn i plateskuffen,
kan du trykke på tasten MENU under avspilling for å starte menyen.
• De enkelte menypunktene kan du velge med å trykke på piltastene
; trykk på tasten PLAY/PAUSE for å bekrefte det valgte menypunktet.
Trykk på tasten MENU igjen for å gå tilbake til avspillingen.
• avspilt tid i aktuelle kapittel
Henvisning:
Når du har avbrutt avspillingen ved å trykke to ganger på tasten STOP
(avspillingsstopp uten gjenopptakelsesfunksjon), er det ikke mulig å
starte hovedmenyen på platen.
• audiospråk, dolbyinnstilling, undertittelspråk og kameraposisjon
• resterende tid i aktuelle kapittel
• avspilt tid i aktuelle tittel
• resterende tid i aktuelle tittel
For VCD/SVCD/DivX/MPEG-CD-er
Playback Control (PBC) for VCD/SVCD-er
Mange VCD/S-VCD-er har Playback Control (forkortet til „PBC“). Playback
Control betegner en hovedmeny der man kan betjene ulike funksjoner på
VCD/S-VCD-en.
Dersom VCD/S-VCD-en i plateskuffen har PBC, så må du først aktivere funksjonen for å kunne blende inn menyen.
For å aktivere PBC…
• Trykk på tasten MENU en gang til.På displayet står det PBC: OFF.
• Trykk på tasten MENU en gang til.På displayet står det PBC: ON. PBC ier
slått på. Hovedmenyen på platen kan startes med tasten MENU eller TITLE.
Henvisning:
• avspilte tid i aktuelle tittel/spor
• resterende tid i aktuelle tittel
Hvis du aktiverer PBC under avspilling kan det skje at avspillingen avbrytes
og vender tilbake til begynnelsen eller hovedmenyen.
Blende inn og ut undertittel (kun DVD/VCD/SVCD)
Henvisning:
Blende ut plateinformasjoner
Denne funksjonen er muligens ikke tilgjengelig for alle DVD/VCD/S-VCD-er!
Dersom du forsøker å utføre utilgjengelige funksjoner, vises meldingen
"INVALID KEY" på displayet.
• For å blende ut plateinformasjonen trykker du igjen på tasten DISPLAY.
Dersom filmen på den innlagte DVD/VCD/S-VCD-en har undertittel, kan du
blende den inn på displayet under avspillingen ved å trykke på tasten SUBTITLE.
• Ved første trykk på tasten SUBTITLE blendes undertittelen inn i det første
tilgjengelige språket på displayet.
• Med hvert videre trykk på tasten SUBTITLE blendes undertitlene i andre
tilgjengelige språk inn etter hverandre på displayet.
På displayet blendes nummeret på det aktuelle innblendede undertittelspråket
inn (f.eks. "6" for det tilgjengelige undertittelspråket).
- 36 -
IB_KH6502_NO_LB3.qxd
07.12.2007
8:36 Uhr
Seite 37
• Når det siste tilgjengelige undertittelspråket er blendet inn, kan du slå av
undertittelfunksjonen ved å trykke på tasten SUBTITLE igjen. På displayet står
det OFF.
Endre avpillingsspråk (kun DVD/VCD/SVCD)
15. Vise MP3-/WMA-/JPEG-/AVI-/MPEG-/
og DivX-filer
• Legg lagringsmediet som MP3-, WMA-, JPEG-, AVI-, MPEG- eller DivX-filene
er på inn i plateskuffen.
Innholdet av dette mediet vises i displayet:
Henvisning:
Denne funksjonen er muligens ikke tilgjengelig for alle DVD/VCD/S-VCD-er!
Dersom du forsøker å utføre utilgjengelige funksjoner, vises meldingen
"INVALID KEY" på displayet.
Visning av MP3-filer
• På mange filmer på DVD/VCD/S-VCD kan du velge et annet avspillingsspråk under avspillingen ved å trykke på tasten AUDIO.
• Ved første trykk på tasten AUDIO slås det første tilgjengelige avspillingsspråket
seg på. Med hvert nye trykk på tasten AUDIO slås de andre tilgjengelige
avspillingsspråkene på etter hverandre.
På displayet blendes det innkoblete avspillingsspråket og lydformatet
(z. B. 5.1CH).
SUB FOLDER
Programmeringsfunksjon
Visning av JPEG-filer
Du kan programmere en spillerekkefølge for titlene som er tilgjengelige på
DVD, VCD, S-VCD-platen.
Trykk under avspillingen på tasten ANGLE/PROGRAM for å blende inn følgende
vindu:
Programmeringsvindu
SUB FOLDER
Visning av AVI-, MPEG- og DivX-filer
Programplassene 1-16 er listet opp. Hver programplass inneholder inntastingsfelt
for en tittel (T) og et kapittel(C).
1. Bruk piltastene for å velge inntastingsfeltet T for tittelen.
2. Bruk talltastene for å taste inn nummeret på tittelen som skal spilles av
først.
3. Bruk piltastene for å velge inntastingsfeltet C for kapittelet.
4. Bruk talltastene for å taste inn nummeret på kapittelet som skal spilles av først.
5. Bruk piltastene for å velge andre programplasser og tast inn
tittel- og kapittelnummer for programplassen.
• For å slette programlisten velger du Clear og trykker på tasten OK.
• For å avbryte programmeringsfunksjonen trykker du på tasten ANGLE/
PROGRAM.
6. Start avspillingen av programplassene ved å velge Play og trykke på
tasten OK .
Under programmert avspilling står det PROGRAM PLAY på displayet.
Programlisten slettes når du trykker på tasten STOP drücken.
SUB FOLDER
• Til venstre er mappene listet opp (mappevindu) og til høyre filene (filvindu).
Mapper symboliseres ved symbolet
.
• Nede til høyre vises formatene som er tilgjengelige på minnemediet
(MP3, JPEG eller MPEG/AVI/DivX).
• Bruk piltastene for å velge en mappe og trykk på tasten PLAY/PAUSE.
Innholdet i mappen vises i filvinduet.
• For å gå til et høyere mappenivå, velger du symbolet
med inntastingen
„..“ og trykker på tasten PLAY/PAUSE.
• Bruk tasten for å bytte til det høyre området, bruk piltastene for å
velge en fil og trykk på tasten PLAY/PAUSE. Musikkfilen/videofilen spilles av,
eller JPEG-bildet vises.
- 37 -
IB_KH6502_NO_LB3.qxd
07.12.2007
8:36 Uhr
Seite 38
Avspilling av MP3-/ WMA-/MPEG- og DivX-plater
• Velg en fil ved hjelp av piltastene . Ved å trykke på tasten
PLAY/PAUSE bekrefter du valget. Avspillingen starter med en gang.
Ved avspilling av musikk- eller videofiler kan de etterfølgende funksjonene
brukes:
Play/Pause
Se „14 Spille av DVD-er, VCD-er eller SVCD-er“
16. Rengjøring av DVD-spilleren
Rengjør huset på DVD-spilleren utelukkende med en lett fuktet klut og mildt
såpevann. Pass på at ingen fuktighet kommer inn i DVD-spilleren under rengjøringen!
Rengjør innsiden av plateskuffen - dersom det er nødvendig - utelukkende
med en ren, tørr kost (f.eks. objektivkost, fås kjøpt i fotoforretninger). Aldri
rengjør innsiden av plateskuffen med væske!
Advarsel!
Stop
Dersom det trenger fuktighet inn i DVD-spilleren, er det fare for elektrisk
støt! Utenom det kan DVD-spilleren få uopprettelige skader!
Se „14 Spille av DVD-er, VCD-er eller SVCD-er“
Skip
Se „14 Spille av DVD-er, VCD-er eller SVCD-er“
17. Deponering
Search
Kaste apparatet
Se „14 Spille av DVD-er, VCD-er eller SVCD-er““
Kast aldri apparatet i den alminnelige husholdningssøppelen.
Dette produktet ligger under de europeiske retningslinjene i EF-direktiv
2002/96/EC om kasserte elektriske og elektroniske produkter (EE-avfall).
Slow (kun ved MPEG- og DivX-filer)
Se „14 Spille av DVD-er, VCD-er eller SVCD-er““
Zoom (kun for JPEG-, MPEG- og DivX-filer)
Se „14 Spille av DVD-er, VCD-er eller SVCD-er““
Kast apparatet via et godkjent avfallsmottak eller via kommunalt mottak for
spesialavfall.
Ta hensyn til de gjeldende forskriftene. I tvilstilfeller, kontakt det lokale renholdsverket.
AB Repeat
Kaste batteriene!
Se „14 Spille av DVD-er, VCD-er eller SVCD-er““
Batterier skal ikke kastes i husholdningsavfallet. Hver forbruker har plikt til å
levere batterier/akkumulatorer som spesialavfall (returpunkt), eller til en
elektrobutikk.
Denne forpliktelsen gjelder for å sørge for at batterier kastes på en miljøvennlig
måte.
Batterier/akkumulatorer må bare returneres i helt utladet tilstand.
Repetisjonsfunksjon for MP3-/WMA-/MPEG-/
JPEG/DivX-plater
Trykk flere ganger på tasten REPEAT under avspillingen for å bruke følgende
repetisjonsfunksjon (den innstilte funksjonen vises på displayet):
REPETERE 1
Uendelig repetisjon av den aktuelle tittelen/bildet.
REPETERE
MAPPE
Repeter den aktuelle mappen.
REPETERE
ALLE
Repeterer alle titlene på platen eller filholderen.
Fjerne emballasjen
Kildesorter all emballasje før du kaster den.
Avspilling av JPEG-plater
• Bruk piltastene for å markere et bilde og trykk på tasten PLAY/PAUSE
for å åpne bildet.
Bildet vises på displayet.
Etterpå skifter visningen til det neste tilgjengelige bildet på platen/i mappen.
• For å vise det aktuelle bildet lenger, trykker du på tasten PLAY/PAUSE.
• For å fortsette avspillingen trykker tu på tasten PLAY/PAUSE.
• Du kan starte et bilde direkte ved å taste inn filnummeret til bildet med talltastene og deretter bekrefte med tasten PLAY/PAUSE .
• Bruk piltastene for å rotere bildet under avspilling i 90° trinn.
• Bruk piltastene for å speile bildet horisontalt eller vertikalt under
avspilling.
Velge lysbildeframvisningsoverganger :
Du kan velge ulike overganger for bytte fra et bilde til det neste.
• Trykk under lysbildeframvisningen på tasten ANGLE/PROGRAM helt til navnet
på overgangen vises øverst i venstre hjørne.
Forstørre og forminske bildeanvisningen
• Med tasten ZOOM kan du forstørre eller forminske bildet.
- 38 -
IB_KH6502_NO_LB3.qxd
07.12.2007
8:36 Uhr
Seite 39
D Se etter i bruksanvisningen for TV-apparatet om det eventuelt er nødvendig
18. Reparering av feil og forstyrrelser
E
Displayet viser ingenting/DVD-spilleren viser ingen funksjon, selv
om den er slått på.
A Kontroller om strømledningen er koblet ordentlig til stikkontakten.
B Kontroller at stikkontakten der strømledningen til DVD-spilleren er satt inn
C
D
Intet 4:3 eller 16:9-bilde
A Les bruksanvisningen til TV-apparatet for å finne ut hvilket bildeformat
har strøm ved å koble til et annet apparat. Stikk strømledningen til DVDspilleren inn i en annen stikkontakt.
Kontroller at displayet er slått av. Trykk på tasten SCREEN ON/OFF på fjernkontrollen.
Slå av DVD-spilleren med bryteren FUNCTION og vent i ti sekunder. Slå
DVD-spilleren bare på igjen med bryteren FUNCTION.
B
B
annen plate.
Land-/regionalkoden på den innlagte DVD/VCD/S-VCD-en stemmer
ikke overens med regional-/landkoden til DVD-spilleren. DVD/VCD/
S-VCD-en kan da ikke spilles av med DVD-spilleren.
C
D
Innlagt plate blir ikke avspilt
Avspillingsspråket/undertittelspråket som er innstilt i OSD-menyen er ikke tilgjengelig på platen som er lagt inn i apparatet.
En eller flere funksjoner kan ikke aktiveres.
Den valgte funksjonen er eventuelt ikke tilgjengelig på alle DVD/VCD/
S-VCD-er! Når du prøver å utføre en utilgjengelig funksjon, vises anvisningen
INVALID KEY på displayet.
Intet bilde eller kun svart/hvitt-bilde
A Kontroller om alle forbindelseskablene mellom DVD-spilleren og TV-ap-
Ingen taster på apparatet eller fjernkontrollen fungerer/andre feilfunksjoner
A Slå DVD-spilleren av med bryteren FUNCTION. Vent i ti sekunder og slå
DVD-spilleren på igjen med bryteren FUNCTION.
B Dersom forstyrrelsen fremdeles er der etterpå: Sett DVD-spilleren tilbake
paratet (eller videoprojektoren) er plugget inn i de tilsvarende kontaktene.
Kontroller om innstillingene i OSD-menyen passer til tilkoblingsvarianten
du har brukt for å tilkoble DVD-spilleren til TV-apparatet (eller videoprojektoren).
til fabrikkinnstillinger.
Ta kontakt med en av våre servicepartnere i nærheten av der du bor dersom...
• de nevnte funksjonsfeilene ikke lar seg reparere som beskrevet, eller
• andre enn de nevnte funsjonsfeilene opptrer
I denne sammenheng henvises det til kapittel 8: „Tilkobling av DVDspilleren til et TV-apparat“.
C
Se etter i bruksanvisningen for TV-apparatet (eller videoprojektoren) om
det eventuelt er nødvendig med innstillinger på TV-apparatet (eller videoprojektoren) for å bruke DVD-spilleren sammen med TV-apparatet.
Se kapittel 20 "Garanti & service".
Ingen lyd
A Kontroller om DVD-spilleren er stilt på lydløs.
B Kontroller om alle koblingsledningene mellom DVD-spilleren og eventuelt
C
tig polaritet.
Kontroller om batteriene i fjernkontrollen er utbrukt, og skift ut begge
batterier hvis det er nødvendig.
Vær sikker på at det ikke er noen hindringer mellom fjernkontrollen og
DVD-spilleren som kan forstyrre mottakingen.
Ikke gå lenger bort enn fem meter fra DVD-spilleren med fjernkontrollen.
Avspillingsspråket eller undertittelspråket tilsvarer ikke innstillingene
i OSD-menyen
Eventuelt har en kondensvannfilm dannet seg på laseravtastningslinsen til
DVD-spilleren. Dette kan spesielt være tilfellet når DVD-spilleren har vært
utsatt for sterke temperaturforskjeller.
I dette tilfellet må DVD-spilleren stilles opp i tørre omgivelser med vanlig romtemperatur. Ta først ut en plate som eventuelt er lagt inn i skuffen. La DVD-spilleren deretter stå innkoblet i minst en time uten at den brukes for å fjerne kondenseringen som har dannet seg i apparatet.
B
TV-skjermen har.
Kontroller om innstillingene i OSD-menyen passer til det tilgjengelige
bildeformatet på TV-apparatet.
Fjernkontrollen virker ikke
A Kontroller om batteriene i fjernkontrollen er satt inn i batterihuset med rik-
Displayet viser „No Disc“ selv om det er plate i skuffen
A Platen er skitten, skrapet eller skadet. Rengjør platen eller legg inn en
B
med innstillinger på TV-apparatet for å bruke DVD-spilleren sammen
med TV-apparatet.
Se etter i bruksanvisningen for en eventuelt tilkoblet audiokomponent om
det er nødvendig å foreta innstillinger på audiokomponenten for å bruke
den sammen med en DVD-spiller.
tilkoblete audiokomponenter er plugget godt inn i de tilsvarende terminalene.
Kontroller om innstillingene i OSD-menyen passer til tilkoblingsvarianten
du har brukt for å tilkoble audiokomponentene til DVD-spilleren..
Se i kapittel 9: „Tilkobling av audiokomponenter til DVD-spilleren“.
- 39 -
IB_KH6502_NO_LB3.qxd
07.12.2007
8:36 Uhr
Seite 40
19. Ordliste/stikkordfortegnelse
Audio-CD
Audio-CD-er inneholder utelukkende audiodata; disse kommer også i formatene 8 cm og 12 cm (diameter). Avspillingstiden for audiodata som er lagret
på dem er 20 minutter (8 cm-format) eller 74 minutter (12 cm-format).
På audio-CD-er lagres audiodata i CDA-formatet.
Hva er DVD-er, VCD-er og S-VCD-er?
DVD-er
MP3
DVD er den engelske forkortelsen for „Digital Versatile Disc“. DVD-er brukes
for lagring av audio- og videodata; de kommer i formatene 8 cm og 12 cm
(diameter). DVD-er har en spilletid på opptil åtte timer for audio- og videodata på grunn av deres økete lagringskapasitet sammenlignet med CD-R/CD-RW.
MP3 henviser til en metode for komprimering av audiodata som ble utviklet
av Fraunhofer-instituttet. Musikkstykker som er komprimert i MP3-format har
kun en brøkdel av deres opprinnelige størrelse, og dermed kan mye mer musikk
lagres på CD-R/CD-RW enn på audio-CD-er fra handelen, der audiodata er
lagret i CDA-format.
VCD/S-VCD
Med „Video-CD“ (VCD) og „Super Video-CD“ (S-VCD) betegnes to metoder
for komprimering, dvs. plassparende lagring av filmer på CD. VCD og S-VCD
finnes i formatene 8 cm og 12 cm (diameter). Deres minnekapasitet er mye
mindre en kapasiteten på en DVD. Derfor har de bare en avspillingstid for
audio- og videodata som er lagret på dem på 20 minutter (8 cm-format) eller
74 minutter (12 cm-format).
VCD-er finnes i to versjoner:
• På VCD-er/S-VCD-er versjon 1.1 kan bare audio- og videodata spilles av.
• På VCD-er/S-VCD-er versjon 2.0 kan PBC (Playback Control)-funksjoner
brukes. I tillegg kan stasjonære bilder spilles av i høy oppløsning.
WMA
WMA (engelsk for „Windows® Media Audio“) er et filformat for audiodata
utviklet av Microsoft®.
JPEG
JPEG (engelsk, „Joint Photographics Expert Group“) betegner et grafikkformat
som er utviklet av organisasjonen med det samme navnet og som er ganske
vanlig. I dette formatet vil fargeskalaer eller monokromskalaer komprimeres.
DivX
Playback Control (PBC)
DivX er et kodingsformat for video og multimediale data, utviklet av firmaet
DivX Networks, Inc.
VCD/S-VCD-er versjon 2.0 disponerer en funksjon som heter Playback Control
(„PBC“). Da er en hovedmeny tilgjengelig på VCD/S-VCD-en som kan brukes
for å betjene forskjellige funksjoner på VCD/S-VCD-en.
MPEG
MPEG („Moving Picture Experts Group“) betegner et videokomprimeringsformat.
Hva er titler og kapitler?
Titler er navnet på de største enhetene av bildenheter og lydenheter på DVD-er;
på mange DVD-er har hovedfilmen tittelnummer 01. For bonusmateriale
(f.eks. filmtrailer, bakgrunninsformasjoner osv.) som er tilgjengelig på mange
DVD-er kan eventuelt andre tittelnumre brukes.
USB-minnepinne
En USB-minnepinneer et USB-apparat med en pinne som er omtrent så stor
som en lighter. Uttrykket er et rent hverdagsbegrep og ingen offisiell betegnelse for en produktklasse. For det meste mener man et USB-apparat som
brukes som et utskiftbart lagringsmedium.
Kapittel kaller man de mindre bilde- og lydenheter under titler. Hvis den ene
eller den andre tittelen på en DVD/VCD/S-VCD er delt i kapitler, så vil disse
kapitlene ha numre som man kan bruke for å velge kapitlene direkte.
Hva er mapper?
I motsetning til audio-CD-er kan titlene på en CD-R/CD-RW med MP3-,
WMA- eller JPEG-filer lagres i mapper, f.eks. for å ordne titler med fra forskjellige musikkstiler.
Strukturen av en MP3-CD kan f.eks. se ut som dette, hvis MP3-filene er lagret
i mapper:
Observer at ikke hver DVD…
• har titler som er oppdelt i (nummererte) kapitler
• kapitler også kalles "scener" (f.eks. i hovedmenyen på DVD-er)
Hva er Composite-Video?
MP3-CD
Composite-video
Videosignal eller FBAS-signal; dette er et bildesignal som inneholder fargeog lysstyrkesignaler samtidig.
Hva er PAL, NTSC og SECAM?
PAL
PAL er forkortelsen for det engelske uttrykket „Phase Alternation Line“. PAL er
fargestandarden som anvendes i Midt- og Vest-Europa (unntak: Frankrike, se
stikkordet „SECAM“).
NTSC
NTSC er forkortelsen for det engelske uttrykket „National Television System
Committee“. NTSC er en TV-fargestandard som brukes i USA og i Japan.
SECAM
SECAM er forkortelsen for det franske uttrykket „système en couleur avec mémoire“. SECAM er TV-fargestandarden som anvendes i Frankrike og i mange
østeuropeiske land.
- 40 -
Mapper
ORDNER
MP3
IB_KH6502_NO_LB3.qxd
07.12.2007
8:36 Uhr
Seite 41
20. Garanti & service
Du får garanti på dette apparatet som gjelder i 3 år etter kjøpsdato. Dersom
du, på tross av vår høye kvalitetsstandard, kontakt oss via vår service-hotline.
Dersom problemet ikke kan løses over telefonen, vil du få
• et behandlingsnummer (RMA-nummer) og
• en adresse som du kan sende produktet til for å få garantibehandling.
Hvis det blir nødvendig å sende inn apparatet må du vedlegge en kopi av
kvitteringen. Apparatet må pakkes godt for transporten, og RMA-nummeret
må være lett å se. Innsendninger uten RMA-nummer kan ikke bearbeides.
Henvisning:
Garanti gis kun for material- eller fabrikasjonsfeil.
Garantien gjelder ikke
• for slipedeler
• for skader på knuselige deler som brytere eller batterier.
Dette produktet er ment kun for privat og ikke for yrkesmessig bruk. Ved uriktig og
ufagmessig behandling, bruk av vold og ved inngrep som ikke har blitt utført
av vår autoriserte servicefilial forfaller garantien.
Dine lovfestete garantikrav innskrenkes ikke av denne garantien.
21. Importør
KOMPERNASS GMBH
BURGSTRASSE 21
D-44867 BOCHUM
www.Kompernass.com
- 41 -
IB_KH6502_NO_LB3.qxd
07.12.2007
8:36 Uhr
Seite 42
- 42 -
IB_KH6502_NO_LB3.qxd
07.12.2007
8:36 Uhr
Seite 43
Fyll ut dette avsnittet nøyaktig og legg det ved apparatet!
Garanti
DVD-spiller/radio KH6502
For å sikre gratis reparasjon må du først kontakte vår
service-hotline. Hold kassakvitteringen klar.
www.mysilvercrest.de
Skriv avsenderen tydelig:
Etternavn
Fornavn
Gate
Postnummer/-sted
Land
Telefon
Dato/underskrift
Beskrivelse av feilen:
✄
Kompernaß Service Norway
Tel.: 0047 35 58 35 50
IB_KH6502_NO_LB3.qxd
07.12.2007
8:36 Uhr
Seite 44
- 44 -