1
MOTOROKRTM E8
Quick Start Guide
PMS 1807c
0/100/96/28
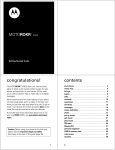
welcome
One touch from talk to music. That's all it takes, on your MOTOROKR™ E8 phone!
•
Touch a button and your phone keypad instantly transforms into a dedicated music player,
through the magic of Motorola ModeShift™ technology (page 18).
•
Transfer your favourite music quickly over a USB 2.0 high-speed cable connection and easily
with Microsoft® Windows® Media Player 11 (page 20).
•
Stream music to your Bluetooth® wireless stereo headphones (page 23). Adjust audio
settings to optimise sound quality on your stereo headphones or stereo headset (page 23).
•
Store up to 1500 songs in phone memory and 3000 songs on an optional 4 GB microSD
memory card (eAAC+ format at 128 kbps, actual capacity varies by content) (page 11).
•
Use the FastScroll™ touch wheel to find any song, contact, calendar event or multimedia file
at the speed you want (page 14).
•
Listen to your favourite FM radio stations with the 3.5 mm stereo headset (page 28).
•
Personalise your phone! Customise home screen shortcuts, change main menu layout and
appearance to match your style (page 16).
•
Capture key moments in a video recording, then upload to your blog (page 31).
•
Snap pictures automatically with your 2-megapixel multi-shot camera (page 35).
For more information: To download the E8 User Guide and more, go to www.hellomoto.com. To get
help on your phone, press s > ~ Office Tools > Help.
Note: Before using the phone for the first time, review the Important Safety
and Legal Information guide included in the box. Periodically review this
information so you remember how to safely use your phone.
2
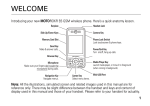
Headset Jack
Volume Keys
Side Select Key
Micro-USB Port
Power ON/OFF Key & Lock Key
Left Soft Key
Right Soft Key
Music Key
Clear/Back Key
Make & answer calls.
Hang up, exit menus.
FastScroll™ Touch Wheel
Open menu, select menu items.
Scroll up/down/left/right.
Tip: Press the centre key s to open the main menu and select menu options. Press the
clear/back key D to delete letters or numbers or to go back one menu.
3
contents
Use and Care. . . . . . . . . . . . . . . . . . . . . . . . . 6
European Union Directives
Conformance Statement . . . . . . . . . . . . . . . 7
menu map . . . . . . . . . . . . . . . . . . . . . . . . . . . 8
essentials . . . . . . . . . . . . . . . . . . . . . . . . . . 10
about this guide . . . . . . . . . . . . . . . . . . . . 10
find information . . . . . . . . . . . . . . . . . . . . 10
getting started . . . . . . . . . . . . . . . . . . . . . . 11
insert your SIM card. . . . . . . . . . . . . . . . . 11
insert a memory card. . . . . . . . . . . . . . . . 11
insert the battery . . . . . . . . . . . . . . . . . . . 12
charge the battery . . . . . . . . . . . . . . . . . . 12
turn the phone on & off . . . . . . . . . . . . . . 13
make a call . . . . . . . . . . . . . . . . . . . . . . . . 13
answer a call . . . . . . . . . . . . . . . . . . . . . . 13
end a call . . . . . . . . . . . . . . . . . . . . . . . . . 13
FastScroll™touch wheel . . . . . . . . . . . . . 14
store a phone number . . . . . . . . . . . . . . . 14
call a stored phone number . . . . . . . . . . . 15
your phone number . . . . . . . . . . . . . . . . . 15
personalise . . . . . . . . . . . . . . . . . . . . . . . . . 16
main menu appearance . . . . . . . . . . . . . . 16
rearrange main menu. . . . . . . . . . . . . . . . 16
home screen shortcuts . . . . . . . . . . . . . . 16
wallpaper . . . . . . . . . . . . . . . . . . . . . . . . . 17
screensaver . . . . . . . . . . . . . . . . . . . . . . . 17
4
contents
music. . . . . . . . . . . . . . . . . . . . . . . . . . . . . . 18
introduction . . . . . . . . . . . . . . . . . . . . . . . 18
1. load music on your computer . . . . . . . 18
2. transfer music to your phone . . . . . . . 20
3. play music . . . . . . . . . . . . . . . . . . . . . . 21
hide the music player . . . . . . . . . . . . . . . 22
use Bluetooth® stereo headphones . . . . 23
adjust audio settings . . . . . . . . . . . . . . . . 23
lock phone keys. . . . . . . . . . . . . . . . . . . . 23
perform other tasks while playing music. . . 24
manually transfer music to your phone
or memory card. . . . . . . . . . . . . . . . . . . . 24
create a playlist . . . . . . . . . . . . . . . . . . . . 26
play a playlist . . . . . . . . . . . . . . . . . . . . . . 27
customise the music player . . . . . . . . . . 27
close the music player. . . . . . . . . . . . . . . 27
radio . . . . . . . . . . . . . . . . . . . . . . . . . . . . . . 28
use the radio . . . . . . . . . . . . . . . . . . . . . . 28
radio options . . . . . . . . . . . . . . . . . . . . . . 29
close the radio . . . . . . . . . . . . . . . . . . . . . 29
SongID . . . . . . . . . . . . . . . . . . . . . . . . . . . . 30
use SongID . . . . . . . . . . . . . . . . . . . . . . . 30
videos . . . . . . . . . . . . . . . . . . . . . . . . . . . . . 31
record a video . . . . . . . . . . . . . . . . . . . . . 31
upload video to a blog . . . . . . . . . . . . . . . 32
play a video . . . . . . . . . . . . . . . . . . . . . . . 32
camera . . . . . . . . . . . . . . . . . . . . . . . . . . . . .
take a photo . . . . . . . . . . . . . . . . . . . . . . .
view a photo. . . . . . . . . . . . . . . . . . . . . . .
camera settings . . . . . . . . . . . . . . . . . . . .
accessories . . . . . . . . . . . . . . . . . . . . . . . . .
battery use & safety . . . . . . . . . . . . . . . . . .
Specific Absorption Rate Data. . . . . . . . . .
OPEN SOURCE SOFTWARE
INFORMATION . . . . . . . . . . . . . . . . . . . . . .
35
35
36
37
39
41
42
43
contents
5
Use and Care
Use and Care
To care for your Motorola phone, please keep it away from:
6
liquids of any kind
dust and dirt
Don’t expose your phone to water,
rain, extreme humidity, sweat or other
moisture. If it does get wet, don’t try
to accelerate drying with the use of an
oven or dryer, as this may damage the
phone.
Don’t expose your phone to dust, dirt,
sand, food or other inappropriate
materials.
extreme heat or cold
cleaning solutions
Avoid temperatures below 0°C/32°F
or above 45°C/113°F.
To clean your phone, use only a dry
soft cloth. Do not use alcohol or other
cleaning solutions.
microwaves
the ground
Don’t try to dry your phone in a
microwave oven.
Don’t drop your phone.
Use and Care
European Union Directives Conformance Statement
EU Conformance
Hereby, Motorola declares that this
product is in compliance with:
• The essential requirements and other relevant
provisions of Directive 1999/5/EC
• All other relevant EU Directives
0168
Product
Approval
Number
The above gives an example of a typical Product Approval
Number.
You can view your product’s Declaration of Conformity
(DoC) to Directive 1999/5/EC (to R&TTE Directive) at
www.motorola.com/rtte. To find your DoC,
enter the product Approval Number from your product’s
label in the “Search” bar on the website.
EU Conformance
7
menu map
main menu
= Music
_ Shuffle
? Radio
{ SongID
< Multimedia
•
•
•
•
•
)
:
8
Media Finder
Games
Camera
Video Camera
Voice Recorder
Contacts
Messages
• Create Message
• Inbox
• My Folders
• Templates
• Drafts
• Outbox
• Create Postcard *
• Email
• Call Voicemail
menu map
;
~
Web Access
• Browser
• My Bookmarks
• My Web Pages
• History
• Go to URL
• Browser Setup
Office Tools
• Recent Calls
• Calendar
• Sync
• Download Manager
• File Manager
• Memory Card
• My Blog *
• Music and Sounds
• Pictures
• Videos
• Voice Note
• Applic. Downloads
• Unrecognisable Files
• My Documents
• Alarm Clock
• World Clock
• Calculator
• Dialling Services
• Task List
• Notes
• Help
@
Settings
• (see next page)
This is the standard main menu layout.
Your phone’s menu may be
different.
To change your home screen
shortcuts and your main menu
appearance, see page 16.
Tip: Press D to exit the current
menu or press O to exit all menus.
* optional features
settings menu
• Profiles
• Themes
• Home Screen
• Navigation Keys
• Change Wallpaper
• Connections
• Bluetooth®
• USB Setting
• Media Sync.
• Memory Card
• Modem
• USB Printing
• Tools
• Modem & Tools
• Voice Networks
• Data Connections
• Add a Connection
• Edit a Connection
• Remove a
Connection
• Call Settings
• Speed Dial
• Call Forward
• In-Call Setup
• In-Call Timer
• Answer Options
• In-Call Message
Alert
• Roam Alert
• Call Waiting
• Auto-Redial
• Call Drop Tone
• Dialling Setup
• My Caller ID
• DTMF
• Dialling Prefix
• Call Barring *
• Fixed Dialling
• My SIM Number
• Active Line *
• Phone Settings
• Display Settings
• Display Timeout
• Screensaver
• Brightness
• Aeroplane Mode
• Battery Meter
• Time & Date
• (continued next column)
• Phone Settings (continued)
• Language
• Talking Phone
• Text Entry
• Reset
• Reset All Settings
• Delete All Data
• Delete Memory
Cards
• View Memory
• Properties
• Legal Notices
• Java System
• OTA Updates
• Headset Setting
• Auto-Answer
• Voice Dial
• TTY Settings
• Security
• Phone Lock
• Application Lock
• SIM Lock
• Change Passwords
• Certificates
• Network
• Current Network
• Scan Avail. Networks
• Find New Network
• My Network List
• Search Setup
• Service Tone
* optional features
menu map
9
essentials
This guide uses the following symbols:
essentials
CAUTION: Before using the phone
for the first time, read the Important
Safety and Legal Information guide
included in the box.
about this guide
This guide shows how to locate a menu feature
as follows:
Find it: s > < Multimedia > Camera
This means that, from the home screen:
symbols
This means a feature is network,
SIM card or subscription dependent
and may not be available in all areas.
Contact your service provider for
more information.
This means a feature requires an
optional accessory.
find information
1
Press the centre key s to open the
menu.
We've crammed all the main features of your
phone into this handy guide. If you want more
information, you can use the following:
2
Press the navigation key S to scroll to
< Multimedia and press s to select it.
on the web
3
Press the navigation key S to scroll to
Camera and press s to select it.
To download the E8 User Guide and more,
go to www.hellomoto.com
on the phone
To get help on your phone, press s > ~ Office
Tools > Help.
10
getting started
getting started
insert your SIM card
insert a memory card
Your Subscriber Identity Module (SIM) card
stores your phone number and other
information.
You can store music, photos and other
multimedia files on an optional removable
microSD memory card.
Caution: Don’t bend or scratch your SIM card.
Keep it away from static electricity, water and
dirt.
Caution: Don’t bend or scratch your memory
card. Keep it away from static electricity, water
and dirt. Turn off your phone before you install or
remove the memory card.
1
2
Note: Your phone can use a memory card with
up to 4 GB capacity (greater than 1 GB storage
guaranteed only for Motorola-approved microSD
cards).
11
getting started
insert the battery
1
2
charge the battery
New batteries are not fully charged. Open the
protective cover on your phone’s micro-USB
port and plug the battery charger into your
phone and an electrical outlet. A battery charge
indicator light next to the micro-USB port shows
12
when the battery is charging. The display shows
Charge Complete when finished.
Note: When recharging a battery that's
completely dead, the time it takes for your
phone to power up can vary, depending on the
type of battery charger you use. A mid-rate
charger might require 30 minutes of charging to
power up the phone, while a rapid-rate charger
might require only 10-15 minutes. The type of
charger provided with your phone can vary by
region. A charge light next to the micro-USB
port on your phone activates during charging, to
show that the phone is functioning properly.
getting started
extend battery life
•
To turn off Bluetooth® power when
you’re not using it, press s
> @ Settings > Connections > Bluetooth, press
Options > Setup Bluetooth > Bluetooth Power > Off.
•
To make your display turn off sooner,
press s > @ Settings > Phone Settings
> Display Settings > Display Timeout > 5 Seconds.
•
To turn off your screensaver, press s
> @ Settings > Phone Settings > Display Settings
> Screensaver > Off.
•
To reduce the display brightness,
press s > @ Settings > Phone Settings
> Display Settings > Brightness, and select a
lower number setting.
turn the phone on & off
To turn your phone on,
slide down and hold the
power ON/OFF key until
the display turns on (see
illustration at right).
To turn your phone off,
slide down and hold the
power ON/OFF key for a
few seconds.
make a call
Enter a phone number, then press the
send key N.
Tip: To voice dial a call, see your User Guide.
answer a call
When your phone rings and/or vibrates, press
N to answer.
end a call
To “hang up,” press O.
13
getting started
FastScroll™touch wheel
Use the FastScroll touch wheel to quickly scroll
through lists.
Move thumb
counter-clockwise
to scroll backwards.
Move thumb
clockwise to
scroll forwards.
Move and hold
here to continue
scrolling backwards
at set speed.
Remove thumb to
stop scrolling.
Move and hold
here to continue
scrolling forwards
at set speed.
Remove thumb to
stop scrolling.
Just move your thumb or finger clockwise or
counter-clockwise over the FastScroll touch
wheel to scroll forwards or back through the list.
Move your thumb slowly for controlled scrolling
through option lists. Move it faster to scroll
quickly through your contact list or song lists.
14
Move and hold your thumb at the lower-left or
lower-right corner of the FastScroll touch wheel
to continue scrolling at the set speed. Move
your thumb in the opposite direction to slow or
reverse the direction of travel. Remove your
thumb to stop scrolling.
Note: When you press hard on the FastScroll
touch wheel, you may notice a moving shadow
in the illuminated area beneath your finger. This
behaviour is normal and is a natural effect of the
touch wheel mechanism.
store a phone number
You can store a phone number in your list of
Contacts.
Note: You can store a new contact in
phone memory, on your SIM card or in both
locations. Contacts on the SIM card only have a
name and phone number. Use this procedure to
store a new contact in both locations:
1
From the home screen, press Shortcuts
> Create Contact.
2
Enter the contact’s first name and last
name in the appropriate fields.
3
Scroll to Save to SIM Card and make sure the
option is selected.
getting started
4
5
Scroll to Number and press s to select it.
2
Enter the contact’s phone number in the
Number field.
6
Scroll to Number Type and press s to select
it.
7
Select the phone number type (for
example, Home or Work), then press Done.
Note: If you’ve got contacts stored on your SIM
card, but the contacts aren’t visible when you
open the contact list, you need to copy the
contacts into phone memory. Press Options
> Import Contacts > SIM Card, press Options > Select All,
press Import.
8
Press Save to store the contact.
Tip: To learn more about storing phone
numbers and email addresses on your phone,
see your User Guide.
Press N to call the contact.
your phone number
To see your phone number:
Find it: s > @ Settings > Call Settings
> My SIM Number
call a stored phone
number
To call a number stored in your contact list:
Find it: s > ) Contacts
1
To see your phone number while you’re on a
call, press Options > My tel. no.
To store or edit your name and phone number
on your SIM card, select the field you want to
edit. If you don’t know your phone number,
contact your service provider.
Scroll to the contact.
Shortcut: In the contact list, press keypad
keys to enter the first letters of the contact
you want. Press s to go to the contact.
Note: If a contact has multiple phone
numbers, press S left/right to select the
number you want.
15
personalise
personalise
main menu appearance
home screen shortcuts
You can personalise the main menu to appear as
a grid of graphic menu icons, a text-based list or
spinning menu icons that you can scroll through
using the left/right nav keys:
From the home screen, you can press
the navigation key S up, down, left or
right as shortcuts to your favourite
features. You can change the shortcuts to suit
your needs.
Find it: From the main menu, press Options
> View by > Grid or List or Spinner
To change navigation key shortcut icons in the
home screen:
rearrange main menu
Find it: s > @ Settings > Home Screen
> Navigation Keys > Up, Down, Left or Right
You can change the order of the main menu
features.
From the main menu, press Options > Reorder, scroll
to the feature you want to move, press Grab,
scroll to the destination location, press Insert.
Select a direction, then choose the feature you
want to open when you press S in that
direction.
To show or hide navigation key shortcut icons
in the home screen:
Find it: s > @ Settings > Home Screen
> Navigation Keys > Icon Display > Show or Hide
Note: You can press S to select the features
in the home screen even when the icons are
hidden.
16
personalise
wallpaper
Change the background wallpaper image in the
home screen:
Find it: s > @ Settings > Home Screen
> Change Wallpaper, scroll to an image, press Select
The new wallpaper is applied to the current
theme.
screensaver
Change the screensaver image that appears in
your phone’s display after a period of inactivity:
Find it: s > < Multimedia > Media Finder
> Wallpapers and Graphics, scroll to an image, press
Options > Apply to > Screensaver
The new screensaver is applied to the current
theme.
Tip: To extend battery life, turn off the
screensaver.
17
music
introduction
music
Copying and syncing music between your
phone and computer has never been easier,
with Microsoft® Windows® Media Player 11.
1. load music on your
computer
1
2
Load music on your computer.
To create a music library on your computer, you
can purchase Windows Media DRM-protected
music files from supported online music stores
(such as Urge, Yahoo and Napster).
Transfer music from the computer to your
phone.
You can also load song files from a music CD
onto your computer:
3
Use the music player to play and manage
music files on your phone.
To listen to music on your phone, you need to:
Note: The unauthorised copying of copyrighted
materials is contrary to the provisions of the
Copyright Laws of the United States and other
countries. This device is intended solely for
copying non-copyrighted materials, materials in
which you own the copyright or materials which
you are authorised or legally permitted to copy.
If you are uncertain about your right to copy any
material, please contact your legal advisor.
1
Insert the music CD in your computer’s CD
drive.
2
3
Launch Windows Media Player 11.
Copy the music CD to the media player
library (also called ripping the CD).
If your computer is connected to the Internet,
the media player may retrieve CD information,
such as song titles, album name, artist name
and album artwork. This information will display
in your phone’s music player.
set default format and bit rate for
Windows® Media Player 11
Windows Media Player 11 lets you adjust format
and bit rate settings, to optimise sound quality
or to increase the number of song files you can
store on your phone.
18
music
Windows Media Audio format offers the
optimal balance between file size and sound
quality. Song files in this format tend to require
more storage space than files that use
Windows Media Audio Pro format.
Windows Media Audio Pro format is designed
for use in portable devices with limited storage
capacity. The format provides improved sound
quality at lower bit rates.
MP3 format is the most popular format for
distributing music on the Web. This format
offers high sound quality at a reasonable file
size.
To set the default file format and bit rate:
1
Insert the music CD in your computer’s CD
drive.
2
3
Launch Windows Media Player 11.
4
Click the Rip tab down arrow, then choose
Format > Windows Media Audio, Windows
Media Audio Pro or mp3.
5
Select the Rip tab in Windows Media
Player 11.
Click the Rip tab down arrow again, then
choose Bit Rate > bit rate.
Tip: To maximise the number of songs you can
store on the phone, we recommend setting the
bit rate to 128 Kbps or lower (use the lowest bit
rate that provides an acceptable sound quality).
convert iTunes AAC files to MP3
files on your computer
Use the iTunes desktop application to convert
standard iTunes AAC files to MP3 files that are
compatible with Windows Media Player 11.
Note: The iTunes desktop application can only
convert AAC files ripped from a music CD. It
can’t convert music files purchased from the
iTunes store.
1
Open the iTunes desktop application on
your computer.
2
Select Edit > Preferences, then click the
Advanced tab and click Importing.
3
Open the Import Using pop-up menu, then
select the MP3 Encoder option. Click OK to
save your settings.
4
Select one or more songs in your iTunes
music library, then choose Advanced
> Convert Selection to MP3.
The converted MP3 file copies appear in your
computer’s music library alongside the original
AAC files.
19
music
2. transfer music to
your phone
Use Windows Media Player 11 to transfer music
from the computer to your phone over a
high-speed USB 2.0 cable connection. (If
necessary, you can download Windows Media
Player 11 at www.microsoft.com/windowsmedia).
Note: Windows Media Player 11 requires
Windows XP™ or later to run. If you are using
an earlier version of Windows OS, see the
section “manually transfer music to your phone
or memory card” on page 24.
Note: Windows Media Player 11 can only be
used to copy music files to your phone. You
can’t use Windows Media Player 11 to copy
pictures or videos to the phone.
When your phone is connected to the computer
in media synchronisation mode, Windows
Media Player 11 treats the phone as a single
memory device and will copy and sync music
files to both phone memory and a microSD
memory card installed in the phone. (For
example, a phone with 2 GB of internal memory
and a 4 GB microSD memory card would appear
to have around 6 GB of available memory in
Windows Media Player 11.)
20
on your phone
If desired, insert a memory card in your phone
(see page 11), then press s > @ Settings
> Connections > USB Setting > Media Sync.
Attach the Motorola Original USB
cable to the micro-USB port on
your phone and to an available USB
port on your computer.
A Motorola Original USB cable and supporting
software may be included with your phone.
These tools are also sold separately.
Note: Some phone functions are temporarily
unavailable when a USB connection is active.
music
on your computer
Run Windows Media Player 11. Your phone
appears in the upper right corner of the
Windows Media Player 11 screen. The phone’s
music files are listed on the left side of the
screen.
1
Select the Sync tab in Windows Media
Player 11.
2
Drag and drop songs or playlists onto the
Sync List on the right side of the Windows
Media Player 11 screen.
When a song or playlist starts to play, use the
following keys to control song playback:
Press volume keys to
change volume.
Timer shows %
played.
song name
10/10/2008--910 Kb
3
Click Start Sync to copy the songs onto the
phone.
4
When you finish, disconnect your phone
from the computer.
3. play music
To play music on your phone:
Find it: [ > category > song or playlist
You can select a song or playlist from the
following categories: Recently Played, Shuffle Songs
(play all songs in random order), All Songs, Playlists,
Artists, Albums, Genres or Composers.
Press to skip
to previous
song. Press
and hold to
rewind.
album
artwork
Song Title
Artist
Album
01:40
02:45
Options
Back
Shuffle
on/off.
Pause/play
the song.
Auto-repeat
on/off.
Press to skip
to next
song. Press
and hold to
fastforward.
Use
FastScroll™
touch wheel
to fastforward or
rewind.
During a song, the music player shows the song
title, artist, album and artwork, if available.
Note: If you receive a call during a song, the
song pauses until the call is over.
21
music
When a song is playing, press Options to select
music player options:
options
Manage
Show song Properties, such as file
name, type and size.
Remove
Delete the song file.
Send to
Send the song in a message or
email or send it to another
device over a Bluetooth®
connection.
Apply to
Add the song to a playlist or
make it a ringtone.
options
Use Bluetooth/
Use Handset
To send the audio to a
Bluetooth® headset, turn on
Bluetooth power, then select
Use Bluetooth to connect to a
recognised Bluetooth headset
or search for a new headset.
When a Bluetooth audio
connection is active, select Use
Handset to drop the Bluetooth
connection and switch the
audio back to the phone.
Note: This option appears only
when Bluetooth power is
turned on.
Setup
Customise settings.
hide the music player
To hide the music player while music plays,
press O. The phone returns you to the home
screen, where you can use the nav key S to
control song playback.
To return to the music player from the home
screen, press S up.
22
music
use Bluetooth® stereo
headphones
Connect your phone with optional
Bluetooth stereo headphones to listen to
music stored on your phone.
To connect your phone to a set of Bluetooth
stereo headphones for the first time, make
sure the headphones are on and ready in
pairing or bonding mode (see the device user
guide).
Find it: s > @ Settings > Connections > Bluetooth,
press Options > Search for Device > Headset
Your phone lists the Bluetooth audio devices it
finds within range.
1
2
Scroll to the stereo headphones in the list.
Press s to connect with the stereo
headphones.
adjust audio settings
You can adjust audio settings to optimise the
sound quality when listening to music through
the phone speaker, stereo headphones or
stereo headset.
To change playback volume, press the volume
keys on the side of your phone.
To change the equalizer setting, press Options
> Setup > Equalizer > equalizer effect.
To set stereo separation, press Options > Setup
> 3D Stereo > separation level.
To set bass boost, press Options > Setup > Bass Boost
> bass level.
Note: The equalizer and stereo effect settings
are best experienced using a 3.5 mm wired
headset or stereo headphones. Your phone
cannot produce stereo effects through the
built-in monaural speaker.
lock phone keys
You can lock the phone keys to prevent
accidental keypresses while playing a song or
playlist.
23
music
To lock the phone keys,
slide the lock key up (as
shown in the illustration at
right).
To unlock the phone
keys, slide the lock key
back down to the centre
position. Note: Do not
slide the lock key all the
way down to the bottom power ON/OFF
position.
perform other tasks
while playing music
To take pictures or record videos while playing
music:
1
From the music player screen, press O to
go to the home screen.
2
Press the side select key to activate the
camera.
3
Press s to take a photo.
or
Press ! to switch to video camera mode,
then press s to record a video.
24
To use the browser while playing music:
1
From the music player screen, press O to
go to the home screen.
2
Press Main Menu > ; Web Access > Browser.
To return to the music player from another
application:
1
2
Press [ to return to the music library.
Press s to return to the music player.
manually transfer
music to your phone
or memory card
Without using Windows Media Player 11, you
can manually copy or sync music files from the
computer to phone memory or to an optional
microSD memory card in the phone. (To insert a
memory card, see page 11).
music
supported audio formats
Before you copy audio files to your phone, make
sure the files are in a format the phone
recognises:
AMR-NB: 4.75 kbps to 12.2 kbps (supports all 3GPP
specified rates), 8 kHz, mono - .amr, .3gp, .3ga, .mp4
file extensions - MIME Audio/amr, Audio/mp4,
Audio/3gpp, Video/mp4, Video/3gpp.
AMR-WB: 6.6 kbps to 23.85 kbps (supports all 3GPP
specified rates), 16 kHz, mono - .awb, .3ga, .3gp file
extensions - MIME Audio/amr-wb, Audio/3gpp,
Video/3gpp.
AAC (MPEG4 AAC-LC): Up to 192 kbps CBR, 48 kHz
max sampling rate, mono/stereo - .mp4, .3gp, .m4a,
.3ga, .aac file extensions - MIME Audio/m4a,
Audio/mp4, Audio/3gpp, Video.mp4, Video/3gpp,
Audio/aac.
AAC+: 16 to 128 kbps, up to 48 kHz, mono/stereo .mp4, .3ga, .m4a, .aac file extensions - MIME
Audio/mp4, Audio/3gpp, Audio/m4a, Audio/aac.
Enhanced AAC+: 16 to 128 kbps, up to 48 kHz,
parametric stereo - .mp4, .3ga, .m4a, .aac file
extensions - MIME Audio/mp4, Audio/3gpp,
Audio/m4a, Audio/aac.
MP3: Up to 320 kbps, up to 48 kHz, mono/stereo .mp3, .mpga file extensions - MIME Audio/mp3,
Audio/x-mp3, Audio/mpeg3, Audio/x-mpeg3,
Audio/mpeg, Audio/mpg, Audio/x-mpeg, Audio/x-mpg.
8-bit Linear PCM: Up to 320 kbps, 8/11.05/12/16 kHz,
stereo/mono - .wav file extension - MIME Audio/L8,
Audio/wav.
16-bit Linear PCM: Up to 320 kbps, 8 kHz,
stereo/mono - .wav file extension - MIME Audio/L16,
Audio/wav.
8-bit A-law PCM: Up to 320 kbps, 8/11.05/12/16 kHz,
stereo/mono - .wav file extension - MIME Audio/pcma.
8-bit mu-law PCM: Up to 320 kbps,
8/11.05/12/16 kHz, stereo/mono - .wav file extension MIME Audio/pcmu.
WMA v9 L2 (also WMA v3, v7, v8): Up to 320 kbps,
48 kHz, stereo/mono - .wma file extension - MIME
Audio/x-ms-wma.
Real Audio LBR (Cook): Up to 96 kbps,
8/11/22/44 kHz, stereo/mono - .rm, .ra file extensions MIME Audio/x-pn-realaudio, Audio/vnd.rn-realaudio.
Real Audio Sipro (ACELP®.net): 5.0 kbps (fixed
rate) at 8 kHz sampling rate, 8.5/6.5 kbps (dual rate) at
8 kHz sampling rate, 16 kbps (wide-band) at 16 kHz
sampling rate, mono - .rm, .ra file extensions - MIME
Audio/x-pn-realaudio, Audio/vnd.rn-realaudio.
Real Audio 10: Up to 192 kbps,
8/11/12/16/22.05/24/32/44.1/48 kHz, stereo/mono .rm, .ra file extensions - MIME Audio/x-pn-realaudio,
Audio/vnd.rn-realaudio.
25
music
on your phone
Press s > @ Settings > Connections > USB Setting
•
If you are using a PC, click the Safely
Remove Hardware icon in the
notification area at the bottom of your
computer screen, then select Safely
Remove USB Mass Storage Device.
•
If you are using a Mac, select and drag
the Removable Disk icon to the Trash.
> Memory Card
Attach the Motorola Original USB
cable to the micro-USB port on your
phone and to an available USB port
on your computer.
A Motorola Original USB cable and supporting
software may be included with your phone.
These tools are also sold separately.
on your computer
Your phone and memory card appear as two
separate removable disks on your computer.
1
Find where your phone and memory card
appear as Removable Disk icons. On a
Windows PC, this is the My Computer
window. On a Macintosh® computer, it’s
on the desktop.
2
Double-click the Removable Disk icon for
your phone or memory card.
3
To copy the desired files onto the phone or
memory card, drag and drop them onto the
appropriate removable disk icon.
4
26
When you finish, remove the phone safely
from your computer:
create a playlist
create a playlist on your
computer
Use Windows Media Player 11 to create a
playlist of music files stored on the computer.
On your phone, press s > @ Settings
> Connections > USB Setting > Memory Card.
Connect your phone to the computer through a
USB cable connection, then drag and drop the
playlist onto the phone or memory card.
create a playlist on your phone
Find it: [ > Playlists, press Options
> Create New Playlist
1
2
Enter a name for the playlist.
Select a storage location for the playlist
(Memory Card or Phone Memory), then press Save.
music
3
Scroll to the playlist you created and press
s to select it.
4
5
Scroll to Add Songs and press s to select it.
options
Scroll to All Songs, Artists, Albums, Genres or
Composers and press s to select it.
Shuffle
Play songs in a random order.
Auto-Repeat
6
Scroll to the songs you want to add and
press s to select them.
Replay the current playlist
when the last song finishes
playing.
7
Press Add to add the selected songs to the
playlist.
Equalizer
Optimise audio settings for the
type of music you play.
8
Repeat the procedure to add more songs or
press Back to return to the Playlists menu.
Bass Boost
Set overall bass level.
3D Stereo
Set stereo separation level.
Internet
Connection
Set your Internet
connection preferences.
play a playlist
Find it: [ > Playlists, scroll to the playlist,
You can select the following options:
press Options > Play
When you scroll to a song in a list and press
Options, you may see additional options for the
song and list, such as Delete, Send to and Apply to.
customise the music
player
close the music player
Find it: [, press Options > Setup
To close the music player when the music
player screen is visible, press O twice.
To close the music player from the home
screen, press O once.
27
radio
use the radio
radio
You can use your phone to listen to
FM radio stations. You can listen to
the radio through the
Motorola Original stereo headset
included with your phone or through the
phone’s handsfree speaker.
Note: You must plug the supplied stereo
headset into the headset jack on your phone
to use the radio. The headset acts as a radio
antenna to receive radio signals. You can’t listen
to the radio over a Bluetooth® wireless
headset.
Find it: s > ? Radio
Press S left/right
to go to
previous/next
frequency setting.
Press S up/down
to go to
next/previous preset.
FM Radio
93.70 FM
FM 1 Preset 1
Back
Options
Select & adjust
FM radio options.
Radio Station
Frequency, Band, &
Preset Number
To adjust radio volume: Press the volume keys
on the side of your phone.
To store a preset station: Press and hold a
number key (1 to 9) to assign the number
to the current tuned station. You can store nine
presets in each of three separate FM bands
(see the following section for details).
28
radio
To select a stored preset station: Press the
number key to select the preset station.
options
Switch Bands
radio options
From the radio screen, press Options to select
radio options:
Shortcut: Press # to
switch bands in the radio
screen.
options
Hide
Hide the radio.
To return to the radio
display, press
s > ? Radio.
Mute/Unmute
Mute or unmute the radio.
Shortcut: Press * to
mute and unmute the radio
in the radio screen.
Switch to Speaker/
Switch to Headset
Switch sound to your phone
speaker or to the attached
headset.
Switch between bands FM 1,
FM 2 and FM 3. Each band can
store nine presets (select
presets by pressing number
keys 1-9).
Scan
Briefly hear each station
your phone can receive.
Press s to stop the scan.
Scan Presets
Briefly hear each stored
preset station. Press s to
stop the scan.
Presets List
See the list of preset
stations.
close the radio
From the radio screen or home screen,
press O to close the radio.
29
SongID
use SongID
SongID
Use your phone to identify commercially
recorded songs played on the radio,
television or other music source.
Note: Where available, song recognition is free.
Network data charges may apply, track
purchases will be billed.
When you hear a song you want to identify:
Find it: s > { SongID
1
2
Click ID music now.
3
Wait for the results (this takes a
few seconds).
4
See what else you can do inside SongID:
depending on your location and service,
you may be able to buy ringtones, share ID,
or see top ID Charts.
5
Remember, inside SongID you can ID
music at any time just by pressing 1
on your phone keypad.
30
Hold your phone toward the music that is
playing (hold near the music source for
15 seconds).
Tips:
•
Be sure that music is playing
•
Do not sing or hum into the handset
•
The music sample must be from
recorded (not live) sound for the radio,
TV, films, etc.
videos
record a video
videos
Find it: s > < Multimedia > Video Camera
The phone display acts as the video camera
viewfinder.
Storage (Phone or
Memory Card)
Video Camera Mode
Audio
(On or Off)
Press S
up/down to
see video
camera
settings,
press left/
right to
change.
Zoom Out
See & edit
most recent video.
To begin video recording, press s.
Press Stop to stop video recording.
•
To store the video, press s.
•
To send the video in a message,
press Send.
•
To discard the video, press D.
•
To select other video options, press
Options. You can choose to Save Only, Discard,
Send to (message, email or Bluetooth
connection) or Preview the video.
Resolution
10:48:00
Remaining
Minutes
Scene
Automatic
Options
1
2
Back
Note: To send your video in an MMS text
message, the video length must be set to
MMS Short or MMS Long before recording. To set
length, press s > < Multimedia > Camera, press
Options > Camera Settings > Video Settings > Video Length.
When the video camera viewfinder is active,
press Options to set video recording options:
Zoom In
Switch between
video camera
& camera.
options
Capture
Begin video recording.
Audio
On/Audio Off
Turn audio recording on/off.
Camera
Settings
Customise camera settings
(see page 38).
31
videos
upload video to a blog
play a video
Upload a video you’ve recorded to your video
blog site:
Find it: s > < Multimedia > Media Finder > Videos
1
Launch your phone’s browser (press
s > ; Web Access > Browser).
2
Go to a video blogging service website and
log in to your account.
3
4
Scroll to Upload Videos and press s.
5
Scroll to Upload and press s.
> video
Press S left/right
to skip to
previous/next video.
Press s to
pause/play the video.
Follow the browser prompts to scroll to the
video you want to upload, then press s.
Your phone uploads the video to the blog.
01:15
Options
Select & adjust video
camera options.
02:40
Back
Timer Shows
% Played
When a video is playing, press Options to select
video options.
32
videos
Note: Your phone’s options may vary. Most
options apply only to user-recorded videos and
are not available for pre-installed videos.
options
Use Bluetooth/
Use Handset
options
Full Screen
Show the video in full screen.
(Press s to return to actual
size.)
Manage
Show video Properties, such as
file name, type and size.
Delete
Delete the video.
Zoom
Show the video at actual size or
scale the video to fit the
viewing area.
Send to
Send the video in a message or
email or send it to another
device over a Bluetooth®
connection.
To send the audio soundtrack
to a Bluetooth® headset, turn
on Bluetooth power, then
select Use Bluetooth to connect to
a recognised Bluetooth
headset or search for a new
headset.
When a Bluetooth audio
connection is active, select
Use Handset to drop the Bluetooth
connection and switch the
audio back to the phone.
Note: This option appears only
when Bluetooth power is
turned on.
Setup
Adjust video settings.
33
videos
supported video formats
Before you copy video files to your phone, make
sure the files are in a format the phone
recognises:
MPEG4 + AMR-NB: total bit rate up to 320 kbps video up to 296 kbps, QVGA, 25 fps - audio up to
12.2 kbps, 8 kHz, mono - .mp4, .3gp, .pvs, .pvp file
extensions - MIME Video/mp4, Video/3gpp.
MPEG4 + AMR-WB: total bit rate up to 320 kbps video up to 296 kbps, QVGA, 25 fps - audio up to
23.85 kbps, 16 kHz, mono - .mp4, .3gp, .pvs, .pvp file
extensions - MIME Video/mp4, Video/3gpp.
MPEG4 + AAC/AAC+/Enhanced AAC+: total bit rate
up to 350 kbps - video up to 296 kbps, QVGA, 25 fps audio up to 128 kbps, up to 48 kHz, stereo/mono - .mp4,
.3gp, .pvs, .pvp file extensions - MIME Video/mp4,
Video/3gpp.
H.263 + AMR-NB: total bit rate up to 320 kbps - video
up to 296 kbps, QVGA, 25 fps - audio up to 12.2 kbps,
8 kHz, mono - .3gp, .pvs, .pvp file extensions - MIME
Video/mp4, Video/3gpp.
H.263 + AMR-WB: total bit rate up to 320 kbps - video
up to 296 kbps, QVGA, 25 fps - audio up to 23.85 kbps,
16 kHz, mono - .3gp, .pvs, .pvp file extensions - MIME
Video/mp4, Video/3gpp.
H.263 + AAC/AAC+/Enhanced AAC+: total bit rate
up to 350 kbps - video up to 296 kbps, QVGA, 25 fps audio up to 128 kbps, up to 48 kHz, stereo/mono - .3gp,
.pvs, .pvp file extensions - MIME Video/mp4,
Video/3gpp.
34
Real Audio + Video: total bit rate up to 350 kbps video up to 296 kbps, QVGA, 15 fps - audio up to
64 kbps, up to 48 kHz, stereo/mono - .rm, .rmvb file
extensions - MIME Application/x-pn-realmedia,
Application/vnd.rn-realmedia.
H.264 + AMR-NB: total bit rate up to 280 kbps - video
up to 256 kbps, QCIF, 15 fps - audio up to 12.2 kbps,
8 kHz, mono - .mp4, .3gp file extensions - MIME
Video/mp4, Video/3gpp.
H.264 + AMR-WB: total bit rate up to 280 kbps - video
up to 256 kbps, QCIF, 15 fps - audio up to 23.85 kbps,
16 kHz, mono - .mp4, .3gp file extensions - MIME
Video/mp4, Video/3gpp.
H264 + AAC/AAC+/Enhanced AAC+: total bit rate up
to 350 kbps - video up to 256 kbps, QCIF, 15 fps - audio
up to 128 kbps, up to 48 kHz, stereo/mono - .mp4, .3gp
file extensions - MIME Video/mp4, Video/3gpp.
WMV 9 + WMA v9 L2 (also WMA v3, v7, v8): total
bit rate up to 224 kbps - video up to 96 kbps, QCIF,
15 fps - audio up to 128 kbps, up to 48 kHz,
stereo/mono - .asf, .wmv file extensions MIME Video/x-ms-wmv.
camera
take a photo
camera
Find it: s > < Multimedia > Camera
Shortcut: From the home screen, press the
side select key to activate the camera.
Shortcut: The phone display acts as the camera
viewfinder.
Camera Mode
(Photo or Video)
Storage (Phone or
Memory Card)
Timer
Press S
up/down to
see camera
settings,
press left/
right to
change.
Zoom Out
See & edit
stored photos.
Resolution
2370
Remaining
Shots
Styles
Color
Options
Back
Zoom In
Switch between
camera &
video camera.
Use the viewfinder to compose your scene,
then press s to take the photo.
35
camera
•
To store the photo, press s.
auto-send
•
To send the photo in a message,
press Send.
•
To discard the photo, press D.
You can set up your phone to automatically send
the photos you take to a list of contacts you
specify.
•
To select other photo options, press
Options. You can choose to Save Only, Delete
Send to (message, email, Bluetooth
connection or postcard), Apply to
(wallpaper, screensaver, new or existing
contact), Edit or Print via (Bluetooth
connection, USB connection or memory
card).
view a photo
To view a stored photo that you’ve taken:
Find it: s > < Multimedia > Media Finder > Pictures
> Captured Pictures > photo
To use auto-send, you first must activate the
auto-save feature:
Find it: s > < Multimedia > Camera, press
Options > Camera Settings > Auto-Save > Enable
Then set the storage location for auto-saved
photos:
Find it: s > < Multimedia > Camera, press
Options > Camera Settings > Storage Location > Phone or
Memory Card
Then activate auto-send:
Find it: s > < Multimedia > Camera, press
Options > Camera Settings > Auto-Send > Enable
To specify message recipients for the photos
you take:
Find it: s > < Multimedia > Camera, press
Options > Camera Settings > Message Recipients
Tip: To send your photo in an MMS text
message, the picture resolution must be set to
X-Small, Small or Medium. To set resolution,
press s > < Multimedia > Camera, press Options
> Camera Settings > Picture Settings > Resolution.
36
camera
camera settings
When the viewfinder is active, you can use the
navigation key S to adjust the following
camera settings. Press S up or down to scroll
to a setting, then press S left or right to
change it:
settings
Styles
Press S left/right to select
Colour, Black & White, Antique, Negative,
Reddish, Greenish or Bluish.
Scene
Press S left/right to select
Automatic, Night or Manual.
Exposure
(Set Scene to Manual to adjust.)
Press S left/right to
decrease/increase the
exposure setting.
Lighting
Conditions
(Set Scene to Manual to adjust.)
Press S left/right to select
Automatic, Sunny, Cloudy, Indoor (Home)
or Indoor (Office).
settings
Tag
Select a predefined text tag to
apply to the photo(s) you take.
(To create a tag, press
Options > Camera Settings
> Tag > Create New Tag).
When the viewfinder is active, press Options to
select the following camera options:
options
Capture
Take a photo.
Auto-Timer
Set a timer to take a photo.
Multi-Shot
Quickly take multiple photos.
37
camera
options
Camera
Settings
38
Customise camera settings:
• Review Time
• Tag
• Default Name
• Storage Location
• Auto-Save
• Auto-Send
• Message Recipients
• Picture Settings
• Resolution
• Shutter Tone
• Quality
• Video Settings
• Resolution
• Capture Tone
• Quality
• Video Length
accessories
accessories
H680 Bluetooth® Headset
JBL R220 3.5 mm Headset
T505 Bluetooth® Handsfree
Car Kit/Speakerphone
3.5 mm FM Optimised Headset
(part number SYN2356A)
H800 Bluetooth® Headset
S9 Bluetooth® Stereo Headphones
39
accessories
P790 POWR Portable Charger
with micro-USB adapter
To see more accessories, visit www.hellomoto.com
40
microSD Removable Memory Card
(up to 4 GB)
battery use & safety
• Motorola recommends you always use
Motorola-branded batteries and chargers.
The warranty does not cover damage caused by
non-Motorola batteries and/or chargers.
Caution: Use of an unqualified battery or
charger may present a risk of fire, explosion,
leakage or other hazard. Improper battery use or
use of a damaged battery, may result in a fire,
explosion or other hazard.
• Battery usage by children should be supervised.
• Important: Motorola mobile devices are
designed to work best with qualified batteries. If
you see a message on your display such as
Invalid Battery or Unable to Charge, take the
following steps:
• Remove the battery and inspect it to
confirm that it bears a Motorola “Original
Equipment” hologram;
• If there is no hologram, the battery is not a
qualified battery;
• If there is a hologram, replace the battery
and retry charging it;
• If the message remains, contact a
Motorola Authorised Service Centre.
• New batteries or batteries stored for a long time
may take more time to charge.
• Charging precautions: When charging your
battery, keep it near room temperature. Never
expose batteries to temperatures below 0°C
(32°F) or above 45°C (113°F) when charging.
Always take your mobile device with you when
you leave your vehicle.
• When storing your battery, keep it in a cool, dry
place.
• It is normal over time for battery life to decrease
and for the battery to exhibit shorter runtime
between charges or require more frequent or
longer charging times.
• Avoid damage to battery and mobile
device. Do not disassemble, open, crush, bend,
deform, puncture, shred or submerge the battery
or mobile device. Avoid dropping the battery or
mobile device, especially on a hard surface. If
your battery or mobile device has been
subjected to such damage, take it to a Motorola
Authorised Service Centre before using. Do not
attempt to dry it with an appliance or heat
source, such as a hair dryer or microwave oven.
• Use care when handling a charged
battery—particularly when placing it inside a
pocket, purse or other container with metal
objects. Contact with metal objects (such as
jewellery, keys, beaded chains) could complete
an electrical circuit (short circuit), causing the
battery to become very hot, which could cause
damage or injury.
Promptly dispose of used batteries in
accordance with local regulations. Contact your
local recycling centre for proper battery
disposal.
Warning: Never dispose of batteries in a fire because
they may explode.
battery use & safety
41
Specific Absorption Rate Data
This model meets international guidelines for
exposure to radio waves.
Your mobile device is a radio transmitter and receiver. It is
designed not to exceed the limits for exposure to radio
waves recommended by international guidelines. These
guidelines were developed by the independent scientific
organization ICNIRP and include safety margins designed
to assure the protection of all persons, regardless of age
and health.
The guidelines use a unit of measurement known as the
Specific Absorption Rate or SAR. The ICNIRP SAR limit for
mobiles devices used by the general public is 2 W/kg and
the highest SAR value for this device when tested at the
ear was 0.89 W/kg.1 As mobile devices offer a range of
functions, they can be used in other positions, such as on
the body as described in this user guide.2 In this case, the
highest tested SAR value is 0.62 W/kg.1
As SAR is measured utilising the device’s highest
transmitting power, the actual SAR of this device while
operating is typically below that indicated above. This is
due to automatic changes to the power level of the device
to ensure it only uses the minimum level required to reach
the network
While there may be differences between the SAR levels of
various phones and at various positions, they all meet the
governmental requirements for safe exposure. Please note
that improvements to this product model could cause
differences in the SAR value for later products; in all
cases, products are designed to be within the guidelines.
SAR Data
42
SAR Data
The World Health Organization has stated that present
scientific information does not indicate the need for any
special precautions for the use of mobile devices. They
note that if you want to reduce your exposure then you can
do so by limiting the length of calls or using a
“hands-free” device to keep the mobile phone away from
the head and body.
Additional Information can be found on the websites of
the World Health Organization
(http://www.who.int/emf) or or Motorola, Inc
(http://www.motorola.com/rfhealth).
1. The tests are carried out in accordance with international
guidelines for testing. The limit incorporates a substantial
margin for safety to give additional protection for the
public and to account for any variations in measurements.
Additional related information includes the Motorola
testing protocol, assessment procedure and measurement
uncertainty range for this product.
2. Please see the Safety and General Information section
about body worn operation.
OPEN SOURCE SOFTWARE INFORMATION
OSS Information
For instructions on how to obtain a copy of any source
code being made publicly available by Motorola related to
software used in this Motorola mobile device you may
send your request in writing to:
MOTOROLA, INC.
OSS Management
600 North US Hwy 45
Libertyville, IL 60048
USA
The Motorola website opensource.motorola.com also
contains information regarding Motorola’s use of open
source.
Motorola has created the opensource.motorola.com to
serve as a portal for interaction with the software
community-at-large.
To view additional information regarding licences,
acknowledgments and required copyright notices for open
source packages used in this Motorola mobile device,
follow these instructions:
1
From the phone Main Menu, select Settings.
2
From Settings, select Phone Settings.
3
From Phone Settings, select Legal Notices.
OSS Information
43
www.motorola.com
Certain mobile phone features are dependent on the
capabilities and settings of your service provider’s network.
Additionally, certain features may not be activated by your
service provider and/or the provider’s network settings may
limit the feature’s functionality. Always contact your
service provider about feature availability and
functionality. All features, functionality and other product
specifications, as well as the information contained in this
user guide are based upon the latest available information
and are believed to be accurate at the time of printing.
Motorola reserves the right to change or modify any
information or specifications without notice or obligation.
MOTOROLA and the Stylised M Logo are registered in the
US Patent & Trademark Office. The Bluetooth trademarks
are owned by their proprietor and used by Motorola, Inc.
under licence. Java and all other Java-based marks are
trademarks or registered trademarks of Sun Microsystems,
Inc. in the U.S. and other countries. Microsoft and
Windows are registered trademarks of Microsoft
Corporation; and Windows XP and Windows Media are
trademarks of Microsoft Corporation. Macintosh is a
registered trademark of Apple Computer, Inc. All other
product or service names are the property of their
respective owners.
© Motorola, Inc. 2008.
Caution: Changes or modifications made in the radio
phone, not expressly approved by Motorola, will void the
user’s authority to operate the equipment.
Software Copyright Notice
The Motorola products described in this manual may
include copyrighted Motorola and third-party software
stored in semiconductor memories or other media. Laws in
the United States and other countries preserve for
Motorola and third-party software providers certain
exclusive rights for copyrighted software, such as the
44
exclusive rights to distribute or reproduce the copyrighted
software. Accordingly, any copyrighted software contained
in the Motorola products may not be modified,
reverse-engineered, distributed or reproduced in any
manner to the extent allowed by law. Furthermore, the
purchase of the Motorola products shall not be deemed to
grant either directly or by implication, estoppel or
otherwise, any licence under the copyrights, patents or
patent applications of Motorola or any third-party software
provider, except for the normal, non-exclusive, royalty-free
licence to use that arises by operation of law in the sale of
a product.
Manual Number: 6803632F58
www.motorola.com
6803632F58
PMS 1807c
0/100/96/28