1
ge.com
Safety Instruc_tions
Operating
...........
2, 3
AHR30
Instruc_tions
About the Controls
on the Dehumidifier
. ...........
Automatic
Deflost ................
AHW30
4
5
Choosing
a Location
.............
5
How tile Dehumidifier
Operates
. . .5
Remoxing
Collected
Water
. .....
6
Water Lmel ....................
6
AHH40
AHR40
AHW40
AHRSO
AHWSO
AHR65
Care and Cleaning
Grille and Case .................
_A'ater Bucket ....................
7
7
Troubleshooting
8
Consumer
Consumer
Warranty
Tips ...........
Support
Support
.............
.....................
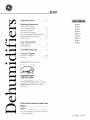
ENERGY STAR ® labeled
AHW65
12
11
product
ENERGY
STAR
As an
ENERGY STAR ® partner,
determined
that
this
product
ENERGY STAR ® guidelines
for
(;E
has
meets
the
enero_
efliciencx.
Write the model and serial numbers here:
Model #
Serial #
You can find them on a label on the back
of the dehmnidifier.
49-7589
12-07JR
IMPORTANTSAFETYINFORMATION.
READALLINSTRUCTIONSBEFOREUSING.
WARNING!
For your safe_ the information in this manual must be followed to minimize the risk of fire, electric shock
or personal injury.
SAFETY
PRECAUTIONS
When using this dehumidifier, always follow basic safety precautions, including the following:
•
Use this appliance
only for its intended
i)urpose as described
in this Owner's
Mannal.
•
Turn tile dehumidifier
before cleaning.
OFFand unI)lug
it
GE does not support any servicing of
the dehumidifier.
VVe strongly recommend
that you do ,lot attempt to serxdce the
dehumidifier
yourself.
This dehumidifier
must be properly
installed
and grounded
as described
in this manual
before
it is used.
Never operate this dehmnidifier
in an area
that is likely to accumulate standing water.
If this condition dex>lops, for your safbrv
disconnect
the power supply befose
stepping into the water.
Nexer unplug your dehumidifier
1)y pulling
on tile power cord. Always grip plug firmly
and pull straight out from the receptacle.
Replace immediately
all elecedc service
cords that haw become flaved or odserwise
damaged. A damaged power supply cord
must be replaced with a new power supply
cord obtained flom the mannfact/5ier
and
not repaired. Do not use a cord flint shows
cracks or abrasion damag_ along its length
or at eiflser rise plug or connector
end.
For your safety, do not store 05 use
combnsdble
materials, gasoline or other
flammable
vapors or liquids ill the vicinity
of this or any other appliance.
All dehumidifiers
contain refiigerants,
which under federal law must be remox>d
prior
rid of
check
about
m product disposal. If you are g_tdng
all old product with refrigerants,
with tile company handling
disposal
what to do.
Do not ttse outdoors.
This dehumidifier
is intended
indoor residential
This dehumidifier
applications
only.
should not be used
for commercial
or industrial
%5
applications.
If the receptacle
does not match tile plug,
the receptacle
must be changed out by a
qualified electrician.
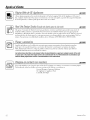
HOWTOCONNECT
ELECTRICITY
Do not, under any circumstances, cut or remove
the third (ground) prong from the power cord.
For personal safety, this appliance must be
properly grounded.
_411eie a 2-plong wall outlet is encounmred,
it is your personal responsibility and obligation
to haxe it 5ei)laced with a properly grounded
3-prong wall outlet.
DO NOT use an adapter plug with this appliance.
The dehumidifier
should always be
plugged into its own individual electrical
oudet, which has a x_ltag> rating matching
the rating plato.
Tile power cosd of dfis appliance is equipped
with a 3q)rong (grounding)
plug which mates
with a standard 3-prong (grounding)
wall
outlet to minimize tile possil)iligv of electric
shock hazard fiom this appliance.
Haxe the wall outlet and circuit
qualified
properly
2
electrician
grounded.
checked
1)v a
to make sure the outlet is
This proxqdes the best performance
and also
piexents oxerloading
house wiring circuits,
which could cause a fire hazard flom
oxerheated
wires.
ge.com
USEOFEXTENSION
CORDS
Because of potential safety hazards under
certain conditions, we strongly recommend
against the use of an extension cord.
However, if you must use an extension
cord, it is absolutely
necessa_ T that it be
a UL-lismd,
14 gauge, 3-wire grounding
type appliance
extension
cord having
a grounding
type plug and outlet and
that the electrical
rating of the cord be
15 amperes
(minimum)
and 195 volts.
READANDFOLLOW
THISSAFETY
INFORMATION
CAREFULLY.
SAVETHESEINSTRUCTIONS
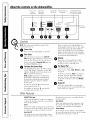
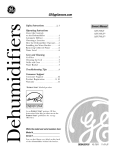
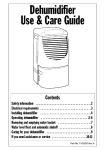
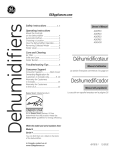
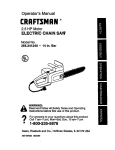
About the controls on the dehumidifier.
4 houror 2 hour
delayoff
indicatorlights
High,Medklm
and Lowfan
indicatorlights
Bucket
Fulllightindicates
bucketneedstobeemptied
orisnotinplaceintheunit
Cleanthe Filter Continuousoperationon
indicatorlight
indicatorlight
Humidity
%
4 hour
Conti
'u
Bucketm Full
ous
PowerOn
2 hour
Clean the
indicatorlight
Filter
ling
/VOTE'._'_hen the bucket
Controls
conti'ols
O
O
cannot
be
is tull or removed,
the
When you fi_st use the dehumidifie_;
the humidity control to 45% or 50%.
at least 24 l_otu_ fi)r the dehumidifier
achieve the humidity level. If you still
set.
Power Pad
Press to turn the dehumidifier
on and oil
damper air than desired, set t'he humidiQ'
level to a lower setting or select ContintlOtlS
for maximum
dehumidification.
Filter Timer
After 250 hours of operation, the Clean the
Filter indicator light MII gl()_ to remind you to
clean the filtei: Remove the filter and clean it.
Press to turn off the Clean the Filterlight.
the Care and Cleaning section.
@
set
Mlow
to
have
0
Display
Sho_s the set % humidity level _dfile
setting, then shows the actual (+/- 5%
accm'ac))
room % humidity
lmel.
See
Humidity Set Control Pads
The humidiff level can be set within a range
of 35% RH (Relative Humidity)
to 80% RH
(Relative Humidity)
in 5% increments
or at
COfi)r continuous
operation.
/VOTE'.If CO (Continuous)
is selected, the
dehumidifier
will operate continuously
at
its maMm um dehumidification
settings if
attached to a hose to drain or until the
bucket is flfll.
For drier ai_; press the • pad and set to
a lower percent vahle (%).
For damper ai_; press the • pad and set
to a higher percent vahle (%).
O
Fan Speed Pad
Controls
the tim speed.
Press to select
fan speed.
either
Set the tim control
moisture
remowfl.
has been
preferred,
or Low.
0
High, Medium or Low
to Highfor maximum
When the humidity
reduced
and quiet operation
is
set the fan control to Medium
Delay Off
%hile the dehumidifier
is in operation,
press this pad to set it to automatically
off in 2 hom_ or 4 hom_.
mrn
OtherFeatures
BUCKETFULLLight
(;lows when the bucket is ready to be emptied,
or when the bucket is removed or not replaced
in the proper position.
Alarm
]f the bucket is fifll or missing tbr more than three
minutes, an alarm will sound filr about l 0 seconds
to remind you to erupt} and replace the bucket.
Auto Shut Off
4
The Water I,evel Control Switch shuts off' the
dehumidifier
when the bucket is fifll, or when
the bucket is removed
proper position.
Auto Defrost
or not replaced
in the
%l_en fix)st builds up on the evaporator
coils,
the compressor
will cycle off and the tim will
continue
to rtm until the fi'ost disappears.
Power Outage
In the case of a power outage or interruption,
the unit will automatically
re-start, in the settings
last used, after the power is restored.
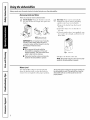
Usingthe dehumidifier,
gecom
When first using the dehumidifier, operate the unit continuously 24 hours.
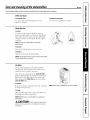
How the Dehumidifier Operates
Moist,
lmmid
air is drawn
over
a cold
Automatic Defrost
refi_igerated
delmmidif)ing coil. Moisture in the air condenses
on this coil and drains into a bucket (or through
a hose and drain).
&&]_en fl'ost
_]_en
Dr,x; clean air is drawn through the condenser
where it is heated and discharged
out the top grille
into the room.
builds
up
on the
evaporator
coils,
the
compressor will Q:cle off and the tim will continue
to run until the ti'ost disappears.
the coil
is defrosted,
will automatically
the
compressor
or tim
restart and dehumidifying will
I'eStllI/e.
It is normal for the surroundingair to become slightly
warmer as the dehumidifier operates.
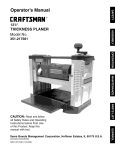
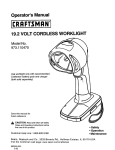
Choosing a Location
YES
A dehumidifier operating in a basement will have
little or no effect in dr)ing an ac!jacent enclosed
storage area, such as a closet, unless there is
adequate circulation
of air in and out of the area.
NO
• Do notuseoutdoors.
•
Thisdehumidifieris intendedforindoorresidential
applications only. Thisdehumidifiershould not be
used for commercial or industrial applications.
• Place the dehumidifier on a smooth, level floor
strong enoughto support the unit with a full bucket
of water.
12 18" rain.
12 1U rain.
• Allowatleast 12-18inches of airspace on allsides
of the unit for good air circulation.
• Place the dehumidifierin an area where the
temperaturewill not fall below 4I°F (5°0. Thecoils
can become covered with frost at temperatures
below 41°F,which may reduce performance.
• Use the dehumidifierin cooking,laundrg,bathing
and dishwashingareas that have excessive
moisture.NOTE:Place the dehumidifieraway
from the clothes dryer.
• Use the dehumidifierto prevent moisturedamage
anywhere books or valuablesare stored.
• Use the dehumidifierin a basementto help prevent
moisture damage.
•
Thedehumidifiermust be operatedin an enclosed
area to be most effective.
• Closeall doors, windows and other outside openings
to the room.
NOTE"Thedehumidifierhas rollers to aid placement,
but it shouldonly be rolled on smooth, flat surfaces.
Do not attempt to roll the dehumidifieron carpet or
over objects.
Usingthe dehumidifier.
Always make sure the water bucket is locked into place on the dehumidifier.
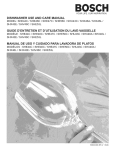
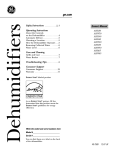
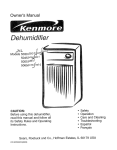
Removing Collected Water
Thereare 2 ways to remove collected water."
[]
Usethebucket "_&
hen the bucket is remoxed,
the
unit
will shut
off. Erupt'
and
replace
the
bucket.
[]
Use a hose. _&'ater can
emptied
a garden
1. Remove
tile
tile
be automaticall_
drain
by attaching
(not included).
into a floor
water hose
bucket
fl'om
tile
fl'ont
of
unit.
2. Open
tile
tile unit.
drain
cover
on tile
side
of
3. Thread a garden hose (not supplied)
onto
tile nozzle, cut to length, and lead it to tile
floor drain.
NOTE:Supportbucketwith
bothhandswhen empHing.
IMPORTANT"
Do not use the hose if using the
bucket to collect water. Whenthe hose is
connected, water will flow throughit onto the
floor instead of into the bucket.
NOTES:
• Do not remove the bucket while the
dehumidifieris operatingor if it hasjust
stopped operating. Thismight cause some
water to drip from the drain pan.
•
Thebucket mustbe in place and securely
seated for the dehumidifier to operate.
Sideof unit
4. Replace tile bucket in tile unit.
NOTE:Thebucket must be in place and securely
seated for the dehumidifier to operate.
Water Level
The
when
deh tunidifier
tile
bucket
will tui'n
is fldl,
off a utomaticall_
or when
tile
bucke{
is
remoxed or not replaced in tile proper position.
Thebucket must be replaced in the proper position for
the dehumidifierto work. Thelight will be on and the
dehumidifierwill not run ff the bucket is not in the
proper position.
Careand cleaning of the dehumidifier,
Turn the dehumidifier
ge.com
off and remove the plug from the wall outlet before cleaning.
Grille and Case
Toclean the case:
Use water and a mild detergent.
bleach or abrasives.
Do not use
Toclean the frontgrille:
Use a w_cuum attachment
or brush.
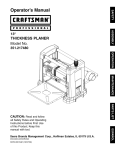
Water Bucket
Toclean'.
Every few week_, clean the bucket to prevent
growth of mold, mildew and bacmria. Partially fill
the bucket with clean water and add a little mild
detergent.
and rinse.
Swish it around
in the bucket,
empty
\
NOTE: Do not use a dishwasher to clean the
water bucket.
Toremove:
Remove
the bucket
and pour any water out.
Toreplace:
Slide the bucket
into the dehumidifier
NOTE:Thebucket must be in place and securelyseated
for the dehumidifier to operate.
Air Filter
The air filter behind the fi'ont grille should be
checked and cleaned at least eve_' 250 hom_ of
()l)eI';Itioll
or
I//oI'e
oJ[[en
if
necess}lI
"V,
_Mier 250 houi_ ot operation,
the Clean the Filter
indicator light will glow to remind you to clean the
film_: Remove the filter and clean it. Replace the
filter and press the Filter Timerpad to turn off the
Clean the Filter light.
Toremove:
Remove the bucket. Grasp the filter edge, and pull
it straight down and out.
NOTE:Avoid usinga dishwasher to clean the filter
Toclean:
Clean the filter with wamL soapy water: Rinse and
let the filter dry beti)re replacing it.
NOTE."DO NOT rinse or put the filter in an automatic
dishwasher
CAUTION:Do
Nor
operate
tbe
debumidifier
without a filter becausedirt and lint will clog it and reduce
performance.
7
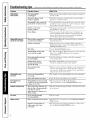
Troubleshootingtips...S eime
,,, money!
Review
thechartbelowfirstandyoumaynotneedto call
forservice,
Problem
Possible
Dehumidifier
does notstart
The dehmnidifier
is unplugged,
• Make sure the delmmidifier's
into the outlet.
plug is i)ushed
The fuse is blown/circuit
breaker is tripped,
"Check the house fllse/circuit
the filse or reset the breaker:
breaker
Dehumidifier
preset level
"The dehumidifier
automatically
turns off when either
condition
occurs. Change to a lower setting or erupt)'
the bucket and replace prol)erly:
Bucket
proper
Power
Dehumidifier does not
dry the airas #should
Dehumidifier runs
too much
Frost appears
the coils
on
Causes
What To Do
has reached
its
or bucket is full.
is not in the
position,
• The bucket
dehumidifier
failure.
completely
box and replace
Inust be in place and securely
to operate.
seated
fin" the
• There is a protective
tilne delay (up to 3 Ininutes) to
prevent tripping of the compressor
overload. For this
reason, the unit may not start n/mnal dehtuniclil_ng
fin" 3 minutes alter it is turned back on.
Did not allow enough time
to remove the moisture,
"X._q/en f]ist installed,
the desired dryness.
Airflow
• Make sure there are no curtains, blinds or flu'niture
blocking the front ()r back of the dehumidilie_:
See the
Choosing a Location section.
is restricted.
allow at least 24 l_otus to maintain
Dirty f'dter.
• See the Care and Cleaning section.
The HmnidJty Con_ol may
not be set low enough.
• For drier ai_; press the • pad and set to a lower percent
\:llue (%) OI" lit CO (con[intlOtlS)
toI" Ill}lXillltlll]
deh umidilication.
Doors and windows
be dosed tightly,
• Check that all (loo_s, windows
are securely closed.
may not
and other
openings
Clothes dryer may be
blowing moisture-laden
air into the room.
• Install the dehumidifier
away fl'om the (lrve_:
The dryer should be xented'to
the outside.
Room temperature
is too low.
• Moisture
remowll is best at higher room temperatures.
I,ower room teml)eratures
will reduce the moisture
remowll rate. Models are designed
to be operated
at
temperatures
al)ove 41°F (5°C).
Area to be dehumidified
is too large.
"The
Doors
• Close all do(n_ and windows
and windows
axe open.
capacib roI your dehumidifier
may not be adequate.
to the outside.
DehmnidJfier
has been recently
turned on, or room temperature
is below 41°F (5°C).
"This is nomml. Frost will usually disapl)ear
within 60 minutes. See the Automatic Defrost section.
Controls cannot be set
The compressor
will turn off
mad the fan will automatically
continue
to run for
approximately
3 minutes
at a
fLxed setting.
"This is nomml.
tim as desired.
Fan noise
Air is moving through
the dehumidifier.
• This is nomml.
Water on floor
Hose
• Check the hose c(mnecfion.
Water section.
Intend
connection
to use the bucket
collect water,
is attached.
8
may be loose.
but
a hose
to
Wait approximately
3 minutes
See the Removing
and set the
Collected
"Discomaect
the hose if using the bucket to collect water:
See the Removing Collected Watersection.
Notes.
ge.com
I
w
w
r_
9
m
_
Notes_
lmi
€_
m
ilmmm
lmi
m
i
_o
_m8
€_
m
m
Q_
€_
10
GEDehumidifier--One YearLimited Warranty.
Proof of the original purchase date
Staple your receipt here.
is needed to make a warranty claim.
For The Period Of."
We Will Replace:
One Year
From the date of the
originalpurchase
Replacement unittbr any product which tifils due to a (lefect in materials
The replacement
unit is warranted
fin" the remainder
of your prodtlct's
warrant}' period.
or workmanship.
original one-year
In Order to Make a Warranty Claim:
• Properly pack your refit. We recommend
original caxton mad packing materials.
using the
• Return the product
was purchased.
where it
to the retail location
• Include
in the
evidence
nmne
package
of date
and address
a copy
of original
of the sales
purchase.
and a description
receipt
Also
or other
print your
of the defect.
What Is Not Covered:
• Customer
instruction.
information
regaxdhlg
user controls.
This
m_aler's
operating
manual
has_'uctions
• Replacement
breakers.
provides
mad
• Failure
of house
fuses or resetting
due to corrosion
on models
of circuit
not corrosion-
• hnproper
h_staJlation, delivery or maintenance.
If you
have an installation problem, or if the dehumidifier
is of
hnproper
dehumidJfyhlg capacity, contact your dealer or
installer. You axe responsible
for providing adequate
electrical, plumbh_g and other cmmecthlg facilities.
• Dmnage to the product caused by improper power supply
voltage, accident, fire, floods or acts of God.
• Failure of the product resulting from modifications
the product or due to mlreasonable
use, including
to provide reasonable
and necessary mah_tenm_ce.
• Dmnage
to
failure
protected.
• Incidental or consequential
dmnage caused by possible
defects with this dehumidifier.
caused
after
delivery.
EXCLUSION OF IMPLIED WARRANTIES--Your sole and exclusive remedy is product replacement as provided
in this Limited Warranty. Any implied warranties, including the implied warranties of merchantability or
fitness for a particular purpose, are limited to one year or the shortest period allowed by law.
This warranty is extended to the original purchaser and any succeeding owner for products purchased for home
use within the USA.
Some states do not aflow the exclusion or limitation of incidental or consequential damages. This warranty gives
you specific legal rights, and you may also have other rights which vary from state to state. To know what your
legal rights are, consult your local or state consumer affairs office or your state's Attorney General
Exclusion of implied warranties: Except whom prohibited or restricted by law, them are no warranties, whether
express, oral or statutory which extend beyond the description on the face hereof, including specifically the
implied warranties of merchantability or fitness for a particular purpose.
Warrantor: General Electric Company. Louisville, KY 40225
11
ConsumerSupport.
gEAppliancesWebsite
ge.com
Haxe a question or need assistance with your appliance? Try the (;E Appliances _4'ebsite 24 hom_ a day
any day of the xear'. For greater comenience
and taster service, you can now download Owner's Manuals,
or exert order parts on-line.
RealLife DesignStudio
ge.com
GE supports the Universal Design concept--products,
services and environments
that can be used by
people of all ages, sizes and capabilities. We recognize the need to design lot a wide range of physical
and mental abilities and impaim_ents.
For details of GE's Universal Design applications,
including
kitchen
design ideas fin" people with disabilities, check out our Website today. For the headng impaired,
please call
800.TDD.GEAC
(800.833.4322).
PartsandAccessories
ge. com
Individuals
qualified m se_'ice their own appliances
can have parts or accessories sent directly to their
homes (VISA, MasterCard
and Discover cards are accepted).
Order on-line today, 24 hours evet-v day or
by phone at 800.626.2002
dining nomml business hours.
Instructions contained in this manual cover procedures to be performed by any user. GEdoes not support any
servicing of the dehumidifier. We strongly recommend that you do not attempt to service _e dehumidifier yourself.
ContactUs
If vou are not safistied
including your phone
2
ge. com
with the service w)u receive fl'om (;E, contact us on our X_'ebsite with all the details
ntllllbeI;
oi" wlJte to:
(;eneral Manage_; CtlStOlllei" Relations
GE Appliances,
Appliance
Park
i,ouisville, KY 40225
Printed in China
ge.com
Instrucciones
©
de seguridad
....
9 3
Instrucciones
de operaci6n
Acerca de los controles
..........
C6mo desechar
el agua acumulada
C6mo flmciona
el deshumedificador
4
..............
6
. ............
5
Descongelado
automddco
........
Nivel de agua ...................
Selecci6n
del lugar adecuado
.....
5
6
5
Cuidado
y limpieza
Rejilla y gabinete
................
Tanque de agua .................
7
7
Soluci6n
8
de problemas
..........
Ayuda
al cliente
Ayuda al cliente ................
Garantfa
......................
Producto
con
la etiqueta
AHR30
AHW30
AHH40
AHR40
AHW40
AHRSO
AHWSO
AHR65
AHW65
19
]]
ENERGY STAR ®
ENERGY
STAR
Como
un
asociado
determinado
que
las gufas
de
Energy
de Energy
este
Star%
producto
Star _ para
GE ha
cumple
con
eficiencia
energ_tica.
Escriba los nf/mems de modelo
y serie aquL"
# de Modelo
#de Serie
Puede
tma
desh
en('onti'ai"
estos
etiqueta
en la parte
umedificador,
n(/I/leI'os
atr_s
en
del
49-7589 12-07JR
INFORMACIONIMPORTANTEDESEGURIDAD.
LEATODASLASINSTRUCCIONES
ANTESDEUSAR.
iADVERTENCIA
!
Por su seguridad, se debe seguir la informaciSn en este manual para minimizar el riesgo de incendios,
descargas el#ctricas o lesiones personales.
PRECAUCIONES
DESEGURIDAD
AI usar este deshumedificador, se deben seguir precauciones b#sicas de seguridad, incluyendo
[as siguiontosJ
•
Use este electrodom_stico
solamente
para
el prop6sito detenninado
segfin se describe
err esm Manual del propietario.
Apague el cormol y desenchufe
su
deshumedificador
arrtes de hacer cualquier
reparaci6n o limpiar
Este deshumedificador
(;E no estfi no apoya que se le proporcione
ningt]n servicio al deshumedificador
Vehementemente
recomendamos
que
usmd no irrmnte propolvionar
servicio
a] deshumediflcador
usmd mismo.
debe iustalarse
correctamente y conectado a tierra de
acuerdo con I&sinsl.ucciones
de este
manual antes de su uso.
Nunca opere este deshmnedificador
en un
firea en la que es posible que se acumule
agua. De encontrarse
en estas corrdiciones,
por su segufidad, desconecte
el suministro
de corrienm el_ctrica arrms de pisar sol)re
el agua.
Nunca
desenchufe
su deshumedificador
tfiando del cable el_ctrico. Siempre
agmTe firmemente
el enchufe y tire de
61 directamente
hacia afl_era.
•
Reemplace
inmediatamente
todos los cables
d6clMcos que se hayan pelado o que se
hwan dafiado de alguna otra manera.
Un cable de coniente
daflado no debe
repararse, sino que debe ser sustituido por
uno nuexo que se adquiera del thbricanm.
No use nn cable el6ctrico que mnesue
evidencias de demrioro, o daflos de
abrasi6n era su superficie err alguno
de sns extremos.
•
2
Si el receptficulo
no coincide con el
enchnfe, un electficista calificado debe
reemplazar
el receptficulo.
Pot su seguridad, no almacene ni use
mamriales combustibles,
gasolina u otros
vapores o lfquidos inflamables err la
proximidad
de _ste o algfin otto
electrodom_stico.
Todos los deshumedificadores
condenen
reflig>ranms, los cuales se deben evacuar
arrms de desechar el producto de acuerdo
con la ley federal. Siva a desechar algfin
aparato arrfiguo corr reflJgeranm,
consnlm a
la compafifa a carg_ de evacuar el aparato,
asegfirese de hacerlo adecuadamente.
No use el deshumedificador
Este deshumedificador
en exteriores.
estfi disefiado
exclusixamente
para aplicaciones
residenciales
de irrterior. No debe usarse
para aplicaciones
indnstfiales.
comerciales
ni
ge.com
COMOCONECTAR
LAELECTRICIDAD
Bajo ninguna circunstancia, corte o remueva la
tercera pOa (tierra) del cable el#ctrico. En pos
de la seguridad personal, este electrodom#stico
debe siempre conectarse a tierra.
NO USEun enchufe adaptador con este aparato.
E1 cable el_ctfico
de este electrodom_sfico
estfi
equipado con un enchufe de tres pfias (tielTa)
que combina con un tomacorfienm
estfindar
de tres tomas de pared para minimizar la
posibilidad de una descalga el_ctrica.
Pida a un t&nico que inspeccione
el
tomaconqenm
y el circuito para cerciorarse
de que el tomacorfiente
estS conectado
a
fiena de la manera apropiada.
Donde exism un tomacolTiente
de dos tomas,
es su responsabilidad
y obligaci6n persona]
hacer que dicho tomacon_ienm
sea
reemplazado
por uno de tres tomas con
conexi6n a tiena.
E1 deshumedificador
deberfa
conectado
a un tomacorfiente
su circuito
de xolt_e
siempre estar
individual con
conespondiente.
Esto proporciona
el mayor rendimiento
y
ademfis evim que los circuitos del resto de
la casa se sobrecarguen,
1o cual podlSa causar
incendios por el sobrecalentamiento
del cableado.
USODECABLES
DEEXTENSION
Debido al potencial de riesgos de seguridad
bajo ciertas condiciones, en#rgicamente
recomendamos en contra del uso de cables
de extension.
Sin embargo,
si usted se ve en la necesidad
de usar un cable el_ctrico
de extensi6n,
es
absolutamente
necesario
que el mismo est_
listado bajo UI,, sea calibre 14, del tipo
de 3 tomas con conexi6n
a fierra para
electrodom_sticos
v el fndice el_ctrico debe
ser de 15 amperios
(mfnimo)
y 195 volfios.
LEAYSIGAESTAS
INSTRUCCIONES
DESEGURIDAD
CUIDADOSAMENTE.
GUARDEESTASINSTRUCCIONES
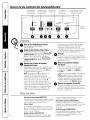
Acerca de los controlesdel deshumedificador.
Luces indicadoras de
Luces indicadoras de
Luz indicadora de
Luz indicadora de
retardo en apagado
de 4 horas o 2 I_oras
velocidad de ventiiador
aita, media Y baia
iimpieza de fiitro
funcionamiento de
operacion continua
Humidity
Laluzdetanquelienoindicaque
eltanquedebevaciarse
o queno
seencuentra
enlaunJdad
%
4 hour
Conti
uous
Bucket
Full
2 hour
Clean the
Filter
indicad0rade
encendido
Cleo
de Encendido/Apagado(Power)
0 BoMn
Controles
Presione pare encender o apag=_r el
24 h/tn_s para que el deshumedificador
alcance
el ni_el de tmmedad. Si el aire adn est;_ x;,x_is
hfimedo de lo deseado, @lste el hi\el de
humedad a un nivel menor 11seleccioi]e el bot6i]
de flmcionamiento continuo (Continuous) para
11bteI]er uI]a mfixima deshumidificacidn.
deshurrmdificador.
O
O
Temporizadordel
(Filter Timer)
Despu4s
de 250 boresfiltro
de operaci6n,
se
ei]cender;_ la ]uz hldicadora de Clean the Filter
(Limpieza de filtro) pare recordarle que debe
limi)iar el filtro, Quite el filtro y lfmi)ielo,
Presi/me })ai_ at)agar, ]a luz, de Clean the Filter
(Limpieza de filtro)light. Vex"la secddn Care
and Cleaning.
otonespara el Controlde humedad
(Humidity Set Control)
O
O
Px_sione pare seleccionar la _elocidad del
ventilador en alta (High),medio (Medium)o
bajo (Low).
contintlo.
NOTE:
s] se selecciona
CO (Continuous),
el
deshumedificador
fimcionm'_i en forma
continua en la configulacidn
m_xima de
deshumedificacidn
haste que se llene el tanque.
Si desea aire mils seco, presioi]e el bot6n •
seleccione ui] valor porcentual mils b@) (%).
Si desea aire mils hdmedo, presione el botdn •
seleccione ui] valor porcentual mils alto (%).
Cuai]do use por t)rimera vez el deshumedificadox;
coloque el control del deshumedificador a 45%
6 50%. Pemdm que transcurr, m t)11rlo menos
oton de velocidad del ventilador
(Fan Speed)
Coxm'ola la velocidad de cir(ulacidx] del aix>.
La humedad se puede controlar a niveles de entre
35% HR (humedad xvlativa)_0% HR (hurnedad
x_lativa) en incrementos del 5% o c(m CO pare
1In lilncionailliento
antalla
Muestm el % del nixel de humedad progmmado
durante ]a coi]fig-uraci6i], ]uego muestm el % del
nivel de humedad real de ]a habitacidn (con una
pxvcisidn de +/- 5%).
(k!loque el comrol del xentilador a alta xelocidad
(High)pare lograr remover la rna_or caI]tidad
de lmlnedad. Cuando ]a humedad haya sido
reducida _ usted prefiera ui]a operaci6i] mils
tnmquila," coloque el control del ventilador
a medio 11bajo vek)cidad (Medium)o (Low).
O
Retardo en apagado (Delay Off)
Mientras el deslmmedificador
se encuentra
en funcionamiento,
presione
este bot6n
pare que se apague autom_ificamente
alas
2 horas o alas 4 horas.
Otrasfunciones
Indicadordel tanquedeagua (BUCKETFULL)
Este indicador se ilumina cuando el taI]que est(: lleI]o
y debera vaciarse, o cuand/t el recipiente se remue_a
o I]O estd colocado en la posicidn corx_cta.
Alarma (Alarm)
Si el tanque se encuentra lleno o no est5 en su
lugar pot m_is (le tres minutos, sonar_i una alarma
dumnm 10 segundos para recordarle de vaciar
u)l\er a colocar el tanque.
Apagade automatice(AUTOSHUTOFF)
4
E1 ]nmrruptor de control de nivel de ague N)aKa
el deshumedificador
cuando el tai]que est(4 lleno
11cuand/t el tanque no est(_ presente 11n11est(_
colocado en una posicidn apropiada.
Oescongelade autematice(AUTODEFROST)
Cuando se acumule escarcha en los serpentines
evaporadm>s, el compresor se apag_mL y el vemilador
continuarfi flmcionai]do haste que la escarcha
desaparezca.
Perdidade energia (POWEROUTAGE)
En caso de la p(_rdida de la energ-[a o ix]terrup(i6n,
la uI]idad reii]iciarfi automfiticameI]te, eI] las
config-ur, lciones usadas por filtima vez, una vez
la energfa sea restaNecida.
Comousar el deshumedificador,
ge.oo
Cuando se disponga a usar el deshumedificador por primera vez,permita que la unidad opere de manera continua
pot 24 horas.
Como funciona el deshumedificador
Descongelado automMico
i,a lmmedad
en el aire pasa pot un seq)entin
deslmmedificado_;
i_ lmmedad
en el aire se
Cuando se acumule escarcha en los seq)entines
ewq)oradores,
el compresor
se apagar;i, y el
venfilador
continuar;_ fiulcionando
hasta que
la escarcha desaparezca.
condensa
en este seq)entin y se drena hacia el
tanque (o a tra\'g_s de la manguera
y luego tra\'g_s
del drenaje).
E1 aire limpio y seco pasa luego pot el condensador
donde es calentado v desechado
de regreso al
medio ambiente a travg_s de la parrilla.
Cuando el ex_q)orador se descongele,
el compresor
o el ventilador se encendeM
autom;iticamente
v el
proceso
de deshumedificaci6n
continuar;i.
Es normal que el aire en los alrededores se caliente un
poco conforme el deshumedificador funciona.
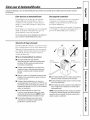
Seleccion del lugar adecuado
E1 deshumediticador
ubicado
en un sdtano
SI
ten(lM
NO
poco o ningfin etecm en secar el aire dentro areas
a(!jacentes
de
ahllacenallliento,
COIllO
tin
[llIIl[lIJO_
pot eiemplo, al inenos que exista una circulaci6n
adecuada de aire hada en interior v hacia el
exterior
•
de dicha
;irea.
No use el deshumedificador en exteriores.
Estedeshumedificadoresta disefiado
exclusivamentepara aplicacionesresidenciales
de interior.No debe usarse para aplicaciones
comerciales ni industriales.
30 46 cm
(12 18 pulgadas)irlin.
30 46 cm
(12 18 pulgadas)rain.
• Coloqueel deshumedificadoron un piso firme y
niveladoque sea Io suficientementefuerte para
soportar la unidad cuandola cubeta est# Ilena
de agua.
• Dejeporlo menos 12-18pulgadasde espacio libre
alrededor de la unidad para que exista una buena
circulaciSn de aire.
• Coloqueel deshumedificadoren un area en la
que la temperatura no sea inferior a 41 °t:(5 °C).Los
serpentinespueden escarcharse en ambientescon
temperaturasinferiores a 41 °F (5 °C),Io cual puede
reducir su rendimiento.
• Use el deshumedificadoren areas como
la cocina, cuartos de lavado,bafios, yen areas
donde exista humedadexcesiva.NOTA:Coloque
el deshumedificadorlejos la secadora de ropa.
• Use eldeshumedificadorpara evitardafios
causadospor la humedaden lugaresdonde
guarde libros o artfculos de valor.
• Use el deshumedificadoron el s6tanopara ayudar a
prevenir los dafios causadospor la humedad.
• Eldeshumedificadordebe usarse en areas cerradas
para mayor efectividad.
• Cierre todas laspuertas, ventanasy otras aberturas
hacia el exterior de la habitaciSnen donde est# el
deshumedificador.
NOTA:El deshumedificadortiene ruedaspara ayudarle
a colocarlo en distintos lugares, pero debe rodarse en
superficies firmes y plantas. No intente rodarlo sobre
objetos o sobreuna alfombra.
Comousar el deshumedificador.
Siempre cerciSrese de que la tanque de agua est_ asegurada en su lugar dentro del deshumedificador.
Como desechar el agua acumulada
Hay2 formas de desechar el agua acumulada:
]
Use el tanque. Cuando tlsted Sa(lt/e el tnn(ltle
de su lu,_,aI;la Ulfidad sea I_agaI'_,Vacfe v,
reinsmlelo.
[]
Use una manguera. E1 agua puede desechax'se
autoln_ticanlente
hacia tm dren_!ie ell el piso
si usted conecta el tubo de drenaje con
boquilla de la mfidad a tma inanguera
paI'a
agua dejardfn
(no incluida).
1. Saque el tnnque
del fl'ente de la mfidad.
2. Abra la tnpa de drenaje
la mfidad.
sobre el lado de
3. Enrosque
una nmnguera
parajardfn
(no
provism) en la boquilla, cut to length, y
dirfjala al di'en;!ie de piso.
NOTA:Paravaciarlo,tome
el tanqueconambasirlanos.
IMPORTANTE:No use el manguerasi usa el
tanquepara recoger agua.Si el manguera est#
conectada, el agua caer# al piso en lugar de caer
dentro del tanque.
NOTAS:
• No retire elbalde con eldeshumedificador
en funcionamientoo si reci#n se apag6.Esto
puede hacer que el agua gotee del recipiente
de drenaje.
• Eltanque debe estaren su lugarybien sujeto
para que el deshumedificadorfuncione.
ParLelado
dela unidad
4. Vuel_a a colocar el tnnque en la mfidad.
IVOTA:El tanquedebe estar on su lugar y bien
sujeto para que el deshumedificadorfuncione.
Nivel de agua
E1 deshmnedificador
cuando
el tnnque
relllovido
o no
apropiada.
sea
se apagar_i auton/_iticanlente
se llene,
colocado
o cuando
en
la
el tanque
posicidn
sea
El tanque debe colocarse on la posiciSn apropbda para
que el deshumedificadorfuncbne. La luzso encender#
y el deshumedificadorno funck_nar#a no ser que el
tanqueest_ colocado on la posbi6n apropbda.
Cuidadoy limpiezadel deshumedificador,
Apague
el deshumedificador
y desconecte
el enchufe
del tomacorriente
ge.oo
en la pared antes de limpiarlo.
Refilla It gabinete
Para limpiar el gabinete:
Pare limpiar la rejilla:
Use agua y un detergente
de baja concentraci6n.
No use blanqueador
ni limpiadores
abrasiw)s.
Use una aspiradora
con accesoiJo
o un cepillo de mano.
de cepillo
suave
Tanque de agua
Para limpiar:
L)espu_s de algtmas semanas,
evitnr la fimnaci6n
de moho,
iJene parcialmente
el tnnque
agregue tm poco de detergente
contenido
demro del tnnque,
eqj ufigueh_.
IVOTA: No use tma mfiquina
el tnnque de agua.
limpie el tnnque para
mildifi v bacterias.
con agua limpia y
suave. Agite el
luego \:_cfelo v
lavavajillas
\
para limpiar
Para retirar:
Retire
el tnnque
y deseche
todo resto de agua.
Para volver a colocar:
Coloque el tnnque
deslizfindolo.
en el deshumedificador
NOTA:El tanque debe estar en su lugar y bien sujeto
para que el deshumedificadorfuncione.
Filtro de aire
E1 filtro de aire detrfis de la rejilla ti'ontnl debe
inspecdomn_e
y limpia_se per lo inenos cada
250
horas
o IIlfis
_l Illentldo
si fllese
necesaiJo.
Despu_s de 250 horas de operaci6n,
se encenderfi
la luz indicadora
de Clean the Filter (timpieza de
filtro) para recordarle que debe limpiar el filtro.
Quite el filtro y lfmpielo. Vuel\_ a colocar el filtro v
presione el bot6n Filter 71mer(tempofi/ndor
del
filtro) para apagar la luz Clean the Filter (limpieza
del filtro).
/VOYA:Evite usar tma mfiqtfina
limpiar el filtro.
Para retirarlo:
Quite el tnnque, tome
hacia abajo y afllera.
el extreme
lawmljillas
para
del filtro yjale
Para limpiar:
I,impie
pei-/llit_l
el filtro con agua tibia yjab6n. Eqjtlfiguelo
que
se seque
antes
de colocarlo otI'a vez
y
ell
su luga_:
NOTA: NO enjuague o lave el filtro usando una m_quina
lavavajillas autom#tica.
A PRECAUCION:No
deshumedificadorsin el fi/tro debido a que /a suciedad
y/as pe/usas /o obstruirfin y reducirfin su rendlmiento.
7
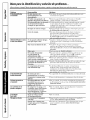
Ideas para la identificaciony solucionde problemas...
iAhorre dinero y tiempo! Revise la siguiente tabla primero y quiz_s no tonga que Ilamar para solicitar servicio.
Problema
El deshumedificador
no enciende
Oue hacer
Causas posibles
I_] cable el6ctrico
deshmnedificador
desenchufado.
del
estfi
E1 fusible
estfi quemado
o el
sTtmtor
del circuito
estfi abierto.
El deshmnedJficador
ha aJcaalzado
su lfivel preseleccionado
o
el taalque de agua estfi lleno.
E1 tm_que
Corte
Deshumedificador no seca
el aire come debiera
de
no estfi en su lugax.
escasa
circulaci6n
tiempo
de aJre.
FMtro sucio
E1 Control
El ventilador
hace mido
Hay agua en el piso
" E1 deshulnedificador
se apaga
aUtoln;ificalnente
cuando
OCUlTe algtma
de las dos condiciones.
Cambie
a tma
configuracidn
in,is b_!ja o \_lcfe el tnnque
de agua y
reinstale
apropiadan/ente.
• E1 tnnque
debe estnr
el deshulnedificador
" ()lando
24 horas
deseada.
ell su lugar
tuncione.
se instala
por plJn/era
para que se inantenga
para
que
lo
baio.
de
Cuidadoylimpieza.
• ]nstale
el deshulnedificador
E1 secador
debe desechar
de ropa podxia estax
aJre hfimedo
en
del rech_to
baja.
E1 vohunen
de aJre a
deshmnedificax
es excesivo.
y venta_as
E1 deshumedJficador
estim
ha sJdo
encendJdo
hace poco o la
temperatura
del rech_to
es
inferior
a 41°F (5°C).
E1 compresor
se apaga,
y el
ventilador
sigue ftmcionando
automfiticamente
durm_te
aproximadamente
3 minutos
a una configuraci6n
ilia.
E1 aJre se mueve
a trav6s
del deshumedJficador.
a la mmlguera
vez, deje que pasen
el nivel de hulnedad
aire in;is seco, presione
el botOn y seleccione
poi'centtlal
Ill;iS b@) (%) o elI CO (con[intlo)
obtener
una in_ixinm
deshumidificacidn.
1_3secador
genermldo
el rech_to.
La conexione
estfi floia.
sqieto
y bien
• (_ercidrese
de que no haya cortinas,
pei_ianas
o
muebles
que bloqueen
la parte posterior
6 al fl'ente
del deshmnedificadoi:
Vea la secci6n
Seleccione
el lugar
adecuado.
"Para
\ulor
para
h_tenta
usax el tm_que para
recoger
agua, pero el mm_guera
eslk colocada.
8
del drcuito
6 el filsible;
acfivar
el disvuntoi:
• Revise qtle todas las ptlertas,
estSn cerradas
conq)letalnente.
Las puertas
abiertas.
Los controlesno se
pueden configurar
disvuntor
o \;uelva
Las puertas y ventaa_as
no
estfi_ cerradas
completmnente.
La temperatura
estfi demasJado
Se forma escarcha en
el serpentin
la c_tja del
el fllsible
" Vea la secd6n
de humedad
no estfi ajustado
suficientemente
El deshumedificador
trabajademasiado
" Revise
cambie
est_
• Hay una delnora
protectora
(de hasta 3 ininutos)
para prevenir
la interrupd6n
de la sobrecarga
del colnpresor.
Por esa razdn,
la unidad
no reiniciai'_
la deshmnedificaci6n
a los 3 ininutos
de haber
sido encendida
de nuevo.
energla.
No ha pasado suficiente
paxa que seque el aJre.
Hay
de que la dav!ia del deshulnedilicador
ell la pared.
"Cercidrese
conectada
ventnnas
y otras
un
abei_ttli'as
lejos de la secadora
de ropa.
el aire hacia el extelJor.
" I:t deshmnedificaci6n
es inejor a telnperaturas
ambiente altas. Telnperaturas
k@s causan bajo
rendilniento
de deshulnedificacidn.
Modelos estSn
disefiada para flmdonar
a telnperamras
por encilna de 5 °C (41 °F).
" I_t capacidad
de su deshulnedNcador
i5o est_in adecuada.
"(Serre
todas
las puertas
• Esto es nOlillal.
ell 60 ininutos.
y ventanas
que dell
al exterioi:
I_t escai'cha
nOlillah/lente
desapai'ecei'_i
Vea la secci6n
de Doscongolado
automdtico
(Automatic defrost).
" Esto es nomml. Espere aproxilnadan/ente
coloque el ventilador
lo desee.
3 ininutos
v
• Esto es noli//al.
"]nspeccione
la cone_one
seccidn
Cdmo desechar
• Desconecte
....
el
agua. (_onsulte
acumulada.
i/l_tllgtlei'a,
la secci6n
a la inanguera.
el aqua acumulada.
Consulte
la
si liSZt,el [;tll(llt/e [)_lI';I recoger,
Como dosechar ol agua
Nota$.
ge.com
I
I
!.
m
w
9
Notas_
im
r_
Q_
m
N
q_
m
q_m
m
€_
r_
q_
10
Garantiade su deshumedificadorGEmgarantia limitada de un a#o.
Se requiere que usted presente prueba de la fecha de compra original para hacer un reclamo
Grape aqui su recibo.
de garantia.
Par el periodo de:
Nosotros reemplazaremos:
Unaria
A partir de la fecha
de compra original
Unidad de reemplazo para cualquier producto que tidle debido a detectos en los matefiales o en
el proceso de tid)ficaci6n. I,a uni(hd de reemplazo est_i gamntizada
para el testa del perfodo
de un aflo de garantfa original del pmducto.
Para hacer un reclamo de garantia:
• Empaque su mlidad apropiadmnente.
usm" el cm'tdn original y los materiales
• Regrese el producto
lo compro.
Recomendmnos
de empaquetado.
M local de ventas donde
usted
• hacluya en el paquete maa copia del recibo de venta
u olra evidencia de la fecha orighmJ de la compra.
Ademfis imprhna su nombre y dJreccidn y tma
descripcidn
del defecto.
Lo que no esM cubierto:
• Instrucciones
proporciona
paJca el cliente.
hfformaci6n
de operaci6n
• InstaJaci6n
hnpropio.
hlstaJaci6n,
capacidad
con nueslro
proporcionar
ilecesaaJas.
y de sus
proporcionar
tiene
usted
necesita,
p6ngase
Usted
el6ctricas
a consecuencia
mm_te_fimiento
durmlte
la
la
adecuado
de su hogm" o reajuste
del sistema
que no estfia_
• Da£lo aJ producto
causado par voltaje hlapropiado
hacia
el equipo, accidentes, h_cendJos, hltmdaciones
o actos
de Dios.
en contacto
de
y de plomeria
• Daa-_o hlcidentaJ
o consecuenciaJ
defectos
con el deshmnedificador.
de modJficaciones
a usa irrazonable
• Reemplazo
de fusibles
de circuitos.
• FMlo debido a la corrosidn en modelos
protegidos contra la corrosidn.
no fiene
es responsable
las h_stalaciones
o debido
propietario
o mmltenhniento
tin problema
dJstribuidor.
• FaJlo del producto
aJ producto
hmpropiada,
o si su deshtunedificador
que
del
de las hlslrucciones
controles.
o entrega
Si usted
E1 Manual
acerca
hlcluyendo
• Causax
daXaos despu6s
causado
par posJbles
de la en_ega.
no
y necesaa'io.
EXCLUSION DE GARANTIAS IMPLJCITAS--su #nico y exclusive derecho es la reemplazo del producto, tal y
coma se indica en esta Garantia limitada. Cualquier garantia implicita, incluyendo las garantias implicitas de
comerciabilidad o adecuaci6n para un fin determinado, esMn limitadas a un a#o o el periodo de tiempo mas
breve permitido par la ley.
Esta garantfa so extiende al comprador original y cualquier comprador posterior de productos comprados para usa
residencial dentro de Estados Unidos.
Algunos estados no permiten la exclusi6n olas limitaciones de dafios incidentales o consecuenciales. Esta garantfa
da derechos legales especificos, y usted podria tenet otros derechos que variar#n de estado a estado. Para saber
cu#les son sus derechos legales, consulte a la oficina de asuntos del consumidor local o la oficina del abogado oficial
(Attorney General) en su Iocalidad.
Exclusion de garantias implicadas: Excepto donde esN prohibido o restringido par la leg no hay garantias, expresas,
orales o estatutarias que extiendan m#s all# de la descripciSn especffica, incluyendo especificamente /as garantfas
implicadas de mercantibilidad o propiedad para un propOsito particular.
Garante: General Electric Company. Louisville, KY 40225
11
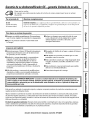
Ayuda al cliente.
P_ginaWebdeGEAppliances
ge.com
;Tiene_ alouna_ l_regunta, sobre su electrodom_stico?
iPmebe la pfigina Web de (;E Appliances
dfa, cualquier dfa del aflo! Para mayor comeniencia
'_ ser\icio mils rfipido, )a puede descargar
de los Propietarios,
o incluso pedir piezas hacer una cita en lfnea.
24 horas al
los Manuales
RealLifeDesignStudio(Estudiode disefio para /a vida real)
ge.com
(;E apoya el concepto
de Disefio Unive_al--productos,
servicios y ambientes
que pueden usar gente de
todas las edades, tamafios y capacidades.
Reconocemos
la necesidad
de diseflar para una gran gama de
habilidades
v dificultades tZsicas y mentales. Para mrs detalles cobre las aplicaciones
de GE Disefio Universal,
incluvendo
ideas de disefio para la cocina para personas con discapacidades,
mire nuestra pfigina _'eb hoy
mismo. Para personas con dificultades auditiw_s, fi_\'or de llamar al 800.TDD.GEAC
(800.833.4322).
Piezas?accesorios
ge.com
Aquellos individuos
con la calificaci6n necesaria para reparar sus propios electrodomg_sticos
pueden
pedir que se les manden las piezas o accesorios directamente
a sus hogares (aceptamos
las tmjetas
VISA, MasterCard
y Discover). Haga su pedido en lfnea hoy, 24 horas cada dfa o llamar pot telGfimo
al 800.626.2002
durante horas nommles de oticina.
Las instrucciones descritas en este manual cubren los procedimientos a seguir por cualquier usuario. GEno esta
no apoya que se le proporcione ningun servicio al acondicionador de aire. Vehementemente recomendamos que
usted no intente proporcionar servicio al acondicionador de aire usted mismo.
P6ngaseen contactocon nosotros
Si no estfi satisfecho con el servicio que recibe de GE, pdngase en contacto con nosotros
_A'ebindicando
todos los detalles asf como su nfimero de tel_fimo o escrfl)anos a:
ge.com
en mmstra
pfigina
General Manage_; Customer ]),elations
GE Appliances,
Appliance
Park
I,ouisville, KY 40225
/2
Impreso on China