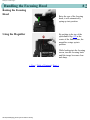
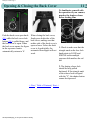
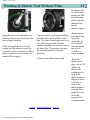
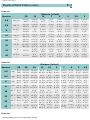
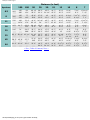
1
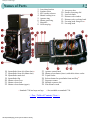
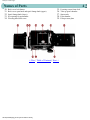
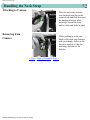
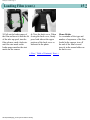
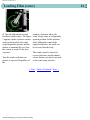
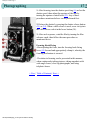
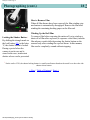
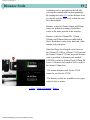
Mamiya C330S Manual
Mamiya C330 Professional
Mamiya C330S & C330
This manual was adapted for the web from scans of an original
C330S manual. The scans were done by Erik Jonker. During the
conversion to the web version I made a few style changes as well
as a couple of grammer changes, mainly to make the document
more web friendly. Also thanks to Keven Fedirko for finding all
of my typos.
There are also a few additions that I made; pointing out where the
C330S differs from the original C330, and the color photos on
page 3 are of a C330, and not a C330s. (the color photos are by
Bob Erdman).
Scans of the tables on pages 40 and 41 were difficult to read and I
am hoping to get some better scans so that I can complete them.
At the moment they are empty...eventually they should contain
the depth of field tables for the 7 lenses listed in the manual.
Hope you find this helpful...John M. Brewer of a few
propellerheads.
[START] | Table of Contents | Next ->
file:///E|/c330s/index.html [22-10-2003 15:26:30]
Mamiya C330S: Contents
Mamiya C330 Professional
Before using the camera, read these
instructions very carefully, and learn
the correct method of hanlding it. By
becoming completely families with
the Mamiya C330 Professional "S",
you can for many years to come
make the most of the splendid
opportunities this fine camera offers.
1
Contents
Specifications..........................2
Names of Parts..........................3
Lens Mounting/Removal...................5
Handling the Neck Strap.................7
Handling Focusing Hood..................8
Opening and Closing the Back Cover.....11
Congratulations on your choice of Winding and Shutter Test Without Film..12
Mamiya C330 Professional "S"
Before Loading Film....................13
twin-lens reflex camera.
Loading Film...........................14
Photographing..........................17
This mamiya C330S, an
Distance Scale.........................19
exceptionally high-grade camera, was
Close-up Photography...................21
designed by emphasizing further
Changing the Focusing Hood.............23
improvements on the popular
Mamiya C series. Retaining the many Changing the Focusing Screen...........25
Flash Photography......................26
features of the Mamiya C series
Handling the 105mm f/3.5 Lens..........27
cameras which have won highest
praise from professional
Multiple Exposures.....................29
photographers the world over as
Precautions on Shutter Operations......29
unique twin-lens reflex cameras (2Mamiya Sekor Lenses....................31
1/4 in. square format) with
Accessories............................33
interchangeable lenses.
Depth-of-Field Tables..................40
System Chart for Mamiya C330S..........42
Final results reveal that this Mamiya
C330S, an ideal camera for
professional photographers, is also a
wise choice for the many advanced
amateurs who wish to take advantage
of fine details in enlargements which
only a large format camera truly
makes possible.
The Mamiya C330S accepts all
interchangeable lenses of the current
Mamiya C series as well as all of the
accessories except the single
exposure attachment.
file:///E|/c330s/page_01.html (1 of 2) [22-10-2003 15:26:31]
Mamiya C330S: Contents
With the wide selection of all these
interchangeable lenses and
accessories, you can further widen
your scope of photography by
making the most of the unlimited
versatility of Mamiya C330S offers.
<- Prev | Table of Contents | Next ->
file:///E|/c330s/page_01.html (2 of 2) [22-10-2003 15:26:31]
Mamiya C330S: Page 2
Specifications
2
Type
6 x 6 Twin-Lens Reflex Camera with Interchangeable Lens System
Picture Size
56 x 56 mm (actual picture area)
Film Size
120 roll film (12 exposures), 220 roll film (24 exposures)
Changeover effected by turning pressure plate
Lens (standard)
Mamiya/Sekor 80 mm f/2.8
Shutter
Seiko-#0 (B, 1-1/500 sec., M-X synchronization)
Focusing
Front extension system by rack-and-pinion with focusing knobs.
Focusing screen
Changeable
Focusing hood
One-touch operation facilitates interchange of dioptric lenses.
Removable and replaceable by other types of finders.
Film wind
By winding crank. Automatic shutter cocking and winding stop. Double
exposure prevention device.
Exposure counter Progressive type, automatic re-set. (120/220 changeover coupled with the
pressure plate)
Other features
Parallax and exposure compensation are readable on the focusing screen in the
finder.
Multiple exposure possible. Shutter release lock provided.
Dimensions
123 (W) x 171 (H) x 113 (D) mm
Weight
1,650 grams (with 80 mm f/2.8 lens)
·Due to a modification of the product, specifications and appearance are subject to change without
notice.
<- Prev | Table of Contents | Next ->
file:///E|/c330s/page_02.html [22-10-2003 15:26:31]
Mamiya C330S: Page 3
Names of Parts
3
1.
2.
3.
4.
5.
6.
7.
8.
16.
17.
18.
19.
20.
21.
22.
Sportsfinder frame (for 65mm lens)**
Sportsfinder frame (for 80mm lens)
Sportsfinder mask stud
Sportsfinder flap
Shutter release lever
Shutter release lock
Shutter release button (upper)
*
Lens clamp bracket
Synchro socket
M-X synchro selector
Shutter cocking lever
Aperture ring
Shutter speed ring
Magnifier
Neck strap lug*
23.
24.
25.
26.
27.
28.
29.
Standard C330 has loops not lugs.
Accessory shoe
Parallax correcting dial
Lens lock knob
Distance scale window
Distance scale revolving knob
Focusing knob fixing lever**
Focusing knob
Aperture control knob
Shutter release button (lower) with cable release socket
Tripod Socket
Release button for sportsfinder frame and flap**
Exposure counter
Multiple exposure dial
Film advance crank
**
Not available on standard C330.
<- Prev | Table of Contents | Next ->
file:///E|/c330s/page_03.html [22-10-2003 15:26:31]
9.
10.
11.
12.
13.
14.
15.
Mamiya C330S: Page 4
Names of Parts
30.
31.
32.
33.
34.
4
Back cover lock button
Back cover open knob and spool change knob (upper)
Spool change knob (lower)
Eye opening for sportsfinder
Focusing hood lock screw
35.
36.
37.
38.
39.
<- Prev | Table of Contents | Next ->
file:///E|/c330s/page_04.html [22-10-2003 15:26:31]
Focusing screen frame lock
Take-up spool chamber
Start marks
Film chamber
Film pressure plate
Mamiya C330S: Page 5
Lens Mounting/Removal
Wind up the film advance crank
and fold it into the camera
body. Turn the focusing knob
and fully retract the lens into
the camera body. Then, turn the
lens lock knob (11) until the
triangle mark points to
UNLOCK.
Place the camera so that the
lens mount faces upward and
pinch the lens clamp bracket
(1), press the head toward the
camera body, and move it along
the groove to release the lens
clamp. Now the body cap
and/or lens can be removed.
5
Insert the lens into the lens
mount so that the lens shutter
cocking lever (4) connects with
the cocking lever on the camera
body. This operation is more
easily performed by cocking the
lens shutter with the fingers and
inserting the lens from the
cocking lever side on the body.
Hook the lens clamp bracket (1)
to its original position, and turn
the lens lock knob (11)
clockwise to the LOCK
position.
<- Prev | Table of Contents | Next ->
file:///E|/c330s/page_05.html [22-10-2003 15:26:32]
Mamiya C330S: Page 6
Lens Mounting/Removal (cont.)
Precautions
1 If the film advance crank is not kept
positioned diagonally upward, (the same
angle as the crank housing position), the
cocking lever (4) cannot be connected to
the cocking lever on the camera body.
After changing a lens, set
the parrallax correcting dial
(10) to the focal length
value of the mounted lens.
For 55mm and 65mm
lenses, set the parallax
correcting dial to 80, then
attach the parallax
correction plate for
55mm/65mm lenses to the
focusing hood. (Refer to
p.22). For the 250mm lens,
set the parallax correcting
dial to 180.
2 For the cocking lever on the 180mm
lens, an auxiliary lever for connection is
provided on the side of the lens barrel.
Since this lever is constantly pushed
upward by a spring, when mounting the
lens, hold the auxiliary lever downward
with a finger tip to prevent obstructing
installation.
3 When the lens lock knob (11) is in the
UNLOCK position, the portion to which
the picture taking lens (lower lens) is
attached is protected from the camera
interior by a cover to shield the film from
exposure to light and a red warning signal
is visible on the focusing screen surface.
Should this cover be pushed while
removing the lens, light will strike the
film. Don't push it.
4 After changing a lens, turn the lens lock
knob (11) to the LOCK position,
otherwise, the shutter release button
cannot be depressed.
<- Prev | Table of Contents | Next ->
file:///E|/c330s/page_06.html [22-10-2003 15:26:32]
6
Mamiya C330S: Page 7
Handling the Neck Strap
Attaching to Camera
7
Place the neck strap fastener
over the neck strap lug on the
camera body and slide it toward
the hanging direction while
pressing it toward the body
until it clicks and locks in place
Removing from
Camera
While pushing in on the rear
blade of the neck strap fastener
with your thumb, slide it in the
direction opposite to that for
attaching, and remove the
fastener.
<- Prev | Table of Contents | Next ->
file:///E|/c330s/page_07.html [22-10-2003 15:26:32]
Mamiya C330S: Page 8
Handling the Focusing Hood
8
Raising the Focusing
Hood
Raise the rear of the focusing
hood; it will automatically
spring up into position.
By pushing in the top of the
sportsfinder flap (19) at the
center of the finder frame, the
magnifier swings up into
position.
Using the Magnifier
While looking into the focusing
screen, turn the focusing knob
until the image becomes clear
and sharp.
<- Prev | Table of Contents | Next ->
file:///E|/c330s/page_08.html [22-10-2003 15:26:33]
Mamiya C330S: Page 9
Handling Focusing Hood
9
Using the Focusing Hood as a Sportsfinder
1. By setting up the magnifier
and pushing down the
sportsfinder flap, and by
retaining the latter to the catch
at the bottom of the focusing
hood, the hood can be used as a
sportsfinder for the 80mm
standard lens.
2. After pushing down the flap
(19), also, fold down the finder
frame (17) to obtain the field of
view for the 65mm lens.
3. When using the 105mm,
135mm, 180mm, or 250mm
lens, attach the sportsfinder
mask corresponding with the
lens used to the sportsfinder
mask stud (18) to obtain the
correct field of view.
<- Prev | Table of Contents | Next ->
file:///E|/c330s/page_09.html [22-10-2003 15:26:33]
Mamiya C330S: Page 10
Handling Focusing Hood (cont.)
10
Using the Focusing Hood as a Sportsfinder
Folding the Focusing Hood
4. To return the sportsfinder
5. To fold the magnifier, simply
frame (17), and the flap (19) to depress the base plate of the
their original position, move the magnifier.
release button (26)* towards the
arrow mark and the frame and
the flap will automatically
return to position.
Return the sportsfinder frame
and flap; then fold the
magnifier. In this condition, the
focusing hood can be folded by
pressing the front frame inward
while pushing both side panels
inward.**.
*
The original focusing hood does not have a release button, simply jiggle the sportsfinder flap with your finger to
release.
** The original focusing hood does not have hinged flaps. You will need to fold the side flaps down before folding
down the back, and finally the front flaps.
<- Prev | Table of Contents | Next ->
file:///E|/c330s/page_10.html [22-10-2003 15:26:33]
Mamiya C330S: Page 11
Opening & Closing the Back Cover
11
To familiarize yourself with
the operation of your camera,
practice the shutter release
before loading film.
Push the back cover open knob
(31) while the back cover lock
button (30) is pulled down, and
the back cover is open. When
the back cover opens, the figure
in the exposure counter
automatically returns to '0'.
When closing the back cover,
firmly press both sides of the
back cover, making sure that
neither side of the back cover is
open or loose. Unless the back
1. Check to make sure that the
cover is closed tightly, the
automatic film stopper will not triangle mark on the lens lock
knob points to LOCK and
work.
SINGLE on the multiple
exposure dial matches the red
dot.
2. The shutter release lock
should be fully pulled
backward. If the triangle mark
of the release lock is aligned
with the "L", the shutter button
cannot be depressed.
<- Prev | Table of Contents | Next ->
file:///E|/c330s/page_11.html [22-10-2003 15:26:34]
Mamiya C330S: Page 12
Winding & Shutter Test Without Film
12
the shutter will
be released. By
turning the film
advance crank
until it stops the
shutter button
may be
depressed again.
Open the back cover and make sure
that a spool has been inserted into the
take-up spool chamber.
3. By closing the back cover and
turning the film advance crank, the
exposure counter will advance. When
figure 1 appears on the counter, the
crank will be stopped.
Turn the shutter speed ring and align a
desired shutter speed with the index
line. The shutter speed ring must be set
on a click stop position. Turn the
aperture ring and set a desired f/stop to
the index line. The aperture ring may
be set at intermediate click stop
positions.
5. Depress the shutter button and
<- Prev | Table of Contents | Next ->
file:///E|/c330s/page_12.html [22-10-2003 15:26:34]
·Depending on
the kind of takeup spools
(especially in
case of metal
one) the shutter
may not be
cocked by a
single winding.
·When the
shutter speed
ring is set on "B"
(Bulb), the
shutter will
remain open as
long as the
shutter button is
depressed and it
will close as
soon as the
shutter button is
released. This
method is used
for a long
exposure of 2
seconds or more.
Mamiya C330S: Page 13
Before Loading Film
13
This camera accepts either 120 or 220 roll film. It has an automatic film stopper and a double
exposure prevention device. Take the following steps before loading film:
1. Preventing Double
Exposures Turn the multiple
exposure dial (28) until
SINGLE matches the red dot of
the side plate. This action locks
the shutter release button until
the film is wound, and prevents
accidental double exposures.
2. Adjust the film pressure
plate according to the film
used. (120 or 220) Open the
back cover and turn the film
pressure plate either to the right
or to the left 90 degrees until
the red dot on the film pressure
plate matches the figure 120 or
220 respectively.
The exposure counter is
automatically set to match the
used film size when the back
cover is closed.
The figure 120 or 220 will
appear in the film size
indicating window at the center
of the back cover.
<- Prev | Table of Contents | Next ->
file:///E|/c330s/page_13.html [22-10-2003 15:26:35]
Mamiya C330S: Page 14
Loading Film
1. Open the back cover and pull
out the upper spool change
knob (31), then insert an empty
spool into the take-up spool
chamber (36) so that it engages
the winding axis. Let go of the
spool change knob.
14
2. Pull out the lower spool
change knob (32), and insert a
roll of film into the film
chamber (38).
By turning the spool change
knobs either to the right or to
the left after pulling them
outward, the knobs stay at their
protruded positions. Turn the
knobs backward to reinsert
them.
· If either spool change knob is
not returned to its original
position after loading film,
unbalanced film winding will
result.
To make sure that the spool
change knobs fit their original
positions, move the spools
slightly to the right and to the
left or up and down.
<- Prev | Table of Contents | Next ->
file:///E|/c330s/page_14.html [22-10-2003 15:26:35]
Mamiya C330S: Page 15
Loading Film (cont.)
3. Pull out the leader paper of
the film and insert it into the slit
of the take-up spool, turn the
film advance crank clockwise
until the start mark on the
leader paper matches the start
marks on the camera.
4. Close the back cover. When
closing the back cover, firmly
press both sides at the upper
portions of the back cover as
indicated in the photo.
15
Memo Holder
As a reminder of the type and
number of exposures of the film
loaded in the camera, tear off
the end of the film box and
insert it in the memo holder on
the back cover.
<- Prev | Table of Contents | Next ->
file:///E|/c330s/page_15.html [22-10-2003 15:26:35]
Mamiya C330S: Page 16
Loading Film (cont.)
5. Turn the film advance crank
clockwise until it stops. The figure
1 appears on the exposure counter
at the position where the crank
stops diagonally upward, and the
shutter is automatically set. Now
the camera is ready for the first
exposure.
Turn the crank each time one
picture is exposed. Regardless of
the
number of pictures taken, the
crank always stops at a diagonally
upward position. In this position,
when folding the crank in the
opposite direction, the crank can
be recessed into the body.
The crank cannot be turned in
reverse direction, and the shutter
release button can only be pressed
at the crank stops position.
<- Prev | Table of Contents | Next ->
file:///E|/c330s/page_16.html [22-10-2003 15:26:36]
16
Mamiya C330S: Page 17
Photographing
17
1. After focusing, turn the shutter speed ring (6) and set the
shutter speed, then adjust the aperture of the lens by
turning the aperture control knob (23). Any of three
procedures mentioned above can be performed first.
2. Release the shutter by pressing the shutter release button
(21) or (24). When a cable release is used, screw its tip into
the cable release socket in the lower button (24).
3. After each exposure, wind the film by turning the film
advance crank, then follow the same procedure as
mentioned above.
Focusing Knob Fixing
After adjusting the focus, turn the focusing knob fixing
lever (14) forward and appropriately clamp it, whereby the
focusing mechanism is secured.
· Deviation in focusing can be prevented in this manner,
when continuously taking pictures, taking snapshots with
wide-angle lenses, close-up photographs, and using
telephoto lenses.
<- Prev | Table of Contents | Next ->
file:///E|/c330s/page_17.html [22-10-2003 15:26:36]
Mamiya C330S: Page 18
Photographing (cont.)
18
How to Remove Film
When all film frames have been exposed, the film winding stop
mechanism is automatically disengaged. Remove the film after
winding the remaining backing paper on the film end.
Locking the Shutter Button*
By shifting the triangle mark on
the lock button (22) to the letter
'L', the shutter button is locked.
During a period when the
camera is not in use and is
stored in the case, inadvertent
shutter release can be prevented.
Winding Up the Roll Film
To remove film before exposing the entire roll, or to wind up a
short roll of film after exposure (6-exposure color films), turn the
film advance crank while depressing the shutter button on the
camera body after winding the exposed frame. In this manner,
film can be completely wound without stopping.
* On the earlier C330, the shutter locking button is a small round button found on the metal lever above the side
shutter release button.
<- Prev | Table of Contents | Next ->
file:///E|/c330s/page_18.html [22-10-2003 15:26:36]
Mamiya C330S: Page 19
Distance Scale
19
A distance scale is provided on the left side
(viewing the camera held for photographing).
By turning the knob (13), set the distance scale
to coincide with the lens used, so that the scale
faces horizontally.
Distance scales for 55mm, 65mm, and 80mm
lenses are indicated in orange. Read these
scales at the index position in the window.
Distance scales for 105mm DS, 135mm,
180mm, and 250mm lenses are indicated in
black. Read these scales at the front end of the
camera body side plate.
Since the flange-focal length varies between
the 105mm f/3.5 DS or 105mm f/3.5D lens and
the former 105mm f/3/5 lens, a special distance
scale is provided. A distance scale marked
105D·DS is used for 105mm D and 105mm DS
lenses. A distance scale marked 105 is used for
the former 105mm lens.
· The former distance scale for the C330f
cannot be used for the C330S.
· The distance scales are available in two types,
scaled in feet or meters.
<- Prev | Table of Contents | Next ->
file:///E|/c330s/page_19.html [22-10-2003 15:26:37]
Mamiya C330S: Page 20
Distance Scale (cont.)
20
Replacing the Distance Scale
To remove the distance scale, first, fully extend
the bellow by turning the focusing knob, then
remove the scale end cover by sliding it to the
front. Next, detach the distance scale from the
bearing, while pressing in the distance scale
shaft with a pointed, fine wire.
When installing the distance scale, insert the
shaft end opposite the revolving knob into the
camera body bearing. Insert the shaft end while
pressing the spring located near the bearing to
the inner side with the side of the scale. Next, fit
the shaft to the front bearing while pushing in the
shaft tip with a finger nail; then install the cover
as it originally was.
<- Prev | Table of Contents | Next ->
file:///E|/c330s/page_20.html [22-10-2003 15:26:37]
Mamiya C330S: Page 21
Close-up Photography
21
Setting the Parallax Correcting Dial:
By turning the parallax correcting dial (10), set the dial index to the
focal lenght of the lens used. Subsequently, while the lens is being
extended, the pointer will appear on the upper left portion of the
focusing screen. The position of this pointer indicates parallax and the
exposure factor.
Correcting Parallax:
When the pointer appears on the focusing screen, the upper portion
visible above the pointer will be cut off on the film. Be sure that the
subject satisfactorily appears under the lower portion of this pointer.
When using the camera on a tripod, use the Paramender (parallax
correcting device) to ensure that the camera photographs the same
image viewed on the focusing screen through simple operations.
Compensating Exposure:
As distance between the lens and film increases, image brightness on
the film is reduced even though aperture size remains the same.
Consequently, it is necessary to increase the exposure.
The figures on the focusing screen left side indicate the exposure
factor. Compensate in the exposure after reading the figure indicated
by the pointer while focusing. For instance, assuming that the correct
exposure value measured by an exposure meter is 1/125 sec. at f/11,
compensate in the exposure as follows:
If the pointer indicates 2, 1/125 sec., f/8
or 1/60 sec., f/11
If the pointer indicates 3, 1/125 sec., between f/8 & f/5.6
or 1/60 sec., between f/11 & f/8
<- Prev | Table of Contents | Next ->
file:///E|/c330s/page_21.html [22-10-2003 15:26:37]
Mamiya C330S: Page 22
Close-up Photography (cont.)
When Using a 55mm or 65mm Lens:
When using a 55mm or 65mm lens, set the dial (10) to 80 and attach
the parallax correction plate for 55mm/65mm lenses to the focusing
hood.
How to Install the Parallax Correction Plate:
Remove the focusing hood from the camera and turn it inside out. Also
turn the correction plate inside out and insert its chamfered edge into
the two catches on the hood, then fit the correction plate while pulling
out the slide lock on the opposite side. When the slide lock is released,
the plate is secured.
The figures visible on the left side of the correction plate after
attaching the focusing hood to the camera reveal the exposure factor.
Observe the line on the right for correcting parallax. When the pointer
indicates 1.5, the upper portion of the first line will be cut off. In turn,
this becomes a correcting scale when the exposure factor is 2, 2.5 and
3.
<- Prev | Table of Contents | Next ->
file:///E|/c330s/page_22.html [22-10-2003 15:26:38]
22
Mamiya C330S: Page 23
Changing the Focusing Hood
The focusing hood can be replaced with various finders available for this camera as optional
accessories.
Removing the Focusing Hood
Turn the focusing hood lock screw
(34) counterclockwise and pull
back the hood and move it
upward; then the hood can be
taken off.
Attaching the Focusing Hood
Match the grooves on the hood's
front sides to the pins of the
camera body, fit the groove on the
hood's rear to the focusing hood
lock screw, then tighten it.
<- Prev | Table of Contents | Next ->
file:///E|/c330s/page_23.html [22-10-2003 15:26:38]
23
Mamiya C330S: Page 24
Changing the Magnifier
Changing the Magnifier (for diopter correction)
In addition to the standard magnifier (-1.5 diopter), diopter lenses of +2,
+1, 0, -2 and -3 diopter are available for near and farsighted persons.
The standard -1.5 diopter magnifier is designed for users, wether or not
they wear eyeglasses, who have no trouble seeing clearly a subject up to
2.5 ft. (70cm) away. Those who have difficulty seeing clearly at such a
distance should use an appropriate diopter lens available as an optional
accessory. However, before making a purchase, test the diopter lens at
your Mamiya dealer to make sure it matches your eye.
Changing Method
1. Raise the focusing hood; then depress the sportsfinder flap and
frame.
2. Fold the raised magnifier, then lay the camera down with the lens
facing upward.
3. Hold the base plate of the magnifier from inside and under the
focusing hood, with the backs of the pins (B) held by your fingers, thus
preventing the base plate from being depressed.
4. By turning the retainer (A) towards the arrow direction in the photo,
the retainer and the magnifier can be removed. In this case, turn the
retainer one side at a time while pushing it towards the base plate, also
holding the base plate from the back as mentioned above.
5. To attach the magnifier, place the magnifier and the retainer on the
base plate, facing the flat surface of the magnifier downward; then, by
turning the retainer clockwise while pressing it towards the base plate,
the retainer will snap into the pins (B). When looking through the
magnifier for focusing, the flat surface of the glass will face one's eyes.
<- Prev | Table of Contents | Next ->
file:///E|/c330s/page_24.html [22-10-2003 15:26:38]
24
Mamiya C330S: Page 25
Changing the Focusing Screen
25
Various types of focusing hoods are available to meet individual needs or preferences.
Removing the Focusing
Screen
Remove the focusing hood and
slide the focusing screen frame
lock (35) in the direction of the
arrow, then the focusing screen
holder will pop-up. Remove the
focusing screen by holding its
both side edges.
Attaching the Focusing
Screen
Hold both side edges of the
focusing screen so that the
Fresnel lens surface faces
upward, then insert the focusing
screen into the screen holder.
After checking to make sure the
screen is correctly fitted into
the screen holder, depress the
focusing screen frame. Then the
focusing screen will be locked
in place.
Since the focusing screens
surfaces are soft and easily
damaged, handle them
carefully. Never touch the
surface with bare fingers,
should dust settle on it, merely
blow away by using a blower.
<- Prev | Table of Contents | Next ->
file:///E|/c330s/page_25.html [22-10-2003 15:26:39]
Mamiya C330S: Page 26
Flash Photography
26
When a falsh unit is used for photographing, connect the
synchro cord to the synchro socket (2).
When using an electronic flash unit, set the M-X synchro
selector (3) on X to synchronize all shutter speeds.
When using M-class flash bulbs, set the M-X synchro selector
(3) on M to synchronize flash at all shutter speeds. This M-X
synchro selector can be switched even after cocking the
shutter.
When photographing without flash, keep the M-X synchro
selector on X.
Flash Synchronization Table
Shutter Speed
Contact
Type of Flash
B 1 1/2 1/4 1/8 1/15 1/30 1/60 1/125 1/250 1/500
M
M class
o o
o
o
o
o
o
o
o
o
o
Electronic Flash o o
o
o
o
o
o
o
o
o
o
o
o
o
o
o
x
x
x
x
X
M class
o o
Combinations with the o mark synchronize.
Combinations with the x mark do not synchronize.
<- Prev | Table of Contents | Next ->
file:///E|/c330s/page_26.html [22-10-2003 15:26:39]
Mamiya C330S: Page 27
Handling the 105mm f/3.5 DS Lens
27
The 105mm f/3.5 DS lens is equiped with diaphragms on the viewing lens, thus enabling you to
observe the depth-of-field on the focusing screen. In addition, this lens-shutter has a built in selftimer.
Depth-of-Field Control
When the camera is focused on
a subject, a certain area in front
of and behind the subject is also
in focus; this is called the depthof-field. Depth-of-field varies
in relation to the aperture in
use; it increases as the aperture
is stopped down to smaller
apertures,
and decreases as the lens is
opened up to larger apertures.
be obtained with the aperture
you are using.
Viewing on the Focusing
Screen
After focusing, set the desired
aperture to the central index
mark by turning the aperture
scale ring of the viewing lens.
Now, the depth-of-field can be
ovserved on the focusing
screen.
For example, if the camera is
focused at 30 ft. (10m) at an
aperture of f/16, the range of
sharp focus will be
approximately from 15 ft. (5m)
to infinity.
Note:
The aperture scale of the
viewing lens does not interlock
with the taking lens, so in
Using the Depth-of-Field
actual photography, never
Scale
Turn the distance scale ring and forget to set the aperture of the
taking lens.
set the focused distance to the
centra index mark. Next, select
and aperture and set it to the
The distance scale of the
central index mark, and look at viewing lens is provided to read
the corresponding figures on
the depth-of-field, and has no
the depth-of-field scale on both relation with actual focusing.
sides of the central index mark.
This is the extent of the depthof-field that will
<- Prev | Table of Contents | Next ->
file:///E|/c330s/page_27.html [22-10-2003 15:26:39]
Mamiya C330S: Page 28
Handling the 105mm f/3.5 DS Lens (cont.)
The M-X synchro selector (3) can
be moved before or after cocking
the shutter.
Self-Timer Operation
By setting M-X synchro selector
to the V position, the shutter is
released approximately 10
seconds after pressing the shutter
release button. At this V setting, X
flash synchronization is offered.
After finishing photographing
with the self-timer, return the
selector to the X position. If left
on the V position, the self-timer
will be activated for the next
picture.
If you notice that the self-timer is
activated after releasing the
shutter for ordinary photography,
depress the shutter cocking lever
immediately to switch off the selftimer. Then set the synchro
selector to X or M to restore
ordinary shutter action.
<- Prev | Table of Contents | Next ->
file:///E|/c330s/page_28.html [22-10-2003 15:26:40]
28
Mamiya C330S: Page 29
Multiple Exposures/Precautions on Shutter Ops.
Turn the multiple exposure dial
(28) and set the word 'MULTI' to
the red dot, then the double
exposure prevention is
disengaged. The shutter button
can be depressed without
advancing the film, whenever the
shutter is cocked manually.
Upon finishing photography, be
sure to set the word 'SINGLE' of
the dial back to the red dot.
When photographing is suspended
with the shutter button depressed
halfway, it very rarely happens
that the shutter button cannot be
depressed on the next attempt. In
this case, the shutter can be
released by setting the 'MULTI' to
the red dot, without needlessly
advancing the film.
29
Precautions on Shutter
Operations
In any of the following situations,
the safety mechanism prevents the
shutter release button from being
depressed.
1. When the triangle mark of the
lens lock knob points to
UNLOCK. Red warning mark will
appear on the ground glass
focusing screen in the finder.
2. When the triangle mark on the
shutter release lock is set to 'L'.
3. When 'SINGLE' on the multiple
exposure dial is set to the red dot,
and...
(1) When film is not
loaded (exposure counter
indicates '0').
(2) When the film has not
been wound completely.
(3) When the shutter
release button has already
been pressed.
(4) When the last film in
roll is exposed (after 12 or
24 exposures).
To freely release the shutter or for
multiple exposures, set the
multiple exposure dial so that the
'MULTI' matches the red dot.
file:///E|/c330s/page_29.html (1 of 2) [22-10-2003 15:26:40]
Mamiya C330S: Page 29
<- Prev | Table of Contents | Next ->
file:///E|/c330s/page_29.html (2 of 2) [22-10-2003 15:26:40]
Mamiya C330S: Page 30
Precautions on Shutter Operations (cont.)
30
250mm f/6.3 and 80mm f/3.7 lenses.
Shutters of these lenses have no
self-cocking system, requiring
the shutter to be set manually
after each film advance.
For certain lens-shutter
assemblies (such as the formar
80mm f/3.7 lens), the release
lever of the lens-shutter can be
depressed many times even
though the shutter is not cocked.
When the shutter is not cocked,
the shutter blades do not open.
When using this type of lensshutter, no picture will be
recorded on the film if the
shutter button is depressed
without cocking the shutter. If
you find the shutter blades are
unopened after depressing the
shutter button, the shutter button
cannot be depressed again by the
double exposure prevention
device even if the shutter is
cocked afterwards. In this case,
set the multiple exposure dial to
the 'MULTI' and depress the
shutter button, or release the
shutter by pushing the release
lever on the lens-shutter
assembly.
<- Prev | Table of Contents | Next ->
file:///E|/c330s/page_30.html [22-10-2003 15:26:40]
Mamiya C330S: Page 31
Mamiya-Sekor Lenses
55mm f/4.5
135mm f/4.5
65mm f/3.5
Super 180mm f/4.5
31
80mm f/2.8
105mm f/3.5DS
250mm f/6.3
<- Prev | Table of Contents | Next ->
file:///E|/c330s/page_31.html [22-10-2003 15:26:41]
Mamiya C330S: Page 32
Mamiya-Sekor Lenses (cont.)
32
Close-Up Capabilities
Lens
Composition
Picture
Angle
55mm f/4.5
9 element
7 group
70°30'
6 element
65mm f/3.5
5 group
5 element
80mm f/2.8
3 group
105mm
f/3.5DS
5 element
3 group
135mm
f/4.5
4 element
3 group
Super
180mm
f/4.5
5 element
4 group
250mm
f/6.3
6 element
4 group
63°
Minimum
Aperture
Filter
Diameter
(mm)
Lens Hood
Diameter
(mm)
f/22
46ø
48ø
9 1/2 in. 2 17/32 in.2
(24.1 cm) (6.4 cm2)
50ø
10 11/16
2 21/32 in.2
in.
2
(27.1 cm) (6.7 cm )
f/32
49ø
Shortest
Distance
from Film to
Subject
Subject
Coverage
50°40'
f/32
46ø
48ø
1 ft. 1
3 25/64 in.2
15/16 in.
2
(35.4 cm) (8.6 cm )
41°20'
f/32
46ø
48ø
1 ft. 11 in.
(58.4 cm)
48ø
2 ft. 11 1/2
9 15/16 in.2
in.
2
(90.2 cm) (25.2 cm )
50ø
4 ft. 2 3/4
in.
(1 m 29
cm)
50ø
6 ft. 8 3/4
1 ft. 1/4 in.2
in.
2
(2 m 5 cm) (31.1 cm )
33°
f/45
24°30'
18°
f/45
f/64
46ø
49ø
49ø
<- Prev | Table of Contents | Next ->
file:///E|/c330s/page_32.html [22-10-2003 15:26:41]
7 1/4 in.2
(18.4 cm2)
10 53/64
in.2
(27.5 cm2)
Mamiya C330S: Page 33
Accessories
Filter
Filters are available in five
types: SY48 (Y2), SO56 (O2),
SL39 (UV), YG, SL-1B
(skylight). Filter sizes for each
lens are shown in the system
chart.
33
2. Lens hood for 65mm lens*
3. Lens hood 48mm ø for
80mm f/2.8, 105mm f/3.5 DS
and 135mm f/4.5 lenses.
4. Lens hood for super 180mm
and 250mm lenses*.
*
· When using a 49mm diameter
filter, employ the 49mm filter
for Mamiya C; otherwise
attaching the lens hood might
be impossible. When you order
filters, always specify the
Mamiya C Professional type.
· To attach a filter to a lens of
49mm filter diameter, place
your palm on the protective
lens ring screwed into the front
barrel of the lens, turn the ring
counter-clockwise to remove it,
and then screw in the filter.
When a filter is not used,
always replace the ring to
protect the lens barrel.
Marked lens hoods have a
side plate which can be
inclined. Attach the lens hood
to the lens with this plate
upward. When light reflected
from the lens hood to the
viewing lens becomes annoying
while focusing, due to a certain
light condition, incline the side
plate to eliminate the annoying
reflection.
· All of these lens hoods are
comparatively new type
attached only to the taking lens.
Old type lens hoods are also
acceptable.
Lens Case
To protect and easily carry
interchangeable lenses, the
following hard cases (4 types)
are available:
(1) Case for 55, 80, and 105mm
lenses
(2) Case for 65 and 135mm
lenses
(3) Case for 180mm lens
(4) Case for 250mm lens
Soft Lens Case
The soft lens case is widely
applicable to protect
interchangeable lenses for the
Mamiya C Professional or to
store accessories.
This case also can hold lenses
for the Mamiya Press and
Mamiya RB.
Focusing Screen
A focusing screen is necessary
to focus quickly and accurately.
Diopter Lens
For persons whose vision is not Mamiya offers the following
seven types, and advises you to
Lens Hood
adapted to the magnifier (-1.5
use these focusing screens by
There are four different types of diopter) mounted on the
changing them according to the
lens hoods available for
focusing hood as standard
interchangeable lenses.
equipment, five additional types lens used, the photographing
of lens (-3,-2,0,+1,+2 diopters) purpose, and/or the subject
condition. Each focusing screen
are available to effect diopter
1. Lens hood for 55mm lens*.
has exposure factor
correction.
graduations.
<- Prev | Table of Contents | Next ->
file:///E|/c330s/page_33.html [22-10-2003 15:26:42]
Mamiya C330S: Page 34
Accessories (Focusing Screens)
34
Type A: Matte
Entirely matted with Fresnel
lens.
For general photography.
Suitable for any focal length
lens.
Type A2: Matte for wideangle lens
Entirely matted with Fresnel
lens.
Clear view-field is objeained
when using the 55mm and
65mm wide-angle lenses since
the parallax correction plate
need not be used.
Type B: Rangefinder Spot 4°
Entirely matted with Fresnel
lens, and split prism.
For general photography.
Quick, accurate focusing is
possible through the matted
surface and the split prism.
Type D: Cross Hair
Entirely matted, center small
circular portion is transparent
without Fresnel lens.
For special photography.
Suiteable for close-up
photography by extending the
bellows; also for dim, distant
views and astrophotography.
Type E: Rangefinder
Spot/Microprism
Entirely matted with Fresnel
Type B2 Rangefinder Spot 6° lens, split prism at center;
microprism surrounding the
Entirely matted with Fresnel
center.
lens, and split prism.
For General photography.
For general photography.
Focusing precision by the split Convenient for quick, accurate
prism is more sensitive than the focusing with either the central
split prism or a doughnuttype B Range Finder Spot 4°.
shaped microprism. Focusing
can also be done in the
Type C: Microprism
surrounding matte area.
Entirely matted with Fresnel
lens, and microprism.
For general photography.
Focusing is performed through
the matted surface and the
center microprism portion.
file:///E|/c330s/page_34.html (1 of 2) [22-10-2003 15:26:42]
Checked Screen
Convenient in arranging
composition.
Most suitable for close-ups,
copying, and photographing
buildings.
The checked screen can be used
with any focusing screen by
simply putting it onto the
focusing screen frame, placing
the thing edge toward the back
cober. The screen will be fixed
by installing the focusing hood.
Mamiya C330S: Page 34
<- Prev | Table of Contents | Next ->
file:///E|/c330s/page_34.html (2 of 2) [22-10-2003 15:26:42]
Mamiya C330S: Page 35
Accessories (cont.)
(1) CdS Magnifying Hood
(3) CdS Porrofinder
This is a spot metering finder
with a CdS exposure meter
incorporated in the
magnifying hood. Since the
meter measures light which
passes through the lens, the
correct exposure setting is
easily obtained. A
compensating exposure factor
need not be considered even
if the bellows is extended.
When employing a color
filter, however, compensating
exposure must be made by
considering the filter
exposure factor. (By
attaching the same color filter
to the viewing lens, such
compensation is
unnecessary.)
This is a Porrofinder with builtin CdS exposure meter. Match
the index needles within the
finder by turning the dial on the
back of the finder, and read the
dial scale. This device measures
the amount of light traveling
through the viewing lens,
offering correct exposure setting
even for amateurs.
Eye Correction Lens
This lens, designed to correct
visibility, is installed inside the
eyepiece ring of the CdS
Porrofinder, or Prism Finder.
(2) Prism Finder
As with the magnifying hood,
this prism finder may be used
instead of the focusing hood.
Through this prism finder, the
image on the ground glass
focusing screen appears
exactly as the subject is seen.
Really an indispensable
accessory for eye-level photojournal photos or candid
shots.
Magnification of this finder is
approximately 2.5 times the
image on the ground glass
focusing screen, particularly
bright and clear.
file:///E|/c330s/page_35.html (1 of 2) [22-10-2003 15:26:42]
35
Nine types of lenses are
provided from +2.5 to -2 diopter
(each diopter is +2.5, +2.0, +1.5,
+ 1.0, +0.5, -0.5, -1.0, -1.5, and 2.0).
When installing the lens on the
finder, hold the milled portion of
the eyepiece ring with the thumb
and finger, and turn it
counterclockwise to remove the
ring. When the lens is a plus
(convex) lens, position it with
the flat surface outside, and
when it is a minus (concave)
lens, place the concave surface
on the exterior, then screw the
ring into its original position.
Mamiya C330S: Page 35
<- Prev | Table of Contents | Next ->
file:///E|/c330s/page_35.html (2 of 2) [22-10-2003 15:26:42]
Mamiya C330S: Page 36
Accessories (cont.)
(4a) Grip Holder
(4b) Grip Holder (for
The grip holder is a very
convenient accessory for hand
holding the camera while taking
pictures or for carrying the
camera. Its accesory shoe is
attached on the top of the grip.
Mamiya C330 and RZ/RB)
The camera shutter can be
released by triggering the
shutter button of this grip. This
grip can also be used for the
Mamiya RZ/RB.
(5) Multi-angle Grip (for
Mamiya C330 and RZ/RB)
The grip mounting angle can be
freely turned by single action,
when one's finger is removed,
the grip is secured after each 20degree turn.
36
A trigger-type design is adopted
for this grip, interlocked with
the camera shutter release
button. It is equipped with a
lock device so that the trigger
cannot be depressed
inadvertently.
The accessory shoe on the grip
can be freely turned in either
direction and secured.
<- Prev | Table of Contents | Next ->
file:///E|/c330s/page_36.html [22-10-2003 15:26:43]
Mamiya C330S: Page 37
Accessories (cont.)
37
(6) Pistol Grip Model 2 (for
(7) Paramender Model 2
(8) Focusing Knob Adapter
Mamiya C330 and RZ/RB)
A trigger-type shutter release
button is interlocked with the
camera. By replacing the
changeable base plate, an
optional flashgun bracket may
be attached. When a subgrip is
mounted instead of the flashgun
bracket, further stabilized eyelevel photography becomse
possible.
This is a parallax-correcting
instrument used between the
camera base and a tripod. Keep
the part attached to the camera
base downward while focusing,
then raise the camera position
by turning the handle unit it
stops prior to releasing the
shutter. Thus, the taking lens is
lifted to the position where the
viewing lens was, and parallax
is hereby automatically
corrected.
DSF-2/DSM-2 (for Mamiya
C330S and C220f)
An adapter for attaching to the
focusing knob to facilitate
precise focusing. Focused
distance can be read easily by
using distance scales (for 65,
80, and 105mm lenses) which
comes with the adapter. The
DSF is calibrated in foot and
the DSM, in meter.
From left to right:
Flashgun bracket Type M
(for Mamiya flashgun), Type
H (for Heiland flashgun),
Type G (for Graflex
flashgun), and Subgrip.
<- Prev | Table of Contents | Next ->
file:///E|/c330s/page_37.html [22-10-2003 15:26:43]
Mamiya C330S: Page 38
Accessories (cont.)
(9) Quick-Show Model 2
so it is highly convenient for
close-up work and daylight
synchro flash.
A two piece set in which one
piece is attached to the camera
and the other to the tripod.
Power source: Eight AA-size
When this is done, the camera
can instantly be mounted to, or alkaline or rechargeable Niremoved from, a tripod without Cad batteries.
the need to fumble with screws.
(11) Electronic Flash Auto
480 Model 2
(10) Mamiyalite MZ 36R
The Auto 480 Model 2 is an
This grip-type auto electronic
flash has a guide number of 36 automatic electronic flash
which features superior bursts
(ASA 100m); 28 when wideof light with a guide number of
angle adapter is attached.
48 (with ASA 100, in meters),
The head of unit can be swung superb flashlight delivery
upward 90° and rotated almost characteristics and three f-stop
value settings.
one full turn, so bounce flash
38
As the bracket can be set to
three different angles, the Auto
480 Model 2 may be used in a
bounced automatic flash mode
with a sensor, which is available
as an accessory.
Flash angle: 60° vertically, 70°
horizontally.
Power source: 12 AA-size
alkaline batteries in the TR
Pack. A Ni-Cad cartridge is
seperately available.
operation on auto is possible.
You can select three different
apertures and the flash unit
automatically controls flash
intensity according to the
subject distance. In addition,
you can select on of five
different flash intensities for
your purpose,
<- Prev | Table of Contents | Next ->
file:///E|/c330s/page_38.html [22-10-2003 15:26:43]
Mamiya C330S: Page 39
Accessories (cont.)
(12) Compartment Case
(13) Aluminum Custom
In addition to the Camera and
Standard Lens set, this
convenient, heavy-duty camera
case holds interchangeable
lenses and camera accessories in
separate compartments. Panels
inside the case may be
rearanged freely for
accomodating various items.
Accessory wrapping cloth for
protection of the camera body
and lenses is also provided.
Case
The Mamiya Custom Case is a
smartly portable, luggage-type
aluminum case.
Inside Dimensions
Length Width Height (top cover)
13 9/16" 7 7/8"
6 7/8" +2"
34.5cm 20cm
17.5cm +5cm
The Custom Case is designed
to accomodate and to easily
hand-carry normally required
interchangeable lenses and
accessories as well as standard
equipment. By changing the
inserts, the Custom Case
conveniently accomodates the
Mamiya C, Mamiya RZ/RB, or
Mamiya Press and related
equipment.
<- Prev | Table of Contents | Next ->
file:///E|/c330s/page_39.html [22-10-2003 15:26:44]
39
The interchangeable inserts,
made of sponge rubber, provide
effective shock absorption and
sufficient protection of the
equipment.
The case measures 18 3/8" x 13
7/8" x 6 3/4" (47 x 35 x 17cm)
and weighs 8 lbs, 2 1/2 oz. (3.7
kg).
Mamiya C330S: Page 40
Depth of Field Tables
40
55mm f/4.5
Distance (in feet)
Aperture
30
15
7
5
3
2.5
2
1.5
1
9 1/2"
4.5
29' 1"
14' 11"
10'
30' 1"
5' 9"
9'
4' 41/4"
5' 11"
2' 91/4"
3' 31/4"
2' 45/8"
2' 83/4"
1' 107/8" 1' 51/2" 1113/16"
2' 11/8" 1' 61/2" 1'1/8"
97/16"
99/16"
5.6
23' 2"
13' 3"
9' 3"
40' 8'
5' 6"
9' 81/2"
4' 21/2"
6' 2"
2' 81/2"
3' 41/4"
2' 41/4"
2' 91/2"
1' 105/8" 1' 53/8" 1113/16"
2' 11/2" 1'63/4" 1'3/16"
97/16"
99/16"
8
16' 5"
10' 9"
8'
145'
5' 1"
11' 7"
11
11' 8"
8' 6"
6' 9"
4' 61/2"
16' 1"
3' 73/4"
8' 2"
16
8' 4"
6' 8"
5' 6"
3' 113/4"
35' 10"
3' 31/2"
11' 1"
22
5' 111/2"
5' 1"
4' 5"
3' 43/4"
3' 111/2" 2' 71/2" 2' 33/8" 1' 101/8" 1' 51/8"
3' 61/4" 2' 103/4" 2' 21/4"
6' 10"
1' 7"
113/4"
1' 1/4"
97/16"
99/16"
2' 57/8"
3' 91/2"
2' 21/4"
3' 3/4"
1' 91/2"
2' 31/4"
1' 43/4"
1' 71/2"
115/8"
1' 3/8"
93/8"
99/16"
2' 41/8"
4' 31/4"
2' 7/8"
3' 41/4"
1' 85/8"
2' 5"
1' 41/4"
1' 81/4"
111/2"
1' 5/8"
93/8"
95/8"
1' 71/2"
2' 73/4"
1' 33/4"
1' 91/4"
115/16"
1' 7/8"
95/16"
911/16"
2' 103/4" 2' 13/4" 1' 111/8"
3' 103/4"
23' 8"
5' 1"
65mm f/3.5
Distance (in feet)
Aperture
30
3.5
18' 111/4"
73' 11/4"
4
50' 23/4"
15
7
11' 8"
21' 1"
6' 21/2"
8'1/4"
3
3
1
43' 111/2" 17' 11 /4" 11' 3 /4" 6' 1 /2"
92' 11/4" 22' 41/2" 8' 21/4"
15' 61/4" 10' 31/2" 5' 93/4"
155' 9"
27' 11" 8' 93/4"
5.6
31' 51/2"
8
22' 1"
11
16' 11/2"
16
11' 13/4"
8' 3"
22
8' 2"
6' 61/4"
32
5' 81/3"
4' 101/4"
12' 101/2"
9' 1"
5' 51/4"
3
44' 5 /4" 9' 11"
5
4'
5'
71/4"
53/4"
3
2
1.75
1.5
1.25
1
2' 101/2"
3' 13/4"
1' 111/4"
2'1/2"
1' 89/16"
1' 915/32"
1' 511/16"
1' 65/16"
1' 213/16"
1' 33/16"
1129/32"
1'3/32"
4' 61/2" 2' 101/4" 1' 111/4" 1' 81/2" 1' 521/32" 1' 213/16" 1129/32"
5' 63/4"
2'3/4"
1' 917/32" 1' 611/32" 1' 37/32" 1'3/32"
3' 2"
4' 43/4"
5' 93/4"
4' 2"
6' 3"
2' 91/2"
3' 3"
1' 11"
2' 1"
1' 89/32" 1' 517/32" 1' 223/32" 117/8"
1' 925/32" 1' 61/2" 1' 39/32" 1'1/8"
1' 511/32" 1' 219/32" 1113/16"
2' 81/2" 1' 101/2"
1' 8"
1
1
1
3' 4 /2" 2' 1 /2" 1' 10 /8" 1' 63/4" 1' 37/16" 1'3/16"
1
1
1
21
3
15
3
1
1
10' 71/2" 7' 11 /4" 5' /4" 3' 11 /4" 2' 7 /2" 1' 10 /4" 1' 7 /32" 1' 5 /32" 1' 2 /32" 11 /4"
1
1
1
19
1
19
1
175' 8" 11' 9 /4" 6' 11" 3' 6 /4" 2' 2 /4" 1' 10 /32" 1' 7 /32" 1' 3 /32" 1' /4"
6' 63/4"
4' 51/2" 3' 71/4" 2' 53/4" 1' 91/2" 1' 73/32" 1' 423/32" 1' 21/4" 1121/32"
17' 21/4" 8' 5" 3' 101/4" 2' 31/2" 1' 1113/32" 1' 79/16" 1' 37/8"
1'3/8"
1
5' 51/4" 3' 11 /4"
3
39' /4"
4' 3"
3' 31/2"
1' 49/32" 1' 131/32" 1117/32
1' 81/4" 1' 41/4" 1'17/32"
3' 3"
11' 5"
2' 4"
4' 33/4"
1' 81/2"
2' 5"
1' 61/2"
2'15/32"
2' 10"
29'3/4"
2' 11/2"
5' 51/4"
1' 71/4"
2' 81/4"
1' 59/16" 1' 35/8" 1' 19/16" 1111/32"
2' 29/16" 1' 915/32" 1' 429/32" 1'25/32"
80mm f/2.8
Distance (in feet)
Aperture
2.8
102' 7"
30
15
10
7
5
4
3
1.5
29' 41/4"
42'1/4"
13' 2"
17' 5"
9' 2"
11'
6' 73/4"
7' 51/2"
4' 91/4"
5' 21/2"
3' 101/2"
4' 13/8"
2' 111/4"
3'3/4"
1' 57/8"
1' 61/2"
file:///E|/c330s/page_40.html (1 of 2) [22-10-2003 15:26:45]
Mamiya C330S: Page 40
4
71' 101/2"
21' 4"
50' 91/4"
12" 61/4"
18' 83/4"
8' 101/2"
11' 53/4"
6' 51/4"
7' 8"
4' 83/4"
5' 33/4"
3' 10"
4' 21/4"
2' 11"
3' 11/4"
1' 527/32"
1' 65/32"
5.6
51' 5"
19' 11/2"
70' 4"
11' 9"
20' 91/2"
8' 53/4"
12' 21/2"
6' 3"
7'113/4"
4' 71/2"
5' 51/2"
3' 91/4"
4' 31/4"
2' 101/2"
3' 11/2"
1' 525/32"
1' 61/4"
8
36'3/4"
16' 7"
167' 53/4"
10' 91/4"
24' 111/2"
7' 111/2"
13' 53/4"
5' 113/4"
8' 53/4"
4' 53/4"
5' 8"
3' 8"
4' 43/4"
2' 10"
3' 21/4"
1' 521/32"
1' 611/32"
11
26' 31/2"
14' 21/2"
9' 83/4"
33' 33/4"
7' 5"
15' 61/2"
5' 8"
9' 21/2"
4' 33/4"
5' 113/4"
3' 63/4"
4' 63/4"
2' 91/4"
3' 31/4"
1' 59/16"
1' 615/32"
16
18' 13/4"
11' 6"
8' 5"
76' 31/4"
6' 71/2"
20' 101/4"
5' 21/2"
10' 91/2"
4'3/4"
6' 63/4"
3' 43/4"
4' 101/2"
2' 8"
3' 5"
1' 511/32"
1' 623/32"
22
13' 31/4"
9' 41/2"
7' 3"
5' 103/4"
35' 8"
4' 91/4"
13' 7"
3' 91/2"
7' 51/4"
3' 23/4"
5' 4"
2' 7"
3' 71/2"
1' 51/8"
1' 7"
32
9' 21/4"
7' 21/4"
5' 103/4"
5'
4' 21/4"
24' 23/4"
3' 51/4"
9' 73/4"
2' 111/2"
6' 33/4"
2' 5"
4'
1' 425/32"
1' 71/2"
105mm f/3.5DS
Distance (in feet)
Aperture
30
15
10
7
5
4.5
4
3
3.5
131' 51/4"
24' 7"
38' 61/2"
13' 63/4"
16' 91/2"
9' 41/4"
10' 83/4"
6' 81/4"
7' 4"
4' 101/4"
5' 2"
4' 41/2"
4' 71/2"
3' 11"
4' 1"
2' 1115/32"
3' 9/16"
4
115' 1/2"
23' 111/2"
40' 2"
13' 41/2"
17' 1"
9' 31/4"
10' 101/4"
6' 73/4"
7' 41/2"
4' 10"
5' 21/4"
4' 41/2"
4' 73/4"
3' 103/4"
4' 11/4"
2' 1113/32"
3' 5/8"
5.6
82' 31/4"
22' 21/4"
46' 61/4"
12' 93/4"
18' 11/4"
9' 1/4"
11' 23/4"
6' 61/4"
7' 63/4"
4' 91/4"
5' 3"
4' 33/4"
4' 81/2"
3' 101/4"
4' 13/4"
2' 115/32"
3' 7/8"
8
57' 81/4"
19' 113/4"
60' 113/4"
12' 1"
19' 101/2"
8' 73/4"
11' 101/2"
6' 4"
7' 93/4"
4' 81/4"
5' 41/2"
4' 3"
4' 91/2"
3' 93/4"
4' 23/4"
2' 1013/16"
3' 19/32"
11
42' 1/2"
17' 91/4"
100'1/2"
11' 3"
22' 73/4"
8' 3"
12' 91/4"
6' 11/2"
8' 21/4"
4' 63/4"
5' 61/4"
4' 2"
4' 11"
3' 83/4"
4'33/4"
2' 1013/32"
3' 125/32"
16
28' 111/2"
15'
10' 11/2"
29' 7"
7' 73/4"
14' 71/2"
5' 93/4"
8' 101/2"
4' 43/4"
5' 93/4"
4'1/4"
5' 11/2"
3' 71/2"
4' 51/2"
2' 923/32"
3' 211/16"
22
21' 21/4"
12' 8"
9' 1/2"
38' 61/2"
7' 1/4"
17' 9"
5' 51/2"
9' 101/2"
4' 21/2"
6' 21/4"
3' 101/2"
5' 5"
3' 6"
4' 8"
2' 815/16"
3' 325/32"
32
14' 8"
10' 1"
7' 81/4"
6' 21/2"
27' 91/4"
4' 113/4"
12' 21/4"
3' 111/4"
6' 113/4"
3' 73/4"
5' 113/4"
3' 4"
4' 3/4"
2' 73/4"
3' 527/32"
<- Prev | Table of Contents | Next ->
file:///E|/c330s/page_40.html (2 of 2) [22-10-2003 15:26:45]
Mamiya C330S: Page 41
Depth of Field Tables (cont.)
41
135mm f/4.5
Distance (in feet)
Aperture
30
15
10
7
6
4
3.5
3
4.5
159' 31/2"
25' 43/4"
36' 8"
13' 91/2"
16' 51/4"
9' 53/4"
10' 7"
6' 9"
7' 31/4"
5' 10"
6' 21/4"
3' 111/4"
4' 3/4"
3' 51/2"
3' 61/2"
2' 111/2"
3' 1/2"
5.6
128' 3/4"
24' 53/4"
38' 91/4"
13' 61/2"
16' 10"
9' 41/4"
10' 9"
6' 81/4"
7' 4"
5' 91/2"
6' 23/4"
3' 11"
4' 1"
3' 51/4"
3' 63/4"
2' 111/2"
3' 1/2"
8
89' 83/4"
22' 81/2"
44' 41/4"
13'
17' 9"
9' 11/4"
11' 11/4"
6' 7"
7' 53/4"
5' 81/4"
6' 4"
3' 101/2"
4' 11/2"
3' 5"
3' 7"
2' 111/4"
3' 3/4"
11
65' 4"
20' 93/4"
54' 11/4"
12' 41/2"
19' 1"
8' 93/4"
11' 9"
6' 51/4"
7' 81/4"
5' 7"
6' 5 ?"
3' 10"
4' 21/4"
3' 41/2"
3' 71/2"
2' 11"
3' 1"
16
45' 1/4"
18' 31/2"
85' 63/4"
11' 53/4"
21' 91/2"
8' 41/4"
12' 53/4"
6' 21/2"
8' 3/4"
5' 5"
6' 83/4"
3' 91/4"
4' 31/4"
3' 4"
3' 81/4"
2' 103/4"
3' 11/2"
22
32' 10"
15' 113/4"
286 21/4"
10' 63/4"
26' 31/2"
7' 101/2"
13' 91/4"
5' 111/4"
8' 61/2"
5' 23/4"
7' 3/4"
3' 81/4"
4' 41/2"
3' 31/4"
3' 91/4"
2' 101/4"
3' 2"
32
22' 8"
13' 21/2"
9' 33/4"
40' 23/4"
7' 21/4"
16' 8"
5' 63/4"
9' 6"
4' 111/4"
7' 8"
3' 63/4"
4' 7"
3' 21/4"
3' 103/4"
2' 91/4"
3' 31/4"
45
16' 21/2"
10' 91/2"
8' 1"
132' 8"
6' 53/4"
23' 1/2"
5' 13/4"
11' 2"
4' 71/2"
8' 81/4"
3' 5"
4' 101/2"
3' 3/4"
4' 33/4"
2' 81/2"
3' 43/4"
5
4.5
180mm f/4.5
Distance (in feet)
Aperture
60
30
15
12
10
8
4.5
299'
50' 2"
74'8"
27' 41/2"
33' 21/4"
5.6
240'
48' 3"
79' 5"
7' 91/2"
26' 93/4" 14' 21/2"
9' 8"
11' 6"
1
1
3
3
34' /4" 15' 10 /4" 12' 6 /2" 10' 4 /2" 8' 23/4"
8
168'
44' 6"
92' 3"
25' 73/4" 13' 101/2" 11' 31/2" 9' 61/4" 7' 81/2"
16' 33/4" 12' 93/4" 10' 61/2" 8' 33/4"
36' 2"
11
122'
9' 83/4"
14' 41/4"
11' 7"
7' 10" 6' 101/2"
1
1
1
15' 8 /2" 12' 5 /4" 10' 3 /2" 8' 21/4" 7' 11/2"
11' 1/2" 9' 41/4"
13' 6"
24' 4"
40' 7"
1
1
115' 7" 39' 2 /4" 16' 10 /2" 13' 11/2" 10' 9"
6' 10"
7' 2"
6
5' 11"
6' 1"
4' 111/4" 4' 51/2"
5' 3/4" 4' 61/2"
5' 103/4" 4' 111/4" 4' 51/4"
6' 11/4"
4' 63/4"
5' 1"
6' 91/4" 5' 101/4" 4' 103/4"
7' 23/4"
5' 11/4"
6' 2"
4' 5"
4' 7"
7' 71/4"
8' 51/2"
6' 1/2"
7' 4"
7' 5"
8' 8"
6' 63/4"
7' 6"
5' 81/4"
6' 4"
4' 93/4" 4' 41/4"
5' 21/2"
4' 8"
12' 31/2"
8' 91/4" 7' 23/4"
10' 3"
6' 5"
1
1
1
1
/
"
14'
6
7'
81/4"
19' 3 /2"
4 11' 7 /2" 8' 11 /2"
5' 7"
6' 53/4"
4' 83/4" 4' 31/2"
5' 31/2" 4' 83/4"
5' 5"
6' 83/4"
4' 71/2" 4' 21/2"
5' 51/2" 4' 10"
5' 23/4"
7' 3/4"
4' 53/4" 4' 11/4"
5' 8"
5'
16
84' 2" 35' 5"
200'
22' 43/4"
10' 8"
9' 1"
12' 11"
45' 61/2" 17' 103/4" 13' 83/4" 11' 11/2"
22
61' 3" 30' 8"
1664'
20' 51/2"
56' 7"
32
1
3
42' 3" 25' 2" 17' 10 /4" 11' 4 /4"
22' 21/2"
95' 2"
45
30' 1" 20' 4"
15' 43/4"
874'
7
9' 71/4" 8' 33/4" 6' 111/4" 6' 21/4"
16' 1/2" 12' 63/4" 9' 53/4"
8' 3/4"
10' 41/4" 8' 103/4" 7' 91/2"
18' 71/2" 14' 1/2"
27' 8"
250mm f/6.3
file:///E|/c330s/page_41.html (1 of 2) [22-10-2003 15:26:46]
6' 7"
10' 3"
5' 11"
8' 71/4"
5' 91/2" 4' 101/4" 4' 43/4"
6' 23/4" 5' 13/4" 4' 71/4"
Mamiya C330S: Page 41
Distance (in feet)
Aperture
200
100
50
30
20
15
12
10
8
7
6.3
412'
135'
385'
81'
131'
44' 11"
56' 5"
28' 2"
32' 1"
19' 2"
20' 10"
14' 7"
15' 5"
11' 9"
12' 3"
9' 10"
10' 2"
7' 11"
8' 1"
6' 111/2"
7' 1/2"
8
325'
125'
513'
77'
143'
43' 8"
58'6"
27' 8"
32' 8"
19'
21' 1"
14' 5"
15' 7"
11' 8"
12' 4"
9' 91/2"
10' 2"
7' 101/2"
8' 11/2"
6' 11"
7' 1"
11
230'
108'
1474'
70' 4"
174'
41' 6" 26' 10"
62' 11"
34'
18' 7"
21' 7"
14' 3"
15' 10"
11' 6"
12' 6"
9' 81/2"
10' 3"
7' 10"
8' 2"
6' 101/2"
7' 11/2"
16
163'
90' 7"
62' 9"
252'
38' 10"
70' 6"
25' 9"
36'
18' 1"
22' 4"
14'
16' 2"
11' 3"
12' 8"
9' 7"
10' 5"
7' 9"
8' 3"
6' 10"
7' 2"
22
116'
74'
54' 5"
688'
35' 7"
85' 2"
24' 4"
39' 3"
17' 5"
23' 6"
13' 7"
16' 9"
11' 2"
13'
9' 5"
10' 8"
7' 8"
8' 41/2"
6' 9"
7' 21/2"
22' 7"
45' 2"
16' 7"
25' 4"
13' 1"
17' 7"
10' 10"
13' 7"
9' 21/2"
10' 11"
7' 61/2"
8' 6"
6' 8"
7' 4"
32
82' 1" 58' 10" 45' 11" 31' 10"
121'
45
58' 5"
64
41' 8" 34' 11"
45' 9"
37' 7"
27' 9"
303'
20' 6"
57' 6"
15' 6"
28' 7"
12' 5"
19'
10' 5"
14' 3"
8' 111/2"
11' 4"
7' 41/2"
8' 9"
6' 61/2"
7' 6"
30' 1"
23' 6"
18' 3"
94' 4"
14' 3"
34' 11"
11' 8"
21' 5"
9' 101/2"
15' 6"
8' 61/2"
12' 1"
7' 11/2"
9' 11/2"
6' 41/2"
7' 9"
<- Prev | Table of Contents | Next ->
file:///E|/c330s/page_41.html (2 of 2) [22-10-2003 15:26:46]
Mamiya C330S: Page 42
System Chart for Mamiya C330S
<- Prev | Table of Contents | [END]
file:///E|/c330s/page_42.html [22-10-2003 15:26:46]
42