1
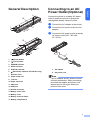
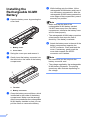
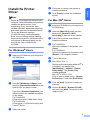
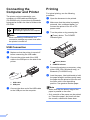
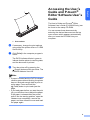
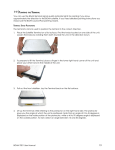
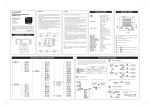
QUICK SETUP GUIDE PJ-622/PJ-623/ PJ-662/PJ-663 Mobile Printer For more information on using this printer, be sure to read the Pocket Jet User’s Guide, which is included on the CD-ROM. Warranty information, product registration and other documents can be viewed and printed from the CD-ROM. We suggest that you keep this manual in a handy place for future reference. US ENG General Description 9 Connect the printer to a nearby AC power outlet to power the printer or charge the rechargeable battery using AC power. 10 8 1 2 34 7 56 a b Connect the AC adapter to the printer. c Connect the AC power cord to a nearby AC power outlet (100 - 240 VAC, 50 - 60 Hz). Connect the AC power cord to the AC adapter. 16 17 15 11 12 13 1 (Power) button 2 (Feed) button 3 POWER indicator 4 DATA indicator 5 STATUS indicator 6 14 (Bluetooth) indicator (PJ-662/663 only) 7 Release cover 8 Paper outlet slot 9 Tear bar 10 Paper input slot 11 IrDA port 12 USB port 1 2 1 AC adapter 2 AC power cord Note The AC adapter and AC power cord are optional accessories. When purchasing, purchase the adapter and power cord appropriate for the region where the printer will be used. 13 AC/DC connector 14 Battery cover latch 15 Battery cover 16 Battery removal ribbon 17 Battery compartment 1 English Connecting to an AC Power Outlet (Optional) Installing the Rechargeable Ni-MH Battery a e Open the battery cover by pressing the cover latch. While holding onto the ribbon, tilt the rechargeable Ni-MH battery and insert it into the battery compartment. After the rechargeable Ni-MH battery passes the outer edges of the compartment, press it securely into position. Note • Make sure that the side of the rechargeable Ni-MH battery marked “Ni-MH” faces away from the battery compartment, otherwise the battery cover will not close properly. 1 2 b c 1 Battery cover 2 Cover latch Swing the cover open and remove it. Gently insert the battery connector into the terminal on the inside of the battery compartment. 4 2 f Attach the battery cover to the end of the battery compartment opposite the AC/DC connector. Close and latch the cover. If necessary, gently push the cover latch towards the AC/DC connector until it latches. Note • Be careful that you do not pinch the battery connector cord. • The voltage supplied by the rechargeable Ni-MH battery fluctuates. The printing speed may also fluctuate depending on the voltage. 3 d • The rechargeable Ni-MH battery contains a heat sensor that stops the flow of electricity if the battery overheats. 3 Terminal 4 Battery connector Grasp the battery removal ribbon, which is attached to the inside of the battery compartment. Make sure that enough ribbon is exposed after the rechargeable Ni-MH battery installed so that you can pull the ribbon to remove the battery. d Follow the on-screen instructions to install the software. e Click [Finish] to close the installation screen. Note • Please do not connect the printer to your computer via the USB cable until you have installed the printer driver. If you accidentally do so, cancel the “New Hardware Wizard”, disconnect the printer, and install the driver as described below. • To use the Bluetooth interface (PJ-662/663 only), install a Bluetooth driver on the computer before installing the printer driver and PJ-600 Series Utility. Instructions for Bluetooth setup can be found in the User’s Guide on the CD-ROM. For Mac OS® Users a Insert the CD-ROM into your computer’s CD-ROM drive. b Open the [Mac OS X] folder and then double-click [Brother PJ-XXX Driver.pkg] to start the driver installer. c Follow the on-screen instructions to install the software. d For PJ-622/623: After the installation is completed, click [Close]. For PJ-662/663: When the installation is completed, click [Restart]. The computer restarts. e f Turn on the printer. For Windows® Users a b Insert the CD-ROM into your computer’s CD-ROM drive. Click [PC (Windows) software], and then click [Standard Installation] or the specific item you want to install. If you click [Standard Installation], the following items are installed depending on the model. For PJ-622/662: Printer driver and PJ-600 Series Utility For PJ-623/663: Printer driver, PJ-600 Series Utility and P-touch® Editor c English Install the Printer Driver Mac OS® X 10.4.11: Double-click the drive where Mac OS® X is installed, and double-click [Applications] - [Utilities] - [Printer Setup Utility]. The [Printer List] window displayed. Mac OS® X 10.5.x - 10.6: Click in order of Apple menu - [System Preferences...], and click [Print & Fax]. g Click the [Add] / [+] button to add your machine. h Choose [PJ-XXX] / [Brother PJ-XXX] and then click [Add]. The printer is now ready to print. Select the model. 3 Connecting the Computer and Printer The printer can be connected to your computer via USB cable and Bluetooth (PJ-662/663 only). Instructions for Bluetooth setup can be found in the User’s Guide on the CD-ROM. Install the printer driver before connecting the printer to the computer. Printing For typical printing, use the following procedure. a b Open the document to be printed. c Turn the printer on by pressing the Note (Power) button. The POWER indicator lights. When connecting via Bluetooth, the connection settings are saved even after the printer is turned off. USB Connection a b 1 Make sure that the printer is turned off before connecting the USB cable. 2 Connect the printer end of the USB cable to the USB port on the side of the printer. 1 2 c Make sure that the printer is properly powered. Use a charged battery, or connect the printer to an AC or DC power outlet. 1 USB cable 2 USB port Connect the other end of the USB cable to the USB port on the computer. 1 (Power) button 2 POWER indicator d Connect the printer to a computer, using either USB, IrDA (Windows® only), or Bluetooth (PJ-662/663 only). e Load the paper. Use both hands to hold the paper straight, and then gently insert the paper into the printer’s input slot until the roller pulls it into the starting position. Use genuine Brother paper. Note • Make sure that the bottom edge of the paper is parallel to the roller. • Only one side of the paper can be printed on. Check the paper, and load it so that the smooth, coated side faces down. 4 English 1 Accessing the User’s Guide and P-touch® Editor Software User’s Guide The User’s Guide and P-touch ® Editor Software User’s Guide (PJ-623/663 only) can be found on the setup CD-ROM. You can access these documents by selecting the desired document on the top menu screen which appears automatically after you insert the CD-ROM into your computer. 1 Print surface f If necessary, change the print settings using either the printer driver or PJ-600 Series Utility. g Click [Print] in the computer program’s menu. The DATA indicator blinks in green to indicate that the printer is receiving data, and the document is printed. h Turn the printer off by pressing the (Power) button quickly two times. The POWER indicator turns off. Note • If paper is loaded and the DATA indicator remains green without blinking, the printer has not received enough data to print an entire page. Press and hold the (Feed) button to print and eject the page. • If you load paper before you start the print job, you will have time to adjust the paper. If the paper is skewed after the printer pulls it into the starting position, open the release cover completely, remove the paper, and then close the cover and load the paper again. 5 LB3827001 Printed in the USA