1
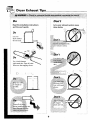
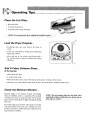
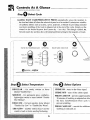
7 CYCLE INTELLIDRY
DRYER D-5
DRYER
USER'S
GUIDE
Welcome
Safety
Dryer
.................. Inside Cover
Instructions
Exhaust
Operating
............... 1-2
_ps ................... 3
31ps ...........................
Controls
At A Glance
Special
Laundry
4
.......... 5-6
1Rps ............... 7
Care and Cleaning
................... 8
Replacing
Drum
Reversing
the Door .................. 8
Before
Light ............. 8
You Call .........................
Warranty
_
KEEP THESE INSTRUCTIONS
......................
9
Back Page
1VIAY[AG
FOR FUTURE
REFERENCE
Model:
MD3000
Welcome
.........................
Welcome
and
congratulations
on
your purchase of a Maytag Neptune
dryer! Your complete satisfaction is
very important
to us. For best
results,
we suggest
reading
this
material to help acquaint you with
proper operating and maintenance
procedures.
Should you need assistance,
1) Have complete
model
it is helpful to:
and serial number
tion of your dryer. This is located
lower center of the door opening.
Model
Number
Serial
Number
identifica-
on a data plate in the
Important
Safety
Notice & Warning
The California
Safe Drinking
Water
and Toxic
Entorcement
Act of 1986 (Proposition 65) requires the
Governor of California
to publish a list of substances
known to the State of California
to cause cancer or
reproductive harm, and requires businesses to warn customers of potential exposures to such substances.
Users of this appliance are hereby warned that the burning of gas can result in low-level exposure to some of
the listed substances, including benzene, formaldehyde
and soot, due primarily to the incomplete combustion of
natural gas or liquid petroleum
(LP) fuels. Exhaust
ducts should be kept free of obstructions
and properly
exhausted dryers will minimize exposure.
_lL WARNING
_
information
in this
lowed
to minimize
For your safety, the
manual must be folthe risk of fire or explo-
sion or to prevent
sonal injury
2) Have proof of original
Please
attach
date of purchase.
your sales
receipt
.........
-
property
damage,
Do not store or use gasoline
flammable
here.
-
per-
or death.
vapors
and liquids
vicinity
of this or any other
INIIAT
TO DO IF YOU
Do not try to light
Do not touch
or other
in the
appliance.
SMELL
GAS
any appliance.
any electrical
do not use any phone
switch;
in your build-
ing.
Clear the room,
building
or area of
all occupants.
For additional
questions,
Immediately
please contact us:
Maytag Consumer Information
One Dependability
Square
Newton, Iowa 50208
(515) 791-8911
(Mon. Fri., 8am-5pm Central Time)
lnternet: http://www.maytag.com
from
the gas supplier's
•
If you cannot
gas supplier
phone.
Follow
instructions.
reach your gas suppli-
er, call the fire department.
Installation
formed
agency
NOTE: In our continuing effort to improve the quality of
our appliances, it may be necessary to make changes to
the appliance without revising this guide.
call your
a neighbor's
by
and
service
a qualified
must
installer,
or the gas supplier.
"be
per-
service
Important
_k
WARNING
your
Safety
_
appliance,
To reduce
follow
1.
Read all instructions
2.
To avoid the possibility
Instructions
the
basic
risk
of fire,
precautions,
electric
shock
including
the
before using the appliance.
of fire or explosion:
rounding
dirt.
6.
opening
and surdust and
must be properly
grounded.
Never
tions fur grounding
this appliance.
WARNING
dryer
_
items
soaked
contain
Do not place
that
with
Even after
have
been
vegetable
significant
into your
spotted
oil or cooking
being washed,
The remaining
dryer.
these
amounts
or
oil.
items
may
of these
oils.
oil can ignite spontaneously.
The potential
for spontaneous
ignition
increases when the items containing
veg-
fire by sponta-
etable
oil
or cooking
heat.
Heat
sources,
oil
are
exposed
such as your
to
clothes
Do not allow children to play on or in the appliance.
Close supervision of children is necessury when the
dryer, can warm these items, allowing
an
oxidation
reaction
in the oil to occur.
appliance
Oxidation
is used near children.
Before the appliance is removed from service or dis
carded, remove the door to the drying compartment.
Do not reach into the appliance
ing.
Do not tamper
8.
Do not repair or replace
catch
these
fire.
gerous.
any part of the appliance
with
or
not
attempt any servicing unless specifically
recommended in published
user-repair
instructions
that
you understand and have the skills to carry out.
extra
reduce
these
detergent
down"
the
the
or
storing
heat from
a fire hazard.
fabrics that
in hot water
will
reduce,
Always
for
con-
oil can be dan-
items
hazard.
cycle
items"
cannot
hot enough
stacking
oil or cooking
Washing
eliminate,
"cool
these
but
will
use the
items
temperature.
to
Never
remove these items from the clothes dryer
hot or interrupt
the drying cycle until the
Do not use labric softeners or products to eliminate
static unless recommended
for dryer use by the
manufacturer
of the fabric softener or product.
items
have
cycle. Never
10. Clean the lint screen belk_re or after each load.
These
can become
Piling,
and unwashed
tain vegetable
with controls.
If this heat
and can create
All washed
where it will be
heat.
kinds of items may prevent
escaping
Save
creates
escape, the items
to
if the drum is mov-
Do not install or store this appliance
exposed to the weather.
7.
9.
the exhaust
14. Do not sit on top of the clothes
b. Items containing
foam rubbcr (may be labeled
latex foam) or similarly
textured
rubber-like
materials must not be dried on a heat setting.
Foam rubber materials when heated, can under
5.
using
plug the appliance cord into a receptacle which is
not grounded adequately
and in accordance
with
local and national codes. See installation
instruc-
of these flammable
liquids or solids and their
fumes have been removed. There are many highly flammable items used in homes, such as: acetone, denatured alcohol, gasoline, kerosene, some
liquid household cleaners, some spot removers,
turpentine, waxes and wax removers.
4.
when
areas free from lint accumulation,
13. This appliance
that could ignite or explode. Any material on
which you have used a cleaning solvent, or which
is saturated
with flammable
liquids or solids,
should not be placed in the dryer, until all traces
3.
to persons
12. The interior of the dryer and exhaust duct should be
cleaned periodically by qualified service personnel.
gasoline, dry-cleaning
solvents, other flammable
or explosive substances
as they give off vapors
produce
or injury
following:
11. Keep the area around
a. Do not dry items that have been previously
cleaned in, washed in, soaked in, or spotted with
certain circumstances
neous combustion.
....................................
they are hot.
Instructions
2
run through
the
pile or stack these
"cool
down"
items when
Dryer
Exhaust
]tips ............. .................................
Don't
Do
Read the installation
instructions
Let a poor exhaust
slow drying.
and the user's guide.
system
Do
Let your
dryer exhaust
the air easily.
a
exhaust
system.
Do
Use 4 inch diameter
rigid metal duct. Tape all joints.
Never use lint-trapping
duct.
screws.
_mns with man%
©
all old
r new
3
cause
Operating
.....................................................
Clean the Lint Filter...
• after each load.
• to shorten
drying time.
• to operate
more energy efficiently.
Load the Dryer
• by placing
a time.
Properly...
only one
wash
load
in the
dryer
• avoid very small loads or mixing heavyweight
lightweight clothes.
at
and
• when only one or two articles need drying, add a
few similar items to improve tumbling and drying
efficiency.
Add A Fabric Softener
Sheet...
(If So Desired)
• after loading
the dryer.
• to control static cling.
• before
the load becomes
• and remove
warm. This helps prevent
any used softener
Check the Moisture
greasyMooking
sheets from the dryer to prevent
The bottom light in the monitor will remain on until the
cool down portion of the cycle starts. During cool down
the dryer continues to tumble the load in unheated air to
wrinkling.
greasy-looking
stains.
softener
stains.
Monitor...
Indicator lights in the moisture monitor will display
when an IntelliDry cycle is in operation. The top light
will blink on and off. As loads dry, there will be longer
pauses between each blink. No lights will display during
Time Dry.
help minimize
softener
NOTE) Ttie:tbpmoni_;:iightmay
small loads Of'heavy,:bMkyltem_
: _rge rugs:o_ _eaters';
i ;
;
_othllnk
Wheh
driedi }uch
:
:
Controls
Features
At A Glance .........................................
may vary according
Step 0
Select
to model.
Cycl e
lntelliDry EASY CARE/PERMANENT
PRESS automatically senses the moisture in
the load and shuts off when the selected dryness level is reached. It minimizes wrinkles
of synthetic fabrics such as acrylic, nylon, polyester, or blends by providing extended
cool down tumbling of the load in unheated air at the end of the cycle. Simply set the
c0ntrol to the desired dryness level (more dry - less dry}. The triangle symbol. A.
between
more dry and less dry is the initial preferred
0
INFINITE
REGULAR
!9
TEMPERATURE
'...
O41t_
OPTIONS
MOISTURE
MORE
_-
OFF
MEDIUM
MONITOR
......
START
i
•
""
lntetl,
EASY C
PERMANEi
LESS [
i
ON
DELICATE
AIR
setting for the majority of loads.
C._ME
i_
PRESS CARE
FLUFF
OFF
O
Step 0
MAYFAG
Select
Temperature
Step 0
Select
CHIME ; 0NQ
CHIME
PRESS
AIR FLUff
for heat::sensitiVe
itemS labeled
; Low,' or ,Tumble
Dry Warm'L
tumbles
senSiiiveioads 0r
turns On the chime s ig na i:
turns Off the Chime signal.
CARE ON)
provide s approximately
20 _inutes Of tumbling in unheated air after
the Easy c_e/Permanent
Press cycle tc
prevent wlinkiingl
D_y Medium!!)::
DELICATE
OFF_
Options
PRESS
without heat: Used for
items needing freshening !
5
cANE OFF _ Cancels ihe
ag in unheated air:
additi0na
Note: The dial can be turned in either direction to select a cycle. Once started, the dial
will not advance at a specific rate during the lntelliDry cycles. At first the dial may not
advance
advance
at all. Toward the end of the cycle (when the load begins to dry) the dial will
at a more regular rate and much more quickly. This is normal operation.
IntelliDry
REGULAR
automatically
senses the moisture
in the load and shuts off when the selected dryness level
is reached. This cycle is designed for loads such as towels, underwear,
t-shirts, jeans, etc. Set the control to the
desired
dryness
gle symbol,
initial
level (more
&, between
preferred
setting
dry - less dry). The trian-
more
dry and less
for the majority
dry is the
of loads.
TIME
PRESS
CARE
• ee
REGULAR
MORE DRY
OFF
OFF
,••
DRY/AIR
selected
lntelliDry
desired.
desired
FLUFF
may be
for any load
sensor
system
Set the control
number
if the
is not
to the
of minutes.
0 iii III
LESS DRY
I
COOL DOWN
/
_E
PRESS
0
OFF
°°i
LESS DRY
MORE
•
[
DAMP
DR _,
tially"
,• • •
OOlOl
:
""
Press Start
OaOll
Push this button to start the dryer. The dryer door must
be shut for the dryer to operate. If the door is opened
during the cycle, the start button must be pushed again
to resume the cycle once the door is closed.
When
the cycle
sound
several
CHIME
is complete,
times.
items.
to "par-
It provides
approximately
20 minutes
of
heated tumbling and 5 minutes of
cool
down
tumbling
without
heat.
J
•o
END OF CYCLE
dry
is designed
i
°°°'°,.,i,
Step
DRY
an audible
chime
If the Press Care option
will
has been
selected,
the audible chime will sound intermittently
during the cool down portion of Press Care.
6
WRINKLE
RELEASE
will
release wrinkles
from items that
are clean and dry but slightly
wrinkled,
such as from a crowded closet or suitcase or from sitting
in the dryer
too long
after
the end of the cycle. It provides"
10 minutes
of heated tumbling
and 5 minutes of cool down tumbling
without
heat.
Special
Laundry
Please follow the care label or manufacturer's
available,
use the following
information
.tips ...........................................
instructions
for drying special
are not
as a guide.
• Follow the care label instructions
Bedspreads
& Comforters
items. If care label instructions
or dry on the Regular
• Block into shape and be sure it is thoroughly
cycle.
dry before using or storing.
e*_°°_''e***ee**_°_°°*e'e**_e**_°°_°_''O**ee*e_°_°°_°_'_0ee*_*°_°_°_°_'e_**_**°_
• Dry only one blanket
Blankets
• Be sure it is thoroughly
Use the Permanent
Curtains
& Draperies
dry before using or storing.
Press cycle to help minimize
wrinkling.
• Dry these in small loads for best results and remove
.°o.o.,e,*t**.°o.oo°o,e**e**o.o..°e
Use the Regular
cycle to make diapers
come out soft and fluffy.
°_''**ee_*_°°_°_e**e*_°_°°_°_o**eee_°_°°°'_eeee**_°°_°°_'e*_ee***_°°_°°_°''e_*
*,oo.o..°°,ee***,oo...°e,,eee,°°ooo
Down-filled
Use the Regular
Items
(jackets, sleeping
comforters, etc.)
cycle and a delicate
temperature
setting.
• Place a clean pair of sneakers in the dryer with the item to fluff the down
comforters,
etc. Adding a couple of dry towels shortens dry time and
absorbs moisture.
bags,
°,ooo°o
o°
°°o°o,e**e**o°°o°°°°o,e****,oo°°°°°ool,le*°°°ooo°o,,o_ee**°°oo°°°°°o_,_***
Rubber
°o°o°oooo°''***e*
• DO NOT dry on a heat setting. Use the Time Dry/Air
(rug backs, stuffed toys,
certain shoulder pads, etc.)
•
_
WARNING
a fire hazard.
- Drying
• Use the Regular
°°o,°o
t_eeo*
°°,oo°o,
,o*
cycle.
Use the Time Dry/Air Fluff cycle on a Delicate
depending on the care label instructions.
(shower curtains, outdoor
furniture covers, etc.)
°°o
°°o°°o
sneakers
to help the
_°_°_eeee*_°°°_'i_**_**°_°_ee_°°_°_*_ee_°°°°_'_i*_*°°_°_°_'ee**_°°°_
Plastics
°o
it or be
kapok or foam pillows.
• Add a couple of dry towels and a pair of clean
tumbling action and to fluff the item.
,*_*ee*
cycle.
°ooo°'oo_eee_*o°°.ooo°_'e**e**
• DO NOT dryer-dry
Pillows
Fluff (no-heat)
a rubber item with heat may damage
e**°,ooo°,e_*,ee_°°°°ooo,,e*****oo°o°,°o*_eee**,,o°o°°°o,,_***
o°o,
as soon as possible.
_eee**_°_°_ee_***_°°°°_O_ee_*_°_°_°°_°_''_****_°_°°_'*****_°I''i*e*_°_
Cloth Diapers
Foam
action.
'*_eee**_°°°°_'ei*e*e*_°°°°_*e_i***_°_°_°°o'_ei**i*_°°_e_eee*i*°_°_°°°_o**_*
o°,.o°*,,e**e**o°o,,oeoeee***,oooo,
°oo°oo,°
at a time for best tumbling
o°o
o°°o
,ooooo
o°°ooo
or Air Fluff temperature
,o°o°°°
°o°°oo°o
Avoid Dryer Drying...
• Fiberglass
Items (curtains,
draperies,
•
Woolens, unless recommended
•
Vegetable
or cooking
7
oil soaked
etc.)
on the label.
items. (See pg.2)
°°o°°°°
Care
and Cleaning
...............................................
Control Panel - clean with a soft, damp cloth.
Do not use abrasive substances.
Cabinet - wipe off any marks with soap and water.
Use an appliance wax once a year if desired.
Tumbler
Dryer Exhaust System - should be inspected and
cleaned once a year to maintain optimum performance. The outside exhaust hood should be cleaned
- remove
any stains (such as crayon,
ink pen or fabric dye) with an alI purpose
cleaner. Then tumble old towels or rags to
remove any excess stain or cleaning substance.
/
more frequently to ensure proper operation. (Refer to
the Installation Instructions for more information.)
\
Replacing
Instructions
Drum
tk)r replacing
1) Unplug or disconnect
cal power supply.
Light .........................................
the bulb:
the dryer from the electri-
2) Open the door and use a Phillips
remove the screw attaching
bler front.
screwdriver
4) Rotate bulb counter
socket.
to remove
1) Remove
7) Relpace
cen-
8) Reinstall
hole.
from
9) Reconnect
into socket.
lens cover by hooking
plastic tabs into
front below the light housing.
the
screw
into the lens cover
Door .............................................
the dryer door.
the door, remove
door by lifting slightly
side.
2 screws in the hinges that secure the hinges to the cabinet.
at the hinges and pulling
the hinge tabs out of the hinge slots.
4) Move the following parts to the opposite side of the door: 2 hinges and 4 hinge screws,
door strike and screw, inner door cover plate and screw.
5) Attach the door to the opposite side of the cabinet using the 2 counter sunk hinge
Screw the lower hinge screw in first. This will help to align the door and hinges.
6) Replace
the hinge hole covers to the opposite
4 door screws,
screws.
side.
Door Catch
rew _
i
..: 2-.-_
:-_:-_:-_-:-:-_-_-_22
_:: _!
I
Cover
Cover
Strike
Door
__;z_z_zzzz;z;z;z
screw
dryer to power supply.
the hinge hole covers and screws. Move the door catch cover to the opposite
2) While supporting
3) Remove
clockwise
the
for reversing
6) Turn the light bulb clockwise
tumbler
cover toward
Directions
to
the lens to the tum-
3) Remove lens cover by pulling
ter of tumbler.
Reversing
5) Replace the bulb with a 120 volt, 10 watt maximum candelabra base light bulb.
....
_Door
J
8
_Screws
(See below).
Before
You Call ...................................................
• Be sure the door is latched
shut.
• Be sure the power cord is plugged
• Check the home's
circuit breaker
into a live electrical
and fuses.
• Press the START button again if the door is opened
• Check
Doesn't
the home's
circuit
outlet.
breaker
during the cycle.
and fuses.
• Select a heat setting, not air-fluff.
Heat
• On a gas dryer, check that the gas supply is on.
Clean the lint filter and exhaust
duct.
• Check all of the above, plus...
Be sure the exhaust
hood at the outside of the home can open and close freely.
Use 4" rigid metal exhaust
Doesn't
Dry
• Do not overload.
duct.
1 Wash load = 1 Dryer load.
• Sort heavy items from lightweight
• Check that the washer
the load.
• Check
Remove
Is Noisy
•
the
load
for
items.
is draining
objects
such
Be sure the dryer is leveled properly
Slowly
advance
•
o°•
For further
coins,
loose
adequate
water
from
buttons,
nails,
etc.
as outlined
in the installation
on the leveling
manual.
legs.
• This is normal operation fi_r an lntelliDry cycle, especially at the beginning of
cycle. Once the load begins to dry, the control knob will start to advance. The
rate of advancement
will be slow at the beginning of the cycle because there is
more moisture in the load. As the load becomes more dry, the control knob will
Knob
Advances
as
to extract
promptly.
• Be sure the rubber feet are installed
Control
properly
•,•••••,
assistance,
more quickly.
•o•••
call Maytag
Customer
••,••o°•
Assistance
9
•,•o•,,•°•
toll-free
at 1-888-4-MAYTAG
•,•o•,•,
(1-888-462-9824).
•••
Clothes
Dryer
Warranty
......................................
Full One Year Warranty
For one (1) year from the date of original
replaced
retail
purchase,
any part which
fails in normal
home
use will be repaired
or
free of charge.
Limited
Warranty
After the first year froin date of original retail purchase, through the time periods listed below, thc parts designated below
which fail in normal home use will be repaired or replaced free of charge lor the part itself, with the owner paying all other
costs, including
labor, mileage
Second Year
All parts.
Third Through
Additional
and transportation,
Fifth Year - Dryer tumbler.
Limited
Warranty
Against
Rust-Through
Should an exterior cabinet, including the door, rust through during the one year period starting from the date of retail purchase, repair or replacement
will be made free of charge. After the first and through the tenth year, repair or replacement
will be made free of charge for the pan itself, with the owner paying all other costs, including labor, mileage and trans
portation.
Please
Dryers
Note: This full warranty and the limited warranties apply when the dryer is located in the United States or Canada.
located elsewhere are covered by the limited warranties only, including parts which fail during the first two years.
Canadian
Residents
This warranty covers only those dryers installed in Canada that have been listed with Canadian Standards
unless the dryers are brought into Canada due to transfer of residence from the United States to Canada.
The specific warranties expressed above are the ONLY warranties provided by the manufacturer.
gives you specific legal rights, and you may also have other rights that vary from state to state.
To Receive
Warranty
Association
This warranty
Service
To locate an authorized service company in your area, call Maytag Customer Service toil-free at 1-888 462-9824. Should you
not receive satisfactory warranty service, please call or write:
Maytag Customer Assistance
c/o Maytag Customer Service
RO. Box 2370
Cleveland, TN 37320-2370
US or CANADA (Toll-Free) 1-888-462-9824
When contacting Maytag Customer Service be sure to provide
address of the dealer from whom you purchased the appliance
the model and serial numbers
and the date of purchase.
of your appliance,
the name and
This Warranty gives you specific legal rights, and you may also have other rights which vary from state to state.
Should you still have a problem, write to: Major Appliance Consumer Action Program (MACAP), 20 North Wacker Drive,
Chicago, Illinois 60606, MACAP is an industry sponsored but independent group of consumer experts who receive and act on
complaints from appliance owners.
NOTE:
When writing about an unsolved service problem, please include the following information:
(a) Your name, address and telephone number;
(b) Model number and serial number (found on lower center of door opening) of your appliance;
(c) Name and address of your dealer and date the appliance was bought;
(d) A clear description of the problem you are having with the appliance.
MAYTAG
Form No. 316CMA
Part NO.6 3702450
• One Dependability
,
,
,
Square
* Newton,
Iowa 50208
htt p://www.maytag.co
m
JN
Litho U.S.A.