1
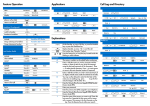
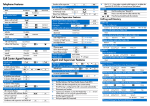
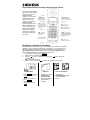
Gigaset 2400 Handset and Charger Quick Reference Guide This guide contains product specific information that will help you quickly use your 2400 Handset and Charger. You must have a Siemens Gigaset 2420, 2402, 2415, or 2410 system to use the 2400 Handset. Detailed information about product features, installation and use is contained in your System Owners Manual. Please read the Safety Instructions and Product Information before using the product. Registering a Handset to Your Base The handset that comes with the system is pre-registered to the base unit. Additional handsets may be purchased to operate with your Gigaset. You can register up to a total of 8 handsets on 2420 and 2402 and up to a total of 4 on the 2415 and 2410. ONLY Siemens 2400 handsets will operate with your Siemens Gigaset system. To register additional handsets, you must be near the base unit. 1. Turn handset on by pressing the PWR key. 2. Display will show “Please Register.” 3. Press the OK soft key, enter System PIN, and press OK again to begin the registration mode. Display will show “Searching.” 4. Within 3 minutes of pressing OK, continue the registration on your base. 2420 Base 2402 Base • Press MENU and scroll to system settings; press Select. • Enter System PIN and press Select. • Scroll to mobile registration and press Select. • Hold down the power ON/OFF indicator and Registration button until it flickers (approximately 4 seconds). 2410 and 2415 Bases • Hold down the Page/Registration button until the PWR LED flickers. 5. When the base station and handset connect, the handset display will allow you to select an intercom number associated with that handset. Valid selections are 1-8 or 1-4 (depending on base) and only unused numbers are displayed. 6. Scroll to select an intercom number and press OK. The display will show “Intercom X Registered.” Handset features may be accessed through dedicated hard keys (TALK, CONF, END, MENU, INT) or two soft keys located directly under the display. The soft keys are defined by the text or icon immediately above them. Pressing [#] and [$] soft or MENU keys scrolls through the list of menu options. Pressing the soft key under moves the menu to the previous level. The dashed line indicates the end of a menu list. Answering Calls When the handset is in the charging cradle, lifting the handset out of the cradle will answer the call OR When the handset is out of the charging cradle answer a call by pressing TALK on the handset. Making Calls Making External Calls 1. 2. 3. 4. Lift the handset. Enter a number using the handset keypad. Press TALK to be connected to the phone line. To hang up or disconnect call, press END or return the handset to its holder. Making Intercom Calls 1. 2. OR 3. OR 4. OR 5. Press INT . Enter intercom number 1-4 or 1-8. (depending on model) Press the ¬ key to call all handsets. Press the 0 key to call base (2420 only). Press the 9 key to access the answering machine menu (2420, 2415 only). Transferring a Call Transferring an External Call 1. 2. 3. 4. Press CONF. Press INT and select intercom number 0-8. Press END. If the transferred call is not answered, it returns to you after 30 seconds. Transferring an Internal Call 1. Press CONF . 2. Press TALK and dial the number. 3. Press END. Conference Calls 1. 2. OR 3. 4. Press CONF . Press INT and choose intercom number for internal conference. Press TALK and dial external number. Press CONF again. Directory Calling from Your Directory 1. 2. 3. Press Dirctry. Press [#] or [$] to find the desired entry. Press TALK to dial number. Editing Your Directory 1. Press Dirctry. 2. Press [#] or [$] to find the desired entry and press OK. 3. Select “Edit Entry” and press OK. 4. Press ßl to erase characters. Press [!] or ["] to help position the flashing cursor. To insert a character, move cursor to the right of the desired location and type the character. Creating a New Entry 1. Press MENU and select “Directory.” 2. Select “New Entry” and press OK. 3. Enter the letters of the name by pressing the related keypad key. 4. Press [>] to move to the number line and enter the number. 5. Press OK. 6. Select “Save Entry” and press OK. Note: Pressing the ¬ key will capitalize the next letter. Correct mistakes by pressing [!]. Press [<] or [>] to move up or down a line. Privacy On/Off (Not available on all systems) • • If Privacy is ON, then the idle mobiles are prevented from joining calls that are already in progress. The conference feature must be used to create a three party call. If Privacy is OFF, then an idle mobile can join an external line call that is already in progress without having to conference. The idle mobile can join the call by pressing the JOIN L(1 or 2) softkey for the active line. A tone is presented to the active callers to advise that a third person (internal) has joined the call. Charger Installation The charger cradle can be desktop mounted or wall mounted. DO NOT place the charger cradle in a location with high humidity or direct sunlight. Desktop Installation Plug the charger's power supply cord into a 110V electrical outlet. Place charger on a flat surface. The charger cradle's plastic feet are designed not to leave marks on surfaces. For added protection, two additional rubber feet are provided for the bottom of the charger cradle. Wall-mount Installation Before wall mounting, make sure that the cable supplied with the power supply reaches the electrical outlet. Hold the charger cradle with the inserted handset against the wall and check whether a communication with the base station exists. (Press INT on the base and then press the ¬ key. The paging call should be received.) Drill two holes approximately 1" apart vertically. Insert screws (#6 or #8 pan head, not provided) into the holes 1/8" from the wall. Attach the charger cradle, sliding the attachment holes over the screws. Plug the charger's attached power supply cord into a 110V electrical outlet. Inserting the Cordless Handset into the Charger Place the cordless handset in the charger cradle with the contact points facing down. To ensure that proper electrical contact has been made, check that the charging light comes on. The charging indicator light for reserve batteries (marked with an “R”) will come on when charging reserve batteries. When charging handset batteries, the handset light will come on. Inserting Reserve Batteries 1. 2. 3. Open the reserve battery compartment by lightly pulling on the pressure points of the battery compartment cover. Insert the reserve batteries in the charging unit. Replace the reserve battery compartment in the charger cradle. Charging Batteries The charger cradle will charge both the reserve batteries and the rechargeable batteries installed in the handset. Batteries in the handset should be charged 12-14 hours prior to initial use. The charging process is indicated by an LED on the charging unit. Note: The reserve batteries are constantly trickle-charged with a low current. Consequently, if the reserve batteries are inserted, the LED for the reserve batteries is continuously on. DO NOT CHARGE ALKALINE BATTERIES OR OTHER NONRECHARGEABLE OR RENEWABLE BATTERIES IN THE BATTERY CHARGER. Cleaning the Charge Contacts Periodically clean the charge contacts on both the charger and the handset. Wipe the charger cradle with a damp cloth or an anti-static wipe. Never use a dry cloth (because of static discharge). For Technical Assistance, call toll free 1-888-777-0211 Or visit our web site at: www.siemenscordless.com For TDD assistance, call 1-888-777-0209 Part #, PB240023 Safety Precautions BEFORE USING YOUR TELEPHONE EQUIPMENT BASIC SAFETY INSTRUCTIONS SHOULD ALWAYS BE FOLLOWED TO REDUCE THE RISK OF FIRE, ELECTRIC SHOCK AND INJURY TO PERSONS. CONTAINS NICKEL CADMIUM BATTERY. BATTERY MUST BE RECYCLED OR DISPOSED OF PROPERLY. DO NOT DISPOSE IN MUNICIPAL WASTE. Only use type AA Nickel-Cadmium (NiCd) or type AA Nickel-Metal Hydride (NiMH) rechargeable batteries in the cordless handset and reserve battery compartment. DO NOT USE ALKALINE OR LITHIUM BATTERIES IN THE CORDLESS HANDSETS, CHARGER OR RESERVE BATTERY COMPARTMENT. Do not mix old and new batteries in this product. Use the same rechargeable battery type. (DO NOT combine rechargeable battery types.) Exercise care in handling batteries in order not to short the batteries with conducting materials such as rings, bracelets and keys. The batteries or conduction material may overheat and cause burns or fire. Do not dispose batteries in fire. Please call 1-800-8-BATTERY for information on NiCd battery recycling in your area. For additional instructions, see the user manual that came with your Gigaset system. Warranty THE PRODUCT WARRANTY IS CONTAINED IN THE USER MANUAL FOR THE GIGASET CORDLESS TELEPHONE. PLEASE REFER TO THE USER MANUAL THAT CAME WITH YOUR GIGASET FOR COMPLETE PRODUCT WARRANTY DETAILS. Information subject to change since Siemens reserves the right, without notice, to make changes in equipment design or components. Siemens and Gigaset are registered trademarks of Siemens AG. Siemens Communication Devices is a division of Siemens Information and Communication Products LLC. Made in USA with U.S and imported parts. Battery charger made in China. Copyright 1999 – July.