1
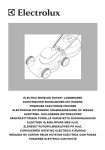
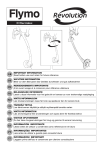
Power Compact 330
Power Compact 400
GB
IMPORTANT INFORMATION
Read before use and retain for future reference
DE
WICHTIGE INFORMATION
Bitte vor dem Benutzen des Gerätes durchlesen und gut aufbewahren
FR
RENSEIGNEMENTS IMPORTANTS
A lire avant usage et à conserver pour référence ultérieure
NL
BELANGRIJKE INFORMATIE
Leest u deze informatie voor het gebruik en bewaar ze voor toekomstige raadpleging
VIKTIG INFORMASJON
NO Les bruksanvisningen nøye før bruk og oppbevar den for senere bruk
FI
TÄRKEÄÄ TIETOA
Lue tämä ennen käyttöä ja säilytä myöhempää tarvetta varten
SE
VIKTIG INFORMATION
Läs anvisningarna före användningen och spara dem för framtida behov
DK
VIGTIGE OPLYSNINGER
Du bør læse brugsanvisningen før brug og gemme til senere henvisning
ES
INFORMACIÓN IMPORTANTE
Léase antes de utilizar y consérvela como referencia en el futuro
PT
INFORMAÇÕES IMPORTANTES
Leia antes de utilizar e guarde para consulta futura
IT
INFORMAZIONI IMPORTANTI
Leggere prima dell’uso e conservare per ulteriore consultazione
A
B
C
D
1
4
3
2
2
1
F
E
G
H
5
3
6
4
5
6
J
K
1
grassbox full
2
grassbox empty
L
M
CH
1
2
3
N
P
CH
Q
CH
R
S
1
T
U
1
2
3
4
5
V
W
1
GB
1.
2.
3.
4.
5.
6.
7.
8.
9.
10.
11.
12.
13.
14.
15.
16.
DE
1.
2.
3.
4.
5.
6.
7.
8.
9.
10.
11.
12.
13.
14.
15.
16.
- CONTENTS
Upper handle
Cable clip
Bolt
Washer
Handle knob
Nut (if applicable)
Lower handle
Deck
Lower handle fixing pin
Grassbox Lid
Individual height
adjustment levers x 4
(Power Compact 330
Only)
Height adjustment lever
(Power Compact 400
Only)
Lock off button
Instruction Manual
Warning Label
Product Rating Label
- INHALT
Oberer Griff
Kabelhalter
Bolzen
Unterlegscheibe
Griffknopf
Mutter (falls vorhanden)
Unterer Griff
Chassis
Befestigungsbolzen,
unterer Griff
Deckel des
Grasauffangbehälters
Einzelne
Höheneinstellungshebel
x 4 (Nur Power Compact
330)
Höheneinstellungshebel
(Nur Power Compact
400)
Knopf zur Festsetzung in
Aus-Position
Bedienungsanweisung
Warnetikett
Produkttypenschild
FR - CONTENU DU CARTON
1. Guidon supérieur
2. Attache câble
3. Vis
4. Rondelles
5. Vis papillon
6. Ecrou (si applicable)
7. Guidon inférieur
8. Carter
9. Goupille de fixation du
guidon inférieur
10. Couvercle du bac à
herbe
11. 4 leviers de réglage de
hauteur de coupe
(Power Compact 330
uniquement)
12. Levier de réglage de
hauteur de coupe
(Power Compact 400
uniquement)
13. Bouton de blocage
14. Manuel d’Instructions
15. Etiquette d’avertissement
16. Plaquette des
Caractéristiques du
Produit
NL
1.
2.
3.
4.
5.
6.
- INHOUD
Bovenstuk van duwboom
Snoerklem
Bout
Pakkingring
Knop voor duwboom
Moer (indien van
toepassing)
7. Onderstuk van duwboom
8. Dek
9. Bevestigingsbout voor
onderste duwstang
10. Deksel van vangbak
11. Individuele
hoogteafstellingshendels
x4 (Alleen voor de
Power Compact 330)
12. Hoogteafstellingshendel
(Alleen voor de Power
Compact 400)
13. Grendelknop
14. Handleiding
15. Waarschuwingsetiket
16. Product-informatielabel
NO - INNHOLD
1. Øvre håndtak
2. Kabelklemme (2 stk)
3. Bolt (2 stk)
4. Skive (2 stk)
5. Vingemutter (2 stk)
6. Mutter (om relevant)
7. Nedre håndtak
8. Klippedeksel
9. Festebolt for nedre
håndtak (2 stk)
10. Lokk for gressoppsamler
11. Regulering for
klippehøyden (individuell,
kun for Power Compact
330)(4 stk)
12. Regulering for
klippehøyden (sentral,
kun for Power Compact
400)
13. Bryterboks
14. Bruksanvisning
15. Advarselsetikett
16. Produktmerking
FI
1.
2.
3.
4.
5.
6.
7.
8.
9.
- SISÄLTÖ
Ylempi kahva
Johdon pidike
Pultti
Tiivistysrengas
Kahvan nuppi
Mutteri (jos käytössä)
Alempi kahva
Kansi
Alemman kahvan
kiinnityspuikko
10. Ruoholaatikon kansi
11. Yksittäiset
korkeudensäätövivut x 4
(ainoastaan Power
Compact 330 -mallissa)
12. Korkeudensäätövipu
(ainoastaan Power
Compact 400 -mallissa)
13. Poislukituspainike
14. Käyttöopas
15. Varoitusnimike
16. Ruohonleikkurin arvokilpi
SE
1.
2.
3.
4.
5.
6.
- INNEHÅLL
Övre handtag
Kabelklämma
Bult
Bricka
Knopp för handtag
Mutter (om sådan är
monterad)
7. Undre handtag
8. Kåpa
9. Fästpinne för det undre
handtaget
10. Gräslådans lock
11. 4 spakar för individuell
höjdinställning (enbart
Power Compact 330)
12. Spak för Central
höjdinställning (enbart
Power Compact 400)
13. Låsknapp
14. Bruksanvisning
15. Varningsetikett
16. Produktmärkning
DK
1.
2.
3.
4.
5.
6.
7.
8.
9.
10.
11.
12.
13.
14.
15.
16.
ES
1.
2.
3.
4.
5.
6.
- INDHOLD
Øvre håndtag
Kabelklemme
Bolt
Spændeskive
Håndtagsknop
Møtrik (hvis relevant)
Nedre håndtag
Skjold
Fastgøringsstift til de
nederste håndtag
Låg til græsopsamler
Individuelle
højdejusteringshåndtag x
4 (gælder kun Power
Compact 330)
Højdejusteringshåndtag
(gælder kun Power
Compact 400)
Kontakt
Brugsvejledning
Advarselsmœrkat
Produktets mærkeskilt
- CONTENIDO
Empuñadura superior
Grapa de cable
Perno
Arandela
Manija de empuñadura
Tuerca (si fuera
aplicable)
7. Empuñadura inferior
8. Cubierta
9. Bajar el pasador de
fijación de la manilla
10. Tapa de la caja de pasto
11. Palancas de ajuste
individual x 4 (Power
Compact 330 solamente)
12. Palanca de ajuste de
altura (Power Compact
400 solamente)
13. Botón de desenganche
14. Manual de instrucciones
15. Etiqueta de Advertencia
16. Placa de Características
del Producto
PT
1.
2.
3.
4.
5.
6.
7.
8.
9.
- LEGENDA
Guiador superior
Grampo do cabo
Cavilha
Anilha
Maçaneta
Porca (se aplicável)
Guiador inferior
Cobertura
Pino de fixação da pega
inferior
10. Tampa do cesto de relva
11. 4 alavancas individuais
de regulação da altura
(Apenas Power Compact
330)
12. Alavanca de regulação
da altura (Apenas Power
Compact 400)
13. Botão para travar
14. Manual de Instrucções
15. Etiqueta de Aviso
16. Rótulo de Avaliação do
Produto
IT
1.
2.
3.
4.
5.
- INDICE CONTENUTI
Impugnatura superiore
Morsetto per il cavo
Bullone
Rondella
Manopola
dell’impugnatura
6. Dado (se pertinente)
7. Impugnatura inferiore
8. Telaio
9. Perno di fissaggio
dell’impugnatura inferiore
10. Coperchio del canestro
raccoglierba
11. 4 leve per la regolazione
individuale dell’altezza
(solo nel Power Compact
330)
12. Leva per la regolazione
dell’altezza (solo nel
Power Compact 400)
13. Pulsante di sblocco
14. Manuale di istruzioni
15. Etichetta di pericolo
16. Etichetta dati del
prodotto
KARTONGEN
INNHOLDER
(ES)
CONTENIDO DEL
CARTON
(FI)
PAKETIN SISÄLTÖ
(PT)
(SE)
FÖRPACKNINGENS
INNEHÅLL
LEGENDAS DOS
DESENHOS
(IT)
CONTENUTO DEL
CARTONE
(NO)
(GB)
CARTON CONTENTS
(DE)
KARTONINHALT
(FR)
CONTENU DU CARTON
(NL)
INHOUD
(DK)
KARTONINDHOLD
Power Compact 330
4
16
3
10
15
9
5
11
6
8
13
14
2
1
7
Power Compact 400
15
4
10
16
9
3
5
12
6
8
2
14
13
1
7
Safety Precautions
If not used properly this lawnmower can be dangerous! This lawnmower can cause serious
injury to the operator and others, the warnings and safety instructions must be followed to
ensure reasonable safety and efficiency in using this lawnmower. The operator is
responsible for following the warning and safety instructions in this manual and on the
lawnmower. Never use the mower unless the grassbox or guards provided by the
manufacturer are in the correct position.
Explanation of Symbols on the Power Compact
Warning
Read the user instructions carefully to
make sure you understand all the
controls and what they do
Always keep the lawnmower on the
ground when mowing. Tilting or lifting
the lawnmower may cause stones to be
thrown out
Keep bystanders away. Do not mow
whilst people especially children or pets
are in the mowing area
Switch off! Remove plug from mains
before adjusting, cleaning or if cable is
entangled or damaged. Keep the cable
away from the blade.
Beware of severing toes or hands.
Do not put hands or feet near a rotating
blade.
STOP
Blade continues to rotate after the
machine is switched off.
Wait until all machine components have
completely stopped before touching
them.
Do not mow in the rain or leave the
lawnmower outdoors while raining
General
1. Never allow children or people unfamiliar with
these instructions to use the mower. Local
regulations may restrict the age of the operator.
2. Only use the lawnmower in the manner and for the
functions described in these instructions.
3. Never operate the lawnmower when you are tired, ill
or under the influence of alcohol, drugs or medicine.
4. The operator or user is responsible for accidents or
hazards occurring to other people or their property.
Electrical
1. The use of a Residual Current Device (R.C.D.)
with a tripping current of not more than 30mA is
recommended. Even with a R.C.D. installed 100%
safety cannot be guaranteed and safe working
practice must be followed at all times. Check your
R.C.D. every time you use it.
2. Before use, examine cable for damage, replace it
if there are signs of damage or ageing.
3. Do not use the lawnmower if the electric cables
are damaged or worn
ENGLISH - 1
4. Immediately disconnect from the mains electricity
supply if the cable is cut, or the insulation is damaged.
Do not touch the electric cable until the electrical
supply has been disconnected. Do not repair a cut or
damaged cable. Replace it with a new one.
5. Your extension cable must be uncoiled, coiled cables
can overheat and reduce the efficiency of your mower.
6. Keep cable away from lawnmower, always work
away from the power point mowing up and down,
never in circles.
7. Do not pull cable around sharp objects.
8. Always switch off at the mains before disconnecting
any plug, cable connector or extension cable.
9. Switch off, remove plug from mains and examine
electric supply cable for damage or ageing before
winding cable for storage. Do not repair a
damaged cable, replace it with a new one. Use
only Flymo replacement cable.
10. Always wind cable carefully, avoiding kinking.
11. Never carry the product by the cable.
12. Never pull on the cable to disconnect any of the plugs.
13. Use only on AC mains supply voltage shown on
the product rating label.
14. Flymo products are double insulated to EN60335.
Under no circumstances should an earth be
connected to any part of the product.
Cables
Use only 1.00mm2 size cable up to 30 metres length
maximum.
Maximum rating:
1.00mm2 size cable 10 amps 250 volts AC
1. Mains cables and extensions are available from
your local Electrolux Outdoor Products Approved
Service Centre.
2. Only use extension cables specifically designed for
outdoor use.
Preparation
1. While using your product always wear substantial
footwear and long trousers.
2. Make sure the lawn is clear of sticks, stones, bones,
wire and debris; they could be thrown by the blade.
3. Before using the machine and after any impact, check
for signs of wear or damage and repair as necessary.
4. Replace worn or damaged blades together with
their fixings in sets to preserve balance.
Use
1. Use the lawnmower only in daylight or good
artificial light.
2. Avoid operating your lawnmower in wet grass,
where feasible.
3. Take care in wet grass, you may lose your footing.
4. On slopes, be extra careful of your footing and
wear non-slip footwear.
5. Mow across the face of slopes, never up and down.
6. Exercise extreme caution when changing direction
on slopes. Walk never run.
7. Mowing on banks and slopes can be dangerous.
Do not mow on banks or steep slopes.
8. Do not walk backwards when mowing, you could trip.
9. Never cut grass by pulling the mower towards you.
Safety Precautions
10. Switch off before pushing the mower over surfaces
other than grass.
11. Never operate the lawnmower with damaged
guards or without guards in place.
12. Keep hands and feet away from the cutting means at
all times and especailly when switching on the motor.
13. Do not tilt lawnmower when the motor is running,
except when starting and stopping. In this case, do
not tilt more than absolutely necessary and lift only
the part which is away from the operator. Always
ensure that both hands are in the operating position
before returning the appliance to the ground.
14. Never pick up or carry a mower when it is
operating or still connected to the mains supply.
15. Remove the plug from the mains:
- before leaving the mower unattended for any period;
- before clearing a blockage;
- before checking, cleaning or working on the appliance;
-
if you hit an object. Do not use your lawnmower
until you are sure that the entire lawnmower is in a
safe operating condition.;
- if the lawnmower starts to vibrate abnormally.
Check immediately. Excessive vibration can cause
injury.
Maintenance and storage
1. Keep all nuts, bolts and screws tight to be sure the
lawnmower is in safe working condition.
2. Check the grassbox frequently for wear or
deterioration.
3. Replace worn or damaged parts for safety.
4. Only use the replacement blade, blade bolt,
spacer and impeller specified for this product.
5. Be careful during adjustment of the lawnmower to
prevent entrapment of the fingers between moving
blades and fixed parts of the machine.
Assembly Instructions
C1 - Grassbox lid, C2 - Lower handle fixing pins
Assembly of Lower Handles to Deck
1. Insert lower handle into holes in the deck and
push into place. (A)
2. Release the grassbox catch and lift the grassbox lid (B).
3. Rest the grassbox lid against the lower handle and
remove the grassbox.
4. Ensure that the holes in the lower handle are
correctly located behind the holes in the deck.
5. Secure the lower handles to the inside of the deck
with the lower handle fixing pins. (C).
6. Ensure the fixing pins are securely located.
7. Should a problem occur when securing lower
handle to deck, carefully lever fixing pins out of
location and repeat steps 4 to 6 above.
8. Replace the grassbox and close the grassbox lid.
D1 - Bolt, D2 - Washer, D3 - Handle knob,
D4 - Nut (if applicable)
Fitting Upper Handles to Lower Handles (D)
1. Ensure the upper handle is located correctly with
the lock-off button on the switchbox uppermost.
2. Ensure the upper handle and the lower handle are
aligned correctly.
3. Insert the nut into the handle knob. (if applicable)
4. Fit the bolts, washers and handle knobs.
5. Fit the cable to the handles with the clips provided.
Make sure the cable is not trapped between the
upper and lower handles.
Adjusting the Cutting Height
F - Front Power Compact 330
G - Highest height of cut
H - Lowest height of cut
Cutting Height Adjustment Power Compact 330
Rear Height Adjustment
1. Select one of the 5 locations and note it as the
other lever will need to be adjusted to the same
position. (E)
2. Lift the lever out of location and rotate to the
desired position. (E)
Front Height Adjustment
• Using the same height adjustment position repeat
the procedure for the other lever (F).
Cutting Height Adjustment Power Compact 400
• Lift the lever out of location and rotate to the
desired position. (E)
Heights of cut
1&2
low
3&4
medium
5&6
high
Removing, Emptying and Refitting the Grassbox
J1 - Grassbox full,
J2 - Grassbox empty
Grassbox Full Indicator
• IMPORTANT:
The machine must be switched on for the
grassbox full indicator to operate
1. When the ball reaches the top of the indicator
window, it is time to empty the grassbox. (J)
2. When the ball is NOT visible in the indicator
window, grass is being collected. (J)
Emptying the Grassbox
• Stop the lawnmower, as described in ‘To Stop
your Lawnmower’ and wait until the blade has
stopped rotating, BEFORE lifting the grassbox lid.
1. Release grassbox catch and lift grassbox lid (B).
See Assembly Instructions.
2. Rest grassbox lid against lower handle and
remove grassbox (K).
3. Empty grassbox.
4. Replace grassbox and close grassbox lid.
• If the ball is visible before the grassbox is full,
raise the height of cut until the grassbox is full.
Cut Out Device
L1 - Grassbox lid actuator, L2 - Swich actuator,
L3 - Cut out
• IMPORTANT: The Power Compact is fitted with a
device which will prevent the lawnmower from
being started until the grassbox is securely located
and the grassbox lid is firmly closed.
•
Do not attempt to use your lawnmower without the
grassbox in place or with the lid open.
ENGLISH - 2
Starting and Stopping
To Start your Lawnmower
1. Connect female extension cable connector to the
back of the switchbox. (M)
2. Form loop in mains cable and push the loop
through the slot. (N)
3. To secure, position loop over the hook and pull the
cable back through the slot.(P).
4. Connect plug to mains and switch on.
5. Tilt the handle downwards to slightly raise the front
of the lawnmower and to reduce the risk of lawn
damage whilst starting.
The switchbox is provided with a lock-off button
(Q1) to prevent accidental starting.
6. Press and hold the lock-off button (Q) on the
switchbox, then squeeze one of the Start/Stop
levers towards the upper handle (R).
7. Continue to squeeze the start/stop lever towards
the upper handle and release the lock-off button.
8. Lower the lawnmower to its proper operating
position and commence mowing.
• NOTE: There are two start/stop levers fitted. Either
one can be used for starting the lawnmower.
• IMPORTANT
Do not use the start/stop levers intermittently
To Stop your Lawnmower
1. Release the pressure on the Start/Stop lever.
How to Mow
1. Start mowing the edge of the lawn nearest to the
power point so the cable is laid out on the lawn
you have already cut. (S)
2. Cut your grass twice a week during the growing
season, your lawn will suffer if more than a third of
its length is cut at one time.
Do Not Overload Your Mower
Mowing long thick grass may cause the motor speed to
drop, you will hear a change in the motor sound. If the
motor speed drops you may overload your lawnmower
which may cause damage. When mowing in long thick
grass a first cut with the cutting height set higher will
help reduce the load. See Adjusting the Cutting Height.
Removing and Fitting the Blade and Fan
T1 - Blade bolt
T2 - Blade
T3 - Spacer
T4 - Fan
T5 - Pulley
Always handle the blade with care - sharp edges
could cause injury. USE GLOVES.
Removing the Blade and Fan
1. To remove the blade bolt, hold the fan firmly and,
with a 13.0mm ring spanner, loosen the blade bolt
by turning it anti-clockwise (T).
2. Remove the blade bolt, blade, spacer and fan from
the pulley. (T)
3. Inspect for damage and clean as necessary.
•
Renew your metal blade after 50 hours mowing
or 2 years whichever is the sooner - regardless
of condition.
• If the blade is cracked or damaged replace it
with a new one.
Fitting the Blade and Fan
1. Ensure the fan is located correctly. (T)
2. Fit the spacer to the fan. (T)
3. Fit the blade to the spacer. (T)
4. Re-assemble blade bolt through blade, spacer and
fan.
5. Hold the fan firmly and tighten blade bolt firmly
with a 13.0mm ring spanner. Do not over tighten.
Caring for your Lawnmower
Cleaning (U) - USE GLOVES
• IMPORTANT
It is very important that you keep your lawnmower
clean. Grass clippings left in any of the air intakes or
under the deck could become a potential fire hazard.
1. Remove grass from under the deck with a piece of
wood or similar.
2. Remove the blade, see Figure T, to gain access
to the fan and clean with a soft brush.
3. Remove grass clippings from:
• all air intakes
• wheels and height adjustment levers
• grassbox
• grassbox lid and both sides of grassbox full indicator
4. Clean around the switch actuator on the grassbox (V1).
5. Wipe over the surface of your lawnmower with a
dry cloth.
•
IMPORTANT
Never use water for cleaning your lawnmower. Do
not clean with chemicals, including petrol, or
solvents - some can destroy critical plastic parts.
At the End of the Mowing Season
1. Replace blade, bolts, nuts or screws, if necessary.
2. Clean your lawnmower thoroughly.
3. Ask your local Service Centre to clean the air filter
thoroughly and carry out any service or repairs required.
4. Make sure that the electric cable is coiled properly.
Storing the lawnmower (W)
The handles can be folded to take up the minimum of space.
• Loosen the handle knobs
• Fold the upper handle over the lawnmower.
• Ensure the switchbox cable is not trapped.
• Store in a dry place where your
lawnmower is protected from damage.
Environmental Information
Electrolux Outdoor Products are manufactured under
an Environmental Management System (ISO 14001)
using, where practical, components manufactured in
the most environmentally responsible manner,
according to company procedures, and with the
potential for recycling at the end of the products’ life.
ENGLISH - 3
•
•
•
Packaging is recyclable and plastic components have
been labelled (where practical) for categorised recycling.
Awareness of the environment must be considered
when disposing of ‘end-of-life’ product.
If necessary, contact your local authority for
disposal information.
Fault Finding Hints
Fails to Operate
1. Is the correct Starting procedure being followed?
See ‘To Start your Lawnmower’.
2. Is the grassbox securely located and the grassbox
lid firmly closed? See ‘Removing, emptying and
refitting the Grassbox’.
3. Is the grassbox plunger damaged or missing? See
'Caring for your Lawnmower'.
4. Is the Power Turned On?
5. Check the fuse in the plug, if blown replace.
6. Fuse continues to blow?
Immediately disconnect from the mains electricity
supply and consult your local approved Electrolux
Outdoor Products Service Centre.
Poor Grass Collection
1. Disconnect from the mains electricity supply.
2. Check that the grass chute and the underside of
the deck are free from grass.
3. Raise to a higher height of cut. See Adjusting the
Cutting Height
4. Clean Fan Blades.
5. If poor collection persists.
Immediately disconnect from the mains electricity
supply and consult your local approved Electrolux
Outdoor Products Service Centre.
Excessive Vibration
1. Disconnect from the mains electricity supply.
2. Check that the blade is fitted correctly?
3. If the blade is damaged or worn, replace it with a
new one.
4. If vibration persists, turn the blade through 180o by
first loosening the blade bolt, turning the blade and
re-tightening the blade bolt.
5. If vibration persists?
Immediately disconnect from the mains electricity
supply and consult your local approved Electrolux
Outdoor Products Service Centre.
Lawnmower becomes heavy to push
1. Disconnect from the mains electricity supply.
2. In long grass or uneven ground, the height of cut
should be raised to a higher position. See
Adjusting the Cutting Height
3. Check that the wheels can rotate freely.
4. If problem persists?
Immediately disconnect from the mains electricity
supply and consult your local approved Electrolux
Outdoor Products Service Centre.
Grassbox Full Indicator Ball is visible when the
grassbox is empty
Grassbox Full Indicator Ball Fails to Operate
1. Remove grass clippings from both sides of
grassbox full indicator.
2. Make sure the discharge chute on the deck and
the grassbox are clean and free from debris.
3. If the chute blocks persistently in longer grass raise the cutting height.
4. If the problem persists.
Immediately disconnect from the mains electricity
supply and consult your local approved Electrolux
Outdoor Products Service Centre.
Service Recommendations
•
•
Your product is uniquely identified by a silver and black product rating label.
We strongly recommend that your product is serviced at least every twelve months, more often in a
professional application.
Guarantee and Guarantee Policy
If any part is found to be defective due to faulty
manufacture within the guarantee period, Electrolux
Outdoor Products, through its Authorised Service
Repairers will effect the repair or replacement to the
customer free of charge providing:
(a) The fault is reported directly to the Authorised
Repairer.
(b) Proof of purchase is provided.
(c) The fault is not caused by misuse, neglect or faulty
adjustment by the user.
(d) The failure has not occurred through fair wear and
tear.
(e) The machine has not been serviced or repaired,
taken apart or tampered with by any person not
authorised by Electrolux Outdoor Products.
(f) The machine has not been used for hire.
(g) The machine is owned by the original purchaser.
(h) The product has not been used outside of the
country in which it was purchased.
(i) The machine has not been used commercially.
* This guarantee is additional to, and in no way
diminishes the customers statutory rights.
Failures due to the following are not covered,
therefore it is important that you read the instructions
contained in this Operator's Manual and understand
how to operate and maintain your machine:
Failures not covered by guarantee
* Replacing worn or damaged blades
* Failures as a result of not reporting an initial fault.
* Failures as a result of sudden impact.
* Failures as a result of not using the product in
accordance with the instructions and
recommendations contained in this Operator's
Manual.
* Machines used for hire are not covered by this
guarantee.
* The following items listed are considered as
wearing parts and their life is dependent on regular
maintenance and are, therefore not normally
subject to a valid warranty claim: Blades, Electric
Mains cable.
* Caution!
Electrolux Outdoor Products does not accept
liability under the warranty for defects caused in
whole or part, directly or indirectly by the fitting of
replacement parts or additional parts that are not
either manufactured or approved by Electrolux
Outdoor Products, or by the machine having been
modified in any way.
ENGLISH - 4
BELGIQUE/BELGIË
Flymo Belgique/België
Tel: 02 363 0311, Fax: 02 363 0391
ČESKÁ REPUBLIKA
Electrolux, spol. s.r.o., oz Electrolux Outdoor Products,
Na Křečku 365, Praha 10 - Horní Měcholupy.
Tel: 02/7847 0164, Info-linka: 0800/110 220
Internet: www.partner-flymo.cz E-mail: info@husqvarna.cz
DANMARK
Electrolux Outdoor Products, Flymo/Partner A/S,
Lundtoftegaardsvej 93A, DK 2800 Kgs.Lyngby
Tel: 45 87 75 77, Fax: 45 93 33 08, www.flymo-partner.dk
DEUTSCHLAND
Flymo Deutschland
Tel: 097 21 7640, Fax:097 21 764202
ESTONIA
Electrolux Estonia Ltd (Electrolux Eesti AS)
Tel: (372) 6650010
FRANCE
Flymo France SNC
Tel 01 46 67 8141, Fax 01 43 34 2491
FINLAND SUOMI
Electrolux Outdoor Products Finland
Tel: 00 358 9 39611, Fax: 00 358 9 3961 2644
ITALIA
McCulloch Italiana s.r.l. - Via Como 72, 23868 Valmadrera
(LECCO) - ITALIA
Tel: 800 017829, Fax: 0341 581671
IRELAND
Flymo Ireland
Tel: 01 4565222, Fax: 01 4568551
MAGYARORSZÁG
Electrolux Lehel Kft
Tel: 00 36 1 251 41 47
NORGE
Flymo/Partner, div. av Electrolux Motor a.s.
Tel: 69 10 47 90
NEDERLAND
Flymo Nederland
Tel: 0172-468322, Fax: 0172-468219
ÖSTERREICH
Husqvarna-Ges.m.b.H. Nfg. KG, Industriezeile 36, 4010 LINZ,
Tel: 0732 770101-0, Fax: 0732 770101-40,
email: office@husqvarna.co.at Internet: www.husqvarna.at
POLSKA
Electrolux Poland Sp. z.o.o. Husqvarna, Wysockiego 15 b
03-371 Warszawa
Tel:- (0-22) 330 96 00, Fax: (0-22) 330 96 35
SLOVENIJA
Husqvarna-Ges.m.b.H. Nfg. KG, Industriezeile 36, 4010 LINZ,
Tel: 0732 770101-0, Fax: 0732 770101-40,
email: office@husqvarna.co.at Internet: www.husqvarna.at
SLOVENSKA
Electrolux Slovakia s.r.o., Borova Sihot 211, 033 01 Lipt. Hradok
Tel: 044 522 14 19, Fax: 044 522 14 18, www.flymo-partner.sk
SCHWEIZ/SUISSE/SUIZZERA
Flymo Schweiz/Suisse/Suizzera
Tel 062 889 93 50 / 889 94 25, Fax 062 889 93 60 / 889 94 35
SVERIGE
Electrolux Outdoor Products, Sverige
Tel: 036 – 14 67 00, Fax: 036 – 14 60 70
UNITED KINGDOM
Electrolux Outdoor Products United Kingdom
Tel: 01325 300303, Fax: 01325 310339
Electrolux Outdoor Products
Aycliffe Industrial Park
NEWTON AYCLIFFE
Co.Durham DL5 6UP
ENGLAND
Telephone - (00) 44 1325 300303 Fax - (00) 44 1325 310339
UK Telephone - 01325 300303 Fax - 01325 310339
Our policy of continuous improvement means that the specification of products may be altered from time to time without prior notice.
Electrolux Outdoor Products manufacture products for a number of well known brands under various registered patents, designs and
trademarks in several countries.
© Electrolux Outdoor Products Ltd. Registered Office, Electrolux Works, Oakley Road, Luton LU4 9QQ
Registered number 974979 England
The Electrolux Group. The world’s No.1 choice.
The Electrolux Group is the world’s largest producer of powered appliances for kitchen, cleaning and outdoor use. More than 55 million
Electrolux Group products (such as refrigerators, cookers, washing machines, vacuum cleaners, chain saws and lawn mowers) are
sold each year to a value of approx. USD 14 billion in more than 150 countries around the world.
5119103-02