1
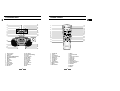
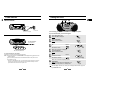
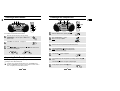
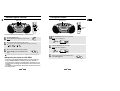
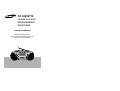
Safety Warnings
Contents
B
Use of controls, adjustments or performance of procedures other than those
specified herein may result in hazardous radiation exposure.
CLASS 1 LASER PRODUCT
KLASSE 1 LASER PRODUKT
LUOKAN 1 LASER LAITE
KLASS 1 LASER APPARAT
PRODUCTO LASER CLASE 1
CAUTION-INVISIBLE LASER
RADIATION WHEN OPEN AND
INTER LOCKS DEFEATED, AVOID
EXPOSURE TO BEAM.
CAUTION
RISK OF ELECTRIC
SHOCK. DO NOT OPEN
CAUTION:
TO REDUCE THE RISK OF ELECTRIC SHOCK,
DO NOT REMOVE REAR COVER, NO USER
SERVICEABLE PARTS INSIDE, REFER SERVICING TO QUALIFIED SERVICE PERSONNEL.
CLASS 1 LASER PRODUCT
This Compact Disc player is
classified as a CLASS 1 LASER
product.
This symbol indicates that dangerous voltage which can cause electric shock is present inside this unit.
◆ Safety Warnings....................................................................................................1
■ Front Panel View .....................................................................................................3
■ Remote Control .......................................................................................................4
■ Power Sources ........................................................................................................5
■ Setting the Clock .....................................................................................................6
◆ Tuner
■ Listening to the Radio ............................................................................................7
■ Searching For and Storing the Radio Stations ....................................................8
■ Selecting a Stored Station .....................................................................................9
■ Improving Radio Reception ....................................................................................9
◆ CD-Player
Listening to the Compact Disc ............................................................................10
Selecting a Track/+10 Function ............................................................................11
■
Searching for a Specific Music Passage ..........................................................12
■
Random Playback Function ............................................................................13
■ CD Repeat Function .............................................................................................14
■ Repeat A↔B Function ..........................................................................................15
■ Programming the order of Playback ....................................................................16
■
■
◆ Tape Deck
■ Listening to the Cassette ......................................................................................18
■ Various Functions for tape....................................................................................19
REV. Mode Function ................................................................................................19
Selecting the side of a tape ......................................................................................19
Tape Speed Function ..............................................................................................19
Tape Counter ..........................................................................................................19
■ Copying a Cassette (Dubbing).............................................................................20
■ Recording from Radio...........................................................................................21
■ Recording from CD ...............................................................................................22
■
■
This symbol alerts you to important operating and maintenance instructions accompanying the unit.
■
■
WARNING: To reduce the risk of fire or electric shock, do not expose this appliance to rain or moisture.
CAUTION: TO PREVENT ELECTRIC SHOCK, MATCH WIDE BLADE OF PLUG TO WIDE SLOT, FULLY
INSERT.
◆ Other Functions
■ CD Synchro Function ...........................................................................................23
■ Timer Function ......................................................................................................24
■ Sleep Timer/Display Color ....................................................................................26
■ Equalizer Mode .....................................................................................................27
■ Power Surround/Mute Function ...........................................................................28
■ MIC Function(Option) ...........................................................................................29
◆ Recommendations for Use
■ Precautions when using Compact Discs.............................................................30
■ Maintaining the Sound Quality .............................................................................30
■ Before Contacting the After-Sales Service ..........................................................31
■ Specifications ........................................................................................................32
1
2
GB
Front Panel View
Remote Control
B
GB
1
2
14
15
16
17
3
4
1
Power
Surround
2
Sleep
Counter
Reset
Mute
EQ
3
TAPE
18
19
20
21
22
5
6
7
8
9
4
5
6
7
8
9
10
Repeat
REC/Pause CD SYNC A B Deck A/B
CD
Repeat
Program/
Set
+10
VOL.
Random
Mode
11
10
12
12
1.
2.
3.
4.
5.
6.
7.
8.
9.
10.
11.
12.
13.
Mono/ST
25
Band
23
24
25
26
13
Skip or Search
Program/Set
Beat Cut
Function(TUNER/CD/TAPE)
MO/ST(Mono/Stereo)
Mode
Random
CD Repeat
STOP
Clock/Timer
Timer On/Off
Standby/On
Phones
14.
15.
16.
17.
18.
19.
20.
21.
22.
23.
24.
25.
26.
3
Tape Speed
Normal/High Dubbing
Volume
Display Color
REV. Mode
REC/Pause
Deck A/B
3 Mode EQ
P. SURR
Repeat A↔B
Sleep
Open/Close
Mic
1.
2.
3.
4.
5.
6.
7.
8.
9.
10.
11.
12.
22
23
24
VOL.
RCD-S70/S70S/S70B
11
13
14
15
16
17
18
19
20
21
Standby/On
Sleep
Tape Rewind
Tape Fast-Forward
REC/Pause
CD Synchro
CD Repeat
CD Stop
Program/Set
Skip or Search
Mode
Mono/Stereo
13.
14.
15.
16.
17.
18.
19.
20.
21.
22.
23.
24.
25.
4
Mute
Power Surround
EQ
Tape Counter Reset
Tape Play
Tape Stop
Deck A/B
Repeat A↔B
CD+10/Tape Speed
CD Play/Pause
Random
Volume
Band
Power Sources
B
Setting the Clock
1 2,4,6 3,5
House Current
■
1 to AC IN
230V
■
■
2 to wall outlet
AC power cord (supplied)
Batteries
CLOCK BATTERY
For each step, you have a few seconds to set the required options.
If you exceed this time, you must start again.
1
Press Clock /Timer twice.
Result: CLOCK is displayed.
2
Press Program/Set.
Result: The hour flashes.
3
To...
4
When the correct hour is displayed,
press Program/Set.
Result: The minutes flash.
5
To...
6
When the correct time is displayed, press
Program/Set.
Result: The clock starts and is displayed, even
when the system is in standby mode.
4.5V; AA,Size X 3
12V ; D, R20, size X 8
For critical recordings or disc playing
Operating the unit using the AC power is recommended.
Note:
■
■
■
If the battery power is low, "BATT-LOW" will be displayed during playback and the
playback will stop.
The unit will not operate from the internal batteries while the AC power cord is
connected to the unit.
Be sure to install batteries (“AA” x 3) to prevent the program preset in the memory
and the active countdown of the Timer from being cleared accidently in case of
power failure of disconnection of the power cord.
Press...
Increase the hours
Decrease the hours
Press...
Increase the minutes
Decrease the minutes
You can display the time, even when you are using another function, by pressing Clock/Timer once.
5
6
GB
Searching for and Storing the Radio Stations
Listening to the Radio
B
1
2
GB
1 42 3
3
Power
Surround
Power
Surround
Sleep
Mute
Counter
Reset
Mute
EQ
TAPE
Sleep
Counter
Reset
EQ
Repeat
REC/Pause CD SYNC A B Deck A/B
CD
TAPE
Repeat
REC/Pause CD SYNC A B Deck A/B
Repeat
CD
Program/
Set
+10
VOL.
Random
Mode
+10
Repeat
Program/
Set
VOL.
Random
Mode
VOL.
Mono/ST
Band
3
1
2
VOL.
Mono/ST
Band
4
2
1
◆ 15 FM stations
◆ 15 AM stations
1
Select the required frequency band by pressing
TUNER/BAND.
1
Select the required frequency band by pressing
TUNER/BAND on the front panel or Band on the
remote.
Press Mode button
2
2
To search for a station...
Press the TUNING(
Manually
Automatically
One or more times until MANUAL is displayed.
One or more times until AUTO is displayed.
,
) button.
PRESET function is explained in detail in the section “Selecting a Stored Station” on.
3
3
Press the Volume button.
Select the station to be stored by:
Pressing
or
buttons to increase or decrease the frequency respectively.
To scroll through the frequencies faster when searching manually, hold down the
or
buttons.
The automatic search procedure may stop on a frequency that does not correspond to a
radio station. If this happens, use the manual search mode.
To improve broadcast reception.
Reorient the antenna for FM.
Reorient the player itself for AM(MW) .
4
If you do not want to store the radio station found, revert to Step 3 and search for another station.
Otherwise:
a Press Program/Set.
Result: The MEMORY is displayed for a few seconds.
For FM
b Press
For AM(MW)
or
to assign a program number between 1 and 15.
c Press Program/Set to store the radio station.
Result: MEMORY is no longer displayed and the station is stored.
5
7
To store any other radio frequencies required, repeat Steps 3 to 4.
The PROGRAM function can be used to assign a new station to an existing
program number.
8
Selecting a Stored Station
Listening to the Compact Disc
B
1,5,6
1 2 3
7
GB
2,4
Power
Surround
Power
Surround
Mute
Sleep
Sleep
Counter
Reset
EQ
Repeat
REC/Pause CD SYNC A B Deck A/B
CD
CD
Repeat
Repeat
+10
VOL.
Random
3
Program/
Set
Band
1
2
2
Press Mode until “PRESET” is displayed.
3
Mono/ST
1
You can listen to a stored radio station as follows:
Select the required frequency band by pressing
TUNER/BAND on the front panel or Band on the
remote control.
2
3
Press
,
on the front panel or
to select the required program.
,
Random
1,5,6
7
VOL.
VOL.
1
+10
VOL.
Mode
Mode
Mono/ST
EQ
TAPE
Repeat
REC/Pause CD SYNC A B Deck A/B
TAPE
Program/
Set
Counter
Reset
Mute
on the remote control
4
Select the CD function by pressing CD(
Band
).
Press the Open/Close(
) button.
Result: The CD tray is opened.
Place the CD on the tray so that the CD label faces upward.
Press the Open/Close(
) button to close the tray.
Result: Number of tracks and the total playback time
are shown on the display.
Mode
Improving Radio Reception
You can improve the quality of radio reception by:
Rotating the FM or AM(LW, MW) aerial
If reception from a specific FM radio station is poor, press MO/ST on the
front panel or Mono/ST on the remote control to switch from stereo mode to
mono. The quality of the sound will be improved.
9
5
Press the CD(
6
If it is desired to stop while the playback is processing, press the CD(
button.
Press the CD(
7
) button for playback.
) button once again to playback again.
To stop playback, press the STOP (■) button.
10
)
Selecting a Track/+10 Function
B
Searching for a Specific Music Passage
GB
Skip/Search Button
Skip/Search Button
Power
Surround
Sleep
Counter
Reset
Power
Surround
Mute
Sleep
EQ
Repeat
REC/Pause CD SYNC A B Deck A/B
Repeat
REC/Pause CD SYNC A B Deck A/B
+10 Button
CD
CD
VOL.
Program/
Set
Random
VOL.
Random
Mode
Mode
VOL.
VOL.
Mono/ST
+10
Repeat
+10
Repeat
EQ
TAPE
TAPE
Program/
Set
Counter
Reset
Mute
Band
Mono/ST
Band
Skip/Search
Button
Skip/Search
Button
● Selecting a Track
You can select the track you wish to listen to, either when the compact disc
player is stopped or when a disc is playing.
When listening to a compact disc, you can quickly search for a specific music
passage on a track.
To start playback at the beginning of the...
Next track
Current track
Previous track
Track of your choice
Press...
To search through the tracks...
once
or
once
or
twice
or
,
or
,
the appropriate number
of times.
Forwards
Backwards
Press and hold down...
or
or
It is recommended that you turn the volume down before using this function.
● Function to skip though 10 tracks at a time
Press the +10 button briefly while playing back a CD. The track 10
tracks after the current one will then be played back.
Example: If you want to select track 43 during playback of track 15, press
the +10 button three times, and then press the
button three
times.
15 ➝ 20 ➝ 30 ➝ 40 ➝ 41 ➝ 42 ➝ 43
+10
+10
+10
11
for at least one second
for at least one second
12
Random Playback Function
B
CD Repeat Function
13 2
GB
CD Repeat button
Power
Surround
Mute
Power
Surround
Sleep
Counter
Reset
Mute
EQ
Sleep
Counter
Reset
EQ
TAPE
TAPE
Repeat
REC/Pause CD SYNC A B Deck A/B
Repeat
REC/Pause CD SYNC A B Deck A/B
CD
CD
+10
Repeat
Program/
Set
VOL.
Random
1
Repeat
Program/
Set
+10
VOL.
Random
CD Repeat
button
Mode
Mode
VOL.
Mono/ST
Band
VOL.
2
Mono/ST
You can listen to the tracks on a compact disc in a different order each time, as the
various tracks will be selected automatically in a random sequence.
1
2
3
Press the Random button.
Result: All the tracks are played in a random order.
When playing tracks in a random order, you can:
Move on to the next track(selected at random) by pressing
,
or
,
.
1
Press the CD Repeat button on the front Panel.
Result: “RPT 1” is displayed.
2
Press the CD Repeat button once again.
Result: “RPT ALL” is displayed.
RPT ALL
When you have finished the random playback,
press STOP ( ■ ) or press the Random button
again.
Repeat and CD Synchro function are not available in random playing mode.
● Regarding the playback of CD-R/RW
VOL
3
When you wish to stop the CD Repeat function,
Press STOP ( ■ ) button.
In the case of an original CD-R(Recordable) recorded in audio CD
format, CD-RW(Rewritable) and editing by the user, playback is
processed on the respective completed status. (The player may not
be played back according to the characteristics of the CD or recorded status.)
The CD-RW is comparably less reflexive than CD which causes more
time delay to read.
13
14
Band
Repeat A ↔ B Function
Programming the Order of Playback
Repeat A↔B button
B
GB
5 1,3,6 2
Power
Surround
Mute
Power
Surround
Sleep
Counter
Reset
Sleep
TAPE
Repeat
REC/Pause CD SYNC A B Deck A/B
CD
Repeat
+10
Repeat A↔B
button
Counter
Reset
VOL.
Repeat
REC/Pause CD SYNC A B Deck A/B
CD
+10
Random
Program/
Set
Mode
VOL.
5
1,3 ,6
Random
Mode
VOL.
Mono/ST
EQ
TAPE
Repeat
Program/
Set
Mute
EQ
VOL.
Band
When you select CD(TAPE) Repeat A ↔ B playback, the music passages to
which you were listening is repeated 3 times.
Mono/ST
Band
2
You can decide:
The order of the track desired to listen
The track not desired to listen
1
2
A maximum of up to 24 order of tracks desired to listen may be programmed.
Press CD(
) or TAPE button.
Result: The CD(TAPE) player starts playing.
Before selecting the track, the CD player should be stopped.
This function may be used simultaneously with the CD Repeat function.
1
Press Repeat A ↔ B button .
Result: A Time is memorized.
Press Program/Set.
Result: The following indications are displayed:
program no. Track Track no.
2
3
Press Repeat A ↔ B button .
Result: B Time is memorized.
Your selected passages are repeated 3 times.
4
When you have finished the Repeat playback, Press Repeat A ↔ B.
3
Press Program/Set to confirm your selection.
Result: The selection is stored and is displayed.
When setting the Repeat A↔B function during tape playback, an end point B
cannot be set within seven seconds after setting the start point A.
4
To select other tracks, repeat Steps 2 to 3.
15
Select the required track by pressing:
to move back through the tracks
or
to move forward through the tracks
or
16
Listening to the Cassette
B
5
1,5
2
GB
4
Power
Surround
Press CD (
) to listen to the track selection in the order
programmed.
Sleep
Counter
Reset
Mute
EQ
TAPE
Repeat
REC/Pause CD SYNC A B Deck A/B
CD
+10
Repeat
Program/
Set
VOL.
Random
Mode
6
7
VOL.
To check your selection of tracks,
Press Program/Set.
If you have already programmed 24 tracks,
program number is displayed.
To cancel the selection, press STOP ( ■ ) button twice.
Result: PROGRAM is no longer displayed.
Mono/ST
1
Select the TAPE function
by pressing TAPE.
2
To open either Deck A or B, press
3
Insert a cassette to Deck A or B.
4
Select Deck A or B by pressing Deck A / B button.
5
Press the TAPE button.
6
To stop playing the cassette,
press STOP ( ■ ).
If you open the compartment, the selection is cancelled.
17
the corresponding Push/Eject (
button.
)
18
Push Eject
Band
5
4
Various functions for tape
B
Repeat A↔ B Button
Copying a Cassette (Dubbing)
Tape Speed Button
1
REV.Mode Button
Power
Surround
Sleep
2
3
Mute
Counter
Reset
EQ
TAPE
Repeat
REC/Pause CD SYNC A B Deck A/B
CD
Repeat
Program/
Set
+10
VOL.
Repeat A ↔ B Button
Tape Speed Button
Random
Mode
VOL.
Mono/ST
● REV. Mode Function
Band
❇ This function is only available on S75/S75S model.
This function is only available in Deck B.
When the display indicates...
1
Put the tape you want to copy into Deck A and put an empty tape into
Deck B.
The cassette plays back...
One side of the selected
cassette and then stops.
One side of the cassette.
The other side of the
cassette and then stops.
Both sides of the cassette
indefinitely until you press stop.
● Selecting the side of a tape
<Deck A>
2
To copy a cassette, press Nor/High Dubbing button.
To copy a cassette at high speed, press
Nor/High Dubbing button for at least two seconds.
3
When you have finished recording,
press STOP ( ■ ).
❇ This function is only available on S75/S75S model.
Pressing the TAPE button while playing
reverses the side (Front and Back)
This function is available in Deck B only.
● Tape Speed Function
During playback, you can select from various playback speeds by using the Tape Speed.
SPEED +10: Playback at the speed 0.10 times faster than the original speed.
OFF: Playback at normal speed.
SPEED -10: Playback at the speed 0.10 times slower than the original speed.
Select the desired speed by using the +10 button on the remote.
<Deck B>
You do not need to adjust the volume, as it has no effect on the recording.
● Tape Counter
When playing a cassette, a counter is displayed to enable you to take note of the counter value.
The counter is only displayed when a cassette is being played.
Before starting to record a cassette for which you wish to take note of the counter values at the
beginning of each track, reset the counter by pressing
Counter Reset on the remote control.
19
20
GB
Recording from Radio
Recording from CD
B
GB
2
3
4 1
Power
Surround
Sleep
Counter
Reset
3
Mute
2 4 1
Power
Surround
EQ
Sleep
TAPE
Repeat
REC/Pause CD SYNC A B Deck A/B
Repeat
Program/
Set
Repeat
REC/Pause CD SYNC A B Deck A/B
CD
+10
VOL.
Random
Mono/ST
Program/
Set
Band
3
Insert a cassette to Deck B.
2
Select the required frequency band by pressing
TUNER/BAND.
Random
3
4
VOL.
1
Push Eject
VOL.
Mode
Mono/ST
1
+10
Repeat
Mode
VOL.
Mute
EQ
TAPE
4
CD
Counter
Reset
Band
Insert a cassette to Deck B.
Push Eject
3
Select the radio station that you wish to
record by pressing
,
or
,
4
Press the REC/Pause button.
5
To stop recording, press STOP ( ■ ).
2
Place the CD on the tray.
3
Press the CD(
4
Press the REC/Pause button.
5
To stop recording, press STOP ( ■ ).
With the label facing UP.
.
) button.
Beat-Cut
When an AM(MW) is being recorded,
the Beat Cut button can be used to reduce noises.
Set the button to the best position in which such noises can
be reduced.
To prevent accidental erasure
Recorded side
Tab
Break off the tab corresponding to the side which has been
recorded on. Recording on that side will be protected.
To re-use
21
22
CD Synchro Function
Timer Function
B
2
2,3,4,5,7
1
GB
3,4,5,6
Power
Surround
Sleep
Power
Surround
Sleep
Counter
Reset
Mute
1
EQ
Counter
Reset
Mute
EQ
8
TAPE
Repeat
REC/Pause CD SYNC A B Deck A/B
CD
TAPE
Repeat
Repeat
REC/Pause CD SYNC A B Deck A/B
CD
Repeat
3
Program/
Set
+10
VOL.
Random
2,3,4,5,7
Mode
+10
VOL.
Program/
Set
VOL.
8
Random
Mode
Mono/ST
Band
3,4,5,6
VOL.
Mono/ST
Band
The timer enables you to switch the system on or off at specific times.
Example: You wish to wake up to music every morning.
1
◆ Before setting the timer, check that the current time is correct.
◆ For each step, you have a few seconds to set the required options.
If you exceed this time, you must start again.
Insert a cassette to Deck B.
Push Eject
2
3
4
Place the CD on the tray.
1
Press Clock/Timer until ‘TIMER’ is displayed.
2
Press Program/Set.
Result: ON TIME is displayed for a few seconds, followed by any switch-on time already set; you
can set the timer switch-on time.
With the label facing UP.
Press the CD Synchro button on the remote control.
When stopped, press the button to start the recording from the first
piece of music.
Press CD Synchro button on the remote control during the playback of
CD to start the recording from the first part of the music being played.
To stop recording, press STOP ( ■ ).
23
3
Set the timer switch-on time.
a Set the hour by pressing
or
button.
b Press Program/Set.
Result: The minutes flash.
c Set the minutes by pressing
or
button.
d Press Program/Set.
Result: OFF TIME is displayed for a few seconds,
followed by any switch-off time already set;
you can now set the timer switch-off time.
24
4
B
Set the timer switch-off time.
a Set the hour by pressing
or
button.
b Press Program/Set.
Result: The minutes flash.
c Set the minutes by pressing
or
button.
d Press Program/Set.
Result: VOL 13 is displayed, where 13 corresponds to the
volume already set.
Sleep Timer/Display Color
Sleep Button
GB
Display Color Button
Power
Surround
Sleep
Counter
Reset
Mute
EQ
TAPE
Sleep Button
Repeat
REC/Pause CD SYNC A B Deck A/B
CD
+10
Repeat
Program/
Set
VOL.
Random
Mode
5
6
VOL.
Mono/ST
Band
Press
or
button to adjust the
volume level and press Program/Set.
Press
or
system switches on.
If you select...
TAPE (cassette)
TUNER (radio)
button to select the source to be played when the
You must also...
Insert a cassette tape.
a Press Program/Set.
b Select a preset station by pressing
or
Tuning
.
Load a compact disc.
CD (compact disc)
You can set the system to switch off automatically.
Example : You wish to go to sleep to music.
● Sleep Timer
Press Sleep one or more times to indicate how long the
system should continue playing before it switches off:
At any time, you can check the remaining time by
pressing Sleep.
To cancel Sleep function, press Sleep one or more
times until OFF is displayed.
7
Press Program/Set to confirm the timer.
8
Press Standby/On to set the system to standby mode.
● Display Color
❇ This function is only available on S75 model.
The System allows you to choose your favorite color to produce your own
personal atmosphere.
● Cancelling the Timer
After having set the timer, it will start automatically as shown by the
TIMER indication on the display. If you no longer wish to use the timer,
you must cancel it.
To...
Press Timer On/Off...
Cancel the timer
Once.
Result:
Restart the timer
is no longer displayed.
Once again.
is displayed again.
Result:
25
Press the Display Color button and select the color
you want.
Result: Whenever the button is pressed, the color is
repeated in the sequence of CYAN➝GREEN
➝ RED➝BLUE➝VIOLET➝Y.GREEN➝
WHITE➝LED OFF➝AUTO.
If you select Auto mode, 7 colors are displayed for 2
seconds alternatively.
26
Equalizer Mode
B
Power Surround/Mute Function
3 Mode EQ
GB
P.SURR Button
Power
Surround
Sleep
Counter
Reset
Power
Surround
Mute
EQ
TAPE
Sleep
EQ
Counter
Reset
CD
CD
Mute Button
Power Surround
Button
+10
Repeat
+10
Repeat
Program/
Set
Mute
EQ
TAPE
Repeat
REC/Pause CD SYNC A B Deck A/B
Repeat
REC/Pause CD SYNC A B Deck A/B
VOL.
Program/
Set
Random
Random
VOL.
Mode
Mode
VOL.
VOL.
Mono/ST
Mono/ST
Your CD player is equipped with a preset equalizer that enables you to
choose the most appropriate balance between treble and bass
frequencies, according to the type of music to which you are listening.
Press 3 Mode EQ until the required option is selected.
Press EQ on the remote control.
Band
Band
● Power Surround Function
The Power Surround replaces conventional stereo sound with a wider and
more true-to-life sound. It creates the feeling of being right at the center of
the music and being surrounded by total music sound.
1
Press P.SURR on the front panel.
Press Power Surround on the remote control.
Press the button repeatedly to select
CLASSIC ➝ROCK➝POP➝PASS.
2
To cancel this function, Press P.SURR or Power Surround again.
● Mute Function
You can turn the sound off temporarily on your system.
Example: You wish to answer a telephone call.
27
1
Press Mute.
2
To switch the sound back on (at the same volume as before), press
Mute again or the Volume buttons.
Mute
28
MIC Function (Option)
B
❇ The microphone does not work during high-speed dubbing.
Precautions when using Compact Discs
◆ Handle your compact discs with care.
Always hold them by the edges to avoid leaving
fingerprints on the shiny surface.
◆ When you have finished playing a compact disc,
always put it back in its case.
◆ Do not fix paper or adhesive tape to the discs
and do not write on the label.
◆ Clean them with a special-purpose cloth.
◆ Store your compact discs in a clean place,
out of direct sunlight, where they will not be exposed to
high temperatures.
◆ Always use compact discs marked
.
COMPACT
The microphone enables the user to mix in his or her vocal to sing-along
with the music.
Preparation
Plug the microphone with a 3.5mm MIC jack into microphone terminal.
If "acoustic feedback" occurs (a howling or squealing noise from the
speakers) due to close proximity to the speaker, use the microphone in
the direction away from the speaker.
Microphone recording is possible only in normal-speed dubbing. The content
of the recording will be output to the speaker and the recording will begin.
To record your own voice against a backdrop of music from a radio, CD, cassette, insert a blank cassette tape into Deck B and then press REC/Pause.
Note:
When using headphones (
Phone)
DIGITAL AUDIO
Maintaining the Sound Quality
To obtain the best possible results from your cassette player, you must
clean it regularly (heads, roller and drive capstan).
Open the deck by pressing deck cover.
Use a cotton bud and a special cassette cleaning agent to clean the:
◆ Heads (①)
◆ Roller (②)
◆ Drive capstan (③)
To guarantee hours of enjoyable listening with your cassettes:
◆ Check that the tape in the cassette is always sufficiently taut.
◆ Store your cassettes in a clean place, out of direct sunlight, where they will not
be exposed to high temperatures.
◆ Avoid using 120-minute cassettes as they are extremely fragile.
You can listen to music through headphones connected
to a terminal on the top of the product.
■ Headphones are an extra, so if you want to buy one,
please inquire at a Samsung agency.
■
29
30
GB
Before Contacting the After-Sales Service
B
Specifications
GB
RADIO
Problem
G
E
N
E
R
A
L
Checks/Explanation
The system does not work
• The mains lead is not correctly plugged into a wall socket
or the wall socket is not switched on.
• The Standby/On button has not been pressed.
There is no sound
• The volume has been completely turned down.
• The correct function (TUNER, CD, TAPE) has not been
selected.
• The loudspeaker wires have been disconnected.
The Timer does not work
• The timer has been stopped by pressing TIMER .
Incase it is not worked, even .......... Press P.SURR button for 5 seconds in power
the action is taken as above.
‘OFF’(standby), then it is returned the original position
(RESET)
C
The compact disc player does not
start playing
D
C
A
S
S
E
T
T
E
S
R
A
D
I
O
The tape does not start playing
The volume falls off
The cassette is not erased correctly
There is excessive wow and flutter
• The CD function has not been selected.
• The disc has been inserted face down or is either dirty or
scratched.
• The laser sensor is dirty or dusty.
• The system has not been installed on a flat, horizontal
surface.
AM(MW)
Frequency range ...........................................................................522 KHz ~ 1611 KHz
Frequency range (option)..............................................................520 KHz ~ 1720 KHz
FM
Frequency range...........................................................................87.5 MHz ~ 108 MHz
COMPACT DISC PLAYER
Frequency response..............................................................................20 Hz ~ 20 KHz
TAPE DECK
Frequency response...........................................................................125 Hz ~ 6.3 KHz
GENERAL
Output power .........................................................................................5 + 5 Watts(4Ω)
Dimensions.....................................................................495(W) x 286(D) x 177(H) mm
• The TAPE function has not been selected.
• The cassette has not been inserted correctly.
• The cassette player has not been closed.
• The tape is either slack or broken.
• The audio heads are dirty.
• The rollers or drive capstans are dirty.
• The tape is worn.
Reception is poor or no radio stations • The TUNER function has not been selected.
are received at all
• The radio frequency has not been correctly selected.
• The aerial has been disconnected or is not facing the right
way. Turn it until you find the best orientation.
• You are in a building that blocks radio waves; you must
use an outside aerial.
31
32
CD CASSETTE
CD-R/RW PLAYBACK
RCD-S70/S70B/S70S
RCD-S75/S75S
Instruction Manual
Before operating the unit,
please read this manual throughly and
retain it for future reference.
ELECTRONICS
AH68-01126J