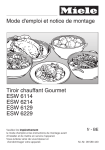
1
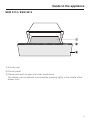
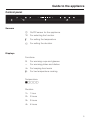
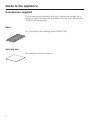
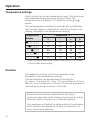
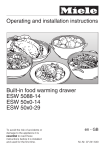
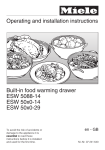
Operating and installation instructions
Food warming drawer
To avoid the risk of accidents or damage to the appliance it is essential
to read these instructions before it is installed and used for the first time.
en - GB
M.-Nr. 09 572 120
Contents
Guide to the appliance . . . . . . . . . . . . . . . . . . . . . . . . . . . . . . . . . . . . . . . . . . . . . 3
ESW 6114 / ESW 6214 . . . . . . . . . . . . . . . . . . . . . . . . . . . . . . . . . . . . . . . . . . . . . . . 3
ESW 6129 / ESW 6229 . . . . . . . . . . . . . . . . . . . . . . . . . . . . . . . . . . . . . . . . . . . . . . . 4
Control panel . . . . . . . . . . . . . . . . . . . . . . . . . . . . . . . . . . . . . . . . . . . . . . . . . . . . . . 5
Accessories supplied . . . . . . . . . . . . . . . . . . . . . . . . . . . . . . . . . . . . . . . . . . . . . . . 6
Warning and Safety instructions . . . . . . . . . . . . . . . . . . . . . . . . . . . . . . . . . . . . . 7
Caring for the environment . . . . . . . . . . . . . . . . . . . . . . . . . . . . . . . . . . . . . . . . . 14
Before using for the first time. . . . . . . . . . . . . . . . . . . . . . . . . . . . . . . . . . . . . . . 15
Operation . . . . . . . . . . . . . . . . . . . . . . . . . . . . . . . . . . . . . . . . . . . . . . . . . . . . . . . 17
Functions . . . . . . . . . . . . . . . . . . . . . . . . . . . . . . . . . . . . . . . . . . . . . . . . . . . . . . . . 17
Temperature settings . . . . . . . . . . . . . . . . . . . . . . . . . . . . . . . . . . . . . . . . . . . . . . . 18
Duration . . . . . . . . . . . . . . . . . . . . . . . . . . . . . . . . . . . . . . . . . . . . . . . . . . . . . . . . . 18
Keeping food warm . . . . . . . . . . . . . . . . . . . . . . . . . . . . . . . . . . . . . . . . . . . . . . . 20
Warming crockery . . . . . . . . . . . . . . . . . . . . . . . . . . . . . . . . . . . . . . . . . . . . . . . . 23
Capacity. . . . . . . . . . . . . . . . . . . . . . . . . . . . . . . . . . . . . . . . . . . . . . . . . . . . . . . . . 24
ESW 6114 / ESW 6214 . . . . . . . . . . . . . . . . . . . . . . . . . . . . . . . . . . . . . . . . . . . 24
ESW 6129 / ESW 6229 . . . . . . . . . . . . . . . . . . . . . . . . . . . . . . . . . . . . . . . . . . . 25
Low temperature cooking . . . . . . . . . . . . . . . . . . . . . . . . . . . . . . . . . . . . . . . . . 26
Cooking table. . . . . . . . . . . . . . . . . . . . . . . . . . . . . . . . . . . . . . . . . . . . . . . . . . . . . 28
Other uses . . . . . . . . . . . . . . . . . . . . . . . . . . . . . . . . . . . . . . . . . . . . . . . . . . . . . . 31
Combination with CVA . . . . . . . . . . . . . . . . . . . . . . . . . . . . . . . . . . . . . . . . . . . . 32
Cleaning and care . . . . . . . . . . . . . . . . . . . . . . . . . . . . . . . . . . . . . . . . . . . . . . . . 33
Appliance front and interior . . . . . . . . . . . . . . . . . . . . . . . . . . . . . . . . . . . . . . . . . . 33
Anti-slip mat . . . . . . . . . . . . . . . . . . . . . . . . . . . . . . . . . . . . . . . . . . . . . . . . . . . . . . 34
Problem solving guide . . . . . . . . . . . . . . . . . . . . . . . . . . . . . . . . . . . . . . . . . . . . 35
Optional accessories . . . . . . . . . . . . . . . . . . . . . . . . . . . . . . . . . . . . . . . . . . . . . . 37
Safety instructions for installation . . . . . . . . . . . . . . . . . . . . . . . . . . . . . . . . . . . 38
Building-in dimensions . . . . . . . . . . . . . . . . . . . . . . . . . . . . . . . . . . . . . . . . . . . 39
ESW 6114 / ESW 6214 . . . . . . . . . . . . . . . . . . . . . . . . . . . . . . . . . . . . . . . . . . . . . . 39
ESW 6129 / ESW 6229 . . . . . . . . . . . . . . . . . . . . . . . . . . . . . . . . . . . . . . . . . . . . . . 42
Installing the appliance . . . . . . . . . . . . . . . . . . . . . . . . . . . . . . . . . . . . . . . . . . . . 45
Electrical connection . . . . . . . . . . . . . . . . . . . . . . . . . . . . . . . . . . . . . . . . . . . . . . 46
After sales service, data plate, guarantee . . . . . . . . . . . . . . . . . . . . . . . . . . . . . 48
2
Guide to the appliance
ESW 6114 / ESW 6214
a Anti-slip mat
b Control panel
c Drawer with push to open and close mechanism
The drawer can be opened and closed by pressing lightly in the middle of the
drawer front.
3
Guide to the appliance
ESW 6129 / ESW 6229
a Anti-slip mat
b Control panel
c Air vents
d Rack
4
Guide to the appliance
Control panel
Sensors
s
On/Off sensor for the appliance
X
For selecting the function
6
For setting the temperature
T
For setting the duration
Displays
Functions:
H
For warming cups and glasses
H
For warming plates and dishes
2
For keeping food warm
¯
For low temperature cooking
Temperature:
]^^^^
Duration:
1h
1 hour
2h
2 hours
3h
3 hours
4h
4 hours
5
Guide to the appliance
Accessories supplied
The accessories supplied with your appliance as well as a
range of optional ones are available to order from Miele (see
"Optional accessories").
Rack
For increasing the loading area (ESW 6*29)
Anti-slip mat
For keeping crockery secure
6
Warning and Safety instructions
This appliance complies with all statutory safety requirements.
Inappropriate use can, however, lead to personal injury and
damage to property.
To avoid the risk of accidents and damage to the appliance,
please read these instructions carefully before installation and
before using it for the first time. They contain important notes on
installation, safety, use and maintenance.
Miele cannot be held liable for damage caused by
non-compliance with these Warning and Safety instructions.
Keep these instructions in a safe place and ensure that new users
are familiar with the content. Pass them on to any future owner.
7
Warning and Safety instructions
Correct application
~ The appliance is not designed for commercial use. It is intended
for use in domestic households and similar working and residential
environments.
~ The appliance is not intended for outdoor use.
~ It is intended for domestic use only as described in these
operating instructions.
Any other usage is not supported by the manufacturer and could be
dangerous.
~ The appliance can only be used by people with reduced
physical, sensory or mental capabilities, or lack of experience and
knowledge, if they are supervised whilst using it, or have been
shown how to use it in a safe way and understand the hazards
involved.
8
Warning and Safety instructions
Safety with children
~ Children under 8 years of age must be kept away from the
appliance unless they are constantly supervised.
~ Children 8 years and older may only use the appliance
unsupervised if they have been shown how to use it in a safe way
and recognise and understand the consequences of incorrect
operation.
~ Children must not be allowed to clean the appliance
unsupervised.
~ Please supervise children in the vicinity of the appliance and do
not let them play with it.
~ The appliance gets hot when in use and remains hot for quite a
while after it has been switched off. Keep children well away from
the appliance until it has cooled down and there is no danger of
burning.
~ Danger of suffocation. Packaging, e.g. plastic wrappings, must
be kept out of the reach of babies and children. Whilst playing,
children could become entangled in packaging or pull it over their
head and suffocate.
9
Warning and Safety instructions
Technical safety
~ Installation, maintenance and repairs may only be carried out by
a Miele authorised service technician. Installation, maintenance and
repairs by unqualified persons could be dangerous.
~ A damaged appliance can be dangerous. Check the appliance
for visible signs of damage. Do not use a damaged appliance.
~ The electrical safety of this appliance can only be guaranteed
when correctly earthed. It is most important that this basic safety
requirement is observed and regularly tested, and where there is
any doubt, the household wiring system should be inspected by a
qualified electrician.
~ To avoid the risk of damage to the appliance, make sure that the
connection data (frequency and voltage) on the data plate
corresponds to the household supply, before connecting the
appliance to the mains supply.
Consult a qualified electrician if in any doubt.
~ Do not connect the appliance to the mains electrical supply by a
multi-socket adapter or extension lead. These are a fire hazard and
do not guarantee the required safety of the appliance.
~ For safety reasons, this appliance may only be used after it has
been built in.
~ This appliance must not be used in a non-stationary location (e.g.
on a ship).
10
Warning and Safety instructions
~ Do not open the casing of the appliance.
Tampering with electrical connections or components and
mechanical parts is highly dangerous to the user and can cause
operational faults.
~ While the appliance is under guarantee, repairs should only be
undertaken by a service technician authorised by Miele. Otherwise
the guarantee is invalidated.
~ Miele can only guarantee the safety of the appliance when
original Miele replacement parts are used. Faulty components must
only be replaced by genuine Miele original spare parts.
~ If the plug is removed from the connection cable or if the
appliance is supplied without a plug, the appliance must be
connected to the electrical supply by a suitably qualified electrician.
~ If the connection cable is damaged, it must be replaced by a
suitably qualified electrician with a specialist connection cable of
type H 05 VV-F ( (pvc insulated), available from Miele.
~ The appliance must be disconnected from the mains electricity
supply during installation, maintenance and repair work. Ensure that
power is not supplied to the appliance until after it has been
installed or until any maintenance or repair work has been carried
out.
~ In areas which may be subject to infestation by cockroaches or
other vermin, pay particular attention to keeping the appliance and
its surroundings clean at all times. Any damage caused by
cockroaches or other vermin will not be covered by the guarantee.
11
Warning and Safety instructions
Correct use
~ You could burn yourself on the hot drawer or crockery. Protect
your hands with heat-resistant pot holders or gloves when handling
hot dishes. Do not let them get wet or damp, as this causes heat to
transfer through the material more quickly with the risk of scalding or
burning yourself.
~ Do not store any plastic containers or inflammable objects in the
warming drawer. They could melt or catch fire when the appliance is
switched on, causing a fire hazard.
~ Due to the high temperatures radiated, objects left near the
appliance when it is in use could catch fire. Do not use the
appliance to heat up the room.
~ Never replace the anti-slip mat supplied with the appliance with
paper kitchen towel or similar.
~ If you overload the drawer, or sit or lean on it, the telescopic
runners will be damaged. The telescopic runners can support a
maximum load of 25 kg.
~ If the appliance is installed behind a kitchen furniture door, it may
only be used with the furniture door open.
Only close the door if the appliance is switched off.
~ Do not heat up unopened tins or jars of food in the drawer, as
pressure will build up in the tin or jar, causing it to explode. This
could result in injury and scalding or damage.
~ The underside of the drawer gets hot when switched on. Be
careful not to touch it when the drawer is open.
12
Warning and Safety instructions
~ Plastic and aluminium foil containers melt at high temperatures.
Use only heat-resistant crockery made of glass, porcelain, etc.
~ Take care when opening and closing the loaded drawer, that
liquids do not spill over and get through the vents. This can cause
the appliance to short circuit.
~ The "Keep food warm" function is designed to keep hot food
warm and not to warm up cold food. Ensure food is really hot when
placed inside the warming drawer.
~ Bacteria can develop on the food if the temperature is too low.
Make sure that you set a high enough temperature to keep food
warm.
Cleaning and care
~ Do not use a steam cleaning appliance to clean this appliance.
The steam could reach electrical components and cause a short
circuit.
13
Caring for the environment
Disposal of the packing
material
Disposing of your old
appliance
The packaging is designed to protect
the appliance from damage during
transportation. The packaging
materials used are selected from
materials which are environmentally
friendly for disposal and should be
recycled.
Electrical and electronic appliances
often contain materials which, if
handled or disposed of incorrectly,
could be potentially hazardous to
human health and to the environment.
They are, however, essential for the
correct functioning of your appliance.
Please do not therefore dispose of it
with your household waste.
Recycling the packaging reduces the
use of raw materials in the
manufacturing process and also
reduces the amount of waste in landfill
sites.
Ensure that any plastic wrappings,
bags etc. are disposed of safely and
kept out of the reach of babies and
young children. Danger of suffocation.
Please dispose of it at your local
community waste collection / recycling
centre or contact your dealer for
advice. Please ensure that it presents
no danger for children while being
stored for disposal.
14
Before using for the first time
Please stick the extra data plate for the appliance supplied
with this documentation in the space provided in the "After
sales service, data plate, guarantee" section of this booklet.
Cleaning and heating up for the first time
^ Remove any protective foil.
^ Remove the anti-slip mat and, if applicable, the rack from
the drawer, and wipe both with a sponge and a solution of
hot water and a little washing-up liquid. Dry using a soft
cloth.
^ Wipe the appliance inside and out with a damp cloth only,
and then dry with a soft cloth.
^ Replace the anti-slip mat and the rack (if applicable) in the
drawer.
Then heat the empty drawer for at least two hours.
^ Switch the appliance on by touching the On/Off s sensor.
^ Touch the X sensor repeatedly until the s symbol lights
up in the display.
^ Touch the 6 sensor repeatedly until the LED on the far right
lights up.
^ Touch the T sensor repeatedly until 2h lights up.
^ Close the drawer.
The drawer is fitted with a contact switch, which ensures
that the heating element and fan in the appliance only work
when the drawer is closed.
15
Before using for the first time
The appliance will switch itself off automatically after 2 hours.
The metal components have a protective coating which may
give off a slight smell when heated up for the first time.
The smell and any vapours will dissipate after a short time,
and do not indicate a faulty connection or appliance.
Ensure that the kitchen is well ventilated.
16
Operation
Functions
Use the X sensor to select the function you want. The
applicable symbol lights up as follows:
– H
For warming cups and glasses
– H
For warming plates and dishes
– 2
For keeping food warm
– ¯
For low temperature cooking
The last function selected is automatically activated the next
time the drawer is switched on and this is shown in the
display.
The appliance has a fan which distributes the warm air evenly
through the drawer. The fan runs continuously when the
drawer is operating on the cups/glasses or plates/dishes
function. It runs at intervals on the "Keep food warm" and
"Low temperature cooking" functions.
The appliance can be used to keep food warm at the same
time as warming plates and dishes.
Use the "Keep food warm" function for this.
Take care. The plates and dishes will take longer to warm
up, but can get very hot on this function.
17
Operation
Temperature settings
Each function has its own temperature range. The factory-set
recommended temperatures are printed in bold. The
temperature can be altered in 5° steps by touching the 6
sensor.
The last temperature selected is automatically activated the
next time the drawer is switched on, and this is shown in the
display. (Exception: Low temperature cooking).
Temperature
display
Temperature °C *
H
H
2
¯
]^^^^
40
60
65
65
^]^^^
45
65
70
70
^^]^^
50
70
75
75
^^^]^
55
75
80
80
^^^^]
60
80
85
85
* Approximate temperature values, measured in the middle
of the drawer when empty
Duration
The appliance is set for continuous operation mode.
(Exception: Low temperature cooking).
A limited duration can be selected by touching the
T sensor. One touch for 1 hour (1h), two touches for 2 hours
(2h) etc, up to a maximum of 4 hours. Continuous operation is
restored by touching the sensor a fifth time.
Do not leave the drawer unattended for too long in
continuous operation mode. Keeping food warm for a long
time can result in it drying out or even self-igniting.
Your appliance is fitted with a safety switch-off mechanism
which switches the appliance off after a maximum of 12
hours' continuous operation.
18
Operation
How to operate the drawer
^ Open the drawer.
^ Switch the appliance on by touching the On/Off s sensor.
^ Touch the X sensor repeatedly until the function required
lights up in the display.
^ If you wish to alter the temperature, touch the 6 sensor until
the LED for the temperature required lights up.
^ Touch the T sensor repeatedly until the duration (in hours)
required lights up.
^ Close the drawer.
The On/Off sensor s must be kept clean. Soiling or liquid
on the sensor could cause it to fail to react or to switch on
the appliance unintentionally.
19
Keeping food warm
In order to ensure that the temperature does not drop
below the minimum required for keeping food warm
(65 °C), select the 2 function only.
This function is for keeping food which has just been cooked
warm, i.e. food that is still hot. It is not for reheating food that
has gone cold.
Procedure
^ Select the 2 function.
^ Select the duration required.
^ Pre-heat the drawer for 15 minutes to ensure that it has
reached the required temperature. Whilst the appliance is
heating up, place the empty dishes in the drawer.
^ Remove the pre-heated dishes from the drawer and fill
them with the hot food. Use oven gloves to remove the
dishes from the drawer.
^ Then place the dishes carefully in the drawer ensuring that
any liquid does not spill over the sides.
Tips
– Place hot food in pre-heated dishes. To pre-heat the
dishes, place them in the drawer whilst it is heating up.
– Do not cover roast or fried food which you want to keep
crisp. These types of food need to be kept warm at a
higher temperature.
– Cover food with a high moisture content and liquid and
food which can develop a skin, with aluminium foil or a
plate.
– To avoid spillages, do not overfill dishes.
20
Keeping food warm
– Freshly cooked food is hotter than food which is being kept
warm. Serve food which is being kept warm on pre-heated
plates.
– Nutrients are lost when food is cooked and continue to
diminish when food is kept warm. The longer food is kept
warm for, the greater the loss of nutrients.
– We do not recommend that food is kept warm for a long
period of time, as it will continue to cook.
– Do not slam the drawer open or shut. Liquids could spill
over and get into the vents.
– Food may cool down if the drawer is opened and shut too
often.
21
Keeping food warm
Settings
Food
Container
Cover the
container?
Temperature for the
2 setting
Position in drawer
Floor
Rack*
x
Steak (rare)
Plate
no
]^^^^
x
Bake / gratin
Shallow dish
yes
^^^]^
x
Roast meat
Plate
yes
^^]^^
x
Casserole
Dish
yes
^^^]^
x
Fish fingers
Pan
no
^^^^]
x
Meat in a sauce
Dish
yes
^^^]^
x
Vegetables in a
sauce
Dish
yes
^^^]^
x
Goulash
Dish
yes
^^^]^
x
Mashed potato
Dish
yes
^^]^^
x
Plated meal
Plate
yes
^^^]^
x
Plate / dish
yes
^^]^^
x
Breaded escalope
Pan
no
^^^^]
x
Pancakes/
potato pancakes
Plate
no
^^^^]
x
Pizza
Plate
no
^^^^]
x
Baked potatoes /
New potatoes
x
Boiled potatoes
Dish
yes
^^^]^
x
Gravy
Dish
yes
^^^]^
x
Strudel
Plate
no
^^^]^
x
To warm bread
-
no
]^^^^
x
x
To warm rolls
-
no
]^^^^
x
x
* Depending on model
22
Warming crockery
– Distribute the crockery over the whole area of the drawer.
Stacks of plates heat up more slowly than individual pieces
of crockery. If large stacks of plates are unavoidable,
place them at the front of the drawer. Use the rack
(depending on model).
– Do not place large serving dishes right up against the
vents. They will cover the warm air outlets, and the
crockery will not heat up evenly.
– For cups and glasses, only select the H function to ensure
that the maximum temperature (60°C) is not exceeded.
– Heated crockery cools down very quickly. Do not remove it
from the drawer until just before you need it.
Heating up times
Various factors will affect the heating up times:
– The material and thickness of the crockery
– The amount of crockery
– How the crockery is arranged
– The temperature setting.
It is therefore not possible to state precise times.
However, the following information can be used as a guide:
On the H setting, it takes approx.
– 30– 35 minutes for 6 place settings to heat up evenly.
– 40– 45 minutes for 12 place settings to heat up evenly.
– As you use the drawer, you will get to know which setting
suits your own needs best.
23
Warming crockery
Capacity
The quantity that can be loaded will depend to a great
extent on the size and weight of your crockery.
Do not overload the drawer. The maximum load bearing
capacity of the drawer is 25 kg.
ESW 6114 / ESW 6214
The loading examples shown here are suggestions only.
– 6 place settings:
6 dinner plates
6 soup bowls
6 dessert plates
1 oval serving dish
1 serving dish
1 serving dish
C 26 cm
C 23 cm
C 19 cm
32 cm
C 16 cm
C 13 cm
or alternatively:
24
– 12 dinner plates
C 26 cm
– 18 soup bowls
C 23 cm
– 16 soup cups
C 10 cm
–
6 dinner plates
6 soup bowls
C 26 cm
C 23 cm
–
6 pizza plates
C 36 cm
– 72 espresso cups
C 5.9 cm
– 30 cappuccino cups
C 8.8 cm
– 30 punch glasses
C 6.7 cm / 8 cm high
Warming crockery
ESW 6129 / ESW 6229
The loading examples shown here are suggestions only.
– 12 place settings:
12 dinner plates
12 soup bowls
12 dessert plates
1 oval serving dish
1 serving dish
1 serving dish
1 serving dish
C 26 cm
C 23 cm
C 19 cm
32 cm
C 19 cm
C 16 cm
C 13 cm
or alternatively:
– 40 dinner plates
C 26 cm
– 60 soup bowls
C 23 cm
– 45 soup cups
C 10 cm
– 20 dinner plates
20 soup bowls
C 26 cm
C 23 cm
– 20 pizza plates
C 36 cm
– 142 espresso cups
C 5.9 cm
– 90 cappuccino cups
C 8.8 cm
– 30 punch glasses
C 6.7 cm / 8 cm high
You can increase the load area by using the rack supplied
with the appliance. Position the rack to suit. With two racks
you can increase the load area even more by placing one
rack on the left and the other on the right. Another rack can
be obtained from Miele or from your Miele dealer (see
"Optional accessories").
25
Low temperature cooking
With low temperature cooking meat is cooked at a low
temperature over a long period of time. Using this method,
meat loses less liquid as it is cooked gently and so remains
succulent and tender.
This cooking method is particularly suitable for large and
tender pieces of meat. The quality of the meat is of vital
importance for a good result.
For precision we recommend using a proprietary food
thermometer to monitor the core temperature.
Do not use the food probe from a Miele steam combi oven
or a Miele oven in the food warming drawer.
Core temperature
Food can be cooked to a core temperature of up to 70 °C in
the food warming drawer. Meat which needs to be cooked to
a core temperature higher than 70 °C is not suitable for
cooking in the food warming drawer.
The core temperature reading gives information about the
degree of cooking in the middle of a piece of meat. The lower
the core temperature, the less cooked the meat is in the
middle:
45-50 °C = rare
55-60 °C = medium
65 °C
= well done
Cooking duration
The cooking duration depends on the size of the individual
pieces of meat, and can be between 1 and 6 hours.
Add 15 minutes heating-up time to the temperature selected.
Example: selected duration 1h, actual operating time 1 hour
15 minutes.
Notes on low temperature cooking
– The meat should have been hung for best flavour.
– The quality of the meat is of vital importance for a good
result.
26
Low temperature cooking
– The meat must be at room temperature. Remove it from the
refrigerator approx. 1 hour before preparation.
– Sear the meat on all sides over a high heat on the hob.
Procedure
^ Select the ¯ low temperature cooking function.
The appliance will pre-heat automatically for 15 minutes and
then operate at the pre-set temperature and duration, e.g. at
85° C and 4h (Medium sirloin joint setting, 1 kg, approx. 3 cm
thick).
^ While the appliance is heating up, sear the meat on all
sides over a high heat on the hob.
^ Put it in a heat-proof dish.
^ Push the food thermometer into the meat so that the tip is in
the centre. Make sure that it does not come into contact
with bones or layers of fat as these can cause a false
reading.
^ Place the dish in the drawer.
If you wish to cook on a different setting, please see the table
on the following pages.
^ Select the ¯ low temperature cooking function.
^ Select the temperature required.
^ Select the duration required.
Tips
– Meat can be carved straight from the oven. It does not
need to rest.
– Due to the low cooking and core temperatures, meat can
be kept warm quite safely in the appliance until it is served.
This will not affect results in any way.
– Serve the meat on pre-heated plates to stop it cooling too
quickly.
27
Low temperature cooking
Cooking table
Type of meat
Searing time
Core
temperature* °C
Cooking time
in minutes
Temperature for the
¯ setting
Beef
Fillet
approx. 1200 g
4–6 mins
6–8 mins
8 mins
45–50
55–60
65
105–135
160–190
195–225
^]^^^
^^^]^
^^^^]
Fillet
approx. 600 g
4–6 mins
6–8 mins
8 mins
45–50
55–60
65
90–120
130–155
160–190
^]^^^
^^^]^
^^^^]
Medallions
3-4 cm thick
1 min per side
1–2 mins per side
2 mins per side
45–50
55–60
65
40–50
60–80
90–110
^]^^^
^^^]^
^^^^]
Sirloin joint
approx. 400 g
4–6 mins
6 mins
8 mins
45–50
55–60
65
90–120
120–145
145–175
^]^^^
^^^]^
^^^^]
Sirloin joint
approx. 600 g
4 mins
6–8 mins
8 mins
45–50
55–60
65
115–135
150–180
225–255
^]^^^
^^^]^
^^^^]
Sirloin joint
approx.1.5 kg
8 mins
8–10 mins
10–12 mins
45–50
55–60
65
120–150
250–280
300–330
^]^^^
^^^]^
^^^^]
Rump steak
approx.180 g
1 min per side
1–2 mins per side
2 mins per side
45–50
55–60
65
50–60
80–90
120–140
^]^^^
^^^]^
^^^^]
Fillet
approx. 1200 g
5 mins
6 mins
6–7 mins
45–50
55–60
65
115–145
150–180
155–185
^]^^^
^^^]^
^^^^]
Fillet
approx. 600 g
4–6 mins
6 mins
6–8 mins
45–50
55–60
65
75–95
90–120
125–155
^]^^^
^^^]^
^^^^]
Medallions
3-4 cm thick
1 min per side
1–2 mins per side
2 mins per side
45–50
55–60
65
40–50
60–80
90–110
^]^^^
^^^]^
^^^^]
Steak
approx. 160 g
2 cm thick
1 min per side
1–2 mins per side
2 mins per side
45–50
55–60
65
35–50
60–80
75–90
^]^^^
^^^]^
^^^^]
Veal
* 45-50 °C rare / 55-60 °C medium / 65 °C well-done
28
Low temperature cooking
Type of meat
Searing time
Core
temperature*
°C
Cooking time
in minutes
Temperature for the
¯ setting
Pork
Fillet
approx. 350 g
5–6 mins
60
65
90–110
120–140
^^^]^
Boned gammon
approx. 700 g
6–8 mins
65
180–200
^^^^]
Boned gammon
approx. 1.5 kg
8 mins
65
195–225
^^^^]
Pork loin approx.
1.5 kg
8–10 mins
65
210–240
^^^^]
Pork loin approx.
700 g
6–8 mins
65
180–210
^^^^]
Medallions
approx. 4 cm
thick
2 mins per side
2–3 mins per side
60
65
75–95
100–120
^^^]^
Roulades
approx. 150 g
½ cm thick
4–6 mins
65
150–180
^^^^]
Spare ribs
4–6 mins per side
65
165–195
^^^^]
Duck breast
approx. 350 g
5–6 mins
65
70
45–65
80–95
^^^]^
^^^^]
Chicken breast
approx. 160 g
2-3 mins per side
70
45–60
^^^^]
Poularde breast
approx. 250 g
2-3 mins per side
70
60–80
^^^^]
Turkey breast
approx. 800 g
6–8 mins
70
150–180
^^^^]
Poultry
* Pork = 60 °C medium / 65 °C well done
Duck breast = 65 °C medium / 70 °C well done
29
Low temperature cooking
Type of meat
Searing time
Core
temperature
* °C
Cooking time
in minutes
Temperature for the
¯ setting
Lamb
Rack of lamb
approx. 170 g
3 mins
4 mins
60
65
90–100
110–130
^^^]^
^^^^]
Rack of lamb
approx. 400 g
3–4 mins
4–6 mins
60
65
100–130
120–150
^^^]^
^^^^]
Saddle of lamb
off the bone
(approx. 600 g)
4 mins
6 mins
60
65
90–120
130–160
^^^]^
^^^^]
Boned leg of lamb
approx. 1.2 kg
8–10 mins
65
330–360
^^^]^
Venison medallions
3–4 cm thick
1–2 mins per side
2 mins per side
60
65
80–100
110–140
^^^^]
Saddle of venison
off the bone
approx. 800 g
4–5 mins
6–8 mins
60
65
135–150
165–180
^^^^]
Saddle of roebuck
off the bone
approx. 800 g
4 mins
6 mins
60
65
120–135
150–165
^^^^]
Haunch of hare
approx. 250 g
5–7 mins
65
210–230
^^^^]
Roast wild boar
approx. 600 g
6–8 mins
70
190–220
^^^^]
Game
* Lamb = 60 °C medium / 65 °C well done
Game = 60 °C medium / 65 °C well done / 70 °C well done
30
Other uses
Type of
food
Container
Cover the Temperature Temperature
for the
container?
for the
H setting
2 setting
Position in
drawer
Floor
Duration in
hours: min
Rack*
Defrosting
berries
Bowl / dish
no
]^^^^
x
Dissolving
gelatine
Bowl
no
^^^^]
x
Proving
dough
Bowl
Yes, with
plate
]^^^^
x
0:30
Making
yoghurt
Yoghurt
jars with
lids
-
^]^^^
x
5:00
0:50
x
0:15
Yes, with
lid
^^^^]
x
x
0:40
Bowl
no
^^^^]
x
x
0:20
Defrosting Bowl
frozen
vegetables
no
^^]^^
x
Dish
Rice
pudding
(to finish off
the
cooking
process)
Melt
chocolate
1:00
* Depending on model
31
Combination with CVA
The warming drawer can be set to come on automatically
before your Miele coffee machine to ensure your cups are the
perfect temperature for your first cup of the day.
Please note that in coffee mode:
– The Cups/Glasses function cannot be altered
– The duration cannot be altered.
– The safety switch-off mechanism is deactivated.
Activating coffee mode
Coffee mode can only be activated when the warming drawer
is switched off.
^ Touch the T sensor.
^ Then touch the On/Off s sensor.
^ Continue to touch both sensors until both the 1h and 4h
symbols in the time display and the H symbol light up
simultaneously.
Deactivating CVA mode
^ Touch the T sensor.
^ Then touch the On/Off s sensor at the same time.
^ Continue to touch both sensors until all symbols have gone
out.
32
Cleaning and care
,Danger of injury.
Do not use a steam cleaning appliance to clean this
appliance. The steam could reach electrical components
and cause a short circuit.
Danger of damage.
Unsuitable cleaning agents can damage the surfaces of
the appliance. Only use domestic washing-up liquid to
clean the appliance.
Clean and dry the entire appliance after each use. Allow the
appliance to cool down to a safe temperature before
cleaning.
Appliance front and interior
Remove any soiling immediately.
If this is not done, it might become impossible to remove
and could cause the surfaces to alter or discolour.
Clean all surfaces with a clean sponge and a solution of hot
water and washing-up liquid. Then dry with a soft cloth.
A clean, damp microfibre E-cloth without cleaning agent can
also be used.
All surfaces are susceptible to scratching. Scratches on
glass surfaces could even cause a breakage.
Contact with unsuitable cleaning agents can alter or
discolour the surfaces.
The On/Off sensor s must be kept clean. Soiling or liquid on
the sensor could cause it to fail to react or to switch on the
appliance unintentionally.
33
Cleaning and care
To avoid damaging the surfaces of your appliance, do not
use:
– cleaning agents containing soda, ammonia, acids or
chlorides,
– cleaning agents containing descaling agents,
– abrasive cleaning agents, e.g. powder cleaners and cream
cleaners,
– solvent-based cleaning agents,
– stainless steel cleaning agents,
– dishwasher cleaner,
– oven sprays,
– glass cleaning agents,
– hard, abrasive sponges and brushes, e.g. pot scourers,
– sharp metal scrapers.
Anti-slip mat
Remove the anti-slip mat from the drawer before cleaning it.
^ Clean the anti-slip mat by hand only, using a solution of hot
water and a little washing-up liquid, and then dry with a
cloth.
Do not put the anti-slip mat back into the drawer until it is
completely dry.
Do not wash the anti-slip mat in a dishwasher or washing
machine.
Never place the anti-slip mat in the oven to dry.
34
Problem solving guide
With the help of the following guide, minor faults in the performance of the
appliance, some of which may result from incorrect operation, can be put right
without contacting the Service Department.
,Installation work and repairs to electrical appliances must only be carried
out by a suitably qualified person in strict accordance with current local and
national safety regulations. Repairs and other work by unqualified persons
could be dangerous.
Problem
Possible cause
The appliance does not
heat up.
The appliance is not correctly Insert the plug and switch on at the
plugged in and switched on at socket.
the mains socket.
The food is not hot
enough.
The food is too hot.
The crockery is not warm
enough.
Remedy
The mains fuse has tripped.
Reset the trip switch in the mains fuse
box (minimum fuse rating - see data
plate).
If, after resetting the trip switch in the
mains fuse box and switching the
appliance back on, the appliance will
still not heat up, contact a qualified
electrician or the Miele Service
Department.
The function for keeping food
warm 2 is not selected.
Select the correct function.
The temperature setting is too
low.
Select a higher temperature.
The vents are covered.
Ensure that the air can circulate freely.
The function for keeping food
warm 2 is not selected.
Select the correct function.
The temperature setting is too
high.
Select a lower temperature.
The function for warming
plates and dishes H is not
selected.
Select the correct function.
The temperature setting is too
low.
Select a higher temperature.
The vents are covered.
Ensure that the air can circulate freely.
The crockery has not been
allowed to heat up for a
sufficiently long time.
Various factors will affect how long the
crockery will take to heat up (see
"Warming crockery").
35
Problem solving guide
Problem
Possible cause
Remedy
The crockery is too hot.
The function for warming
plates and dishes H or
warming cups and glasses H
is not selected.
Select the correct function.
The temperature setting is too
high.
Select a lower temperature.
A noise can be heard
when the drawer is being
used.
36
The noise is caused by the fan This is not a fault.
which distributes the heat
evenly through the drawer.
The fan operates at intervals
when the functions for keeping
food warm and low
temperature cooking are
being used.
Optional accessories
Miele offer a range of useful accessories as well as cleaning
and conditioning products for your Miele appliances.
These can be ordered online at:
or from Miele (see back of manual for contact details)
Rack
For increasing the loading area.
Anti-slip mat
The anti-slip mat keeps crockery securely in place.
E-cloth (microfibre cloth)
Removes finger marks and light soiling.
37
Safety instructions for installation
~ Before connecting the appliance to the mains electricity
supply make sure that the connection data on the data plate
(voltage and frequency) correspond with the mains electricity
supply.
This data must correspond in order to avoid the risk of
damage to the appliance. Consult a qualified electrician if in
any doubt.
~ The socket and On/Off switch should be easily accessible
after the appliance has been built in.
~ The food warming drawer may only be built in in
combination with those appliances quoted by Miele as being
suitable. Miele cannot guarantee trouble-free operation if the
appliance is operated in combination with appliances other
than those quoted by Miele as being suitable.
~ When building in the food warming drawer in combination
with another suitable appliance, the food warming drawer
must be fitted above a fixed interim shelf in the housing unit
which can support the weight of both the food warming
drawer and that of the other appliance.
~ As the combination appliance is placed directly on top of
the food warming drawer once it is built in, an interim shelf is
not necessary between the two appliances.
~ The appliance must be built in so that
- the contents of the drawer can be seen. This is to avoid
scalding from hot food spilling over.
- there is enough space for the drawer to be pulled out fully.
~ The food warming drawer is available in two models which
differ in height. The building-in dimensions for the food
warming drawer must be added to the building-in dimensions
for the combination appliance to establish the niche size
required.
When building in the combination appliance, it is essential
to follow the instructions given in the operating and
installation instructions supplied with the combination
appliance.
All dimensions in this instruction booklet are given in mm.
38
Building-in dimensions
ESW 6114 / ESW 6214
Ovens
H 2* B(P) and H 6* B(P)
Microwave combi ovens
H 6*BM
a Ventilation cut-out required when
installed with a pyrolytic oven
b Building-in dimension including mains
supply cable connection
Connection cable L = 2200 mm
* Appliances with glass front
** Appliances with metal front
39
Building-in dimensions
Steam ovens
DG 61*/ DG 62*/ DG 63*/ DG 64*/
DG 65*/ DG 66*/ DG 68*
b Building-in dimension including
mains supply cable connection
Connection cable L = 2200 mm
* Appliances with glass front
** Appliances with metal front
40
Steam combi ovens
DGC 63* / DGC 64*
a Ventilation cut-out required when
installed with a steam combi oven
b Building-in dimension including mains
supply cable connection
Connection cable L = 2200 mm
Building-in dimensions
XL steam combi ovens
DGC 65*/ DGC 66* / DGC 68*
Coffee machines
CVA 6401 und CVA 68*
a Ventilation cut-out required when
installed with an XL steam combi
oven
b Building-in dimension including mains
supply cable connection
Connection cable L = 2200 mm
b Building-in dimension including mains
supply cable connection
Connection cable L = 2200 mm
* Appliances with glass front
** Appliances with metal front
* Appliances with glass front
** Appliances with metal front
41
Building-in dimensions
ESW 6129 / ESW 6229
Ovens
H 2* B(P) und H 6* B(P)
Microwave combi ovens
H 6* BM
a Ventilation cut-out required when
installed with a pyrolytic oven
* Appliances with glass front
b Building-in dimension including mains
supply cable connection
Connection cable L = 2200 mm
42
** Appliances with metal front
Building-in dimensions
Steam ovens
DG 61*/ DG 62*/ DG 63*/ DG 64*/
DG 65*/ DG 66*/ DG 68*
Steam combi ovens
DGC 6300 / DGC 6400
* Appliances with glass front
** Appliances with metal front
a Ventilation cut-out required when
installed with a steam combi oven
b Building-in dimension including mains
supply cable connection
Connection cable L = 2200 mm
43
Building-in dimensions
XL steam combi ovens
DGC 65* / DGC 66* / DGC 68*
Coffee machines
CVA 6401 und CVA 68*
a Ventilation cut-out required when
installed with an XL steam combi
oven
b Building-in dimension including mains
supply cable connection
Connection cable L = 2200 mm
b Building-in dimension including mains
supply cable connection
Connection cable L = 2200 mm
* Appliances with glass front
** Appliances with metal front
* Appliances with glass front
** Appliances with metal front
44
Installing the appliance
Check that the base of the drawer is clean and that it is
level (use a spirit level). This is important for the appliance
to function correctly.
^ Push the appliance into the housing unit as far the vapour
strip, and align it.
^ Open the drawer, and use the 2 screws supplied to secure
the appliance to the side walls of the housing unit.
^ Build in the combination appliance in accordance with its
operating and installation instructions.
45
Electrical connection
All electrical work should be carried out by a suitably
qualified and competent person, in strict accordance with
current local and national safety regulations (BS 7671 in
the UK).
Installation, repairs and other work by unqualified persons
could be dangerous. The manufacturer cannot be held
liable for unauthorised work.
Ensure power is not supplied to the appliance until after
installation work has been carried out.
The appliance must only be operated when built-in. This is
to ensure that all electrical parts are shielded. Live parts
must not be exposed.
Do not connect the appliance to the mains electricity
supply via an extension lead. These do not guarantee the
required safety of the appliance.
Please ensure that the connection data quoted on the data
plate match the household mains supply.
This appliance is supplied with a cable and moulded plug for
connection to a suitable switched socket which should be
easily accessible after installation.
It can, if necessary, be connected to a suitable isolator or a
double pole fused spur connection unit which complies with
national and local safety regulations by a suitably qualified
electrician.
If the switch is not accessible after installation (depending on
country) an additional means of disconnection must be
provided for all poles.
For extra safety it is advisable to protect the appliance with a
suitable residual current device.
When switched off there must be an all-pole contact gap of
3 mm in the isolator switch (including switch, fuses and
relays).
46
Electrical connection
Important U.K. Connection to an isolator switch or double pole fused spur
connection unit:
This appliance is supplied for connection to a single phase
230-240 V 50 Hz supply with a 3-core cable.
The wires in the mains lead are coloured in accordance with
the following code:
Green/yellow = earth
Blue = neutral
Brown = live
WARNING: THIS APPLIANCE MUST BE
EARTHED
Non-rewireable plugs BS 1363
The fuse cover must be refitted when changing the fuse, and
if the fuse cover is lost, the plug must not be used until a
suitable replacement is obtained. The colour of the correct
replacement cover is that of the coloured insert in the base of
the plug, or the colour that is embossed in words on the base
of the plug (as applicable to the design of plug fitted).
Replacement fuses should be ASTA approved to BS 1362
and have the correct rating. Replacement fuses and fuse
covers may be purchased from your local electrical supplier.
Important
The electrical safety of this appliance can only be guaranteed
when correctly earthed. It is most important that this basic
safety requirement is observed and regularly tested and
where there is any doubt the household wiring should be
inspected by a qualified electrician. The manufacturer cannot
be held liable for the consequences of an inadequate
earthing system such as electric shock.
The manufacturer cannot be held liable for damage
caused by incorrect installation or connection.
47
After sales service, data plate, guarantee
In the event of any faults which you cannot remedy yourself, please contact:
– your Miele Dealer
or
– Miele (see back of manual for contact details).
Please note that telephone calls may be monitored and recorded to improve
our service.
When contacting Miele, please quote the model and serial number of your
appliance. These are given on the data plate.
N.B. A call-out charge will be applied for service visits where the problem
could have been resolved as described in these instructions.
Space in which to stick the extra data plate supplied with the appliance. Ensure
that the model number is the same as the one on the front of these instructions.
Guarantee
For information on the appliance guarantee specific to your country please
contact Miele. See back cover for contact details. In the UK, your appliance is
guaranteed for 2 years from the date of purchase. However, you must activate
your cover by calling 0845 365 6640 or registering online at www.miele.co.uk.
48
49
50
51
ESW 6114 / ESW 6214 / ESW 6129 / ESW 6229
en - GB
M.-Nr. 09 572 120 / 01