1
h ng
ach
user manual
the possibilities
Thank you for purchasing this Samsung product.
To receive more complete service,
please register
your product
at
www.samsung.com/global/register
1. Child Lock
The Child Lock function keeps curious little hands out of the washer. This safety feature
ensures, that children do not toy with the operation of the washer. A beep will alert you when
the Child Lock is activated.
2. Handwash
Clothes susceptible to damage, such as those made of linen or silk, can be washed just as if
they were being washed by hand.
3. Delay Start
This function enables users to delay the washing machine's starting time for up to 24 hours.
4. Calm Wash
We have a wash cycle that is so quiet you can do laundry while you sleep. The spin cycle is
whisper quiet as it drains away water.
5. Easy Iron
Less ironing is needed as Samsung's Carefreewash safely cleans your soft, delicate
cloths and easy-care fabrics. Developed by Samsung's globally recognized digital process
technology, the Easy Iron function is a specialized laundry program that will help to reduce
wrinkles on your delicate garments, freeing up the time you would have spent on ironing.
2 Features
Nform t oN
.J
Congratulations on the purchase of your new washing machine. This Owner's
Manual contains valuable information on the installation, use, and care of this
appliance. Please take the time to read this manual so that you can take full
advantage of the washing machine's features and enjoy this appliance for many
years to come.
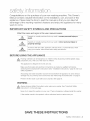
IMPORTANT
SAFETY SYMBOLS
AND PRECAUTIONS
What the icons and signs in this user manual
means:
Hazards or unsafe practices that may result in severe personal
death.
injury or
WARNING
CAUTION
Z_
CAUTION
Hazards or unsafe practices that may result in minor personal injury or
property damage.
To reduce the risk of fire, explosion, electric shock, or personal injury when
using your washer, follow these basic safety precautions:
BEFORE USING THE APPLIANCE
/_
Packing materials can be dangerous to children; keep all packing material (plastic bags,
.......
_
polystyrene, etc.) well out of the reach of children.
This appliance is designed for home use only.
Make sure that water and electrical connections are made by qualified technicians,
observing the manufacturer's instructions (see, "Installation Instructions," page 4) and local
safety regulations.
All packing and transit brackets must be removed before the appliance is used. Serious
damage may occur if they are not removed. See "Removing the transit bolts" on page 5.
Perform the first wash cycle without any laundry (See page 9).
WARNING
Z_ Always observe Safety Precautions when using your washer. See "Important Safety
....... Instructions" on the next page.
Never try to repair the washer on your own. There is dangerous voltage inside this washer.
If the washer needs to be repaired, call an authorized service center near you.
SAVE THESE INSTRUCTIONS
Safety informaton
3
Please record the serial number from the back of your washer
of purchase
in the space provided
below.
and the date
We recommend that you keep your purchase receipt with this manual for warranty service.
Model Number
Serial Number
Date Purchased
Dealer
IM PORTANT SAFETY INSTRUCTIONS
WARNING
/_k To reduce the risk of fire, explosion, electric shock, property damage or injury to persons
....... when using your appliance, follow basic precautions, including the following
1,
Read all safety instructions before using the appliance.
2. As with any equipment using electricity and having moving parts, there are potential
hazards. To use this appliance safely, the operator should become familiar with the
instructions for the operation of this appliance and always exercise care when using it.
Do not install or store this appliance where it will be exposed to bad weather.
4. Install and level the washing machine on a floor that can support the weight.
5. This appliance must be properly grounded. Never plug the appliance cord into a
receptacle which is not grounded adequately and in accordance with local and national
codes. See installation instructions for grounding this appliance.
6,
To avoid the possibility of fire or explosion:
a. Do not wash or dry items that have been previously cleaned in, washed in, soaked
in or spotted with gasoline, dry-cleaning solvents or other flammable or explosive
substances as they give off vapors that could ignite or explode. Hand wash and line
dry any items containing these substances. Any material on which you have used a
cleaning solvent, or which is saturated with flammable liquids or solids, should not
be placed in the clothes washer until all traces of these liquids or solids and their
fumes have been removed.
These items include acetone, denatured alcohol, gasoline, kerosene, some liquid
household cleaners, some spot removers, turpentine, waxes and wax removers.
3,
b.
Do not add gasoline, dry-cleaning solvents, or other flammable or explosive
substances to the wash water. These substances give off vapors that could ignite or
explode.
c.
Under certain conditions, hydrogen gas may be produced in a hot water system that
has not been used for 2 weeks or more.
HYDROGEN GAS IS EXPLOSIVE. If the hot water system has not been used for
such a period, before using a washing machine or combination washer-dryer, turn
on all hot water faucets and let the water flow from each for several minutes. This
will release any accumulated hydrogen gas. As the gas is flammable, do not smoke
or use an open flame during this time.
SAVE THESE INSTRUCTIONS
4 Safety informaton
7. Do not reach into the appliance if the tub is moving.
8. Do not allow children to play on or in the appliance. Close supervision of children is
necessary when the appliance is used near children.
9. Do not tamper with the controls.
10. Do not repair or replace any part of the appliance or attempt any servicing unless
specifically recommended in published user- repair instructions that you understand and
have the skills to carry out.
11. Unplug the power supply cord before attempting to service your washing machine.
12. Store laundry aids and other material in a cool, dry place where children cannot reach
them.
13. Do not wash or dry items that are soiled with vegetable or cooking oil. These items may
contain some oil after laundering. Due to the remaining oil, the fabric may smoke or
catch fire by itself.
14. Do not use chlorine bleach and ammonia or acids (such as vinegar or rust remover) in
the same wash.
Hazardous fumes can form.
15. Do not wash fiberglass materials. Small particles can stick to fabrics washed in
subsequent loads and cause skin irritation.
16. Before the appliance is removed from service or discarded, remove the door to the
washing compartment.
17. Do not sit on top of the clothes washer.
18. Do not use heat to dry articles containing foam rubber or similarly textured rubber-like
materials.
19. Do not use fabric softeners or products to eliminate static unless recommended by the
manufacturer of the fabric softener.
GROUNDING
INSTRUCTIONS
This appliance must be grounded. In the event of malfunction or breakdown, grounding will
reduce the risk of electric shock by providing a path of least resistance for electric current. This
appliance is equipped with a cord having an equipment-grounding conductor and a grounding
plug. The plug must be plugged into an appropriate outlet that is properly installed and grounded
in accordance with all local codes and ordinances.
WARNING
Improper connection of the equipment-grounding conductor can result in a risk of electric
....... shock. Check with a qualified electrician or serviceman if you are in doubt as to whether the
appliance is properly grounded. Do not modify the plug provided with the appliance - if it
will not fit the outlet, have a proper outlet installed by a qualified electrician.
SAVE THESE INSTRUCTIONS
Safety informaton
5
USE OF EXTENSION
CORDS
A short power-supply cord is provided to reduce the risks resulting from becoming entangled in
or tripping over a longer cord.
Longer cord sets or extension cords are available and may be used if care is exercised in their
use.
If a long cord or extension cord is used,
1. The marked electrical rating of the cord set or extension cord should be at least as great as
the electrical rating of the appliance.
2. The extension cord must be a groundingtype 3-wire cord and it must be plugged into a 3slot outlet.
3. The longer cord should be arranged so that it will not be pulled on by children or tripped over
unintentionally.
WARNING
/_
Do not cut or remove the third (ground) prong from the power cord under any
wAR.,.G_
circumstances.
PREFERRED
METHOD
OF GROUNDING
Plug the three-prong power cord into a properly grounded outlet of standard 120 VAC, 60 Hz.
Your washer should be the only appliance on this circuit.
SAVE THESE INSTRUCTIONS
6 Safety informaton
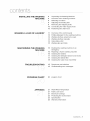
content
INSTALLING
WASHING
THE WASHING
MACHINE
A LOAD OF LAUNDRY
i
MAINTAINING
i
THE WASHING
MACHINE
i
TROUBLESHOOTING
PROGRAM
CHART
APPENDIX
i
J
8
8
9
Unpacking the Washing Machine
Overview of the washing machine
Selecting a location
9
9
10
10
Adjusting the leveling feet
Removing the shipping bolts
Connecting the water supply hose
Positioning the drain hose
11
13
13
14
Overview of the control panel
Putting detergent in the washing machine
Washing clothes using Fuzzy Logic
Washing clothes manually
14
15
Using delay start
Washing tips and hints
16
16
Draining the washing machine in an
emergency
Repairing a frozen washing machine
16
17
17
18
Cleaning
Cleaning
Cleaning
Cleaning
19
19
Symptoms and solutions
Understanding error messages
20
program chart
21
21
Wash/Rinse Temperature
Fabric care chart
21
22
22
Electrical warnings
Protecting the environment
Specification
23
Warranty information
the
the
the
the
exterior
detergent drawer and recess
debris filter
water hose mesh filter
Contents 7
UNPACKING
THE WASHING
MACHINE
Unpack your washing machine and inspect it for transit damage. Also make sure that you have received all
of the items shown below. If the washing machine was damaged during transport or you do not have all of
the items, contact your Samsung dealer immediately.
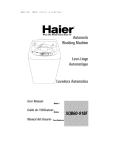
OVERVIEW
OF THE WASHING
MACHINE
Worktop
Deterg_
Control
hose
panel
Base cover
Adj
'gency drain tube
Filter=cover
Wrench
8 Hnstaling the washng machne
Hose guide
Bolt hole covers
SELECTING
A LOCATION
Before you install the washing machine, select a location with the following characteristics:
• A hard, level surface (if the surface is uneven, see "Adjusting the leveling feet," below)
Away from direct sunlight.
Adequate ventilation
Room temperature that will not fall below 32 °F
Away from sources of heat such as coal or gas
Make sure that the washing machine does not rest on its power cord.
Ventilation openings must not be obstructed by carpeting when the washing machine is installed
on a carpeted floor.
THE MINIMUM CLEARANCES FOR CLOSET AND ALCOVE INSTALLATIONS - SIDES 0 IN.,
REAR 1 IN. TOP 2 IN., CLOSET FRONT 0 IN.
Closet Front Must Have Two Unobstructed Air Openings Combined Total Area 72 Sq. In. Min.
Located 3 in. From Top and Bottom. Louvered Door With Equivalent Air Opening Is Acceptable.
ADJUSTING
THE LEVELING
FEET
If the floor is uneven, adjust the feet (do not insert pieces of wood or any other objects under the
feet):
1. Loosen the leg bolt by turning it with your hand
until it is at the desired height.
2. Tighten the locking nut by turning it with the
supplied wrench.
,, Place the washer on a sturdy, flat surface.
If the washer is placed on an uneven or weak
surface, noise or vibration occurs.
(Only a I degree angle is allowed.)
REMOVING
THE SHIPPING
BOLTS
Before using the washing machine, you must remove all of the shipping bolts from the back of
the unit.
To remove
the bolts:
1. Loosen all bolts with the supplied wrench before
removing them.
2. Take each bolt head and plastic together, pull it
through the wide part of the hole.
Repeat for each bolt.
3. Fill the holes with the supplied plastic covers.
4. Keep the transit bolts for future use.
hstaling
the wash ng machne 9
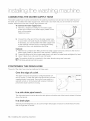
CONNECTING
THE WATER SUPPLY HOSE
The water supply hose must be connected to the washing machine at one end and to the water faucet at
the other. Do not stretch the water supply hose. If the hose is too short and you do not wish to move the
washer, replace the hose with a longer, high pressure one.
To connect the water supply hose:
1. Take the L-shaped arm fitting for the water supply
hoses and connect to the water supply intake on the
back of the washer.
Tighten by hand.
2.
_
Connect the other end of the cold water supply hose
to your sink's cold water faucet and tighten it by hand.
If necessary, you can reposition the water supply hose
at the washing machine end by loosening the fitting,
rotating the hose, and retightening the fitting.
Optional:
1. Take the red L-shaped arm fitting for the hot water supply hose and connect to the red hot
water supply intake on the back of the machine. Tighten by hand.
2+ Connect the otherend of the hot water supply hoseto your sink's hot water faucet and tighten it by hand.
3+ Use a Y-piece if you only want to use cold water.
The
washer should
benot
connected
Old hose-sets
should
be used.to the water faucets using new hose-sets.
POSITIONING
THE DRAIN HOSE
The end of the drain hose may be positioned in three ways:
Over the edge of a sink
The drain hose must be placed at a height between 24
and 35 inches. To keep the drain hose spout bent, use the
supplied plastic hose guide. Secure the hose guide to a
wall with a hook or to the faucet with a piece of string to
prevent the drain hose from moving.
In a sink drain pipe branch
The drain pipe branch must be above the sink siphon so that the end of the hose is at least 24 inches
above the ground.
In a drain pipe
Samsung recommends that you use a 26 inch high vertical pipe; it must be no shorter than 24 inches
and no longer than 35 inches.
10 hsta+ing the washng mach ne
Normal
Towels
;
0
Hot/Warm
©
Very Heavy ©
ExtraHgh © Child Lock ,_ Door Lock
©
Hot/Cod
0
Heavy
H gh
0
'
Min
0 Melody1
0 Warm/Warm© Normal
_ Medium \
..................................................................................................................
....
,_) off
............._..Lc_w....
_,
Cold/Cold
©
VeryLight
/
0 Rinse Hold
Heavy Duty
Colors
Mixed Load
PermPress
Calm Wash
Delicates
Drain
L_ NoSpln C?)DelayStart C_Easylron
Wool
Spin
Quick
Signal
Temp.
Soil Level
Spin
Delay Start
Easy Iron
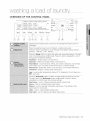
Displays the remaining wash cycle time, all washing information and error
messages.
When the selected wash cycle is finished, a melody will sound.
Press the button repeatedly to cycle through the available melody options.
(Melody1 . Melody2. OFF. Melody1 .... )
iiiiiiiiiiiiiiiiiiiiiiiiiiiiiiiiiiiiiiiiiiiiiiiiiiiiiiiiiiiiiiiiiiiiiiiiiiiiiiiiiiiiiiiiiiiiiiiiiiiiiiiiiiiiiiiiiiiiiiiiiiiiiiiiiiiiiiiiiiiiiiii
iiiiiiiiiiiiiiiiiiiiiiiiiiiiiiiiiiiiiiiiiiiiiiiiiiiiiiiiiiiiiiiiiiiiiiiiiiiiiiiiiiiiiiiiiiiiiiiiiiiiiiiiiiiiiiiiiiiiiiiiiiiiiiiiiiiiiiiiiiiiiiii
Press the Temp. button to select the wash and rinse temperatures. The light
next to the temperature will illuminate. Press the button repeatedly to scroll
through the temperature settings.
iiiiiiiiiiiiiiiiiiiiiiiiiiiiiiiiiiiiiiiiiiiiiiiiiiiiiiiiiiiiiiiiiiiiiiiiiiiiiiiiiiiiiiiiiiiiiiiiiiiiiiiiiiiiiiiiiiiiiiiiiiiiiiiiiiiiiiiiiiiiiiii
Hot/Warm - Heavily soiled color-fast items.
Hot/Cold - Whites and heavily soiled color-fast items.
Warm/Warm - Color-fast items. When warm rinse is selected, only the final
rinse will be warm. The other rinses will be cold to conserve energy.
Warm/Cold - Moderately soiled, color-fast items; most wrinkle free items.
iiiiiiiiiiiiiiiiiiiiiiiiiiiiiiiiiiiiiiiiiiiiiiiiiiiiiiiiiiiiiiiiiiiiiiiiiiiiiiiiiiiiiiiiiiiiiiiiiiiiiiiiiiiiiiiiiiiiiiiiiiiiiiiiiiiiiiiiiiiiiiii
iiiiiiiiiiiiiiiiiiiiiiiiiiiiiiiiiiiiiiiiiiiiiiiiiiiiiiiiiiiiiiiiiiiiiiiiiiiiiiiiiiiiiiiiiiiiiiiiiiiiiiiiiiiiiiiiiiiiiiiiiiiiiiiiiiiiiiiiiiiiiiii
iiiiiiiiiiiiiiiiiiiiiiiiiiiiiiiiiiiiiiiiiiiiiiiiiiiiiiiiiiiiiiiiiiiiiiiiiiiiiiiiiiiiiiiiiiiiiiiiiiiiiiiiiiiiiiiiiiiiiiiiiiiiiiiiiiiiiiiiiiiiiiii
iiiiiiiiiiiiiiiiiiiiiiiiiiiiiiiiiiiiiiiiiiiiiiiiiiiiiiiiiiiiiiiiiiiiiiiiiiiiiiiiiiiiiiiiiiiiiiiiiiiiiiiiiiiiiiiiiiiiiiiiiiiiiiiiiiiiiiiiiiiiiiii
Cold/Cold
- Brightly colored, lightly soiled items.
ln
wash
water temperatures below 60 ° F, detergents do not dissolve or
clean
well.
Press the Soil Level button to select the appropriate soil level for the load.
The light next to the Soil Level button will illuminate. Press the button
repeatedly to scroll through the soil level settings.
Very Heavy - Use for cleaning extremely heavily soiled loads.
Heavy - Use for cleaning heavily soiled loads.
iiiiiiiiiiiiiiiiiiiiiiiiiiiiiiiiiiiiiiiiiiiiiiiiiiiiiiiiiiiiiiiiiiiiiiiiiiiiiiiiiiiiiiiiiiiiiiiiiiiiiiiiiiiiiiiiiiiiiiiiiiiiiiiiiiiiiiiiiiiiiiiii
Normal - Use for cleaning moderately soiled loads. This setting will be
iiiiiiiiiiiiiiiiiiiiiiiiiiiiiiiiiiiiiiiiiiiiiiiiiiiiiiiiiiiiiiiiiiiiiiiiiiiiiiiiiiiiiiiiiiiiiiiiiiiiiiiiiiiiiiiiiiiiiiiiiiiiiiiiiiiiiiiiiiiiiiiii
iiiiiiiiiiiiiiiiiiiiiiiiiiiiiiiiiiiiiiiiiiiiiiiiiiiiiiiiiiiiiiiiiiiiiiiiiiiiiiiiiiiiiiiiiiiiiiiiiiiiiiiiiiiiiiiiiiiiiiiiiiiiiiiiiiiiiiiiiiiiiiiii
appropriate for most loads.
iiiiiiiiiiiiiiiiiiiiiiiiiiiiiiiiiiiiiiiiiiiiiiiiiiiiiiiiiiiiiiiiiiiiiiiiiiiiiiiiiiiiiiiiiiiiiiiiiiiiiiiiiiiiiiiiiiiiiiiiiiiiiiiiiiiiiiiiiiiiiiiii
iiiiiiiiiiiiiiiiiiiiiiiiiiiiiiiiiiiiiiiiiiiiiiiiiiiiiiiiiiiiiiiiiiiiiiiiiiiiiiiiiiiiiiiiiiiiiiiiiiiiiiiiiiiiiiiiiiiiiiiiiiiiiiiiiiiiiiiiiiiiiiiii
Light - Use for cleaning lightly soiled loads.
iiiiiiiiiiiiiiiiiiiiiiiiiiiiiiiiiiiiiiiiiiiiiiiiiiiiiiiiiiiiiiiiiiiiiiiiiiiiiiiiiiiiiiiiiiiiiiiiiiiiiiiiiiiiiiiiiiiiiiiiiiiiiiiiiiiiiiiiiiiiiiiii
iiiiiiiiiiiiiiiiiiiiiiiiiiiiiiiiiiiiiiiiiiiiiiiiiiiiiiiiiiiiiiiiiiiiiiiiiiiiiiiiiiiiiiiiiiiiiiiiiiiiiiiiiiiiiiiiiiiiiiiiiiiiiiiiiiiiiiiiiiiiiiiii
Very Light - Use for cleaning very lightly soiled loads.
iiiiiiiiiiiiiiiiiiiiiiiiiiiiiiiiiiiiiiiiiiiiiiiiiiiiiiiiiiiiiiiiiiiiiiiiiiiiiiiiiiiiiiiiiiiiiiiiiiiiiiiiiiiiiiiiiiiiiiiiiiiiiiiiiiiiiiiiiiiiiiiii
Wash ng a cad of aundry 11
Press the Spin button to select the appropriate spin speed for the load. The
light next to the spin speed will illuminate. Press the button repeatedly to scroll
through the spin speed settings.
Extra High - Use for underwear and sturdy cottons.
High - Use for underwear, t-shirts and sturdy cottons.
Medium - Use for jeans, wrinkle free or "wash-and-wear" items and
synthetics.
Low - Use for delicate items needing a slow spin speed because of fabric and
construction and for hang-dry items.
1/o Spin - Drains the washer without spinning. Use for extremely delicate
items that cannot tolerate any spin.
Press the button repeatedly to cycle through the available delayed start
options (from 2 to 24 hours in one hour increments).
The displayed hours indicate when the washing cycle will finish.
Press this button to to reduce wrinkles on your delicate garments, freeing up
the time you would have spent on ironing. It is best to use this feature with
Normal, Colors, Quick, Towels, Heavy Duty, and Mixed load cycles.
Using this feature will prevent children from manipulating the washing
machine.
To turn the "Child Lock" on: Press the Start/Pause
button to turn on the
washing machine. Press and hold down the Soil Level + Spin button for
2-3 seconds. The "Child Lock" can only be activated when the washer is
on. Once you set the Child Lock function, no button will be active except the
POWER button. The Child Lock indicator will blink on and off when it is set.
To turn the "Child Lock" off: Press and hold down the Soil Level + Spin
button for 2-3 seconds. The Child Lock indicator will turn off and the "Child
Lock" will be deactivated.
When
the is
buttons
on the washer are not working please check that the
child lock
not active.
Turn the dial to select one of the 14 available wash programs:
Normal, Colors, Perm Press, Delicates, Wool, Hand wash, Quick,
Rinse+Spin, Spin, Drain, Calm Wash, Mixed Load, Heavy Duty, Towels
Press to pause and restart programs.
Press the Start/Pause button before adding the laundry.
Press once to turn the washing machine on, press again to turn the washing
machine off.
If the washing machine power is left on for longer than 10 minutes without
any buttons being touched, the power automatically turns off.
12 Washng a cad of aundry
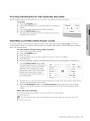
PUTTING
DETERGENT
IN THE WASHING
MACHINE
Before washing clothes for the first time, you must run a complete cycle without clothes.
To do this:
1. Press the POWER button.
2. Pour a little detergent into compartment @ in the detergent
drawer.
3. Turn on the water supply to the washing machine.
4. Press the Start/Pause button.
• This will remove any water from the manufacturer's test run
remaining in the washer.
WASHING
CLOTHES
Detergent
USING FUZZY LOGIC
Your new washing machine makes washing clothes easy, using Samsung's "Fuzzy Logic" automatic
control system. When you select a wash program, the machine will set the correct temperature, washing
time, and washing speed.
To
1.
2.
3.
4.
5.
6.
7,
wash clothes using the Fuzzy Logic programs:
Turn on your sink's water faucet.
Press the POWER button.
Open the door.
Load the articles one at a time loosely into the drum, without overfilling.
Close the door.
Add the detergent, softener, and bleach(if necessary) into the appropriate compartment.
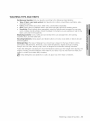
Turn the Fuzzy Control dial to select
the appropriate program for the type of
clothes. Normal, Colors, Perm Press,
Delicates, Wool, Handwash, Quick,
Rinse+Spin, Spin, Drain, Calm Wash,
Mixed Load, Heavy Duty, Towels.
You will see the indicators light up on
the control panel.
Towels
Normal
HeavyDuty
Colors
MixedLoadm
Perm
Press
CalmWash--
Delicates
Drain
Wool
Spin
'Handwash
Rinse+Spin_
Quick
8. At this time, you can control the wash temperature, rinsing times, spin speed, delay time by
pressing the appropriate option button.
9. Press the Start/Pause button on the Fuzzy Control dial and the wash cycle will begin.
The process indicator will light up and the remaining time for the cycle will appear in the
display.
When the cycle is finished:
After all the cycles have finished, the power will turn off automatically.
1. Open the door.
_The
door will not open until 3 minutes after the machine stops or the power turns off.
2. Remove laundry.
Washng a cad of aundry 13
WASHING
CLOTHES
MANUALLY
You can wash clothes manually without using the "Fuzzy Logic" feature.
To do so:
1.
2.
3.
4.
5.
6.
Turn on your sink's water faucet.
Press the POWER button on the washing machine.
Open the door.
Load the articles one at a time loosely into the drum, without overfilling.
Close the door.
Put the detergent and, if necessary, softener or chlorine bleach, in the appropriate
compartments.
7. Press the Temp. button to select the water temperature.
(Hot/Warm -> Hot/Cold --> Warm/Warm -->Warm/Cold --> Cold/Cold )
8. Press the Soil Level button to select the soil level for the load.
(Very Heavy --> Heavy --> Normal --> Light --> Very Light)
9. Press the Spin button to select the spin speed, [Extra high --> High --> Medium --> Low --> No
Spin --> Rinse Hold].
The
rinse hold program allows you to take clothes that are dripping wet out of the washing
machine.
no : No Spin, rh : Rinse Hold.
10. Press the button repeatedly to cycle through the available delayed start options (from 2 to
24 hours in one hour increments).The displayed hours indicate when the washing cycle will
finish.
11. Press the Start/Pause
button and the machine will begin the cycle.
When the cycle is finished:
1. Open the door.
[_The
2.
door will not open until 3 minutes after the machine stops or the power turns off.
Remove laundry.
USING DELAY START
You can set the washing machine to finish your wash automatically at a later time, choosing from 2 to 24
hour delay (in 1 hour increments). The displayed hours indicate when the washing cycle will finish.
To do so:
1. Manually or automatically set your washing machine for the type of clothes you are washing.
2. Press the Delay Start button repeatedly until the delay time is set.
3. Press the Start/Pause button. The Delay Start indicator will light, and the clock will begin
counting down until the washing cycle finished.
4. To cancel "Delay Start", press the POWER button, then turn the washing machine on again.
14 Washng a oad of aundry
WASHING
TiPS AND HINTS
Sorting your laundry: Sort your laundry according to the following characteristics:
,, Type of fabric care label symbol: Sort laundry into cottons, mixed fibers, synthetics, silks,
wools and rayon.
• Color: Divide whites and colors. Wash new, colored items separately.
• Size: Placing items of different sizes in the same load will improve the washing action.
Sensitivity: Wash delicate items separately, using the Delicate wash program for pure new
wool, curtains and silk articles. Check the labels on the items you are washing or refer to the
fabric care chart in the appendix.
Emptying pockets: Coins, safety pins and similar items can damage linen, the washing
machine drum, and the water tank.
Securing fasteners:
be tied together.
Close zippers and fasten buttons or hooks; loose belts or ribbons should
Detergent tips: The type of detergent you should use is based on the type of fabric (cotton,
perm press, delicate items, knit/wool), color, wash temperature, degree and type of soiling.
Always use "low suds" laundry soap, which is designed for automatic washing machines.
Follow the detergent manufacturer's recommendations based upon the weight of the laundry, the
degree of soiling, and the hardness of the water in your area. If you do not know how hard your
water is, contact your water utility company.
_Keep
detergents and additives in a safe, dry place out of the reach of children.
Washng a cad of aundry 15
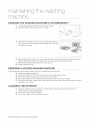
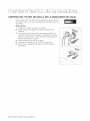
DRAINING
THE WASHING
MACHINE
IN AN EMERGENCY
1. Unplug the washing machine from the power supply.
2. Open the filter-cover by using a coin or a key.
3.
Unscrew the emergency drain cap by turning left. Grip the
cap on the end of the emergency drain tube and slowly pull
it out about 6 inches.
4. Allow all the water to flow into a bowl. Keep a bucket on hand to empty water from the bowl.
While emptying the washer, the water flow can be stopped by pinching the tube.
5. Reinsert the drain tube and screw the cap back on.
6. Replace the filter-cover.
REPAIRING
A FROZEN WASHING
MACHINE
If the temperature drops below freezing and your washing machine is frozen:
1. Unplug the washing machine.
2. Pour warm water on the sink's faucet to loosen the water supply hose.
3. Remove the water supply hose and soak it in warm water.
4. Pour warm water into the washing machine drum and let it sit for 10 minutes.
5. Reconnect the water supply hose to the water faucet and check if the water supply and drain
operations are normal.
CLEANING
THE EXTERIOR
1. Wipe the washing machine surfaces, including the control panel, with a soft cloth and
nonabrasive household detergents.
2. Use a soft cloth to dry the surfaces.
3. Do not pour water on the washing machine.
18 Maintanng
the washng machne
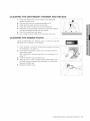
CLEANING
THE DETERGENT
DRAWER AND RECESS
1. Press the release lever on the inside of the detergent
drawer and pull it out.
2. Remove the cap from compartment _) and (_.
3. Wash all of the parts under running water.
4. Clean the drawer recess with an old toothbrush.
5. Reinsert the cap (Pushing it firmly into place) and replace
the liquid detergent divider into the drawer.
6. Push the drawer back into place.
7. Run a rinse program without any laundry in the drum.
CLEANING
THE DEBRIS
FILTER
Clean the debris filter 5 or 6 times a year, or when you see the
following error message on the display:
1. Open the filter-cover, See "Draining the washing machine in
an emergency" on page 15.
2. Unscrew the emergency drain cap by turning it left and
drain all the water.
See "Draining the washing machine in an emergency" on
page 15.
3. Unscrew the filter cap and take it out.
4. Wash any dirt or other material from the filter. Make sure
the drain pump propeller behind the filter is not blocked.
Replace the filter cap.
5. Replace the filter-cover.
Maintanng
the washng
machne 17
CLEANING
THE WATER HOSE MESH FILTER
You should clean the water hose mesh filter at least once a year,
or when you see the following error message on the display:
To do this:
1. Turn off the water source to the washing machine.
2, Unscrew the hose from the back of the washing machine.
3, With a pair of pliers, gently pull out the mesh filter from the
end of the hose and rinse it under water until clean. Also
clean the inside and outside of the threaded connector.
4, Push the filter back into place.
5, Screw the hose back onto the washing machine.
6, Turn on the faucet and make sure the connections are
watertight.
18 Maintan ng the wash ng mach ne
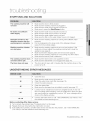
SYMPTOMS
AND SOLUTIONS
ROBLEM
The washing
not start
machine will
Make
Make
Make
Make
sure
sure
sure
sure
the door is firmly closed.
the washing machine is plugged in.
the water source faucet is turned on.
to press the Start/Pause
button.
No water or insufficient
water supply
Make
Make
Make
Make
sure
sure
sure
sure
the
the
the
the
Detergent remains in the
detergent drawer after the
wash program is corn plete
Make sure the washing machine is running with sufficient water
pressure.
Put the detergents in the inner parts of the detergent drawer
(away from the outside edges).
Washing machine vibrates
or is too noisy
Make sure the washing machine is set on a level surface. If the
surface is not level, adjust the washing machine feet to level the
appliance (see page 8).
Make sure that the shipping bolts are removed (see page 8).
Make sure the washing machine is not touching any other object.
Make sure the laundry load is balanced.
The washing machine does
not drain and/or spin
Make sure the drain hose is not squashed or bent.
Make sure the debris filter is not clogged (see page 16).
The Door does not open
The door will not open until 3 minutes after the machine stops or the
power turns off.
UNDERSTANDING
•
water source faucet is turned on.
water source hose is not frozen.
water intake hose is not bent.
filter on the water intake hose is not clogged.
ERROR MESSAGES
i_i!i
_i!i
_;;_i_i_i_i_i_;!_!_;!_!_;!_!_;_!i_;_;_i_!_;_;_i_;_!_1_i_;_;;_i_!_i_;!;!_!_
_!!_'i_i_;_i_i_;!!'_i_i_i_!_i_i_i_i_!_i_i_i_i_!_i_i_i_i_!i
_II
_!I
_II
_!I
_II
_!I
_II
_!I
_II
_!I
_II
_!I
_II
_!I
_II
_!I
_II
_!I
_II
_!I
_II
_!I
_II
_!I
_II
_!I
_II
_!I
_II
_!I
_II
_!I
_II
_!I
_II
_!I
_II
_!I
_II_III
dE
•
Close the door.
4E
*
Make sure the water source is turned on.
Clean the water hose mesh filter (see page 18).
Check the water pressure.
5E
Clean the debris filter.
Make sure the drainage hose is installed correctly (see page 17).
Laundry load is unbalanced; loosen any tangled laundry. If only one
item of clothing needs washing, such as a bathrobe or jeans, the final
spin result might be unsatisfactory and an "UE" error message will be
shown in the display window.
cE / 3E
Contact after-sales service. Call 1-800-SAMSUNG
the website at www.samsung.com
(726-7864) or visit
Before contacting After-Sales service:
1. Try to remedy the problem (See "Troubleshooting" on this page).
2. Repeat what was done before the malfunction occured.
3. If the malfunction persists, call after-sales service and describe the problem. Call 1-800-SAMSUNG
(726-7864) or visit the website at www.samsung.com
Troubleshooting
19
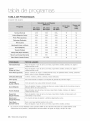
PROGRAM
CHART
(÷ user option)
Normal
1200
1000
800+
÷
52
Colors
1200
1000
800+
÷
50
Perm Press
800
800
800
÷
50
Delicates
800
600
600
÷
43
400
400
400
÷
30
400
400
400
÷
32
1200
1000
800+
÷
26
1200
1000
800+
÷
61
1200
1000
800+
÷
68
600
400
÷
52
÷
43
W001
Handwash
Towels
Heavy Soil
Mixed
Load
Calm Wash
800
NO SPIN
Normal
Average or lightly soiled cottons, bed linen, table linen, underwear, towels, shirts,
etc.
Colors
Average or lightly soiled cottons, bed linen, table linen, underwear, towels, shirts,
etc.
Perm Press
Average or lightly soiled blouses, shirts, etc., Made of polyester (diolen, trevira),
polyamide (perlon, nylon) or other similar blends.
o
Delicates
Delicate curtains, dresses, skirts, shirts and blouses.
Wool
Only machine washable woolens with pure new wool label.
Handwash
Very light wash course like hand wash.
Quick
Lightly soiled cottons or linen blouses, shirts, dark colored terry cloth, colored
linen articles, jeans, etc.
Towels
Average or lightly soiled baby cottons, bed linen, table linen, underwear, towels,
shirts, etc.
Heavy Soil
Stained or heavy soiled cottons, bed linen, table linen, underwear, towels, shirts,
jeans, etc.
Mixed Load
A mix of lightly soiled cottons and synthetic fabrics.
Calm Wash
Extremely low noise level during the entire cycle.
Cottons, bed linen, table linen, underwear, towels, shirts.
The cycles times may differ from the values given in the table due to variations in the pressure and
temperature of the water supply, as well as the load and the type of laundry.
20 Program chart
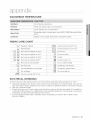
WASH/RINSE
TEMPERATURE
iiiiiii i i ' i ¸iiii!
ili ii ii !ii! ii'
ii ii i
ii ii! ii' i!ii !
!!_!_!_!_!_!_!_!_!_!_!_!_!_!_!_!_!_!_!_!_!_!_!_!iii_i
_I_I_!_II
!_I_!_II
!_I_!_II
!_I_!_II
!_I_!_II
!_I_!_II
!_I_!_II
!_I_!_II
!_ii!!ili_i_i_ii_i
_!_!_!_i_i_!_!!_i_i_!!_!!i_i_!i_!!_!!i_i_!i_!!_!!i_i_!i_!!_!!i_i_!i_!!_!!i_i_!i_!!_!!i_i_!i_!!_!!i_i_!i_!!_!!i_i_!i_!!_!!i_i_!i_!!_!!i_i_!i_!!_!!i_i_!i@_!
Hot/Warm
Extra Heavily soiled items.
Not/Cold
White and heavily soiled, color-fast items.
Warm/warm
Some delicate and color-fast items.
Warm/Cold
Moderately soiled, colored items; most EASY CARE/Permanent
Items.
ColdiCold
Brightly colored, lightly soiled items; washable woolens.
Press
FABRIC CARE CHART
'_
Resistant matena
_
Can be ironed at 302 °F max
Delicate fabric
_
Can be ironed at 212 °F max
_
tern ma', De wasnea at 194 °F
_
Do not iron
_L'L__
tern ma', De wasnea at 140 °F
(_
Do not dry clean
_'_
_'
tern ma', De wasnea at 104 °F
[]
Dry flat
_
temma'_ Dewasneaat86°F
[]
Can be hung to dry
tern ma', De nana washed
[]
Dry on clothes hanger
Dry slean _n,
_
Tumble dry, normal heat
Can be Dleacnea _ cold water
_
Tumble dry, reduced heat
Do not bleach
[]
Do not tumble dry
_
"_
Z_
Can be ronea at 392 °F max
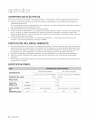
ELECTRICAL
WARNINGS
To reduce the risk of fire, electrical shock, and other injuries, keep these safety precautions in mind:
Operate the appliance only from the type of power source indicated on the marking label. If you are not
sure of the type of power supplied to your home, consult your appliance dealer or local power company.
Use only a grounded outlet.
Protect the power cord. Power supply cords should be routed so that they are unlikely to be walked on
or pinched by items placed on or against them. Pay particular attention to cords at plugs, convenience
receptacles, and the point where they exit from the unit.
Do not overload the wall outlet or extension cords. Overloading can result in fire or electric shock.
(AC120V 15AMR)
PROTECTING
o
o
o
o
THE ENVIRONMENT
This appliance is manufactured from recyclable materials. If you decide to dispose of this appliance,
please observe local waste disposal regulations. Cut off the power cord so that the appliance cannot be
connected to a power source. Remove the door so that animals and small children cannot get trapped
inside the appliance.
Do not exceed the detergent quantities recommended in the detergent manufacturers' instructions.
Use stain removal products and bleaches before the wash cycle only when strictly necessary.
Save water and electricity by only washing full loads (the exact amount depends upon the program
used).
SPECIFICATION
i
WF-B1254/B1054/B854
WF-J1254/J1054/J854
W23,54x D21,65x H33.23inches
W23.54x D23.62x H33,23inches
DIMENSION
WATER PRESSURE
50 kPa- 800 kPa
NET WEIGHT
156.53Ib
PAPER
5,51 Ib
PLASTIC
2,20 Ib
PACKAG E Wt
SPIN
REVOLUT ON
22 Append x
MODEL
rpm
WF-J1254/B1254
WF-J1054/B1054
WF-J854/B854
1200
1000
800
WARRANTY
Limited
INFORMATION
Warranty
for Original
Purchaser
This Samsung product is warranted by Samsung Electronics America, Inc. (hereafter referred to as
Samsung) against manufacturing defects in material or workmanship for the following periods:
Labor: 1 year (in-home)
Parts: 1 year
Samsung further warrants that if this product fails to operate properly within the specified warranty period
and the failure is due to improper workmanship or defective material, Samsung will repair or replace the
product at its option.
All warranty repairs or part replacements must be performed by a Samsung Authorized Service Center. (To
find the nearest Samsung Service Center, call 1-800-SAMSUNG or visit our web site at www.samsung.
com.)
Obligation
to the Original
Owner
The original dated sales receipt must be retained by the customer and is the only acceptable proof of
purchase. It must be presented to a Samsung Authorized Service Center at the time service is requested
before warranty services are rendered. On all carry-in models, transportation to and from the Authorized
Service Center is the responsibility of the customer.
Exclusions
of the Warranty
This warranty does not cover damage due to accident, fire, flood, and/or other Acts of God, misuse,
incorrect line voltage, improper installation, improper or unauthorized repairs, commercial use, or damage
that occurs during shipping. Customer adjustments which are explained in this owner's manual are not
covered under the terms of this warranty. This warranty will automatically be voided for any unit found with
a missing or altered serial number. This warranty is valid only on products purchased and used in the United
States.
SAMSUNG
ELECTRONICS
NORTH AMERICAN
LIMITED
WARRANTY
STATEMENT
Subject to the requirements, conditions, exclusions and limitations of the Original Limited Warranty
supplied with Samsung Electronics (SAMSUNG) products, and the requirements, conditions, exclusions
and limitations contained herein, SAMSUNG will additionally provide Warranty Repair Service in the United
States on SAMSUNG products purchased in Canada, and in Canada on SAMSUNG products purchased in
the United States, for the warranty period originally specified, and to the Original Purchaser only.
The above described warranty repairs must be performed by a SAMSUNG Authorized Service Center.
Along with this Statement, the Original Limited Warranty Statement and a dated Bill of Sale as Proof of
Purchase must be presented to the Service Center. Transportation to and from the Service Center is the
responsibility of the purchaser.
Conditions covered are limited only to manufacturing defects in material or workmanship, and only those
encountered in normal use of the product.
Excluded, but not limited to, are any original specified provisions for, in-home or on-site services, minimum
or maximum repair times, exchanges or replacements, accessories, options, upgrades, or consumables.
For the location of a SAMSUNG Authorized Service Center, please call toll-free:
In the United States: I=800-SAMSUNG
in Canada: 1-800=SAMSUNG
(1=800=726=7864)
QUESTIONS
OR COMMENTS?
Code No. DC68-02455C_EN
ors
manual del usuario
las posibiiidades
Gracias por comprar un producto Samsung.
Para recibir un servlcio ma_e completJ,C reglstre su
producto en
www.samsung.com/globaVregister
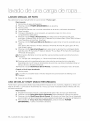
caractor t cas
1. Child lock (Seguro
para niSos)
La funci6n Seguro para ninos (Child Lock) mantiene las manitos curiosas alejadas de la
lavadora. Esta funciOn de seguridad asegura que los ninos no jueguen con el funcionamiento
de la lavadora. Tambien le avisa cuando se encuentra activado.
2. Lavado
a mano
La ropa que se dana con facilidad, como pot ejemplo las prendas de lino o seda, pueden
lavarse en la lavadora obteniendo los mismos resultados que con el lavado a mano.
3. Inicio Retardado
Esta funciOn permite que los usuarios retarden el inicio del funcionamiento de la lavadora
hasta pot 24 horas.
4. Calm Wash (Lavado
suave)
Tenemos un ciclo de lavado tan silencioso que podra, lavar su ropa cuando duerme. El ciclo
de centrifugado es solo un murmullo mientras la lavadora drena el agua.
5. Easy Iron (Planchado
f_.cil)
Se necesita menos planchado puesto que Carefreewash de Samsung lava adecuadamente
las prendas suaves y delicadas, y las telas que requieren poco planchado. Desarrollado pot
el servicio de tecnologia en procesos digitales de reconocimiento mundial de Samsung, la
funciOn Easy Iron es un programa de lavado especializado que le ayudara, a disminuir las
arrugas de las prendas delicadas, gracias a Io cual contara, con ma,s tiempo libre que, de Io
contrario, tendria que dedicar al planchado.
2 Caracter sticas
nformac On sobre see(]triad
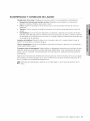
Feiicitaciones
por ia compra de ia nueva iavadora de Samsung.
Este manual contiene informaci6n importante acerca de ia instaiaci6n, el uso y
ei cuidado dei eiectrodomestico.
Lea detenidamente estas instrucciones a fin de
aprovechar
SiMBOLOS
al maximo los mOitipies beneficios y funciones
Y PRECAUCIONES
DE SEGURIDAD
What the icons and signs in this user manual
de ia iavadora.
IMPORTANTES
means:
Z_
Peligros
o pra,cticas inseguras que pueden causar lesiones fisicas graves o
la muerte.
ADVERTENCIA
PRECAUCION
Peligros o pra,cticas inseguras que pueden causar lesiones
da_os materiales.
fisicas leves o
Para reducir el riesgo de incendio, explosion, descargas electricas o lesiones
fisicas cuando usa esta secadora, siga estas instruccionesde seguridad
PRECAUCION ba,sicas:
ANTES DE USAR EL ELECTRODOMESTiCO
,/_
Los materiales de embalaje pueden ser peligrosos para los ninos; mantenga todo el
.....
-"%uo,,
material de embalaje (bolsas de pla,stico, poliestireno, etc.) fuera del alcance de los ninos.
Este electrodomestico
esta, disenado exclusivamente para uso domestico.
Asegurese de que las conexiones de agua y electricidad sean realizadas por tecnicos
calificados, siguiendo las instrucciones del fabricante (consulte "Manual de Instalaci0n" en
la pa,gina 4) y la normativa local sobre seguridad.
Debe quitarse el embalaje y los soportes para el transporte antes de utilizar el
electrodomestico. Si no Io hace, podrian producirse danos graves. Consulte "Retirar los
tornillos de transporte" en la pa,gina 5.
Realice el primer lavado sin colocar prendas en la lavadora (Consulte la pa,gina 9).
ADVERTENCIA
Z_ siempre respete las Precauciones de seguridad cuando utiliza su lavadora. Consulte
.....
_TE,,A"lnstrucciones de seguridad importantes" en la pa,gina siguiente.
Nunca intente reparar la lavadora sin asistencia. El voltaje de la lavadora puede resultar
peligroso.
Si es necesario reparar la lavadora, Ilame al servicio tecnico autorizado mas cercano.
GUARDE ESTAS INSTRUCCIONES
Informacion sobre segurdad 3
Registre
lavadora
el nQmero de serie que se encuentra en la parte posterior de la
y la fecha de compra en el espacio que se brinda a continuaci6n.
Se recomienda guardar el recibo de su compra junto con este manual para contar con los beneficios del
servicio de garantia.
Numero de modelo
Numero de serie
Fecha de Compra
Distribuidor
INSTRUCCIONES
DE SEGURIDAD
IMPORTANTES
ADVERTENCIA
/_
Para reducir el riesgo de incendio, explosion, descargas electricas, danos materiales o
Ao_,Alesiones fisicas cuando usa este electrodomestico, siga las instrucciones de seguridad
b_tsicas que figuran a continuacion:
1,
Lea todas las instrucciones de seguridad antes de usar este electrodomestico.
2. AI igual que con cualquier equipo electrico y de piezas moviles, existen riesgos
potenciales. Para usar este electrodomestico de forma segura, el operador debe
familiarizarse con las instrucciones de funcionamiento y set cuidadoso en su uso.
3,
No instale o guarde este electrodomestico donde quede expuesto a los factores
clima,ticos.
4. Instale y nivele la lavadora sobre una superficie que pueda soportar su peso.
5. Este electrodomestico debe conectarse a tierra correctamente. Nunca enchufe el cable
del electrodomestico a un recepta,culo que no este conectado a tierra correctamente ni
guarde conformidad con los codigos locales y nacionales. Consulte las instrucciones de
instalacion para conectar este electrodomestico a tierra.
6. Para evitar la posibilidad de incendio o explosion:
a. No lave o seque prendas que han sido previamente limpiadas, lavadas, remojadas
o salpicadas con gasolina, solventes de limpieza en seco u otras sustancias
inflamables o explosivas, ya que emiten vapores que pueden prenderse fuego o
explotar. Lave a mano y tienda las prendas que contienen estas sustancias.
No se debe colocar en la lavadora ningun material en el que se haya usado un
solvente de limpieza o que contenga liquidos o solidos inflamables hasta que se
haya eliminado todo vestigio de tales liquidos o solidos y sus vapores.
Estas sustancias inflamables son la acetona, el alcohol desnaturalizado, la gasolina,
el kerosene, algunos limpiadores liquidos de uso domestico y quitamanchas, el
aguarra,s, las ceras y los removedores de cera.
b.
No agregue gasolina, solventes de limpieza en seco u otras sustancias inflamables
o explosivas al agua del lavado. Estas sustancias emiten vapores que se pueden
prender fuego o explotar.
GUARDE ESTAS INSTRUCCIONES
4 hformaci6n
sobre segurdad
c. En ciertas circunstancias, se puede producir gas hidrogeno en un sistema de agua
caliente que no se ha usado durante 2 semanas o ma,s.
EL GAS HIDROGENO ES EXPLOSIVO. Si el sistema de agua caliente no fue
utilizado durante dicho periodo, antes de usar la lavadora o la lavadora y la
secadora combinadas, abra las Ilaves de agua caliente y deje cotter el agua per
varies minutes. De esta manera, se eliminara, el gas hidrogeno acumulado. Dado
que el gas es inflamable, no fume ni use una llama abierta en ese memento.
7. No introduzca su mane en el electrodomestico cuando el tambor este en movimiento.
8. No permita que los nines jueguen sobre la lavadora o dentro de ella. Se requiere de
supervision cuando el electrodomestico es utilizado cerca de los nines.
9. No modifique los controles.
10. No repare, reemplace ni intente realizar el mantenimiento de cualquier pieza del
electrodomestico salvo que este recomendado especificamente en las instrucciones
de reparacion para el usuario y que, a su juicio, usted tenga la habilidad para Ilevarlas a
cabo.
11. Desconecte el cable de alimentacion antes de intentar realizar el mantenimiento de la
lavadora.
12. Guarde los productos para el lavado y dema,s materiales en un lugar frio y seco, fuera
del alcance de los nines.
13. No lave ni seque prendas que tengan manchas de aceite vegetal o aceite de cocina.
Dichas prendas pueden tenet vestigios de aceite despues del lavado. A causa de los
testes de aceite, la tela puede despedir humo o prenderse fuego.
14. No use lejia que contenga cloro, amoniaco o a,cidos (tales come vinagre o removedores
de Oxide) en el mismo lavado.
Se pueden generar vapores peligrosos.
15. No lave en la lavadora materiales de fibra de vidrio.
Se pueden adherir pequenas particulas a telas lavadas en las cargas subsiguientes y
causar irritacion en la piel.
16. Antes de descartar la lavadora o de trasladarla para que se le efectue el servicio
tecnico, retire la puerta del compartimiento de lavado.
17. No se siente encima de la lavadora.
18. No aplique calor para secar prendas que contengan goma espuma o materiales
semejantes a la goma con textura similar.
19. No use suavizante para ropa o productos para evitar la esta,tica salvo que el fabricante
del suavizante para ropa Io recomiende.
GUARDE ESTAS INSTRUCCIONES
hformaciOn
sobre segurdad 5
INSTRUCCIONES
DE CONEXI6N
A TIERRA
Este electrodomestico debe conectarse a tierra. En caso de que el electrodomestico funcione
real o se descomponga, la conexi0n a tierra reducira, el riesgo de descarga electrica al ofrecer
una via de menos resistencia a la corriente electrica. Este electrodomestico esta, equipado
con un cable que incluye un conductor y un enchufe de conexi0n a tierra. El enchufe debe
conectarse a un tomacorriente adecuado que este correctamente instalado y conectado a tierra
en conformidad con todos los c0digos y ordenanzas locales.
ADVERTENCIA
A
La conexi0n inadecuada del conductor de conexi0n a tierra del equipo puede generar
.....
"--'_,EN
,Auna descarga electrica. Consulte a un electricista o tecnico calificado si le surgen dudas
acerca de si la conexi0n a tierra del electrodomestico es correcta. No modifique el enchufe
provisto con el electrodomestico; si no entra en el tomacorriente, solicite a un electricista
calificado que instale el tomacorriente adecuado
USO DE LOS CABLES
PROLONGADORES
Se suministra un cable de alimentaci0n corto para reducir el riesgo de enredarse o tropezar y
caerse debido a un cable ma,s largo.
Los juegos de cables ma,s largos o cables prolongadores se encuentran disponibles y pueden
usarse si se tiene sumo cuidado.
Si se usa un cable largo o un cable prolongador,
1. La especificaci0n electrica marcada del juego de cables o cable prolongador debe set como
minimo igual a la especificaci0n electrica del electrodomestico.
2. El cable prolongador debe set un cable de 3 hilos de conexi0n a tierra y se Io debe enchufar
en un tomacorriente de 3 ranuras.
3. El cable ma,s largo debe colocarse de manera tal que no los nihos no puedan tirar de el o
tropezarse con el accidentalmente.
ADVERTENCIA
Z_
No corte ni retire el tercer pin (a tierra) del cable de alimentaci0n bajo ninguna circunstancia.
ADVERTENGIA
METODO
PREFERIDO
DE CONEXION
A TIERRA
Enchufe el cable de alimentaci0n de tres pines en un tomacorriente correctamente conectado
a tierra de 120 VAC esta,ndar, 60 Hz. Su lavadora debe set el unico electrodomestico en este
circuito.
GUARDE ESTAS INSTRUCCIONES
6 hformaciOn
sobre segurdad
contendo
INSTALACION
LAVADO
DE LA LAVADORA
DE UNA CARGA
DE ROPA
i
MANTENIMIENTO
i
DE LA LAVADORA
8
8
9
Desembalaje de la lavadora
Descripci6n general de la lavadora
Seleccionar una ubicaci6n
9
9
10
10
Ajuste de las patas niveladoras
Retirar los tornillos de transporte
Conexi6n de la manguera de suministro de
agua
Colocaci6n de la manguera de desagQe
11
13
13
Descripci6n general del panel de control
Colocar el detergente en la lavadora
Lavado de ropa utilizando Fuzzy Logic
14
14
15
Lavado manual de ropa
Uso de Delay Start (Inicio retardado)
Sugerencias y consejos de lavado
16
DesagQe de la lavadora en caso de
emergencia
Reparaci6n de la lavadora si sufri6 el efecto
de las heladas
i
16
h
16
17
17
Limpieza del exterior
Limpieza del caj6n de detergente y el hueco
del caj6n
Limpieza del filtro de residuos
18
Limpieza del filtro de malla de la manguera
de agua
DE PROBLEMAS
19
19
Problemas y soluciones
Interpretaci6n de los mensajes de error
TABLA DE PROGRAMAS
20
Tabla de programas
21
21
22
22
Temperatura de lavado/enjuague
Tabla de indicaciones sobre la tela
Advertencias el6ctricas
Protecci6n del medio ambiente
22
Especificaciones
23
Informaci6n sobre la garantia
SOLUCION
APENDICE
i
J
Conten do 7
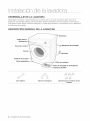
DESEMBALAJE
DE LA LAVADORA
Desembale su lavadora e inspecci0nela para controlar que no se hayan producido danos durante el
transporte. Compruebe adema,s que haya recibido todos los elementos que se muestran a continuaci0n.
Si la lavadora sufri0 danos durante el transporte, o si falta algun elemento, comuniquese con su distribuidor
de Samsung de inmediato.
DESCRIPCION
GENERAL
DE LA LAVADORA
Encimera
Caj6n para el
deter(
_Manguera
Panel de control
Cubierta
de desag_e
de la base
Patas ajl
gLie de emergencia
del filtro
Llave inglesa
8 HnstalacOn de a avadora
Guia de la manguera
Tapones para los orificios de los
torniUos
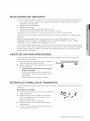
SELECCIONAR
UNA UBICACION
Antes de instalar la lavadora, seleccione una ubicacion que re0na las siguientes caracteristicas:
+ Una superficie dura y nivelada (si la superficie es irregular, consulte "Ajuste de las patas
niveladoras" ma,s adelante)
+ Alejada de la luz solar directa.
+ Ventilacion adecuada
+ Temperatura ambiente que no sea inferior a los 0 °C
+ Alejada de las fuentes de calor tales como el carbon o el gas
Aseg0rese de que la lavadora no quede apoyada sobre su cable de alimentacion.
Cuando la lavadora se instala sobre una alfombra, los orificios de ventilacion no deben quedar
obstruidos.
ESPACIO LIBRE M[NIMO PARA LA INSTALACION DEL ELECTRODOMC:STICO EN UN
GABINETE O EN UN HUECO - LATERALES 0 PULG., PARTE TRASERA 1 PULG., PARTE
SUPERIOR 2 PULG., FRENTE DEL GABINETE 0 PULG.
El frente del gabinete debe contar con dos aberturas sin obstrucciones para que ingrese el aire,
para ocupar un a,rea total combinada de al menos 72 pulg 2y deben estar ubicadas a 3 pulgadas
desde la parte superior y la inferior. Se acepta una puerta tipo persiana con aberturas para el
ingreso de aire equivalentes.
AJUSTE
DE LAS PATAS NiVELADORAS
Si el suelo esta, desnivelado, ajuste las patas (no inserte pedacitos de madera ni ning0n otto
objeto debajo de las patas):
1. Afloje el tornillo de la pata gira,ndolo con la mano
hasta que alcance la altura deseada.
2. Ajuste la tuerca de bloqueo gira,ndola con la Ilave
que se suministra.
,, Coloque la lavadora sobre una superficie
plana y resistente.
Si coloca la lavadora sobre una superficie
desnivelada o blanda, se producira,n ruidos o
vibraciones.
(S01ose permite un a,ngulo de Igrado).
RETIRAR LOS TORNILLOS
DE TRANSPORTE
Antes de utilizar la lavadora, debe quitar los cinco tornillos de transporte de la parte posterior de
la unidad.
Rata retirar
los tornillos:
1. Afloje todos los tornillos con la Ilave suministrada
antes de quitarlos.
2. Sujete cada uno de los tornillos pot la cabeza
junto con el pD,stico y tire de el a traves de la
parte ancha del orificio.
Repita el proceso para cada tornillo.
3. Cubra los orificios con los tapones de pD,stico
suministrados.
4. Conserve los tornillos de transporte en caso de
que los necesite en el futuro.
hsta+acOn de a avadora 9
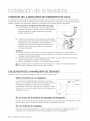
CONEXION
DE LA MANGUERA
DE SUMINISTRO
DE AGUA
La manguera de suministro de agua debe conectarse pot un extremo a la lavadora y pot el otto extremo
a la Ilave de agua. No estire la manguera de suministro de agua. Si la manguera resulta demasiado corta y
usted no desea mover la lavadora, sustituya la manguera pot otra ma,s larga de alta presion.
Para conectar
la manguera
de suministro
de agua:
1. Tome el extremo en forma de L de las mangueras de
suministro de agua y conectelo a la toma del suministro
de agua situada en la parte trasera de la lavadora.
Ajustelo manualmente.
2.
Conecte el otto extremo de la manguera de suministro
de agua fria al grifo de agua fria del fregadero y ajustelo
manualmente. Si es necesario, puede reubicar la
manguera de suministro de agua en el extremo de la
lavadora aflojando el ajuste, girando la manguera y
volviendola a ajustar.
Opcional:
1. Tome el extremo en forma de L rojo de la manguera de suministro de agua caliente y
conectelo a la toma del suministro de agua caliente roja situada en la parte trasera de la
ma,quina. Ajustelo manualmente.
2. Conecte el otto extremo de la manguera de suministro de agua caliente al grifo de agua
caliente del fregadero y ajustelo manualmente.
3. Utilice una pieza en forma de Y si s01o desea utilizar agua fria.
La
debe conectarse
Ilaves de
agua con juegos de mangueras nuevos.
No lavadora
deben utilizarse
juegos de alas
mangueras
usados.
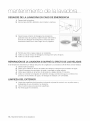
COLOCACi0N
DE LA MANGUERA
DE DESAGOE
El extremo de la manguera de desagOe puede colocarse de tres formas:
Sobre el borde de un fregadero
La manguera de desagOe debe colocarse a una altura
entre 24 y 35 pulgadas. Para mantener doblado el extremo
de salida de la manguera, utilice la guia de pla,stico
suministrada. Fije la guia a la pared con un gancho o bien
a la Ilave con una cuerda para impedir que la manguera de
desagOe se mueva.
En un brazo de la tuberia
de desaqQe
del fregadero
El brazo de la tuberia de desagOe debe estar situado pot encima del sifon del fregadero a fin de
que el extremo de la manguera quede al menos a 24 pulgadas del suelo.
En una tuberia
de desagQe
Samsung recomienda que utilice una tuberia vertical de al menos 26 pulgadas de altura; en
cualquier caso no debe tenet menos de 24 pulgadas ni ma,s de 35 pulgadas.
10 HnstalaciOn de a avadora
lavado de (]na caraa de ro >a
L_J
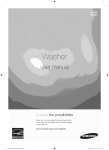
DESCRIPCi0N
GENERAL
I
DEL PANEL DE CONTROL
Towels
0
HotlWarm 0
VeryHeavy O [xtraHighO ChildLock0 DoorLock
Normal
HeavyDuty
...............................
: ..........................
:::_
............................
:.......:
...........
/ ..............................................................
© HotlCold _ Heavy
0 H_gh
Min
Mixed Load
0 --Delicates
Calm Wash-© Melody2
O WarmlCold{2 Light
_5 Low
_ RinseHold
{# Off
© ColdlCold © Very Light {} HoSpin ,_3DelayStart{_Easylron
Wool
Drain
/Handwash
Spin
Quick
Rinse+Sp
Signal
Temp.
Soil Level
Spin
Delay Start
Easy Iron
d}
@
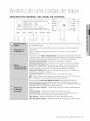
Muestra el tiempo restante de lavado, toda la informaciGn
los mensajes de error.
Presione este botGn repetidamente
del proceso
para rotar entre las opciones
de lavado y
de melodias
disponibles:
Melody1 (Melodial)
(Melodial) -> ... )
÷ Melody2
(Melodia2) ÷ OFF (Sin Sonido) ÷ Melody1
Presione el botGn Temps, {Temperatura)
para elegir las temperaturas de lavado
y enjuague La luz que se encuentra junto a la temperatura se encenderb,. Presione
el botGn repetidamente para desplazarse por las opciones de temperatura.
Hot/Warm
(Caliente/Tibia):
Prendas muy sueias qua no destiflen.
Hot/Cold
(Caliente/Fda):
Ropa blanea y prendas muy sueias que no destiflen.
Warm
arm
enjuagar con agua tibia,
ren asnoesti en.
Cuan
sese,eeeiona
o
sGIo el enjuague final se realizarb, con agua tibia. Los
demb,s enjuagues se efectuarb, n con agua fria para preservar la energia.
Warm/Cold
(Tibia/Fda): prendas moderadamente
sucias, que no destifien;
mayoria de las prendas sin arrugas.
Cold/Cold
(Fda/Fda):
prendas de colores vivos, ligeramente
la
sucias.
Cuando la temperatura del agua de lavado es inferior a 15,5 °C (60 °F), los
detergentes no se disuelven ni limpian adecuadamente.
Presione el botGn Soil Level (Nivel de Sucio) para seleccionar el nivel de
suciedad adecuado en cada carga. La luz que se encuentra junto a el botGn
Soil Level (Nivel de Sucio) se encenderb,. Presione la tecla repetidamente para
desplazarse pot las opciones de nivel de suciedad.
Very Heavy (Muy Pesado)
sucias.
Heavy
Normal
(Pesado)
(Normal)-
- Utilicela para el lavado de cargas extremadamente
- Utilicela para el lavado de cargas muy sucias.
Utilicela para el lavado de oargas moderadamente
Esta opciGn serb, la adecuada
suoias.
para la mayoria de las oargas.
Light (Ligero) - Utilioela para el lavado de oargas ligeramente suoias.
Very Light (Super Ligero) - Utilicela para el lavado de cargas muy poco sucias.
Lavado de una carga de ropa 11
Presione el botCn Spin (Centrifugar} para seleccionar la velocidad de
centrifugado adecuada en cada carga. La luz que se encuentra junto a la
velocidad de centrifugado se encenderb,. Presione la tecla repetidamente
desplazarse por las opciones de velocidad de centrifugado.
Extra High (Extra Alto): Utilicela para la ropa interior y los algodones
High (Alto): Utilicela para la ropa interior, las camisetas
y los algodones
para
resistentes.
resistentes.
Medium (Medic): Utilicela para los jeans, las prendas sin arrugas o que no
necesitan planchado, y para las telas sinteticas.
Low (Bajo):
Utilicela para las prendas delicadas que necesitan
lento debido a la tela o a la confecciCn,
secarse.
No Spin (Sin Centrifugar):
extremadamente
delicadas
Drena la lavadora sin centrifugar. Utilicela para prendas
que no puedan tolerar el centrifugado.
Presione este botCn repetidamente
retardado
disponibles
Las horas mostradas
un centrifugado
y para las prendas que se tienden para
para rotar entre las opciones
(de 2 a 24 horas en incrementos
de inicio
de una hora).
indican el tiempo del ciclo de lavado terminado.
Presione este botCn para disminuir las arrugas de las prendas delicadas, gracias
a Io cual contarb, con mb,s tiempo libre que, de Io contrario, tendria que dedicar
al planchado. Es conveniente utilizar esta funciCn con ciclos de carga Normal
(Normal), Colors (Ropa de Color), Quick (Rb,pido), Towels (Toallas), Heavy Duty
(Super Pesado) y Mixed Load (Carga Mezclada).
AI activar esta funciCn, evitarb, que los nifios utilicen la lavadora.
Para activar "Child
(Inicio/Pausa}
Mantenga
Lock (Seguro
contra
Nifios)":
Presione el botOn Start/Pause
para encender la lavadora.
presionado
el botCn Soil Level
(Nivel
de Sucio}
+ Spin (Centrifugar)
durante 2 o 3 segundos. La funciCn "Child Lock (Seguro contra Nifios)" sClo
puede activarse cuando la lavadora estb, encendida. Una vez configurada la
funciCn "Child Lock (Seguro contra Nifios)", el Onico botCn que estarb, activo
sera el POWER (ENCENDIDO).
El indicador de Child Lock (Seguro contra Nifios)
titilarb, cuando este configurado.
Para desactivar Child Lock (Seguro contra Nifios): Mantenga presionado el botCn
Soil Level (Nivel de Sucio} + Spin (Centrifugar)
durante 2 o 3 segundos. El
indicador de Child Lock (Seguro contra Nifios) se apagarb, y se desactivarb, la
funciCn.
Si los botones de la lavadora no responden, verifique que la funciCn Child
Lock (Seguro contra Nifios) no este activada.
Gire el disco para seleccionar
uno de los 14 programas
de lavado disponibles:
Normal (Normal), Colors (Ropa de Color), Perm Press (Liviano), Delicates
(Delicada), Wool (Lana), Hand wash (Lavar a Mano), Quick (Rb,pido), Rinse+Spin
(Enjuagar+Centrifugar),
Spin (Centrifugar), Drain (DesagOe), Calm Wash (Lavado
Suave), Mixed Load (Carga Mezclada),
(Toallas)
Heavy Duty (Super Pesado), Towels
PresiCnelo para detener y reiniciar los programas.
Presione el botCn Start/Pause (Inicio/Pausa) antes de colocar la ropa sucia.
PresiCnelo una vez para encender
apagar la lavadora.
la lavadora,
presiCnelo nuevamente
Si la lavadora permanece encendida durante mb,s de 10 minutos
ninguno de los botones, se apagarb, automb, ticamente.
12 Lavado de una carga de ropa
para
sin que se toque
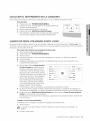
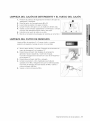
COLOCAR
EL DETERGENTE
EN LA LAVADORA
Antes de lavar prendas por primera vez, debe efectuar un ciclo completo de lavado sin ropa.
Para hacerlo:
1. Presione el boton POWER (ENCENDIDO).
2. Coloque un poco de detergente en el compartimiento @
del caj0n para detergente.
3. Abra el suministro de agua a la lavadora.
4. Presione el boton Start/Pause (Inicio/Pausa).
• Esto eliminara, cualquier resto de agua que haya quedado
en la lavadora despues de las pruebas del fabricante.
LAVADO DE ROPA UTILIZANDO
FUZZY LOGIC
Su nueva lavadora facilita el lavado de la ropa gracias al sistema de control automa,tico "Fuzzy Logic" de
Samsung. Cuando seleccione un programa de lavado, la lavadora elegira, la temperatura correcta, el tiempo
de lavado y la velocidad de lavado.
Para lavar ropa usando los programas Fuzzy Logic:
1. Abra la Ilave de agua del fregadero.
2. Presione el boton POWER (ENCENDIDO).
3. Abra la puerta.
4. Coloque las prendas una a una bien extendidas en el tambor, sin Ilenarlo demasiado.
5. Cierre la puerta.
6. Agregue el detergente, el suavizante y el detergente para lavado (sl es necesario) en el
compartimiento adecuado.
Gire el disco selector Fuzzy Control
Towels
Normal
(Control Fuzzy} para seleccionar el
HeavyDuty
Colors
programa adecuado para cada tipo
MixedLoadm
Perm
Press
de prendas. Normal (Normal), Colors
(Ropa de Color), Perm Press (Liviano),
CalmWash--o
i
-- Delicates
Delicates (Delicada), Wool (Lana), Hand
Drain
_
Wo01
wash (Lavar a Mano), Quick (R_tpido),
Spin
_/Handwash
Rinse+Spin (Enjuagar+Centrifugar),
Rinse+Spin_
_
Quick
Spin (Centrifugar), Drain (DesagOe),
Calm Wash (Lavado Suave), Mixed
Load (Carga Mezclada), Heavy Duty
(Super Pesado), Towels (Toallas).
Podra, observar que los indicadores se encienden en el panel de control.
8,
En este momento, puede controlar la temperatura de lavado, la cantidad de enjuagues, la
velocidad de centrifugado, y el tiempo de retardo presionando el bot0n de opci0n adecuado.
9. Presione el bot0n Start/Pause (Inicio/Pausa}
del disco selector Fuzzy Control (Control
Fuzzy} y comenzara, el ciclo de lavado.
El indicador de funcionamiento se iluminara, y aparecera, en la pantalla el tiempo restante del
ciclo de lavado.
7,
Cuando el ciclo haya terrninado:
AI finalizar el ciclo completo, la lavadora se apagar_t autom_tticamente.
1. Abra la puerta.
La puerta no se abrira, hasta 3 minutos despues de que la lavadora se detenga o se
apague.
2. Saque la ropa limpia.
Lavado de una carga de ropa 13
LAVADO MANUAL
DE ROPA
Se puede lavar la ropa manualmente sin usar la funci0n "Fuzzy Logic".
Para hacerlo:
1.
2.
3.
4.
5.
6.
Abra la Ilave de agua del fregadero.
Presione el bot0n POWER {ENOENDIDO} de su lavadora.
Abra la puerta.
Coloque las prendas una a una bien extendidas en el tambor, sin Ilenarlo demasiado.
Cierre la puerta.
Coloque el detergente y, si es necesario, el suavizante o lejia con cloro, en los
compartimientos adecuados.
7. Presione el bot0n Temp. ('remperatura} para seleccionar la temperatura del agua.
(Hot/Warm (Caliente/Tibia) --> Hot/Cold (Caliente/Fria) --> Warm/Warm (Tibia/Tibia) --> Warm/
Cold (Tibia/Fria) --> Cold/Cold (Fria!Fria))
8. Presione el bot0n Soil Level {Nivel de Sucio} para seleccionar el nivel de suciedad para la
carga.
(Very Heavy (Muy Pesado) --> Heavy (Pesado) --> Normal (Normal) --> Light (Ligero) --> Very
Light (Super Ligero))
9. Presione el bot0n Spin (Oentrifugar} para seleccionar la velocidad de centrifugado [Extra
high (Muy Alto) --> High (Alto) --> Medium (Medic) --> Low (Bajo) --> No Spin (Sin Centrifugar)
Parada de Enjuague].
EI
programa Mantener en remojo permite que las prendas puedan escurrirse fuera de la
lavadora.
no : No Spin (Sin centrifugado), rh : Rinse Hold (Parada de Enjuague).
10. Presione este bot0n repetidamente para rotar entre las opciones de inicio retardado
disponibles (de 2 a 24 horas en incrementos de una hora). Las horas mostradas indican el
tiempo del ciclo de lavado terminado.
11. Presione el bot0n Start/Pause
(Inicio/Pausa} y la lavadora comenzara, el ciclo de lavado.
Cuando el ciclo haya terminado:
1. Abra la puerta.
La puerta no se abrira, hasta 3 minutos despues de que la lavadora se detenga o se
apague.
2.
Saque la ropa limpia.
USO DE DELAY START (INICIO RETARDADO)
Puede hacer que la lavadora finalice automa, ticamente el lavado en otto momento, eligiendo un tiempo de
retardo de entre 2 y 24 horas (en incrementos de 1 hora). Las horas mostradas indican el tiempo del ciclo
de lavado terminado.
Para hacerlo:
1. Programe la lavadora manual o automa, ticamente para el tipo de ropa que desee lavar.
2. Presione el boton Delay Start (Inicio Retardado} hasta establecer el tiempo de retardo.
3. Presione el bot0n Start/Pause
(Inicio/Pausa}.
El indicador de Delay Start (Inicio Retardado)
se encendera, y el reloj comenzara, la cuenta regresiva hasta Ilegar a su tiempo de finalizaci0n.
4. Para cancelar el "Delay Start (Inicio Retardado)", presione el boton POWER
(ENCENDIDO}, y vuelva a encender la lavadora.
14 Lavado de una carga de ropa
SUGERENCIAS
Y CONSEJOS
DE LAVADO
Clasificaci6n de la ropa: Clasifique la ropa de acuerdo con las siguientes caracteristicas:
• Etiqueta de indicaciones del tipo de tela: Clasifique la ropa segun su composicion:
algodon, mezclas, sintetica, seda, lana y rayon.
• Color: Separe la ropa blanca de la ropa de color. Lave las prendas nuevas de color pot
separado.
TamaOo: Colocar prendas de distintos tamanos en la misma carga mejorara, la accion de
lavado.
Sensibilidad: Lave los articulos delicados pot separado, utilizando el programa de lavado
Delicate (ropa delicada) para los articulos nuevos de pura lana, de seda y cortinas. Controle
las etiquetas de los articulos que va a lavar o consulte la tabla de indicaciones de la tela que
se encuentra en el apendice.
Vaciado de bolsillos: Elementos tales como monedas, clips, etc., pueden danar la ropa, el
tambor de la lavadora y el tanque de agua.
Cierres asegurados: Cierre las cremalleras y abroche los botones o ganchos; los cinturones o
cintas sueltos deben atarse.
Consejos sobre el detergente: Debera, utilizar un detergente adecuado para cada tipo de tela
(algodon, plancha permanente, prendas delicadas, tejidos/lana), color, temperatura de lavado,
grado y tipo de suciedad. Use siempre jabon de "baja espuma", disenado para las lavadoras
automa,ticas.
Siga las recomendaciones del fabricante de la lavadora en funcion del peso de la ropa, el grado
de suciedad y la dureza del agua en su zona. Si desconoce el grado de dureza del agua de su
zona, consulte a la compania proveedora local.
_
antenga los detergentes y aditivos en un lugar seguro y seco fuera del alcance de los
ninos.
Lavado de una carga de ropa 15
DESAGOE
DE LA LAVADORA
EN CASO DE EMERGENCIA
1. Desenchufe la lavadora.
2. Abra la tapa del filtro utilizando una moneda o una Ilave.
3_
Desenrosque el tap6n del desagOe de emergencia
gira,ndolo hacia la izquierda. Sujete el tap6n del extremo
del tubo de desagOe de emergencia y tire hacia fuera
lentamente hasta que el tubo salga unos 6 pulgadas.
4. Permita que todo el agua caiga en un recipiente.
5. Vuelva a colocar el tubo de desagOe y enrosque de nuevo el tap6n.
6. Vuelva a colocar la tapa del filtro.
REPARACION DE LA LAVADORA Sl SUFRIO EL EFECTO DE LAS HELADAS
Si la temperatura desciende pot debajo del punto de congelaci0n y su lavadora sufre el efecto de las heladas:
1. Desenchufe la lavadora
2. Vierta agua caliente en la Ilave de salida para aflojar la manguera de suministro de agua.
3. Quite la manguera de suministro de agua y sumerjala en agua caliente.
4. Vierta agua caliente en el tambor de la lavadora y dejela durante 10 minutos.
5. Vuelva a conectar la manguera de suministro de agua a la Ilave de agua y controle si los
procesos de suministro de agua y de desagOe se realizan con normalidad.
LIMPIEZA
DEL EXTERIOR
1. Limpie las superficies de la lavadora, incluyendo el panel de control, con un patio suave y
detergentes de uso domestico no abrasivos.
2. Use un patio suave para secar las superficies.
3. No vierta agua en la lavadora.
16 Manten miento de a avadora
LIMPIEZA
DEL CAJON DE DETERGENTE
Y EL HUECO DEL CAJON
1. Presione la palanca de seguridad en el interior del cajon de
detergente y extra,igalo.
2. Retire el tap0n de compartimiento _ y (_.
3. Lave todas las partes con agua corriente.
4. Limpie el hueco del caj0n con un cepillo de dientes viejo.
5. Vuelva a poner el tap0n (ajusta,ndolo con firmeza) y coloque
el divisor del detergente liquido dentro del cajon.
6. Introduzca de nuevo el caj0n en su sitio.
7. Ejecute un programa de enjuague sin prendas en el tambor.
LIMPIEZA
DEL FILTRO DE RESIDUOS
Limpie el filtro de residuos 5 6 6 veces al ano, o cuando
aparezca el siguiente mensaje de error en la pantalla:
1. Abra la tapa del filtro. Consulte "DesagQe de la lavadora en
caso de emergencia" en la pa,gina 15.
2. Desenrosque el tap0n del desagQe de emergencia
gira,ndolo hacia la izquierda y vacie todo el agua.
Consulte "DesagQe de la lavadora en caso de emergencia"
en la pa,gina 15.
3. Desenrosque el tap0n del filtro y sa,quelo.
4. Limpie la suciedad u otros materiales que hubieran
quedado en el filtro. Aseg0rese de que no este bloqueada
la bomba de desagQe ubicada detra,s del filtro. Vuelva a
colocar el tap0n del filtro.
5. Vuelva a colocar la tapa del filtro.
Mantenmento
de a avadora 17
LIMPIEZA
DEL FILTRO DE MALLA DE LA MANGUERA
Debe limpiar el filtro de malla de la manguera de agua al menos
una vez pot aflo, o cuando vea el siguiente mensaje de error en
la pantalla:
Para hacerlo:
1. Cierre el suministro de agua a la lavadora.
2, Desenrosque la manguera de la parte posterior de la
lavadora.
3, Con ayuda de unas pinzas, tire suavemente del filtro de
malla del extremo de la manguera y enjua,guelo con agua
hasta que quede limpio. Limpie tambien la parte interior y
exterior del conector roscado.
4, Vuelva a introducir el filtro en su lugar.
5, Enrosque la manguera en la lavadora nuevamente.
6, Abra la Ilave y asegurese de que las conexiones sean
hermeticas.
18 Manten miento de a avadora
DE AGUA
PROBLEMAS
Y SOLUCIONES
PROBLEMA
La lavadora
no inicia
el
•
•
AsegOrese de que la puerta est# bien cerrada.
Verifique que la lavadora est# enchufada.
•
•
Compruebe que la fuente de agua est# abierta.
AsegOrese de presionar el bot6n Start/Pause
(Jnicio/Pausa).
No hay suministro de agua
o el suministro de agua es
insuficiente
•
Compruebe
•
•
•
Compruebe que la manguera de la fuente de agua no est# congelada.
Compruebe que la manguera de entrada de agua no est# doblada.
Compruebe que el filtro de la manguera de entrada de agua no este obstruido,
Queda detergente en el caj6n
despu6s de que finaJJzael
programa de lavado
La lavadora vibra o hace
demasiado ruido
•
•
AsegOrese de que la lavadora funcione con suficiente presi6n de agua.
Coloque los detergentes en las partes intemas del caj6n (alejado de los
bordes externos).
•
Compruebe que la lavadora este ubicada sobre una superficie nivelada.
Si la superficie no estb, nivelada, ajuste las patas de la lavadora para
lavado
•
nivelarla (consulte la pb,gina 8).
Asegurese de que se hayan retirado los tornillos de transporte
la pb,gina 8).
AsegOrese de que la lavadora no toque ningOn otto objeto.
•
Verifique que la carga de ropa sea equilibrada.
,,
AsegOrese de que la manguera de desagOe no est# doblada o aplastada.
Compruebe que el filtro de residuos no este obstruido (consulte la p6,gina 16).
•
La lavadora
no desagua
y/o
no centrJfuga
•
La puerta
•
no se abre
INTERPRETACi0N
que la fuente de agua est# abierta.
La puerta no se abrirb, hasta 3 minutos
detenga o se apague.
DE LOS MENSAJES
(consulte
despues de que la lavadora se
DE ERROR
Cierre la puerta.
Compruebe que la fuente de agua est# abierta.
Limpieza del filtro de malla de la manguera de agua(consulte
Controle la presi6n del agua.
la pb,gina 18).
Limpie el filtro de residuos.
AsegOrese de que la manguera de desagOe est# instalada
correctamente(consulte
la pb,gina 17).
La carga
lava una
resultado
mensaje
estb, desequilibrada;
suelte las prendas enredadas. Si s61o
prenda, como por ejemplo una bata de ba_io o unos jeans, el
del centrifugado final puede no ser satisfactorio y aparecerb, el
de error "UE" en la pantalla.
Llame al servicio posventa.
1-800-SAMSUNG(7267864)
www.samsung.com
Antes de comunicarse
con eJ servicio posventa:
1. Intente solucionar el problema (Consulte "Soluci0n de problemas" en esta pagina).
2. Repita Io que hizo antes de que el desperfecto ocurriera.
3. Si el problema persiste, Ilame al servicio posventa y describa el problema.
1-800-SAM SU NG(7267864)
www.samsung.com
Solucion de problemas 19
I
k._.#
TABLA DE PROGRAMAS
(÷ opci0n
del usuario)
i_ii_ii_ii_ii_iii
i{ ! i ii!ii{iiiiiiiiiiiiiil
i!ii!:i'ii_:iiiii!i!iiiiiiiii!i,i,i
Normal(Normal)
1200
1coo
800+
@
52
1200
1000
800+
@
5O
Perm Press (Liviano)
800
8oo
800
@
5O
Delicates
(Delieada)
800
6oo
600
@
43
(Lana)
Colors
(Ropa de Color)
400
4oo
400
@
3O
HandwaSh (Lavar a Mano)
w001
400
4oo
400
@
32
Quick (R&pido)
1200
1000
800+
@
26
Towels (Toallas)
1200
1000
800+
@
61
1200
1000
800+
@
68
800
6oo
400
@
52
@
43
Heavy
Mixed
s0il (super
Pesado)
Load (Carga Mezclada)
Calm Wash (Lavado suave)
NO SPIN
Normal (Normal)
RoDa de algod6n, ropa de cama y de mesa, ropa interior, toallas, sb.banas, etc. ligera o
mealanamen_:e sucias.
Colors
RoDa de algod6n, ropa de cama y de mesa, ropa interior, toallas, camisas, etc. ligera o
mealanamen_:e sucias.
(Ropa de Color)
Perm Press (Liviano)
Blusas. camisas, etc. ligera o medianamente sucias, de policster (diolen, trevira), poliamida
iDenon, nylon) u otros materiales similares.
Delicates
Cortinas. vestidos, polleras, camisas y blusas delicadas.
(Delicada)
Wool (Lana)
Handwash
(Lavar a Mano)
Quick (Rb.pido)
SOIc lanas lavables a mb.quina con etiqueta de garantia de pura lana virgen.
Ciclo de lavado muy suave similar al lavado manual.
RoDa de algodon, blusas y camisas de lino poco sucias, toallas de rizo de colores oscuros,
de IlnO de COlOr, jeans, etc.
a_lcuIos
Towels (Toallas)
RoDa ae bebe, ropa de cama y de mesa, ropa interior, toallas, camisas, etc. ligera o
mealanamen_e sucias.
Heavy Soil
(Super Pesado)
RoDa de algodon, ropa de cama y de mesa, ropa interior, toallas, camisas, jeans, etc.
mancnaaas o muy sucias.
Mixed Load
Una mezcla de telas de algodon y sinteticas ligeramente sucias.
(Carga Mezclada)
Calm Wash
(Lavado Suave)
Ruido :asi imperceptible durante todo el ciclo.
RoDa de algodon, ropa de cama y de mesa, ropa interior, toallas, camisas.
El consumo en las distintas casas pueden diferir de los valores indicados en la tabla debido alas
variaciones en la presi0n y temperatura del suministro de agua, la carga y el tipo de ropa.
20 _ba
de programas
TEMPERATURA
Hot/Warm
DE LAVADO/ENJUAGUE
Prendas demasiado sucias.
(Fria/Tibia)
HotJCold (Caliente/Fria)
Ropa blanca y prendas muy sucias que no destiflen.
warm/warm
Algunas prendas delicadas y que no destinen.
(Tibia/Tibia)
Warm!Cold
Cold/Cold
(Ti bia!Fria)
(Fria/Fria)
.....
Prendas de color moderadamente sucias; la mayoria de las prendas de
D,cil cuidado (EASY CARE) y de plancha permanente.
Prendas de colores vivos, ligeramente sucias; lanas lavables.
TABLA DE INDICACIONES
_
SOBRE LA TELA
Materia reslstente
Telas
aellcaaas
Se puede planchar a 302 °F como
ma,ximo
Se puede planchar a 212 °F como
ma,ximo
La _)renaa oueae lavarse a 194 °F
No planchar
La _)renaa oueae lavarse a 140 °F
No limpiar en seco
La _)renaa oueae lavarse a 104 °F
Secar en posici0n horizontal
La _)renaa oueae lavarse a 86 °F
Puede secarse colgado
Puede avarse a mano
Secar colgando de una percha
$61o _-oleza en seco
Admite secadora, temperatura
normal
A
Se oueae utlllzar lejia en agua fria
Admite secadora, temperatura
reducida
A
No asar ejla
No secar en secadora
"_:_
Se Dueae olancnar a 392 °F como
maxlmo
a,p nctce
ADVERTENCIAS
ELi CTRICAS
Para reducir el riesgo de incendio, descarga electrica y otras lesiones, tome las siguientes precauciones:
• Utilice la lavadora unicamente con el tipo de fuente de alimentacion que se indica en la etiqueta de
caracteristicas tecnicas.
Si no esta, seguro del tipo de alimentacion de su vivienda, consulte al distribuidor del electrodomestico o
a la compania de suministro electrico local.
Utilice unicamente un tomacorriente conectado a tierra.
Proteja el cable de alimentacion. Los cables de suministro electrico deben colocarse con cuidado para
que no se pisen ni queden aplastados pot objetos colocados sobre ellos o apoyados contra ellos.
Preste especial atencion a las condiciones del cable junto a los enchufes, los tomacorrientes y el punto
donde el cable sale de la unidad.
No sobrecargue el tomacorriente o los cables prolongadores. La sobrecarga puede provocar un
incendio o una descarga electrica. (AC120V 15AMR)
PROTECCION
DEL MEDIO AMBIENTE
Este electrodomestico se fabrica con materiales reciclables. Si decide desechar este electrodomestico,
siga la normativa local relacionada con la eliminacion de desechos. Corte el cable de alimentacion para
que el electrodomestico no pueda conectarse a una fuente de alimentacion. Quite la puerta para que
los animales y los ninos pequenos no puedan quedar atrapados dentro del electrodomestico.
No utilice cantidades de detergente mayores a las recomendadas pot el fabricante del detergente.
Utilice productos quitamanchas y lejias antes del ciclo de lavado y sOlo cuando sea estrictamente
necesario.
Ahorre agua y electricidad utilizando la capacidad total de la lavadora (la cantidad exacta depende del
programa que se utilice).
ESPECi FICACIO N ES
WF-B1254/B1054/B854
WF-J 1254/J1054/J854
DIMENSIONES
W23.54 x D21.65 x H33.23 pulgadas
PRESION DEL AGUA
50 kPa - 800 kPa
PESO NETO
71.0 kg
PESO DEL
EM BALAJ E
PAPEL
PLASTIOO
REVOLUClON
DEL
CENTRIFUGADO
MODELO
22 Apend ce
W23.54 x D23.62 x H33.23 pulgadas
rpm
2.5 kg
1.0 kg
WF-J1254/B1254
1200
WF-J1054/B1054
1000
WF-J854/B854
800
INFORMACi0N
SOBRE LA GARANTiA
Garantia
para el comprador
limitada
original
Este producto Samsung esta, garantizado pot Samsung Electronics America, Inc. (en adelante denominada
Samsung) contra defectos de fabricaci0n de los materiales o la mano de obra durante los siguientes
periodos:
Mano de obra: 1 ano (a domicilio)
Piezas: 1 ano
Asimismo, Samsung garantiza que si este producto no funciona adecuadamente dentro del perbdo de la
garantia especificado y la falla se debe a una mano de obra inapropiada o a material defectuoso, Samsung
reparara, o reemplazara, el producto a su discrecion.
Todas las reparaciones o los reemplazos de piezas en Wtud de la garantia debera,n estar a cargo de
un Centro de Servicio Tecnico Autorizado de Samsung. (Para Iocalizar el Centro de Servicio Tecnico de
Samsung, Ilame al 1-800-SAMSUNG o visite nuestro sitio Web en www.samsung.com.)
Obligaci6n
para el comprador
original
El cliente debe conservar el recibo de venta original fechado, este documento constituye la unica prueba
de compra aceptable. Se la debe presentar ante el Centro de Servicio Tecnico Autorizado de Samsung en
el momento en que se solicite el servicio tecnico antes de que se brinden los servicios de la garantia. Para
todos los modelos que se puedan transportar, el transporte hacia y desde el Centro de Servicio Tecnico
Autorizado es responsabilidad del cliente.
Exclusiones
de la garantia
Esta garantia no cubre danos debido a accidente, incendio, inundaci0n y/u otros casos de fuerza mayor,
uso incorrecto, voltaje de la linea incorrecto, instalaci0n inadecuada, reparaciones inadecuadas o no
autorizadas, uso comercial, o da_os que surjan durante el envio. Los ajustes del cliente que se explican en
este manual del usuario no esta,n cubiertos pot los terminos de esta garantia. Esta garantia quedara, nula
automa,ticamente para toda unidad cuyo numero de serie faltare o fuere alterado. Esta garantia es va,lida
exclusivamente para los productos adquiridos y usados en Estados Unidos.
SAMSUNG
ELECTRONICS
DECLARACION
DE LA GARANTiA
LIMITADA
NORTEAMERICANA
Sujeto a los requisitos, condiciones, exclusiones y limitaciones de la Garantia limitada original que se
extiende junto con los productos Samsung Electronics (SAMSUNG), y los requisitos, condiciones,
exclusiones y limitaciones contenidos en el presente documento, SAMSUNG ofrecer& asimismo, Servicio
de Reparaci0n Garantizado en los Estados Unidos para los productos SAMSUNG adquiridos en Canada,,
yen Canada, para los productos SAMSUNG adquiridos en los Estados Unidos, durante el periodo de la
garantia especificado originalmente y para el Comprador Original unicamente.
Las reparaciones garantizadas descritas ma,s arriba sera,n efectuadas pot un Centro de Servicio Tecnico
Autorizado de SAMSUNG. En el Centro de Servicio Tecnico, junto con esta Declaraci0n, se debera,
presentar la Declaraci0n de la Garantia limitada original y la Factura fechada como Prueba de compra. El
transporte hacia y desde el Centro de Servicio Tecnico es responsabilidad del comprador.
Las condiciones cubiertas se limitan exclusivamente a los defectos de fabricaci0n de los materiales o de la
mano de obra, y exclusivamente a aquellos encontrados durante el uso normal del producto.
Quedan excluidas, aunque no en cara,cter taxativo, todas las previsiones especificadas originalmente para
servicios tecnicos a domicilio o in-situ, tiempos de reparaci0n minimos y ma,ximos, cambios o reemplazos,
accesorios, opciones, mejoras o insumos.
Para conocer la ubicaci0n de un Centro de Servicio Tecnico Autorizado de SAMSUNG, Ilame a la linea
gratuita:
En los Estados Unidos: I=800=SAMSUNG
En Canada: 1-800-SAMSUNG
(1-800-726-7864}
sTIENE ALGUNA PREGUNTA O ALGON COMENTARIO?
Codigo N. ° DC68-O2455C_MES