1
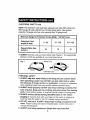
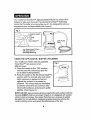
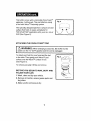
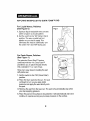
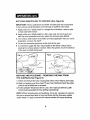
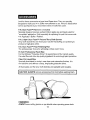
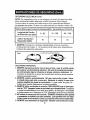
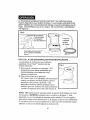
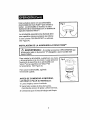
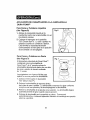
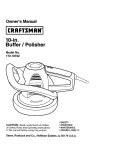
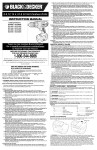
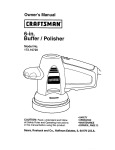
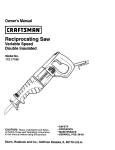
Owner's Manual
Smart Start
TM
4-in. Applicator/
Buffer / Polisher
Model No.
146.107190
CAUTION:
Read, understand and follow
all Safety Rules and Operating Instructions
in this manual before using this product.
•
•
•
•
SAFETY
OPERATION
MAINTENANCE
ESPANOL
Sears, Roebuck and Co., Hoffman Estates, IL 60179 U.S.A.
4-17-01
Safety Instructions .....................................
Operation ...................................................
Maintenance ..............................................
Warranty. ....................................................
Accessories ..............................................
Repair Service, Maintenance Agreement
Phone Numbers ........................................
SAVE THESE INSTRUCTIONS!
READ ALL INSTRUCTIONS!
2
Pages
Pages
Page
Page
Page
3-5
6-9
10
10
11
Page
12
I
I
Failure to follow all instructions listed below may result in electricl
WARNING:
BE SUREpersonal
to read and
understand all instructions. I|
shock,
fire and/or serious
injury.
I
I
WORK AREA SAFETY
1. ALWAYS keep your work area clean and well lit. Cluttered benches and
dark areas invite accidents.
2. DO NOT operate power tools in explosive atmospheres, such as in the
presence of flammable liquids, gases, or dust. Power toolscreate sparks
which may ignite the dust or fumes.
3. ALWAYS keep bystanders, children, and visitors away while operating
a power tool. Distractions can cause you to lose control.
ELECTRICAL
SAFETY
1. Double insulated tools are equipped with a polarized plug (one blade
is wider than the other.)This plug will fit in a polarized outlet only one
way. If the plug does not fit fully in the outlet, reverse the plug. If it still
does not fit, contact a qualified electrician to install a polarized outlet.
DO NOT change the plug in any way.
2. Double insulation [] eliminates the need for the three wire grounded power
cord and grounded power supply system. Applicable only to Class II
(double insulated) tools.
3. ALWAYS avoid body contact with grounded surfaces such as pipes,
radiators, ranges and refrigerators. There is an increased risk of electric
shock if your body is grounded.
4. DO NOT expose power tools to rain or wet conditions. Water entering
a power tool will increase the risk of electric shock.
5. DO NOT abuse the cord. Never use the cord to carry the tools or pull
the plug from an outlet. Keep cord away from heat, oil, sharp edges or
moving parts. Replace damaged cords immediately. Damaged cords
increase the risk of electric shock.
6.When operating a power tool outside, ALWAYS use an outdoor
extension cord marked "W-A" or "W". These cords are rated for outdoor
use and reduce the risk of electric shock.
3
ELECTRICAL SAFETY cont.
NOTE: The extension cord must have adequate wire size AWG (American
Wire Gauge) for safe, efficient use. Smaller gauge wires, have greater
capacity (16 gauge wire has more capacity than 18 gauge wire).
Minimum Gauge for Extension Cords (AWG) - 120 VAC Tools
Extension Cord
length (in feet)
0 - 50
51 - 100
101 - 150
16
14
12
Required Wire Size
(A.W.G.)
7. ALWAYS connect cords as shown below (See Figure 1). The appropriate
extension cords are available at your local Sears stores,
Fig. 1
Power Cord
xtentio_
PERSONAL
SAFETY
1. ALWAYS stay alert, watch what you are doing and use common sense
when operating a power tool. DO NOT use tool while tired or under
the influence of drugs, alcohol, or medication. A moment of inattention
while operating power tools may result in serious personal injury.
2. ALWAYS dress properly. DO NOT wear loose clothing
or jewelry. Pull
back long hair. Keep your hair, clothing, and gloves away from moving
parts. Loose clothes, jewelry, or long hair can be caught in moving parts.
3. ALWAYS avoid accidental starting. BE SURE switch is "Off" before
plugging in. Carrying tools with your finger on the switch or plugging in
tools that have the switch in the "On" position invites accidents.
4. DO NOT overreach. ALWAYS keep proper footing and balance at all
times. Proper footing and balance enables better control of the tool in
unexpected situations.
5. ALWAYS use safety
equipment.
Always
4
wear eye protection.
TOOL USE AND CARE SAFETY
1. DO NOT force the tool. Use the correct tool for your application.
The correct tool will do the job better and safer at the rate for
which it is designed.
2. DO NOT use the tool if the switch does not turn it "On" or "Off". Any
tool that cannot be controlled with the switch is dangerous and must
be repaired.
3. ALWAYS disconnect
the plug from the power source before making any
adjustments,
changing accessories
or storing the tool. Such preventive
safety measures reduce the risk of starting the tool accidentally.
4. ALWAYS store idle tools out of the reach of children and other
untrained
persons.
Tools are dangerous
in the hands of untrained users.
5. ALWAYS check for misalignment
or binding of moving parts, breakage
of parts, and any other condition
that may affect the tool's operation.
If damaged, have the tool serviced before using. Many accidents are
caused by poorly maintained tools.
I
USE OF ACCESSORIES THAT ARE NOT RECOMMENDED FOR USE
WARNING:
WITH
THIS TOOL MAY CREATE A HAZARDOUS CONDITION.
6. ALWAYS use only the Craftsman accessories
that are recommended
for this tool. Accessories that may be suitable for one tool can become
hazardous when used on another tool.
SERVICE SAFETY
1. Tool service must be performed only by Sears or other qualified repair
personnel. Service or maintenance performed by unqualified personnel
could result in a risk of injury.
2. When servicing a tool, ALWAYS use only identical replacement parts.
Follow instructions in the maintenance section of this manual. Use of
unauthorized
parts may create a risk of electric shock or injury.
SYMBOLS The following symbols appear on the label of your tool
V ...........................................................................
volts
A ...........................................................................
amps
Hz .........................................................................
hertz
........................................................................
alternating current
no ........................................................................
no-load speed
[] ........................................................................
double insulated
IMPORTANT! READ ALL INSTRUCTIONS!
5
Your CraftsmanSmartStartTM Applicator/Buffer/Polisher
has many built-in
features to make your job easier. The patented SmartStart TM technology
means that '"[he buffer only works when you do". It is designed for safe use,
high performance and dependability (See Figure 2).
Fig. 2
-_-_
/ 3-Position Switch
_!O(%(SmartStart
- I
SS
4-in. Dura FoamTi
with easy Velcro TM
attachin_detaching
USING THE APPLICATOR
TM)
_
__---_
_-_
_
"
Pad--._
_
'_lO-ft
C-orci P°wer
/
_
-'-'-- I
L..
/ BUFFER / POLISHER
Your Craftsman Buffer with the patented
SmartStart TM will operate in two
different ways:
1. Press the switch to the "ON" position
and the pad will continously spin like
on all other buffer/polishers.
2. Press the switch to the SS (Smart Start TM)
position and the tool will only work when
slight pressure is applied to the tool
against the surface to be waxed or
polished. This unique feature eliminates
accidental starts that are common with
other buffer/polishers and prevents polish
splatter. (See Figure 3.)
NOTE: DO NOT apply excessive pressure against the work surface with this
tool and ALWAYS hold tool as shown in figure 3. It is designed with random
orbital motion technology. This means that when less pressure is applied,
the better the tool will perform. Applying excessive pressure will slow the
random orbiting motion and reduce the effectiveness of the tool.
6
This buffer comes with a removable
Dura Foam
TM
applicator / buffing pad. This pad attaches easily
to tool with Velcro TM fastening system.
The specially designed pad has a unique concave
surface that holds in waxes and glazes for
"NO SPLATTER" application onto your car, van or
SUV (See Figure 4).
ATTACHINGTHE
I
DURA
FOAM
TM
PAD
When position
changingandaccessories,
BE SURE that the
switchWARNING:
is in the "O" (OFF)
the cord is unplugged.
To attach pad, hold it in one hand and the tool
in the other. Then gently push Velcro TM pad
surface onto the Velcro TM surface of tool.
(See Figure 5).
To remove pad, grip it firmly and remove.
BEFOREYOU
BEGIN TO WAX, BUFF AND
POLISH YOUR CAR:
1. Wash, clean and dry your vehicle.
2. Remove all road tar, excess grease spots and
bug stains.
3. Make sure the work area is dry.
7
I
APPLYING
WAX/POLISH
For Liquid Waxes,
(See Figure 6)
TO DURA
FOAM
TM
PAD
Polishes
1. Squeeze liquid wax/polish onto concave
center of pad in a circular pattern.
2. Set the switch to the "SS" (Smart Start)
position. The wax or polish will not
splatter as you start to apply. This
eliminates the need to continually turn
the switch "On" and "Off" during use.
For Paste Waxes, Polishes
(See Figure 7)
The patented Smart Start TM feature
combined with the 4-in. Dura Foam TM
pad allows you to place the pad directly
into a standard 11-oz. can of wax.
Here are 4 easy steps to loading the pad
with paste wax:
1. Set the switch to the "SS" (Smart Start)
position.
2. Place the foam pad into the can. The pad
will begin to turn as you apply slight
pressure and apply the wax directly onto
the pad.
3. Remove the pad from the wax can. The pad will automatically stop when
you stop applying pressure.
4. Place the pad on the surface to be polished. It will automatically start and
continue to operate as long as you keep pressure on the surface.
8
APPLYING
WAX/POLISH
TO SURFACE
(See Figure
8)
IMPORTANT: Read, understand and follow all safety and user instructions
in this manual and all directions and warnings on polishes and waxes.
1. Apply paste wax / liquid polish in a straight line with either a side-to-side
or back-and-forth motion.
2. Apply past¢ wax / liquid polish in a thin, even coat. Too much does not
add any more protection and only makes the removal more difficult.
3. The random orbit motion of the buffer provides applicatien that can not be
duplicated, not even "by hand".
4. Do not use excessive pressure, let the tool do the work.
5. It is easiest to apply the wax / liquid polish to the entire surface before
starting the removal phase, however, follow the specific recommendations
of the wax or polish being used.
BUFFING
AND POLISHING
THE SURFACE
- REMOVING
THE WAX FROM
(See Figure 9)
1. Polish and remove the wax / liquid polish when it has dried to even haze.
2. Wash out and dry your Dura Foam TM pad. Then "Buff and Polish" the entire
surface until all dried wax is removed.
3. For the ultimate "Showroom Shine", use a 6-in. foam pad with terry cloth
bonnet (sold separately) for final buffing and polishing.
NOTE: When removing wax and polishing, it may be necessary to remove
the pad or bonnet from time to time and shake out the dried wax residue
and/or wash it. A pad or bonnet with excess residue will cause streaking.
9
Clean 4-in. buffer with a soft, damp cloth. NEVER use commercial solvents
when cleaning the buffer because they can damage plastic parts.
Z_ WARNING:
NEVER allow brake fluids, gasoline, petroleum-based
products, penetrating oils or any other such product to come into contact
with plastic parts. They contain chemicals that can damage, weaken
or destroy plastic.
I foam
Z_ WARNING:
DO NOT
immerse
the buffer
water. Remove the
pads and terry cloth
bonnets
and wash
them inseparately.
CLEANING
ACCESSORIES
The Dura Foam TM pads and terry cloth polishing bonnets are washable and
reusable. Simply remove them from buffer and wash them in warm water
with a mild detergent and air dry.
FULL ONE YEAR WARRANTY ON CRAFTSMAN SMART STARTTM
APPLICATOR / BUFFER / POLISHER
If this CRAFTSMAN Applicator/Buffer/Polisher fails to givecomplete
satisfaction within one year from the date of purchase, RETURN ITTO
THE NEAREST SEARS STORE IN THE UNITED STATES, and Sears
will replace it, free of charge.
If this CRAFTSMAN Applicator/Buffer/Polisher is used for commercialor
rental purposes, this warrantyappliesfor only90 days from the date of
purchase.This warranty gives you specific legal rights and you may also
have other rights,whichvary from state to state.
Sears, Roebuck and Co., Dept. 817 WA, Hoffman Estates, IL 60179
10
I
Look for these accessories at your local Sears store. They are specially
designed to make your 4-in. Buffer more efficient to use. All items listed below
"can be purchased at your local Sears store or Craftsman outlet.
4-In. Dura Foam TM Pad (One is included)
Specially designed concave surface holds in paste wax and liquid polish for
"no splatter" application. Sold separately for replacing the pad that comes with
4-in. Applicator / Buffer / Polisher.
6-In. 2-layer Dura Foam TM Pad and Terry Cloth Bonnet
Terry cloth bonnet fits over foam pad. Use for final buffing and polishing to
produce a high-gloss shine.
6-In. Dura Foam
The professionals'
Hi-Tech
TM
Final Polishing
Pad
choice for achieving a "show room" shine.
Professional
Paste Wax
For the Ultimate "Protective Shine"! A special blend of the highest quality
Carnuba Wax and other top-quality ingredients for extra tough paint protection.
Clear Pro Liquid Wax
Specially formulated for today's new clear-coat automotive finishes. It is
non-abrasive and delivers a deep, long-lasting protective shine.
All foam pads and the terry cloth bonnets are washable and reusable.
I CAUTION: ALWAYS remove accessories from tool before washing them.
REMEMBER:
ALWAYS wear safety glasses or eye shields when operating power tools.
11
I
Get it fixed, at your home or ours!
For repair of major brand appliances
in your own home...
no matter who made it, no matter who sold it!
1-800-4-MY-HOME
sMAnytime,
day or night
(1-800-.469-4663)
www.sears,com
To bring in products such as vacuums,
lawn equipment and electronics for repair, call for
the location of your nearest Sears Parts & Repair Center.
1-800-488-1222
Aoytime,
dayo_ night
www.sears.com
For the replacement pads, accessories and owner s manuals
that you need to do-it-yourself,
call Sears PartsDirect
sM!
1-800-366-PART
6am- 11pm CST,
(1-800-366-7278)
7 days a week
www.sears.condpartsdirect
To purchase
or inquire about a Sears Service Agreement:
1-800-827-6655
7 a.m. - 5 p.m. CST, Mort. - Sat.
Para pedir servicio de reparacion a domicilio,
y para ordenar piezas con entrega a domicilio:
1-888-SU-HOGAR
s_
Au Canada pour service en fran£;ais:
1-877-LE-FOYER
"_"
(1-877-533-6937)
(1-888-784-6427)
SEARS !
H°meCentral_
© Sears, Roebu<)x and Co.
® Registered Trademark ! rM Trademark of Sea_s, Roebuck atld Co.
Marca Registrada / T,_ Marca de F_bdca de Sears, Roebuck and Co.
12
Manual de Operaci6n
Smart Start tM
Enceradora/Lustradora/
Pulidora de 4"
• SEGURIDAD
• OPERACION
• MANTENIMIENTO
CUIDADO:
Leer, entender y seguir todas
las Reglas de Seguridad e Instrucciones de
Operaci6n de este Manual antes de utilizar
este artefacto.
Sears,
Roebuck-and
4-17-01
Modelo No.
146.107190
Ce.,-_bq_[_,Slta_._O!_0L]
d3
7_JeJq!qo],/_doo
p,oeEI d3
,
I
P,OeEI/Qe]qF!
79 U.S.A.
Instrucciones de Seguridad ........................
Operaci6n ...................................................
Mantenimiento ............................................
Garantfa ......................................................
Accesorios .................................................
NQmeros de Tel6fono para Servicio de
Reparaciones, y Contratos
de Mantenimiento ..................................
P&ginas
P_,ginas
P__gina
Pagina
P&gina
3-5
6-9
10
10
11
P_,gina
12
iCONSERVAR ESTAS INSTRUCCIONES!
iLEER TODAS LAS INSTRUCCIONES!
2
ADVERTENCIA:
ASEGURARSE DE: Leer y entender todas
las instrucciones. Si no se siguen todas las instrucciones indicadas
a continuacien se p0dr_a producir choques eldctricos, incendios y/o
lesiones personales serias.
SEGURIDAD
EN EL AREA DETRABAJO
1. Siempre mantener el _rea de trabajo limpia y bien iluminada. Las
mesas de trabajo y las areas oscuras propician los accidentes,
2. NO operar herramientas
el_ctricas en ambientes explosives,
tales
come en la presencia de liquidos, gases o pelves inflamables.
Las
herramientas electricas pueden generar chispas que enciendan el
polvo o los gases.
3. SlEMPRE mantener a los espectadores,
niSos y visitantes
alejados
de las herramientas
el6ctricas cuando se operan. Las distracciones
pueden causar la perdida de control.
SEGURIDAD
ELI_CTRICA
1. Las herramientas
con doble aislamiento estan equipadas con
enchufes polarizados (una espiga m_s ancha que la otra). Este
enchufe encajara en un tomacorriente polarizado _nicamente
en una
forma. Si el enchufe no encaia completamente en el tomacorriente,
invertir el enchufe. Si aun asi no encaia, contactese con un electricista
calificado para que instale un tomacorriente polarizado.
NO cambiar
el enchufe ni modificarlo en forma alguna.
2. El aislamiento doble o elimina la necesidad de tener un cordon de
suministro electrico de tres alambres y un sistema de suministro con
conexion a tierra. Aplicable unicamente a tas herramientas de la
clase II (doble aislamiento).
3. SIEMPRE evitar contacto del cuerpo con las superficies
eonectadas
a tierra tales come tubenas, radiadores, estufas y refrigeradores.
Existe un mayor riesgo de cheque electrico cuando su cuerpo est6 en
contacto a tierra.
4. NO exponer las herramientas
electricas a la Iluvia ni a condiciones
mojadas. El agua que ingrese en las herramientas electricas
incrementara_ el riesgo de cheque electrico.
5. NO maltratar el cordon. Nunca usar el cordon para cargar la herramienta
o para desconectar el enchufe del tomacorriente. Mantener el cord6n
alejado de las fuentes de calor, aceite, bordes filosos o piezas movibles.
Reemplazar inmediatamente los cordones daSados. Los cordones
da_ados incrementan el riesgo de cheque electrieo.
6. Cuando se opere una herramienta
electrica en ambientes exteriores,
SIEMPRE usar un cordon de extensi6n
para exteriores que tenga la
marca "W-A" o "W". Estos cordones estan certificados para use en
exteriores y reducen el riesgo de choque electrico.
3
SEGURIDAD
ELI_CTRICA
(Cont.)
NOTA: Por seguridad y para un uso eficiente, el cordon de extensidn debe
tener atambre del calibre adecuado a AWG (American Wire Gauge).
Cuanto menor el numero del calibre mayor es la capacidad del alambre
un atambre de calibre 16 tiene m_.s capacidad que un alambre calibre 18).
CalibresMinimosparaCordonesde Extensi6n(AWG)- Herramientasde 120 V de CA
Longitud del Cordon
de Extensi6n (en pies)
Calibre de Alambre
Requerido (AWG)
0- 50
51 - 100
101 - 150
16
14
12
7. SIEMPRE conectar los cordones amarra, ndolos como se muestra a
continuaci6n (Ver Figura 1). Su tienda local de Sears tiene disponible los
cordones de extensi6n adecuados.
Cordon de Suministro Electrico
Fig. 1
_ord6n
d_
SEGURIDAD PERSONAL
1. SlEMPRE mantenerse alerta, mirar Io que se hace y usar el sentido comt]n
para operar una herramienta el_ctrica. NO usar la herramienta mientras
se est_ cansado, bajo la influencia de drogas, alcohol o medicinas. Un
momento de distracci6n al operar las herramientas electricas puede causarle
lesiones personales serias.
2. SlEMPRE vestirse apropiadamente. NO usar ropa suelta ni joyas. Echar
el cabello largo para atras y amarrarlo. Mantener el cabello, la ropa y los
guantes alejados de piezas en movimiento. La ropa suelta, las joyas y el
cabello largo pueden atraparse en las piezas movibles.
3. SIEMPRE evitar accidentes al arrancar. CERClORARSE que el interruptor
est_ en "OFF" (apagado) antes de enchufarlo en el tomacorriente. Transportar
o cargar las herramientas con el dedo en el gatillo o el interruptor o enchufadas
al tomacorriente con el interruptor en "ON" (encendido) propician los accidentes.
4. NO estirar el cuerpo m_s de la cuenta. SlEMPRE mantenerse bien parado
y guardando el equilibrio en todo momento. Esto permite tener un rnejor
control sobre la herramienta cuandose presentan situaciones inesperadas.
5. SlEMPRE usar elementos de seguridad. Siempre usar proteccion ocular.
4
SEGURIDAD EN EL USOY CUIDADO DE LA HERRAMIENTA
1. NO forzar la herramienta. Use la herramienta correcta para el trabajo
que realice. La herramienta adecuada hara un trabaje mejor, m&s seguro y
a la velocidad para la cual fue dise_ada.
2. NO usar la herramienta si es que el interruptor no la puede encender
o apagar. Toda herramienta que no pueda controlarse con su interruptor
o gatillo, es peligrosa y debe repararse.
3. SIEMPRE desconectar el enchufe del tomacorriente antes de hacer
cualquier ajuste, cambio de accesorios o de guardar la herramienta.
Estas medidas preventivas de seguridacl reducen el riesgo de un arranque
accidental de la herramienta.
4. SlEMPRE guardar las herramientas que no est_n en uso fuera del
alcance de los niSos y de otras personas no entrenadas para su uso.
Las herramientas son peligrosas en manos de usuarios no entrenados.
5. SIEMPRE revisar la herramienta para detectar desaliniamientos,
piezas movibles pegadas, piezas rotas o cualquier otra condici6n que
pueda afectar la operacibn de la herramienta. Si estuviese daSada,
reparar la herramienta antes de usarla. Muchos accidentes se producen
debido a herramientas mal mantenidas.
I
ADVERTENCIA
ELusoDEAOCESOR,OS
PUEDE CREAR CONDICIONES
ENESTA
HERRAMIENTA
DE RIESGO.
QUE NO ESTEN RECOMENDADOS
6. SlEMPRE usar s61o accesorios
Craftsman que est&n recomendados
para la herramienta.
Los accesorios adecuados para una herramienta
pueden convertirse en peligrosos cuando se usen en otra herramienta.
SEGURIDAD EN EL SERVlClO
1. Alas herramientas
s61o debe darle servicio de mantenimiento
el
personal de Sears u otro personal de reparaciones
calificado.
El servicio de mantenimiento efectuado por personal no calificado puede
generar riesgos de lesiones personales.
2. AI darle servicio a una herramienta,
SlEMPRE usar solo repuestos
id_nticos.
Siga las instrucciones
en la secci6n de mantenimiento
de este manual. El uso de repuestos no autofizados puede generar
riesgos de choque el6ctrico o lesiones personales.
SiMBOLOS:
Los siguientes simbolos aparecen en la etiqueta de su herramienta.
V ...........................................................................
voltios
A ...........................................................................
amperios
Hz .........................................................................
hertzios
........................................................................
corriente alterna
no ........................................................................
velocidad sin carga
[] ........................................................................
doble aislamieto
ilMPORTANTE! iLEER TODAS LAS INSTRUCCIONESt
5
La Enceradora/Lustradora/Pulidora Smart Start TM de Craftsman incluye
muchos dispositivos que facilitan el trabajo. La tecnologfa f)atentada Smart
Start TM significa que "la lustradora sSIo trabajara cuando usted quiera que Io
haga". Esta diseSada para un uso seguro, alto rendimiento y confiabilidad
(Ver figura 2).
USO
DE LA ENCERADORNLUSTRADORAJPULIDORA
La lustradora de Craftsman con el sistema
patentado Smart Start TM funciona de dos
formas diferentes:
1. Moviendo el interruptor a la posicion "ON"
(encendido) para que !a almohadilla gire
constantemente como todas las otras
lustradorasipulidoras.
2. Con el interr-_ptor en la posicion
SS (Smart Start'") la lustradora solo funcionara
cuando se aplique una leve presion sobre la
superficie a encerarse o lustrarse. Este
dispositivo exclusivo elimina arranques accidentales que son comunes en otras lustradoras
y evitan el salpicado de la cera. (Ver Figura 3).
NOTA: NO aplicar presion excesiva sobre la superficie de trabajo con esta
herramienta y SIEMPRE sujetarla como se indica en la figura 3. Est,,
diseSada con una tecnologfa de rotacion orbital aleatoria, to cual significa
que cuanto menor sea la presion que se le aplique mejor sera su rendimiento.
Si se aplica presion excesiva disminuira, la veloc_dad del movimiento orbital
aleatorio y reducira la efectividad de la herramienta.
6
Esta lustradoraviene con una almohadilla
desmontable de Dura FoamTM para encerar y
lustrar. La almohadilla se instala y se saca
f__cilmentede la herramienta con un sistema de
sujeci6n mediante Velcro TM.
La almohadilla especialmente diseSada tiene
una superficie c6ncava exclusiva que retiene
la cera y lustra "SIN SALPICAR" su vehiculo
(Ver Figura 4).
INSTALACION
I
DE LA ALMOHADILLA
DURA FOAM
TM
el interruptor este en la posicion "O" (Apagado) y que el cord6n est_
ADVERTENCIA: A_cambiar accesorios CERCIORARSEque
desenchufado.
Para instalar la almohadiUa, sujetarla en una mano
y la herramienta en la otra mano. Luego presionar
levemente la superficie de la almohadilla con
Velcro TM en la superficie con Velcro TM de
la herramienta. (Ver Figura 5).
Para sacar la almohadilla, agarrela
firmemente y j_,lela.
ANTES DE COMENZAR
A ENCERAR,
LUSTRAR
O PULIR SU VEHiCULO:
1. Lavar, lirnpiar y secar el vehiculo.
2. Sacar todo residuo de brea de la pista,
manchas de exceso de grasa y otras manchas.
3. Cerciorarse
que el a_reade trabajo este limpia.
7
Fig 5_
I
APLICACION
DURA
DE CERAJPULIDOR
FOAM
A LA ALMOHADILLA
TM
Para Ceras y Pulidores
(Ver Figura 6)
Liquidos
1. Aplique la ceraJpulidor liquido en la
cavidad del centro de la almohadilla con un
movimiento circular.
2. Coloque el interruptor en la posici6n
"SS" (Smart StartT_). La cera o pulidor no
salpicargt cuando se comience a aplicar.
Esto elimina la necesidad de mover
continuamente el interruptor de la posici6n
de encendido a la de apagado.
Para Ceras
(Ver Figura
y Pulidores
7)
en Pasta
El dispositivo patentado de Smart Start TM
combinado con la almohadilta de
Dura Foam TM de 4" permite colocar la
almohadilla directamente dentro de una lata
de cera o pulidor de tama5o est_ndar
de 11 onzas,
Los siguientes son 4 pasos fAciles para
aplicar la cera en pasta a la almohadilla:
1. Colocar el interruptor en la posici6n
"SS" (Smart StartTM).
2. Colocar la almohadilla de espuma dentro
de la tata de cera o pulidor, La almohadilla comenzara a girar conforme
se aplica una leve presi6n y la cera impregnar_, la almohadilla.
3. Retirar la almohadilla de la lata de cera o pulidor. La almohadilla
autom_,ticamente de girar cuando cese la presion.
dejara
4. Coloque la almohadilla en la superficie a putirse. Comenzarb,
automa,ticamente y continuara operando mientras se mantenga una presion
sobre la superficie.
8
APLICACION
DE CERA/PULIDOR
A UNA SUPERFICIE
(Ver Figura 8)
IMPORTANTE: Leer, entender y seguir todas las instrucciones de
seguridad y de operaci6n en este manual y todas las instrucciones y
advertencias en los productos pulidores o ceras.
1. Aplique la cera o pulidor en pasta o liquido en una linea recta ya sea
con un movimiento de lado a lado o de adelante hacia atr_,s.
2. El pulidor o cera en pasta o liquido debe aplicarse en capas delgadas y
uniformes. El exceso de cera no agrega protecci6n adicional y s61o
dificulta ma_ssu remoci6n.
3. El movimiento orbital aleatorio de la unidad provee una aplicaci6n que
no puede igualarse, ni siquiera a mane.
4. No aplique presi6n excesiva. Permita que la herramienta haga su trabajo.
5. Es m&s f_cil aplicar la cera o pulidor liquido a toda la superficie antes
de comenzar la fase de pulido; sin embargo, siga las recomendaciones
indicadas por el fabricante de la cera o pulidor.
PULIDOY
SUPERFICIE
LUSTRADO(Ver Figura
REMOCION
DE LA CERA
DE LA
9)
1. Pulir la cera o pulidor liquido cuando se haya secado hasta opacarlo en
forma pareja.
2. Lavar y secar la almohadilla de Dura Foam. Luego pulir toda la superficie
hasta sacar toda la cera seca.
3. Para Iograr un brillo digno de "Sal6n de Exhibici6n" use una almohadilla
de 6 pulgadas con un bonete de tela de felpa (se vende por separado)
para Iograr un pulido y lustrado final.
NOTA: Cuando se pule y se remueve la cera, puede set necesario sacar la
almohadilla o bonete de tiempo en tiempo y sacudirlo para eliminar los
residuos de cera seca y/o lavarlo. Una almohadilla o bonete con exceso
de residuos de cera dejara huellas al lustrar.
9
Limpie la lustradora de 4" con un paso suave y ht_medo.NUNCA use
solventes comercialescuando se limpie la lustradora porque pueden
daSarlas piezas de plastico.
/iN ADVERTENClA:
NUNCA permitir que liquidos para frenos,
gasolina, productos a base de petr61eo,aceites penetrantes o
productos por el estilo entren en contacto con las piezas plasticas, porque
contienen quimicos que pueden daSar, debilitar o destruir el pla_stico.
/_
ADVERTENClA:
NO sumergir la lustradora en agua. Sacar la
almohadilla de espuma y el bonete de felpa y lavados por separado.
ACCESORIOS
DE LIMPIEZA
La almohadilla Dura Foam TM y los bonetes lustradores de tela de felpa son
lavables y reutilizables. Simplemente saquelos de la lustradora y lavetos
con agua tibia y una soluci6n suave de detergente y s6quelos al aire.
GARANTiA TOTAL DE UN ANO PARA LA ENCERADORA/LUSTRADORA/
PULIDORA SMART START TM DE CRAFTSMAN
Siesta Enceradora/Lustradora/Pulidora de Craftsman dejara de satisfacerle
completamente durante el periodo de un aSo a partir de la fecha de compra,
DEVOLVERLA A LATIENDA SEARS MAS CERCANA EN LOS ESTADOS
UNIDOS, y Sears la reemplazar,:isin cargo alguno.
Siesta Enceradora!Lustradora/Pulidora de Craftsman se usa comercialmente
o para fines de alquiler, esta garantia se aplica s61opara los 90 dias siguientes
a la fecha de compra. Esta garantia le otorga derechos especificos y usted
tambi6n podda tener otros derechos que varian de un estado a otto.
Sears, Roebuck and Co., Dept. 817 WA, Hoffman Estates, IL 60179
10
I
I
Busque los siguientes accesorios en su tienda local de Sears. Est__n
especialmente disefiados para que su lustradora de 4" funcione mas
eficientemente. Todos los arficulos indicados a continuacion pueden
comprarse en la tienda local de Sears o de Craftsman.
Almohadilla Dura Foam TM de 4" (Se incluye una)
Especialmente disefiada con una superficie concava para que retenga la cera
en pasta o liquida y para que se pueda aplicar sin que salpique. Se vende por
separado como almohadilla de repuesto para la de 4" que viene en la
Enceradora/Lustradora/Pulidora.
Almohadilla Dura Foam TM de 6" de Dos Capas y Bonete de Felpa
El bonete de felpa cubre la almohadilla de espuma, Se usa para una
lustrada final de alto brillo.
Almohadilla Dura Foam TM de 6" para Lustrada Final
La elecciSn de los profesionales para Iograr un brillo digno de
"sala de exhibici6n".
Cera en Pasta Profesional HI-Tech
Para Io 51timo en brillo protector. Una mezcla especial de cera carnauba
de lamas alta calidad con otros ingredientes de gran calidad para dar
proteccion adicional a la pintura.
Cera Liquida Clear Pro
Formulada especialmente para los acabados automotrices clear-coat.
No es abrasiva y produce un brillo protector de larga duraci6n.
Todas las almohadit!as
y reutilizables.
de espuma y los bonetes de fetpa son lavables
I CUIDADO:
quitar los accesorios de las herramientas
SIEMPRE
antes de lavarlos. I
RECUERDE:
SlEMPRE use anteojos de seguridad o protectores de ojos cuando opere
herramientas electricas.
11
Get it fixed, at your home or ourst
For repair of major brand appliances in your own home...
no matter who made it, no matter who sold it!
1-800-4-MY-HOME
sMAnytime,
day or night
(1-800-469-4663)
www.sears.com
To bring in products such as vacuums,
lawn equipment and electronics for repair, call for
the location of your nearest Sears Parts & Repair Center.
1-800-488-1222
Anytime,
day or night
www,sears.com
For the replacement parts, accessories
and owner s manuals
that you need to do-it-yourself,
call Sears PartsDirectSm!
1-800-366-PART
ea.m,- +t p.m.CST,
(1-800-366-7278)
7 days a week
www.sears.com/partsdirect
To purchase
or inquire about a Sears Service
Agreement:
1-800-827-6655
7am+
5p.m.
CST, Mon.-Sat.
Para pedir servicio de reparaci6n a domicilio,
y para ordenar piezas con entrega a domicilio:
1-888-SU-HOGAR
_
(1-888+784 6427)
® Regislered
_] Sears
Roebuck
and Co
® M,_ICa
Regis
Au Canada pour service en fran_ais:
1-877-LE-FOYER
_
(1-877-533-6937)
Trademark
! =_ Tladem_rk
of Sears,
Roebuck
and Co
/ TM
rada,
Marc_
de Fabrica
do S_qr$.
_qoebu43k and Co
12