1
_______________________________________________ Zaxcom Control Surfaces User’s Manual
Table of Contents
TABLE OF FIGURES................................................................................................................................................... 3
TABLE OF TABLES .................................................................................................................................................... 3
CHAPTER 1 – INTRODUCTION .............................................................................................................................. 4
WHAT’S INCLUDED WITH THE MIX-8 ........................................................................................................................................................... 4
WHAT’S INCLUDED WITH THE MIX-12 ......................................................................................................................................................... 4
MIX-8 FEATURES .............................................................................................................................................................................................. 4
MIX-12 FEATURES ............................................................................................................................................................................................ 4
CHAPTER 2 – EXTERIOR DESCRIPTION .............................................................................................................. 5
GETTING TO KNOW YOUR MIX-8 ................................................................................................................................................................ 5
GETTING TO KNOW YOUR MIX-12 .............................................................................................................................................................. 6
PRODUCT SUPPORT ........................................................................................................................................................................................ 6
CHAPTER 3 – INSTALLATION ................................................................................................................................ 7
MIX-8 ................................................................................................................................................................................................................ 7
Typical Setup Sequence .................................................................................................................................................................................................. 7
DC Power ............................................................................................................................................................................................................................ 7
MIX-12 ............................................................................................................................................................................................................. 7
Typical Setup Sequence .................................................................................................................................................................................................. 7
DC Power ............................................................................................................................................................................................................................ 7
CHAPTER 4 – OPERATION ...................................................................................................................................... 8
MIX-8 ................................................................................................................................................................................................................ 8
Channel Strip ..................................................................................................................................................................................................................... 8
Trim rotary fader .......................................................................................................................................................................................................... 8
Pre-fader Input meter .................................................................................................................................................................................................. 8
Adjusting the Meter Brightness ............................................................................................................................................................................ 8
Linear fader .................................................................................................................................................................................................................... 8
MIX-12 ............................................................................................................................................................................................................. 9
Channel Strip ..................................................................................................................................................................................................................... 9
Trim rotary fader .......................................................................................................................................................................................................... 9
Pre-fader Input meter .................................................................................................................................................................................................. 9
Adjusting the Meter Brightness ......................................................................................................................................................................... 10
BUS key ........................................................................................................................................................................................................................ 10
BUS key - Input page Shortcuts......................................................................................................................................................................... 11
BUS key - Output page Shortcuts .................................................................................................................................................................... 11
PFL key ......................................................................................................................................................................................................................... 11
EQ key .......................................................................................................................................................................................................................... 11
EQ key Shortcuts ................................................................................................................................................................................................. 12
CH key (Channel) ...................................................................................................................................................................................................... 13
CH key Shortcuts ................................................................................................................................................................................................. 13
Linear fader ................................................................................................................................................................................................................. 13
Faders 9 through 12 .................................................................................................................................................................................................. 13
Keyboard ........................................................................................................................................................................................................................... 13
OUT# rotary faders ....................................................................................................................................................................................................... 13
REC and STOP keys ....................................................................................................................................................................................................... 13
TONE key ......................................................................................................................................................................................................................... 14
Reassigning the Tone Key ........................................................................................................................................................................................ 14
TALK1, TALK2 and SLATE keys ................................................................................................................................................................................. 14
CHAPTER 5 – SPECIFICATIONS ........................................................................................................................... 15
MIX-8 SPECIFICATIONS ................................................................................................................................................................................. 15
MIX-12 SPECIFICATIONS ............................................................................................................................................................................... 15
CHAPTER 6 – CONNECTOR PINOUTS ............................................................................................................... 16
POWER CONNECTOR ................................................................................................................................................................................... 16
2
Zaxcom Control Surfaces User’s Manual________________________________________________
CONTROL CABLE, DB-9 .............................................................................................................................................................................. 16
CHAPTER 7 – ZAXCOM WARRANTY POLICY AND LIMITATIONS............................................................. 17
Table of Figures
Figure 1-1
Figure 1-2
Figure 3-1
Figure 3-2
Figure 3-3
Figure 3-4
Figure 3-5
Figure 5-1
Figure 5-2
Mix-8 Top View & Back View .................................................................................................................................................... 5
Mix-12 Top View & Back View .................................................................................................................................................. 6
Input (#) – Mix12 Setup page ..................................................................................................................................................... 9
Input (#) – BUS page (Analog/Digital) ................................................................................................................................... 10
Output Channel – BUS page (Analog) .................................................................................................................................. 11
Input (#) – EQ page (Analog/Digital) ..................................................................................................................................... 12
Input (#) page – (Analog/Digital) ............................................................................................................................................. 13
XLR-4F Power Connector Pin Numbering ........................................................................................................................... 16
DB-9M Control Cable Connector Pin Numbering ............................................................................................................. 16
Table of Tables
Table 3-1
Table 3-2
Table 3-3
Table 5-1
Table 5-2
Mix-8 Fader - Channel Association ............................................................................................................................................ 8
Mix-12 Fader - Channel Stripe Assignments ............................................................................................................................ 9
Input Channel BUS, Matrix Symbols ........................................................................................................................................ 10
XLR-4F Pin Description .............................................................................................................................................................. 16
DB-9M Pin Description ............................................................................................................................................................... 16
3
Chapter 1_____________________________________________ Zaxcom Control Surfaces User’s Manual
Chapter 1 – Introduction
The Zaxcom Mix-8 is a control surface for the audio mixer embedded in the Nomad, Fusion, and Deva IV, V, 5.8
and 16 location mixer / recorders.
The Zaxcom Mix-12 is a control surface for the audio mixer embedded in the Fusion, and Deva IV, V, 5.8 and 16
location mixer / recorders. It is not supported for use with the Nomad.
Both are fully digital. All mixing is performed in the digital domain using a floating point DSP ensuring the highest
quality audio.
No additional software is required. The recorder’s software recognizes when it connects to the control surface
and makes the necessary connections to allow the control surface to function. Be aware, if your recorder does
not have the Effects Package included, connecting one of the control surfaces temporarily enables the Effects
Package for the duration of the recorder being turned ON.
What’s included with the Mix-8
One RS-422 data cable:
o DB-9 to DB-9 (if ordered for use w/Fusion or Deva)
o USB to DB-9 (if ordered for use w/Nomad)
12 VDC Power Supply
CD-ROM containing this PDF User’s Manual
What’s included with the Mix-12
RS-422 cable
12 VDC Power Supply
CD-ROM containing this PDF User’s Manual
Mix-8 Features
Easily controls fader levels
Control of input trims
True digital mixing console
Zero time offset design for no phase distortion channel-to-channel
No audio cabling from mixer to recorder
Floating point DSP digital mixing with no internal clipping or quantization issues
Unlimited routing
No sample rate issues between mixer and recorder
Cross points can be pre- or post-fader with phase inversion
All cross points are cross faded (never any clicks or pops)
Mix-12 Features
True digital mixing console
Three band shelving EQ with two notch filters and high pass per channel
Soft knee compressor with makeup gain
All cross points are cross faded (never any clicks or pops)
Cross points can be pre- or post-fader with phase inversion
Zero time offset design for no phase distortion channel-to-channel
No audio cabling from mixer to recorder
Floating point DSP digital mixing with no internal clipping or quantization issues
Unlimited routing
No sample rate issues between mixer and recorder
Integrated RECORD and STOP keys
Integrated QWERTY keyboard for metadata input
4
Zaxcom Control Surfaces User’s Manual _____________________________________________Chapter 1
Chapter 2 – Exterior Description
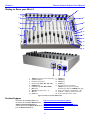
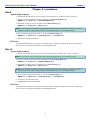
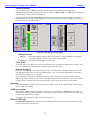
Getting to Know your Mix-8
1.
2.
3.
4.
5.
1.
2.
3.
LINEAR fader
TRIM knob
Pre-fader input meter (CLIP, +10, 0 -10)
4.
5.
6.
One complete channel strip consisting of:
TRIM (#2), Meter (#3) and LINEAR fader (#1)
Power connector
Serial port – RS-422 Ports
Figure 2-1 Mix-8 Top View & Back View
5
6.
Chapter 1_____________________________________________ Zaxcom Control Surfaces User’s Manual
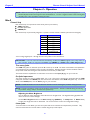
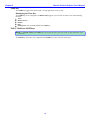
Getting to Know your Mix-12
6.
1.
2.
7.
3.
8.
4.
9.
10.
5.
11.
12.
13.
14.
15.
16.
1.
2.
3.
4.
5.
6.
7.
8.
9.
10.
TRIM knobs (part of each strip {#15})
QWERTY keypad
Pre-fader input meter
Channel keys (BUS, PFL, EQ, CH)
LINEAR fader
Equalization (LOW, MID, HIGH)
JOG wheel
OUT# rotary faders (Ch 1- 4)
REC key
STOP key
17.
18.
11.
12.
13.
14.
15.
TONE key
TALK2 key
TALK1 key
SLATE key
One channel strip consists of:
TRIM knob (#1), Input meter (#3),
Channel keys (#4) and LINEAR fader (#5)
16. COM 1 & COM 2 – RS-422 Ports 1 & 2
17. XLR-4M – standard 12VDC connector
18. Power ON/OFF rocker switch
Figure 2-2 Mix-12 Top View & Back View
Product Support
Download the latest Firmware from:
Download the latest User Manuals from:
Submit Technical Questions at:
Submit information for Repair Services at:
Join the Zaxcom Forum at:
http://www.zaxcom.com/software-updates
http://www.zaxcom.com/instruction-manuals
http://www.zaxcom.com/submit-a-technical-question
http://www.zaxcom.com/repairs
http://www.zaxcom.com/forum
6
Zaxcom Control Surfaces User’s Manual _____________________________________________Chapter 2
Chapter 3 – Installation
Mix-8
Typical Setup Sequence
1. Connect the RS-422 cable from your recorder’s serial connector to the Mix-8’s “Serial” connector.
2. Set your recorder’s Serial Port Mode to RS-422 from the Operating Mode page.
(MENU key Setup button Operating Mode button)
3. Enable Mix-12 support on your recorder from the Mix-12 Setup page.
(MENU key Setup button Mix12 button)
NOTE: Your recorder will retain the Operating Mode settings when not powered up. However, if a factory
restore is performed, these settings must be re-enabled since they are not the default settings.
4. Clear the fader assignments for Knobs 1 – 8 from the Fader Assign page.
(MENU key Faders button Fader Assign button Clear All button)
5. Connect the 12 VDC power input.
DC Power
The supplied AC-to-DC power convertor provides the proper voltage to the Mix-8. However, if a DC power
source is used, it must supply between 8 and 16 VDC @ 0.25 amps.
Mix-12
Typical Setup Sequence
1. Connect the RS-422 cable from your recorder’s serial connector to the Mix-12’s “Com 1” connector.
NOTE: The “Com 2” port is reserved for future use (displaying the meters on a computer screen).
2. Set your recorder’s Serial Port Mode to RS-422 from the Operating Mode page.
(MENU key Setup button Operating Mode button)
3. Enable Mix-12 support on your recorder from the Mix-12 Setup page.
(MENU key Setup button Mix12 button)
NOTE: Your recorder will retain the Operating Mode settings when not powered up. However, if a factory
restore is performed, these settings must be re-enabled since they are not the default settings.
4. Clear the fader assignments for Knobs 1 – 8 from the Fader Assign page.
(MENU key Faders button Fader Assign button Clear All button)
5. Connect the 12 VDC power input.
6. Turn ON the Mix-12’s power switch.
DC Power
The supplied AC-to-DC power convertor provides the proper voltage to the Mix-12. However, if a DC power
source is used, it must supply between 8 and 16 VDC @ 0.25 amps.
7
Chapter 3_____________________________________________ Zaxcom Control Surfaces User’s Manual
Chapter 4 – Operation
NOTE: When it is necessary to update parameter values, you can use the front panel numeric keypad, an
attached keyboard and/or the keypad on the attached Mix-12. To enter a negative number while entering data
manually, enter a zero (0) before entering the value.
Mix-8
Channel Strip
Each channel strip is composed of several items (from top to bottom):
TRIM rotary fader
Pre-fader input meter
LINEAR fader
Each channel strip is permanently assigned to a specific recorder channel as follows (and cannot be changed):
Fader
1
2
3
4
5
6
7
8
Channel
Analog Input 1
Analog Input 2
Analog Input 3
Analog Input 4
Analog Input 5
Analog Input 6
Analog Input 7
Analog Input 8
Table 4-1 Mix-8 Fader - Channel Association
You can assign digital inputs 1 through 8 to the rotary faders on the Deva/Fusion.
IMPORTANT: You must ensure all channels controlled by the Mix-8 are NOT assigned to the rotary faders on
your recorder. Faders are assigned in the Faders page (MENU key > Faders button > Fader Assign button).
Trim rotary fader
The TRIM rotary fader can attenuate up to 20 dB or boost up to 30 dB. The limits of attenuation and amplification
are controlled by the combination of the recorder and software. Rotating the fader counter-clockwise reduces
the pre-fader audio and rotating the fader clockwise increases the pre-fader audio.
The actual amount of amplification or attenuation can be seen on the Input (#) page on your recorder.
Pre-fader Input meter
This meter consists of a series of 4 LEDs (CLIP, +10, 0 -10). This meter is placed in the signal path after the TRIM
rotary fader and before the LINEAR fader, thus it shows the contribution of the TRIM rotary fader only. To see the
effect of the LINEAR fader, view the Home page on your recorder.
NOTE: The PFL illumination is inverted whenever the Mix-12 is not metering the pre-fader analog input bus.
NOTE: The Mix-12 metering mode is not saved when powered down. The Mix-12 default setting of metering
the pre-fader analog is always used when first powered up.
Adjusting the Meter Brightness
You can adjust the meter brightness on the Mix-8 to one of eight levels. The brightest setting (8) allows the
meters to be seen in direct sunlight.
Use the Meter Brightness button in the Mix12 Setup page (MENU key Setup button Mix12 button)
to adjust how bright the meter is illuminated. The current value is saved in the configuration settings.
Linear fader
To use the faders on the Mix-8, you must set up the audio to be routed to the output busses post fader. They
cannot be used when the recorder audio is routed using the pre-fader option.
8
Zaxcom Control Surfaces User’s Manual _____________________________________________Chapter 3
Mix-12
Channel Strip
Each channel strip is composed of several items (from top to bottom):
TRIM rotary fader
Pre-fader input meter
BUS key
PFL key
EQ key
CH key
LINEAR fader
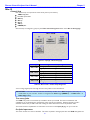
Channel strips are assigned in groups by the Fader Channel Assignment button in the Mix-12 Setup page:
Figure 4-1 Input (#) – Mix12 Setup page
Setting
1-8 A, 1-4 D
1-6A, 1-6 D
1-4 A, 1-8 D
1-8 D, 1-4 A
Resulting Channel Strip Assignments
Analog Inputs 1 – 8 are assigned to Ch Strips 1 – 8
Digital Inputs 1 – 4 are assigned to Ch Strips 9 – 12
Analog Inputs 1 – 6 are assigned to Ch Strips 1 – 6
Digital Inputs 1 – 6 are assigned to Ch Strips 7 – 12
Analog Inputs 1 – 4 are assigned to Ch Strips 1 – 4
Digital Inputs 1 – 8 are assigned to Ch Strips 5 – 12
Digital Inputs 1 – 8 are assigned to Ch Strips 1 – 8
Analog Inputs 1 – 4 are assigned to Ch Strips 9 – 12
Table 4-2 Mix-12 Fader - Channel Stripe Assignments
You can assign digital inputs 5 through 8 to the rotary faders on the Deva/Fusion.
IMPORTANT: You must ensure all channels controlled by the Mix-12 are NOT assigned to the rotary or
virtual faders on your recorder. Faders are assigned in the Faders page (MENU key Faders button
Fader Assign button).
Trim rotary fader
The TRIM rotary fader can attenuate up to 20 dB or boost up to 30 dB. The limits of attenuation and
amplification are controlled by the combination of the recorder and software. Rotating the fader counterclockwise reduces the pre-fader audio and rotating the fader clockwise increases the pre-fader audio.
The actual amount of amplification or attenuation can be seen on the Input (#) page on your recorder.
Pre-fader Input meter
This meter consists of a series of 18 LEDs. This meter is placed in the signal path after the TRIM rotary fader and
9
Chapter 3_____________________________________________ Zaxcom Control Surfaces User’s Manual
before the LINEAR fader, thus it shows the contribution of the TRIM rotary fader only. To see the effect of the
LINEAR fader, view the Home page on your recorder. To get the best possible signal, the input should read
between 0dB and +6dB.
In the Home page and Cue page, pressing the M key toggles the Mix-12 metering between pre-fader input bus
metering and disk mix metering.
NOTE: The PFL illumination is inverted whenever the Mix-12 is not metering the pre-fader analog input bus.
NOTE: The Mix-12 metering mode is not saved when powered down. The Mix-12 default setting of metering
the pre-fader analog is always used when first powered up.
Adjusting the Meter Brightness
You can adjust the meter brightness on the Mix-12 to one of eight levels. The brightest setting (8) allows the
meters to be seen in direct sunlight.
Use the Meter Brightness button in the Mix12 Setup page (MENU key Setup button Mix12 button)
to adjust how bright the meter is illuminated. The current value is saved in the configuration settings.
BUS key
An individual BUS page allows the routing for a single channel on the recorder’s internal mix busses and to the
output busses. The number keypad on the Mix-12 can be used to make channel assignments on the recorder and
assign the outputs.
The illuminated BUS key indicates channel, output or disk that is in the mix while in STOP mode. While in
RECORD mode, the illuminated BUS key indicates the channels in the disk mix.
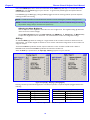
When the BUS key is pressed once, the Input (#) – BUS page appears on your recorder.
Figure 4-2 Input (#) – BUS page (Analog/Digital)
Pressing a number (on the built-in keypad, the recorder front panel or a separate keyboard) toggles between the
following:
Analog Channels (strips 1 – 8)
Black A
analog post-fader
Black A with line
analog post-fader inverted
White A
analog pre-fader
White A with line
analog pre-fader inverted
Blank
not assigned
Digital Channels (strips 9 – 12)
Black D
digital post fader
Black D with line
digital post fader inverted
White D
digital pre-fader
White D with line
digital pre-fader inverted
Blank
not assigned
Table 4-3 Input Channel BUS, Matrix Symbols
10
Zaxcom Control Surfaces User’s Manual _____________________________________________Chapter 3
BUS key - Input page Shortcuts
The list below contains the keys that perform special functions.
LEFT ARROW and RIGHT ARROW keys – toggles between Disk Channel and Output Channel.
The selected group’s title is blue.
CH key
– Toggles the cross point (see Table 3-3 above).
When the BUS key is pressed a second time, the output routing for that channel appears on your recorder.
Figure 4-3 Output Channel – BUS page (Analog)
The TALK and SLATE# keys are selected in this page.
BUS key - Output page Shortcuts
The list below contains the keys that perform special functions.
UP ARROW and DOWN ARROW keys
SLATE, TALK1, TALK2, TONE keys
– toggles between Disk Channel and Output Channel.
The selected group’s title is blue.
– toggle cross points in the output mix.
IMPORTANT: In the Output page, any signal sent to the Disk Channel Mix will be recorded. Unless you
want to record your private line conversations, on top of the pristine audio you are recording, route your
PL to the Output Channel Mix.
When the BUS key is pressed a third time, it exits.
PFL key
The PFL key routes one or more channels directly to the headphone bus in a pre-fader mode (think solo). When
the PFL key is active, the current headphone selection will be suspended. Pressing the PFL key activates and deactivates the PFL function. Only the headphone use is affected by the PFL function. Multiple inputs can be selected
when using the PFL function by pressing each key in turn.
When the metering is changed (by pressing the M key, on the Mix-12’s keyboard or an attached keyboard) the
PFL key’s illumination is inverted.
EQ key
The Deva/Fusion EQ is very powerful. It consists of five filters. A three band parametric and two notch filters are
available on each channel. The EQ is present in both pre- and post-fader and cannot be separated. When EQ is
changed, all audio on that channel is affected. However, adding EQ does not change the timing of the audio as it
passes through a channel, any delay remains constant.
NOTE: Each channel has its own filter set. If a filter is not in use, leave the EQ for that channel disabled. That
saves processing power. It may be important if a number of the effects need to be “On” at the same time.
Pressing the EQ key, displays the EQ page for that channel on the recorder’s screen and illuminates the CH key to
further remind the operator which channel’s EQ is being modified.
11
Chapter 3_____________________________________________ Zaxcom Control Surfaces User’s Manual
Figure 4-4 Input (#) – EQ page (Analog/Digital)
Pressing any other channel’s EQ key displays the new channel’s EQ page and illuminates only that channel’s CH
key.
NOTE: If you press and hold the EQ key, when you release the key you will exit the EQ page.
EQ key Shortcuts
While in the EQ page, the following keys are in effect:
ENTER key
– alternately enables (inline) and disables (bypassed) ALL EQ settings for the current
channel. When a channel’s EQ has been bypassed, the settings are still maintained
until they are specifically modified.
RIGHT ARROW key – advances to the next filter band (note the green light in the buttons on the bottom
of the page).
LEFT ARROW key – advances to the previous filter band.
CH key
– advances to the next EQ band.
UP ARROW key
– changes the current filter’s, filter type:
o Band 1 – 3 are band filters selectable as Lo Shelf, Hi Shelf, Peaking or Off.
o Notch 1 & 2 are notch filters selectable as Off or On.
U key
– resets the Level field of all bands of the current channel to 0.0, effectively negating
them.
L key
– changes focus to the Level field.
F key
– changes focus to the Frequency field.
Q key
– changes focus to the Q field.
LOW EQ knob
– changes the view to band 1 and adjusts the Level field.
MID EQ knob
– changes the view to band 2 and adjusts the Level field.
HIGH EQ knob
– changes the view to band 3 and adjusts the Level field.
JOG wheel
– changes the value of Frequency or Q fields.
EQ key
– advances to the EQ Memory page.
E key
– advances to the EQ Memory page.
While in the EQ Memory page, the following keys are in effect:
CH key
– toggles Load/Save mode.
1 thru 5 keys
– pressing one of them loads/saves (depending on the mode) in the respective
memory.
EQ key
– exits the EQ page
E key
– exits the EQ page
12
Zaxcom Control Surfaces User’s Manual _____________________________________________Chapter 3
CH key (Channel)
On each channel strip, the CH key allows direct access to that channels effects and characteristics.
The CH key illuminates indicating the channel selected. When the SLATE, TALK 1 or TALK 2 key is pressed, the
channels they are being mixed to are illuminated.
Pressing the CH key opens the Input (#) page for that channel, allowing easy access to setting the input type,
phantom power options, EQ, channel assignments, channel delay and more. Pressing the CH key again, takes you
back to the page you were previously on.
Figure 4-5 Input (#) page – (Analog/Digital)
CH key Shortcuts
EQ page
– Pressing the CH key changes which of the five filters is being controlled by the jog wheel.
Pressing the CH key moves the control knob to the next filter.
BUS page – Pressing the CH key toggles the cross point.
Linear fader
To use the faders on the Mix-12, you must set up the audio to be routed to the output busses post fader. They
cannot be used when the recorder audio is routed using the pre-fader option.
Faders 9 through 12
Deva/Fusion recorders have only eight microphone inputs. However faders 9 through 12 allow you to use the
four AES digital inputs on the recorder for additional inputs. You can assign these digital inputs to any track or
place them on any output pre- or post-fader.
If you would like to use these for additional microphone inputs, you need to use an external A/D converter.
When using an external ADC, the word clock on the Deva feeds the external converter, so it is in sync with the
recorders clock. You always want the recorder’s clock to be the master when using an external ADC.
Keyboard
The built-in QWERTY keyboard can be used to enter metadata. Also, see the “Shortcut Keys” chapter in your
Deva or Fusion User Manual.
OUT# rotary faders
Both analog and digital output levels of busses 1 through 4 are controlled by the Out# rotary faders, which are
adjustable from infinity to 0 dBu (clockwise). These busses should be used to feed Comteks or any device where
an output level adjustment is necessary.
You cannot adjust the level of outputs 5 and 6 from the Mix-12.
REC and STOP keys
The RECORD and STOP keys on the Mix-12 are identical to those on the Deva/Fusion and reflect the current
transport status of the recorder itself.
13
Chapter 3_____________________________________________ Zaxcom Control Surfaces User’s Manual
TONE key
The TONE key toggles Tone ON and OFF. The key lights when Tone is active.
Reassigning the Tone Key
The TONE key can be reassigned in the Mix12 Setup page on your recorder to perform one of the following
functions:
Tone
Home Screen
Escape
Play
Unassigned - This essentially disables the TONE key.
TALK1, TALK2 and SLATE keys
NOTE: The SLATE, TALK1 and TALK2 keys can be pressed at the same time to talk to each destination at the
same time.
The SLATE key on the Mix 12 is a duplicate of the SLATE key on the recorder’s front panel.
14
Zaxcom Control Surfaces User’s Manual _____________________________________________Chapter 4
Chapter 5 – Specifications
Mix-8 Specifications
Operating Temp. Range
Meters
Faders
Trimmers
Weight
Dimensions (H x W x D)
Data Connection
Power
Power Connector
-20 to +60 C
8 – 4 LED segments per meter
8 – 100 mm faders
8 – rotary
4 lbs (1.8 kg)
6.88” x 10.56” x 3.13” (174.8 mm x 268.2 mm x 79.5 mm)
DB-9 (DE-9) RS422 to Host Recorder
8 to 16 VDC @ 500 mA
Barrel - M
Mix-12 Specifications
Operating Temp. Range
Meters
Channel EQ buttons
Input Faders
Trimmers
EQ levels
Joq Wheel
Output Faders
Buttons
Built-in Keyboard
Weight
Dimensions (H x W x D)
Data Connection
Power
Power Connector
-20 to +60 C
12 – 18 LED segments per meter
12 – 4 buttons each
12 – 100 mm faders
12 – rotary
3 – rotary
1
4 – rotary
REC, STOP, TONE, TALK1, TALK2, SLATE
60 keys
8.6 lbs (3.9 kg)
12.38” x 17” x 4” (314.5 mm x 431.8 mm x 101.6 mm)
2 – DB-9 (DE-9) RS422 to Host Recorder
8 to 16 VDC @ 500 mA
XLR-4M
15
Chapter 5_____________________________________________ Zaxcom Control Surfaces User’s Manual
Chapter 6 – Connector Pinouts
This section provides the pinouts for the connectors on the both Control Surfaces.
NOTE: All of the diagrams in this chapter show the solder side of each connector.
Power Connector
The Power Connector on the both Control Surfaces is a standard 4-pin XLR connector available at most
electronics stores. The both units require a power source of 9.5 to 18 VDC @ 1 A.
3
2
4
1
Figure 6-1 XLR-4F Power Connector Pin Numbering
Pin
Description
1
Ground
2
Ground
3
N/C
4
Input: 9.5 to 18 VDC (+)
Table 6-1 XLR-4F Pin Description
Control Cable, DB-9
The Control Surfaces use DB-9 connectors for both ends of the control cable to the Deva and Fusion recorders.
The pins are connected straight through between both ends.
Top row pins: 5, 4, 3, 2, 1
Bottom row pins: 9, 8, 7, 6
Figure 6-2 DB-9M Control Cable Connector Pin Numbering
Pin
DESC
Pin
DESC
1
Shield
6
Green
2
N/C
7
N/C
3
N/C
8
White
4
N/C
9
Black
5
Red
Table 6-2 DB-9M Pin Description
16
Zaxcom Control Surfaces User’s Manual _____________________________________________Chapter 6
Chapter 7 – Zaxcom Warranty Policy and Limitations
Zaxcom Inc. values your business and always attempts to provide you with the very best service.
No limited warranty is provided by Zaxcom unless your Zaxcom Deva Mix-8/Mix-12 (“Product”) was purchased from an authorized distributer
or authorized reseller. Distributers may sell Product to resellers who then sell Product to end users. Please see below for warranty
information or obtaining service. No warranty service is provided unless the Product is returned to Zaxcom Inc. or a Zaxcom dealer in the
region where the Product was first shipped by Zaxcom.
Warranty Policy
Zaxcom Product carries a Standard Warranty Period of one (1) year.
NOTE: The warranty period commences from the date of delivery from the Zaxcom dealer or reseller to the end user.
There are no warranties which extend beyond the face of the Zaxcom limited warranty. Zaxcom disclaims all other warranties, express or
implied, regarding the Product, including any implied warranties of merchantability, fitness for a particular purpose or non-infringement. In the
United States, some laws do not allow the exclusion of the implied warranties.
Troubleshooting & Repair Services
No Product should be returned to Zaxcom without first going through some basic troubleshooting steps with the dealer you purchased your
gear from.
To return a product for repair service, go to the Zaxcom Repair Services page (http://www.zaxcom.com/repairs) and fill in your information;
there is no need to call the factory for an RMA. Then send your item(s) securely packed (in the original packaging or a suitable substitute) to
the address that was returned on the Repair Services page. Insure the package, as we cannot be held responsible for what the shipper does.
Zaxcom will return the warranty repaired item(s) via two-day delivery within the United States at their discretion. If overnight service is
required, a FedEx or UPS account number must be provided to Zaxcom to cover the shipping charges.
*Please note, a great resource to troubleshoot your gear is the Zaxcom Forum: http://www.zaxcom.com/forum.
Warranty Limitations
Zaxcom’s limited warranty provides that, subject to the following limitations, each Product will be free from defects in material and
workmanship and will conform to Zaxcom’s specification for the particular Product.
Limitation of Remedies
Your exclusive remedy for any defective Product is limited to the repair or replacement of the defective Product.
Zaxcom may elect which remedy or combination of remedies to provide in its sole discretion. Zaxcom shall have a reasonable time after
determining that a defective Product exists to repair or replace a defective Product. Zaxcom’s replacement Product under its limited warranty
will be manufactured from new and serviceable used parts. Zaxcom’s warranty applies to repaired or replaced Product for the balance of the
applicable period of the original warranty or thirty days from the date of shipment of a repaired or replaced Product, whichever is longer.
Limitation of Damages
Zaxcom’s entire liability for any defective Product shall, in no event, exceed the purchase price for the defective Product. This limitation
applies even if Zaxcom cannot or does not repair or replace any defective Product and your exclusive remedy fails of its essential purpose.
No Consequential or Other Damages
Zaxcom has no liability for general, consequential, incidental or special damages. These include loss of recorded data, the cost of recovery of
lost data, lost profits and the cost of the installation or removal of any Product, the installation of replacement Product, and any inspection,
testing or redesign caused by any defect or by the repair or replacement of Product arising from a defect in any Product.
In the United States, some states do not allow exclusion or limitation of incidental or consequential damages, so the limitations above may not
apply to you. This warranty gives you specific legal rights and you may also have other rights, which vary from state to state.
Your Use of the Product
Zaxcom will have no liability for any Product returned if Zaxcom determines that:
The Product was stolen.
The asserted defect:
1. Is not present,
2. Cannot reasonably be fixed because of damage occurring when the Product is in the possession of someone other than Zaxcom, or
3. Is attributable to misuse, improper installation, alteration, including removing or obliterating labels and opening or removing external
covers (unless authorized to do so by Zaxcom or an authorized Service Center), accident or mishandling while in the possession of
someone other than Zaxcom.
The Product was not sold to you as new.
Additional Limitations on Warranty
Zaxcom’s warranty does not cover Product, which has been received improperly packaged, altered or physically abused.
17