1
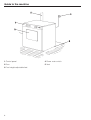
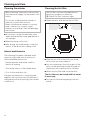
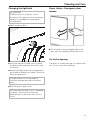
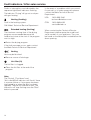
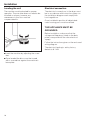
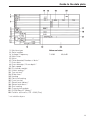
Operating Instructions
Tumble Dryer
PT 6185
To prevent accidents
and machine damage
read these instructions
before installation or use.
UV
M.-Nr. 05 945 470
2
Contents
IMPORTANT SAFETY INSTRUCTIONS . . . . . . . . . . . . . . . . . . . . . . . . . . . . . . . . . . . . . . . . . . . 4
Guide to the machine . . . . . . . . . . . . . . . . . . . . . . . . . . . . . . . . . . . . . . . . . . . . . . . . . . . . . . . . . 6
Operation . . . . . . . . . . . . . . . . . . . . . . . . . . . . . . . . . . . . . . . . . . . . . . . . . . . . . . . . . . . . . . . . . . 8
Turn on the dryer and load the laundry . . . . . . . . . . . . . . . . . . . . . . . . . . . . . . . . . . . . . . . . . . . . 9
Select a program . . . . . . . . . . . . . . . . . . . . . . . . . . . . . . . . . . . . . . . . . . . . . . . . . . . . . . . . . . . . 10
Available programs . . . . . . . . . . . . . . . . . . . . . . . . . . . . . . . . . . . . . . . . . . . . . . . . . . . . . . . . . . 10
Add or remove laundry during a program . . . . . . . . . . . . . . . . . . . . . . . . . . . . . . . . . . . . . . . . . 11
Change a program . . . . . . . . . . . . . . . . . . . . . . . . . . . . . . . . . . . . . . . . . . . . . . . . . . . . . . . . . . . 11
Program end. . . . . . . . . . . . . . . . . . . . . . . . . . . . . . . . . . . . . . . . . . . . . . . . . . . . . . . . . . . . . . . . 11
Cleaning and Care . . . . . . . . . . . . . . . . . . . . . . . . . . . . . . . . . . . . . . . . . . . . . . . . . . . . . . . . . . 12
Cleaning the exterior . . . . . . . . . . . . . . . . . . . . . . . . . . . . . . . . . . . . . . . . . . . . . . . . . . . . . . . . . 12
Cleaning the lint filter . . . . . . . . . . . . . . . . . . . . . . . . . . . . . . . . . . . . . . . . . . . . . . . . . . . . . . . . . 12
Changing the light bulb . . . . . . . . . . . . . . . . . . . . . . . . . . . . . . . . . . . . . . . . . . . . . . . . . . . . . . . 13
Power failure - Emergency door release . . . . . . . . . . . . . . . . . . . . . . . . . . . . . . . . . . . . . . . . . . 13
Fault indicators / After sales service . . . . . . . . . . . . . . . . . . . . . . . . . . . . . . . . . . . . . . . . . . . 14
Installation instructions . . . . . . . . . . . . . . . . . . . . . . . . . . . . . . . . . . . . . . . . . . . . . . . . . . . . . 15
IMPORTANT SAFETY INSTRUCTIONS . . . . . . . . . . . . . . . . . . . . . . . . . . . . . . . . . . . . . . . . . . 16
Caring for the environment . . . . . . . . . . . . . . . . . . . . . . . . . . . . . . . . . . . . . . . . . . . . . . . . . . . 17
Installation . . . . . . . . . . . . . . . . . . . . . . . . . . . . . . . . . . . . . . . . . . . . . . . . . . . . . . . . . . . . . . . . 18
Leveling the unit . . . . . . . . . . . . . . . . . . . . . . . . . . . . . . . . . . . . . . . . . . . . . . . . . . . . . . . . . . . . . 18
Electrical connection . . . . . . . . . . . . . . . . . . . . . . . . . . . . . . . . . . . . . . . . . . . . . . . . . . . . . . . . . 18
Guide to the data plate. . . . . . . . . . . . . . . . . . . . . . . . . . . . . . . . . . . . . . . . . . . . . . . . . . . . . . . 19
3
IMPORTANT SAFETY INSTRUCTIONS
Installation, repair and maintenance work
should be performed by a Miele
authorized service technician. Work by
unqualified persons could be dangerous
and may void the warranty.
Read all instructions before installation or
use of the tumble dryer to prevent injury
and machine damage.
All personnel working with this machine
must be fully trained in all aspects of its
use and safety.
The tumble dryer is only intended for
drying fabrics washed in a water solution.
Check fabric care labels to verify
materials can be machine dried.
SAVE THESE INSTRUCTIONS AND
REVIEW THEM PERIODICALLY
To prevent fires, do not use this
tumble dryer to dry the following:
– Articles containing foam rubber, rubber or
rubber like materials.
– Articles which have been treated with
flammable cleaning agents.
– Articles which have been splashed with
hair spray, nail polish remover, etc.
– Clothing which may be greasy, oily or
saturated with other residues.
Do not dry mops, floor cloths, etc. in this
machine if they contain substances such
as wax or chemical cleaning agents.
Padded or filled fabrics (e.g. jackets or
cushions) that are damaged should not
be dried. Loose filling could catch fire.
Some fabrics get very hot during drying
and there may be a risk of high
temperatures causing them to ignite in
extreme circumstances. They should be
taken out of the machine as soon as the
program has finished and as soon as
possible if there has been a power failure. It
is advisable to keep a fire extinguisher near
the machine at all times.
Laundry must not be removed from the
dryer before the drying program has
finished, i.e., the cooling down phase must
be completed.
If hot laundry items are stacked or packed
they may spontaneously combust.
Do not let children play in or near the
machine. Do not let them play with the
controls or operate the unit.
Make sure the drum is stationary before
removing laundry. Never put your hand
into a drum that is still moving.
4
IMPORTANT SAFETY INSTRUCTIONS
Use the dryer only if all housing parts are
installed and no hazard of electrical or
moving parts exists.
The air intake opening is located to the
rear of the machine. Do not cover the
opening under any circumstances.
Fire and Explosion hazard
Never use or store gas, gasoline based
substances or any easily flammable
substances near the machine.
Fire hazard
Do not use the machine without the lint
filter in place. If the lint filter is damaged it
must be replaced immediately.
Clean the lint filter regularly. A build up of
lint could block the airflow, heating and
ventilation. This may impair the efficiency of
the machine.
Keep the area around the air intake
(toekick) and adjacent surrounding areas
free from lint, dust and dirt.
Ensure that there is adequate ventilation
for operation in the room where it is
installed.
Do not use a high-pressure cleaner or
water jet to clean the machine.
Caution
If the tumble dryer shuts off during the
drying cycle, without a fault indicator
lighting, a temperature limiter has activated.
Check the seals and locks on the machine
door and the lint filter.
Check the condition of the air inlet and air
outlet vents. If no damage is evident to any
of the parts checked, the dryer can be
restarted.
If the fault occurs again, call the Miele
Technical Service Department.
KEEP THESE OPERATING
INSTRUCTIONS IN A SAFE PLACE
Disinfecting and cleaning agents often
contain chlorides (salts) that can cause
steel surfaces to rust. To protect your
machine from rust damage, only use
chloride free disinfecting and cleaning
agents for laundry, disinfection and cleaning
of the machine. If you are not sure about a
particular agent contact Miele’s Professional
Division.
If you accidentally spill an agent containing
chloride on the machine it should be rinsed
off with water and dried with a soft cloth.
If there is any damage to the controls or
to the cable insulation, the machine must
not be used until it has been repaired.
Ensure that only fresh air is drawn into
the machine and that it does not contain
chlorine, fluoride or solvent fumes.
5
Guide to the machine
1 Control panel
4 Power main switch
2 Door
5 Vent
3 Four height adjustable feet
6
Guide to the machine
Control panel
6 Program sequence / Fault indicators
g
= On indicator
! = Drying
ä = Cool down
~r= Anti crease / End
0 = Check venting
W = Check lint filter
7 Program selector
8 Push buttons
"a
Door" button
To open the drum door.
"s
On-Off" button
"L
Low temperature" button
Lowers the drying temperature for delicate
fabrics (e.g. acrylics). Press in the button to
select this feature.
"l
Buzzer" button
The end of a program can be indicated by a
buzzer. Press in the button to select this
feature.
"h
Start" button
This button starts the program when pushed
in.
7
Operation
Before using for the first time
Preparing the laundry
^ Wipe out the inside of the drum with a soft
dry cloth.
^ Sort the laundry according to fabric type
for even drying results.
Not all fabrics are suitable for drying. Check
the manufacturer’s instructions on the wash
care label.
q = Dry at normal temperature
r = Dry at low temperature
s = Do not tumble dry
– Do not tumble dry articles made from pure
wool and wool mixtures, they tend to
become matted and shrink.
– Pure linen may become rough by tumble
drying. Consult the manufacturer’s
instructions before drying.
– Important: Items with metal buckles,
hooks, eyes, zippers etc. should be put
into the dryer in a cloth bag (e.g.
pillowcase) to protect the drum from
scratches and dents.
– Items with zippers should be dried with
the zippers open.
– Some woven and loop knit materials shrink
with over-drying. Avoid the "Extra dry"
program for such fabrics.
– Pillow cases and duvet covers should be
fastened, if possible, to avoid smaller
items getting entangled.
– If drying starched laundry, select the most
suitable program for ironing by hand or
machine.
– Sort the laundry according to the level of
dryness required. It is not necessary to
sort according to size.
– For cost efficiency, only dry full loads. Do
not overload the dryer.
Padded or filled fabrics (e.g. jackets or
cushions) that are damaged should not
be dried. Loose filling could catch fire.
8
Operation
Turn on the dryer and load the
laundry
Maximum Laundry weight (dry)
^ Turn on the power main (on site).
T 6185
^ Press the "s On/Off" button to turn on the
dryer.
Drum volume
^ Press the "a Door" button to open the
door.
Permanent Press
Cottons
185 Liter
16.5 lbs / 7.5 kg
5.5 lbs / 2.5 kg
^ Load the laundry loosely into the drum.
Check that no foreign objects are in the
drum, e.g. wash dosage containers.
^ Close the drum door.
^ To prevent fabric damage, check that
laundry has not been caught in the closed
door.
9
Operation
Select a program
Available programs
^ Select a program by turning the program
selector clockwise or counterclockwise.
^ The "L Low temperature" and "l Buzzer"
features can be selected at this time.
^ Press the "h Start" button.
The selected program starts.
Once the required level of dryness has been
reached the laundry is cooled and the
drying program will end.
Note:
The dryer uses an electronic sensor system
which monitors the residual moisture in the
laundry.
A COTTONS
For drying cotton/linen
Residual
moisture value
A
B
C
D
E
F
Extra dry
Normal +
Normal
Machine iron ,
Machine iron .
Machine iron -
(-4%)
(-2%)
(3%)
(13%)
(20%)
(26%)
B PERMANENT PRESS
For drying polyester cotton mixtures,
delicates and synthetics
G Normal +
(-2%)
H Normal
(2%)
I Machine iron ,
(8%)
C TIMED DRYING
Airing and timed drying
J Without Heating
(15 min)
For airing laundry
K With Heating
(20 min)
To dry small loads or to dry individual
items.
t End
10
Operation
Add or remove laundry during a
program
^ Press the "a Door" button.
^ Add or remove laundry.
^ Close the drum door.
^ Press the "h Start" button.
The program continues.
Change a program
Once a drying program has started,
changes to the program and any drying
options selected can only be made by
cancelling the current program.
To cancel the current program:
Note
If the "l Check lint filter" light comes on, the
lint filter needs to be cleaned. Clean the filter
as soon as the program has finished. See,
"Cleaning and Care" for details.
The laundry must not be removed from the
dryer before the drying program has
finished, ie, the cooling down phase must be
completed.
If hot laundry items are stacked or packed
they could auto-combust.
If the laundry is rinsed with hot water in the
final rinse, the residual heat in the laundry
together with the reduced residual moisture
content, will lead to shorter processing times
and save energy.
^ Turn the program selector to "End".
When the program has been canceled the
"Anti-crease/End" indicator lights.
^ Turn the program selector either clockwise
or counterclockwise to the new program.
^ The "L Low temperature" and "l Buzzer"
features can be selected at this time.
^ Press the "h Start" button.
When the program selector is turned after a
program has started, the "On" indicator
flashes. It will stop flashing, when the
program selector is turned back to the
selected program or turned to "End" to
cancel the program.
Program end
At the end of drying the "~ t Anti-crease /
End" indicator will light up and the buzzer
will sound (if selected).
^ Turn the program selector to "t End".
^ Open the drum door.
^ Remove the laundry.
If the laundry is not removed from the
machine at the end of the program an
anti-crease cycle will automatically start.
The drum turns at intervals to minimize
creasing in the laundry.
The anti-crease cycle runs 1 hour.
^ Clean the lint filter.
^ Close the drum door.
^ Press the "s On/Off" button to turn off the
machine.
^ Turn off power at the power main switch.
11
Cleaning and Care
Cleaning the exterior
Before cleaning, disconnect the machine
from the power supply via the power main
switch.
Do not use a high pressure cleaner or
water jet to clean the machine.
Never use abrasive cleaners, scouring
pads, steel wool or caustic (oven)
cleaners on the dryer. They will damage
the surface.
Cleaning the lint filter
The lint filter must be cleaned before or
after every program or when the
"l Check lint filter" indicator lights.
^ Open the door and remove the lint filter.
^ All surfaces can be cleaned with warm
water and liquid dish soap applied with a
soft sponge.
^ Wipe dry using a soft cloth.
^ After drying starched laundry, clean the
interior of the drum with a damp cloth.
Annual maintenance
The following should be checked and if
necessary serviced once a year by an
authorized Miele technician:
– Heater element and heater shaft for
electrical heating
^ Wipe the lint off the filter with your hand,
do not use any sharp objects!
– The whole interior of the tumble dryer
^ Any lint remaining in the hollow part of the
door can be removed through the gap at
the bottom with a dust brush or vacuum.
– Fins on the ventilation fan
^ Return the lint filter and close the door.
If proper maintenance is not performed
regularly the machine may lose efficiency
and operational faults posing a fire hazard
could occur.
12
The lint filter can be rinsed with hot water
if necessary.
^ Dry the lint filter before putting it back in
place.
Cleaning and Care
Changing the light bulb
,WARNING
Power failure - Emergency door
release
To reduce the risk of electric shock,
disconnect this appliance from the power
supply by unplugging or tripping the
circuit breaker.
^ Open the drum door.
^ Pull forward on the unhinged side of the
door with the supplied yellow plastic tool.
Air intake opening
^ Unscrew the plastic bulb cover located
inside the drum and above the door (see
illustration.)
The dryer air intake opening is located at the
rear. Do not cover the opening!
^ Replace the light bulb with a temperature
proof bulb available from Miele’s Technical
Service Department.
The light bulb must not exceed the
maximum wattage quoted on the data
plate.
^ Refit the plastic bulb cover.
Take care that the bulb cover is tightened
into place. Otherwise moisture may
penetrate the socket and cause a short
circuit.
13
Fault indicators / After sales service
Faults or interruptions are indicated by the
sequence lights/fault indicators flashing.
The indicator "Drying" will go out on dryers
with gas heating
In the event of a problem which you cannot
fix yourself, or to order spare parts please
contact the Miele Technical Service
Department
USA
1-800-999-1360
techserv@mieleusa.com
CDN
1-800-565-6435
service@miele.ca
Heating (flashing)
Fault in the heating system.
Call Miele’s Technical Service Department
Extended heating (flashing)
The maximum running time of the drying
program was exceeded because the
residual moisture at the start of the program
was too high.
^ Restart the drying program.
If the fault message occurs again contact
the Miele Technical Service Department
Venting
Vent may be blocked.
^ Remove source of blockage.
Lint filter (lit)
The lint filter is clogged.
^ Clean the lint filter at the end of the
program.
Note:
The "Drying", "Cool down" and
"Anti-crease/End" indicators will flash if there
is a power failure or if a program has been
interrupted (e.g. when the door has been
opened). They do not indicate a fault. The
indicators will stop flashing once the "Start"
button is pressed.
14
When contacting the Technical Service
Department, please quote the model and
serial number of your appliance. They can
be found on the data plate located below the
drum opening.
Installation instructions
IMPORTANT SAFETY INSTRUCTIONS
Installation and Repair
Any repair or installation work is to be
done by a Miele Service Technician. Any
work done by an unauthorized person could
be dangerous. The manufacturer cannot be
held responsible for unauthorized repairs.
Pay close attention to the installation
instructions and the installation diagram.
Be certain your appliance is properly
installed and grounded by a qualified
technician.
To guarantee the electrical safety of this
appliance, continuity must exist between
the appliance and an effective grounding
system. It is imperative that this basic safety
requirement be met. If there is any doubt,
have the electrical system of the house
checked by a qualified electrician. The
manufacturer cannot be held responsible for
damages caused by the lack, or inadequacy
of, an effective grounding system.
Electrically heated dryers must not be
installed in the same room as dry
cleaning machines using solvents containing
CFCs. Escaping fumes will break down into
hydrochloric acid if ignited. This will damage
the machine.
If installed in an adjacent room there must
be no exchange of air between them.
The exhaust must not be led into a
chimney used by another gas, coal or oil
heated appliance. The warm humid air
should be directed by the shortest route into
the open air or into a suitable venting duct.
The duct must be designed and installed to
accommodate the high throughput of air
(few bends, as short a duct as possible, well
shaped and leakproof joints).
No filters or louvres should be built into
the exhaust duct.
The connection between the exhaust
ducting and the exhaust connection on
the dryer must be airtight.
Before installation or service, disconnect
the power supply to the work area by
removing the fuse or "tripping" the circuit
breaker to the unit.
Where the exhaust is ducted directly into
the open air, the end of the duct should
be protected against the weather, ideally by
a downward angle of 90°.
Do not damage, remove or bypass the
safety components, fixtures and control
elements of this machine.
To facilitate cleaning of the duct,
cleaning flaps or covers should be fitted
on the bends wherever possible.
Faulty components must only be
exchanged for Miele original spare parts.
Only when these parts are fitted can the
safety standards of the machine be
guaranteed.
With upward sloping exhaust ducting a
condensation drain must be made at the
lowest point.
Disposal of an old appliance
When disposing of an old machine,
prevent hazards to children by removing the
drum door and the lint filter access panel.
Disconnect the power supply and remove
the power cord.
Do not install the dryer in a room where
there is danger of frost.
Ensure that there is adequate ventilation
for operation in the room where it is
installed.
16
The dryer is fitted with an exhaust fan
which can be heard during operation.
The noise level of the fan can be reduced by
fitting a muffler to the end of the dryer vent
(available from Miele’s Technical Service
Department).
The minimum dimensions and distance
required from the wall, as shown in the
installation diagram, must be observed to
allow service to be performed.
Caring for the environment
Disposal of packing material
Disposal of an old machine
The transport and protective packing are
environmentally friendly for disposal and can
be recycled.
Old machines contain materials which can
be recycled. Please contact your local
recycling authority about the possibility of
recycling these materials.
Please recycle.
17
Installation
Leveling the unit
Electrical connection
The machine must be leveled for proper
operation. The machine does not need to be
installed on a base, however any
unevenness in the floor must be
compensated for.
The electrical connections to the dryer must
be in accordance with instructions given on
the installation diagram and comply with
local regulations.
Once installed in position all detachable
outer housing parts must be refitted.
THIS APPLIANCE MUST BE
GROUNDED.
Before installation, make sure that the
voltage and frequency listed on the data
plate correspond with the sites electrical
supply.
Follow the instructions given on the enclosed
wiring diagram.
The electrical heating is set by factory
default to 8.1 kW.
^ Level the machine by adjusting the screw
feet.
^ Once leveled the discs must be turned
with a screwdriver against the machine’s
base plate.
18
Guide to the data plate
1
2
3
4
5
6
7
8
9
10
11
12
13
14
15
16
17
18
19
20
21
22
Machine type
Serial number
Voltage / Frequency
Mains fuse
Motor
Plate diameter/ Number of disks *
Drum data
Drum diameter / Drum depth *
Spin speed *
Dry laundry weight
Kinetic energy *
Top run time *
Brake time *
Heating
Electrical heating
Fuse (on-site)
Steam heat indirect *
Steam heat direct *
Gas heating
Commissioning date
DVGW-Reg.-N° (Water) *
Field for test marks / CE - 0063 (Gas)
Noise emission
T 6185
63,6 dB
* not valid for dryers
19
Alteration rights reserved / 2104
This paper is made from cellulose bleached without the use of chlorine.
00