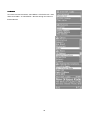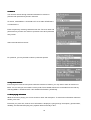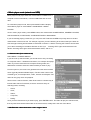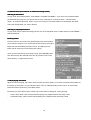
1
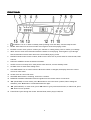
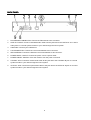
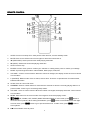
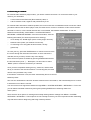
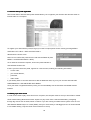
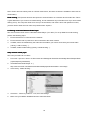
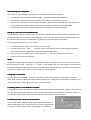
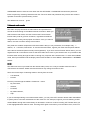
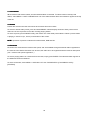
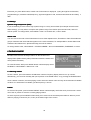
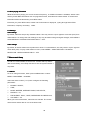
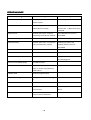
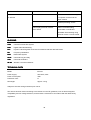
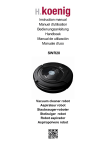
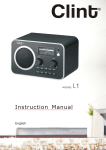
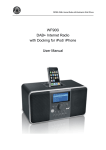
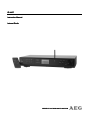
IR 4427
Instruction Manual
Internet Radio
PERFECT IN FORM AND FUNCTION
FORWORD
SAFETY INFORMATION
IMPORTANT NOTICE
1.
Read these instructions.
2.
Keep these instructions.
3.
Heed all warnings.
4.
Follow all instructions.
5.
Do not use your radio near water.
6.
Clean with a dry clothe only.
7.
Do not block any ventilation openings. Install in accordance with the manufacture´s instructions.
8.
Do not install near any heat sources such as radiators, heat registers, stoves or other apparatus
(including amplifiers) that produce heat.
9.
Do not defeat the safety purpose of the polarized or grounding-type plug. A polarized plug has two blades
with a third prong is provided for your safety. If the provided plug does not fit into your outlet, consult and
electrician for replacement of the obsolete outlet.
10. Protect the power cord from being walked on or pinched particularly at plugs, convenience receptacles,
and the point where they exit from your radio.
11. Only use attachments or accessories specified by the manufacturer.
12. Use only with a cart, stand, tripod, bracket or table specified by the manufacturer. When a cart is used,
use caution when moving the cart and radio combination to avoid injury from tip-cover.
13. Unplug your radio during lightning storms or when unused for long periods of time.
14. The apparatus shall not be exposed to dripping or splashing and that no objects filled with liquids, such as
vases, shall be placed on the apparatus.
15. The batteries shall not be exposed to excessive heat such as sunshine, fire or the like.
16. The mains plug is used as the disconnect device, the disconnect device shall remain readily operable.
2
CONTENT
FOREWORD………………………………………………………………………………………………….....
2
FRONT PANEL...……………………………………………………………………………………………….
5
BACK PANEL……………………………………………………………………………………………………
6
REMOTE CONTROL…………………………………………………………………………………………...
7
SYSTEM CONNECTION……………………………………………………………..………………………..
9
INTRODUCTION………………………………………………………………………………………………...
10
BASIC OPERATION……………………………………………………………………..……………………..
11
1 Getting start…....…………………………………………….………………………...................................
11
2 Setup…………………………………………………………………………………...………………………
12
2.1 Setting the language………………………………………………………………………………………..
12
2.2 Setting the time/date………………………………………………………………………………………..
12
2.3 Connecting to a network………………………………………………………..………………………….
13
2.4 Internet radio portal registration…………………………………………………………………………...
14
2.5 Setting up a music server………………………………………………………………………………….
14
2.6 Sharing media with Windows Media Player……………………………………………………………...
15
2.7 Sharing folders on a Windows PC………………..…………………………….…………………………
16
2.8 Sharing folders on non-Windows computers…………………………………………………………….
17
2.9 Setting the radio to work with shared folders…………………………………………………………….
17
3 Internet radio mode…………………………………………………………………………………………...
18
3.1 Last listened…………………………………………………………………………………………………
19
3.2 Presets……………………………………………………………………………………………………….
19
3.3 Favourites……………………..……………………………………………………………………………..
19
3.4 Browse……………………………………………………………………………………………………….
20
3.5 Search………………………………………………………………………………………………………..
21
3.6 My added stations…………………………………………………………………………………………..
21
3.7 Now playing information……………………………………………………………………………………
21
4 Music player mode (network and USB)…………………………………………..………………………...
22
4.1 Shared media (from media server)………………………………………………………………………..
22
4.2 Shared folder (from network or USB mass-storage device)……………………………………………
23
4.3 Now playing information……………………………………………………………………………………
23
5 DAB radio mode……………………………………………………………………………………………….
24
5.1 Scanning for stations……………………………………………………………………………………….
24
5.2 Selecting stations…………………………………………………………………………………………...
24
5.3 Now playing information……………………………………………………………………………………
24
5.4 Settings………………………………………………………………………………………………………
25
6 FM radio mode………………………………………………………………………………………………...
25
6.1 Selecting stations…………………………………………..……………………………………………….
25
3
CONTENT
6.2 Now playing information……………………………………………………………………………………
26
6.3 Settings…………………………..…………………………………………………………………………..
26
7 Alarms and sleep……………………………………………………………………………………………...
26
7.1 Alarms………………………………………………….…………………………………………………….
26
7.2 Sleep…………………………………………………………………………………………………………
27
8 Software upgrade and factory reset…………………………………………………………………………
27
8.1 Software upgrade…………………………………………………………………………………………...
27
8.2 Factory reset………………………………………………………………………………………………...
27
ERROR MESSAGE……………………………………………………………………………………………..
28
TROUBLE SHOOTING…………………………………………………………………………………………
29
GLOSSARY…………………………………………………………………………………............................
30
TECHNICAL DATA……………………………………………………………………………………………...
30
MEANING OF THE “ DUSBIN” SYMBOL………………………………………………………………….
31
4
FRONT PANEL
1
STANDBY: Turn on or back to standby mode (showing clock and date). Cancels sleep function.
2
MENU: Show menu for the current mode. Press again to show Now playing screen.
3
ENTER: In menu mode, press to confirm your selection. In setting mode, press to confirm your settings.
4
INFO: Press to view more information about the station or track playing. Press again to cycle through
further information screens then return to the normal Now playing screen.
5
PRESET: Radio modes: Press to select; Hold to store. There are 10 presets each for Internet radio, DAB
and FM.
6
DISPLAY SCREEN: Shows the status information.
7
SLEEP: Press to set sleep off or other periods. After time out, it enters standby mode.
8
ALARM: Press to enter alarm setting menu.
9
VOLUME KNOB: Turn to control volume. When the volume is changed, the display shows the current
volume or mute status.
10
SCAN: Press to scan in FM mode.
11
SNOOZE: When alarm is sounding, snooze for a set time.
12
REMOTE CONTROL SENSOR: Receives signals from the remote control. Do not block.
13
▲▼ (UP/DOWN): In menu mode, press ▲▼ button to move the cursor up/down; When setting the
date/time, press ▲▼button to increase/decrease the digits.
14
◄► (LEFT/RIGHT): In menu mode, press ◄► button to go to previous/next menu; In radio mode, press
◄► button to scan up/down.
15
FUNCTION: Cycle through the modes: Internet Radio, Music player, DAB, FM.
5
BACK PANEL
1
FM ANTENNA CONNECTOR: Connect the FM antenna to this connector.
2
LINE OUT JACKS: Connect a standard audio cable to these jacks and to the LINE IN or AV L and R
audio jacks on a sound system to listen to your radio through the sound system.
3
USB PORT: Connect your USB device.
4
LAN CONNECTOR: Connect the Local Area Network to this connector.
5
WIFI-ANTENNA: Connect the Wireless Local Area Network to this connector.
6
POWER SUPPLY INPUT: Connect the power cord to a power outlet.
7
POWER ON/OFF SWITCH: Press this switch to turn the power on and off.
8
COAXIAL JACK: Connect a coaxial audio cable to this jack and to the COAXIAL IN jack on a sound
system to listen to your radio through the sound system.
9
OPTICAL JACK: Connect an optical audio cable to this jack and to the OPTICAL IN jack on a sound
system to listen to your radio through the sound system.
6
REMOTE CONTROL
1
SLEEP: Press to set sleep off or other periods. After time out, it enters standby mode.
2
MUTE: Press to turn off the sound. Press again to return the sound back on.
3
4
(PREVIOUS): Select previous track while playing audio files.
(NEXT): Select next track while playing audio files.
5
STOP: Press to stop.
6
ENTER: In menu mode, press to confirm your selection. In setting mode, press to confirm your settings.
7
MODE: Cycle through the modes: Internet Radio, Music player, DAB, FM.
8
VOLUME +: Press to control volume. When the volume is changed, the display shows the current volume
or mute status.
9
P (PRESET): Radio modes: Press to select; Hold to store. There are 10 presets each for Internet radio,
DAB and FM modes.
10
SCAN: Press to scan in FM mode.
11
NUMBERS: Press a number button for more than two seconds to store the currently playing station to a
preset number. Press to go to a stored (preset) station.
12
VOLUME -: Press to control volume. When the volume is changed, the display shows the current volume
or mute status.
13
14
MENU: Show menu for the current mode. Press again to show Now playing screen.
(UP, DOWN, LEFT, RIGHT) DIRECTION BUTTONS: In menu mode, press
move the cursor up/down; When setting the date/time, press
In menu mode, press
15
button to increase/decrease the digits.
button to go to previous/next menu. In radio mode, press
scan up/down.
►II
II PLAY/PAUSE: Press to pause.
7
button to
button to
16
17
(SNOOZE): When alarm is sounding, snooze for a set time.
INFO: Press to view more information about the station or track playing. Press again to cycle through
further information screens then return to the normal Now playing screen.
18
19
STANDBY: Turn on or back to standby mode (showing clock and date). Cancels sleep function.
ALARM: Press to enter alarm setting menu.
Install
Install the remote control battery
battery
1.
Remove the battery cover.
2.
Insert the battery of the type CR 2025 into the battery compartment. Make sure that the + symbol faces
upwards.
3.
Replace the cover.
WARNING:
WARNING
•
Leaking out battery acid can damage your health. Remove the battery from the battery compartment as
soon as it is exhausted or if the remote control is not going to be used for a longer period of time. Wipe up
leaked out battery acid with a cloth. In case of skin contact immediately wash the affected area. Seek
medical advice if battery acid has been swallowed. In case of contact with your eyes wash out the eyes
and seek medical advice.
•
Do not expose the battery to high temperatures or direct sunlight. Never throw batteries into the fire.
There is a danger of explosion!
explosion
•
Never try to recharge batteries, short-circuit, cutting or buried.
•
Avoid contact with metallic objects (Rings, nails, screws et cetera). There is a danger of shortshort-circuiting!
circuiting
As a result of a short-circuit batteries may heat up considerably or even catch fire. This may result in
burns.
CAUTION:
•
Batteries are not to be disposed of together with domestic wastes. Dispose of the used batteries at the
relevant collection bin or at your dealer’ s.
•
Improper installation of batteries can cause leaking out and corrosion and leaving the remote irreparable
damaged.
NOTE:
•
If the remote control is not going to be used for an extended period of time, remove the battery.
•
Exhausted batteries should be replaced immediately to prevent corrosion damage.
•
If the range of the remote control is reduced replace the cell by a battery of the same type (CR 2025).
Usage of the remote control
•
Align the remote control directly at the remote control sensor of the device.
•
The range of the remote control depends on the brightness of the room and the charge of the battery.
•
Bright light (Sun or artificial light) should not fall directly at the remote control sensor. Bright light can
negative influence the efficacy of the remote control.
•
Make sure that they be no obstacles between the remote control and the remote control sensor.
8
SYSTEM CONNECTION
To connect the antennas
1.
Connect the FM antenna to the FM connector on the back of your radio. Fully extend the antenna wires.
You may need to adjust the antenna to get the best radio. (Figure 1)
2.
Connect the Local Area Network or Wireless Local Area Network to the connector on the back of your
radio. (Figure 2)
To connect to a sound system
You can connect your radio to a sound system by suing a coaxial, optical or standard audio cable. Make sure
that your radio and the sound system are turned off and the power cords are unplugged.
1.
To connect to a sound system by suing a coaxial or optical audio cable. Connect a coaxial or optical
audio cable to the COAXIAL or OPTCIAL jack on the back of your radio.
2.
To connect to a sound system by using a standard audio cable. Connect a standard AV audio cable to
the LINE OUT jack on the back of your radio. (Select one of the L/R LINE OUT jacks.)
9
NOTE:
1.
Please turn off the both player and sound system before they are connected to the power line from the
socket.
2.
Do not switch on /off or press power switch frequently, switching on and off each time must have an
interval of 3 seconds.
3.
Do not connect the digital optical or coaxial output jack of this player with the analogue signal input
terminal for reception.
4.
Please refer to the above figures to connect your acoustic equipment. Please keep all the connection
correctly and firmly. The power supply should be connected finally.
INTRODUCTION
This radio has basically three types of menu. Press the ENTER button on the front panel (or on the remote
control) to step through and select options. A scroll bar on the right of the screen shows if there are further
options above or below those visible.
Each mode has a MODE MENU, with options specific to that mode.
For example, the FM mode menu has just two options: Scan setting
and Audio setting. In addition, each mode menu has two final options:
SYSTEM SETTINGS > and MAIN MENU >. The ‘ >’ indicates
options leading to further menus.
The SYSTEM SETTINGS MENU allows access to system settings and
information such as network, time/date, language and software
update.
Menus with more options than will fit on one screen have a scroll bar
to the right.
10
The MAIN MENU allows access to all modes plus sleep and timer
functions.
Some menus, for example the SYSTEM SETTINGS MENU, have
several submenus.
Dialogue screens
Dialogue screens are shown to allow the user to change settings.
They vary in complexity from simple Yes/No options up to the
scrollable network password input screen.
As with menus, the selected item is shown with a white background.
Dialogue screens mark the current setting with an asterisk (*).
Display screens
This radio has basically three types of display screen:
The Standby screen shows the time, date and any active alarm times.
As you cycle through the play modes pressing MODE button, The
radio shows a splash screen for each mode. After one second, the
radio enters the selected mode and tries to start playing the last
station or track that was playing in that mode. If this is not possible,
Jupiter 6 will try to connect to the selected source by scanning for
stations, networks, or prompting for user input as appropriate.
The NOW PLAYING SCREEN shows information about the audio
source and track now playing, where available.
In addition, there are screens for information such as volume, mute
and information/error messages.
BASIC OPERATION
1 Getting started
Although this radio is sophisticated, getting started is simple. To play DAB or FM radio, all you need is a power
source (~220-240 V mains supply).
NOTE:
It is recommended to use the mains power supply where available, for economy and to avoid unnecessary
waste.
1.
Place the radio on a suitable shelf or table and plug it in to a power outlet.
2.
Extend the telescopic antenna.
11
3.
Press STANDBY button on the front panel. You should see a welcome message ‘ Frontier Silicon
Starting’ and a moving progress bar.
4.
The first time the unit is switched on, it shows the main menu. Press the ENTER button on front panel
until FM is shown highlighted on the menu then press ENTER button again.
5.
Press ▲ (UP) direction button until the frequency display starts incrementing as the radio scans. Once a
station is found it plays, with the station name shown in the ``Now playing`` display.
2 Setup
2.1 Setting the language
The default language is English. To change this, select MENU > SYSTEM SETTINGS > LANGUAGES > then
select your language.
2.2
2.2 Setting the time/date
The time and date can be updated automatically or manually. To enter the Time settings menu, select MENU
> SYSTEM SETTINGS > TIME/DATE >
Auto update
Select AUTO UPDATE > then select Update from DAB, Update from FM or Update from Network.
Set your time zone through SET TIME ZONE >.
If your country uses daylight saving during the summer, the automatically updated time may be wrong by one
hour. When daylight savings are in effect, turn on the Daylight savings option through DAYLIGHT SAVINGS >
ON
The unit will auto-update from the selected source when time information is available.
Manual update
Select Time/Date >The date and time are displayed as dd-mm-yyyy and
hh:mm AM/PM with the first value, dd active (flashing).Press the
UP/DOWN button on the remote control to increase/decrease the digits;
Press the LEFT/RIGHT button to go to the previous/next value. As each
value is adjusted, the next value becomes active and flashes. When
you select the final value (minutes or AM/PM, depending on whether the clock is set to 12 or 24 hour mode),
the display reverts to the now playing screen and shows the newly updated time.
12/24 hour display
To change between 12 and 24 hour display, select SET FORMAT > SET 12/24 HOUR and then select your
preference.
12
2.3 Connecting to a network
For Internet radio and Music player modes, you need a network connection. To connect the radio to your
network, you need either
o
a wired router and an Ethernet (RJ45 network) cable, or
o
a Wi-Fi wireless router, together with password key if set.
For Internet radio and Internet software updates, the router must have a broadband Internet connection. When
you select Internet radio or Music player mode, the radio tries to connect to a network. If this is the first time it
has tried to connect, or if the stored networks are not accessible, the Network wizard starts. To run the
Network wizard manually, select MENU > SYSTEM SETTINGS >
NETWORK > NETWORK WIZARD. Once the wizard starts, enter the
following information (If it needs a password for entering):
o
If not already set, WLAN region (select country/region from list),
o
Network name (select your network from the list),
o
If connecting to an encrypted wireless network, the key
(password).
To enter your key, press the ENTER button on remote control to move
the cursor through the characters and select. As each character is
selected, the key is built up near the top of the display.
There are three options accessible by pressing ENTER button before
the first characters (0123…) – Backspace, OK and Cancel. Select
`BKSP` option to erase the characters you selected.
Once you have completed entering the key, select OK, and the radio
will try to connect to the selected network. If connecting fails, the radio
returns to the password entry screen.
If the network connection is lost, the radio automatically tries to reconnect.
Network profiles
This unit can remembers the last four wireless networks it has connected to, and automatically tries to connect
to whichever one of them it can find.
You can see the list of registered networks through MENU > SYSTEM SETTINGS > NETWORK >. From here
you can delete unwanted networks by turning and pressing ENTER then confirming delete Yes.
Other options
There are also other options for viewing and manually altering network settings from MENU > SYSTEM
SETTINGS > NETWORK >. These options are not normally necessary, but users experienced with networking
may find them useful for diagnosing and fixing network problems.
13
2.4 Internet radio portal registration
The Frontier Silicon Internet radio portal website allows you to organize your favorites lists and also listen to
Internet radio on a computer.
To register your radio with the portal, first get your radio´s unique portal access code by pressing MENU >
STATION LIST > HELP > GET ACCESS CODE >.
Write down the access code.
Note: Do not confuse the portal access code with the Radio ID (from
MENU > SYSTEM SETTINGS > INFO.)
On an internet-connected computer, access the portal website at
www.wifiradio-frontier.com .
If this is your first visit to the portal, register for a new account, entering the following information:
o
access code,
o
your e-mail address,
o
password,
o
radio model.
If you already have an account and wish to add an additional radio, log in to your account and select MY
PREFERENCES > ADD ANOTHER WI-FI RADIO.
Once your radio is registered with the portal, you can immediately use the favourites and added stations
features.
2.5 Setting up a music server
In order for the radio to play music files from a computer, the computer must be set up to share files or media.
UPnP media sharing allows devices like Jupiter 6 to play music from a shared media library, navigating
through tag menus such as Artist, Album or Genre. If you are running a suitable server system such as a PC
with Windows Media Player 10 or later (WMP), and your music library is well-tagged, then it is recommended
to use media sharing. Only the UPnP server needs to be set up.
14
Note: iTunes does not natively work as a UPnP media server, but there are add-ons available to work with an
iTunes library.
Folder sharing (CIFS) allows devices like Jupiter 6 to browse folders on a network drive for audio files. This is
a good alternative if you cannot use media sharing, and an alternative way to find files even if you have media
sharing set up. The computer needs to be set up to share folders, and if this is done with password control,
you also need to enter the user name and password into Jupiter 6.
2.6 Sharing media with Windows Media Player
The most common UPnP server is Windows Media Player (10 or later). To set up WMP for media sharing,
perform the following steps:
1.
Ensure that the PC is connected to the network.
2.
Ensure that the radio is powered on and connected to the same network.
3.
In WMP, add to the media library the audio files and folders you want to share with your internet radio
(Library > Add to Library…).
4.
In WMP, enable media sharing (Library > Media sharing…).
Setup windows media player
This is the procedure to run UPnP.
1.
Put some *.mp3 and *.wma in C:\Documents and Settings\All Users\Documents\My Music\Sample Music
(\\palm\dropbox\ylam\Music\)
2.
Install Windows Media Player 11 (
http://www.microsoft.com/windows/windowsmedia/player/download/dow nload.aspx)
3.
Click Library - Media Sharing…
4.
Check the “ Share my media to” box, then click settings
5.
Make sure your MEDIA SHARING look the same like below:
15
OK all the way out.
6.
7.
In Windows XP - Start Menu - Run - type services.msc, make sure
a.
Universal Plug and Play Device Host
b.
Windows Media Player Network Sharing Service is “ started” .
Make sure you laptop / PC and V6 board is connected to the same wireless network. If you are in Frontier
Silicon office, make sure your PC and V6 are connected to Frontier-Visitor
8.
Start V6 board. Go to Music Player Mode - Shared media - then you should be able to find the your
shared music in there. (I think Shared Media is for UPnP and Share folder is for samba)
2.7 Sharing folders on a Windows PC
To share folders in Windows, the PC must first be a member of a domain or workgroup. Once this is setup,
folders can be shared from Windows Explorer (My Computer).
16
Domain/workgroup configuration
The Domain configuration item can be found on a Windows XP machine as follows:
1.
From the start menu, select CONTROL PANEL > SYSTEM > COMPUTER NAME tab.
2.
The Domain or Workgroup that this Computer is a member of is displayed in this tab.
3.
If the PC is not a member of any Domain or Workgroup then one must be joined. To do this click on the
change button and enter the name of the domain (the default for Windows XP is MSHOME).
4.
A reboot of the PC may be prompted if the Domain or Workgroup has been changed.
Setting up a new user account (Windows XP)
The Wi-Fi Radio requires a user account to be set up on each PC that you wish to browse. By default most
PCs have at least one user account associated with it. The user name and password (optional) needs to be
the same on each PC as the Internet Radio only stores one user name and one password.
For windows XP this can be set up as follows:
1.
From the start menu, select Control Panel > User accounts.
2.
From this screen click ‘ Add …’ , and enter the new user name and the Domain/Workgroup setting
noted above. Select the type of user (restricted) and then select finish.
3.
Select the user just created, select ‘ Reset Password …’ and enter a password for this user.
4.
Note the User name and Password.
NOTE:
For Windows Vista: Users have to turn on the Guest account via manage user accounts in the control panel,
then add access to either ‘ Everyone’ or ‘ Guest’ on the shared drive. You could create a new account for
the internet radio, with a password, if you are concerned about security. The Guest account has no password
by default, so Jupiter 6 will connect to it from its factory default settings.
Configuring a shared drive
From the Start menu select My Computer or Windows Explorer and navigate to the directory you wish to
share. Right click on the folder and select Sharing and Security. Configure the shared drive as read-only, and
ensure that the user created above has read access to the share.
2.8 Sharing folders on nonnon-Windows computers
It is beyond the scope of this manual to describe how to share folders on all computer systems. Please refer to
your operating system documentation to find out how to share folders on non-Windows computer systems. If
you configure shared folders with user name and password security, note these values.
2.9 Setting the radio
radio to work with shared folders
To set up the radio to playback audio stored on password-protected
shared network drives, you need to enter a user name and password.
To do this, from Music player mode, select MENU > PC SETUP >
17
USERNAME and then enter the user name then PC SETTINGS > PASSWORD and enter the password.
Enter a keyword by selecting characters then OK. The user name and password entry screens are similar in
operation to the Wi-Fi password entry screen.
The default user name is ‘ guest’ .
3 Internet
Internet radio mode
This radio can play thousands of radio stations and podcasts from
around the world though a broadband Internet connection. When you
select Internet radio mode, the radio contacts the Frontier Silicon
Internet radio portal to get a list of stations, organized into different
categories like Country, Most popular and Genre. Once you select a
station, the radio connects directly to that station.
The portal also enables multiple lists of favorite stations that you can personalize, for example Andy’ s
stations, Jo’ s favorites, Talk shows. To use the favorites feature, register your radio with the portal website
as the above-mentioned (Internet radio portal registration). If you have several Frontier Silicon radios, you can
register them all on the same account so that each radio has access to your favorites lists. It is possible to add
favorites either directly through the radio or through any computer with a web browser. To enter Internet Radio
mode, either press MODE until the display shows Internet Radio or select MENU > MAIN MENU > INTERNET
RADIO.
NOTE:
The station list menu is provided from the Internet radio portal, so it is only accessible when the radio is
connected to the Internet. Station lists and submenus may change from time to time.
There are several ways of selecting stations. Directly from the radio:
o
Last listened,
o
Presets.
From the portal through the MENU > Station list > menu:
o
My Favourites,
o
Stations,
o
Podcasts,
o
My added stations,
o
Help.
If you are already listening to an Internet radio station, you can press LEFT direction button rather than MENU
to quickly return to the last visited branch of the menu tree. For example, suppose you were listening to New
Orleans Radio through the browse facility as described in section 5.4 below. Pressing LEFT would return you
to the Highlighted Blues stations menu. Pressing LEFT again would return you to the Blues menu, and so on.
18
3.1 Last listened
When Internet radio mode restarts, the last-listened station is selected. To select another recently used
station, select MENU > LAST LISTENED then one of the stations listed. Most recent stations appear at the top
of the list.
3.2 Presets
Presets are stored in the radio and cannot be accessed from other radios.
To store an Internet radio preset, press and hold PRESET until the display shows the Save preset screen.
Select one of the 10 presets to save the currently playing station.
To select a preset, press PRESET briefly, then select one of the listed preset stations. When a preset station
is playing, it shows Pn (P1, P2 etc) in the bottom of the screen.
NOTE: Operation of presets is identical for Internet radio, DAB and FM.
3.3 Favourites
Favourites are stored with the Internet radio portal, and are available through all Internet radios registered on
the same account. Before favourites can be used, the radio has to be registered with the Internet radio portal
(see ``Internet radio portal registration``).
To store a playing station as a favourite from the radio, simply press ENTER. The selected station appears in
the default favourites list Stations.
To select a favourite, select MENU > STATION LIST > MY FAVOURITES > [FAVOURITES LIST]>
[STATION].
19
3.4 Browse
To browse Internet broadcasts, select MENU > STATION LIST > then
either STATIONS > or PODCASTS >. Browse through the menus to
find broadcasts.
20
3.5 Search
You can also search through Internet broadcasts for stations or
podcasts with particular keywords in their title.
To search, select MENU > STATION LIST > then either STATIONS >
or PODCASTS >
Enter a keyword by selecting characters then OK. The user name and
password entry screens are similar in operation to the Wi-Fi password
entry screen.
Select a broadcast from the list.
For podcasts, you may be able to select a particular episode.
3.6 My added stations
Even though the Internet radio portal contains thousands of stations, you may want to listen to stations not
listed. You can add your own stations via the portal. These added stations are accessible from the radio by
selecting MENU > STATION LIST > MY ADDED STATIONS > [STATION].
3.7 Now playing information
While the stream is playing, the screen shows its name and description. To view further information about the
stream, press Info.
Each time you press Info, another set of information is displayed, cycling through `description, genre/location,
reliability, bit rate/codec/sampling rate, playback buffer and today´s date`.
21
4 Music player mode (network and USB)
Music player mode plays audio files such as MP3s or WMAs from a
computer on the local network, or from a USB Flash stick or hard
drive.
To enter Music player mode, either press MODE until the display
shows Music player or select MENU > MAIN MENU > MUSIC
PLAYER.
Once in music player mode, press MENU button, then select either SHARED MEDIA, SHARED FOLDERS,
USB PLAYBACK, PC SETTINGS, SYSTEM SETTINGS or MAIN MENU.
If you are already playing a music file, you can press LEFT rather than MENU to quickly return to the last
visited branch of the menu tree. For example, suppose you were listening to the track Heat by the artist 50
Cent through browsing shared media as described in section 6.1 below. Pressing LEFT button would return
you to the track listing for the album Get Rich or Die Tryin’ . Pressing LEFT again would list all 50 Cent
albums. Pressing LEFT again would list all album artists, and so on.
4.1 Shared media (from media server)
Select MENU > SHARED MEDIA >
If you have set up shared media, you should see an entry consisting
of <computer name>: <Shared media name>, for example JB-Laptop:
Audio. If you have more than one computer sharing media, the
alternatives are listed. Select the shared media you want to play.
From this point on, the menus are generated from the shared media
server (typically Windows Media Player). The first menu shows a list
of media types, for example Music, Video, Pictures and Playlists. The
radio can only play music and playlists.
There is also a search function, which finds tracks in a similar way to
Internet radio search.From Music, there are numerous ways of
selecting tracks, including:
o
Genre,
o
Artist,
o
Album,
o
Composer,
o
Rating.
Once you have found a track you want to play, press ENTER button. The radio will play the selected track,
then any further tracks that were listed on the same screen; usually this is the rest of the album.
* USBUSB-Extension cable should have a max. length of 25cm
22
4.2 Shared folders (from network or USB massmass-storage device)
Selecting shared folders
To play audio from shared folders, select MENU > SHARED FOLDERS > If you have set up shared folders
(as described from page 21), you should see an entry consisting of <Computer name>: <Shared folder
name>, for example JB-Laptop: Audio. If you have more than one shared folder, the alternatives are listed.
Select the shared folder you want to browse.
Selecting a USB playback device
To play audio from a USB mass-storage device such as a USB Flash stick or USB hard drive, select MENU >
USB PLAYBACK.
Browsing folders
folders
From this point on, the menus are generated from the shared folders
on the remote computer. You can browse the music library through its
folder tree with the ENTER and LEFT button. The display shows
folder and file names (not necessarily track names).
Once you have found a track you want to play, press ENTER button.
The radio will play the selected track, then any further tracks in the
same directory, in alphanumeric order.
4.3 Now playing information
While the track is playing, the screen shows its track and artist (UPnP) or file name and folder (CIFS/USB). At
the bottom of the screen, an icon indicates UPnP, CIFS or USB depending on the source. To view further
information about the stream, press INFO button.
Each time you press INFO button, another set of information is displayed, cycling through:
o
UPnP: artist, album, URL, bit rate/codec/sampling rate, playback buffer and today´s date,
o
CIFS/USB: folder, path, bit rate/codec/sampling rate, playback buffer and today´s date.
23
5 DAB radio
radio mode
DAB radio mode receives DAB/DAB+ digital radio and displays
information about the station, stream and track playing.
To enter DAB mode, either press MODE button until the display
shows DAB Radio or select MENU > Main menu > DAB.
5.1 Scanning
Scanning for stations
The first time you select DAB radio mode, the unit automatically
performs a full scan to see what stations are available. You may also
need to start a scan manually to update the list of stations for one of
the following reasons:
o
Available stations change from time to time.
o
If reception was not good for the original scan (for example the antenna was not up), this may result in an
empty or incomplete list of available stations.
o
If you have poor reception of some stations (burbling), you may wish to list only stations with good signal
strength.
To start a scan manually, select MENU > FULL SCAN. To scan only stations with good signal strength, select
MENU > LOCAL SCAN.
Once the scan is complete, the radio shows a list of available stations.
5.2 Selecting stations
To listen to or change a station, press the ENTER button to view a list of stations and press to select. Once
selected, the station plays and the screen shows information about the station, track or show as broadcast.
Presets
To store a DAB preset, press and hold PRESET until the display shows the Save preset screen. Select one of
the 10 presets to save the currently playing station.
To select a preset, press PRESET button briefly, then select one of the listed preset stations. When a preset
station is playing, it shows Pn (P1, P2 etc) in the bottom right of the screen.
5.3 Now playing information
While the stream is playing, the screen shows its name and DLS information broadcast by the station such as
programmed name, track title and contact details. To view further information about the stream, press INFO
button.
24
Each time you press INFO button, another set of information is displayed, cycling through DLS information,
programmed type, ensemble name/frequency, signal strength/error rate, bit rate/codec/channels and today’ s
date.
5.4 Settings
Dynamic range compression (DRC)
If you are listening to music with a high dynamic range in a noisy environment (for example classical music
while cooking), you may wish to compress the dynamic range. This makes quiet sounds louder, and loud
sounds quieter. To change DRC, select MENU > DRC > then DRC OFF, LOW or HIGH.
Station order
You can choose the order of the DAB station list to be either Alphanumeric, Ensemble or Valid. Ensemble lists
groups of stations that are broadcast together on the same ensemble, for example BBC or South Wales local.
Valid lists valid stations first, alphanumerically, then off-air stations.
To change station order, select MENU > STATION ORDER > then ALPHANUMERIC, ENSEMBLE or VALID.
6 FM RADIO MODE
FM radio mode receives analogue radio from the FM band and
displays RDS (Radio Data System) information about the station and
show (where broadcast).
To enter FM mode, either press MODE button until the display shows
FM Radio or select MENU > Main menu > FM.
6.1 Selecting stations
To find a station, press and hold the SCAN button until the frequency display starts to run up or down.
Alternatively, you can tune manually with quick presses of the SCAN button, or by pressing the ENTER button.
Once a station is tuned in, the Now playing screen shows the station name and any other information available
on RDS. If no information is available, just the frequency is shown.
Presets
To store an FM preset, press and hold PRESET button until the display shows the Save preset screen. Select
one of the 10 presets to save the currently playing station.
To select a preset, press PRESET button briefly, then select one of the listed preset stations. When a preset
station is playing, it shows Pn (P1, P2 etc) in the bottom right of the screen.
25
6.2 Now playing information
While the stream is playing, the screen shows its frequency, or if RDS information is available, station name
and any further RDS information such as programme name, track title and contact details. To view further
information about the broadcast, press INFO button.
Each time you press INFO button, another set of information is displayed, cycling through further RDS
information, frequency and today’ s date.
6.3 Settings
Scan settings
By default, FM scans stop at any available station. This may result in a poor signal-to-noise ratio (hiss) from
weak stations. To change the scan settings to stop only at stations with good signal strength, select MENU >
SCAN SETTING > STRONG STATIONS ONLY? > YES.
Audio settings
By default, all stereo stations are reproduced in stereo. For weak stations, this may result in a poor signal-tonoise ration (hiss). To play weak stations in mono, select MENU > AUDIO SETTING > FM WEAK
RECEPTION: LISTEN IN MONO ONLY > YES.
7 Alarms and sleep
As well as a clock/calendar, there are two versatile wake-up alarms
with snooze facility, and a sleep function to turn the system off after a
set period.
7.1 Alarms
To set or change an alarm, either press ALARM button or select
MENU > MAIN MENU > ALARMS.
Select the alarm number (1 or 2) then configure the following
parameters:
O
ENABLE: ON/OFF,
O
TIME,
O
MODE: BUZZER, INTERNET RADIO, DAB OR FM,
O
PRESET: 1-10,
O
FREQUENCY: DAILY, ONCE, WEEKENDS OR WEEKDAYS,
O
VOLUME:0 – 20.
When you have set the alarm, select Save to activate. The screen
shows active alarms with an icon at the bottom left.
26
At the set time, the alarm will sound. To temporarily silence it, press SNOOZE button. You can change the
snooze period by pressing the ENTER button on the front panel if you like. The radio returns to standby for the
set period, with the silenced alarm icon flashing.
7.2 Sleep
To set the sleep timer, select MENU > MAIN MENU > Sleep then choose from SLEEP OFF, 15 MINUTES, 30
MINUTES, 45 MINUTES OR 60 MINUTES.
Once you select a sleep period, the system returns to the main menu. Press MENU button to return to the
Now playing screen.
8 Software upgrade and factory reset
8.1 Software upgrade
upgrade
From time to time, Frontier Silicon may make software upgrades available with bug fixes and/or additional
features. You can either check manually, or set the radio to check periodically automatically (this is the
default). If Jupiter 6 detects that newer software is available, it will ask if you want to go ahead with an update.
If you agree, the new software is then downloaded and installed. After a software upgrade, all user settings
are maintained.
Before starting a software upgrade, ensure that the radio is plugged into a stable mains power connection.
To turn automatic checking on or off, select MENU > SYSTEM SETTINGS > SOFTWARE UPDATE > AUTOCHECK SETTING.
8.2 Factory reset
A factory reset resets all user settings to default values, so time/date, network configuration and presets are
lost. However, the radio´s current software version is maintained, as is registration with the Internet radio
portal. Internet radio favourites therefore remain unless you re-register your radio with another account on the
portal website.
To perform a factory reset, select MENU > SYSTEM SETTINGS > FACTORY RESET > YES.
27
ERROR MASSAGE
Message
Failed to connect
Description
Correct key entered, but router
Example
MAC filtering enabled on router
rejects request
Format error
Cannot recognize file format -
Received .wma, but found that the
independent of network
stream wasn’ t WMA when trying
to decode
Network error
Problem past router -incorrect
Data obtained from server is
data being received from network
unreadable.
Network not ready
Problem with connection to router
Router switched off
Network timeout
Problem past router -no response
Streaming IR station and
being received from network
suddenly station becomes
unavailable
No shared folders found
No CIFS folders on network
No UPnP media found
No UPnP servers found
No USB device found
Trying to access USB menu, but
no USB plugged in
Service not available (DAB)
No DAB reception
Unauthorized
Incorrect username/password for
CIFS, or access not granted by
UPnP server
Update failed
Software upgrade failed
USB device unsupported
Unsupported USB device plugged
in.
USB error
General USB problems
USB read error
Unable to read particular data
Bad memory sector found on USB
from memory
device
USB underpowered
Power failure to USB device -user
have to remove the device
28
TROUBLE SHOOTING
Problem
Cannot connect to network
Cause
Network down
Solutions
Check that network is working
between a computer and the
router
Router restricts access to listed
Obtain the Jupiter 6 MAC address
MAC addresses
from MENU > SYSTEM
SETTINGS > VIEW SETTINGS
and add to router list.
NOTE: The radio has separate
MAC addresses for wired and
wireless networks; only the
current network adaptor method
address is displayed, but the
other address can be obtained by
changing the first pair of digits
between ‘ 00’ (wireless) and
‘ 02’ (wired)
Cannot connect
Insufficient Wi-Fi signal strength
to Internet
Check distance to router; see if a
computer can connect to the
network in this location
Unknown encryption method
Change encryption method on
router. The radio supports WEP,
WPA, WPA2
Unusual network configuration
Setup network manually through
MENU > SYSTEM SETTINGS >
NETWORK > MANUAL
SETTINGS
Firewall preventing access
Check the following ports are
open: UDP and TCP ports 80 and
123; DNS port 53. Windows
shares: ports 135 – 139 and 445.
Windows Media Player: varies –
non-Microsoft firewalls may
require configuration for UPnP.
29
Problem
Cannot connect
Cause
Cause
Internet connection down
to Internet
Solutions
Check that Internet is working for
a computer connected to the
same network
Firewall preventing access
Cannot play particular Internet
Station not broadcasting,
radio station
overloaded or insufficient
bandwidth. Broadcasting using
unknown codec. Link out of date.
GLOSSAR
CIFS
Common Internet File System
DAB
Digital Audio Broadcasting
DLS
Dynamic Label Segment-short text information broadcast with DAB audio
FM
Frequency Modulation
MSC
Radio Data System
UPnP
Universal Plug and Play
USB
Universal Serial Bus
WLAN
Wireless Local Area Network
TECHNICAL DATA
Model:
IR 4427
Power supply:
220-240V, 50Hz
Power consumption:
15W
Protection class:
II
Net weight:
approx. 2.5 kg
Subject to technical changes without prior notice!
This device has been tested according to all relevant current CE guidelines, such as electromagnetic
compatibility and low voltage directives, and has been constructed in accordance with the latest safety
regulations.
30
MEANING OF THE „ DUSBIN“
DUSBIN“ SYMBOL
Protect our environment: do not dispose of electrical equipment in the domestic waste.
Please return any electrical equipment that you will no longer use to the collection point provided for their
disposal.
This helps avoid the potential effects of incorrect disposal on the environment and human health.
This will contribute to the recycling and other forms of reutilization of electrical and electronic equipment.
Information concerning where the equipment can be disposed of can be obtain from your local authority.
31
Stand 04/09
IR 4427
Elektro-technische Vertriebsges. mbH
Industriering Ost 40 • 47906 Kempen
PERFECT IN FORM AND FUNCTION