1
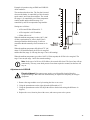
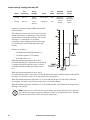
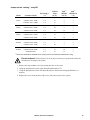
DATA CENTER SOLUTIONS For More Information: (866) 787-3271 Sales@PTSdcs.com Addendum Remote Air-Cooled Condenser Contents Overview .......................................................................... 1 Save these instructions . . . . . . . . . . . . . . . . . . . . . . . . . . . 1 Safety symbols that may be used in this manual . . . . . . . . . . . 1 Cross-reference symbols used in this manual . . . . . . . . . . . . . 1 Safety . . . . . . . . . . . . . . . . . . . . . . . . . . . . . . . . . . . . . . . . . . . . . . . . . . . 2 Inspecting the Equipment . . . . . . . . . . . . . . . . . . . . . . . . . . . . . . . . . . 3 Filing a claim . . . . . . . . . . . . . . . . . . . . . . . . . . . . . . . . . . 3 Storing the Equipment Before Installation . . . . . . . . . . . . . . . . . . . . . 3 Configuration and Integration........................................ 4 Introduction . . . . . . . . . . . . . . . . . . . . . . . . . . . . . . . . . . . . . . . . . . . . . . 4 Wiring Diagrams . . . . . . . . . . . . . . . . . . . . . . . . . . . . . . . . 4 Electrical Connections . . . . . . . . . . . . . . . . . . . . . . . . . . . . 4 Electrical Data . . . . . . . . . . . . . . . . . . . . . . . . . . . . . . . . . . 4 Piping Diagrams . . . . . . . . . . . . . . . . . . . . . . . . . . . . . . . . 4 Flooded Receiver . . . . . . . . . . . . . . . . . . . . . . . . . . . . . . . 4 System Installation . . . . . . . . . . . . . . . . . . . . . . . . . . . . . . 4 Operational Temperature Controls . . . . . . . . . . . . . . . . . . . . 4 Electrical Connections . . . . . . . . . . . . . . . . . . . . . . . . . . . . . . . . . . . . . 5 Electrical Data . . . . . . . . . . . . . . . . . . . . . . . . . . . . . . . . . . . . . . . . . . . . 6 Piping Diagrams . . . . . . . . . . . . . . . . . . . . . . . . . . . . . . . . . . . . . . . . . . 7 System Installation . . . . . . . . . . . . . . . . . . . . . . . . . . . . . . . . . . . . . . . . 8 Installing the flooded receiver . . . . . . . . . . . . . . . . . . . . . . . 8 Refrigerant Piping . . . . . . . . . . . . . . . . . . . . . . . . . . . . . . . . . . . . . . . . . 9 Recommended line sizes . . . . . . . . . . . . . . . . . . . . . . . . . . 9 Fittings and valves . . . . . . . . . . . . . . . . . . . . . . . . . . . . . 10 Charging the system . . . . . . . . . . . . . . . . . . . . . . . . . . . . 11 Piping Volume . . . . . . . . . . . . . . . . . . . . . . . . . . . . . . . . . . . . . . . . . . . 13 Piping Insulation . . . . . . . . . . . . . . . . . . . . . . . . . . . . . . . 13 Remote Air Cooled Condenser i Temperature Controls . . . . . . . . . . . . . . . . . . . . . . . . . . . . . . . . . . . . 13 Operation . . . . . . . . . . . . . . . . . . . . . . . . . . . . . . . . . . . 13 Setpoint adjustment . . . . . . . . . . . . . . . . . . . . . . . . . . . . . 14 Differential adjustment . . . . . . . . . . . . . . . . . . . . . . . . . . . 14 Adjusting the A350A/B . . . . . . . . . . . . . . . . . . . . . . . . . . . 14 Adjusting the S350A/B . . . . . . . . . . . . . . . . . . . . . . . . . . . 15 Default jumper settings for “heating”, relay NC . . . . . . . . . . . 16 Adjustments to A350A/B . . . . . . . . . . . . . . . . . . . . . . . . . . 17 Jumper setting: cooling with relay NO . . . . . . . . . . . . . . . . . 18 Jumper set as “cooling”, relay NO . . . . . . . . . . . . . . . . . . . 19 ii Remote Air Cooled Condenser Overview Save these instructions This manual is an addendum to Larkin® installation manuals and contains technical information required by American Power Conversion (APC®) systems for proper condenser system installation and operation. Safety symbols that may be used in this manual Electrical Hazard: Indicates an electrical hazard, which, if not avoided, could result in injury or death. Danger: Indicates a hazard, which, if not avoided, could result in severe personal injury or substantial damage to product or other property. Warning: Indicates a hazard, which, if not avoided, could result in personal injury or damage to product or other property. Heavy: Indicates a heavy load that should not be lifted without assistance. Caution: Indicates a potential hazard, which, if not avoided, could result in personal injury or damage to product or other property. Tip Hazard: This equipment is easily tipped. Use extreme caution when unpacking or moving. Note: Indicates important information. Cross-reference symbols used in this manual Indicates that more information is available on the same subject in a different section of this manual. Indicates that more information is available on the same subject in a different manual. Remote Air Cooled Condenser 1 Safety Note: All work should be performed by APC authorized personnel only. Follow all local and national codes when installing this system. Only a licensed plumber may connect the water lines. Warning: A licensed plumber is required to connect all plumbing in compliance with all local and national codes. Caution: Keep your hands, clothing, and jewelry away from moving parts. Check dry cooler fans for foreign objects before starting the unit. Heavy: This equipment is heavy. Rigging is required for moving and installing the dry cooler. When using a forklift to move the pumping system, make sure to lift only from the bottom. Electrical Hazard: Only a licensed electrician or APC Field Service Engineer may connect the equipment to the UPS. Lock out power when shutting off the system for service. Only a licensed electrician may connect the equipment to utility power. Do not wear watches or jewelry when working near energized components. 2 Remote Air Cooled Condenser Inspecting the Equipment Your equipment has been tested and inspected for quality assurance prior to shipment from APC. To ensure that the equipment has not been damaged during transit, carefully inspect both the exterior and interior of the equipment immediately upon receipt. Filing a claim If damage is identified upon receipt of the equipment, note the damage on the bill of lading and file a damage claim with the shipping company. Contact APC for information on filing a claim with the shipping company. The shipping claim must be filed at the receiving end of the delivery. Note: In case of shipping damage, do not operate the equipment. Keep all packaging for inspection by the shipper and call APC at one of the numbers listed on the back cover of this manual. Storing the Equipment Before Installation Caution: Leaving the equipment uncovered and exposed to the elements can cause damage and will void the factory warranty. Remote Air Cooled Condenser 3 Configuration and Integration Introduction The included electrical data, piping diagram, system installation information, and operational control settings are required to properly connect and configure the Outdoor Heat Exchanger (OHE) to operate. Warning: Failure to follow this information may result in poor performance or damage to air conditioning products and/or the OHE. Wiring Diagrams See the wiring diagrams included with the OHE for proper electrical connection and jumper settings required for each OHE model to operate properly. These wiring diagrams are also available at the Sales Tool Portal for Wiring Diagrams on the APC web site at http://salestools.apc.com/. Electrical Connections See “Electrical Connections” on page 5, for OHE to NetworkAIR User Interface connection. Electrical Data See “Electrical Data” on page 6, for power requirements. Piping Diagrams See “Piping Diagrams” on page 7, for recommended piping and valve locations connecting the OHE to the NetworkAIR equipment. Flooded Receiver See “System Installation” on page 8, for proper installation of the Flooded Receiver. System Installation See “Plumbing” on page 9, for piping sizes, piping insulation, and system charges. Operational Temperature Controls See “Temperature Controls” on page 13, for the correct settings used with NetworkAIR products. 4 Remote Air Cooled Condenser Electrical Connections REMOTE AIR COOLED CONDENSER AFX AFX FM FM USER INTERFACE Remote Air Cooled Condenser 5 Electrical Data Ambient Temperature OHE SKU Larkin P/N Voltage 95° F (35° C) 105° F (40.5° C) ACCD75018 FCB-8 208-230/1/60 AFX018 N/A N/A 3.9 15.0 15.0 ACCD75019 FCB-8 460/1/60 AFX018 N/A N/A 2.4 15.0 15.0 ACCD75028 FCB-14 208-230/1/60 FM35 AFX018 N/A 7.8 15.0 15.0 ACCD75322 FCB-14 460/1/60 FM35 AFX018 NA 4.8 15.0 15.0 ACCD75301 LNH-S01-A007 12FPI 208-230/3/60 AFX018/ FM35 AFX018 N/A 4.8 15.0 25.0 ACCD75302 LNH-S01-A007 12FPI 460/3/60 AFX018/ FM35 AFX018 N/A 2.4 15.0 15.0 ACCD75303 LNH-S01-A007 12FPI 575/3/60 AFX018/ FM35 AFX018 N/A 1.7 15.0 15.0 ACCD75304 LNH-S02-A011 12FPI 208-230/3/60 FM40/50 FM35 AFX018 11.8 20.0 35.0 ACCD75305 LNH-S02-A011 12FPI 460/3/60 FM40/50 FM35 AFX018 5.9 15.0 15.0 ACCD75306 LNH-S02-A011 12FPI 575/3/60 FM40/50 FM35 AFX018 4.5 15.0 15.0 ACCD75307 LNH-S02-A017 12FPI 208-230/3/60 N/A FM40/50 FM35 11.8 20.0 35.0 ACCD75308 LNH-S02-A017 12FPI 460/3/60 N/A FM40/50 FM35 5.9 15.0 15.0 ACCD75309 LNH-S02-A017 12FPI 575/3/60 N/A FM40/50 FM35 4.5 15.0 15.0 ACCD75310 LNH-S03-A026 12FPI 208-230/3/60 N/A N/A FM40/50 18.8 22.8 40.0 ACCD75311 LNH-S03-A026 12FPI 460/3/60 N/A N/A FM40/50 9.4 15.0 20.0 ACCD75312 LNH-S03-A026 12FPI 575/3/60 N/A N/A FM40/50 7.3 15.0 15.0 ACCD75313 LNH-S02-A017 12FPI* 208-230/3/60 AFX065 N/A N/A 11.8 20.0 35.0 ACCD75314 LNH-S02-A017 12FPI* 460/3/60 AFX065 N/A N/A 5.9 15.0 15.0 ACCD75315 LNH-S02-A017 12FPI* 575/3/60 AFX065 N/A N/A 4.5 15.0 15.0 ACCD75316 LNH-S03-A026 12FPI* 208-230/3/60 N/A AFX065 N/A 18.8 22.8 40.0 ACCD75317 LNH-S03-A026 12FPI* 460/3/60 N/A AFX065 N/A 9.4 15.0 20.0 ACCD75318 LNH-S03-A026 12FPI* 575/3/60 N/A AFX065 N/A 7.3 15.0 15.0 ACCD75319 LNH-D06-A044* 208-230/3/60 N/A N/A AFX065 37.6 43.8 60.0 ACCD75320 LNH-D06-A044* 460/3/60 N/A N/A AFX065 18.8 21.9 30.0 ACCD75321 LNH-D06-A044* 575/3/60 N/A N/A AFX065 14.6 20.0 25.0 Note:* Dual circuited FLA = Full Load Amps MCA = Minimum Circuit Ampacity MOP = Maximum Overcurrent Protection 6 Electrical Data Remote Air Cooled Condenser 115° F (46.1° C) FLA MCA MOP Piping Diagrams Head pressure control valve** Module Flooded receiver** “P” trap Condenser Pitch in direction of refrigerant flow, 1/2 in. per 10 ft (4 mm per meter). Inverted “P” trap Control OHE interlock “S” trap Note:*Items supplied by other **Optional Remote Air Cooled Condenser 7 System Installation Installing the flooded receiver Attach the flooded receiver to the side of the heat exchanger. 1. Position the mounting brackets on the desired side of the heat exchanger. Mount each bracket to the heat exchanger using two screws for each bracket, and using the top holes in each bracket for placement. Caution: Be careful to select a mounting location that will avoid hot gas inlet and liquid outlet lines in the condenser. 2. Using the holes provided on the vertical side of the mounting brackets as a template, drill 3/16 in (5mm) pilot holes for each remaining mounting hole (six per mounting bracket). 3. Attach the flooded receiver to the side of the heat exchanger, aligning the twelve holes of the flooded receiver mounts to the corresponding holes in the mounting brackets, using twelve selftapping screws (provided). 4. Connect the flooded receiver as shown (all piping is field-supplied). HEAD PRESSURE CONTROL VALVE (MODEL OKEY) CONDENSER COMPRESSOR FLOODED RECEIVER tem Installation 8 Remote Air Cooled Condenser Refrigerant Piping Recommended line sizes See the NetworkAIR FM Installation Manual for detailed installation information. Equivalent Length ft (meters) 50 (15.25) 100 (31) 150 (46) 200 (61) FM35 FM40 FM50 AFX 018 AFX 065 Discharge line (horizontal) 1 1/8 1 1/8 1 3/8 7/8 1 3/8 Discharge line (vertical) 7/8 7/8 1 1/8 7/8 1 3/8 Liquid line 7/8 7/8 7/8 3/8 7/8 Flooded condenser to receiver 1 1/8 1 1/8 1 1/8 1 1/8 1 1/8 Discharge line (horizontal) 1 1/8 1 3/8 1 3/8 7/8 1 3/8 Discharge line (vertical) 7/8 7/8 1 1/8 7/8 1 3/8 Liquid line 7/8 7/8 7/8 3/8 7/8 Flooded condenser to receiver 1 1/8 1 1/8 1 1/8 1 1/8 1 1/8 Discharge line (horizontal) 1 1/8 1 3/8 1 5/8 1 1/8 1 5/8 Discharge line (vertical) 7/8 7/8 1 1/8 1 1/8 1 5/8 Liquid line 7/8 7/8 1 1/8 5/8 1 1/8 Flooded condenser to receiver 1 1/8 1 1/8 1 1/8 1 1/8 1 1/8 Discharge line (horizontal) 1 1/8 1 3/8 1 5/8 1 1/8 1 5/8 Discharge line (vertical) 7/8 7/8 1 1/8 1 1/8 1 5/8 Liquid line 7/8 7/8 1 1/8 5/8 1 1/8 Flooded condenser to receiver 1 1/8 1 1/8 1 1/8 1 1/8 1 1/8 Line type Follow ASHRAE and ARI guidelines for velocity and pressure drop in refrigerant piping design. Vertical discharge lines shall have a loop down to the floor or a trap at a minimum of one (1) per vertical run closest to the compressor, and additional traps at approximately every 20 feet to prevent oil return to the compressor discharge. Total pressure drop in the gas and liquid lines should not exceed 6 PSID for the AFX and FM series. The installing contractor should verify their pressure drop based on type of pipe and fittings used. All piping should be as clean as new, with a flush procedure and cleanliness testing for piping prior to being put into service. In addition, pressure test lines with an inert gas (nitrogen) for leakage, prior to charging with refrigerant. Install piping in accordance with ASHRAE, ARI, and local and national codes. Piping shall be properly supported throughout its entire length, with provisions for expansions due to temperature changes. Insulate hot gas discharge sections and liquid return lines to prevent early condensation, maintain required degrees of sub-cooling, and safeguard against personnel hazard from contact. All horizontal gas discharge runs of piping should slope/pitch down and in the direction of flow away from the compresor(s) at 1 inch over 10 feet. Return liquid lines should slope/pitch down and in the direction of flow toward the compressor(s) at 1 inch over 10 feet. Remote Air Cooled Condenser 9 Fittings and valves See the NetworkAIR FM Installation Manual for detailed installation information. ASHRAE refrigerant equivalent lengths for fittings and valve standards Type of Fitting or Valve - Equivalent Length of Pipe in Feet 10 Nominal Size of Pipe (in inches) Gate Valve Std Elbow 90° Reduced Coupling Side Outlet “T” Angle Valve 1/2 0.7 1.6 1.6 3.0 7.0 3/4 0.9 2.0 2.0 4.0 9.0 1 1.0 2.6 2.6 5.0 12.0 1 1/4 1.5 3.3 3.3 7.0 15.0 1 1/2 1.8 4.0 4.0 8.0 18.0 2 2.3 5.0 5.0 10.0 24.0 2 1/2 2.8 6.0 6.0 12.0 29.0 3 3.2 7.5 7.5 15.0 35.0 Remote Air Cooled Condenser Charging the system 35° C (95° F) Ambient Condenser Flooded Recievers APC SKU Larkin Model Charge needed for Larkin Condensers filled 100% in kg (lbs) System charge CRAC Unit Charge + Larkin condenser summer charge + Liquid line charge between CRAC unit and condenser + optional flooded receiver Optional Flooded Charge Receiver Dimensions Larkin Condenser Summer Charge in kg (lbs) Flooded Receiver Options in kg (lbs) Weight - kg (lbs) Diameter - mm (in) Length - mm (in) ACCD75018 & 019 FCB-8 12.9 (28.3) 3.2 (9.5) 11.6 (25.5) 14 (31) 152 (6) 914 (36) ACCD75028 & 322 FCB-14 19.1 (42.0) 5.7 (12.5) 17.2 (37.8) 28 (62) 219 (8 5/8) 914 (36) ACCD75301, 302, & 303 LNH-S01-A007 12FPI 11.4 (25.0) 3.7 (8.0) 10.3 (22.5) 14 (31) 152 (6) 914 (36) ACCD75304, 305, & 306 LNH-S02-A011 12FPI 14.6 (32.0) 4.6 (10.0) 13.1 (28.8) 18 (39) 168 (6 5/8) 965 (38) ACCD75313, 314, & 315 LNH-S02-A017 12FPI * 21.9 (48.0) 6.9 (15.0) 19.7 (43.2) 28 (62) 219 (8 5/8) 914 (36) * Dual Circuit = values shown are per circuit NOTE: Two flooded receivers are needed for dual circuited condensers (one per circuit) Remote Air Cooled Condenser 11 40.5° C (105° F) Ambient Condenser Flooded Receivers APC SKU Larkin Model Charge needed for Larkin Condensers filled 100% in kg (lbs) System charge CRAC Unit Charge + Larkin condenser summer charge + Liquid line charge between CRAC unit and condenser + optional flooded receiver Optional Flooded Charge Receiver Dimensions Larkin Condenser Summer Charge in kg (lbs) Flooded Receiver Options in kg (lbs) Weight - kg (lbs) Diameter - mm (in) Length - mm (in) ACCD75028 & 322 FCB-14 19.1 (42.0) 12.5 (5.7) 17.2 (37.8) 28 (62) 219 (8 5/8) 914 (36) ACCD75301, 302, & 303 LNH-S01-A007 12FPI 11.4 (25.0) 3.7 (8.0) 10.3 (22.5) 14 (31) 152 (6) 914 (36) ACCD75304, 305, & 306 LNH-S02-A011 12FPI 14.6 (32.0) 4.6 (10.0) 13.1 (28.8) 18 (39) 168 (6 5/8) 965 (38) ACCD75307, 308, & 309 LNH-S02-A017 12FPI 44.1 (97.0) 13.2 (29.0) 39.7 (87.3) 48 (106) 219 (8 5/8) 1524 (60) ACCD75316, 317, & 318 LNH-S02-A026 12FPI * 21.9 (48.0) 6.9 (15.0) 19.7 (43.2) 28 (62) 219 (8 5/8) 914 (36) * Dual Circuit = values shown are per circuit NOTE: Two flooded receivers are needed for dual circuited condensers (one per circuit) 12 Remote Air Cooled Condenser Piping Volume Overall System Charge = CRAC Unit Charge* + Larkin Condenser Summer Charge + Liquid line charge between CRAC unit and Condenser + Optional Flooded Charge. Density of liquid R22 @ 105°F 260 psig = 70.3 lb/ft3 (40.5°C 1793 kPa = 95 N m) Inside diameter for 7/8 in (22 mm) OD ACR copper tube is 0.785 in (20 mm) Cross sectional area for 0.785 in (20 mm) ID pipe is 0.00336 ft2 (312 mm2) R22 in liquid line = area × Length in ft × density = 0.00336 ft2 × L ft × 70.3 lb/ft3 (312 mm2 × L m × 1126 kg/m3) Liquid line charge for 7/8 in (22 mm) OD ACR copper tube is 2.36 lbs/10 ft R22 (1 kg/3 m) Inside diameter for 1 1/8 in (28.6 mm) OD ACR copper tube is 1.025 in (26 mm) Cross Sectional Area for 1.025 (26 mm) ID pipe is 0.00573 ft2 (532 mm2) R22 in Liquid line = area × Length in ft × density = 0.00573 ft2 × L ft × 70.3 lb/ft3 (532 mm2 × L ft × 1126 kg/m3) Liquid line charge for 1 1/8 in (28.6 mm) OD ACR copper tube is 4.03 lbs/10 ft R22 (1.8 kg/3 m) Note:*FM35 charge = 11.3 kg (25 lbs) *FM50 charge = 11.3 kg (25 lbs) *AFX 018 charge = 6 kg (13 lbs) *AFX 065 charge = 20 kg (44 lbs) Piping Insulation See “Piping Diagrams” on page 7 for details and locations of recommended valves. To prevent condensation on piping, proper pipe insulation must be practiced. Insulate all piping that is exposed to sunlight Temperature Controls Operation The OHEs use A350A/B and S350A/B temperature controllers to regulate fan operation. These controllers operate on 24 VAC, and each provides an SPDT relay output. Each controller has a front panel LED that indicates when the relay is energized. Adjustable features include: • setpoint • differential • heating/cooling jumpers Note: All System 350 controls are designed for use ONLY as operating controls. Where an operating control failure would result in personal injury or loss of property, it is the responsibility of the installer to add devices (safety, limit controls) that protect against, or systems (alarm, supervisory systems) that warn of, control failure. Remote Air Cooled Condenser 13 Setpoint adjustment Setpoint adjustment is defined as the temperature at which the relay de-energizes. Use the setpoint dial on the front of the controller to adjust the setpoint. Differential adjustment Differential adjustment is defined as the change in sensor temperature between energizing and deenergizing the relay. Use the potentiometer marked “DIFF” to adjust the temperature differential. A350A/B Board Layout and Terminal Locations Module Connector DIFF (Differential Potentiometer) Relay LED Indicator Heat Cool Relay Jumper Block Cover screw NC COM DIFF (Differential Potentiometer) Offset Potentiometer Setpoint Dial 24V COM VDC SEN S350A/B Board Layout and Terminal Locations NO Module Connector Module Connector Heat Relay LED Indicator Cool Relay Jumper Block Cover screw NC COM NO Adjusting the A350A/B Set the A350A/B for the desired operation: 1. Remove the A350A/B cover by loosening the four cover screws. 2. Set the heating/cooling jumper blocks to the desired mode of operation. Position the jumper blocks vertically for heating or horizontal for cooling. Note: Verify that the heating/cooling jumper blocks are in the proper position before powering the System A350A/B modules. If the jumper blocks on the control or staging modules are installed in the wrong position, the device will activate the relay in response to the opposite signal. The heating or cooling equipment will remain energized until the error is corrected. Electrical Hazard: Disconnect power to avoid possible electrical shock or equipment damage. More than one disconnect may be required to completely deenergize the equipment. Note: Make all wiring connections in accordance with all national and local codes. Use copper conductors only. Do not exceed electrical ratings. 3.Adjust the differential potentiometer (DIFF) on the A350 to 3°F. 4. Replace the cover, and secure in place with the four captive screws. Move the setpoint dial to the desired position. 14 Remote Air Cooled Condenser Adjusting the S350A/B Refer to the following steps for adjusting stage module settings. Electrical Hazard: Disconnect power supply to avoid possible electrical shock or equipment damage. More than one disconnect may be required to completely de-energize equipment. 1. Ensure all power to system is off. Each stage module may be receiving power from separate sources. Make sure all power sources to each stage module are off. 2. Remove the stage module cover by loosening the four captive cover screws. 3. Set the heating/cooling jumper blocks to the desired mode of operation. Position the jumper blocks vertically for heating or horizontal for cooling. 4. Adjust the differential using the potentiometer marked DIFF to the desired setting (the difference in degrees [3°F] between energizing and de-energizing the stage module relay). 5. Use the potentiometer marked OFFSET to adjust the offset to the number of degrees from the System 350 control setpoint at which the stage relay de-energizes. 6. Replace the cover on the stage module and fasten it in place with screws. 7. Restore power to system. Remote Air Cooled Condenser 15 Default jumper settings for “heating”, relay NC Mode Fan Connection Sensor Reading Relay Fan Status Standard Operation Control Failure Heating NC to C Below Setpoint Energized OFF Above Setpoint De-energized ON Will drive head pressure toward setpoint. May drive head pressure below desired level. Heating NC to C S350** S350** OFFSET S2 OFFSET S3 (°F) (°F) Model LNH 1140 rpm Larkin Condensers Fan Config. 1×N or 2×N A350 Set Point S1 ºC (°F) FM35 LNH-S01-A007 12FPI 1×1 x x x LNH-S01-A011 12FPI 1×2 90 x x LNH-S02-A017 12FPI 1×2 100 x x LNH-S02-A011 12FPI 1×2 87 x x LNH-S02-A017 12FPI 1×2 95 x x LNH-S02-A026 12FPI 1×3 110 12 x LNH-S02-A011 12FPI 1×2 77 x x LNH-S02-A017 12FPI 1×2 90 x x LNH-S02-A026 12FPI 1×3 100 10 x LNH-S01-A007 12FPI 1×1 x x x LNH-S01-A007 12FPI 1×1 x x x LNH-S02-A011 12FPI 1×2 95 x x LNH-S02-A017 12FPI 1×2 70 x x LNH-S03-A026 12FPI 1×3 96 20 x LNH-D06-A044 2×3 100 10 x FM40 FM50 AFX018 AFX065 Note:** Larkin wires A350A/B and S350A/B as NC, jumper positions in A350A/B and S350A/B as heating. 16 Remote Air Cooled Condenser Example of operation using an FM50 and LNH-S03A026 condenser: The condenser has three fans. The first fan is located closest to the header, is controlled by a P66 electronic speed control, and is not discussed here. The second fan (stage 1) is controlled by an A350A temperature control module and the third fan (stage 2) is controlled by an S350A temperature stage module. Settings are as follows: • A350A and S350A differential is 3°. • A350A setpoint is 100°F ambient. • S350A offset is 10°. When the ambient temperature is above 90°F (100º A350A setpoint minus 10º offset), the S350A is deenergized and the third fan (stage 2) will run (remember that the normally closed contacts are in use). When the ambient temperature falls below 87°F (90º minus 3º S350A differential), the S350A is energized and the third fan (stage 2) will stop (the stage 1 fan is still running). When the ambient temperature goes above 100°F (A350A setpoint) the S350A is de-energized. The stage 3 fan runs (the stage 1 and 2 fans remain running). Note: In the case of A350A or S350 failure, the controls fail closed. The fan or fans will run continuously. This may cause head pressure lower than required or wanted, but the fans will stay on. Adjustments to A350A/B Electrical Hazard: Disconnect power supply to avoid possible electrical shock or equipment damage. More than one disconnect may be required to completely de-energize equipment. 1. Remove the stage module cover by loosening the four cover screws. 2. Using the potentiometer on the right, adjust the differential to 3°F. 3. Using the potentiometer on the left, adjust the offset to the desired setting (the difference in degrees). 4. Replace the cover, fasten in place with screws, and restore power to the system. Remote Air Cooled Condenser 17 Jumper setting: cooling with relay NO Mode Fan Connection Sensor Reading Relay Fan Status Standard Operation Control Failure Cooling NO to C Below Setpoint De-energized OFF Above Setpoint Energized ON Will drive head pressure toward setpoint. Unit will trip on high pressure switch. Cooling NO to C Example of operation using an FM50 and LNH-S03A026 condenser: The condenser has three fans. The first fan is located closest to the header, is controlled by a P66 electronic speed control, and is not discussed here. The second fan (stage 1) is controlled by an A350A/B temperature control module and the third fan (stage 2) is controlled by an S350A/B temperature stage module. Settings are as follows: • A350A/B and S350A/B differential is 3°. • A350A/B setpoint is 87°F ambient. • S350A/B offset is 10°. When the ambient temperature is above 90°F (A350A/B setpoint plus 3º differential), the A350A/B is energized, and the second fan (stage 1) will run (remember that the normally open contacts are in use). When the ambient temperature is above 100°F (A350A/B setpoint plus 10º offset, plus 3º S350A/B differential), the S350A/B is energized and the third fan (stage 2) will run (the stage 1 fan is still running at this temperature). When the ambient temperature falls below 97°F (A350A/B setpoint plus 10° offset) the S350A/B is de-energized. The stage 2 fan will stop, but the stage 1 fan remains running. When the ambient temperature falls below 87°F (A350A/B setpoint), the A350A/B is de-energized and the stage 1 fan will stop. Note: In the case of a A350A/B and /or S350 failure, the controls fail open. Fan or fans will stop, causing the computer room air conditioner (CRAC) to go high head pressure. The high pressure cut switch in the CRAC will stop the compressors. 18 Remote Air Cooled Condenser Jumper set as “cooling”, relay NO Model FM35 FM40 FM50 AFX018 AFX065 S350** OFFSET S2 (°F) S350** OFFSET S3 (°F) Condenser Model Fan Config. 1 ×N A350 Set Point S1 (°F) LNH-S01-A007 12FPI 1×1 x x x LNH-S01-A011 12FPI 1×2 87 x x LNH-S01-A017 12FPH 1×2 97 x x LNH-S02-A011 12FPI 1×2 84 x x LNH-S02-A017 12FPI 1×2 92 x x LNH-S03-A026 12FPI 1×3 95 12 x LNH-S02-A011 12FPI 1×2 74 x x LNH-S02-AP17 12FPI 1×2 87 x x LNH-S03-A026 12FPI 1×3 87 10 x LNH-S01-A007 12FPI 1×1 x x x LNH-S01-A007 12FPI 1×1 x x x LNH-S01-A011 12FPI 1×2 92 x x LNH-S02-A017 12FPI 1×2 67 x x LNH-S03-A026 12FPI 1×3 72 20 x LNH-D06-A044 2×3 87 10 x **Larkin wires A350A/B and S350A/B as NO, jumper positions in A350A/B and S350A/B as cooling. Electrical Hazard: Ensure all power is off. It may be necessary to perform more than one disconnect to de-energize the system. 1. Remove the stage module cover by loosening the four cover screws. 2. Using the potentiometer on the right, adjust the differential to 3°F. 3. Using the potentiometer on the left, adjust the offset to the desired setting (the difference in degrees). 4. Replace the cover, fasten in place with screws, and restore power to the system. Remote Air Cooled Condenser 19 APC Worldwide Customer Support Customer support for this or any other APC product is available at no charge in any of the following ways: • Visit the APC Web site to access documents in the APC Knowledge Base and to submit customer support requests. – www.apc.com (Corporate Headquarters) Connect to localized APC Web sites for specific countries, each of which provides customer support information. – www.apc.com/support/ Global support searching APC Knowledge Base and using e-support. • Contact an APC Customer Support center by telephone or e-mail. – Regional centers Direct InfraStruXure Customer Support Line (1)(877)537-0607 (toll free) APC headquarters U.S., (1)(800)800-4272 (toll free) Canada Latin America (1)(401)789-5735 (USA) Europe, Middle East, Africa (353)(91)702000 (Ireland) Japan (0) 35434-2021 Australia, New Zealand, (61) (2) 9955 9366 South Pacific area (Australia) – Local, country-specific centers: go to www.apc.com/support/contact for contact information. Contact the APC representative or other distributor from whom you purchased your APC product for information on how to obtain local customer support. DATA CENTER SOLUTIONS For More Information: (866) 787-3271 Sales@PTSdcs.com Entire contents copyright 2006 American Power Conversion Corporation. All rights reserved. Reproduction in whole or in part without permission is prohibited. APC, the APC logo, NetworkAIR, and InfraStruXure are trademarks of American Power Conversion Corporation. All other trademarks, product names, and corporate names are the property of their respective owners and are used for informational purposes only. 990-1904 *990-1904* 10/2006