1
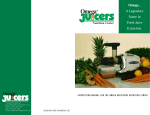
USER MANUAL
ELECTRIC YOGHURT MAKER
Model: 3440
Helpline No: 015394 88100
The Lakeland Guarantee....
is probably the simplest guarantee in the world!
If you are not satisfied at any time, you receive your money back!
This is our promise.
Lakeland
Alexandra Buildings, Windermere, Cumbria LA23 1BQ
Tel: 015394 88100 Web: www.lakeland.co.uk
INTRODUCTION
Thank you for choosing this electric yoghurt maker from My Kitchen, a hard-working
range of everyday cooks' essentials by Lakeland. The yoghurt maker is simple to use,
creating 1 litre of fresh, creamy, natural yoghurt in 8 hours, and costs just pennies to
run. Please take a few moments to read these instructions before using your yoghurt
maker for the first time, and keep them in a safe place for future reference.
FEATURES
1.
Memory dial
2. Outer lid
3. Inner lid with serving spoon
4. Yoghurt bowl
5. Insulated base
6. Power light
Operating voltage: 230V~50Hz
Power: 9W
Extra yoghurt bowls are available from www.lakeland.co.uk
IMPORTANT SAFEGUARDS
When using this yoghurt maker, please follow these basic safety precautions.
1.
Please read all instructions before using.
2.
Make sure your electricity supply matches the voltage shown on the appliance.
3.
This yoghurt maker is for household use only. It is not suitable for commercial
use, or for use outdoors. It must only be used for its intended purpose.
4.
Place the yoghurt maker on a flat, dry surface, well away from hot ovens, electric
and gas burners. Do not let the power cord hang over the edge of the worktop or
table, or touch hot surfaces, such as stovetops.
5.
To avoid electric shock, do not immerse the yoghurt maker, cord or plug in water
or any other liquid. Never allow the cord or plug to get wet.
6.
Once the yoghurt maker is switched on, please do not move it. Place it away from
any sources of vibration such as washing machines or fridges.
7.
Always switch off and unplug the yoghurt maker before adding or removing parts,
when not in use and before cleaning.
8.
Using attachments not supplied by the manufacturer may lead to electric shock,
fire or injury.
9.
The yoghurt maker is not intended for use by children or infirm people unless
they have been adequately supervised by a responsible person to ensure they
can use it safely. Children should be supervised to ensure they do not play with
the yoghurt maker.
10.
Do not use the yoghurt maker if the power cord or plug show any signs of
damage, or if the appliance is dropped, damaged or working incorrectly. Call the
helpline on 015394 88100 to arrange a repair by an authorised repairer, or a
replacement. Never try to repair the yoghurt maker yourself as this may cause
electric shock.
BEFORE USING FOR THE FIRST TIME
Carefully unpack the yoghurt maker and remove any packaging. Wipe the insulated
base with a soft, damp cloth, then dry. Wash all other parts in hot, soapy water. Rinse
well, then dry.
ABOUT HOME-MADE YOGHURT
Yoghurt is a live milk product which can reproduce itself in warm conditions. Easy and
inexpensive to make at home, all you need is a carton of natural live yoghurt to get
started, some milk and the means of keeping the correct temperature (ideally between
40°C and 47°C): this electric yoghurt maker.
CHOOSING THE MILK
Yoghurt can be made with any type of milk, including evaporated, goat’s, ewe’s and
soya. Calories, fat content and flavour will vary with the type of milk chosen. Yoghurt
made with semi-skimmed or skimmed milk will also have a thinner consistency.
Pasteurised
This milk has been heated to 71°C for 15 seconds, then rapidly cooled. Some bacteria
may remain so pasteurised milk should be heated to boiling point, then allowed to cool
below 50°C before use.
Untreated/goat’s/ewe’s milk
Bring to the boil and simmer for 7 minutes before cooling.
Long-life UHT/sterilised/evaporated/reconstituted milk
All these types of milk have been ready-treated and do not need boiling. Use at room
temperature, not straight from the fridge.
MAKING YOGHURT
1.
If you are using pasteurised or untreated milk, heat them as above and leave to
cool.
2.
Place the yoghurt maker on a level, dry and sturdy surface, away from draughts,
heat sources and appliances which may vibrate e.g. washing machines and
fridges.
3.
As your starter, put 2 teaspoons (10ml) unflavoured natural live yoghurt into the
bowl – the fresher the better, so please check the Use By date on the carton.
Gradually stir in 900ml (11⁄2 pints) milk. Take care not to whip or beat the mixture
too vigorously.
4.
Cover with the inner lid. Place the bowl inside the insulated base, and place the
outer lid on top. Plug in the yoghurt maker; the power light will come on. Make a
note of the start time by setting the memory dial on top of the lid.
5.
Leave the yoghurt maker undisturbed for 8 hours. There is no need to stir or mix
in the meantime. Many people find it convenient to make yoghurt overnight,
switching on the machine before they go to bed.
6.
After 8 hours – or next morning – unplug the yoghurt maker and lift out the lidded
bowl. Let it cool, then store in the fridge for up to 5 days. Please do not place the
insulated base in the fridge, only the bowl. TIP: yoghurt can be frozen but its
consistency will change after thawing, so it is best used as an ingredient or in
cooked dishes.
HELPFUL HINTS
The starter
•
Use unflavoured low-fat natural yoghurt, the freshest available with a long Use By
date.
•
If you make yoghurt regularly, save a couple of teaspoons of unflavoured yoghurt
from your last batch to start your next.
•
Yoghurt made from long-life UHT or evaporated milk tends to be the best starter.
The milk
•
Long-life UHT and evaporated milk make the best yoghurt.
•
Pasteurised milk often causes problems as it must be very fresh. It must be
boiled, then not too hot or too cold before use. If in doubt about temperature,
please check the milk with a cooking thermometer.
•
To make thicker yoghurt, add 2 tablespoons dried skimmed milk powder to the
milk before boiling.
The location
•
Yoghurt will take longer to make in a cool, draughty room.
•
If your kitchen is too cold (under 20°C) the yoghurt maker will need plugging in
for 5 minutes to warm up before using.
•
If possible, choose a draught-free position; draughts will cool the yoghurt maker.
•
Movement will cause separation and uneven texture so avoid moving the yoghurt
maker and do not place it on top of a source of vibration e.g. fridge or washing
machine.
•
Keep the yoghurt maker away from heat sources such as ovens and stovetops. Do
not place it on a shelf above a radiator.
The yoghurt maker
•
The incubation process is vital for success. Tempting though it may be, please
don’t lift the lid or stir the yoghurt before 8 hours have elapsed.
•
To speed up the incubation, plug in the yoghurt maker for 5 minutes before
adding the mixture.
•
If the power light does not come on, check the plug, fuse and socket. If in doubt,
please consult a qualified electrician or call the helpline on 015394 88100.
SERVING SUGGESTIONS
Home-made yoghurt tastes wonderful chilled from the fridge, but its smooth
creaminess is also the perfect backdrop for sweet and savoury ingredients. Flavourings
should be added after the yoghurt is made, never before, as this will inhibit the
incubation process. Flavoured yoghurt will keep in the fridge for up to 5 days.
ELECTRICAL CONNECTIONS
THIS APPLIANCE MUST BE EARTHED
This appliance is fitted with a fused three-pin plug to BS1363 which is suitable for use in all homes
fitted with sockets to current specifications. If the fitted plug is not suitable for your socket
outlets, it should be cut off and carefully disposed of. To avoid an electric shock, do not insert the
discarded plug into a socket.
Fitting a new plug
If for any reason you need to fit a new plug, the flexible mains lead must be connected as shown
here. The wires in the mains lead fitted to this appliance are coloured in accordance with the
following code:
Earth(green/yellow)
•
•
•
•
Spoon over muesli and drizzle with runny honey.
Make your own fresh fruit yoghurt by adding raspberries, blueberries,
strawberries or chopped banana. Sweeten to taste with honey or caster sugar.
Try flavourings such as milkshake syrup or powder, pureed tinned fruit, chopped
nuts, maple syrup or vanilla extract. Liquid flavourings will dilute the yoghurt.
Make strained, Greek-style yoghurt by placing a sieve over a bowl and lining with
a double thickness of muslin. Spoon the yoghurt into the sieve and leave to drain
in a cool place for at least 2 hours. Serve chilled with toasted nuts and honey.
Yoghurt makes a cool, creamy accompaniment to savoury dishes like curries and
chilli con carne. Add fresh chopped herbs, garlic, chilli or ground spices such as
cumin, turmeric or coriander.
Fresh yoghurt makes a smooth base for salad dressings, dips, seafood sauce,
cucumber raita and toppings for jacket potatoes.
CARE AND CLEANING
Always unplug the yoghurt maker before cleaning. Wipe the insulated base with a soft,
damp cloth, then dry thoroughly. Never immerse it in water.
Wash all other parts in hot, soapy water. Rinse well, then dry. Do not use abrasive
cleaners or metal scourers.
RECYCLING YOUR ELECTRICALS
Along with many other high street retailers, Lakeland has joined a scheme whereby
customers can take their unwanted electricals to recycling points set up around the
country. Visit www.recycle-more.co.uk to find your nearest recycling point.
L
Neutral(blue)
3amp FUSE
E
•
•
3amp fuse
N
Live(brown)
Connect BLUE to Neutral (N)
Connect GREEN & YELLOW to Earth (E)
Connect BROWN to Live (L)
3 amp fuse to be used
If the colours of the wires in the mains lead of this appliance do not correspond with the coloured
markings identifying the terminals in your plug, proceed as follows. The wire which is coloured
green and yellow MUST be connected to the terminal which is marked with the letter E (Earth) or
coloured green. The wire which is coloured blue MUST be connected to the terminal which is
marked with the letter N (Neutral) or coloured black. The wire which is coloured brown MUST be
connected to the terminal which is marked with the letter L (Live) or coloured red.
Before refitting the plug cover, check that there are no cut or stray strands of wire inside the plug.
Use a 3 amp BS1362 fuse. Only BSI or ASTA approved fuses should be used. If you are at all unsure
which plug or fuse to use, always refer to a qualified electrician.
Note: after replacing or changing a fuse on a moulded plug which has a fuse cover, the cover must
be refitted to the plug; the appliance must not be used without a fuse cover. If lost, replacement
fuse covers can be obtained from an electrical shop. This appliance complies with the following
EEC Directives: 73/23 EEC (Low Voltage Directive) and 89/336 EEC (EMC Directive).
0001