1
Operator's Manual
CRRFTSNRNo
2.6 cu. in./42cc 2-Cycle
GASOLINE CHAIN SAW
Model No.
358.352680 - 18 in. Bar
@
Read
and follow all Safety Rules and Operating
WARNING:
Instructions before first use of this product.
For answers to your questions about this product:
Call 7 am-7 pro, Mon-Sat; Sun, 10 am-7 pm
1-800-235-5878
Sears, Roebuck
530-087030
07/0"_/97
and Co., Hoffman
Estates, IL 60179 USA
Warranty
Safety Rules
Assembly
Operation
Maintenance
Service and Adjustments
2
2
5
6
11
14
FULL ONE YEAR WARRANTY
CHAIN SAW
Storage
Trouble Shooting Chart
Parts List
Spanish
Parts & Ordering
ON CRAFTSMAN
16
17
19
22
Back
® GAS
For one year from the date of purchase, when this Craftsman Gas Chain Saw is
maintained, lubricated and tuned up according to the owner's manual, Sears will
repair, free of charge, any defect in material or workmanship.
This warranty excludes the bar, chain, spark plug and air filter, which are
expendable parts, and become worn during normat use.
If this Gas Chain Saw is used for commercial or rental purposes, this warranty
applies for 30 clays from the date of purchase.
WARRANTY SERVICE IS AVAILABLE BY RETURNING THIS CHAIN SAW TO
THE NEAREST SEARS SERVICE CENTER IN THE UNITED STATicS.
This warranty gives you specific legal rights, and you may also have other rights
which vary from state to state.
Sears, Roebuck and Co., D1817 WA, Hoffman Estates, IL 60179
WARNING: Always disconnect spark
plugwire when makingrepairsexcept
for carburetoradjustments.Because a
chainsaw is a high-speed woodcutting
tool,careless or improper use of this
toolcan cause seriousinjury.
PLAN AHEAD
• Restrict the use ofyour saw to adult
users who understand and can follow
the safety rules, precautions, and operating instructions found in this
manual,
Snug
Fitting --_-.-_
Cfothing
Safety
Shoes
Protection
Heavy Duty
Gloves
/
j
-\
Safety Chaps
=_llllle
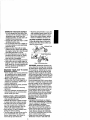
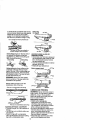
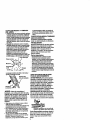
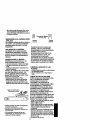
, Wear protective gear. Always use
steel-toed safety footwear with nonslip soles; snug-fitting clothing; heavy-
duty, non-slipgloves; eye protection
such as non-fogging,vented goggles
or face screen; an approvedsafety
hard hat;and sound barriers(ear
plugs or mufflers) to protect your
hearing. Regular usersshould have
hearingchecked regularlyas chain
saw noisecan damage hearing.Socure hair above shoulder length.
, Keep all parts of your body away from
the chain when the engine is running.
° Keep children, bystanders, and anireals at least 30 feet (10 meters)
away from the work area when starting and using the saw.
Do not handle or operate a chain saw
when you are fatigued, il!, or upset, or
if you have taken alcohol, drugs, or
medication, You must be in good
physical condition and mentally alert.
If you have any condition that might
be aggravated by strenuous work,
check with doctor before operating.
Do not start cutting until you have a
clear work area, secure footing, and
especially if you are felling a tree, a
retreat path.
........
?
OPERATE YOUR SAW SAFELY
• Do not operate with one hand. Serious injury to the operator, helpers, or
bystanders may result from onehanded operation. A chain saw is intended for two-handed use.
• Operate the chain saw only in a wellventilated outdoor area.
• Do not operate saw from a ladder or
in a tree, unless you are specifically
trained to do so.
• Make sure the chain will not make
contact with any object while starting
the engine. Never try to start the saw
when the guide bar is in a cut.
• Do not put pressure on the saw, especially at the end of the cut. Doing
so can cause you to lose control
when the cut is completed.
° Stop engine before setting saw down.
• Hand carry saw only when engine is
stopped. Carry with muffler away from
body; guide bar & chain projecting behind you; guide bar preferably covered with a scabbard.
MAINTAIN
YOUR SAW IN GOOD
WORKING
ORDER
- Have all chain saw service performed
by a qualified service dealer except
the items listed in the maintenance
section of this manual.
• Make certain the saw chain stops
moving when the throttle trigger is released. For correction, refer to "Carburetor Adjustments."
• Keep the handles dry, clean, and free
from oil or fuel mixture.
• Keep caps and fasteners securely
tightened.
• Use only Craftsman accessories and
replacement parts as recommended.
Never modify your saw.
HANDLE FUEL WITH CAUTION
• Do not smoke while handling fuel or
while operating the saw.
• Eliminateall sources of sparks or flame
in areas where fuel is mixed or poured.
• Mix and pour fuel in an outdoor area
and use an approved, marked container for aU fuel purposes. Wipe UP
all fuel spills before starting saw.
• Move at least 10 feet (3 meters) from
fueling site before starting.
Turn the engine off and let saw cool in
a non-combustible area, not on dry
leaves, straw, paper, etc. Slowly remove fuel cap and refuel unit.
• Store the unit and fuel in a cool, dry
well ventilated space where fuel vapors cannot reach sparks or open
flames from water heaters, electdc
motors or switches, furnaces, etc.
GUARD AGAINST
KICKBACK
Follow all safety rules to help avoid
kickback and other forces which can
result in serious injury.
_
.,,._/,
Kickback Path
Avon Obstructions
Clear The WorkingArea
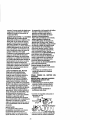
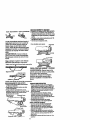
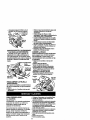
WARNING;
Rotational Kickback can
occur when the moving chain contacts
an object at the upper portion of the tip
of the guide bar, Contact at the upper
portion of the tip of the guide bar can
cause the chain to dig into the object,
which stops the chain for an instant. The
result is a lightning fast, reverse reaction
which kicks the guide bar up and back
toward the operator.
Pinch-Kickback and Pull-In occur when
the chain is suddenly stopped by being
pinched, caught, or by contacting a foreign object in the wood. This sudden
stopping of the chain results in a reversal of the chain force used to cut wood
and causes the saw to move in the opposite direction of the chain rotation.
Pinch-Kickback drives the saw straight
back toward the operator. Pull-In pulls
the saw away from the operator.
REDUCE THE CHANCE OF
KICKBACK
• Recognize that kickback can happen.
With a basic understanding of kickback,
you can reduce the element of surprise
which contributes to accidents.
• Never let the moving chain contact
any object at the tip of the guide bar.
• Keep working area free from obstructions such as other trees, branches,
rocks, fences, stumps, etc. Eliminate
or avoid any obstruction that your saw
chain could hit while cutting.
• Keep saw chain sharp and propedy
tensioned. A loose or dull chain can
increase the chance of kickback, Folkeep _our body from being in a direct
low manufacturer's chain sharpening
line with the cutting chain.
and maintenance instructions. Check
• Stand with your weight evenly balanced on both feet.
tension at regular intervals, but never
• Do not overreach. You could be drawn
with engine running. Make sure bar
or thrown off balance and lose control.
clamp nuts are securely tightened.
• Do not cut above shoulder height, tt is
• Begin and continue cutting at full
difficult to maintain control of saw
speed, if the chain is moving at a
above shoulder height,
slower speed, there is greater chance
of kickback occurring.
KICKBACK
SAFETY FEATURES
• Use extreme caution when reentering
WARNING:
The following features are
cut.
included on your saw to help reduce
• Do not attempt cuts starting with the
hazard of kickback; however, such featip of the bar (plunge cuts).
• Watch for shifting logs or other forces tures will not totally eliminate this danthat could close a cut and pinch or fall get. Do not rely only on safety devices.
into chain.
• Handguard: designed to reduce the
• Use the specified Reduced-Kickback
chance of your left hand contacting
Guide Bar and Low-Kickback Chain.
the chain if your hand slips off the
front handlebar.
Avoid Pinch-Kickback:
• Position of front and rear handlebars:
• Be extremely aware of situations or
designed with distance between hanobstructions that can cause material
dles and "in-line" with each other. The
to pinch the top of or otherwise stop
spread and "in-line" position of the
the chain.
hands provided by this design work
• Do not cut more than one log at a
together to give balance and reslstime.
tance in controlling the pivot of the
• Do not twist saw as bar is withdrawn
saw back toward the operator if kickfrom an undercut when bucking.
back occurs.
Avoid Pull-In:
- Reduced-Kickback Guide Bar: de• Always begin cutting with the engine
signed with a small radius tip which
at full speed and the saw housing
reduces the size of the kickback danagainst wood.
ger zone. This type bar has been
• Use wedges made of plastic or wood.
demonstrated to significantly reduce
Never use metal to hold the cut open.
the number and seriousness of kickMAINTAIN CONTROL
backs when tested in accordance with
ANSI B175.1.
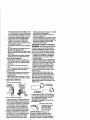
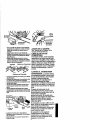
Standto the left ofthe saw
SmatlRadius
Thumbon
=
Tip Guide Bar
underside
of handlebar
Large
Radius
"tipGuide
Bar [i
Elbow
locked
• Low-Kickback Chain: has met kickback
performance requirements when tested
on a representative sample of chain
Neverreversehand positions
saws below 3,8 cubic inch
• A good firm grip on the saw with both
displacement specified in ANSi B175.1.
hands will help you mainta n control.
Low-I_ckback Chain
Don't let go. Grip the rear handle with
Contoured Depth Gauge
your right hand whether you are right
or left handed. Wrap the fingers of
Deflects Kickback
your left hand over and around the
Force And Allows
front handlebar, and your left thumb
To Gradually
_ Wood
longated
Guard Link
under the front handlebar. Keep your
Ride Into Cutter
. left
arm straight
theon
elbow
locked. SAFETY NOTICE: Exposure to
Position
your leftwith
hand
the front
handlebar soit is in a straight line with
your right hand on the rear handle
when making bucking cuts. Stand
slightlyto the left side of the saw to
vibrationsthroughprolonged use of
gasoline powered hand tools could,
cause blood vessel or nerve damage in
the fingers, hands, and joints of people
4
prone to circulation disorders or
abnormal swelling. Prolonged use in
cold weather has been linked to blood
vessel damage in otherwise healthy
people. If symptoms occur such as
numbness, pain, loss of strength,
change in skin color or texture, or loss
of feeling in the fingers, hands, or joints
discont nue the use of this tool and
seek medical attention. An
anti-vibration system does not
guarantee the avoidance of these
problems. Users who operate power
tools on a continual and regular basis
must closely monitor their physical
condition and the condition of this tool.
CHAIN BRAKE If this saw is to be used
for commercial logging, you must order
and install a chain brake to comply with
Federal OSHA Regulations for Commercial Logging. Contact your Sears
Service Center or call 1-800-235-5878:
SPARK ARRESTOR: Your saw is
equipped with a temperature timing
CARTON CONTENTS
Check carton contents against the following list.
Model 358.352680
• Chain Saw (fully assembled)
• Bar tool
• Chain
, Carrying Case
• Gloves
• Gas Can
• Bar & Chain Lube
• 2-cycle engine oil
o Examine parts for damage. Do not
use damaged parts.
mufflerand spark arresting screen
whichmeets the requirementsof
CaliforniaCodes4442 and 4443. All
U.S. forestlandand the statesof
California,Idaho,Maine, Minnesota,
New Jersey,Oregon,and Washington
requireby lawthat many internal
combustion enginesbe equippedwith a
spark arrestor screen.If you operatea
chainsaw in a state or localewhere
such regulationsexist, you are legally
responsiblefor maintainingthe
operatingconditionof theseparts.
Failureto do so is a violationof the law.
Refer to Customer Responsibilities
chart in the MAINTENANCE
section.
STANDARDS: This chainsaw is listed
by UnderwritersLaboratories,inc. in
accordance with AmericanNational
Standards for Gasoline-PoweredChain
Saws Safety Requ;rements(ANSI
B175.1-1991).
• If you need assistance or find that
parts are missing or damaged, please
call 1-800-235-5878.
NOTE: It is normal to hear the fuel filter
rattle in an empty fuel tank.
Your unit has been factory tested and
the carburetor precisely adjusted. As a
result you may smell gasoline or find a
drop of oil/fuel residue on the muffler
when you unpack the unit.
ASSEMBLY
Your saw is fully assembled; no
assembly is necessary.
I
KNOWYOURSAW
READ
THISOPERATOR'S
MANUAL
ANDSAFETY
RULES
BEFORE
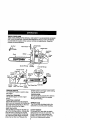
OPERATING YOUR CHAIN SAW, Compare the illustrations with your unit to familiarize
yourself with the location of the various controls and adjustments. Save this
manual for future reference.
r Too,
"
Hand Guard.---_
A_._.
Handle
"NLk
t I.,I
Chain
Muffler _
S .or.ope
.1
I_ /_._
switch
.
Bar Oil Fill Cap
Housing
Pdmer
Fuel Mix FillCap
Cylinder Cover
Fast Idle
Adjusting
Screw
Throttle
Tdgger
Choke
Knob Bar Clamp
Chain
Direction
of Travel
}
Bar Clamp Nuts Guide Bar
Chain
Catcher
ON/STOP SWITCH
The ON/STOP Switch is used to stop
the engine.
THROTTLE TRIGGER
The throttle trigger controls engine
speed.
THROTTLE LOCKOUT
The throttle lockout must be pressed
before you can squeeze the throttle trigger. This feature prevents you from accidentally squeezing the trigger.
FAST IDLE LOCK
The fast idle lock holds the throttle trigger in the starting position, Activate the
fast idle lock by pressing the throttle
lockout and squeezing the throttle trigger. With the throttle trigger squeezed,
press the fast idle lock. Release the
throttle lockout and trigger while holding
the fast idle lock button.
CHOKE KNOB
The Choke Knob activates the choke to
provide additional fuel to the engine
during cold starting.
PRIMER BULB
The Primer Bulbcirculates fuel to the
carburetorto providequicker starting,
CHAIN TENSION
It is normal for a new chain to stretch
during first 30 minutes of operation. You
should check your chain tension frequently. See Chain Tension under the
Service and Adjustments section.
6
BEFORE STARTING ENGINE
WARNING: Be sure to read the fuel
handlinginformationin the safety rules
sectionofthis manual beforeyou begin.
If you do not understandthe fuel handlinginformationdo not attemptto fuel
your unit. Seek helpfrom someonethat
does understandthe informationor call
the customerassistancehelp lineat
1-800-235-5878.
GUIDE BAR AND CHAIN OIL
The chain oiler provides continuous lubrication to the chain and guide bar. Be
sure to fill the bar oil tank when you fill
the fuel tank (Capacity = 6.8 fl. oz.).
For maximum guide bar and chain life,
we recommend you use Craftsman
chain saw bar oil. If Craftsman bar oil is
not available, you may use a good
grade SAE 30 oil until you are able to
obtain Craftsman brand. The oil output
is automatically metered during operation, Your saw will use approximately
one tank of bar el! for every tank of fuel
mix. Always fill the bar oil tank when
you fill the fuel tank,
lines and carburetor are empty. Use fresh
fuel next season. See STORAGE instructions for additionalinformation.
Never use engine or carburetor cleaner
products in the fuel tank or permanent
damage may occur.
See the STORAGE section for additional
information.
STOPPING
YOUR ENGINE
• Move On/Stop switch to STOP.
• If engine does not stop, pull choke
knob out fully.
STARTING YOUR ENGINE
COLD ENGINE OR WARM ENGINE
AFTER RUNNING OUT OF FUEL
• Fuel engine with 40:1 fuel mix.
• Fill bar oil tank with bar oil.
• Prime engine by slowly pressing primer bulb six times.
• Move OntStop switch to ON.
PrimerBulb
s tch
CHOKE POSITIONS
.... FUEUNG ENGINE
This engine is certified to operate on
unleaded gasoline. Before operation,
gasoline must be mixed with a good
quality 2-cycle air-cooled engine oil. We
recommend Craftsman brand oil. Mix
gasoline and oil at a ratio of 40:i (A
40:1 ratio is obtained by mixing 3.2
ounces of oil with 1 gatlon of unleaded
gasoline). DO NOT USE automotive oil
or boat oil. These oils will cause engine
damage. When mixing fuel follow the
instructions printed on the container.
Once oil is added to the gasoline,
shake container momentarily to assure
that the fuel is thoroughly mixed.
Always read and follow the safety rules
relating to fuel before fueling your unit.
k_!
I Off
Full
• Actuate choke by pulling choke knob
fulfy out.
• Set saw on the ground. Grip front
handle with your left hand and place
right foot through rear handle.
Starter RopeHandle
°.n 22t
IMPORTANT
Experience indicatesthat ak:ohol blended
RightFoot ThroughRear Handle
fuels (called gasohol or using ethanol or
methanol) can attract moisture which
• Set fast idle by depressing the throttle
leads to separationand formation of
lock with your right hand. Then,
acids during storage. Acidic gas can
squeeze and hold throttle trigger. With
damage the fuel system of an engine
dYourthumb, press the fast idle lock
while in storage.
own and hold. Next, release the
To avoid engine problems,the fuel systhrottle trigger.
tem should be emptied before storage for • DO NOT squeeze throttle trigger dur30 days or longer. Drain the gas tank,
ing starting; otherwise, it will be necstart the engine and let it run until the fuel
essary to reset the fast idle lock.
7
NOTE: When pulling the starter rope,
OPERATING
TIPS
do not use the full extent of the rope.
• Check chain tension before first use
Do not let starter rope snap back. Hold
and after 1 minute of operation. See
handle. Let rope rewind slowly.
Chain Tension in the Maintenance
section.
• Pull starter rope handle firmly and
quickly with your right hand until the
• Cut wood only. Do not cut metal, plasengine attempts to start, but no more
tics, masonry, non-wood building mathan 5 pulls. Then, push in choke
terials, etc.
knob fully. Resume pulling handle un- • Stop the saw if the chain strikes a fortil engine starts.
eign objecL Inspect the saw and re• Above 40°F, allow engine to run for
pair parts as necessary.
approximately 5 seconds. Then
• Keep the chain out of dirt and sand.
squeeze and release throttle trigger to
Even a small amount of dirt will quickallow engine to idte.
ly dull a chain and increase the possi• Below 40 °F, allow engine to warm up
bility of kickback.
for 30 seconds to 1 minute with choke • Practice cutting a few small logs using
at partial position. Push choke knob in
the following steps. This will help you
to the OFF position; then squeeze and
get the "feel" of using your saw before
release throttle trigger to allow engine
you begin a major sawing operation.
to idle.
• Squeeze the throttle trigger and al• To stop engine, move On/Stop switch
low the engine to reach full speed
to the STOP position.
before cutting.
• Begin cutting with the saw frame
STARTING A WARM ENGINE
against the log.
DO NOT use the choke to start a warm
• Keep the engine at full speed the
engine or flooding and hard starting
entire time you are cuffing.
may occur.
° Allow the chain to cut for you. Exert
• Move On/Stop switch to ON.
only light downward pressure.
• Set fast idle lock.
• Release the throttle trigger as soon
• Be sure choke is in the OFF position.
as the cut is completed, allowing the
• With saw on ground, grip front handle
engine to idle. If you run the saw at
with left hand and place your right foot
full throttle without a cutting load,
through rear handle.
unnecessary wear can occur.
• Pul! starter rope handle until engine
° To avoid losing control when cut is
starts.
complete, do not put pressure on
• Squeeze and release throttle trigger
saw at end of cut.
to return engine to idle speed.
• Stop engine before setting saw down.
DIFFICULT STARTING
OR
TREE FELLING TECHNIQUES
STARTING A FLOODED
ENGINE
Check for broken or dead
The engine may be flooded if it has not WARNING:
branches
which
can fall while cutting
started after 10 pulls. Flooded engines
causing serious injury. Do not cut near
can be cleared of excess fuel with the
buildings or electrical wires if you do not
following procedure:
know the direction of tree fall, nor cut at
• Engage the fast idle lock.
• Verify that the On/Stop switch is in the night since you will not be able to see
well, nor during bad weather such as
ON position.
• Push choke knob to the OFF position. rain, snow, or strong winds, etc.
• With saw on ground, grip front handle • Carefully plan your sawing operation
in advance.
with left hand and place right foot
• Clear the work area. You need a clear
through rear handle.
area all around the tree so you can
• Pull starter rope handle until engine
have secure footing.
starts.
• Study the natural conditions that can
• Starting could require many pulls decause the tree to fall in a particular
pending on how badly the unit is
direction. These conditions include:
flooded. If engine still fails to start, re• The wind direction and speed.
fer to the TROUBLESHOOTING chart or
• The lean of the tree. The lean of a
call 1-800-235-5878.
tree might not be apparent due to
uneven or sloping terrain. Use a
plumb or level to determine the direction of tree lean.
° Weight and branches on one side.
• Surrounding trees and obstacles.
Look for decay and rot. If the trunk is
rotted, it can snap and fall toward the
operator.
Make sure there is enough room for
the tree to fall. Maintain a distance of
2.1/2 tree lengths from the nearest
person or other objects. Engine noise
can drown out a warning call.
Remove dirt, stones, loose bark,
nails, staples, and wire from the tree
where cuts are to be made.
,_
Plan a clear retreat path
_,.... ()--=,",==_45 ° ..
Directionof Fall
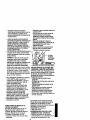
FELLING LARGE TREES
(6 inches in diameter or larger)
The notch method is used to fell large
trees. A notch is cut on the side of the
tree in the desired direction of fall. After
a felling cut is made on the opposite
side of tree, the tree will tend to fall in
the direction of the notch.
This hinge will help prevent the tree
from falling in the wrong direction.
Hingeholdstree on
stumpand helps
controlfat1
Opening of
felling cut
NOTE: Before felling cut is complete,
use wedges to open the cut when
necessary to control the direction of fall.
To avold kickback and chain damage,
use wood or plastic wedges, but never
steel or iron wedges.
• Be alert to signs that the tree is ready
to fall: cracking sounds, widening of
the felling cut, or movement in the upper branches.
° As tree starts to fall, stop saw, put it
down, and get away quickly on your
planned retreat path.
• Be extremely cautious with partially
fallen trees that may be poorly supported. When a tree doesn't fall completely, set the saw aside and pull
down the tree with a cable winch,
block and tackle, or tractor. Do not
use your saw to cut down a partially
fallen tree.
CUTTING A FALLEN TREE
(BUCKING)
Bucking is the term used for cutting a
fallen tree to the desired log size.
WARNING:
Do not stand on the log
being cut. Any portion can roll causing
toss of footing and control. Do not stand
downhill of the log being cut.
IMPORTANT POINTS
• Cut only one log at a time.
• Cut shattered wood very carefully;
sharp pieces of wood could be flung
toward operator.
Notch -_.,_
° Use a sawhorse to cut small logs.
Never allow another person to hold
the log while cutting and never hold
the log with your leg or foot.
• Do not cut in an area where logs,
limbs, and roots are tangled. Drag logs
into a clear area before cutting them.
• After removingthe wood, make the
BUCKING TECHNIQUES
felling cuton the opposite side of the
notch.This is done by making a cut
WARNING:
If saw becomes pinched
about two inches higher than the cen- or hung in a log, don't try to force it out.
ter of the notch. This will leave
You can lose control of the saw resultenough uncut wood between the felling in injury and/or damage to the saw.
ing cut and the notch to form a hinge.
Stop the saw, drive a wedge of plastic
9
NOTE: If tree has large buttress roots,
remove them before making the notch.
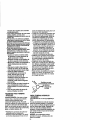
NOTCH CUT AND FELLING TREE
• Make notch cut by cutting the top of
the notch first. Cut through 1/3 of the
diameter of the tree. Next complete
the notch by cutting the bottom. See
illustration. Once the notch is cut, remove the wedge of wood from tree.
Finalcut here
Firstcut
=/
\
orwood into the cut until the saw can be
removed easily. Restart saw and carefulJy
reenter the cut. Do not use a metal
wedge. Do not attempt to restart your
saw when it is pinched or hung in a log.
Usinga log
for support
2n d
1stcut
Use a wedge to remove pinchedsaw
1stGut
"rumsaw OFF and use a plastic or
woodenwedge to force cut open.
Overcutting begins on the top side of
the log with the bottom of the saw
against the log. When overcutting use
light downward pressure.
Overcuttlng
Undercutting
Undercutting involves cutting on the
underside of the log with top of saw
against the log. When undercutting use
light upward pressure. Hold saw firmly
and maintain control, The saw will tend
to push back toward you.
WARNING:
Never turn saw upside
down to undercut. The saw cannot be
controlled in this position.
BUCKING USING A LOG OR
SUPPORT STAND
• Remember your first cut is always on
the compression side of the log. (Refer to the illustration below for your
first and second cut).
• Your first cut should extend 1/3 of the
diameter of the log.
• F3nishwith your second cut.
Using a_2
__lSt
naCut
Cut
Alwaysmake yourfirst cut on the
compressionside of the log.
First cut on compression side of log
LIMBING AND PRUNING
WARNING:
Never climb into a tree to
limb or prune. Do not stand on ladders,
platforms, a Iog, or in any position
Second cut
which can cause you to lose your balance or control of the saw,
IMPORTANT POINTS
* Watch out for spdngpoles.
Spriogpoles are small size limbs
which can whip toward you, or pull
Firstcut on compressionside of log
you off balance. Use extreme caution
BUCKING WITHOUT A SUPPORT
when cutting small size limbs.
• Overcut through 1/3 of the diameter of • Be atert for springback. Watch out for
the log.
branches that are bent or under pres• Roll the log over and finish with a secsure. Avoid being struck by the
end overcut,
branch or the saw when the tension in
• Watch for logs with a compresion
the wood fibers is released.
side. See illustration above for cutting
• Frequently clear branches out of the
logs with a compression side,
way to avoid tdpping over them.
10
LIMBING
branches are higher than your shoul• Limb a tree only after it is cut down.
der. Get a professional to do the job.
• Leave the larger limbs underneath the • Make your first cut 1/3 of the way
felled tree to support the tree as you
through the bottom of the limb.
work.
• Next make a second cut all the way
• Start at the base of the felled tree and
through the limb.
work toward the top, cutting branches
• Finish the pruning operation by using
and limbs. Remove small limbs with
an ovemut so that the stump of the
one cut.
limb protrudes t to 2 inches from the
° Keep the tree between you and the
trunk of the tree.
chain.
• Remove larger, supporting branches
with the 1/3, 2/3 cutting techniques dei
| Secondcut
scribed in the bucking section.
• Always use an overcut to cut small
and freely hanging limbs. Undercutting could cause limbs to fall and
pinch the saw.
PRUNING
/
t
WARNING;
Limit pruning to limbs
shoulder height or below. Do not cut if
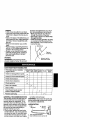
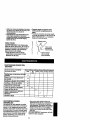
CUSTOMER
\
3rd cut I to 2in.
fromtrunkof tree
RESPONSIBILITIES
FlU in dates as you complete
regular service
Before After
Use
Use
EveryJ Every
5 hrs.125 hrs. Yearly
Service
Dates
Check for damaged/worn parts
Check for loose fasteners/parts
._,
Check chain tension
Check chain sharpness
•
Check guide bar
r
v"
Clean unit & labels
Clean air filter
Clearv'inspect spark arrestor
screen & inspect muffler
Replace spark plug
GENERAL RECOMMENDATIONS
The warrantyon this unitdoes notcover itemsthat have been subjectedto
operatorabuseor negligence.To receive fullvalue from the warranty, the
operator mustmaintain unit as instructed in this manual. Various adjustments
will need to be made periodicallyto
properly maintain your unit.
• Once a year, replace the spark plug,
air filter element, and check guide bar
and chain for wear. A new spark plug
and air filter element assures proper
air-fuel mixture and helps your engine
run better and last longer.
WARNING: Disconnect the spark plug
before performingmaintenanceexcept
for carburetoradjustments.
LUBRICATION
1 Bar
S-rocket
2 Bar Oil
"_ I
F,,cap
t
I Us_
2 Use Craftsman chainsaw bar oil
11
CHECK FOR DAMAGED OR
WORN PARTS
Replacementofdamaged/wornparts
shouldbe referredto yourSeam Service Center.
NOTE: It is normalfor a small amount
ofoil to appear underthe saw after engine stops.Do not confusethis with a
leakingoiltank.
o On/Stop Switch- EnsureOn/Stop
switchfunctions propedyby moving
the switchto the "Stop"position.
Make sure enginestops;then restart
engine and continue.
• Fuel Tank- Do not usesaw iffuel
tankshows signsofdamage or leaks.
• Oil Tank- Do not use saw ifoil tank
shows signsof damage or leaks.
CHECK FOR LOOSE
FASTENERS AND PARTS
° Bar Clamp Nut
• Chain
• Muffler
• Cylinder Shield
• Nr Filter
• Clutch Drum/Sprocket
° Handle Screws
• VibrationMounts
• Starter Housing
° Handguard
CHECK CHAIN TENSION
° Use the screwdriver end of the bar
tool to move chain around guide bar
to ensure kinks do not exist. The
chain should rotate freely.
Adiu_ng Screw - 1/4 rum
• Lift up tip of guide bar to check for
sag. Release tip of guide bar, then
turn adjusting screw 1/4 turn clockwise. Repeat until sag does not exist.
• While lifting tip of guide bar, tighten
bar clamp nuts with the bar tool.
Torque to 10-15 ft-lbs,
• Use the screwdriver end of the bar
tool to move chain around guide bar.
° If chain does not rotate, it is too tight.
Slightly loosen bar clamp nuts and
turn adjusting screw 1/4 turn counterclockwise. Retighten bar clamp nuts.
• If chain is too loose, it will sag below
the guide bar. DO NOT operate the
saw if the chain is loose.
CHECK CHAIN SHARPNESS
A sharp chain makes wood chips. A
dull chain makes a sawdust powder
and cuts slowly.
CHAIN SHARPENING
Chain sharpening requires special
tools. You can purchase sharpening
tools at Sears or go to a professional
chain sharpener.
CHECK GUIDE BAR
Bar Tool
Bar Clamp Nuts
• Loosen bar clamp nuts until they are
finger tight against the bar clamp.
• Turn adjusting screw clockwise until
chain barely touches the bottom of
guide bar.
A iost,ogJ
Conditions which require guide bar
maintenance:
• Saw cuts to one side or at an angle.
• Saw has to be forced through the cut.
• Inadequate supply of oil to bar/chaln.
Check the condition of guide bar each
time chain is sharpened. A worn guide
bar will damage the chain and make
cutting difficult, To maintain guide bar:
• Move On/Stop switch to "Stop."
• Remove bar and chain from saw,
• Clean all sawdust and any other
debris from the guide bar groove and
sprocket hole after each use.
RemoveSawdust From
Guide BarGroo_,_
° Using bar tool, roll chain around guide
bar to ensure all links are in bar groove.
12
• Add lubricant to sprocket hole after
each use.
• Burring of guide bar roils is a normal
process of rail wear. Remove these
burrs with a flat file.
• When rail top is uneven, use a fiat file
to restore square edges and sides.
INSPECT MUFFLER AND SPARK
ARRESTOR SCREEN
As the unitis used,carbon deposits
buildup on the mufflerand spark
arrestorscreen,and mustbe removed
to avoidcreatinga fire hazard or affecting engineperformance.
Replacethe spark arrestorscreenif
breaksoccur.
sidesSquare
File
Edges and
WornGroove
Correct Groove
Replace guide bar when the groove is
worn, the guide bar is bent or cracked,
or when excess heating or burring of
the rails occurs, tf replacement is necessary, use only the guide bar specified
for your saw in the repair parts list or on
the decal located on the chain saw.
Muffler Diffuser
Spark
Arrestor
Muffter
Cover
Screws
/
CLEAN UNIT & LABELS
Muffler
• Clean the unit using a damp cloth with Body
Muffler Cover
a mild detergent.
• Wipe off unit with a clean dry cloth.
CLEAN AIR FILTER
A dirty air filter decreases the life and
CLEANING
THE SPARK
performance of the engine and inARRESTOR
SCREEN
creases fuel consumption and harmful
Cleaning is required every 25 hours of
emissions. Always clean your air filter
operation or annually, whichever comes
after 15 tanks of fuel or 5 hours of opfirst.
eration, whichever comes first. Clean
• Loosen and remove the 2 muffler covmore frequently in dusty conditions. A
er screws.
used air filter can never be completely
• Remove the muffler cover (cover
cleaned. It is advisable to replace your
snaps off muffler body).
air filter with a new one after every 50
• Remove muffler diffuser and spark
hours of operation, or annually, whichever comes first. To clean filter:.
arrestor screen assembly. Notice the
orientation of these parts for reassem• Loosen 3 screws on cylinder cover.
bling.
• Remove cylinder cover.
• Clean the spark arrestor screen with a
, Remove air filter.
wire brush. Replace screen if breaks
• Clean the air filter using hot soapy
are found.
water. Rinse with clean cool water.
Air dry completely before reinstafling. • Replace any broken or cracked muffler pans.
• Lightly oil air filter before installing to
improve the efficiency of air filter. Use • Reinstall diffuser and spark arrestor
screen assembly with round holes
2-cycle engine og or motor oil (SAE
facing up.
30). Squeeze excess oil from filter.
• Reinstall muffler cover and 2 screws
• Reinstall air filter.
(7-8 ft-lbs).
• Reinstall cylinder cover and 3 screws
(15-20 in-lbs.).
REPLACE SPARK PLUG
CylinderCover
Air Filter
Screws
The spark plug should be replaced
each year to ensure the engine starts
easier and runs better. Ignition timing is
fixed and nonadjustable.
Cylinder
° Loosen 3 screws on cylinder cover.
Cover
• Remove the cylinder cover.
• Pull off the spark plug boot.
• Remove spark plug from cylinder and
discard.
13
• Replace with Champion RCJ7Y spark
plug and tighten with a 3'4 inch socket
wrench (10-12 ft-lbs). Spark plug gap
should be .025 in.
• Reinstall the spark plug boot.
Plug Boot
• Reinstall the cylinder cover and 3
screws (t5-20 in-lbs).
Spark
Plug
CHAIN
REPLACEMENT
Cylinder
Cover
Cutters
Dep_ Gauge
CAUTION:
Wear protective gloves
when handling chain. The chain is
sharp and can cut you even when it is
not moving.
It is normal for a new chain to stretch during the first 15 minutes of operation. You
should recheck your chain tension frequenfiy and adjustthe chain tension as
required. See Chain Tension section.
• Move On/Stop switch to the Stop
position.
• Replace the old chain when it becomes worn or damaged.
• Use only the Low-Kickback replacement chain specified in the repair
parts list. The correct replacement bar
and chain is also specified on a decal
located on the chain saw.
• See your Sears Service Center to replace and sharpen individual cutters
on your chain.
• Remove bar clamp nuts.
• Remove bar clamp.
• Remove the old chain.
Drive Links
• Place chain over and behind clutch.
• Fit bottom of drive links between teeth
in sprocket nose.
• Fit chain drive links into bar groove.
•Putl guide bar forward until chain is
snug in guide bar groove.
, Now, install bar clamp making sure
the adjusting pin is positioned in the
lower hole in the guide bar.
Lower
Hole
Adjusting
Pin
Bar
Clamp
, Turn adjusting screw by hand counterclockwise until adjusting pin just
touches the stop.
• Slide guide bar behind clutch drum
until guide bar stops against clutch
drum sprocket.
° Carefully remove new chain from
package. Hold chain with the drive
links as shown.
Guide Bar
• install bar clamp nuts andfinger tighten only. Do not tightenany further at
this point.
".f?} o,o No,o
CHAIN ADJUSTMENT
See "Chain Tension"in Maintenance
section.
14
CLEAN FUEL FILTER
To clean fuel filter, drain your unit by
running dry of fuel, remove fuel cap/retainer assembly from tank. Pull filter
from tank and remove from llne. Clean
with mild detergent and rinse. Dry thoroughly, reassemble.
CARBURETOR
ADJUSTMENT
WARNING:
The chain will be moving
during most of this procedure. Wear
your protective equipment and observe
all safety precautions. During the low
speed mixture adjustment recheck idle
speed after each turn of the screw. The
chain must not move at idle speed.
Carburetor adjustment is critical and if
done improperly can permanently damage the engine as well as the carburetor. if you require further assistance or
are unsure about performing this procedure, calt our customer assistance help
line at 1-800-235-5878.
Start motor, let it run for 3 minutes, and
proceed to the adjustment section. If
engine does not start, refer to troubleshooting chart or call 1-800-235-5878.
if engine performance is acceptable at
the preset positions and there is no
chain movement at idle, no further adjustment is necessary.
ADJUSTING
PROCEDURE
idle Speed-T
Allow engine to idle. Adjust speed until
engine runs without chain movement or
stalling.
• Turn clockwise to increase engine
speed if engine stalls or dies.
• Turn counterclockwise to decrease
speed.
No further adjustments are necessary if
chain does net move at idle speed and
if performance is satisfactory.
Low Speed Mixture-L
Allow engine to idle. Then accelerate
the engine and note performance. If enOld fuel, a dirty air filter, dirty fuel filter,
gine hesitates, bogs down, or smokes
or flooding may give the impression of
during acceleration, turn mixture screw
an improperly adjusted carburetor.
clockwise in 1/16-turn increments until
Check these conditions before adjusting the carburetor.
performance is satisfactory. Repeat this
The carburetor has been carefully set at procedure as necessary for proper adthe factory. Adjustments may be neces- justment. After completing adjustments,
check for acceleration and chain movesan/if you notice any of the following
ment at idle. Reset if necessary.
conditions:
• Chain moves at idle. See "Idle Speed" High Speed Mixture-H
under adjusting procedure.
DO NOT operate engine at full throttle
• Saw will not idle. See "Idle Speed"
for prolonged periods while making adand "Low Speed Mixture"under adjustments. Damage to the engine can
justing procedure.
occur. Make a test cut. Based on per• Engine dies or hesitates when it
formance of the saw while cutting, adshould accelerate. See =Acceleration
just the high speed mixture setting in
1/16-turn increments as follows:
Check" under adjusting procedure.
• Loss of cutting power. See "High
• Clockwise until saw has good power in
Speed Mixture H" under adjusting
the cut with no hesitation.Do not adjust
procedure.
by sound or speed, butjudge by how
well the saw perfoilT_ in the cut.
There are three adjustment screws on
• Counterclockwise if the saw has
the carburetor. They are labeled H, L,
speed, but dies in the cut or lacks
and T. They are located in the area just
power in the cut.
above the primer bulb.
After
completing adjustments, check for
CARBURETOR
PRESETS
acceleration and chain movement at
When making adjustments, do not force
idle. Reset if necessary.
the plastic timiter caps beyond the
Acceleration
Check
stops or damage wifl occur.
if the engine dies or hes_tes instead of
If carburetor presets are not needed,
accelerating, turn the low speed m_ure
proceed to "Idle Speed-T."
• Turn both mixture screws counteradjustment counterclockwiseuntil you
have smooth acceleration with no chain
clockwise until they stop.
• Turn the idle speed screw clockwise
movement at idle, Recheck and adjust as
until it stops. Now turn counterclocknecessary for acceptable performance.
wise 4-1/2 full turns.
15
Prepare
yourunitfor storageat the end tire in minimizingthe formationof fuel
of the seasonor if it will not be usedfor gum depositsduringstorage.Add stabilizer to the gasolinein the fuel tank or
30 days or more.
fuel storagecontainer. Followthe mix
WARNING:
instructions found on stabilizercontain• Allow the engine to coot,and secure
ers. Run engineat least 5 minutes after
the unitbeforestoring or transporting.
adding stabilizer.
• Store chainsaw and fuel in a well
CRAFTSMAN 40:1, 2-cycle engine oil
ventilated area where fuel vapors
(air cooled) is especially blended with
cannot reach sparks or open flames
from water heaters, electric motors or fuel stabilizer. If you do not use this
Sears oil, you can add a fuel stabilizer
switches, furnaces, etc.
to your fuel tank.
• Store chainsaw with all guards in
ENGINE
place and position chain saw so that
any sharp object cannot accidentally • Remove spark plugand pour 1 teacause injury.
spoonof 40:1, 2-cycle engine oil (air
• Storechainsaw well out ofthe reach
cooled) through the spark plug openof children.
ing.Slowly pull the starter rope 8 to
10 times to distribute oil.
EXTERNAL SURFACES
• Replace spark plug with new one of
Ifyourchainsaw is to be stored for a
recommended type and heat range.
periodof time, clean itthoroughlybe* Cleanair filler.
fore storage.Store in a clean dry area. • Check entireunitfor loose screws,
• Lightlyoilexternalmetal surfaces and
nuts, and bo_ts.Replace any damguide bar.
aged, broken,or wornparts.
• Oil the chain and wrap it in heavy pa- . At the beginningof the nextseason,
per or cloth.
useonly fresh fuel havingthe proper
gasolineto oll ratio.
FUEL SYSTEM
Under FuelingEngine in the Operating OTHER
Section ofthis manual, see message
• Do not store gasolinefrom one seasonto another.
labeled IMPORTANTregardingthe use
• Replace your gasoline can if it starts
ofgasohol in yourchain saw.
tOrust,
Fuelstabilizerisan acceptablealtema-
16
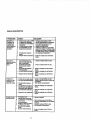
TROUBLE SHOOTING CHART
!TROUBLE
CAUSE
.......
Enginewiltnot r • ignitionswitch off.
startor willrun !• Engineflooded,
onlya few
• Fuel tank empty.
secondsafter • Spark plugnot firing.
starting.
• Fuel not reaching
carburetor.
EnginewUl not
idle properly,
- Carburetor requires
adjustment.
• None of the above.
• Idle speed set too high
or too low.
• Low Speed Mixture
requires adjustment.
• Crankshaft seals worn.
• Compression low.
• None of the above.
Engine wilt not • Air filter dirty.
accelerate,
• Spark plug fouled.
lacks power,
or dies under
• Carburetor requires
a load.
adjustment.
• Exhaust ports or muffler outlets plugged.
° Compression low.
• None of the above.
Engine smokes
excessively.
• Choke partially on.
• Fuel mixture incorrect.
• Air filter dirty.
• High Speed Mixture
requires adjustment.
• Crankcase leak.
Engine runs
hot.
Oil inadequate
for bar and
chain
lubrication.
, Fuel mixture incorrect.
• Spark plug incorrect.
• High Speed Mixture
set too lean.
• Exhaust ports or muffler outlets plugged.
• Carbon build-up on
muffler outlet screen.
• Fan housing/cylinder
fins dirty.
• None of the above.
- Oil tank empty.
• Oil pump or oil filter
clogged.
• Guide bar oil hole
blocked.
REMEDY
• Move Ignition Switch to ONI
• See "Starting instructions."
• Fill tank with correct fuel mixture
: install new spark plug.
Check for dirty fuel filter; replace
Check for kinked or split fuel line
repair or replace.
• See =Carburetor Adjustments."
• Contact Sears Service.
,, See "Carburetor Adjustments."
• See =Carburetor Adjustments."
• Contact Sears Service.
• Contact Sears Service.
. Contact Sears Service.
• Clean or replace air filter.
• Clean or replace plug
and regap.
• See "CarburetorAdjustments."
• Contact Sears Service.
- Contact Sears Service.
• Contact Sears Service.
• Adjust choke.
• Empty fuel tank and refill with
correct fuel mixture.
° Clean or replace air filter.
• See "Carburetor Adjustments."
• Contact Sears Service.
° See "Fueling Your Unit."
• Replace with correct plug.
• See "Carburetor Adjustments."
• Contact Sears Service.
• Clean spark arrestor screen.
° Clean area.
, Contact Sears Service.
• Fill oil tank.
• Contact Sears See,ice.
° Remove bar and clean.
17
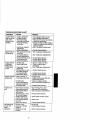
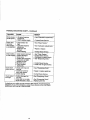
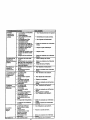
TROUBLE SHOOTING CHART - Continued
TROUBLE
CAUSE
REMEDY
Chain moves
at idle speed.
• Idle speed requires
adjustment.
• Clutch requiresrepair.
• See "Carburetor Adjustments."
Chain does
• Chain tension too
not move
tight.
when engine E*Carburetor requires
is accelerated. adjustment.
• Guide bar rails
pinched.
• Clutch slipping.
* Contact SearsService.
o See "Chain Tension,"
• See =CarburetorAdjustments."
• Repairor replace.
• ContactSears Service.
Chain clatters • Chain tension incorrect.
or cuts roughly,• Cutters damaged.
• Chain worn.
• Cutters dull, improperly
sharpened, or depth
gauges too high.
I. Sprocket worn.
• Chain installed
backwards.
•
•
•
•
See =ChainTension."
ContactSearsService.
Resharpenor replace chain.
See =SharpeningChain."
• Contact Sears Service.
• Install chain in right direction.
i .....
Chain stops
within the cut.
Chain cuts at
an angle.
• Chain cutter tops not
filed flat.
• Guide bar burred or
bent; rails uneven.
, Clutch slipping
• Cutters damaged on
one side.
• Chain dull on one side.
• Guide bar bent or worn.
• See "Sharpening Chain."
• Repair or replace guide bar.
• Contact Sears Servk'e.
• See "Sharpening Chain."
• See "Sharpening Chain,"
• Replace guide bar.
If situations occur which are not covered in this manual, use care and good
judgement. If you need assistance, contact Sears Service or the CUSTOMER
ASSISTANCE HELPUNE at 1-800-235-5878.
18
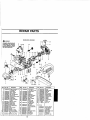
REPAIR PARTS
53 52
t
6
1
9.
10,
53_26119
530037809
530037803
530015917
530047989
53O038406
530069803
530094188
530047061
11,
12.
13.
14.
15,
16.
17.
530015611
530014949
53_8227
530016M9
53CO38264
530015922
530025850
18.;
19.J
20
22,
530015905
5300"[5997
530015826
53006961 t
23, : 530038238
--
51
7
3
Desorrption
2.
3,
4.
5,
6.
7.
50
Trigger & Lockout
(includes Pin)
Check Valve
Wire -Throttle
CJutch Cover
Rat,
Kit
Nut- Bat Mounting
*_Oke Lever
,_rororoet--Choke Knob
3hassis Kit
_utch Spdng
Clutch Drum Ass'¥-
wiBrg.
Washer- Clutch
ClutchAss'y.
Switch Lever
Sw;tchSpring
Pl_-Bronze Vent
Nut
ChainCatcher
Screw
Washer- Thrust
Pin,-Bar Adjusting
)Sat AdjustingScrew
K_
BarMcuntJng
Plate
24,
Part
NO.
Desodptlon
530069957
26.
28.
29,
530010846
53C016080
530016064
530019206
301
31.
530049477
3?- : 530038373
33.
530037821
530030189
34.
530015775
35,
36.
58_069_47
38.
530047192
40.
41.
530016133
530047663
42,
43_
44.
45.
46.
47.
48.
530016020
530016132
530015905
530037820
530019231
530037799
530038224
Part
NO.
49.
53C015940
50,
530037485
51.
530069232
52.
530015892
53.
530049336
54.
530027531
55.
530037817
56. 530039187
57.
530400897
Plug- OU Filter
Screw
58.
59,
60.
61.
62.
Fuel Line _31
(Large Die.)
Fuel Cap ASS_i,
wlRetainer
BoJt- Bar
Oi_Pickup Ass'y,
(tncl. 32, 33 & 34)
Screw
Screw
Screw
Worm Gear Spring
Dust Seal
Front HandJe
Handguard
19
Ref.
OilPump I_
(tnoJ, 30, 31 & 45)
Oil Cap Ass'y.
Screw
Screw
Seat Biock
Elbow-Oil Pickup
Pick--Up Oiler
Oil Filter
Not
530001717
530016"_34
530015920
7%-3619
71-,36374
Description
Screw
Starter Hendle
Rope Krt
Screw
Fan Housing
Recoil Spring
Starter Pulley
R_I
Ass_.
Washer
Washer
Nut-Ry_eel
Screw
Chain - 18"
Bar- 18"
Shown
530087030
530049248
Operator Manual
DecaF-Star_ing
Instruction
530038486
530053122
530052362
DecaF-Stop
Decal-Clutch Cover
Decs_-Chain
Readjust
Oscal,.-Fan Hs_j.
530053121
lUlnlIIIIIIIHII
IIInI
REPAIR PARTS
:
ii
i
14 12 13
28 15
17
3
4
5
6
16
30
2O
1
34
25
36
29
37
42
35
Rsf.
Part
NO.
Description
1_
2,
3.
4.
5.
530031163
530037793
530016101
530037804
5300697O3
6,
7.
8.
9.
$0.
11.
12.
13.
14.
15=
16.
530019239
530015810
530069929
530016187
530016102
530037798
530038318
530038317
530049244
530_47566
53C_B9216
17,
'_8,
19.
20.
21,
530019210
71-85849
530019249
530069607
530069605
A_r 8ox Seal
92_
23.
530038729
530015697
PistonRing
Re L
Bar Wrench
Foam-Air FiJter
Nut
Ce_. Adapter
Screw
Screw
K_t
Cylindar Shield
Limiter Cap-High
Umiter Cap-,Low
Gtommet-Carb
Adjust
Air Pucge Ass'y.
Primer Line K_t
(SmallO_a)
Spark Rug (CJ-TY)
Gasket,,,,Cerb Adaptor
Cyt_de_ )_
Piston Kit
(InoL 22 & 23)
Retainer-Piston
No.
Deasdptten
530047062
530047827
26,
27.
28,
29.
530037935
530016136
530016090
530069608
30.
31.
32.
; 33.
34.
35,
530052296
53C014382
530037652
530019221
530038237
5300472O7
CrankshaftAss_
Seal & BearingAss'y,
Cap.-Crankc_se
Clip
Screw
EngineGasket Kit
(tncL6, 17,19& 33)
W_reHarnessAss'),.
Fuet Ff_up Ass'y.
Heat/nsu{ator
Muter Gasket
Muffler Back Plate
MufflerAss'y,
36=
37.
38,
39.
40.
41.
42.
530037813
53O036103
530016132
530052277
53CO15905
530047442
952706606
Muffler Diffuser
Spark An'esterSc1_en
Screw
Ignition Module
Screw
GroundStrap
ChainBrake Kit
Air Filter Housing
Ca,'bu retor t_
(lasL 12 & 13)
Cash. Gasket
Screw
Part
24,
25.
Not Shown
95203t t 64
Pin
20
Carrying
Case
38
II
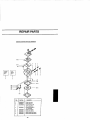
REPAIR PARTS
..N.
=
Assembly
KiT --_
..1,
Kit Number
L ill i
#530069703
_[T
R4.
Part No,
Descdptlon
1,
5300383_8
Lim_ter Cap-High
2.
530038,31_7
Limlter Cap-Low
3.
530069826
C_rburetor
Repafr Kit
{KIT = Contents}
53O069844
GeskedDiephragm
Kit
(* =C_ntents)
5°
530035383
Needle-Low
Speed
6.
53G035384
Needle-Hfgh
Speed
7.
530035293
Needle
8,
530035295
NeodEe Spdng,,*-High Speed
21
Spring-Low
Sp_sct
,
sarantfa
22
.sF.
n,icioy ApSes
Reglas de Segufidad
Montaj_
Uso
Mantenimiento
22
26
27
33
_rnacenammemo
Tabla Diagn_'tica
Repuestos y Encargos
36
38
40
Contmtapa
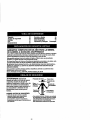
GARANTIA COMPLETA DE UN AP',IOPARA LA SIERRA
DE CADENA A GASOLINA CRAFTSMAN®
Porun m3oa contar de la fed_ de compra, siempreque esta Sierrade C,ader_ a Gasolina
Craftsman est(_mantenida, lubdcaday ajustadade acuerdo al manualdelusuario,Sears
repara.,dgratuitamente cuaJquierdefectode materiaJeso mano de dora.
Esta garantfa excluye la barra, la cadena, la bujlay el filtrode aJre,que sonarb'cdos
fungiblesy se ga.standurante el funcionamierdonormal
Sise usa esta Siena de Cadena a Gasolina para p_os
comerdaJeso de alquiler,esta
garardiatendrd validez de 30 dfas contadosa partirde la fecha decompra.
EL SER'V_C10BAJO GARANTIA ESTAA SU DISPOSICION CON SOLO DEVOLVER LA
SIERRA DE CADENA AL C_Ti'RO DE SERVtCIO SEARS MAS CERCANO EN LOS
ESTADOS UNIDOS.
Estagarantia le confiere derechosjurfdicosespec_cos; ademds ud.podr_tenerotros
derectzosclue vadan entre estados.
Sears, Roebuck and CO.,D/817 WA, Hoffman Estates, IL 6017g
ADVERTENCIA: Desconecte
Protecck_ de O_dos
Casco Duro
siempreel calde de la bujfa al reparar
el aparato, excepto en el ca,so de
ajustesal carburador. Debido a que las
sierras de cadena son instrumentos
pare cortar madera a alta velocidad,el
uso descuidado o indebido de esta
herramienta puede causar graves
Oj06
.A_s/ada"'...._
_ Cuerpo
tos de
uridad
heridas.
PIENSE ANTES DE PROCEDER
Guantesde
Uso lndusUbl
deSeguddad
llPiN
. Lin_e el uso de la sierra a aquellos
usuadosaduttos que cc_nprendany
• Use equlpOprotector.Siempreuse calzado
de seguddad conpuntasde aceroy.suelas
puedan implementar todas las
anti-deslizantes;,ropaa_us_ada
al cuerpo;
prec_uciones, regl_.sde seguridade
tns_tuccionesde usoque se encuentmnen
guantes gruesosde uso industrial
este manual.
ant_deslizantes; protecci6nde ojostales
22
como
gabsdesegurldadque no se la
MANTENGA
LA
SIERRA
EN
cam; casco duroaprobado; y barrerade
BUENAS
CONDICIONES
DE
sonido(taponesde ofdo u orejeres
antJ-sonido)para protegerla auo'_'6n. Los FUNCIONAMIENTO
L/eve la sierrade cadena a un proveedor
que usan sierrasde fuet-zahabilualmente
de servidoautodzadepara quehaga todo
deberdnhacerserevisarla audici6n
serviciomenosaquellosprocedimlentos
frecuentementeya cluee! ruidede les
lisiz_Iosen lasecc_6nde mantenimientode
sierrasde cadena puede daF,ar losoidos.
este manual.
Mantenga e! ¢abellopor e_
de|nivel
de los hombros,atdndotopare teJefectosi • AsegOresede que la cadena se detenga
por cornpletocuandose sueltael galztlo.
fuerenecesario.
Pare hacercorrecciones,yea los"Ajustes
• Mantengatcdas les partes de! cuerpo
al _ckx'.
alejadesde la cadenasiempreque elmotor
• MantengaI_ rnar,-_sseces, r_pies y
estd en _Jndona_ento.
libresde aceite o de mezcla de
• Mantengaa losnifios,espectadoresy
combusb'ble.
ardrnalesa una d'mtanclaminima de 10
metros (30 pies) del drea de trabajoo
fijos.
Mantengalas tapes y los fijadores bien
cuandoest_ hac;endoarrancar y uso
Use exdusivarnentelos accesodosy
el motor.
repuestosCraftsmanrecornendados.
• No levante ni opere fas sierras de ca.dena
Nuncamod'r_quela siena.
cuande estdfatigado,enfermo,ansiosoo sl
ha tornadoalcohol,drogeso ren-,e_os.Es
MANEJE EL COMBUSTIBLE CON
inpresclndibleque ud. est_ en buenas
CUIDADO
condiclonesfisicasy alerta mentalmente. EXTREMO
Si ud. sufm de cuakiuiercondici6nque
• No fumemientrastrabaja conel
pueciaempeorarconel trabajoarduo,
combush_leni cuandoestd haciendo uso
esesSrese consu m_:_cfico.
de la sierra.
• No ponga en marchala sierra sin tenet un • E_rninetodesles po_'blesfuentesde
drea de trabajodespejada, una superEde
chispeso llamas en/as drees donde se
estable pare parame y,st est_ denubando
mezc_ o vierteel combustible.
drbo_es,un carnlnopredetem]inadode
• Mezde y viertae! combustibleafuem y use
retroceso.
siernprere_pienteapmbado para
USE LA SIERRA OBSERVANDO
corn_ibl_ es ymarca_ como_. Limp_e
todoslosdenames de combu_ble antes
TODOS LOS PROCEDIMIENTOS
de ponerel aparatoen man:ha.
DE SEGURIDAD
• Aldjesea pot Io menos 3 metros(10 pies)
• Mantengalas dosmanos en las man_
del lugarde abastecimientoantes de poner
siempreque el aparato est_ en _
El
el motor en mamha.
usode| aparato conur_ solamano puede . Apagueel motory deje que la sierra se
causargraves heddasaJusua,do,a los
enfde en un lugarlibre de substancies
adstentes o a k_sespectaderes.Las
cornl_._J'bles
y no sobre hojes seces, paja,
sierrasde cadena _
dIseFk_lespara
paper,etc, Retirela tapa tentamente y
que se las use con bs dos manos entodo
reabestezcael epar-atoo
moIT_tdo,
o Guarde
el aparato y e/cornbu_'ble en un
• Haga uso de la sierra de cadena
espado fresco, secoy bienventilado
• (¢dcamenteen iuga_esextedoresbien
deride losvaporesde| combustibleno
vent_dos.
puedenentraren contactoconchispesni
• No haga usode/a sierra desde les
llamasabierlesprovenientesde
escalerasport_blesni losdrboles,a menos
tem'_otangues,
motoreso tntemJptores
cluetengael enkenamientoespedficopard
el_:tricos,ca[efactorescentra/es,etc.
hacerlo.
PROTEJASE
CONTRA
LAS
• Aseg,3resede quela cadena no vaya a
hacer contactocon ningdnobjetoantes de RECULADAS
porteren rnarchael motor.Nunca intente
Ud. debe seguir todes las precauciones e
hacer atrancarla sierracon la barra guia
instruccionesde seguridadpara ayudar
dentrode un code.
a evitar las reculadasy lasdem_.s
• No aplique presidn a la sierra, especialfuerzas que pueden causargraves
. mente al final del corte. La applicacidn
heridas,
de presiSn puede causar que se pierda
el control al completarse el corte,
• Pareel motorantes de apoyar _ siena en
ning_nlac!o.
• Cuando tra_ade la sierra en lamano,
hdgalodnicamenteconet motorpazado.
Udvela conel si/enciadorapartadodel
cueqooy la barray cadena I'_cia ateds,con
la barra de preferenciacu_erta por tma
funda.
23
ADVERTENCIA:
LaReculada
Rotacional
puede
acontecer
cuandola
cadena
enmovimiento
entraen
contacto
conalgt]nobjetoenlaenla
parlesuperior
delapuntadelabara
gu[apuede
causar
quetacadena
entre
al material y se detenga pot un
instante.El resultadoes una reacoi6n
inversa,a velocidadde rel_mpago, que
hace recularla barra guia hacia ardba y
hacia atrAs hacia el usuario.
• Empiece y efeckte la total!dadde
cada corte con el aceleradora fondo.
Si la cadena se estdmoviendea una
velocidadmenor que fa mdxima, hay
•mils probabilidadde que ia sierra
recule.
° Use cuidado extremo al entrarde
nuevo en un code ya empezado.
• No intentehacer codes empezando
con la punta de la barm (cortesde
taladro).
° Tenga c_idado con troncosque se
desplazan y con las demdsrue=as
.quepodfian cerrar un code y apretar
la cadena o bien caersobreella.
• Use !a Barm Gu[a Reducidorade
Reculadas y la Cadena Minimizadora
d.e Reculadas recomendadaspara su
sierra.
Evite la Reoulada pot Presi6n:
• Mant_ngase siempre altanto de.toda
situaci6n u obstrucci6nque pueda
apretar la cadena en la partesuperior
de la barra o detener!a cadena de
cualquierforma.
• No code mds que un troncoa lavez.
• AI seccionartroncoscon code
ascendiente, no tuerza la sierraal
sacar la barb del code.
Evite la Impulsi6n:
La Reculada por Presi6n y la lmpulsi6n
acontecen cuando la cadena se
detiene repentinamente porquee.st_
apretada, atmpada o en contactocon
algr3nobjeto extmfio a la madera. Esta
detenci6n repentinade la cadena tiene
como resultade una inversi6n de la
fuerza de la cadena usada para cortar
madera y causa que la sierra se mueva
en senfido opuesto al de la mtaci6nde
ia cadena. La Reculada pot Pres_n
propulsa la sierra directamente hacia
atms en direcoi6nal usuario. La
Impulsi6n aleja la sierra de! usuado.
motoracelerado a fondo y la cajade
REDLIZCA LAS
i !ampiece
los cortes
sierra apoyada
ensiemprecon
la madera. el
PROBABILIDADES
DE
Use cutlas de pl;_tico o de madera,
RECULADA
no de meted,para mantenerabiertoel
code.
o Est_ conscientede la posibilidadde
reculada.Teniendo una buena
MANTENGA EL CONTROL
comprensi6nbdsica de la reculada,
ud. podrd reducirel elemento de
Pfirese hac_ _ izquierda dela siena
accidentes,
-
dE]e
_jog_ddeP_r_
rnan_
Nunca permita que la cadena en
movfi'nientotoque ningdn objeto en ta
punta de la barra gu[a.
° Mantenga el drea de trabajo librede
obstmccionescomo per ejemplo
otros drboles, ramas, piedras, cercas, '
tocones, etc. El!mine o evite toda
Codor_gido
obstmcci6n que !a cadena pueda
Nunca inviertala posick_ de las manos
tocar mientras est_ cortando.
o Mantenga !a sierra afilada y con !a
• Sostener firmementeconlas dosmanosle
tensiSn correcta_ Las cadenas con
ayudar& a mantener el controlde la sierra.
Ix)CO file o fiojas incrementan la
":
No affoje. Manten_ la manoderecha
envolviendototalmentela man_ trasera,
probabilidad de reculada. Siga las i_,:
sea ud. derecho o zurdo. Sostengala
msttucciones del fabricante para afifar
rnan_aaelantera conla manoizquierda,
y efectuar mantenimiento de la
_;
cof.ocandoel pulgardeba_ode la rnan_ay
cadena. Venfique la tensi6n a
rooe_uxIola manijacon losdedos.
intervalos regulares con el motor
Mantenga el brazoizquierdototalmente
parado, nunca en marcha. Asegdrese
extendidocon el cod<>_o.
de que las tuercas de !a abrazadera
• Coloque la mano izquierda en la
de la barra estdn ajustadas
manija delantera, de modo que quede
firmemente.
en lfnea recta con la mano demcha
24
Puntsde Radio
en la manijatmsera, cuandoest_
haciendo codes de seccionamiento.
_er_
z°"=d° Pequefio_
Pdrese levementehaciala izquierda
de la sierra paraevitar que el cuerpo
ro
_Z_
de
est6 en ifnea directaconla cadena.
• Pdrese con el peso distdbuido
igualmente entrelos dos pies.
• No se extiendaexcesivamente.La
Puntade RadioGrar_e B_maGufa
sierra puede irnpulsadoo empuj.adoy
ud. puede perderel equit_doy el
control de la sierra.
• No code arribadel nivelde los
• Les Cadenas Minimizadorasde
hombros, puedstoque tomadiffcil
Recutadashartsatisfecholos
mantener el controlde |a sierra.
requisitosde rendimientoen pruebas
con una muestrarepresentativade
sierrasde cadena con
desplazamientode menos de 3,8
pulgadas,como se especif'_ca
en
ANSI B175.1.
DISPOSITIVOS
DE SEGURIDAD
CadenaM_ndzadoradeReculadas
CONTRA I.AS RECULADAS
,_,/Marcador d'e
Profundidad
Perfilado
.
.
ADVERTENCIA: Los siguientes
,¢=x_:_.,P--Eslab_PmtectorPJarg_oo
dL_>sitivos hen sidoincluidosen la
_
Desv=*a
la Fuerzade
s_errapara ayudara reducirel riesgo
_._ Reacci6n
y Permitequela
MaderaEntre
de recutadas;sinembargo,tales
Gradualmente
a laCuchilla
implementos nopueden eliminar
totalmente esta reacci6npeligrosa.No
se conffe exclusivamenteen los
d'rspositivos
de osguddad.
* Protector deMane, diseSadopara
reducir la pmbabi_dadque su mane
izquierda entreen contactocon la
cadena, si la manose desprendede
la manFjadelantera.
• La Pos=ci6nde las man_jasdelantera
y trasera, diseSadascondistancia
entre las manijosy =enlinea"la una
con la otra. Laseparaci6ny la
colocaci6n en Eneaque este disefio
provee se combinanpara dar
"equilibdo y resistenciaparacontro|ar
la ptopulsi6nde la sierrahaciael
usuario si acontece una reculad_L
* BarraGui'aReductdora
de Reculadas,
disefiadaconpuntade radiopeque5oque
reduceeltama,5o
de la zonadepellgro.
Estetipode barraha dernostmdoque
reduce significat_amente
la can_dady
lasededaddelasreculaaas cuanoo
ha sido exarninado deacuerdocon
ANSI (American National Standards
Institute, Inc.) Bt75.1.
AVISO DE SEGURIDAD: El estar
expuestoalas vibracioensa travds del
uso pmlongadode herramientasde
fuerza a gasolinapuede causar dzu3os
a los vasossangufneoso a los nervios
de los dedos, las manos y las
coyunturasen aqueltas personasque
tienenpropenstdada los trastomosde
la circulaci6no alas hinchazones
anormales.El us<>prolongadeen
tiempofn'oha sido asociadocon da_os
a los vasossanguineosde personas
que per otra parte se encuentranen
perfectoestado de salud. Si ocurren
s_ntomastales como el
entumecimiento,el dolor,la falta de
fuerza, los cambk_sen el coloro la
texturade la piei o falta de sentidoen
los dedos, les manoso las coyunturas,
pare de usar esta mdquina
inmediatamente y procure atenci6n
/
25
m_dica. Los sistemas de anti-vibraci6n
no garantizan que se eviten tales
problemas. Los usuariosque hacen
use eontinuo y prolongando de las
herramientas de fueFzadeben fiscalizar
atentamentesu estado fisico y el
estado del aparato.
FRENO DE CADENA Si esta sierra ha
de usarse para el tumbadocomercial
de drboles, ud. deber_ encargar e
instalarun freno de cadena para
cumplircon los Reg|amentosFederates
del OSHA para el TumbadoComercial
de Arboles. Entre en contactocon
et Servicio Sears o llame al
1-800-235-5878.
REJILLA ANTICHISPA: Su sierra
viene equipadacon silenciador
limitador de temperaturay con rejilla
antichispaque cumplecon los
requisitesde los C6dig'osde California
4442 y 4443. Todas las tierras
forestadas fsderales, mds los estados
de California,Idaho, Maine, Minnesota,
Nueva Jersey, Oreg6n y Washington,
requieren por ley que muchos motores
de combusti6nintema est_n equipados
con rej_llaantichispa. Si usted usa una
siena de cadena donde existen tales
reglamentos,usted tiene la
i responsabilidad jun'dica de mantener
:estas.piezas en conecto estado de
funcionamiento. De Io contrario,estarfi
en infmcci6n de la ley. Vea la tabla de
RESPONSABILIDADES DELUSUARIOa la
CONTENIDO DE LA CAJA
Use la siguientelista para verifcar el
contenido.
Modelo 358.352680
• Sierra de cadena (completamente
montada)
• Herrienta de la barra
• Cadena
• Estuche de transporte
• Guantes
• Lata para gasolina
• Barra y cadena lubricaci6n
• Mezcla de combustible/aceite
- Si necesitaayudaosi_
piezaso
encuentrapiezasdar3ada.s,
favor deUamar
al 1-800-235-5878.
AVISO: Es normaloir el golpeteodel
filtrode combustibleen el tanque vacfo.
Su apamto ha sidopuestoa prueba en
la fdbdca y se le ha ajustado con
precisiSnel carburador.Como
resultado,as posibleque se sienta un
olor a gasolinao que s.eencuentre una
gota de residuode aceite o
combustilbeen el silenciadoral
desempacarel aparato.
MONTAJE
El aparatoviene completamente
armadoy no hay necesidad de
montaje.
° Verifiqueque no haya piezas dar3adas. No
use piezas dar_adas.
26
s__e_i<_n de MAINTENIMIENTO.
PADRONES: Este sierra de cadena
consta en la lista de Underwriters
Laboratories, Inc., de acuerdo a los
Requisites Nacionales de Seguddad
Estadounidenses para Sierras de
Cadena a Gasolina (ANSI
B175.1-1991).
CONOZCA
EL APARATO
LEA ESTE MANUAL DEL USUARIO Y LAS REGLAS DE SEGURIDAD ANTES
DE USAR LA SIERRA DE CADENA. Compare las _ustraciones con su aparato
para famiE_e
con la ubicaci6n de los ratios contmles y ajustes. Guarde este
manualpard usofuturo.
Herramientade Ajuste
de la Cadena
.....
_1
|
=_,,_
._"=_
Protectorde MaJ',o-_._
_f,,
_
_
Silenciador _
l_
r_l_,_._
.........
_'_^ de Arranque
j
lntermptor
_/J-.-_
-_,_-/
de
Lubdcan,e de Barra Caja delArmnque ,_T_,....,,,Tapap.,omb_.zs_,_e_.e
Tapa del Cilindro _
_,,
Traba de Matcha,
JJ
eo_des
y=_
LentaAoelerada _ _
J
(.Traba del .
_
/..._
Tomglodet_
Acelerader/ _
_
Ajuste
__
Mar.ja
',.
|
/
Ace1_
Cebador
.
Abraz_lem Qeb. Bar_
EN/TOPE INTERRUPTOR
El En/Tope Interruptor estd acostum• brado a detener la mdquina.
GA'I3LLO DE ACELERADOR
El Gatillo de Acelerador controla velocidad de mdquina.
TRABA DEL ACELERADOR
Es necesarioapretar pdmero la traba del
aceleradorpa_ poder accionar el acelerador. Este d_.spos_o previene el accionamientoac_dentaf del acelerador,
TRABA DE LA MARCHA LENTA
ACELERADA
La traba de la m_rcha tents acelerada
mantiene el gatillo en la posici_n de
arranque. Accione la traba de marcha
lenta acelerada de la siguente manera:
Aprete la traba de! acelerador y luego
aprete el gatil[o acelerador. Con el
acelerador apretado, opdma la traba
de marcha lenta acelerada. Suelte la
traba del acelerador y el gatillo mien27
_.
_
_r'_)
DirecciSrlde
Rotaci6nde la
ca="a
.......
tras mantiene opdmida la traba de marcha lenta acelerada.
PERILLA DEL CEBADOR
La Penlladel Cebador provee comloustz_leacr_cionalal motor al _
en frio.
BOMBEADOR
El Bombeador c_rculacombustible al
carbumdor.
TENSION DE LA CADENA
Es normal que las cadenas nuevas se
est_rendurante los pdmeros 30 minutos de uso. Deberd verificarse la tensi6n de la cadena frecuentemente. Vea
Tenel6n de Ia Cadena en la seccidn de
Serv_cioy Ajustes.
ANTES DE PONER EL MOTOR EN
MARCHA:
ADVERTENCIA: Lea toda la informacibn
sobre el manejo del _
en la
secci&qde reglas de seguddad de este
manual antes de empezar. _ no compre_de la info_
sobre el manejo
del _e,
no intente abastecer su
aparato. Procureayuda de alguienque la separaci6n y la forrnaci6nde dcidos
durante e! almacenarniento.La
comprendala informaci6no llame al
gasolina acidicapuede da_,arel
teT_fonode ayuda at consumidoral
1--800.-235-5878.
sistema de combustible de! motor
durante el almacenamiento.
ACEITE PARA BARRA Y LA CADENA
Para evitar promblemascon el motor,
[] lubricadorde la cadena provee
deberd vaciarse e! sLstemade
lubricaci6ncontinuaa la cadena y a la
combustibleantes de almacenaret
barm gufa. No se olvidede llenar el
apareto por30 dias o rods.Vacie el
tanquede aeeite pare barrasiempre
tanque de combusb'ble,ponga el motor
que Ileneel tanque de combustible
en marcha y d_jeloen marcha hasta
(Capacidad=6,8ft. oz.). Para obtenerla
que las lineas de combustible y el
mdxima prelongaci6nde la vida de la
carburador queden vacfos. Cuando
barny la cadena, recomendamosque
vaya a usar el aparato nuevamente,
use el aceite para barrasde sierra de
use combustible fresco. Vea las
cadena Craftsman.Si el aceite
Craftsmanno e.,_ddispondible,puede instruccionesde ALMACENAMIENTO
para obtener m_s informaciones.
usarse un acelte SAE 30 de buena
Nunca use productosde fimpjezade
calidad hestaobtener el aceite mama
motor
o carburadoren el tanque de
Craftsman.La cantidadde lubdcaci6n
es medidaautomdticamenteduranteel combus_"oleya que hacedopuede
provoc_r da_os permanentes.
funcionamientode la sierra. La sierra
Vea la secci6n de ALMACENAMtENTO
usardmds o menos un tanquede
acelte para la barra porcada tanquede para rods informaciones.
PARA PARAR EL MOTOR
combustible.Siempre Ileneel tanque
de aceite de la barra cuandollene el
= Coloque el interruptoren la posici6n
STOP.
tanquede combust_le.
• Si el motorno se detiene, tire la
ABASTECIMIENTO DEL MOTOR
peritia del cebador a su mgLxima
Este motorest,. habilitadopare
extensi6n.
funcionarcon gaselina sinplomo.
PARA PONER EL MOTOR EN
Antes de usar,se deberd mezclarla
MARCHA
gasolinacon un aceite de buena
¢aiidadpara motoresde 2 tiempps
MOTOR FRIO O MOTOR CALIENTE
enfriadosa aire. Recomendamosel
DESPUES DE QUEDAR SIN
aceitemama Craftsman.Mezde la
COMBUSTIBLE
gasoTinacon el aceite en la proporci6n • Uene el tanque de aceite de barb
de 40:1. (Se obtiene una pmporci6nde
usando el aceite correspondiente.
40.1 mezclando 3,2 onzas de aceite
• Uene el tanquecon la mezcla 40:1
de combustible.
con cada gal6n de gaselinasin piomo).
NO USE aceite para autom6viles ni
• Prepare el motorapretandoel
bombeader seis veces.
para bamos.Estosaceites dafiardnel
motor.A! mezclarel combustible,siga
las instmccionesimpresesen el
• Conecte el encendidocolocandoel
rec_piente.Una vez que haya afiadido
interruptoren ON.
el ace'dea la gasolina, agite e!
Bombeador
recipientebrevementepara asegurar
oN A
f
que el combustibleest6 completamente
mezclade. Lea siemprey siga tas
reglasde seguridadque tienen que ver
con el combustibleantes de abastecer
STOP-_
el aparato.
Palanca del Cebador
IMPORTANTE
La expedenciaindica que los
combustiblesmezcladoscon alcohol
arciel Full
(los Ilamados gasoholo los que
• Active el cebadortirando la pedlla del
contienenetano!o metanol)pueden
cebador hasta su mdximaextensi6n.
atmer humedad,!o que puedecausar
28
• Asegt_reseque el cebaderest+en la
posici6nOFF.
• Con la sierraen el suelo, sujetela
man+adelanteracon la mano
izquierday coloqueel pie derecho
atravesandoel interiorde la n__nija
• Active la marcha lenta acelerada
trasera.
apretando ta tmba del aceleradorcon • Sujete ]a man_a de la soga de
la mano derecha_Luego, aprete el
arranquefirmemente y tironeede la
gatilloace_eradory mantdngalo
soga rdpidamentepara hacer
apretado. Con el pulgar oprima la
anancar el motor,
traba de la marcha lenta aceleraday • Apretey suelteel aceleradorpara
mant_ngala opdmida. Por dRimo,
dejarel motoren mamhalenta.
suelte el acelerador.
Man_adela SogadeAmanque
• NOAPRETE_ ACF..LERADOR
dul'_lteel
_rmr_que;deottomode,serenecesario
activarnuevamente
la tTabade la marcha
lenta_celerada.
• Coloque la sierra en el suelo.
Sostenga la manija delantera con la
mano izquierdey coloqueel pie
derecho atravesandoel interiorde la
manija trasera.
,
AVISO: AI tironear de la soga de
'ti{_ .._-,/'v/_"-_,I
enlaManlja
arranque, nunca use la extensi6n
compieta de la soga. Tarnpoco
permita que la soga se rebobine sola;
al contrario,sostenga la manija y
haga que se rebobinelentamente.
• Tironeede la sogacon la mano derecha MOTOR DIFICIL DE PONER EN
hastaque el motorintente_
pero MARCHA O MOTOR AHOGADO
no rndsde 5 veces.Luegoempujela
El motorpuede esterahogadosi no se
pedl_ del c_..dor has_. la posici6npar- poneeri mamha despudsde 10 tirones
cial.continuearonP_.anao
ae _asoga has- de la soga.Se puedelibrarel motor
ta que el motorarranque,
ahogadode!excesode combustiblede
la stguientemanera:
• Si la temperatra ambiente es superior • Ac6vela kaba de mamha lenta
a 5°C (40° F), deje el motor en
acelerada.
mamha unos5 segundos. Aprete y
• Verifiqueaue el interruptorest6 en la
suelte e! aceleredor para dejar el
posici6nON,
motor en marcha lenta.
• Coloquela penlla del cebadoren la
• Con la temperatura ambiente por
posici6nOFF.
• debajo de 5°0, deje el motor en
• Con la sierra en el suelo,sujete la
mamha entre 30 segundos y un
mannadelanteracon la mano
minutopara que se caliente, con el
izquierday coloqueel pie derecho
cebador en la posici<Sn
pamiaL
por el interiorde la manija trasera.
Despu_s empuje la perilla del
• Timnee de la soga derecha basra que
cebador hasta la posici6nOFF y por
el motorarrancar.
dltimoaprete y suelte el acelerador
para dejar el motoren marcha lerrta.
• Para parar el motor,coloque el
interruptoren STOP.
E! armnquetal vez requiem muncos
PARA PONER EN MARCHA EL
MOTOR CAUENTE
NO USE el cebador para poner en
mamha el motor caliente; de to
contrario el motor se puede ahogar o
ponerse diffcil de hacer arrancar.
• Coloque el _nterruptor en ON.
• Accione ta traba de la marcha lenta
acelerada.
:[ironesde la soga,dependiendode la
cantidadde combustible que est_
_=
ahogandoel motor.Si el motoraun asf
no a_ca, yea la TABLA
DIAGNOSTICA o Ilame a|
I--800-235--5878.
SUGERENCIAS PARA EL USO
CORRECTO DEL APARATO
• Verifiquela tensi6n de ta cadena
antes del primeruso y despu_sde un
rninutode funcionamiento.Vea
29
Tensi6n
delaCadena
enlasecci6n
deMantenimeinto.
• Corte
ma_era
dnicamente.
Nocorte
metal,
tomo del drbol donde pueda pisar con
firmeza en todo momento.
• Estudie las condiciones naturales que
puedan causar que el drbol caiga en
pldstico,
ladrillos,
cemento,otro_
una direcci6n determinada. Entre las
materiales
decon_Jucci_t
quenosear=de
madera,etc.
condiciones naturales que pueden
• Parelasiermsi/a caderk_toca
_jalquier
causer que el drbo! caiga en una dlobjetoajeno.Inspeccione
lasierray repare recci6n determinada, se encuentran:
/aspiezasseg_ lanecesidad.
• Mantengalacadenafueradelaaranayla •
tierra.La rnenor
cantidaddetierradesefila
_0idamente lascadenase i_rementala
po_'b_TK_d
dereCulades.
• Codevadost_'lcospeque_os
como
pd_ctica,
uS_KIola stguiente
t_'_ica,para
La direcc_n y la velocidad del viento.
El dngulo de inclinaci6n del drbol. El
&ngulo de los drbeles a veces no se
nota debido al declive del terreno o
a terreno desparejo. Use plana o
cordel de sonda para determinar la
direcci6n de la inclinaci6n del _.rbol.
acostumbrarse aJ manejo de la sierl_
• El _.rbol es mrs pesado o tieno muantesde empezarunproyecto
deg_cles
cho m_s ramas de un lado.
dimensione_
•
Arboles y obstdculos en derredor.
• Acelere el motoral m_ximo antes
• Verifiquesi hay pomiones desconpuesde empezar a cortarapretandeel
tas o podridas. Si el tronco est_ podrigatilloaceleradora fonde.
do, puede partirse repentinamente sin
• Empiece el corte con el bastidorde
avisoy caer sobre el usuario.
la sierra apoyada contrael tronco.
• Asegurese de que haya suficiente es• Mantenga el motorcon aceleradora
pacio para la caida del _rbol. Mantenga
fondo constantementemientras
una dJstanciaequivalente a dos veces
cort_
y medio del largo del _rbol y la persona
mds cercana u otros objetos. E1ruido
• Deje que la cadena haga todoel
del motor puede impedir que se escutrabajo de corta_,no use_
que
chert las adver_enciasgritadas.
una muy ligerapresi6nhacia abajo.
• Retire |a tierra, las piedras, la corteza
• Suelte el gatilloacelerador
suelta, los clavos, las grampas y el
inmediatamenteal terminarde
alambre que pueda haber en el drbot
cortar, dejandoque el motor
en el lugar del corte.
funcione a marcha lenta.Si
mantiene la sierraen marcha con
acelerador a for,dosin estar
cortando, puedecausar desgaste
innecesario.
• Para no perderel control cuandose
haya completadoel code, no le
ponga presi6n a la sierraal final del
code.
• Pare el motorantes de apoyarla
sierra al finalizarun code.
TECNICAS PARA TUMBAR
ARBOLES
ADVERTENCIA: vea que no haya
ramas rotas o muertas que podfian
caerle encima mientrascorta,
causando heridasgraves. No code
cerca de edificiosni cables el_ctricossi
no sabe la direcci6nde tumbadodel
drbo_ ne de nocheya que no podrdver
bien, ni durante real tiempocomoIluvia,
nieve, o vientosfuertes, etc.
• Planifique la operacibn de corte cuidadosamente por adelantado.
o Despeje al area de trabajo. Ud. precisa un _irea despejada en todo el con-
_'e
Plan_]ue unarata
"X_,_Ppredetermhladaydespejada
"A_'%.
de retmceso.
1--"+_5o _
,ecc de
laCafda
,,_
PARA TUMBAR ARBOLES
GRANDES
(condidmetro de 15 cm (6 pulgadas)o
m_s)
Se usa el m_todo de corte de muessa
pare los _rbotes grandes. La muesca
es un corte en el lado del drbolhaoia el
cua!se desea que caiga. Despu_s de
hacer el corte de tumbado del lado
opuesto,el drbo!tendr_ la tendencia de
caer hacia el lado en que se ha hecho
el code de muesca.
AVISO: si et _rbol tiene ra_ces
9randes de apoyo, ret{relasantes de
nacer la muesca.
3O
CORTE DE MUESCA Y TUMBADO
DEL ARBOL
• Haga elcorte de muescacodando pdrnero
la parte supedorde la muesca. Haga clue
el corte altaviese un tetciodel anchodel
tmnco. Luego completeel cortede mue_ca
cortando la parte de abajo de la muesca.
Yea la ilustraci_.
Una vez completoel
corte de muesca, retire la curia de madera
del _rboL
• Despuds de retirada la curia de madera,
del lade opuestoat corte de muesca naga
el code de tumbade. El cortede tumbado
debe quedar a 5 crn(2 pu/gadas)rnds
arriba que el cen_rodel cortede muesca.
Este procedimientodejar_suficiente
madera sin cort_ entreel code de
tumbado y ta muesca para forn__runa
bisagra. Esta bisagmayudar_ a evitarclue
el drbol caiga en ]a direcci6nequivocada.
Corte final aqui
Pdmer corte
Muesce.,,_
j.,/
<--¢.-
Segu_
La bisagra sostieneel drbo!en el toc_ny
ayuda a controlarla cafda
Aberturadel
code de tumbado
Cierre de
la muesca
AVISO: Antes de comp[etar el
tumb_lo, use cutlas para abdr el code,
cuando sea necesario, para controlar ia
direcci6n de la cafda. Use cuSas de
madera o de pldstico, pero nunca de
acero o de hierro, para evitar que la
sierra recule y para evitar dafios a ta
cadena.
* Est_ alerta a los indiciosde que el drbol
estd
pot caer: loscfujidos,el
ensanch_niento
del cortedetumbadoy Ios
mo'.4mientosde las rarnassuperiores.
. En el instanteen que el drbel comienzaa
caer, pare la siena, ap6yela en el suelo y
reb'ocedar_idamente, por la tmyectoria
de retrocesoprevista.
o Tenga extmmo cuidadoconlos _xboles
parcielmente tumbadosquefienen apoyo
precado. Cuando el _.fool no cae
totalmente, ponga ta sierra de lado y use
un montacargasa cable, unaparejode
poleaso un tractorpara bajado. No€_te
los_,-bolesparciaJmenteca_doscon/a
sierra.
CORTE DE UN ARBOL TUMBADO
(=SE.CCIONAMmNTO)
E! t_rmino seccionamiento significa
cortar un drbol tumbado en secciones
del largo deseado.
ADVERTENCIA:
No se pare encima
del tronco que estd siendo cortado.
Cua/quier parle del tronco puede rodar
haciendo que el usuado pierda el
eqm'l_do y el controL No se posicione
cuesta abajo del tronco que est_
siendo cortado.
Puntos importantes
• CorteOnicamenteun troncoa la vez.
, Corte consum<}c_dado _amadera
astillad_ La sierra puedea_rojarpedazos
punteadudosy lgososhacia el usuario.
• Use tin caballetepara cortart_oncos
pequefios.Nunca perrnitaa ob'a persona
quesostengael troncomientmsud. coda
ni sostengael troncocon/a piema o el pie.
- No codeen lugares dondehaya_'oncos,
rarnasy rafces entrelazadas.Amastrelos
troncoshasta un iugardespejadoanteSde
cortados.
TIPOS DE CORTE QUE SE USAN
PARA EL SECCIONAMIENTO
ADVERTENCIA:
Si la sierra queda
apretada o atascada dentro dei tronco,
no intente sacarla a la fuerza. Puede
perder el control de b. sierra, causando
heddad o clafios el aparato. Pare la
sierra, martilie una curia de pldstico o
de madem en et code hasta que la
sierra salga f_='lmente. Ponga la sierra
de nuevo en marcha y col6quela
cuidadosamente de nuevo en el corte.
No use curia de matal. No intente poner
en marcha la siena de nuevo cuando
est_ apretada o atascada en un tronco.
Use unac_a pare sacarla sierra atascada.
APAGUE la sierra y use unacuriade
maderao de pk_sticopara abrir eltajo.
Code Descendiente empieza desde el
1ado superior del tronco con la parle de
abajo de la sierra apoyade contra el
tronco; haga una leve presi6n hacia
abajo.
3t
SECCIONAMIENTO USANDO
O CABALLETE DE APOYO
* Recuen_e
quee_pdmercortesiemprees
delladocompresibnados
del tmnco.(Vea
ilustmd6nquesigueelprimeroy segundo
corte.)
o B primercortedeberdextendersepor1/3
deldi,:b'n
etrode!trormo.
• TerminepOrelsegun<:_
cone.
TRONCO
Cortedescendiente
Corteascendlente
Corte Ascendlente empiezadesde el
lado inferiordel troncocon la parte de
arrrba de ta sierra apoyadacontrael
tmnco; haga una leve fuerza hacia
atria. Sujete la sierrafirmemente para
rnantenerel control.Lasierratendrd ia
tendencia de empujar alusuariohacia
=atr_s.
ADVERTENCIA: Nunca inviertala
sierra para hacer cortesascendientes.
No se puede contro|arla sierrade esa
forma.
Con caba/lete€ornoapoyo
2do corte
I er code
Haga siempre el primer corte del lado
de! tronco que estd bajo compresi6n.
Primercortedel ]adode! _onco bajocompresi6n
/.
PARA CORTAR RAMAS Y PODAR
Segundo corte
f
Segundocorte
ADVERTENCiA" Nunce trepe a los
_rboles para cortarramas o para podar.
No se pare sobre escaleras,
plataformas, troncos ni en ninguna
posici6n que podda causade que
p/erda el equ_ibdo o el control de ta
sierra.
Pdmer corte de! iadode! troncobajocompresi6n.
SECCIONAMIENTO
SIN APOYO
PUNTOS IMPORTANTES
• Haga el cortede_oendienteatmvesando
• Tenga cuidadoc_n las ramas delgadas
tm terclodel dZ_nebo.
bajopresi6r_ El rnate_l de poco di_.'netro
• Haga rodarel tmncoy ten'nineconotto
puede enmdarseen la cadena, dando un
code descendiente.
latigazoal usuadoo haciendo que pierda el
•"Tenga cuidadoespeciaJmente
conlos
equilibdo.Use extremocuidado af cortar
troncoscompresi#nado de un lado.Vea la
ramas peque_s.
ilusb-aci6nanteriorpara cortartroncos
•
Est_ _erta contm los rebotes. Tenga
presionadosde un lado.
cuidadoal cortarramas dob_adas o bajo
Uso de Vonco
SegundoCorte
presk_)n
para evitarset gotpeado por la
como apoyo
rama o la sierra cuandose suelte la tens[6n
en las fibrasde madera.
• Despeje frecuentementetas ramas
acumuladaspara no le hagan tropezar.
PARA CORTAR RAMAS
, Corte laSramas de!_irbol Onicamente
despu_s de quese Io l_ya tumbado.
P_merCorte
• Deje/as ramasrndsguresas debajo del
_rbol tumbadopare que apoyen e! drbol
mientzasud.trab_a.
• Ernpiecepot _abasede; d_'boltumbado y
vaya trabaja,-',do
hacia el tope, cortandolas
ramas. Corte las lamas peque_as de un
dosocorte.
• Mantengael b'oncodel &rb_ entre u_. y la
Seg
. : ._ .
cadena.
32
o Retire las ramas m6sgrandesy las ramas • Despu,_shaga un segundocorte
de apoyo con la t_,tica de un tercioy dos
atmvesando completamente la
terciosdescdta en ta secci_'lde
lama
seccionamiento
• Fir=alicela maniobrsde podar dando
• Use siempre un corte descendientepara
un corte de manera que e! toc6n de Is
cortar ramas peque_s y ramasque
rama sobresalgade 1 a 2 pulgadas
cuelgan I_remente. Loscortesacendientes
desde e! troncodel drboL
podrfan hacer que las ramascaigany
apreten la sierra
I Segundo
corte
PARA PODAR
ADVERTENClA:
Pode dnicamente
hasta Is altura del hombre.No corte las
ramss cluequeden rodsalias que los
hombros. Consiga sun profesional
para efecturar ese trabajo..
• Haga el primer code en forma
ascendiente atravesandoI[3 dei
didmetro de la rama
RESPONSABILIDADES
USUARIO
\\ _v
\
fa_esando
Temer corte de
2,5 a 5 cm del
tronco del _rbol
DEL
!An0telas fechasal
complelar
elserviciode rutlna
IAntesd, Despu_Cada.=FCacla
25 Anua_Fechasd
'Usar
de
hor_ horas mentE Servicio
Usar
ve quequeno
.....
gas_das
P"
vedfiqueque nohayafij_dores/piezassueltas
e,,
.VenfiqueIs tensi6n de Is cadena
Verifique el filo de la cadena
e_
_,
?nspeccione la i_arragufa
zJ
.....
Limpie el aparato y las plscas ............
!Limpie el flltro de aim
!Limpie'e _speccionela rejilla_ii: ........
chispase inspeccione
el
silenciador
Cambie ia bujia
p-
.......
p,_
.......
• Una vez pot afio, cambiela buj_ay el
RECOMENDACIONES
elemento del _
de airee inspeccionela
GENERALES
barra
gufa
y
la
cadenapara
vet queno
La garantia de este apamto no cubre
est_n gastadas. El reemplazode la buj_ay
los articulos que hart sidosometidosal
del etementodelfilbo deaJreasegurauna
abuso o a la negligenciade parte del
mezda correctade airey combuslibley
usuado Para poder rec_ir el valortotal
ayuds a que el motormarchemejor y que
dure rn_.
de la garantfa, el usuadodeberd hacer
el msntenirnientotai como se indicaen ADVERTENCIA:
Desconecte la bujfa
este manual, Har_.fsfta hscer vsfios
antes de hacer cualquier
ajustes pedSdicos para msntener el
aparato sdecuadsmente.
33
mantenimiento,con la excepci6nde los
ajustesa] carburador.
LUBRICAClON
2 Tapa del
1 Engra_je
de ]a barra
Aceite de la
1 Lubdcadordeengranajes
2 Aceite parebarra de sierrade
cadenaCcaftsman
VERIFIQUE QUE NO HAYA
PIEZAS DAt_ADAS O GASTADAS
El cambio de piezas dax3adas o
_naStadasdeber_ ser efectuado por el
tro de Servic_oSears.
AVISO:
Es normal que aparezca una
peque_a cantidad de aceite debajo de
la sierra despu_s de parar el motor. No
confunda esto con pdrdidas del tanque
de aceite.
• lnterruptor-AsegOresequeef intertuptor
est_ funcionandecorrec_u_snte
co_oc_d_o en la posici_Sn
STOP.
Aseg(Lresedeque e! motorse haya
detenidopor completo,luegoponga el
motoren marchanuevamentey continde.
• Tanquede Combustible-Deje de usar la
sierrasi hay seSalesde _
o fugas de[
tanquede combustible.
• Tanquede Aceite-Deje de usar la siena si
el ta.nquede aceite da se_es de dar3oo
fugas.
VERIRQUE QUE NO HAYA
RJADORES O PIEZAS SUELTAS
° Tuercade la Abrazadera de la Barra
• Cadena
• Silencia_or
- ProtectordelCilindro
o FiibOde Aire
* C_ndro y d_entesde engranaje del
ernbmgue
• Tomillosde las Manijas
, FijadoresAnti-Vibraci6n
- Caja delAnanque
o Protectorde Mano
VERIRQUE
I
LA TENSION DE LA
CADENA
* Use la puntadestomilladorade la
herramientade ajuste de la cadena para
hacerrotarla cadena porb bara gufa,
verificandoque no haya dobleces en la
cadena. La cadena deberd rotar
libmmente.
Herrandenta
de Ajustede
la Cadena
Tuercasde la
Abrazadem
de la Barra
• Aflojefas tuercas de la abrazaderade la
batm hasta que estdntan ajustadas corno
si se las hubiera _ustado cont_ la barra
conlos dedosdrdcamente.
• Gire el tomillode ajuste a ia derecha (en el
sentidodel reloj) kk_._"ta
quela cadena
apenas toque la superficieinferiorde ta
barra gu/a.
° Use la herramienta de la cadena para
hacer rotar la cadena para asegurarse
que todes los estabones est_n en la
ranura de la barra.
.--_
Tomillo de
ie_]_
Ajuste
J
/
• Levantela punta de la barra para conb'olar
ta separadSn entrela barra y la cader,a.
Sueftela barra y gire el tomillode ajuste
1t4 devuelte a la derecha(en el senfldodel
reloj).Repita este pasobasraque no haya
rnds separaci6n.
114de Vuelta
Tom,lo deAjuste "_]DDI_@
° Manteniendola puntade la barra
levantad_ ajuste las tuercasde la
abmT_deracon la hertamientade ajuste de
la cadena. ApliquetorsiSnde 10 a 15
Tuercas
• Use la punta destomilladomde la
herramientapara hacer rotarla cadena pot
Pabarra.
- Si no puede hacer rotarla cadena, estd
demasiadoajustada.Aflojelevemente las
tuercasde la abrazaderay gire el tomillo
de ajuste I/4 de vuelte hac_ala izq_erda
(en contra del sentidodel reloj),vuelva a
ajustarlas tuercas de la abrazadera.
34
• Si la cadena est_ demasiadofloja, se la
verd separada de la parte infedorde ta
barra. NO HAGA FUNCIONAR fa siena si
la cadena e.stdfloja.
EncuadrelosBordes
conunaUrea
VERIFIQUE SI LA CADENA ESTA
Ranura
Ranura
AFILADA
correcta
gastada
Las cadenas afiladas producentrocitos
de madera. Lascadenas desafiladas
producen polvode asem'ny cod.an
lentamente.
Cambie la barra si la ranuraestd
gastada,si la barra est_ torcidao
ARLACION DE LA CADENA
resquebrajadao si hay calentamiento
La afilaci6n de la cadena requiem
excesivo o formaci6nde
herramientasespeciales. Se puede
protuberanciasen los deles.Si es
comprar las herramientasen Sears o
necesario cambiarla barra, use
Ilevar la cadena a un especialistade
exclusivamentela barra gufa
afilaci6n.
especificadapare su sierraen la lista
de repuestos,espec'dicadetambi6nen
INSPECCIONE
LA BARRA
la calcomanfade repuestode barra y
Condiciones que requieren que se
cadena que se encuerrtraen la sierra.
haga mantenimiento ala barra:
• La sierra cortapara un I_doo en dngulo,
o Hay que forza_a para cluea_aviese el
code.
• Cantidad inadecuada de lubricate en la
bana y la cadena.
Vedfique la condici6n de la barra cada
vez que haga afilar la cadena. Las
barras gastadas dafian It cadena y
roman dificil el trabajo de cortar. Para
mantener la barra gufa:
• Coloque el interruptoren "Stop:
LIMPIE EL APARATO Y LAS
PLACAS
° Limpieelaparatousandountrapohdmedo
condetergente
suave.
- Sequeelaparatocon untrap<)/impio
y
seco.
LIMPIE EL FILTRO DE AIRE
El filtro de aim sucio disminukdia ,,,ida
t3'd!
y el rendimientode! motore
: Retire
harm
y la cadena
de! aparato.
Umpie la
todo
el aserdn
y cualqulero_o
incrementar_el consumode
escombrode la ranura de la barray de!
combustible y la producci6nde
odfictodel engranaje despu_sde carla uso. contaminantes. Umpie siempreel filtm
de aire despu(_sde 15 tanquesde
combusb'ble o 5 horas de uso,el que
acontezca primero.Umpielocon rods
RetireelAserr_n
de la
frecuencia en condicionesmuy
polvorientas.Losfiltrosusadosnunca
quedan totalmentelimpios.Se
Ranuradela_
aconseja reemplazaral fi_ de aJrepor
uno nuevodespuES.s
de cada 50 bores
_,,f On'lic_odel Engmnaje
de uso o anua/mente,lo que acontezca
.-)
• Attada lubricante al orificiodel engranaje
despu6s de cada uso.
o Los deles de la barra desarrolfan
protuberanciasal g_rse.
Sdquelascon
una lima plane.
• St la superficiesuperiorde! rielestd
desnive_ada,use una lima planepare
restaurarla forrnacuadrada.
primero. Para limpiarel filtro:
Aflojelos 3 tomgios
en latapadel ciFmdro.
° Retire_ tapadelcilinclro.
• Retireelfiltro deerie.
° Limpieelfiltro deaireconaguecaiientey J_
jabbn.Enjuague
bienconaguedata yffia.
SdqueloalairetotaJmente
antesde
reir_alado.
• Coloque una pequefia cantidad
deaceffea!
fittroantesde instalado.
Useaceitepara
motoresde2 tiemposo aceitedemotores
SAE30. Escurr_bienelexsesodeaceite /
apretando
elfiltroparemejorarlaeficiencia
del_tro deaire.
* Reinstaleelfiltrode aim.
35
• Reinsta]ela tapa del dJindroy los 3
tomillos(15-20 libraspor pulgada).
Filtro
de Aire
Qlindto
Tapadel '
C_l_ndro
INSPECCIONE EL SILENCIADOR
¥ LA REJILLA ANTICHISPAS
A medida que se use el aparato, el
silenciadory la rejillaantichispasse
van carbonizando.Es neces_o sacar
la cafoonizac_6npare evitar el desgo de
incendio o afeclar el rendimientodel
motor.
• Retirela tapa delsilenciador(latapa estd
colocadaa presi6nen la caja del
silenciador).
• Retire el juegode difusory rejilta
antichispas.Tomenorade la odentad6nde
estaspiezas para su reinstalaci&-_.
• IJmpie la re_la anlJchispasconun cepglo
dealambre. Cambie la rej_a si encuentra
rob.rtas.
• Candle todaslas piezas del s_lenciador
que est_nrotaso resquebrajadas.
• Vuelva a instalar el juego de difusor y
rejitla antichispas con los or_ficiosredondos hacia arriba.
•
• Reinstalela tapa del silenciadory los2
tomillos(7 a 8 libraspot pie).
CAMBIE LA BUJIA
Deberd cambiarse la bujia anualmente
para asegurar que el motor arranque
rnds f_cilmente y mrche mejor. La
cmnometrizaci6n del encendido es fija
e inalterable.
• Aflojelos irestomiilosen ta tapadel
=lindm.
- ReSrela tapa del cir_dro.
Relilla
Antichispas • Saque ta cubierta de la buj[a.
• Retirela buji'adel cilindroy d_ela.
Tomillosde - Reempl_celacon unabujia Champion
RCJ7Y ajtT_--tela
conuna Ilave de 3/4 de
laTapa del
S_lenciador pulgada(10,312 libraspot pie).
• Reinstalela cubiertade la buj(a.
• Reinst_e la tapa deJcilindroy tos tins
tomi_os(15 a 20 libraspot pulgada).
Tapa del
Si/enciador
Torn=l_s
Tapa del
de la
PARA LIMPIAR LA REJILLA
ANTICHISPAS
Buifa
Se requiem ia limpieza a cada 25 horas
de uso o anualmente, el que acontezca
pdmero.
-,,
Aflojey retirelos2 tomillosde la tapa del
silenciador.
PARA REEMPLAZAR
LA CADENA
. Coloqueel intermptoren la posici6nStop.
• Cambie la cadena usada cuar,do est_
gastadao da_da.
CUIDADO: Usegua_tesprotectores - Use exdusivamentela cadena derepuesto
para tocar la cadena. La cadena es
Minirnizadorade Reculadas especificada
en la r_ta de repuestos.I.,3cadena y barra
muy filosa y puede cortaraun no
de repuestocorrectastambidn est_n
estandoen movimiento.
especificadasen una calcomanfaub_ada
enla siena de cadena.
Es normal que las cadenas nuevasse
estirendurantelos primeros15 minutos ° Entreen contacto con el Centrode Servicio
Searspara cambiary afiiar tascucttillas
de uso. Serd necesarioverificarla
individualesde la cadena.
tensi6n de ta cadena frecuentementey • Retire las tuercasde la abrazaderade la
ajustar la tensi6nsegdnsea necesario.
barra.
Vea la secciSnsobre Tensi6nde la
• Retirela abrazadera.
Cadena.
- Retirela cadena usada.
36
Abrazadera
de la Barra
Abrazadera
• Gire el tom_llode ajuste a mar_ hacia la
izquierda (en cordradel sentido det reloj)
hasta que la clavija de ajuste toque el
retentor.
• Haga desr_ar la barra por dell. del
cilindmdel embrague hasta que la oarm se
detenga _ tocar el engranaje del cilindro
del embrague.
• Retire muy cuidadosamentela nueva
cadena de! pacluete.Sostenga fa cadena
con Ion eslabones de impulsiSnodentados
cornose ve en la ilustraci6n.
CuchiIlas
AJUSTE DE LA CADENA
Vea "Tensi6n de la Cadena" en la
secci6n de Mantenimiento.
MMPIE EL FILTRO DE
COMBUSTIBLE
Para limpiar el flltro, vacle el apamto
haciendo que el motor, marche hasta
quedar sin combustible,luego retire el
juego de tapa del filtro de combu_'ble y
retentor del tanque. Saque el filtm de|
Medidor de Pmfundidad tanque y sep_relo de la lfnea. IJ'mpelo
con un detergente suave y enjudguelo.
S_:]ueto compietamente y vuelva a
annado.
AJUSTES AL CARBURADOR
ADVERTENCIA: La cadena estard
I_l_s
de Pmpulsi6n
en movimiento durante la mayor parte
• Coloque b. c_dena porencima y pot deltds de este prodecimiento. Use el equipo
delembrague.
protector y observe todas las
precauciones de seguddad. En el
dientes de
la punta de!
: los
Co_oquelos
eslabones
de engranaje.
propulsi_.'lentre
Coloque los eslabones de proputsiSnen la "Ajuste de la Mezda de Bajas
Revoluciones" verifique la marcha lenta
ranurade la batra.
despu_s de cada ajuste. La cadena no
• Tire la barra lmcia adeIante basraque la
debe moverse con el motor en marcha
cadena quede tiranteen la t-dnurade la
lent_
• Ahora insta]ela abrazadera de la barra
asegur_ndoseque la da'_a de aju_'t,
e est_ E! ajuste del carbumdor es de
• posicionadaen el orificioinferioren la oan'a primordial importancia. Si se Io hace
incorrectamente, puede dafiar tanto el
gura_
motor como el carbrador
permanentemente. Si necesita mds
Abrazadera
ayuda o no est& seguro de c6mo hacer
el procedimiento, Ilame a nuestro
tel_fono de ayuda al consumidor, al
1800-235-5878.
E! combustible vencido, el filtro de aire
sucio, el filtro de combustible sucio o el
s
Odficio
motor ahogado pueden dar la
Inferior
Barra
impmsi6n de carburaci6n desajustada.
Clavija de
Gu_a
Vedfique estas condiciones antes de
/_uste
hacer cualquier ajuste.
El carburador ha sido ajustado
• Instalelas tuercas de la abrazadera y
cuidadosamente en la fdbdca.
aj_stelasa mano6nicamente+ No losajuste Posibtemente se hagan necesados
rodspot ahora.
ajustes si se nora cualquiera de las
• Ahora proceda a la secci6n "Ajuste de ta
siguientes condiciones:
Cadena" abajo.
37
I
• La cadenase mueveconel motoren
marchalenta.Vea =MarchaLentaT"bajo
prodecimiento
de ajuste.
• La sierranoandaa amrct'_len_ Vea
Mezcla para Bajas Revoluciones-L
Deje el motor en marcha lenta. Luego
acelere el motory tome nota del
funcionamiento. Si el motorse ahoga, o
"Mazcha Lenla T" y =Mezcla de Bajas
acelera bien o largahumoal acelerar,
Revoluciones
L'.
• B motorse parao se ahogacuandodebe gireel tomillode ajuste a la derecha
(en el sentido del reloj) en incrementos
acelerar.Vea "Verificaci6ndela
de 1/16 de vuelta dnicamentehasta
Acelemci6n'.
• Bajade potenciade corte._Vea
"Mezdade obtener un funcionamiento
AltasRevoluciones
H"bajoel
eatisfactorio. Repitaeste procedimiento
procedimiento
de ajuste.
las veces que sea necesado. Repita
Hay tres tomillos de ajusteen el
este procedirnientolas veces que sea
carburador. Estdn mareadoscon =H',
necesado para obtener rendimiento
=L"y "q".Est_inubicadosarriba del
satL_factodo.Despu(_sde comptetar
bombeador.
estosajustes, verifiquela aceleraci6ny
et movimientode la eadena en mamha
PUNTOS DE PRECALIBRACION
lenta.Ajuste nuevamentesi es
AI hoer ajustes no fueme lastapas
necesario.
limitadorasde pldsticorods elld de los
retentores o puede haber defios. Si no Mezcla para Altas Revoluciones-H
se necesitan los puntos de
NO HAGA FUNCIONAR EL MOTOR
precatibraci6n,pase a la secci6n
con el acelerador a fondo pot mucho
"Marcha Lenta-T."
tiempoal hacer los ajustesya que
• Gire losdostorn_llos
deajustede mezclaa
puede de,Sarel motor.Haga un corte de
la izquierda(encontradetsentidodelreloj)
pmeba. Basado en el funcionamiento
basraquese paten.
- Gireeltomillodemarchalentaa laderecha de la sierra durante el code, ajuste el
tomillopara la mezcla de altas
(enel sent_ode!reloj)basraquese
detenga.Ahora girelohaciala izquierda4 revolucionespot incrementosde s61o
vueltasy media.
1/16 de vuelta, como se detalla a
Ponga el motor en marcha y d_jeloen continuaci6n:
marcha pot 3 minutos, iuego procedaa • A laderecha(enel sentidodel ml_ hasta
la secci6n de ajustes. Si el motorno
que/asienatengabuenapotenciaaJcorta_
sinhesitaciones.
Nohagalosajustesporel
- arranca, yea la Tabla Diagn<_icao
sonidoni pot lasrevducione_sinoporel
game al 1-800-235--5878. Si el
buenfur'_onamiento
al cortar.
funcionamiento del motores aceptable
- Ala izquierda (en cordradelsentido
del
con las postcionesanterioresy la
re!oj')
si lasierratienerevoluciones
alias
cadena no se mueve en marchalenta,
perose parao lefa]tapotenciaal cortar.
no hard falta hacer m_s ajustes.
Despu_sde completarlos ajustes,
PROCEDIMIENTO
DE AJUSTE
verifiquela aceleraci6ny el movimiento
Marcha Lenta-T
de la cadena en rnamhalenta. Ajuste
Deje el motoren.marcha lenta_Ajuste nuevamente si es neceeario.
las revolucioneshasta que el motorse Verificaoi6n de la Aceleraci6n
mantenga en marcha sin que la cadena Si el motor se para o hasita en vez de
se mueva o que el motorse ahogue.
acelerar, gire el tomillode ajuste de la
• Gite eltomillo a la derecha(enelsentido mezda para bajas revolucionesa/,3
delreloj) paraaumentarlasrevoluciones
si
izquierda (en contradel sentidode!
et motorse ahogao se para.
• Gireeltomilloa laizquierda(encontra
del reJoj)hasta conseguiruna aceleraci6n
pareja sin movimiento de la cadena en
sentJdo
delreloj)par'abajarlas
revoluciones.
rnamhalenta. Verifiquenuevamente y
No hace falta ning_n otroajustesi la
haga los ajustes necesadospara
cadena no se mueve en marcha lenta y conseguirun funcionamiento
el el rendimientoes satisfactodo.
aceptable.
38
Prepare el apamto para guardado al
final de la temporada o si no se Io va a
usar Dot mds de 30 dfas o mAs.
ADVERTENCIA:
• Deje que el motor se enfn'ey fije bien el
aparato antes de guarderloo de
Afiada estabilizadora la gasolinaen el
tr=w/x_mrb.
• Guarde la s_erray el combusb'bte
en
unlocal bienventfladodondelosvapores
de combust_le nopuedan ere-at en
contactocon chispasnl llamasabiertas
provenientesde lostem,,otanques,los
motoreso intenuptoresel_'tdcos,
caIefactorescentr_es, etc.
• Guarde el aparato contodoslos
protectoresen su lugary coloqueel
aparato de modoque las piezasfilosasno
puedan causar heddospot accidente.
• Guarde el aparato bienfuera delaJcance
de los nifios.
tanque de combustible o en el
recipiente de almacenado de
combus0ble. Siga las instrucciones de
mezda que se encuentran en los
envases de estabilizador. Ponga el
motor en marcha y d_jelo en marcha
unos 5 minutos despu_s de ponede
estabilizador.
El aceite CRAFTSMAN 40:1 para
motores de 2 tiempos (enfriados a aim)
viene mezclado con estabilizador de
combustible. Si no usa este aceite de
Sears, entonces puede afiadir un
estabilizador al tanque de combustible.
MOTOR
SUPERFICIES EXTERNAS
St va a guardar el aparatodurante
muchotiempo, Ifmpielodgumsamente
• Retire la bujia y viertauna cucharadade
las de t_ de aceite40:1 para motoresde 2
fiempos (enfdadosa aire) pot la abertum
para la bujl'a.Tironeelentamentede la
soga de arranque 8 a 10 veces pare
d'_tfibuirel aceite.
• Reemplacela bujfacon otradellipoyde la
• gama de calor recomendados.
. Lim_e el filbo de aire.
Examine todoel aparato para verificarque
no hayatomglos,luemas ni pemos sueltos.
Cambie todeslas piezasda_das,
quebradeso gastades.
• AIpdncipiode la pr6_ma tempomde,use
exclusivamentecombustiblenuevoconla
proporci6ncorrectade gasolinaa aceite.
primem. Gu_rdelo en un lugar limpio y
seco.
,, ApIiqueuna pequeF=acanfidadde aceite a
las superficiesextemas met_icas y a la
barra gula.
• Lubriquelaosdena y envudlvalaen papel
gruesoo tela.
SlSTEMA DE COMBUSTIBLE
Vea el mensaje maroado
1MPORTANTE',
que se refiere at uso
de combustibles con mezcla de alcohol
en su aparato, en la secci6n de Uso,
bajoAbastecimientodel Motor.
OTRO
Los estabilizadoresde combusbl01e
son
No guardegasotina
deunatempomda
a al
una aitemativa aceptable para
pr6xima.
minimizarle formaci6nde dep6sitosde • Cambieet recipiente
degasolinasise
goma durante el almacenamiento,
empiezaa oxidar.
39
TABLA DIAGNOS1TCA
PROBLEMA
CAUSA
•
EJmotor no
;EuT3nc3
0 se
man_ene en
_s61o
unos seg_cios
despu6sde
El interruptorestd enOFF =•
Coloque el intermptoren ON.
• B motorest_ahogado. • Vea las lnsl_JCCiones
de Arranque.
•
B tanquede combustible • Uene el tanqueconla rnezda
est_ vacio.
correctade cornbusb'ble.
• La bujfano hace ct_L_l_. • Inst_e una bujfanueva.
• B combus_bleno e_,dd • VeriEquesi el flitro de combusb'ble
Ilegandoal catburador.
est_ sucio;Ifmpielo.VedfJquesi hay
doblecesen la Ifneade combustible
o si estdpartida:rep_r_ o cdmbiela.
• El carbu_dor requiere
° Vea "AjustesaJCad_rador'.
ajuste.
• Ningunode losanteriore_ • En_e en contactoconel Servicio
Sears.
•
_ revoluc_onesde la
marcha fenta est_ muy
altos o mw bajas.
• La Mezcla pard Bajas
Revo]ucionesrequier
ajuste.
• Lasjuntas del cig0e£-_
est_mgastadas.
• La compresi6nest_ baja.
El motor no
anda en marcha
lenta como
debe.
•
El motor no
acelere_ le bJta
potencia o se
para bajo carga.
SOLUCION
i
* Umpte o cambieel littrode ._re: ......
• Limpieo cambteel filtrode _dre.
o Entre enco_ttactoconel Servicio
Sears.
• Enlte en contactoconet Servicio
Sears.
Ningunode los antedores !, Enbe en contactoconel Servicio
Sears,
•
•
E] filtm de aire est_ sucto. •
La bujraestd _da
•
•
B carburadorrequiere
ajuste.
Lospuertosde escapeo •
las aberturasde satidade
silenciadorestdntapados
La compresi6nest_ baja. •
•
Limpie o cambieel filtm de aim:
Umpie o cambiela buj/a y calibrela
separaci6n.
• Vea "AjustesaJCarburador'.
Errtreen cor__ctoconel Servicio
Sears.
Entre encontactoconel Servicio
Sears,
• Ningunode los antedores * Entreen contactoconel Serv_cio
Sears.
•
El motor hume_
excesivamente.
-
El cebador est_
parci_lmenteacc_nado. •
• La mezda de combustible*
se ha hecho
incorrectamente.
- E1fiffro de aJreest_ sucio. •
- L_ Mezcla pare Altas
.
Revolucionesrequiem
ajuste.
- El c_rterest_ pemier.do. •
4O
Ajuste el cebador.
Vacie el tanquede combustibley
II_nelode combust_b|e
conla mezda
correcta.
I impieo cambieel filtro de aire.
Vea "Ajustes
alCarburador'.
Entre en contactocon el Service
Sears.
SOLUCION
pROMBLEMA
CAUSA
• Lamezcla
decombustible• Vea "AbasteclmientodelApamto"
Elmotor
se ha hecho
marcha
con
tempemtura ;_ncorrectamente.
° Se ha instaladola bujfa
elvada.
* Cdrnbielaparla bujlacotrecta.
incorrecta.
o La Mezcla para Altas
Revolucionesesld
dernasiadopobre.
• Lospuertosde escape o
las aberturasde salida de!
s_lenciadorest_ tapados.
• La re_la de escape del
silenciadorest_
carbonizada.
,* La caja del ventJladoro las
rebabas de! dlindm est_
sucias.
• Ningunode losantenores.
• Vea "AjustesalCazbwador'.
•
Entre en contactocon el Servicio
Sears.
•
Limpie ta rejlllaa_chisp_
• Umpie el _ea.
° Entre en contactocon el Servicio
Sears.
* Uene elt_nque de aceite.
insuficlencia de . El tanquede aceite est_
aceitepare
vaefo.
lubdcarlabarra y° B bombeadorde ace_teo el • EntTeen contactocon el Servicio
Sears.
caderEL
filtro de aceite est_ tapado.
• El odficiopara aceite en la
° Saque la barra y limpiela.
b_m est&_pado.
.a cadena se
• In maria lenta requiem
• Vea =Aju._esa/C_"bumdor'.
mueveen
ajuste.
• EnlTeen contactocon elServicio
marct'_ lenta.
• E1embmgue requiem
Sears.
, reparaciones.
• Vea "Tensi6nde la C_dean'.
cadena no se ° La cader_ est_
muevecuando
demasiado
se acelera el
tensionada.
motor.
• El carburadorrequiem
* Yea "Ajustesal Carburador'.
•
•
_ste.
Losdeles de la barra
guia e_
apretados.
El embragueest_
pa_enando..
La cadena
•
dgolpeteao corta
esparejo,
•
La cadena
corta en
6ngulo.
•
Repare o reemplace.
.
Entre en contactocon el Servicio
Sears.
. Yea "TensiSnde la Cadena'.
La cadean est_
incorrectamente
tensionada.
I.as cuchillas
d_das.
• La ca.deanest_ gastada.
• Las cuchillasest_n
desafiladaso rna[aft!arias
o los medidoresde
_tosrOfundidad
estdnmuy
* Entre en cont_ctocon el Servicio
Seam.
° ABe o cambie la cadean.
° Vea "Afilaci6nde la Cadean'.
•
•
* La cader_ est_ instalada
•
Entre en contacto con el Ser_cio
Sears.
tnstale la c_dena en ]a direcck_n
• La l:_rte
de ardbade
lascuchill.as
no est_tq
p_nas.
* La barm tiene
protuberandaso est_
torcidao losdeles
est_n desparejos.
o El embrague est_
pa_nando.
i• Le_cuchillas
es'!'_n
41
•
Ve_ "AfllaciSn de ta Cadena'..
*
Repare o cambie la barra.
•
Entre en contactocon elServicio
Sears.
•
V_I
El engranaje eSt_gastado.
=Af_f_Pifm
d_ Im _:_d_=r_"
For the repair or replacement parts you need
delivered directly to your home
Call 7 am - 7 pm, 7 days a week
1-800-366-PART
(1-800-366-7278)
Para ordenar piezas con entrega
domicilio - 1-800-659-7084
a
For in-house major brand repair service
Call 24 hours a day, 7 days a week
1-800-4-REPAIR
(1-800-473-7247)
Para pedir servicio de reparaci6n
domicilio1-800-676-5811
a
For the location of a Sears Parts and
Repair Center in your area
Call 24 hours a day, 7 days a week
1-800-488-1222
For information on purchasing a Sears
Maintenance Agreement or to inquire
about an existing Agreement
Call 9 am - 5 pm, Monday-Saturday
1-800-827-6655
When requesting service or ordering
parts, always provide the following
information:
•
°
Product Type
Model Number
*
•
Part Number
Part Description
America's Repair Specialists