1
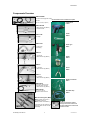
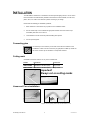
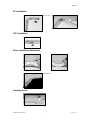
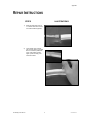
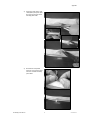
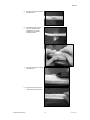
CF-NEONB30 COLORflex™ Blue CF-NEONR30 COLORflex™ Red USER MANUAL th CHAUVET, 3000 N 29 Ct, Hollywood, FL 33020 U.S.A (800) 762-1084 – (954) 929-1115 FAX (954) 929-5560 www.chauvetlighting.com TABLE OF CONTENT BEFORE YOU BEGIN ...................................................................................................................................................... 3 WHAT IS INCLUDED................................................................................................................................................................................ 3 UNPACKING INSTRUCTIONS .................................................................................................................................................................... 3 AC POWER .......................................................................................................................................................................................... 3 SAFETY INSTRUCTIONS .......................................................................................................................................................................... 3 INTRODUCTION............................................................................................................................................................... 4 FEATURES ............................................................................................................................................................................................ 4 FOREWORD .......................................................................................................................................................................................... 4 COMPONENTS OVERVIEW ...................................................................................................................................................................... 5 INSTALLATION ................................................................................................................................................................ 6 CONNECTING PINS ................................................................................................................................................................................ 6 CUTTING MARK ..................................................................................................................................................................................... 6 LINEAR AND CURVE INSTALLATION .......................................................................................................................................................... 6 90° INSTALLATION ................................................................................................................................................................................ 7 180° INSTALLATION .............................................................................................................................................................................. 7 OTHER INSTALLATION ILLUSTRATIONS ..................................................................................................................................................... 7 CAPPING OFF RUN ................................................................................................................................................................................. 7 REPAIR INSTRUCTIONS ................................................................................................................................................. 8 APPENDIX...................................................................................................................................................................... 11 RETURNS PROCEDURE ........................................................................................................................................................................ 11 CLAIMS .............................................................................................................................................................................................. 11 TECHNICAL SPECIFICATIONS ................................................................................................................................................................ 12 COLORFLEX™ WARRANTY INFORMATION ............................................................................................................... 13 CF-NEON(x) User Manual 2 2004-09-20/15:34 BEFORE YOU BEGIN What is included 30ft roll of blue or red COLORflex™ 2 pieces of the following items; Power cord/converter, End cap, Splice connector 15 Channel mounting clips 5 pieces of the following items; Male connecting pins type MCP-3 and MCP-2 Manual & Warranty Card Unpacking Instructions Immediately upon receiving a fixture, carefully unpack the carton, check the contents to ensure that all parts are present, and have been received in good condition. Notify the shipper immediately and retain packing material for inspection if any parts appear damaged from shipping or the carton itself shows signs of mishandling. Save the carton and all packing materials. In the event that a fixture must be returned to the factory, it is important that the fixture be returned in the original factory box and packing. AC Power To determine the power requirements please look for a label affixed to the product or packaging or refer to the product’s specifications chart. A product’s listed current rating is its average current draw under normal conditions. Before applying power to a fixture, check that the source voltage matches the fixture’s requirement. Warning! Verify that the power required on your unit matches the line voltage applied. All fixtures must be connected to circuits with a suitable Earth Ground. Safety Instructions Please read these instructions carefully, which includes important information about the installation, usage and maintenance? CF-NEON(x) User Manual Please keep this User Guide for future consultation. If you sell the unit to another user, be sure that they also receive this instruction booklet. Always make sure that you are connecting to the proper voltage and that the line voltage you are connecting to is not higher than that stated on decal or rear panel of the product. Although repair instructions are included in this manual, It should be carried out by qualified persons knowledgeable in electrical repair. Repairs carried out by unskilled people can lead to damage or malfunction. Please contact the nearest authorized technical assistance center. Always use recommended type spare parts. Don’t connect the device to a dimmer pack. Make sure power cord is never crimped or damaged. Never disconnect power cord by pulling or tugging on the cord. 3 2004-09-20/15:34 INTRODUCTION COLORflex™ is a professional linear lighting device using LED technology. It looks like Glass neon, but it is flexible, safer, and more durable, lasts longer and can be used outdoors. Only a few tools are required for field design and installation. COLORflex™ is ideal for permanent, fixed installations requiring minimum maintenance but can also be useful when adding last minute, creative, custom design details. Professionals in the entertainment industry will find practical, functional and creative use of the COLORflex™ product in the design of tradeshow booths, special events, merchandising, retail displays and themed environments. Features COLORflex™ LED Neon is flexible Safer than glass Neon Shockproof Easily transportable Provides longer life Lower power consumption Lower maintenance Bright output Easy to install Dimmable to approximately 5% Foreword Please review the component’s overview section before commencing with installation. It will be important to have ready the tools necessary to complete the job successfully. One such item to draw special attention to is the PVC glue. CHAUVET does not provide PVC glue with the accessories enclosed. This item is continuously illustrated in all pictures and is an integral component for maintaining water-tight connections. PVC glue and cement are general terms. Be sure to use adhesive that will bond to PVC. Following is a list of the accessories enclosed with this product; 2 Pieces: LEDCF-POWER............................................................................... Power cord with AC/DC converter LEDCF-SPLICE .........................................................................................................Splice Connector LEDCF-CAP............................................................................................................................End Cap 15 Pieces: LEDCF-CLIP ................................................................................................................... Mounting Clip 5 Pieces: Male Connecting Pins type MCP-3 (see Components Overview) Male Connecting Pins type MCP-2 (see Components Overview) CF-NEON(x) User Manual 4 2004-09-20/15:34 Introduction Components Overview LEDCF-POWER 1 1. Power cord and plug with AC/DC Recommended tools for installation and repairs converter Heater Gunn Part B Use male connector pin (MCP-2) LEDCF-SPLICE 1. Male connector pin (MCP-3) 2. Heat shrink tube 2 1 Cutter Part D LEDCF-CAP 1. End cap 1 LEDCF-CLIP Solder gun Part F 1. Channel clip 2. Screws (2) 2 1 LEDCF-X 1. X connector 2. Male connector pin (MCP-2) 1 Solder Part G 2 LEDCF-L 1 1. L connector 2. Male connector pin (MCP-2) Pincer Part E 2 LEDCF-T 1. T connector 2. Male connector pin (MCP-2) Needle connectors Part C 1 2 LEDCF-EXT8 1 2 3 1. Extension cable, 8 inches 2. Female power connector 3. Male connector pin (MCP-2) LEDCF-EXT96 Same as above but with; Ant-static strip Part A Extension cable, 96 inches MCP-3 Male Connecting Pins (MCP) MCP-2 (between power cord or specialized connectors) MCP-3 (between COLORflex™) MCP-2 CF-NEON(x) User Manual Connecting pins are included in all accessory items and are not sold individually. 5 PVC Glue This item is important to maintain water tight connections. Please visit your local hardware store. Please read “Foreword” section. 2004-09-20/15:34 INSTALLATION The COLORflex™ LED Neon is a versatile and user friendly linear lighting device; it can be cut and bent and formed in the field and easily installed on flat surfaces of varied materials, such as wood, plastic, steel, or on walls to form all kinds of pattern according to your design. Please follow the following pre-installation guidelines; 1. Mark centerlines or draw outlines of your pattern on the installation surface. 2. Secure channel clips on the centerlines at appropriate intervals with screws. Secure clips immediately after each curve to secure. 3. Insert LED Neon into the channel clip with illuminating side upwards. 4. Connect pieces together. Connecting pins It is necessary for the connector pins to make contact with the conductors in the COLORflex™ cable. There are 2 connector pin types (MCP-2 & MCP-3). Please use the correct connector pin as described in “Components Overview”. Cutting mark COLORflex™ LED Neon must be cut only on the indicated mark. ITEM NO. DESCRIPTION CUTTING UNIT LEDCF-NEONR COLORflex™ LED Neon (Red) Every 2.5 feet LEDCF-NEONB COLORflex™ LED Neon (Blue) Every 1.5 feet Important! Always cut on cutting marks Linear and Curve installation Support curves by placing channel clips on both sides of a curve. CF-NEON(x) User Manual 6 2004-09-20/15:34 Appendix 90° Installation Continuous 90° run. 90° run using the L connector. 180° Installation Other installation illustrations Convex Installation Concave Installation Slotted Installation Capping off run CF-NEON(x) User Manual 7 2004-09-20/15:34 Appendix REPAIR INSTRUCTIONS STEPS 1) Wear anti-static strap (Part A) or a similar device and connect it to earthed metal equipment. 2) Insert another end of needle like connector (Part C) into LED Neon to locate the problematic point. If the problem section lights up then the faulty point has been located. CF-NEON(x) User Manual ILLUSTRATIONS 8 2004-09-20/15:34 Appendix 3) Unplug the power source. Use cutter (Part D) and pincer (Part E) to open up the PVC and fix the faulty parts inside. 4) Re-solder the components (Part F & G). Plug in the power source to re-confirm the faulty part is fixed. CF-NEON(x) User Manual 9 2004-09-20/15:34 Appendix 5) Put back all of the parts into the LED Neon-Flex. 6) Use heater (Part B) to soften the PVC. Use flat & clean materials to press on the softened PVC to make the opening stick back. 7) Use cutter (Part D) to cut off the excessive PVC. 8) Plug in the power source to reconfirm the faulty part is fixed. CF-NEON(x) User Manual 10 2004-09-20/15:34 APPENDIX Returns Procedure Returned merchandise must be sent prepaid and in the original packing, call tags will not be issued. Package must be clearly labeled with a Return Merchandise Authorization Number (RA #). Products returned without an RA # will be refused. Call CHAUVET and request RA # prior to shipping the fixture. Be prepared to provide the model number, serial number and a brief description of the cause for the return. Be sure to properly pack fixture, any shipping damage resulting from inadequate packaging is the customer’s responsibility. CHAUVET reserves the right to use its own discretion to repair or replace product(s). As a suggestion, proper UPS packing or double-boxing is always a safe method to use. Claims Damage incurred in shipping is the responsibility of the shipper; therefore the damage must be reported to the carrier upon receipt of merchandise. It is the customer's responsibility to notify and submit claims with the shipper in the event that a fixture is damaged due to shipping. Any other claim for items such as missing component/part, damage not related to shipping, and concealed damage, must be made within seven (7) days of receiving merchandise. CF-NEON(x) User Manual 11 2004-09-20/15:34 Appendix Technical Specifications WEIGHT & DIMENSIONS Linear device..................................................................................... .47 in x 1.02 in (12 mm x 26 mm) Carton Size ........................................................... 16.34 in x 16.34 in x 10.24 in (415 x 415 x 260mm) Carton Weight ......................................................................................................... 37.9 lbs (17.2 Kgs) Net Weight .............................................................................................................. 31.3 lbs (14.2 Kgs) POWER AC/DC Power Converter & plug ..................................................................115V 60 Hz or 230V 50 Hz LENGTH OF ROLL .....................................................................................................................................30 feet (9.14m) NUMBER OF LEDS .........................................................................................................................24 per foot or (30.5cm) WATTS CONSUMPTION CF-NEONR30 – Red..................................................................................................... 1.44W per foot CF-NEONB30 – Blue .................................................................................................... 2.00W per foot CUTTING UNITS CF-NEONR30 – Red.................................................................................................... 2.5 feet (76 cm) CF-NEONB30 – Blue ................................................................................................ 1.5 feet (45.7 cm) ORDERING INFORMATION CF-NEONR30 ........................................................................................ COLORflex™ LED Neon Red CF-NEONB30 ........................................................................................ COLORflex™ LED Neon Blue ACCESSORIES LEDCF-POWER............................................................................... Power cord with AC/DC converter LEDCF-SPLICE .........................................................................................................Splice Connector LEDCF-CAP............................................................................................................................End Cap LEDCF-CLIP ................................................................................................................... Mounting Clip LEDCF-EXT8 ............................................................................................... Extension Cable, 8 inches LEDCF-EXT96 ........................................................................................... Extension Cable, 96 inches LEDCF-X .......................................................................................................................... X Connector LEDCF-L........................................................................................................................... L Connector LEDCF-T........................................................................................................................... T Connector CF-NEON(x) User Manual 12 2004-09-20/15:34 Appendix COLORflex™ WARRANTY INFORMATION We take great pride in the quality, value and performance of our products and believe that it should offer you trouble free operation throughout its lifetime providing you take care to follow the simple instructions in this manual. LIMITED WARRANTY USA CHAUVET provides, from the date of purchase, to the original purchaser, a 12-month limited warranty on COLORflex™. This limited warranty covers manufacturing defects in material and workmanship, only on the section of COLORflex™ that is faulty. Warranty replacement is provided only on the defective section of COLORflex™ as defined by its cutting marks. At the time of service, the owner will need to be able to provide evidence of date and place of purchase and serial number. CHAUVET does not cover damage or failure caused by abuse, misuse, faulty installation, improper maintenance, disregard for proper cleaning, or any repairs not carried out by CHAUVET. Items which are not covered by warranty are those considered as parts which are prone to failure due to general wear and tear. For example – lamps, fuses, brushes, contact rings, lamp sockets and belts. Laser diodes carry a (90day) warranty. For foggers, see user manual. There will be no obligations or liability on the part of CHAUVET for consequential damages arising from the use of the product or any indirect damages with respect to loss of property, revenue, or costs for removal, installation, or re-installation. For warranty service the product must be reported to CHAUVET to receive a unique RA# (returns authorization number) and at that time you will be advised of where to send the faulty product. All shipping charges for returns should be pre-paid. If the requested repairs or service are within the terms of this warranty then the item will be returned to you on completion without any charge. The unit(s) must be in the original packaging with any original accessories. Any shipping damage resulting from either inadequate packaging or carrier mishandling is the responsibility of the sender. CHAUVET will not be responsible or accept any liabilities for any loss or damage to additional items which are sent with returned product. If this product is not covered under the terms of this warranty, CHAUVET will advise you of the costs to carry out any repairs necessary and the unit will be shipped to you on receipt of payment for the work including the return freight charges. Please allow 2 to 4 weeks for return of your product. Under normal circumstances we try to ensure we carry out warranty repairs within 5 working days. We cannot be held responsible for delays in shipping. Title First Name Initials Last Name Address Apt. City State Country Or Province Zip Code Or Postal Code e-mail Date of Purchase Telephone # (include area code) Purchase Price (before tax) Dealer To return via fax: Date of Birth Model Serial # City 954-929-5560 CF-NEON(x) User Manual Country To return via mail: 13 CHAUVET U.S.A. Warranty Registration 3000 North 29th Ct. Hollywood, FL 33020 U.S.A. www.chauvetlighting.com 2004-09-20/15:34