1
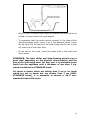
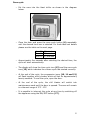
BBC460SS Blast
chiller
He
USER MANUAL FOR YOUR BAUMATIC
BBC460SS Blast
chiller
NOTE: This User Instruction Manual contains important
information, including safety & installation points, which will
enable you to get the most out of your appliance. Please keep it
in a safe place so that it is easily available for future reference. for
you or any person not familiar with the operation of the appliance.
GS 18/06/10
2
Contents
Environmental note
4
Important safety information
5–6
Specifications of your blast chiller
Dimensions of the appliance
Electrical details
7-8
7
8
Using your blast chiller
Before switching on
Storing blast chilled or frozen products
Loading the blast chiller
Using the core probe
8-10
8
8-9
9
9-10
Switching on the appliance and setting a chiller cycle
Control panel
Switching the appliance on
3°C blast chiller cycle with core probe
-18°C standard foods deep-freezing cycle with core probe
-18°C non-standard foods deep-freezing cycle with core probe
3°C blast chiller time cycle
Food class table
-18°C standard foods deep-freezing time cycle
Food class table
-18°C non-standard foods deep-freezing time cycle
Food class table
Bottles cycle
Cans cycle
11-23
11
11-12
12
12-13
13-14
14-15
15-17
17-18
18-19
19-20
20-21
22
23
Cleaning and Maintenance
24-25
Installation
Electrical connection
Positioning
Installing your blast chiller
25-27
25-26
26
27
Troubleshooting
28-29
Contact details
30
3
Environmental note
Note: Before discarding an old appliance, switch off and
disconnect it from the power supply. Cut off and render any plug
useless. Cut the cable off directly behind the appliance to prevent
misuse. This should be undertaken by a competent person. Disable
the door lock to make sure that children cannot get stuck inside
the appliance.
4
Important safety information
Your safety is of the utmost importance to Baumatic.
Please make sure that you read this instruction booklet
before attempting to install or use the appliance. If
you are unsure of any of the information contained in
this booklet, please contact the Baumatic Advice Line.
IMPORTANT: Any installation work must be
carried out by a qualified electrician or
competent person.
Use of the appliance
o Your appliance is only designed to be used in the
home. It is suitable for rapidly lowering
temperatures, rapidly freezing foods and rapidly
cooling drinks. If it is used for any other purpose or
it is not used correctly, then Baumatic Ltd. will
accept no liability for any damage or injury that
might be caused.
o Altering the specification of the appliance must not be attempted
for reasons of safety.
o The blast chiller has NOT been designed to be used
continuously. Therefore, for it to function correctly and
efficiently, it is advisable to switch the appliance off after a
maximum of two cycles and leave the door open for around 30 –
40 minutes so that any ice which has formed can evaporate.
Before using your appliance
o Check the appliance for any signs of transport damage. If you
notice any damage, then you should not connect your appliance
to your mains supply and should contact your supplier.
Child safety
o Packaging material should be kept away from
children.
o Children should not be allowed to touch the
controls or play with the appliance.
5
General safety
o Do not pull on the power supply cable to remove the plug from
your mains supply socket.
o Do not pull out or insert the plug with wet hands.
o Do not attempt to use your appliance outdoors or
any place where it is likely to come into contact
with the elements.
o Before cleaning the appliance or performing
maintenance work, ensure that the appliance
disconnected from your mains supply.
has
been
o Never allow the back coils of the appliance to come into contact
with the wall surface.
o Always ensure that the location where you are installing your
appliance is free of stored items such as papers and other
flammable materials.
o Never block the ventilation openings of the appliance, either on
the inside or its exterior.
o It is vital to keep your appliance well ventilated,
so that there is proper air flow between the
bottom of the unit and the plinth/kick plate
which it is sitting on.
o Do not place electrical devices inside of the appliance, such as
mixers and electric ice cream makers.
o This appliance is not intended for use by persons (including
children) with reduced physical, sensory or mental capabilities or
lack of experience and knowledge, unless they have been given
supervision or instruction concerning use of the appliance by a
person responsible for their safety.
Service
You should not attempt to repair the appliance
yourself, as this could cause injury or a more serious
malfunction. If you require a service call then please
contact the Customer Care Department.
6
Specifications of your blast chiller
o
o
o
o
o
o
o
o
o
5 x chiller cycles
10 x display icons
Door open indicator
Low performance indicator
Core probe device
3 x Programmable chiller time cycles
Bottles cycle
Cans cycle
Thermal maintenance mode
Dimensions of appliance
Height:
Width:
Depth:
460 mm
598 mm
566 mm
Dimensions of aperture*
Height:
Width:
Depth:
450 mm
560 mm
570 mm (min)
7
Net capacity: 27 litres
Electrical details
Rated Voltage:
Max Rated Inputs:
220 - 240 Vac 50 Hz
0.44 kW
Standard accessories
Core probe device
Glass tray
* Please refer to the installation instructions for more specific
information on the size of aperture that you will require.
IMPORTANT: When you install your appliance it is important to bear
in mind its climatic rating.
Using your Baumatic blast chiller
Before switching on
o Make sure that it has been installed by a suitably qualified
person, as per the information contained in Baumatic’s
installation instructions.
o After delivery, wait for eight hours before connecting the
appliance to your mains supply. This will allow any refrigerant
gasses that may have been disturbed during the transportation
process to settle.
o The outside of the appliance and the removable accessories
contained within it, should be cleaned with a solution of liquid
detergent and water.
o The interior of the appliance should be cleaned with a solution of
sodium bicarbonate dissolved in lukewarm water. The interior
and accessories should be thoroughly dried, after the cleaning
process has been completed.
o There can be an odour when you first switch on the appliance. It
will lessen as the appliance starts to cool.
Storing blast chilled or frozen products
o Blast chilled and / or rapidly frozen food MUST NOT be kept
inside the blast chiller. It must be accurately covered and
protected (with cling film, a hermetic seal etc.) in the fridge or
freezer.
8
o Blast chilled food must be kept in a fridge at a constant
temperature of 3°C.
o Frozen food must be kept in a freezer at a constant temperature
of -18°C.
Loading the blast chiller
o Avoid keeping chilled and / or rapidly frozen food at room
temperature for long. If kept at room temperature, the foods will
undergo the following negative transformations: loss of
moisture, loss of initial quality and an increase in the possibility
of contamination.
o For these reasons, it is advisable to start the chosen cycle as
soon as the preparation and / or cooking of the food is finished.
o To load the blast chiller, always use the supplied grills, basket
and drip-tray in order to avoid blocking the airflow hitting the
product, which is located at the back of the blast chiller.
o Ensure that the products to be blast chilled are not stacked
incorrectly by inserting them individually or in small pieces when
they are large.
Using the core probe
o The core probe is a device which can be found within the blast
chiller refrigerator and is used for reading the temperature at the
centre of the food which is to be rapidly chilled or frozen.
o WARNING: Take extra care when using the core probe as
it is very sharp and there is a risk of injury if handled
incorrectly.
9
o While in use, the core probe must be inserted into the food to be
chilled or frozen before the cycle begins.
o To guarantee that the probe works correctly in the blast chiller
and deep-freeze cycle, insert it as in the diagram below. Insert
the tip right into the centre of the food, being careful that it does
not come out of the other side.
o At the end of the cycle, clean the probe with a soft cloth and
warm water.
REMEMBER: The blast chiller and deep-freezing periods vary a
great deal depending on the physical characteristics and the
size of the food being used. For best use, it is advisable to put
foods into the appliance with a thickness of less than 2 cm,
which are defined as STANDARD foods.
For foods in basins which are thicker than 2 cm or for foods
which are not in bowls but are thicker than 2 cm (NONSTANDARD foods), it is advisable to choose a -18°C nonstandard foods chiller cycle.
10
Switching on the appliance and setting a chiller cycle
Control panel
1 = +3°C blast chiller cycle with core probe button
2 = -18°C standard foods deep-freezing cycle with core probe button
3 = +3°C blast chiller time cycle button
4 = -18°C standard foods deep-freezing time cycle button
5 = Bottles cycle button
6 = Cans cycles button
7 – +3°C blast chiller icon
8 = -18°C deep-freezing icon
9 = Core probe icon
10 = First stage cycle icon
11 = Second stage cycle icon
12 = Third stage cycle icon
13 = Time cycle icon
14 = Bottles cycle icon
15 = Cans cycle icon
16 = Ignition icon
17 = ON / OFF button
Switching the appliance on
o To switch on the appliance, press and hold the ON / OFF button
(17) for a few seconds.
o The ignition icon (16) will remain on for the whole length of time
that the appliance is in use.
o At the end of each cycle, press the ON / OFF button (17) again
to switch off the appliance.
o Within the first three minutes after the start of the chosen cycle,
it is possible to modify it or switch the appliance off.
o If there is five minutes of inactivity after the appliance is
switched on, the appliance will automatically switch off.
11
o All the blast chiller and deep-freezing cycles indicated in
this user manual are defined based on a starting food
temperature of between 70°C and 90°C.
o At the end of any cycle, it is possible to keep the food stuff in the
appliance for longer by simply not opening the door immediately.
All three chiller cycle stage icons (10, 11 and 12) will flash
during this period.
3°C Blast chiller cycle with core probe
o The weight of the food must NEVER be more than 1 kg.
o The temperature reading takes place in the central part of the
food by inserting the core probe.
o Carefully put the hot food into the blast chiller, slide in the probe
ensuring that the tip is in the centre of the food. To guarantee
that the probe works correctly in the blast chiller and deepfreezing cycle, insert it as the ‘Using the core probe’ section
directs.
o Close the door and press the 3°C blast chiller cycle with core
probe button (1). The display will show the 3°C blast chiller icon
(7) and the core probe icon (9), which are lit at the same time,
indicating that the chosen cycle has started correctly.
o There are three icons which light to show the progression of the
cycle (10, 11 and 12). They will switch off in turn and flash in
order.
o At the end of the cycle, the progression icons (10, 11 and 12)
will flash together with a buzzer which will sound for around
twenty seconds. To end the cycle, open the door.
o At the end of the cycle, the chill blaster will switch into
maintenance mode until the door is opened. The product will
remain in a thermal range of 1°C - 5°C.
-18°C Standard foods deep-freezing cycle with core probe
o The weight of the food must NEVER be more than 1 kg.
o The temperature reading takes place in the central part of the
food by inserting the core probe.
o Put the hot food into the blast chiller, slide in the probe ensuring
that the tip is in the centre of the food. To guarantee that the
12
probe works correctly in the blast chiller and deep-freezing cycle,
insert it as the ‘Using the core probe’ section directs.
o Close the door and press the -18°C standard foods deep-freezing
cycle with core probe button (2). The display will show the 18°C deep-freezing icon (8) and the core probe icon (9) which
are lit at the same time, indicating that the chosen cycle has
started correctly.
o The cycle progression icons (10, 11 and 12) show the different
stages of the cycle and will switch off in turn and flash in order.
o At the end of the cycle, the progression icons (10, 11 and 12)
will flash together with a buzzer which will sound for
approximately twenty seconds. To end the cycle, open the door.
o At the end of the cycle, the chill blaster will switch into
maintenance mode until the door is opened. The product will
remain in a thermal range of -16°C - -20°C.
-18°C Non-standard foods deep-freezing cycle with core probe
ATTENTION: Before beginning this cycle, the food must have a
temperature of 3°C. Therefore, if necessary, chill the food using
the 3°C blast chiller cycle with the core probe first.
o A non-standard food is classified as a product with a thickness
larger than 2 cm or foods in basins or bowls which are thicker
than 2 cm.
o The weight of the food must NEVER be more than 1 kg.
o The temperature reading takes place in the central part of the
food by inserting the core probe. To guarantee that the probe
works correctly in the blast chiller and deep-freezing cycle,
insert it as the ‘Using the core probe’ section directs.
o Check that the blast chiller is empty and that the door is closed.
o Press the 3°C blast chiller cycle with core probe button (1) and
the -18°C standard foods deep-freezing cycle with core probe
button (2) simultaneously to select this cycle. The display will
show the 3°C blast chiller icon (7), -18°C deep-freezing icon
(8) and the core probe icon (9) which indicates that the chosen
cycle has started correctly.
o After a few minutes, a buzzer will signal the best time to put the
food to be deep-frozen into the appliance.
13
o Put the food into the appliance within five minutes otherwise the
appliance will be switched off and it will be necessary to start
the procedure again from the beginning.
o Insert the probe, ensuring that the tip is at the centre of the
product and close the door.
o On the display, the progression icons (10, 11 and 12) show
the different stages of the cycle and will switch off in turn and
flash in order.
o At the end of the cycle, the progression icons (10, 11 and 12)
will flash together with a buzzer which will sound for
approximately twenty seconds. To end the cycle, open the door.
o At the end of the cycle, the chill blaster will switch into
maintenance mode until the door is opened. The product will
remain in a thermal range of -16°C - -20°C.
3°C Blast chiller time cycle
o The weight of the food must NEVER be more than 1 kg.
o Place the hot food into the blast chiller. Close the door and press
the 3°C blast chiller time cycle button (3) repeatedly until the
desired food class icon has been chosen. For food class icon
details see the table below.
Icon 10
Class 1 30 minutes
Icon 11
Class 2 60 minutes
Icon 12
Class 3 90 minutes
Icons 10 + 11 Class 4 120 minutes
Icons 11 + 12 Class 5 150 minutes
Icons 10 + 12 Class 6 180 minutes
o Approximately five seconds after selecting the desired food class,
the cycle will start automatically.
o The display will show the 3°C blast chiller icon (7) and the time
cycle icon (13) which are lit at the same time, indicating that
the chosen cycle has started correctly.
o The cycle progression icons (10, 11 and 12) show the different
stages of the cycle and will switch off in turn and flash in order.
o At the end of the cycle, the progression icons (10, 11 and 12)
will flash together with a buzzer which will sound for
approximately twenty seconds. To end the cycle, open the door.
14
o At the end of the cycle, the chill blaster will switch into
maintenance mode until the door is opened. The product will
remain in a thermal range of 1°C - 5°C.
o For a general guideline for food classes and chiller times please
refer to the table below.
Please note the following table should be used as a guideline
only. Chiller times can vary depending on the type and size of
the food.
Class 1 foods (g) for blast chiller times of
less than ½ an hour (icon 10)
Short-crust pastry biscuits
500
Yoghurt biscuits
500
Spinach
500 – 1000
Asparagus
500 – 1000
Swiss chard stalks
500 – 1000
Courgettes
500 – 1000
Cauliflower
500 – 1000
Fennels
500
Carrots
500
Broccoli
500 – 1000
Peppers
500 – 1000
Leeks
500 – 1000
Celery
500 – 1000
Brussels sprouts
500
Potatoes
500
Class 2 foods (g) for blast chiller times of
between ½ hour and 1 hour (icon 11)
Short-crust pastry biscuits
1000
Yoghurt biscuits
1000
Custard
500
Fennels
1000
Potatoes
1000
Carrots
1000
Brussels sprouts
1000
Rare T-bone steak core
500 - 1000
temperature 55°C
Class 3 foods (g) for blast chiller times of
between 1 hour and 1 and a ½ hours (icon
12)
Plum cake
500
Apple pie
500 – 1000
Sponge cake
500
Custard
500
Neck of pork core temperature
500
72°C
15
Medium – well done T-bone steak
core temperature 65°C
Roast beef core temperature
58°C
Ricotta and spinach cannelloni
core temperature 75°C
500
500
500
Lasagne Bolognese core
500
temperature 78°C
Courgette flan core temperature
500
70°C
Savoury flan core temperature
500
72°C
Class 4 foods (g) for blast chiller times of
between 1 and ½ hours and 2 hours (icons
10 and 11)
Custard
1000
Plum cake
1000
Sponge cake
1000
Tomato sauce
500
White sauce
500
Meat sauce
500
Trout
500
Mussels and clams
500 – 1000
Prawns and flat lobster
500
Plaice fillet
500 – 1000
Scorpion fish fillet
500
Roast pork core temperature
500
70°C
Roast turkey breast core
500
temperature 68°C
Class 5 foods (g) for blast chiller times of
between 2 hours and 2 and a ½ hours (icons
11 and 12)
Tomato sauce
1000
Meat sauce
1000
White sauce
1000
Trout
1000
Prawns and flat lobster
1000
Scorpion fish fillet
1000
Braised shoulder of beef core
500
temperature 75°C
Class 6 foods (g) for blast chiller times of
between 2 and ½ hours and 3 hours (icons
10 and 12)
Roast pork core temperature
1000
70°C
Neck of pork core temperature
1000
16
72°C
Medium – well done T-bone steak
core temperature 65°C
Roast beef core temperature
58°C
Roast turkey breast core
temperature 68°C
Ricotta and spinach cannelloni
core temperature 75°C
Courgette flan core temperature
70°C
Savoury flan core temperature
72°C
Braised shoulder of beef core
temperature 75°C
Lasagne Bolognese core
temperature 78°C
1000
1000
1000
1000
1000
1000
1000
1000
If the food being used is not shown in the above table, it is
advisable, for the first few times that the appliance is used, to
use the 3°C blast chiller cycle with the core probe and to
manually check the time taken so that the food can then be
classified.
-18°C Standard foods deep-freezing time cycle
o The weight of the food must NEVER be more than 1 kg.
o Put the hot food into the blast chiller and close the door.
o Press the -18°C standard foods deep-freezing time cycle button
(4) repeatedly until the desired food class icon has been
selected. For food class icon details please see the table below.
Icon 10
Icon 11
Icon 12
Icons 10 + 11
Class
Class
Class
Class
1 60 minutes
2 120 minutes
3 180 minutes
4 240 minutes
o Approximately five seconds after selecting the desired food class,
the cycle will start automatically.
o The display will show the -18°C deep-freezing icon (8) and the
time cycle icon (13) which are lit at the same time, indicating
that the chosen cycle has started correctly.
o The cycle progression icons (10, 11 and 12) show the different
stages of the cycle and will switch off in turn and flash in order.
17
o At the end of the cycle, the progression icons (10, 11 and 12)
will flash together with a buzzer which will sound for around
twenty seconds. To end the cycle, open the door.
o At the end of the cycle, the chill blaster will switch into
maintenance mode until the door is opened. The product will
remain in a thermal range of -16°C - -20°C.
o For a general guideline for food classes and deep-freezing times,
please refer to the table on the next page.
Please note the following table should be used as a guideline
only. Chiller times can vary depending on the type and size of
the food.
Class 1 foods (g) for deep-freezing times of
less than 1 hour (icon 10)
Short-crust pastry biscuits
500 – 1000
Yoghurt biscuits
500 – 1000
Spinach
500
Asparagus
500
Swiss chard stalks
500
Courgettes
500
Cauliflower
500
Fennels
500
Carrots
500
Broccoli
500
Peppers
500
Leeks
500
Celery
500
Brussels sprouts
500
Class 2 foods (g) for deep-freezing times of
between 1 and 2 hours (icon 11)
Plum cake
500
Apple pie
500
Custard
500
Sponge cake
500
Spinach
1000
Asparagus
1000
Courgettes
1000
Cauliflower
1000
Fennels
1000
Carrots
1000
Broccoli
1000
Peppers
1000
Leeks
1000
Celery
1000
Brussels sprouts
1000
18
Potatoes
500 – 1000
Swiss chard stalks
1000
Class 3 foods (g) for deep-freezing times of
between 2 and 3 hours (icon 12)
Plum cake
1000
Apple pie
1000
Sponge cake
1000
Custard
1000
White sauce
500 – 1000
Meat sauce
500
Tomato sauce
500
Class 4 foods (g) for deep-freezing times of
between 3 and 4 hours (icons 10 and 11)
Tomato sauce
1000
Meat sauce
1000
If the food being used is not shown in the above table, it is
advisable, for the first few times that the appliance is used, to
use the -18°C standard food deep-freezing cycle with the core
probe and to manually check the time taken so that the food
can then be classified.
-18°C Non-standard foods deep-freezing time cycle
ATTENTION: Before beginning this cycle, the food must have a
temperature of 3°C. Therefore, if necessary, chill the food using
the 3°C blast chiller cycle with the core probe first.
o A non-standard food is classified as a product with a thickness
larger than 2 cm or foods in basins or bowls which are thicker
than 2 cm.
o The weight of the food must NEVER be more than 1 kg.
o Ensure that the blast chiller is empty and that the door is closed.
o Press the 3°C blast chiller time cycle button (3) and the -18°C
standard foods deep-freezing time cycle button (4) repeatedly
until the desired food class icon has been chosen. For food class
icon details please see the table below.
Icon 10 Class 1 120 minutes
Icon 11 Class 2 180 minutes
Icon 12 Class 3 240 minutes
o Approximately five seconds after selecting the desired food class,
the cycle will start automatically.
19
o The display will show the 3°C blast chiller icon (7), the -18°C
deep-freezing icon (8) and the time cycle icon (13) which
indicates that the chosen cycle has started correctly.
o After a few minutes, a buzzer will signal the best time to put the
product to be deep-frozen into the appliance.
o Put the food into the appliance within five minutes otherwise the
appliance will be switched off and it will be necessary to start the
procedure again from the beginning.
o On the display, the cycle progression icons (10, 11 and 12)
show the different stages of the cycle and will switch off in turn
and flash in order.
o At the end of the cycle, the progression icons (10, 11 and 12)
will flash together with a buzzer which will sound for
approximately twenty seconds. To end the cycle, open the door.
o At the end of the cycle, the chill blaster will switch into
maintenance mode until the door is opened. The product will
remain in a thermal range of -16°C - -20 °C.
o For a general guideline for food classes and deep-freezing times,
please refer to the table below:
Please note the following table should be used as a guideline
only. Chiller times can vary depending on the type and size of
the food.
Class 1 foods (g) for deep-freezing times of
less than 2 hours (icon 10)
Trout
500 – 1000
Mussels and clams
500 – 1000
Prawns and flat lobster
500 – 1000
Plaice fillet
500 – 1000
Scorpion fish fillet
500 – 1000
Roast pork core temperature 70°C
500
Neck of pork core temperature
500
72°C
Medium – well done T-bone steak
500
core temperature 65°C
Rare T-bone steak core
500 – 1000
temperature 55°C
Roast beef core temperature 58°C
500
Roast turkey breast core
500
temperature 68°C
Braised shoulder of beef core
500
temperature 75°C
20
Ricotta and spinach cannelloni core
500
temperature 75°C
Lasagne Bolognese core
500
temperature 78°C
Courgette flan core temperature
500
70°C
Savoury flan core temperature
500
72°C
Class 2 foods (g) for deep-freezing times of
between 2 and 3 hours (icon 11)
Roast pork core temperature 70°C
1000
Neck of pork core temperature
1000
72°C
Medium – well done T-bone steak
1000
core temperature 65°C
Roast beef core temperature 58°C
1000
Roast turkey breast core
1000
temperature 68°C
Braised shoulder of beef core
1000
temperature 75°C
Ricotta and spinach cannelloni core
1000
temperature 75°C
Lasagne Bolognese core
1000
temperature 78°C
Courgette flan core temperature
1000
70°C
Savoury flan core temperature
1000
72°C
If the food being used is not shown in the above table, it is
advisable, for the first few times that the appliance is used, to
use the -18°C non standard food deep-freezing cycle with the
core probe and to manually check the time taken so that the
food can then be classified. If the deep-freezing time is
between 3 and 4 hours, please refer to class 3 foods.
21
Bottles cycle
o Place the bottles into the blast chiller as shown in the diagram
below:
o Close the door and press the bottles cycle button (5) repeatedly
until the relevant time icon is selected. For food class icon details
please see the table below.
Icon 10 10 minutes
Icon 11 20 minutes
Icon 12 30 minutes
o Approximately five seconds after selecting the desired time, the
cycle will start automatically.
o The display will show the time cycle icon (13) and the bottles
cycle icon (14) which indicates the chosen cycle has started
correctly.
o At the end of the cycle, the progression icons (10, 11 and 12)
will flash together with a buzzer which will sound for
approximately twenty seconds. To end the cycle, open the door.
o At the end of the cycle, the chill blaster will switch into
maintenance mode until the door is opened. The bottles will
remain in a thermal range of 8°C - 12 °C.
o It is possible to interrupt the cycle at any time by switching the
appliance off using the ON / OFF button (17).
22
Cans cycle
o Put the cans into the blast chiller as shown in the diagram
below:
o Close the door and press the cans cycle button (6) repeatedly
until the desired time icon is selected. For food class icon details
please see the table on the next page.
Icon 10 10 minutes
Icon 11 20 minutes
Icon 12 30 minutes
o Approximately five seconds after selecting the desired time, the
cycle will start automatically.
o The display will show the time cycle icon (13) and the cans cycle
icon (15) which indicates the chosen cycle has started correctly.
o At the end of the cycle, the progression icons (10, 11 and 12)
will flash together with a buzzer which will last for approximately
twenty seconds. To end the cycle, open the door.
o At the end of the cycle, the chill blaster will switch into
maintenance mode until the door is opened. The cans will remain
in a thermal range of 3°C - 8°C.
o It is possible to interrupt the cycle at any time by switching off
the appliance using the ON/ OFF button (17).
23
Cleaning and maintenance
WARNING: PLEASE ENSURE THAT YOUR
APPLIANCE IS DISCONNECTED FROM
YOUR
MAINS
SUPPLY
BEFORE
ATTEMPTING TO CLEAN IT.
o Do not clean the appliance by pouring water onto it or spraying
water over it.
o The blast chiller should be cleaned periodically, using a solution
of bicarbonate of soda and lukewarm water.
o Clean the accessories separately with soap and water. Do not
clean them in a dishwasher.
o Do not use abrasive products, detergents or soaps. Do not
scrape the surface with sharp objects.
o After washing the appliance, wipe over the area that you have
cleaned with a damp cloth and then dry it carefully and
thoroughly.
o Use only water for washing the seal on the front.
o The probe should be washed by hand, using warm water and
neutral soap. Rinse with clean water.
24
ATTENTION: The probe must NOT be washed with boiling
water.
o When cleaning is complete, dry your hands and then reconnect
the plug to your mains supply.
o If the appliance is not used for long periods, rub a cloth soaked
in Vaseline oil over the inside, in order to coat it with a
protective layer.
o While it is not being used, clean and dry the cell and leave the
door ajar in order to ensure air circulation.
o If it should not be used for a long period, it is wise to disconnect
the appliance from the electricity supply.
Baumatic Ltd declines any responsibility for work carried out on
the appliance which is not in line with the instructions reported
in this manual.
Installation
IMPORTANT: Before installation and usage read
all the instructions and make sure that the
voltage (V) and the frequency (Hz) indicated on
the rating plate are exactly the same as the
voltage and frequency in your home. The rating
plate can be found on the front left edge of the
inside of the freezer.
The manufacturer declines all responsibility in the event of the installer
failing to observe all the accident prevention regulations in force,
which are necessary for normal use and the regular operation of the
electric system.
Electrical connection
YOUR BLAST CHILLER IS INTENDED FOR FITTED
AND PERMANENT INSTALLATION.
We recommend that the appliance is connected by a qualified
electrician, who is a member of the N.I.C.E.I.C. and who will comply
with the I.E.E. and local regulations.
o Your blast chiller’s fuse must be rated at 3 AMPS.
25
o The wiring in the mains lead is coloured as follows:
Brown
Live
Blue
Neutral
Green and yellow
Earth
o As the colours of the wires in the appliance’s mains lead may not
correspond with the coloured markings identifying the terminals
in your spur box, please proceed as follows:
The brown wire must be connected to the terminal marked “L”
(live), or coloured red.
The blue wire must be connected to the terminal marked “N”
(neutral), or coloured black.
The green and yellow wire must be connected to the terminal
marked “E” (earth), or by the earth symbol, or coloured green
and yellow.
o When the connection is completed, no stray strands or cut wire
should be present. The cord clamp must be secured over the
outer sheath.
Positioning
o Your appliance should not be located in direct sunlight or
exposed to continuous heat or extremes of temperature (e.g.
next to a radiator or boiler).
o The door should be able to open completely and freely
o The appliance should be situated so you can easily access the
food that is placed in it.
o You should check whether there is an electrical socket available,
which will be accessible after your appliance is installed.
26
Installing your blast chiller
o Place the blast chiller, still in its packaging, near to the position
where it will be located. Then remove the packaging.
o Make a gap in the housing unit observing the measurements and
ventilation requirements in the diagram above.
o Attach the appliance to the furniture using fixing screws. Open
the door and take off the protective PVC film on the door frame.
After positioning and connecting the blast chiller, the following
checks should be made before the appliance is used:
o Ensure the electrical connection is functioning correctly.
o Check the command and control systems are functioning.
o Check that the fan is not blocked.
o Carry out at least one complete dry-run cycle to check that all
the components of the appliance are working correctly.
o Clean the inside of the appliance before using it.
27
Troubleshooting
Malfunction alarms
Door open:
o When the blast chiller is working, every time the door is opened
the evaporator fans stop.
o If it is left open from 0 – 15 seconds a buzzer is sounded and
icons 7, 8, 14, 15 flash in order. The cycle is not interrupted so
by closing the door, the cycle restarts immediately.
o If it is open from 15 seconds – 3 minutes, the cycle is paused.
The buzzer stops and sounds every 10 seconds. Icons 7, 8, 14,
15 continue to flash. When the door is closed, the cycle starts
again from where it was interrupted.
o If it is open for more than 3 minutes, the cycle is definitively
interrupted and the appliance goes into an alarm state and all
the icons will flash. To reset the appliance you should press
buttons (1) and (6) together for a few seconds until a double
buzzer sounds and the appliance will switch off.
Power cut:
o If the electrical current has been interrupted from 0 to 3
minutes, the appliance will automatically restart the chosen
chiller cycle once the mains electricity is restored, including the
maintenance mode.
o If the current has been interrupted for more than 3 minutes, the
chiller cycle is interrupted and the appliance will go into an alarm
state, even during the maintenance mode.
o To reset the appliance once it is in an alarm state, press buttons
(1) and (6) simultaneously for a few seconds until a double
buzzer sounds. The appliance will then switch off.
Core probe malfunction:
o It is not possible to restart the cycles which use the food probe.
If any of these cycles, which are in progress, are interrupted, the
appliance will go into an alarm state. The core probe icon (9)
will continue to flash until the appliance is reset.
o To reset the appliance, press buttons (1) and (6)
simultaneously for a few seconds until a double buzzer sounds.
The appliance will then switch off.
28
Voluntary interruption:
o You can switch off the appliance at any moment using the ON /
OFF button (17). In this case, all the cycles, except the bottle
and can cycles go into an alarm state.
o To reset the appliance press the buttons (1) and (6)
simultaneously for a few seconds until a double buzzer sounds.
The appliance will then switch off.
IMPORTANT: If your appliance appears not to be
operating correctly, then you should disconnect it
from your mains supply and then contact
Baumatic Customer Care on telephone number
(0118) 933 6911.
DO NOT ATTEMPT TO REPAIR THE APPLIANCE
YOURSELF.
Please note that if an engineer is asked to attend whilst the product is
under guarantee and finds that the problem is not the result of an
appliance fault, then you may be liable for the cost of the call out
charge.
The appliance must be accessible for the engineer to perform
any necessary repair. If your appliance is installed in such a
way that an engineer is concerned that damage will be caused
to the appliance or your kitchen, then he will not complete a
repair.
This includes situations where appliances have been tiled in,
sealed in with sealant, have wooden obstructions placed in
front of the appliance, like plinths. Or any installation other
than the one specified by Baumatic Ltd. has been completed.
Please refer to the conditions of guarantee that appear on the
warranty card that you receive with the appliance.
29
United Kingdom
Baumatic Ltd.,
Baumatic Buildings,
6 Bennet Road,
Reading, Berkshire
RG2 0QX
United Kingdom
Czech Republic
Baumatic CR spol s.r.o.
Průmyslová zóna Sever 696
460 11 Liberec 11
Czech Republic
Sales Telephone
(0118) 933 6900
Sales Fax
(0118) 931 0035
Customer Care Telephone
(0118) 933 6911
Customer Care Fax
(0118) 986 9124
Spares Telephone
(01235) 437244
Advice Line Telephone
(0118) 933 6933
www.baumatic.cz
E-mail:
sales@baumatic.co.uk
customercare@baumatic.co.uk
spares@baumatic.co.uk
technical@baumatic.co.uk
Website:
www.baumatic.co.uk
Republic of Ireland
Service Telephone
1-890 812 724
Spares Telephone
091 756 771
+420 483 577 200
Slovakia
Baumatic Slovakia, s.r.o.
Galvániho 7/D
Slovakia
+421 255 640 618
Germany
Baumatic Gmbh
Lilienthalstrasse 1
320 52 Herford
Deutschland
+49 5221 694 99-0
www.baumatic.de
Italy
Baumatic Italia S.R.L.
Via Galvani N.3
35011 Campodarsego (PD)
+3904 9920 2297
www.baumatic.it
Holland
Baumatic Benelux B.V.
Grindzuigerstraat 22
1333 MS ALMERE
Nederland
+3136 549 1555
www.baumatic.nl
35