1
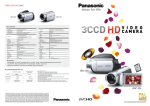
1400214
User’s Guide
Desktop Digital Recorder
Thank you for purchasing your Desktop Digital Recorder from
RadioShack. Please read this user’s guide before setting up
and using your new recorder.
Package Contents
• Desktop Digital Recorder
• AC Adapter
• Zipper Pouch
• User’s Guide
• USB Cable
Features
• Voice activation mode (VOX) records when the internal or
external mic picks up sound
• Built-in 4GB memory
• Analog to digital conversion
• Recording volume auto adjustment maximizes recording
quality
• Three recording modes (SP/MP/HP)
Specifications
Power Requirements ................................. AC 120-240V, 50/60Hz,
......................................................................... or four AA batteries,
...............................................................................or DC 6V, 600mA
Audio Format ........................................................................... WAV
Display ...................................................2.8 in (71mm) LCD display
Recording System .................................... SD/SDHC memory card
Capacity ........................................................ Built-in 4GB memory;
.............................................. SDHC card compatible (up to 32GB)
Frequency Response ...............................................300Hz – 10KHz
Signal-to-Noise Ratio ..............................................................36dB
USB Socket ...................................................................................2.0
Weight ..........................................9.3 oz (263g) (without batteries)
Dimensions (DWH) ....................7.1×4.7×1.6 in (180×120×41mm)
Specifications are subject to change and improvement without notice.
Actual product may vary from the images found in this document.
2
USB
Connects to PC for data transfer using
the supplied USB cable.
DC 6V
Connect AC power adapter (supplied)
or DC 6V adapter (not included).
*
(Earphone)
Insert earphones (not supplied) for private
listening. The speaker is deactivated.
AUX-IN
Connect an audio source using a patch
cord with a 1/8-inch (3.5 mm) plug
(neither included).
MIC
Connect a 1/8-inch (3.5mm) plug
microphone (not included). The builtin microphone is deactivated.
TONE
Increases or decreases the
high-pitched tone when playing.
REC Indicator
Lights during
recording;
blinks during
pausing.
VOL
Adjusts the volume level when playing.
Record/Play Controls:
• REC (Record)
• PLAY*
• RWD# (Rewind/Previous)
• FFWD# (Forward/Next)
• STOP
• PAUSE
* Also confirms a setting mode selection.
# Also toggle through various setting options.
3
MIC
Place sound source w
SD Card Storage Slots (4)
HOLD OFF/LOCK
Slide to LOCK to lock all
the buttons.
VOX ON/OFF
Slide to ON to enable VOX
recording (refer to “Make a
Recording” on page 8).
SD Card Slot
1(Power) – Press and hold to turn on/off.
SOURCE – For activating AUX recording.
FILE – For selecting folders.
ERASE – For erasing files.
REPEAT – For playing files or excerpts
of files repeatedly.
MODE – Press to go to voice mode;
press and hold to go to setting mode.
within 4 in (10cm) of MIC when recording.
4
Powering the Recorder
You can power the recorder through AC, DC, or battery power.
AC Power
Plug the
supplied AC
adapter into
the DC 6V
jack to use the
AC wall power.
DC Power (Vehicle)
Plug a 6V, 600mA
DC adapter (not
included) into the
DC 6V jack to
use your vehicle’s
power.
AA
AA
AA
AA
Battery
Open the battery
compartment on the back
of the recorder and install
four AA batteries (not
included), matching the
polarity symbols (+/–).
n Note:
• When the low battery icon ( ) appears, replace the batteries.
Finish within one minute to retain the date and time settings.
• The DC power adapter must supply 6V DC and deliver at least
600mA. Its center tip must be set to positive and its plug must
fit the DC 6V jack. Using a DC adapter that does not meet
these specifications could damage the recorder or adapter.
Battery Notes:
• Dispose of batteries promptly and properly. Do not burn or
bury them.
• Use only fresh batteries of the required size and type.
• Do not mix old and new batteries, different types
of batteries (standard, alkaline, or rechargeable), or
rechargeable batteries of different capacities.
• If you do not plan to use the recorder for a long period,
remove the batteries. Batteries can leak chemicals that can
damage electronic parts.
5
Setting the Recorder
Press and hold MODE until SEE appears. In this mode, you can
perform the following actions.
Set Recording Quality
1. If necessary, press PLAY repeatedly
until SP, MP, HP appear.
2. Press RWD or FFWD to select your
voice recording mode: SP, MP, HP (the selected option
flashes), then press PLAY to confirm your selection.
For recording through a microphone:
Recording Mode
Recording Quality
Max. Recording Time
SP (standard play) Good
262 hours
MP (medium play) Very good
136 hours
HP (high play)
Best quality possible 92 hours
3. Proceed to set recording sensitivity, or press MODE to exit
setting mode.
n Note:
• You must play a recorded message to check its recording mode.
• The backlight turns on when you press a button and shuts
off after 30 seconds.
Set Recording Sensitivity
1. Press PLAY repeatedly until mic:HI appears.
2. Press RWD or FFWD to switch between HI and Lo, then
press PLAY to confirm your selection.
3. Proceed to set SD or SDHC card (not
included), or press MODE to exit.
n Note: Select Lo when the sound
source is close. Otherwise, select HI.
6
Use an SD or SDHC Card
1. Insert an SD or SDHC card into the SD
card slot.
2. Press PLAY repeatedly until the SD card
icon ( ) flashes.
3. Press RWD or FFWD to switch between on (automatically
save messages to the SD card) and oFF (do not use SD
card), then press PLAY to confirm your selection.
4. Proceed to format the recorder, or press MODE to exit.
Format the Recorder
1. Press PLAY repeatedly until For-appears.
2. Press RWD or FFWD to switch between
YES and No, then press PLAY to confirm
your selection. If you select YES, all files
in the recorder’s built-in memory will be erased.
3. Proceed to set the date and time, or press MODE to exit.
n Note: Be sure you have saved a copy of your files before
formatting the recorder. Erased files cannot be recovered.
Set Date and Time
1. Press PLAY repeatedly to show the date
and time screen with the year digits
flashing.
2. Press RWD or FFWD to set the year,
month, day, hour, minute, and second;
press PLAY to confirm each setting.
3. Press MODE to exit.
n Note: In standby (clock) mode, press FILE to switch
between 12-hour (AM or PM appears) and 24-hour format.
7
Operating the Recorder
Make a Recording
1. Prepare the recording source:
• Built-in microphone — Place the recorder within 4 inches
(10cm) of the sound source.
• External microphone — Insert a microphone plug into
the MIC jack.
• Audio source — Connect an audio source to the AUX-IN
jack (refer to “Make an AUX Recording” on page 9).
2. If necessary, press MODE to enter voice mode. VOICE appears.
• Recorder settings — Refer to “Setting the Recorder“ on
page 6 to make the necessary settings.
• VOX recording — Set VOX to ON.
VOX appears. This records only
when there is sound. Refer to “Set
Recording Sensitivity“ on page 6 to set
the VOX sensitivity. The higher the
VOX sensitivity, the lower the sound
level is needed to start recording.
• Choosing a folder — Press FILE to choose a folder (F1,
F2, F3, F4) to keep the voice message.
3. Press REC. When the REC indicator lights, speak into the MIC.
When VOX is on, if there is no sound, recording pauses with
PAUSE flashing. When there is sound, recording resumes.
4. Press STOP to stop recording. The message is saved.
• A recorded message is saved as a serial number (01-99)
with the recording mode indicator SP, MP or HP.
• To remove the message, press ERASE twice (refer to
“Erase Files” on page 10).
• If no space is available in the folder, FULL displays.
8
n Note:
• In voice mode, if no button is pressed for one minute, the
recorder goes to standby mode. In standby mode, if no
button is pressed for 3 minutes, the recorder powers off.
• If you try to make a recording when the battery power is low,
Lo Bat appears and the recorder turns off soon.
• Changes to the VOX setting (ON/OFF) are only effective
before you start a recording. Stop recording and start again
if you want to adjust VOX.
Make an AUX Recording
1. Connect your recorder to an external device using a patch
cord (not included).
2. Make sure you have selected your desired recording mode
setting (refer to “Setting the Recorder“ on page 6).
The maximum recording time for AUX recording is: 140
hours for SP, 70 hours for MP, 47 hours for HP.
3. Go to voice mode, press SOURCE.
LIN1 appears, indicating AUX mode.
To exit AUX mode, press SOURCE again.
4. Start recording from the external device.
n Note: All the messages recorded in
AUX mode are saved in the F4 folder.
Monitor Your Recording Time
During recording, press PLAY to check the remaining time for
the current recording, press PAUSE to pause recording, and
press REC again to resume.
Manage Folders and Files
• Each of the four folders can hold up to 99 files. You cannot
delete these folders.
• In voice mode, press FILE to select a folder, then press RWD
or FFWD to select a file in the folder.
9
Erase Files
To erase a file
In voice or AUX mode, choose the file, then press ERASE. The
file is played and dEL appears. Press ERASE again to confirm.
To erase all the files in a folder
Enter the folder, press and hold ERASE until dELALL and YES
or No appear. Press RWD or FFWD to select YES, then press
ERASE to confirm. To quit erasing, select No.
Repeat Playback
One file
In voice mode or during
playback, press and
hold REPEAT until
REPEAT appears.
All files in a folder
In voice mode or
during playback,
press and hold
REPEAT until
REPEAT ALL
appears.
To cancel, press and hold To cancel, press
REPEAT until REPEAT
and hold REPEAT
ALL appears, then press until REPEAT ALL
and hold REPEAT till
disappears.
REPEAT ALL disappears.
A section of a file
During playback, press
REPEAT at the start
point. REPEAT and
A b appear with b
flashing. Press REPEAT
again at the end point.
To cancel, press
REPEAT until
REPEAT and A b
disappear.
Explain Error Messages
Display
Meaning
File repairing
rFILE
rFAIL File repairing failed
SD IN SD card inserted
SD card read-write
Err077
error
Display
Meaning
rDone File repairing completed
rONLY SD card write-protected
SD OUT SD card removed
Number of files exceeds
Err218
limit
Internal memory read-write
Err254 Battery voltage low Err266
error
Err297 Internal memory full
10
WARNING: To reduce the risk of fire or shock hazard, do not expose this product
to rain or moisture.
This symbol is
intended to alert you to the
presence of uninsulated
dangerous voltage within
the product’s enclosure
that might be of sufficient
magnitude to constitute a
risk of electric shock. Do not
open the product’s case.
CAUTION
RISK OF ELECTRIC SHOCK
DO NOT OPEN
CAUTION: To reduce the
risk of electric shock, do
not remove cover or back.
No user-serviceable parts
inside. Refer servicing to
qualified personnel.
This symbol is
intended to inform you
that important operating
and maintenance instructions are included in the
literature accompanying
this product.
IMPORTANT SAFETY INSTRUCTIONS
Read and Retain Instructions — Safety and operating instructions should
be read prior to use. The safety and operating instructions should be retained
for future reference.
Heed Warnings — Follow all warnings on the device and in the instructions.
Cleaning — Unplug this device from the wall outlet before cleaning. Clean
only as recommended by the manufacturer. Clean by wiping with a cloth
slightly dampened with water. Avoid getting water inside the device. Do not
use liquid or aerosol cleaners.
Water and Moisture — Do not use this device near water (for example, near
a bathtub, washbowl, kitchen sink, or laundry tub; in a wet basement; or near a
swimming pool).
Accessories — Do not place device on an unstable cart, stand, tripod, bracket,
or table. The device may fall, causing injury to a child or adult, and damage the
device. Use only with a cart, stand, tripod, bracket, or table recommended by
the manufacturer or sold with the device. Follow the manufacturer’s mounting
instructions, and use a recommended mounting accessory.
Ventilation — Slots and openings in the cabinet provide ventilation, ensure
reliable operation, and protect from overheating. Do not block or cover these
openings, and do not place the device on a bed, sofa, rug, or other similar surface.
Do not place the device in a built-in installation such as a bookcase or rack unless
it provides proper ventilation as specified by the manufacturer.
Heat — The device should be situated away from heat sources such as
radiators, heat registers, stoves, or other devices that produce heat.
Power Sources — Use this device with the power source indicated on its
marking label. If you are not sure of your home’s power type, consult your
appliance dealer or local power company.
Power-Cord Protection — Route power-supply cords so they are not likely to
be walked on or pinched by items placed on or against them, paying particular
11
attention to cords at plugs, outlets, and the point where they exit from the device.
Non-use Periods — The device’s power cord should be unplugged from the
outlet when it is to be left unused for a long period of time.
Overloading — Do not overload wall outlets, extension cords, or other
outlets. This can result in fire or electric shock.
Objects and Liquids — Never spill liquids or push objects of any kind into
this device through openings, as they may touch dangerous voltage points or
short out parts that could result in a fire or electric shock.
Carts and Stands — If the device is used with a cart or stand, the cart or
stand should be a type recommended by the manufacturer. A device and cart
combination should be moved with care. Quick stops, excessive force, and
uneven surfaces cause the device and cart combination to overturn.
Damage Requiring Service — Refer servicing to qualified service personnel
under these conditions:
• When the power-supply cord or plug is damaged.
• Liquid was spilled or objects fell in the device.
• If the device has been exposed to rain or water.
• If the device does not operate normally by following the operating
instructions. Adjust only those controls that are covered by the operating
instructions, as an improper adjustment of other controls may result in
damage and will often require extensive work by a qualified technician to
restore the device to normal operation.
• If the device has been dropped or damaged.
• When there a distinct change in performance.
Servicing — Do not attempt to service this device yourself, as opening or
removing covers may expose you to dangerous voltage or other hazards.
Refer all servicing to qualified service personnel.
Replacement Parts — When replacement parts are needed, use only parts
specified by the manufacturer or parts with the same characteristics as the
original part. Substitutions may result in fire or electric shock.
Safety Check — Upon completion of service or repairs, ask the service technician
to perform safety checks to determine if the device is in operating condition.
Lightning — For added protection during a lightning storm, or when the
device is unused for long periods of time, unplug it from the wall outlet. This
prevents damage due to lightning and power surges.
Attachments — Do not use attachments not recommended by the product
manufacturer as they may cause hazards.
Wall or Ceiling Mounting — The product should be mounted to a wall or
ceiling only as recommended by the manufacturer.
SAVE THESE INSTRUCTIONS
12
FCC Information
This equipment has been tested and found to comply with the limits for a
Class B digital device, pursuant to Part 15 of the FCC Rules. These limits are
designed to provide reasonable protection against harmful interference in
a residential installation. This equipment generates, uses, and can radiate
radio frequency energy and, if not installed and used in accordance with
the instructions, may cause harmful interference to radio communications.
However, there is no guarantee that interference will not occur in a particular
installation. If this equipment does cause harmful interference to radio or
television reception, which can be determined by turning the equipment off
and on, the user is encouraged to try to correct the interference by one or
more of the following measures:
• Reorient or relocate the receiving antenna.
• Increase the separation between the equipment and receiver.
• Connect the equipment into an outlet on a circuit different from that to
which the receiver is connected.
• Consult your local RadioShack store or an experienced radio/TV technician
for help.
If you cannot eliminate the interference, the FCC requires that you stop
using your equipment. Changes or modifications not expressly approved by
RadioShack could void the user’s authority to operate the equipment.
This device complies with Part 15 of the FCC rules. Operation is subject to the
following two conditions: (1) This device may not cause harmful interference,
and (2) this device must accept any interference received, including
interference that may cause undesired operation.
Product
Model
Desktop Digital Recorder
1400214
RadioShack
Responsible Party 300 RadioShack Circle,
Fort Worth, TX 76102
Phone
817-415-3200
Limited Warranty
RadioShack warrants this product against defects in materials and workmanship
under normal use by the original purchaser for ninety (90) days after the date of
purchase from a RadioShack-owned store or an authorized RadioShack franchisee
or dealer. RADIOSHACK MAKES NO OTHER EXPRESS WARRANTIES.
This warranty does not cover: (a) damage or failure caused by or attributable
to abuse, misuse, failure to follow instructions, improper installation or
maintenance, alteration, accident, Acts of God (such as floods or lightning),
or excess voltage or current; (b) improper or incorrectly performed repairs
13
by persons who are not a RadioShack Authorized Service Facility; (c)
consumables such as fuses or batteries; (d) ordinary wear and tear or cosmetic
damage; (e) transportation, shipping or insurance costs; (f) costs of product
removal, installation, set-up service, adjustment or reinstallation; and (g) claims
by persons other than the original purchaser.
Should a problem occur that is covered by this warranty, take the product and
the RadioShack sales receipt as proof of purchase date to any RadioShack
store in the U.S. RadioShack will, at its option, unless otherwise provided by
law: (a) repair the product without charge for parts and labor; (b) replace the
product with the same or a comparable product; or (c) refund the purchase
price. All replaced parts and products, and products on which a refund is
made, become the property of RadioShack. New or reconditioned parts and
products may be used in the performance of warranty service. Repaired or
replaced parts and products are warranted for the remainder of the original
warranty period. You will be charged for repair or replacement of the product
made after the expiration of the warranty period.
RADIOSHACK EXPRESSLY DISCLAIMS ALL WARRANTIES AND
CONDITIONS NOT STATED IN THIS LIMITED WARRANTY. ANY IMPLIED
WARRANTIES THAT MAY BE IMPOSED BY LAW, INCLUDING THE IMPLIED
WARRANTY OF MERCHANTABILITY AND, IF APPLICABLE, THE IMPLIED
WARRANTY OF FITNESS FOR A PARTICULAR PURPOSE, SHALL EXPIRE ON
THE EXPIRATION OF THE STATED WARRANTY PERIOD.
EXCEPT AS DESCRIBED ABOVE, RADIOSHACK SHALL HAVE NO LIABILITY
OR RESPONSIBILITY TO THE PURCHASER OF THE PRODUCT OR ANY
OTHER PERSON OR ENTITY WITH RESPECT TO ANY LIABILITY, LOSS OR
DAMAGE CAUSED DIRECTLY OR INDIRECTLY BY USE OR PERFORMANCE
OF THE PRODUCT OR ARISING OUT OF ANY BREACH OF THIS WARRANTY,
INCLUDING, BUT NOT LIMITED TO, ANY DAMAGES RESULTING
FROM INCONVENIENCE AND ANY LOSS OF TIME, DATA, PROPERTY,
REVENUE, OR PROFIT AND ANY INDIRECT, SPECIAL, INCIDENTAL, OR
CONSEQUENTIAL DAMAGES, EVEN IF RADIOSHACK HAS BEEN ADVISED
OF THE POSSIBILITY OF SUCH DAMAGES.
Some states do not allow limitations on how long an implied warranty lasts
or the exclusion or limitation of incidental or consequential damages, so the
above limitations or exclusions may not apply to you. This warranty gives you
specific legal rights, and you may also have other rights which vary from state
to state. You may contact RadioShack at:
RadioShack Customer Relations
300 RadioShack Circle, Fort Worth, TX 76102
04/08
www.RadioShack.com
©2013. RadioShack Corporation.
All rights reserved. RadioShack is a
trademark used by RadioShack Corporation.
14
Printed
in China
03A13
1400214