1
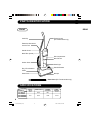
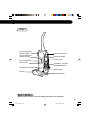
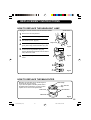
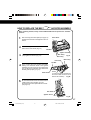
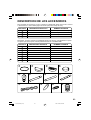
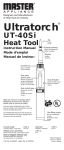
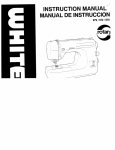
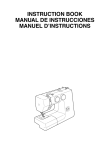
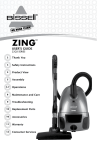
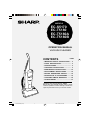
MODELS
EC-S5170
EC-T5180
EC-T5180A
EC-T5180B
OPERATION MANUAL
VACUUM CLEANER
CONTENTS
PAGE
• IMPORTANT SAFETY INSTRUCTIONS .... 2
• PARTS IDENTIFICATION ........................... 4
• SPECIFICATIONS ........................................ 4
• OPERATING INSTRUCTIONS ................... 6
• MAINTENANCE INSTRUCTIONS .............. 10
• REPLACEMENT INSTRUCTIONS ............. 15
• BEFORE REQUESTING SERVICE ........... 18
• DESCRIPTION OF ACCESSORIES .......... 19
• CONSUMER LIMITED WARRANTY .......... 20
• SPANISH DIGEST ....................................... 21
Thank you very much for buying SHARP
Before using your SHARP vacuum cleaner, please
read this operation manual carefully to obtain the
optimum performance from your vacuum cleaner.
1
S5170/t5180(Layout)
1
2001.12.20, 8:07 AM
IMPORTANT SAFETY INSTRUCTIONS
When using an electrical vacuum cleaner, basic precautions should always be followed
including the following:
Read all instructions carefully before using this vacuum cleaner.
WARNING /
To reduce the risk of fire, electric shock, or injury:
1
2
Do not leave vacuum cleaner unattended when plugged in. Unplug from outlet
when not in use and before user-servicing.
3
Close supervision is necessary when used by or near children.
Do not allow this vacuum to be used as a toy.
4
Use only as described in this manual. Use only manufacturers recommended
attachments.
5
Never operate this vacuum cleaner if it has a damaged cord or plug, if it is not
working properly, if it has been dropped, damaged, exposed to weather or
dropped into water.
Return the vacuum cleaner to a Sharp Authorized Servicer in the United States
for examination and repair.
6
Do not pull or carry this vacuum cleaner by the power cord. Do not use the power
cord as a handle, close a door on the cord, or pull the cord around sharp edges
or corners. Keep cord away from heated surfaces.
7
Do not run the vacuum over the cord. Running over the cord may damage the
insulation resulting in an electrical short. If the insulation is damaged, immediately remove the plug from the electrical outlet and bring the vacuum to a Sharp
Authorized Servicer.
8
Never disconnect the plug by pulling on the cord. To disconnect from an outlet,
grasp the plug, not the cord.
9
Never operate this vacuum cleaner with any air opening blocked. Keep the air
openings free of dust, lint, hair and any other similar material.
Do not use outdoors or on wet surfaces.
10 Never drop or insert any object into any opening.
hair, face, fingers and loose clothing away from all openings, the agitator
11 Keep
and any moving parts.
not use this vacuum cleaner to pick up the following objects:
12 Do
a. flammable objects: lit cigarettes, hot ashes, lit matches, toner or similar
materials.
b. sharp objects: razor blades, broken glass, needles, pins, nails or similar
materials.
c. very fine dust: plaster, cement, cooking flour, etc.
2
S5170/t5180(Layout)
2
2001.12.20, 8:07 AM
IMPORTANT SAFETY INSTRUCTIONS
13
Never operate this vacuum cleaner without the dirt compartment and filters in place.
Empty the dirt compartment before reaching the “Max Fill Line” and clean the filters
often.
14
15
16
17
18
19
20
21
Before removing the plug from the outlet, turn all controls to the “OFF” position.
22
23
24
25
Use extra caution when cleaning on stairs.
Never handle plug, cord or vacuum cleaner with wet hands.
Never touch the underside of the vacuum cleaner when it is plugged in. The rotating
agitator may cause injury.
Do not use in presence of flammable or combustible liquids or fumes.
Do not place heavy objects on the vacuum cleaner.
Do not step on the hose or pull the hose forcibly.
Do not pick up objects such as waste paper, plastic sheets, tissue paper or
wrappings which may clog the hose and filters. Do not pick up a large amount of
dust at once. This may clog the filters and rapidly reduce the performance of the
vacuum cleaner.
Do not expose this vacuum cleaner to high temperatures while operating or during
storage.
Store this vacuum cleaner in a dry place.
Use the carrying handle on the back of the body to carry this vacuum cleaner.
Before servicing this vacuum cleaner, allow all parts to cool.
To reduce the risk of electric shock, this vacuum cleaner
CAUTION:
has a polarized plug (one blade is wider than the other). This
plug will fit in a polarized outlet only one way. If the plug does not fit fully in the outlet,
reverse the plug. If it still does not fit, contact a qualified electrician to install the
proper outlet. Do not change the plug in any way.
This vacuum contains a motor protection system to maxWARNING:
imize the motor life. It is designed to shut off to avoid
overheating in case of a blockage or clogged filter. If the protection device is
activated, the vacuum stops without turning off the switch. If this happens, turn off
the vacuum and unplug the cleaner.
Please empty the dirt compartment, clean the net filter with water and check the main
filter. After approximately 30 minutes the motor will have cooled and the vacuum will
be ready to use. Operating this vacuum with clogged or dirty filters may cause the
vacuum to overheat. Please clean the filters regularly.
SAVE THESE INSTRUCTIONS
This vacuum cleaner is intended for household use only.
3
S5170/t5180(Layout)
3
2001.12.20, 8:07 AM
PARTS IDENTIFICATION
REAR
FRONT
Power Control
(EC-T5180 series only)
Cord Clip
Extension Wands and
Crevice Tool
Handle Screw
Main Filter (Inside)
Dirt Compartment
Max Fill Line
Suction Hose
Head Light
Handle Release
Rug / Floor Selector
Pedal
Head Cover
Bumper
Extra Hose (EC-T5180 series only)
SPECIFICATIONS
FEATURES
MODEL
EC-S5170
EC-T5180
EC-T5180A
EC-T5180B
INPUT
(Amp)
HEAD LIGHT
POWER
CONTROL
CORD
LENGTH
12.0
YES
NO
24 Ft
12.0
YES
YES
35 Ft
4
S5170/t5180(Layout)
4
2001.12.20, 8:07 AM
REAR
Dirt Compartment
Handle (Upper)
Cord Storage Hook
Dirt Compartment
Handle (Lower)
Carrying Handle
Power Cord
Dirt Compartment
Max Fill Line
Upholstery Tool with
Detachable Brush
Exhaust Filter (Inside)
Name Plate
Bumper
ON/OFF Switch
WARNING:
Operate vacuum cleaner only at the voltage specified on the nameplate.
5
S5170/t5180(Layout)
5
2001.12.20, 8:07 AM
OPERATING INSTRUCTIONS
HOW TO ATTACH THE HANDLE TO VACUUM CLEANER
remove the handle screw.
1 First
Then slide the base of the handle to
up the hole on the handle with the
2 Line
hole on the side of the vacuum cleaner
the body of the vacuum cleaner as
shown. (Fig. 1)
and insert the screw. (Fig. 2)
Be sure the screw is tightened securely.
Handle
Handle
Slide
Handle screw
Handle screw
Fig.2
Fig.1
HOW TO WIND POWER CORD
Insert the power cord in the clip
1 located
on handle as shown. (Fig. 3)
excess cord around the cord
2 Wrap
storage hooks to prevent dragging and
any interference with cleaning. (Fig. 4)
Upper cord
storage hook
Clip
Lower hook
Fig.3
Fig.4
HOW TO RELEASE POWER CORD
Rotate the upper cord storage hook
downward for quick cord release. (Fig. 5)
Upper cord storage hook
Fig.5
6
S5170/t5180(Layout)
6
2001.12.20, 8:07 AM
HOW TO RELEASE THE HANDLE
Place foot on the left side of the nozzle head and pull the
handle to release.(Fig.6)
Upright Position
Push the handle forward so it is locked in upright position. In
this position, agitator brush stop autmatically by "Agitator
Safety Mechanism".
NOTE: Agitator Safety Mechanism
The brush is stopped by Agitator Safety Mechanism to
prevent damage of rug or floor during operation in upright
position.
Fig.6
HOW TO OPERATE "RUG" /"FLOOR"SELECTOR PEDAL
The Rug / Floor selector pedal is located at the right side of
the head.
Select the pedal position for appropriate ate flooring. (Fig.7)
"RUG" POSITION
"RUG" POSITION
In this position, agitator brush is rotating and vacuums from
the main duct for rug and carpet cleaning.
"FLOOR" POSITION
Fig.7
Front channel for barefloor or flat
surface cleaning
"FLOOR" POSITION (Bare Floor Position)
In this position, agitator brush is stopped and
vacuums from the front channel of the nozzle head
for barefloor or flat surface cleaning.(Fig.8)
Agitator
Main Duct for rug
and carpet cleaning
Fig.8
7
S5170/t5180(Layout)
7
2001.12.20, 8:07 AM
OPERATING INSTRUCTIONS
ON/OFF SWITCH
At the back lower left of vacuum cleaner. The ON/OFF
switch is located. (Fig.9)
ON/OFF Switch
Fig.9
POWER CONTROL SWITCH (EC-T5180 series only)
A slide switch allows selection of cleaning power
from low "L" to high "H". To increase the suction
power; slide the switch toward the "H" position.
To decrease the suction power, slide the switch
toward the "L" position. (Fig.10)
POWER
HIGH
HIGH: Greatest suction power for heavy
vacuuming jobs. Medium power levels are
positioned between "H" and "L".
LOW: Low suction power for delicate cleaning jobs.
LOW
Fig.10
8
S5170/t5180(Layout)
8
2001.12.20, 8:07 AM
HOW TO USE THE ON BOARD TOOLS
CREVICE TOOL
For door tracks, narrow spots, etc.(Fig.12)
EXTENSION WANDS
For reaching ceilings, curtains, etc.(Fig.13)
Combine these wands at the end of suction
hose. (Fig.14-1)
When connecting two wands, match the
illustrated mark to each other.(Fig.14-2)
SUCTION HOSE
For using ON BOARD tools, remove the
suction hose from the nozzle head. (Fig.11)
Fig.11
UPHOLSTERY TOOL WITH DETACHABLE
BRUSH
Use the brush for upholstered furniture, table
tops, books, lamps, baseboards, etc. (Fig.16)
Use without the brush for draperies,
mattresses, clothing, carpeted stairs, etc.
(Fig.15)
Fig.14-1
Fig.14-2
Pull to Detach brush
from tool
Fig.12
Fig.13
Turn to adjust cleaning angle
Fig.15
Fig.16
HEAT PROTECTION SYSTEM
This vacuum cleaner has a special thermostat that protects the motor from overheating. If the
vacuum cleaner suddenly shuts off, turn off the vacuum and unplug the cleaner. Check the
vacuum cleaner for a possible source of overheating such as a full dirt compartment or
clogged filters. If these conditions are found, empty the dirt compartment and clean the filters
(see pages 10 and 11) or replace if necessary (see page 15). To maintain the best
performance of your vacuum cleaner, we recommend emptying the dirt compartment before
the dirt reaches the “Max Fill Line” and clean the filters.
9
S5170/t5180(Layout)
9
2001.12.20, 8:07 AM
MAINTENANCE INSTRUCTIONS
Unplug this vacuum cleaner from the electrical outlet before servicing.
HOW TO REMOVE AND REPLACE DIRT COMPARTMENT
DIRT COMPARTMENT
The dirt compartment assembly consists of the following parts:
Dirt Compartment Release
Upper Handle
Filter Compartment
Filter Clamp
Top Handle Grip
Air Duct
Filter Cover
Net Filter Assembly
Lower Handle
Main Filter
Max Fill Line
Filter Compartment
Dirt Compartment
Rectangular Groove
Fig.18
Fig.17
1
Press down dirt compartment release button
to remove dirt compartment from vacuum
cleaner. (Fig.19)
Fig.19
2
Hold lower handle on dust cup and turn top
handle grip slightly to left Remove net filter
assembly from dirt compartment. (Fig.20)
2
1
OPEN/CLOSE marks are at the
side of the Filter Compartment.
Net Filter
Assembly
OPEN CLOSE
Air Duct
Dirt Compartment
Fig.20
10
S5170/t5180(Layout)
10
2001.12.20, 8:07 AM
3
Empty dirt compartment. (Fig.21)
Fig.21
4
Replace the net filter assembly into the dirt
compartment.
Be sure to match the
marks of the Filter
Compartment and Dust Cup.
Upper Handle
OPEN
CLOS
E
Air Duct
Fig.22
5
Net Filter
assembly
Align the projection of net filter assembly
to the slot of dirt compartment and follow
the arrow to fit or turn to CLOSE side.
Projection
Slot
Fig.23
Dirt Compartment
STEP 2
6
Align the rectangular groove to the guide
of vacuum cleaner then push to snap
into place. (Fig.24)
Also marks are on Dust Compartment
and Base.
Rectangular Mark
Groove
STEP 1
Guide
Mark
Fig.24
CAUTION: Do not use chemicals, bleach or hot water to clean the dirt compartment.
Wash with soap and water using a soft brush. Do not dry with hair dryer or heater.
Air Duct
NOTE: Very fine materials, such as face powder, plaster or fine powder may seal the
filters and cause loss of suction. When vacuuming this type of material, be sure to
empty the dirt compartment and clean the filters more frequently (before reaching the
“Max Fill Line”).
11
S5170/t5180(Layout)
11
2001.12.20, 8:07 AM
MAINTENANCE INSTRUCTIONS
HOW TO CLEAN THE NET FILTER ASSEMBLY
1
2
3
4
5
Slide net filter assembly out of dirt compartment.
Unscrew the filter element from the assembly.
(Fig.25)
Wipe excess dust from the net filter.
Unscrew
Wash net filter with water, using a soft sponge.
Net Filter
Allow net filter assembly to completely dry before
replacing it, then insert it into the dirt
compartment.
Filter
Assembly
CAUTION: Do not use chemicals, bleach or hot
water to clean the dirt compartment. Wash with
water using a soft sponge. Do not dry with hair
dryer or heater.
Fig.25
HOW TO CLEAN THE MAIN FILTER
1
Hold the top handle glip, and release the filter
clamp then remove the filter cover to open.
2
Remove main filter from the filter box and scrub the
filter.
Top Handle Grip
3
Wash the filter with soap and water.
Latch Portion
4
Allow the filter to completely dry before putting
back in the filter compartment.
Filter Clamp
Filter Cover
Filter
Compartment
5
Replace the filter cover onto the filter compartment,
interlocking the latch portions.
Main Filter
Fig.26
CAUTION: Do not use a washing machine for cleaning. Do not dry with hair dryer or
heater. Be sure the filter is set in the right position.
NOTE: For maximum performance we recommend to clean this filter every time you
empty the dirt compartment.
12
S5170/t5180(Layout)
12
2001.12.20, 8:07 AM
WHEN YOU FOUND ANY OBSTACLES IN THE HEAD COVER OR FRONT CHANNEL
If you find some obstacles such as hair, paper
slip, are caught inside the head cover or front
channel, please try to remove with suction hose
of this vacuum cleaner. (Fig.27)
Suction Hose
Front channel
If this is not enough cleaning, please use some
wooden stick for picking, or removing bottom
plate and / or head cover for cleaning.
Net Filter
Fig.27
HOW TO REMOVE / AND RESET THE BOTTOM PLATE
Before replacing any parts, unplug the vacuum
cleaner from the electrical outlet and release the
handle. Then turn the vacuum cleaner over,
exposing the underside.
Four Screws
REMOVE
Loosen the bottom plate by unscrewing four
screws, (Fig. 28) then remove the bottom plate.
Fig.28
RESET
Make sure that all the parts are properly position.
the front three tabs of the bottom plate
1 Insert
into the grooves at the front end of the nozzle
head, then reset the bottom plate. (Fig. 29)
2 Fasten four screws.
Three Tabs
Fig.29
13
S5170/t5180(Layout)
13
2001.12.20, 8:07 AM
REPL
REPLACEMENT INSTRUCTIONS
INSTRUCTIONS
MAINTENANCE
HOW TO REMOVE THE HEAD COVER
If you find excess dirt or obstructions under the head cover, you can remove the head
cover. The head cover is secured by two screws from the bottom side.
the bottom plate,
1 Remove
instructions on page 13.
following the
Head Cover
Top Tab
the agitator assembly and the belt,
2 Remove
following the instructions on page17.
3
Fig.30
Unscrew two screws at the nozzle head.
(Fig.31)
Two screws secure
the head cover
Fig.31
4
Lift the top tab of the head cover and remove.
resetting the head cover, be sure to fit
5 When
the three front tabs in the nozzle head.
Three Front Tabs
Fig.32
14
S5170/t5180(Layout)
14
2001.12.20, 8:07 AM
REPLACEMENT INSTRUCTIONS
HOW TO REPLACE THE HEADLIGHT LAMP
Center Screw
Unplug the vacuum cleaner from the electrical outlet.
1
2
3
Remove the dirt compartment.
4
Remove the lamp from the socket by pushing in
gently and turning counterclockwise. (Fig. 35)
5
Install the new lamp by pushing it gently into the
socket and turning clockwise. (Fig. 35)
Use any standard bayonet base vacuum cleaner
lamp rated 125V, 20W.
6
Replace the Lamp cover and secure with the
screw.
Unscrew the center screw. (Fig.33)
Lift the lamp cover. (Fig.34)
Lamp cover
Fig.33
Lift
Fig.34
2
1
2
1
Fig.35
HOW TO REPLACE THE MAIN FILTER
Basically, the main filter can be used throughout
the life of the vacuum cleaner.
If you chose to replace main filter, please refer to
the maintenance instructions on page 12 which
explain how to remove and replace filter.
Filter Cover
Filter Clamp
Top Handle
Grip
Latch Portion
Main Filter
Fig.36
15
S5170/t5180(Layout)
15
2001.12.20, 8:07 AM
REPLACEMENT INSTRUCTIONS
HOW TO MAINTAIN OR REPLACE THE EXHAUST FILTERS
The exhaust filter consists of an electrostatic HEPA Type filter. (EC-S5170) HEPA
Filter (EC-T5180 series)
The HEPA Type filter should be replaced at least every 10 months to maintain efficient
filtration. (EC-S5170)
HEPA Filter(EC-T5180 series) can be washed with running water.
How to remove/set the filter.
1
Remove the dirt compartment.
2
Unscrew the center screw. (Fig.37)
Exhaust Filter
Case
Lamp cover
3
Lift the lamp cover. (Fig.37)
4
Lift the exhaust filter case.(Fig.38)
Fig.37
Lift
Fig.38
5
At the botton of the case HEPA type filter (ECS5170) or HEPA filter(EC-T5180) is placed.
6
HEPA Filter (EC-T5180 series) can be washed
with running water.
After washing it, please dry completely in the air.
Do not use hair dryer or other heating machine.
Fig.39
Filter case
7
8
Replace the filter as before and set the
filter case and lamp cover.
HEPA filter
(EC-T5180 series)
HEPA Type Filter
(EC-S5170)
(Replace type)
Secure the center screw.
Show Green Net Side
Fig.40
16
S5170/t5180(Layout)
16
2001.12.20, 8:07 AM
HOW TO REPLACE THE BELT
AND
OR
AGITATOR ASSEMBLY
When replacing the belt, always set the RUG/FLOOR Selector pedal in the "FLOOR"
position.
1
After removing the bottom plate (see page 13)
to determine if the belt or the agitator is worn or
broken.
2
Pull out the agitator and then remove the flat
belt from the motor shaft. (Fig. 42)
Motor Shaft
Flat Belt
Agitator Assembly
3
Loop the (new) belt around the motor shaft and
(new) agitator as shown. (Fig. 42)
Main Pulley
Fig.41
Idler Pulley
Idler Pulley
Main Pulley
Flat Belt
4
Then re-insert the (new) agitator assembly,
making sure that both ends of the agitator
assembly fit in the groove of the nozzle head.
(Fig. 43) Be sure to install the new flat belt into
the belt guide properly. (Fig. 43)
Motor Shaft
Arrow
(To insert the agitator assembly into
the nozzle head, follow the Arrow
direction as indicated.)
Fig.42
5
Be sure that the flat belt is not twisted and all
rotating parts move smoothly. (Fig.43)
And secure the bottom plate with four screws.
(see page 13)
Belt Guide
Agitator Groove
Fig.43
17
S5170/t5180(Layout)
17
2001.12.20, 8:07 AM
BEFORE REQUESTING SERVICE
If you experience any difficulties with your vacuum cleaner, use this Troubleshooting Chart
first before requesting service.
NOTE:
Always remember to have the vacuum cleaner turned OFF and disconnect the plug from the
power outlet before working on the vacuum cleaner.
TROUBLESHOOTING CHART
Problem
Check
Possible Remedy
Motor does not start when
the power switch is in the
ON position.
Check if the power cord plug
is completely inserted into
the outlet.
Insert the plug properly into
the outlet.
The agitator does not rotate when the power
switch is in the ON position.
Be sure the flat belt is not severed or installed incorrectly.
Be sure the "RUG/FLOOR"
pedal is in "Rug".
Replace the flat belt or install
it properly.
Suction power is weak or
decreases suddenly.
Check if the nozzle head, suc- Remove any foreign objects
that may have become
tion hose, etc. is clogged.
jammed in the nozzle head,
suction hose, etc.
Please request service if the problem still persists or if the problem is not defined in the
Troubleshooting Chart.
FOR CUSTOMER ASSISTANCE
To aid in reporting this vacuum cleaner in case of loss or theft, please record below
the model number and serial number located on this unit. We also suggest you record
all the information listed and retain for future reference.
MODEL NUMBER
DATE OF PURCHASE
Dealer
Service Station
SERIAL NUMBER
Telephone
Telephone
TO PHONE:
Dial 1-800-BE-SHARP (1-800-237-4277) for:
SERVICE (for your nearest Sharp Authorized Servicer)
PARTS (for your Authorized Parts Distributor)
ACCESSORIES
ADDITIONAL CUSTOMER INFORMATION
TO WRITE:
For service problems, warranty information, missing items and other
assistance:
Sharp Electronics Corporation
Customer Assistance Center
1300 Naperville Drive
Romeoville, IL 60446-1091
Please provide the following information when you write or call: model number, serial
number, date of purchase, your complete mailing adress (including zip code), your daytime
telephone number (including area code) and description of the problem.
18
S5170/t5180(Layout)
18
2001.12.20, 8:07 AM
DESCRIPTION OF ACCESSORIES
For replacement accessories, contact your local dealer or call the Sharp Accessories and Supply
Center at 1-800-642-2122, or visit Sharp’s web site at www.sharp-usa.com.
ITEM
PARTS DESCRIPTION
PART NUMBER
1
2
FLAT BELT
EC-02BU3 (2 PCS IN 1 PACK )
EXHAUST FILTER (EC-S5170)
EC-01MU14 (HEPA Type)
3
4
EXHAUST FILTER (EC-T5180 series)
EC-01MU13 (HEPA Filter)
MAIN FILTER
EC-01MU12
For other parts, please contact your nearest Sharp Dealer. If your dealer does not stock these parts,
you may order them by calling 1-800-BE-SHARP
ITEM
PARTS DESCRIPTION
PART NUMBER
5
6
7
LAMP
RLMP-A003VBE0
EXTENSION WAND (Inner)
PPIPPA164VBFC
EXTENSION WAND (Outer)
PPIPPA163VBFE
8
9
CREVICE TOOL
UCATSA057VBFE
AGITATOR ASSEMBLY
DRTR-A018VBKZ
10
11
UPHOLSTERY TOOL
FCAT-A102VBKZ
DETACHABLE BRUSH
PBRS-A061VBEB
12
NET FILTERS
FDUC-A019VBKA
1
5
3
2
6
4
8
7
10
9
11
12
19
S5170/t5180(Layout)
19
2001.12.20, 8:07 AM
CONSUMER LIMITED WARRANTY
SHARP ELECTRONICS CORPORATION warrants to the first consumer purchaser that this Sharp
brand product (the “Product”), when shipped in its original container, will be free from defective
workmanship and materials, and agrees that it will, at its option, either repair the defect or replace
the defective Product or part thereof with a new or remanufactured equivalent at no charge to the
purchaser for parts or labor for the period(s) set forth below.
This warranty does not apply to any appearance items of the Product nor to the additional
excluded item(s) set forth below nor to any Product the exterior of which has been damaged or
defaced, which has been subjected to improper voltage or other misuse, abnormal service or
handling, or which has been altered or modified in design or construction.
In order to enforce the rights under this limited warranty, the purchaser should follow the steps set
forth below and provide proof of purchase to the servicer.
The limited warranty described herein is in addition to whatever implied warranties may be granted
to purchasers by law. ALL IMPLIED WARRANTIES INCLUDING THE WARRANTIES OF
MERCHANTABILITY AND FITNESS FOR USE ARE LIMITED TO THE PERIOD(S) FROM THE
DATE OF PURCHASE SET FORTH BELOW. Some states do not allow limitations on how long
an implied warranty lasts, so the above limitation may not apply to you.
Neither the sales personnel of the seller nor any other person is authorized to make any warranties
other than those described herein, or to extend the duration of any warranties beyond the time
period described herein on behalf of Sharp.
The warranties described herein shall be the sole and exclusive warranties granted by Sharp and
shall be the sole and exclusive remedy available to the purchaser. Correction of defects, in the
manner and for the period of time described herein, shall constitute complete fulfillment of all
liabilities and responsibilities of Sharp to the purchaser with respect to the Product, and shall
constitute full satisfaction of all claims, whether based on contract, negligence, strict liability or
otherwise. In no event shall Sharp be liable, or in any way responsible, for any damages or
defects in the Product which were caused by repairs or attempted repairs performed by anyone
other than an authorized servicer. Nor shall Sharp be liable or in any way responsible for any
incidental or consequential economic or property damage. Some states do not allow the exclusion
of incidental or consequential damages, so the above exclusion may not apply to you.
THIS WARRANTY GIVES YOU SPECIFIC LEGAL RIGHTS. YOU MAY ALSO HAVE OTHER
RIGHTS WHICH VARY FROM STATE TO STATE.
Model Specific Section
Your Product Model Number &
Description:
Warranty Period for This Product:
Additional Item(s) Excluded from
Warranty Coverage (if any):
EC-S5170, EC-T5180,T5180A. or T5180B Home Use
Vacuum Cleaner.
(Be sure to have this information available when you need
service for your product.)
One (1) year parts and labor.
Where to Obtain Service:
Appearance items of the product, accessories, filters, or any
printed materials.
What to Do to Obtain Service:
At a Sharp Authorized Servicer located in the United States.
To find the location of the nearest Sharp Authorized
Servicer, call Sharp toll free at 1-800-BE-SHARP.
Ship prepaid or carry in your Product to a Sharp Authorized
Servicer. Be sure to have Proof of Purchase available. If
you ship the Product, be sure it is insured and packaged
securely.
TO OBTAIN SUPPLY, ACCESSORY OR PRODUCT INFORMATION, CALL 1-800-BE-SHARP.
SHARP ELECTRONICS CORPORATION
Sharp Plaza, Mahwah, New Jersey 07430-2135
SHARP CORPORATION
Osaka, Japan
20
S5170/t5180(Layout)
20
2001.12.20, 8:07 AM
ASPIRADORA
INSTRUCCIONES DE OPERACION
INSTRUCCIONES DE SEGURIDAD IMPORTANTES
Cuando utilice un aparato eléctrico, deben seguirse siempre las precauciones básicas, incluyendo lo
siguiente:
Lea todas las instrucciones cuidadosamente antes de usar esta aspiradora.
Para reducir el peligro de incendio, descargas eléctricas o
daños:
ADVERTENCIA /
1
2
3
4
5
6
7
8
9
Pueden ocurrir descargas eléctricas si se
utiliza en exteriores o superficies mojadas.
No deje el aparato desatendido cuando
esté enchufado. Desenchúfelo del
tomacorriente cuando no lo utilice y antes
de realizar el servicio.
Deberá tenerse mucho cuidado cuando
se utilice por o cerca de niños.
No deje que sea utilizado como un
juguete.
Utilice el aparato sólo para su uso
especifico como se describe en este
manual.
Utilice sólo los accesorios recomendados
por el fabricante.
No opere nunca este aparato si el cable
o clavija están dañados; si no funciona
correctamente; si se ha caido al suelo
danãdo, expuesto al aire libre o se ha
caído en el agua. Retorne el aparato a un
distribuidor o tienda de servicio autorizado
de Sharp en los Estados Unidos para su
examinación y reparación.
No tire ni mueva el aparato por el cable de
alimentación, no utilice el cable de
alimentación como manija, no cierre una
puerta con el cable entre medio ni tire del
cable en esquinas o bordes puntiagudos.
Mantenga el cable alejado de superficies
calientes.
No haga pasar el aparato por encima del
cable.
No desconecte nunca la clavija tirando
del cable. Para desconectarlo de un
tomacorriente, sujete la clavija, no el cable.
No opere nunca el aparato con ninguna
abertura de aire bloqueada. Mantenga
las aberturas de aire libres de polvo,
pelusa, pelos y otros materiales similares.
Cuando el filtro principal se ensucie, lávelo
con agua. Los filtros deben limpiarse
completamente antes de volverse a usar.
No inserte nunca ningún objeto en
ninguna abertura.
Mantenga el pelo, cara, dedos y ropas
10 flojas
alejadas de las aberturas, tales
11
12
13
14
15
16
17
18
19
20
21
22
23
24
como la del agitador y todas las partes
móviles.
No recoja cigarrillos encendidos, cenizas
calientes, cerillas ni materiales similares,
cuchillas, agujas, pasadores u otros
objetos afilados.
No opere nunca el aparato sin el
compartimento para polvo y los filtros en
su lugar.
Antes de extraer la clavija del
tomacorriente, desconecte todos los
controles.
Tenga mucho cuidado cuando limpie
escaleras.
No maneje nunca la clavija, cable o
aparato con las manos húmedas.
No toque el agitador mientras está
girando.
No utilice el aparato cerca de líquidos o
humos inflamables o combustibles.
No coloque objetos pesados en la
aspiradora.
No pise la manguera ni tire de ella
forzadamente.
No recoja objetos grandes tales como
papel o trapos ya que obstruirá la
manguera.
No exponga el aparato a altas
temperaturas mientras lo opera o durante el almacenaje.
Guarde este aparato en un lugar seco.
Utilice la manija de transporte de la parte
posterior del cuerpo para transportar el
aparato.
Antes de realizar el servicio del aparato,
deje que todas las partes métalicas se
enfrien.
21
S5170/t5180(Layout)
21
2001.12.20, 8:07 AM
GUARDE ESTAS INSTRUCCIONES
Esta aspiradora sirve sólo para el uso casero.
ADVERTENCIA:
Opere la aspiradora sólo con la tensión especificada en la placa de características.
ANTES DE SOLICITAR EL SERVICIO
Si tiene dificultades con su aspiradora, utilice primero este gráfico de localización y reparación de
averías antes de solicitar el servicio.
NOTA:
Acuérdese siempre de desconectar la clavija del tomacorriente antes de manipular la aspiradora.
GRAFICO DE LOCALIZACION Y REPARACION DE AVERIAS
Problema
Comprobaci n
El motor no arranca cuando el
interruptor de alimentaci n est
en posici n ON.
El motor no arranca cuando el
interruptor de alimentaci n est
en posici n ON.
La potencia de succi n es d bil
o disminuye s bitamente.
Remedio posible
Compruebe si la clavija del
cable de alimentaci n est
completamente insertada en
el tomacorriente.
Aseg rese de que la correa
plana no est da ada ni est
mal instalada.
Inserte bien la clavija en el
tomacorriente.
Compruebe la cabeza de la
boquilla, manguera de
succi n, etc., para ver si hay
obstrucci n.
Extraiga los objetos extran s
que pueden haberse atascado
en la cabeza de la boquilla,
manguera de succi n, etc.
Reemplace la correa plana o
inst lela correctamente.
SERVICIO AL CONSUMIDOR
POR TELEFONO: Disque 1-800-BE-SHARP (1-800-237-4277) por:
SERVICIO (por el Servicio Autorizado Sharp más cercano)
REPUESTOS (por el Distribuidor de Repuestos más cercano)
ACCESORIOS
INFORMACION ADICIONAL
POR ESCRITO:
Por problemas de funcionamiento, información acerca de la garantía,
unidades incompletas u otro tipo de consultas.
Sharp Electronics Corporation
Customer Assistance Center
1300 Naperville Drive
Romeoville, IL 60446-1091
Cuando nos llame o escriba suministrenos la siguiente información: modelo, número de serie,
fecha de compra, su dirección (incluyendo el código postal), un teléfono donde podamos
llamarle durante el día (incluyendo el código del area) y la descripción del problema.
22
S5170/t5180(Layout)
22
2001.12.20, 8:08 AM
DESCRIPCION DE LOS ACCESORIOS
Para reemplazo de accesorios, por favor contacte a su distribuidor Sharp mas cercano. Liame al
1-800-642-2122, o visite nuestra pagina de internet (http://www.sharp-usa.com)
ARTICULO
DESCRIPCION ARTICULO
NUMERO DE PARTE
1
2
CORREA PLANA
EC-02BU3 (2 Piezas en 1 Paquete )
FILTRO DE RESCARGA (EC-S5170)
EC-01MU14 (
)
3
FILTRO DE RESCARGA (EC-T5180 serie) EC-01MU13 (
)
4
FILTRO PRINCIPAL
EC-01MU12
Para Partes, por favor contacte a su distribuidor Sharp mas cercano, si su distribuidor no posee
Las partes que usted requiere, deberá pedirlas llamando al 1-800-BE-SHARP.
ARTICULO
DESCRIPCION ARTICULO
NUMERO DE PARTE
5
6
7
LAMPARA
RLMP-A003VBE0
TURBO EXTENTION (INTERIOR)
PPIPPA164VBFC
TURBO EXTENTION (IEXTERIOR)
PPIPPA163VBFE
8
9
TUBO PARAHENDIDURAS
UCATSA057VBFE
ENSAMBLE DE AGITATOR
DRTR-A018VBKZ
10
11
HERRAMIENTA PARA TAPICERIA
FCAT-A102VBKZ
CEPILLO
PBRS-A061VBEB
12
FILTRO DE RED
FDUC-A019VBKA
1
5
3
2
6
4
8
7
10
9
11
12
23
S5170/t5180(Layout)
23
2001.12.20, 8:08 AM
GARANTIA LIMITADA
SHARP ELECTRONICS CORPORATION garantiza al primer comprador del producto que
este producto de marca Sharp (el “Producto”), cuando es embarcado en su recipiente original, está
libre de materiales y fabricación defectuosa y acorda que a su opción, reparará el defecto o
reemplazará el producto o la parte defectuosa sin cargar al comprador las partes o trabajo durante
el periodo(s) de tiempo establecido abajo.
Esta garantía no se aplica a los articulos de apariencia del producto o a los articulos adicionales
excluidos establecidos abajo, ni a ningún producto cuyo exterior haya sido dañado o deformado,
que haya sometido a mal uso, servicio o manejo anormal o se haya alterado o modificado en diseño
o construcción.
Para aplicar el derecho bajo esta garantía limitada, el comprador debe seguir los pasos
establecidos abajo y proporcionar una prueba de la compra al reparador.
La garantía limitada descrita aquí es una adición a otras garantías que se aplican por ley a
los compradores.
TODAS LAS GARANTIAS APLICADAS INCLUYENDO LAS GARANTIAS DE VENTAS Y
CORRESPONDENCIA DE USO ESTAN LIMITADAS AL PERIODO(S) DESDE LA FECHA DE LA
COMPRA ESTABLECIDA ABAJO.
Algunos estados no permiten limitaciones de tiempo de las garantías implicadas, por eso la
limitación de encima tal vez no se aplique a su caso.
Ni en personal de ventas ni el vendedor u otra persona queda autorizada a realizar otras
garantías que no sean las descritas aquí o la extensión de la duración de las garantías más alla del
periodo de tiempo descrito aquí por Sharp.
Las garantías descritas aquí deben ser solamente las garantías garantizadas por Sharp y
deben ser el único y exclusivo remedio disponible para el cliente. La corrección de defectos, de la
forma y durante el periodo de tiempo descrito aquí, debe constituir un cumplimiento completo de
todas las obligaciones y responsabilidades de Sharp al cliente con respecto al producto y debe
constituir una completa satisfacción de todas las reclamaciones, basándose en el contrato,
negligencia, obligación estricta o similar. En ningún caso debe obligarse ni responsabilizarse a
Sharp de los daños o defectos del producto que fueron causados por reparaciones o intentos de
reparaciones causados por cualquiera que no sea un reparador de servicio autorizado. Sharp no se
responsabilizará de ninguna forma de los daños econónmicos consecuentes o accidentales ni de
los daños a la propiedad. Algunos estados no permiten la exclusión de daños consecuentes o
accidentales, por eso la exclusión de encima tal vez no se aplique a su caso.
LA GARANTIA LE DA LOS DERECHOS LEGALES ESPECIFICOS. TAMBIEN PUEDE TENER
OTROS DERECHOS QUE VARIAS DE ESTADO A ESTADO.
Sección especilica al modelo
Su número de modelo del producto:
Periodo de garantia para este Producto:
articulos adicional(es) excluido(s) de la
garantia (si los hubiera):
Donde obtener el servicio:
Que hacer para obtener el servicio:
EC-S5170,EC-T5180,T5180A.o T5180B
Aspiradora para uso en el hogar.
(Tenga esta infomación disponible cuando
necesite el servicio para su producto.)
Un (1) año de partes y trabajo.
articulos de apariencia del producto, accesorios,
filtros o materiales impresos.
De una estación de servicio autorizada Sharp en
los Estados Unidos. Para buscar el lugar de la
estación de servicio autorizada Sharp más
cercana, llame a Sharp libre de cargo al número
1-800-BE-SHARP (1-800-237-4277).
Haga el envio pagando el flete o lleve el producto
a una estación de servicio autorizada Sharp.
Tenga a mano una Prueba de Compra del
aparato. Si envia el producto por correo,
asegurese de comprar un seguro y realice un
embalaje correcto.
PARA RECIBIR INSUMOS, ACCESOROS O INFORMACION DE PRODUCTOS, LLAME AL 1-800-BE-SHARP.
SHARP ELECTRONICS CORPORATION
Sharp Plaza, Mahwah, New Jersey 07430-2135
SHARP CORPORATION
Osaka, Japan
Printed in Mexico
TINSKA012VBRZ 1M- Me
24
S5170/t5180(Layout)
24
2001.12.20, 8:08 AM
1