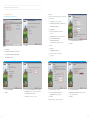
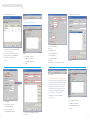
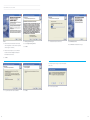
1
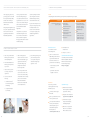
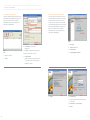
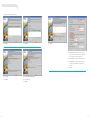
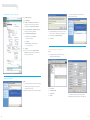
Call the Telstra Business
Technical helpdesk on 1800 066 594
visit Telstra.com/business
cisco user guide
apr 10
XXXXXX
CODE
Welcome to Telstra Business Broadband
Equipment – Cisco® 877W and 1812 1 Router
You have purchased Telstra Business Broadband Equipment Extras – Cisco® Customer
premises equipment. The Cisco user guide will help you to configure and setup your
new router, so you can get more out of your Telstra Business Broadband service.
1. A bout this User Guide – about Security Device Manager (SDM)
03
2. Things to note before you start
03
3. Minimum Systems Requirements
04
4. Security Device Manager
06
5. Ways to access the SDM off CD or GUI
06
6. Installing the Security Device Manager (SDM version 2.5)
07
7. Launching SDM
09
8. Installing Cisco VPN Client
11
9. Configuring your Router using SDM
21
10. commonly requested features for Business Broadband Equipment Extras – Cisco CPE
23
11. “How to” for each feature
25
12. Glossary
37
13. Need additional help?
37
ADSL Customers
If you have purchased our Telstra
Broadband Equipment Extras with Cisco
ADSL Customer Premises Equipment (CPE),
your included router is the Cisco 877W–K9.
It has wireless capability.
Ethernet customers
The Cisco 1812–K9 router does not have built-in wireless
capability. If you require wireless capability, please
consult your IT specialist or contact 1800 655 744 for
information on our range of IT support options,
available through Telstra Business Support Extras .
02
1. About this document – about Security Device Manager (SDM)
3. Minimum Systems Requirements
This is a step-by-step guide to help The user guide requires the reader to
Customers requiring more advanced
A.SDM
you configure your Cisco router with have a basic working knowledge of
router configuration or Local Area
The following table defines the minimum system requirements to install the SDM on your computer.
the Security Device Manager (SDM), Cisco equipment, and should be used to
Network (LAN) settings should use so that it can be used with your supplement the Cisco 850, Cisco 870 and
the Command Line Interface (CLI)2.
Telstra Business Broadband ADSL 1800 Series Access Routers Cabling and
or Ethernet service.
Quick Start Guide, which is included in
It will guide you through the basic steps
to set up the configuration and features
your Telstra Business Broadband
Equipment kit.
Computer
If you do not have the expertise to do
Computer with a Pentium®-class
processor or greater
this, please consult your IT specialist,
Operating System W
indows Vista® (Business Edition)
Account Representative or call Windows® XP Professional
1800 655 744 for more information W
indows 2003 Server (Standard Edition)
for the Cisco 877W or 1812 router
To help make the set up of the basic on our range of IT support options,
supplied with your Telstra Business
and standard configurations easier, available through the Business Broadband Equipment Extras.
we recommend customers familiarise
Support Extras3.
themselves with the Security Device
Requirements
M
icrosoft TCP/IP installed
(confirm via Start > Settings >
Control Panel > Network >
Protocols orConfiguration)
9 MB hard disk space
RAM:
W
indows 2000 Professional with Service Pack 4
Windows 2000 Advanced Server is not supported
– 128 MB for Windows XP (256 MB recommended)
– 64 MB for Windows 2000 (128 MB recommended)
Manager (your SDM software is included
in this Extras package).
Web browser versions
2. Things to note before you start
Cisco SDM can be used with the following browsers:
a. Please ensure you have read the
e. All the commonly requested
minimum systems requirements features noted in section 10 and 11
your router default password as
and compatibility criteria.
have been made available on your
soon as possible after you have
supplied router (877W or 1812) ; installed and configured your
this document will guide you
supplied Cisco router.
5
b. Ensure that all hardware meets
minimum system requirements as per section 3.
c. Please store this user guide in a secure place, for quick and easy reference.
d. You can access the router in two ways:
1. Command Line Interface4 (for advanced configuration & LAN settings)
Firefox® 1.0.6 and later versions
g. We recommend you change or reset
through how to enable these
Please note: if you have Firefox set
as your default web browser and
would like to continue to use it, you will need to note the following:
features using the SDM.
f. Please ensure you have read the
Cisco 850 & Cisco 870 Series or the
– ensure that the pop-up blocker 2. Security Device Manager
and later versions.
Netscape® 7.1, 7.2, and 9.0.
Java™ Run Time Environment (JRE)
Cisco SDM requires Sun Java™ Runtime
Environment (JRE). The Java Run Time
Environment can be downloaded from the following webpage: www.java.com/getjava/
is switched off
– you will not be able to connect
using https or secure mode.
1800 Series Access Routers Cabling
and Quick Start Guide for connecting
your Cisco router to the Telstra
Business Broadband ADSL or
Ethernet service. This Quick Start
B.Wireless
Guide is included in the kit.
Please ensure you check the following requirements for using Internet Explorer® 5.5 WPA wireless protocol.
(recommended).
Your wireless card must support WPA or WEP.
Make sure you have the most current
drivers for your wireless card.
Your computer must have Windows
XP service pack 2 installed and all the latest updates (you can Important first step:
Windows XP users must install a Microsoft update to enable WPA
support before continuing.
The update can be downloaded at support.microsoft.com/kb/893357
You will need to restart your
computer after downloading and installing the update.
Wireless Access is supported via download them through the
Mac OS® X 10.3.3 or later with
Windows update site AirPort® software 3.3 or later.
at windowsupdate.microsoft.com).
03
04
minimum systems requirements
C.Cisco VPN Client
4. Security Device Manager
The following table indicates the system requirements to install the Cisco VPN Client on each of the supported platforms.6
The Security Device Manager is Computer
Computer with a Pentium®-class
processor or greater, including Tablet PC (Cisco VPN Client version 5.0.03.560)
Operating System Requirements
W
indows Vista (all released
versions)
M
icrosoft TCP/IP installed
(confirm via Start > Settings >
Control Panel > Network >
Protocols or Configuration).
Windows XP
Windows 20007
Apple® computer
Mac OS® X, Version 10.4 or later
(Cisco VPN Client version 4.9.00.0050)
– 128 MB for Windows XP (256 MB recommended)
– 64 MB for Windows 2000 (128 MB recommended)
– 32 MB for Windows 98 (see note under Operating Systems)
– 64 MB for Windows NT and
Windows ME (see note under
Operating Systems)
50 MB hard disk space
P PC only. None of the Release
4.9.00.0050 Mac OS® X 10.4 and
higher on both Power PC (PPC) and Intel processors
release 5.0.03.560, does NOT support Advisory about Connection Time on Windows
the following features:
Using the VPN Client to connect
System upgraded from Windows XP
or earlier Windows operating
systems to Vista. Please note: Clean OS installation if required.
Start Before Logon.
Security and Network connection
features via a web based Graphical User Interface (GUI).
RAM:
Not supported on Mac OS® X 10.3.9 and earlier
Cisco VPN Client for Windows Vista,
to allow users to configure router IOS,
50 MB hard disk space
TabletPC 2004/2005
Note For all Windows operating
systems, only 32-bit platforms are supported
a software program provided by Cisco 5. Ways to access the SDM off CD or GUI
We recommend users access the SDM GUI by opening up a web browser
and typing in: https://10.10.10.1
Please note: An internet connection
does not need to be open in order to
access this site as it operates at the router level.
to a Windows Vista system might take longer than the time needed to connect to a Windows 2000 or
Windows XP system.
The actual time it takes to connect may vary for each customer.
SmartCard authentication.
Integrated firewall.
InstallShield.
Auto Update.
05
06
6. Installing the Security Device Manager (SDM version 2.5)
It is recommended that users install the Security Device Manager directly to the PC or desktop.
You are now ready to install:
STEPS:
11.Click Install.
1. Insert the SDM CD into your CD Drive.
2. Download the SDM zip file to the PC.
5. Select I accept the terms of the license agreement
as shown above.
12.Click Finish after successful installation – as shown above.
6. Click Next.
3. Extract the SDM zip file. Go to SDM installer folder and click setup.exe. The installation wizard will start as shown above.
4. Click Next.
07
7. Select This Computer – as shown above
9. Accept the default destination folder – as show above
8. Click Next.
10.Click Next.
08
7. Launching SDM
STEPS:
A Security Alert will appear as per below:
THE popup screen will then Appear: “Warning – HTTPS”
1. Go to Start – All Programs – Cisco Systems – Cisco SDM
– Cisco SDM. You will then be prompted with the below
text box.
8. This is a self signed certificate by the router, so the
publisher will be unknown. This is the correct behaviour,
Click Yes.
9. A pop up screen will now show with Warning – Security as above. Click Yes.
2. Enter the Device IP address of the router. 5. Click Yes.
Telstra default shown above 10.10.10.1.
3. Select This device has HTTPS enabled and I want to use it.
4. Click Launch.
You will be prompted to enter the user name and password.
6. Enter User name and Password. A default administrator
user name and password “advantage/advantage” has
been pre-configured into the router configuration. For your network and router security, you are advised to
change your user name and password. See section 8 (F) – Adding User name and Password.
10. A warning will then appear, Click Yes.
7. An error may occur such as the one shown above. To unblock the SDM popup page, move your mouse 11. Windows Security Alert may pop up. Click Unblock.
cursor over the yellow bar and right click the mouse and select Allow Blocked Content.
09
10
8. Configuring your Router using SDM
A.Configuring Interfaces:
Please note:
1. Configuring your ADSL (WAN) Interface
If the previous steps fail at this point, we recommend you take
the following action:
a. Click Configure – as per steps on page 11.
b. Click Interfaces and Connections from the Tasks section.
c. Click Edit Interface/Connection.
d. Highlight ATM0.1
e. Double Click on Username on the bottom half of the screen.
f. Click Authentication in the pop up box that appears.
g. Populate Username, New Password and Confirm new Password fields, caps authentication should already be selected.
STEPS:
5. Click Next.
10. Select Easy IP (IP Negotiated) as shown above.
11. Click Next.
h. Click OK.
i. Click OK again.
1. Click Configure.
j. Click File/Write to Startup config
2. Click Interfaces and Connections in the Tasks section.
k. Click Yes when prompted to continue with 3. Select ADSL (PPPoE or RFC 1483 Routing or PPPoA).
the copy process
4. Click Create New Connection.
6. Select PPPoA with AAL5MUX.
7. Click Next.
8. Enter values for Virtual Path Identifier (VPI) and Virtual
Circuit Identifier (VCI). The VPI and VCI are obtained from
the Configuration Advice from Telstra.
9. Click Next (if successful, move on to step 10).
12. Authentication Type – Select CHAP.
15. Select Port Address Translation.
13. Enter the Username and Password from the
16. L AN interface to be translated – Click drop down menu
Configuration Advice provided by Telstra.
14. Click Next.
and select your LAN interface.
17. Click Next.
Please note: The above is provided as an example.
11
12
configuring your router using sdm
2. Configuring Ethernet/Static Interface
B.Configuring Static Route
STEPS:
STEPS:
1. Select Configure as shown above.
1. Click Configure.
18. Select Test the connection after configuring.
19. Click Finish.
2. Click Routing from the Tasks section You will be provided with the following dialogue box:
– on the left hand side of the screen.
3. Click Add as shown above.
You will be provided with the following screen to add your static route:
Fill in the details as shown above.
4. Select IP Address radio button.
5. Enter your default route address.
6. Select Permanent route.
7. Click OK
Please note: The above shows a sample default route.
C .Network Address Translation (NAT )/Port Address Translation (PAT )
1. Defining Trusted and Untrusted Interface
STEPS:
1. Click Configure.
2. Click Interfaces and Connections from the Tasks section.
2. Click NAT from the Tasks section.
3. Click Edit Interface/Connection.
3. Select Edit NAT Configuration tab.
4. Highlight Fastethernet0 interface.
4. Click Designated NAT Interfaces.
5. Click Enable. The status column should now change from Down to Up.
6. Click Edit Interface Connection tab.
7. Click and highlight Interface and click Edit 13
8. Fill in the details as shown above and click OK.
Please note: The Edit tab may not always be active. Please note: the above IP address is used as an example only
If this does not work, please use/follow the create
– the actual static IP address is detailed in your configuration
connection wizard.
email for Telstra Business Broadband.
14
configuring your router using sdm
The following dialogue box will appear:
The following screen will be provided:
7. Click Save.
2. Dynamic Port Address Translation
Complete the following fields:
10.Action.
5. Select appropriate boxes for trusted and untrusted
11.Description (optional).
interfaces – as shown above.
Please note: The above WAN interface is provided as STEPS:
12.Source Host/Network source.
an example for Ethernet set up (ie FastEthernet0), 1. Click Configure – as shown above.
13.Protocol and Service.
2. Click NAT from the Tasks section.
14.Select IP in the IP Protocol.
3. Select Edit NAT Configuration tab.
15.Click OK.
4. Click Add.
Please note: The source should be the trusted network.
for ADSL customers please use dialler0.
6. Click OK.
16. Click OK.
17.Click on Save.
D.Static Port Address Translation (Static PAT)
Static port address translation is required if the customer has
a web server located within their LAN which they would like
to give internet users access to. This assumes the customer
has appropriate security measures on the server before
configuring this feature, if you are unsure please consult your IT specialist or contact your Account Representative for more information on our IT Services solutions.
The following screens show how to configure PAT for web (port 80)
1. Click Configure – as shown above.
5. Select Dynamic.
2. Click NAT from the Tasks section.
6. In the Direction drop down menu: 3. Select Edit NAT Configuration tab.
select From Inside to outside.
4. Click Add.
7. Click pull down menu and select Create a new rule (ACL) and select…
15
STEPS:
8. Fill in Name, Type and Description as appropriate.
9. Click Add
16
configuring your router using sdm
5. Select Static – as shown above.
6. In the Direction drop down menu – select From inside to outside.
7. In the Translate from Interface enter the IP address and subnet mask of the Web sever on the LAN.
8. In Translate to interface, enter the public IP address in the IP address field.
9. Ensure that the Redirect Port is selected.
10.Select TCP.
11.Original Port and Translated Port are set to 80.
12.Click OK.
13.Click Save.
7. The above examples shows any user (source) allowed to access the public address of the web server. Access has been restricted to port 80 only.
8. Once you have added the rule, click OK.
9. The above will be shown to verify the rule which was configured.
E.Creating Access Control List
10.To apply the rule, click Associate.
11.As the example allows internet users to access a web server
in the LAN, select an Interface (example FastEthernet0) and
specify Inbound direction.
Please note: This is provided as an example only – for Ethernet set up use ie FastEthernet and ADSL set up please use ie dialler0.
12.Click OK.
STEPS:
1. Click Configure – as shown above.
2. Click Additional Tasks from the Tasks section.
3. Select Edit NAT Configuration tab.
4. Click Add.
5. Complete the fields Name/Number and Description.
6. Click Add.
17
18
configuring your router using sdm
13.You will be provided with this screen, which will confirm
You will be provided with the following screen:
6. Fill in the Username, New Password and Confirm New Password fields.
the interface association and direction.
Please note: The the WAN interface is provided as 7. For Privilege Level, only administrators should be marked
an example for Ethernet set up (ie FastEthernet), with 15 and all other users should be marked with 1
for ADSL customers this should indicate dialler0.
8. Click OK.
14.Click OK to finish.
9. Click File and Write (File toolbar) to start up Configure
– THIS IS VERY IMPORTANT AND IS REQUIRED TO SAVE
THE CHANGES INTO THE ROUTER IN CASE OF A POWER
FAILURE/POWER CYCLE.
15.Click Save.
F. A dding/modifying/Removing Username and Password
2. Removing Telstra Administrator Account
Please note:
The following prompt – SDM Warning will be shown, this will
1. Adding UserNAME and Password
warn the administrator. Before this default account is deleted,
The following instructions show how to add make sure a NEW Username and Password with Privilege
new users with passwords.
Level 15 has been configured.
STEPS:
1. Click Configure as shown above.
6. Click Yes to initiate the Administrator Account deletion.
STEPS:
2. Click Additional Tasks in the Tasks section.
1. Click Configure as shown above.
3. Click Router Access.
2. Click Additional Tasks in the Tasks section.
4. Click User Accounts/view.
3. Click User Account/View.
5. Click Add or click Edit if you wish to modify username
4. Click and highlight advantage and/or password.
or the administrator username.
5. Click Delete.
19
20
9. Installing Cisco VPN Client
STEPS:
4. A License Agreement will appear.
1. Download the Cisco VPN client to the PC (This feature/
5. Select I accept the license agreement.
client is only available to customers who have purchased
our Router Support Service Extra).
9. The installation will start as shown above.
Cisco VPN install successful:
10.Click Finish when the installation is complete.
6. Click Next.
2. Extract the Cisco Client zip file. Go to Cisco VPN Client
installer folder and click setup.exe. The installation
wizard will start as shown above.
3. Click Next.
You will be prompted to reboot your computer for installation
to take effect:
11.To reboot computer, click Yes.
7. Accept default destination folder and click Next.
21
8. Click Next.
22
10.Commonly requested features for Telstra Business Broadband Equipment Extras – Cisco CPE
A.Wireless
B.Remote Access
Wired Equivalent Privacy (WEP) and The routers support various remote
D.Dynamic Host Control
Protocol (DHCP)
WiFi Protected Access (WPA) are the access applications, such as SDM, telnet,
The DHCP protocol allows a server to
F. Network Address Translation
(NAT)/Port Address
Translation (PAT)
two security protocol options available and SSH to allow remote management.
dynamically assign IP addresses and
The concept of NAT and PAT allows
DNS addresses to the PC TCP/IP software
internal devices with unregistered
stack. The IP addresses are assigned
(private) address to access the internet
from an arbitrary IP address pool.
by having the router re-write and
for encrypting wireless communications
on the router.
We recommend customers use WPA – the stronger of the two encryption
SDM can either use http or https.
However, the SDM software needs to be installed on the PC.
replace the internal address with an
Telnet and SSH are network protocols
E.Integrated Firewall
which allow remote interactive TCP
In its simplest form, a firewall WPA is the second generation wireless
sessions to the router. Telnet is less
prevents unauthorized access from encryption protocol and designed to
secure since the TCP session is all in
an untrusted source to a trusted
overcome the security flaws that were
clear text while SSH is more secure, network. The Zone Base Firewall (ZBF)
evident in WEP. WPA is available in WPA2
it uses encryption to protect the data
feature is a sophisticated form of
(Enterprise) and WPA-PSK (Personal).
between the client and the router.
firewall introduced in Cisco IOS methods.
We recommend you use WPA as your
method for Wireless Encryption.
version 12.4(6)T which provides C.Remote Access VPN (IPSec VPN)
WPA-PSK is easier to setup than WPA2
Remote Access VPN allows mobile
(enterprise) since it uses a pre-shared
workers (Tele-workers) to securely
key, compared to certificates in an
access the corporate network from
enterprise environment. The minimum
anywhere in the world.
length is 8 characters; with maximum 63 characters, we recommend a
minimum length of 20 characters.
Values can be alpha-numeric.
IP addressed devices.
It should be noted that some protocols
may break when used in conjunction
with NAT/PAT since some protocols may have embedded IP addresses in the payload itself.
only encounter standard well different types of connections.
known protocols.
to accept and terminate the IPSec VPN tunnel and the Cisco VPN client
When the IPSec tunnel is established, it offers the user comprehensive security
systems may not support WPA and by encrypting the data between the
will require WEP. It is not possible client PC and the router.
is to be limited to using WEP.
amongst many internal private distinguish legitimate packets for
Please note: Some older operating
to be replaced or the entire network the packet up to the application layer
router to share one public IP address
network, the router needs to be setup
the PC to initiate the request.
to WEP, then either that device needs traversing the router by “inspecting” private IP address while PAT allows the
To securely access the corporate
software needs to be installed on If one device on the network is limited
security by keeping track of the packets
one public IP address to one internal
It is assumed the customer will wireless devices and the operating
to mix WPA and WEP.
Stateful inspection offers better NAT allows the router to allocate information. This allows the router to
To use either WEP or WPA both the
system must be able to support it.
stateful inspection.
internet (public) valid IP Address.
Important note:
This feature is available through Telstra if you have purchased the Telstra Business Broadband Extras
‘Router Support Service (RSS)’. For more information on this Telstra
Business Broadband Extras, please
contact your Telstra Account
Representative or call 1800 655 744.
23
24
11.“How to” for each feature
A.Cisco VPN Client Configuration
B.Configuring an IPSec VPN on the Router
This feature is available through Telstra if you have purchased
This section shows how to configure the router to act as an
the Telstra Business Broadband Extras ‘Router Support Service
IPSec VPN termination point to allow remote users who have
(RSS)’. For more information on this Telstra Business
installed Cisco VPN Client on their personal computer, to
Broadband Extras, please contact your Telstra Account
securely connect to the corporate local area network. This
Representative or call 1800 655 744.
feature is available through Telstra if you have purchased the
Telstra Business Broadband Extras ‘Router Support Service
(RSS)’. For more information on this Telstra Business
Broadband Extras, please contact your Telstra Account
Representative or call 1800 655 744.
STEPS:
1. Click Configure.
3. Connection Entry – is the name of this 2. Click VPN in the Tasks section.
particular profile.
3. Click Easy VPN Server.
4. Description – a meaningful description of the profile.
STEPS:
5. Host – the public IP address of the router.
1. Start the Cisco VPN Client.
6. Group Authentication:
2. Click New.
4. Click Launch Easy VPN Server Wizard.
Name – user defined, this group name MUST be the
same as the one defined in section 11(B) step 18.
Password – user defined.
5. Click Next.
6. Click Unnumbered to.
7. Click the drop down menu and choose the interface which
faces the internet.
8. For Authentication, select Pre-shared Keys.
9. Click Next.
25
26
“how to” for each feature
You will be provided with the following screen.
10.Click Next.
11.Click Next.
17.Click Add.
18.Name of This Group – define remote access policies that are common to all specific users. This group name
must match the name in Section 11(A) step 6.
19.Pre-shared Keys – password for device authentication.
20.Pool Information – range of IP addresses that can be
allocated to IPSec VPN Clients. This address MUST be unique.
21.Click OK.
12.Select Local.
14.Select Enable User Authentication.
13.Click Next.
15.Select Local Only.
16.Click Next.
27
28
“how to” for each feature
C.Other IPSec VPN settings
1. DNS/WINS
The DNS/WINS configuration page allows customers who have internal
servers within the corporate network which need to be assigned to the
IPSec VPN user so they can resolve private host or device names.
STEPS:
13.Click Yes.
1. Click DNS/WINS tab.
2. Select Configure DNS Servers and fill in the required fields.
3. Check Configure WINS Servers and fill in the required fields.
2. Split Tunneling
Split tunneling allows administrators to configure the router to allow remote users (Cisco VPN Clients) to have secure access to the company network while at the same time allowing unsecure access to the internet.
Split tunneling can pose a security risk when configured.
Since VPN Clients have unsecured access to the internet, they can be compromised by an attacker. That attacker is
then able to access the corporate LAN via the IPsec tunnel.
It is advised administrators do not enable split tunneling.
In the Action dropdown box:
8. Click Select an action and select Protect the traffic.
In the Source Host/Network section:
9. Type – select A Network
10.IP Address and Wildcard Mask – this is the source subnet.
Typically it is your LAN subnet.
In the Destination Host/Network section:
14.Click Next.
11.Type – select A Network
12.IP Address and Wildcard Mask – this is the destination
subnet. This is your pool of IP addresses create in section
11(B) step 20 – Pool Information: – range of IP addresses
that can be allocated to IPSec VPN Clients. This address
MUST be unique.
STEPS:
1. Click Split tunneling tab – as shown above.
2. Select Enable Split Tunneling.
29
5. Name/Number – provide a meaningful name of the ACL (no spaces).
3. Select Select the Split tunneling ACL.
6. Description – provide a meaningful description.
4. Click Create a new rule (ACL) and select…
7. Click Add.
15.Click Next.
16.Click Finish.
30
“how to” for each feature
D.Wireless
Radio Express Setup:
Configuring Wireless Interface:
Router Wireless Configuration
6. Click Wireless Radio Express Setup.
7. Select Default for Optimize Radio Network for.
8. Select Enable for Aironet Extensions.
9. Click Apply.
Please note: The Wireless hostname is provided as an
example only.
18.Click Apply.
14.Click Wireless Interface.
STEPS:
15.Click Radio 802.11G.
1. Click Configure.
16.Click Setting tab.
2. Click Interface and Connections from the 17.Select Enable.
Tasks section.
3. Click Create Connection tab.
4. Click Wireless radio button.
10.Click Wireless Express Security.
5. Click Launch Wireless.
11.Select Routing from the Connection Selection.
12.Fill in the following fields:
SSID (the SSID provided here is used for example
purposes only).
IP Address and IP Subnet Mask.
13.Click Apply.
31
Configuring Wireless Security: – Encryption Manager
19.Click Wireless Security.
20.Click Encryption Manger.
21.Select Cipher radio button. From the pull down menu,
select TKIP.
22.Click Apply.
32
“how to” for each feature
Configuring Wireless Security: – SSID Manager
You have successfully connected your client/PC to the
Wireless connection as shown.
23.Click Wireless Security.
24.Click SSID Manger.
25.Click BBE from Current SSID List. The BBE SSID is an
example. The user should select their custom SSID as defined in step XII – Fill in the following fields.
26.Select Open Authentication in Authentication Setting.
From the drop down menu, select TKIP.
27.Under Authenticated Key Management:
a. Key Management, select Mandatory from the drop down menu.
b. Select WPA.
c. WPA Preshare Key – enter WPA password, 3. Enter the WPA shared key. This is the same key as entered
in Step 27 (opposite) – Authenticated key management.
4. Re-enter the value in Confirm network key.
5. Click Connect.
20 to 60 characters long.
28.Click Apply.
29.Please refer to section 8(C) 2 Dynamic Port Address
Translation to configure the router to allow wireless
devices to access the internet.
E.Configuring Router as a DHCP Server
STEPS:
1. Configure Static Interface as shown in section 8(A) 2
Configuring Ethernet/Static Interfaces.
Client Wireless Configuration
STEPS:
1. Search for various wireless networks in the local vicinity.
2. The SSID configured will show up in the list. Select the
desired SSID and click connect.
Please note: The SSID shown here is provided as an example.
2. Click Configure.
3. Click Additional Tasks.
4. Click DHCP Pools.
5. Click Add.
33
6. Fill in the fields as required for your internal network.
Please note: Domain name provided here is an example only.
34
“how to” for each feature
F. Firewall
There are three levels of Security, as described below:
Low Security:
WARNING:
Important notice to all customers selecting “High”
Select this option if you do not need to track use of these
It is recommended that the administrator preview the
or “Medium” Firewall policy levels.
applications on the network.
commands before applying the firewall polices. Activating Your Cisco device will constantly download the information the firewall feature without familiarity with Cisco IOS firewall
polices can cause disconnection and lock the administrator
out of the router.
The router does not identify application-specific traffic.
it requires to enforce access controls, which may result in increased
Returns TCP and UDP traffic on sessions initiated inside
downloads which count towards the usage of your Telstra Business
the firewall.
Broadband plan8. This is more likely to occur if you have set your
Firewall/security policy to either “High” or “Medium” – please
consult your IT specialist for further advice.
High Security:
Select this option if you want to prevent use of these
applications on the network.
5. Click Next.
The router identifies inbound and outbound Instant
Messaging and drops it.
The router checks inbound and outbound HTTP traffic and e-mail traffic for protocol compliance, and drops
non-compliant traffic.
Return traffic for other TCP and UDP applications is routed if the session was initiated inside the firewall.
STEPS:
10.Select the Security level required.
11.Click Next.
Medium Security:
1. Click Configure.
Select this option if you want to track use of these
2. Click Firewall and ACL in the Tasks section.
applications on the network.
3. Click Basic Firewall.
The router identifies inbound and outbound Instant
Messaging, and checks inbound and outbound HTTP
4. Click Launch Easy VPN Server Wizard.
traffic and e-mail traffic for protocol compliance.
Return TCP and UDP traffic on sessions initiated inside the firewall is routed.
Your Firewall Configuration is now complete.
You will be provided with the below screen to confirm the action:
9. Click OK.
6. Set Outside (untrusted) Interface.
7. Select Inside (Trusted) Interface.
12.Enter your Primary DNS Server address.
13.Click Next.
14.Click Finish.
8. Click Next.
35
36
12.Glossary
ADSL
Ethernet
Asymmetric Digital Subscriber Line
For those who like the details, we’ve got them here
1. The 1812 Router supplied is non wireless.
Business Digital Subscriber Line
2. This guide does not step through the modification to Command Line Interface (CLI).
IT support services – PAYG options, IT Services On Demand
3. Additional fees and charges may apply.
CLI
Command Line Interface
5. Some support exclusions apply.
CPE
Customer Premise Equipment
DSL
Digital Subscriber Line
DNS
Domain Name System (Server)
7. The VPN Client supports both the Windows 2000 Server and the Windows 2003 Server operating systems.
DHCP
Dynamic Host Control Protocol
8. Excess Usage charges will apply if subscribed plan is exceeded.
Telstra Business
Support Extras
IOS
Internet Protocol Address
IPSec
Internet Protocol Security
JRE
Java Runtime Environment
LAN
Local Area Network
NAT
Network Address Translation
PAT
Port Address Translation
SSID
Split Tunneling
Telstra Business Support Extras services.
Service Set Identifier – the unique name given to a Wireless Network
Allows IPSec VPN users to access the internet and their LAN using the same connection
Security Device Manager
WAN
Wide Area Network
WINS
Windows Internet Name Service
VPN Client
set up, for support of this feature please contact your IT Specialist or contact us on 1800 655 744 to find out more about our
Subscription based service for basic router configuration changes
SDM
VPN
6. Not available unless Router Support Service is purchased. Telstra does not support faults relating to customer initiated IPSec VPN Internetwork Operating System
IP Address
Router Support Service
4. This guide does not provide instructions on how to modify the CLI.
Virtual Private Network
The application used to communicate securely with your Cisco router over the internet
13.Need additional help?
Please contact the Telstra Business Technical Helpdesk on 1800 066 594 or visit us at telstrabusiness.com
The following links may be useful:
Cisco 1812:
www.cisco.com/en/US/products/ps6183/index.html
Cisco 800 Series ISR’s Q&A:
www.cisco.com/en/US/prod/collateral/routers/ps380/ps6200/prod_qas0900aecd8028a982.html
Cisco Security Device Manager:
www.cisco.com/en/US/products/sw/secursw/ps5318/index.html
37
™ Trade mark of Telstra Corporation Limited ABN 33 051 775 556. Cisco is a registered trademark of Cisco Systems, Inc. and/or its affiliates in the U.S. and certain other countries. Pentium is a
trademark of Intel Corporation in the U.S. as other countries. Microsoft, Windows Vista, Windows and Internet Explorer are registered trademarks of Microsoft Corporation in the United States and/or
other countries. Firefox is a registered trademark of the Mozilla Foundation. Netscape is a U.S. trademark of Netscape Communications Corporation. Java is a U.S. trademark of Sun Microsystems, Inc.
Mac OS, Airport and Apple are trademarks of Apple Inc., registered in the U.S. and other countries.
38