1
English
MULTI PJ CAMERA/
Multifunctional Camera System
YC-400 User’s Guide
z Before using this product, be sure to read the Safety Precautions and ensure
that you always use the product correctly.
z The Multi PJ Camera System is used in combination with a projector. See the
user documentation that comes with the projector for safety precautions and for
details about its operation.
• Microsoft, PowerPoint, Windows, Windows NT, Windows XP, and the Windows logo are registered
trademarks or trademarks of Microsoft Corporation of the United States in the United States and
other countries.
• Apple and Macintosh are registered trademarks of Apple Computer, Inc. of the United States.
• Adobe and Acrobat are registered trademarks of Adobe Systems Incorporated.
• Other company and product names may be registered trademarks or trademarks of their
respective owners.
• Photo Loader and Photohands are the property of CASIO COMPUTER CO., LTD. Except as
stipulated above, all copyrights and other related rights to these applications revert to CASIO
COMPUTER CO., LTD.
Using Copyrighted Material
Except for your own personal use, reproduction and editing of documents,
photographs, panels, illustrations or other copyrighted materials that you record with
this product are forbidden by copyright laws and international contracts. Copyright
laws and international contracts strictly forbid the placing of copyrighted files on a
network and otherwise distributing them to third parties, regardless of whether you
purchased such files or obtained them for free, without the permission of the
copyright holder. CASIO COMPUTER CO., LTD. assumes no responsibility for any
unlawful use of copyrighted materials using this product.
• The contents of this User’s Guide are subject to change without notice.
• Copying of this manual, either in part or its entirety, is forbidden. You are allowed to use this
manual for your own personal use. Any other use is forbidden without the permission of CASIO
COMPUTER CO., LTD.
• CASIO COMPUTER CO., LTD. shall not be held liable for any lost profits or claims from third
parties arising out of the use of this product or this manual.
• CASIO COMPUTER CO., LTD. shall not be held liable for any loss or lost profits due to deletion of
data caused by malfunction or maintenance of this product, or any other reason.
• The sample screens shown in this manual are for illustrative purposes only, and appear differently
from the screens actually produced by the product.
E-1
Safety Precautions
Safety Precautions
Thank you for selecting this CASIO product. Be sure to read these “Safety Precautions”
before trying to use it. After reading this User’s Guide, keep it in a safe place for future
reference.
About safety symbols
Various symbols are used in this User’s Guide and on the product itself to ensure safe
operation, and to protect you and others against the risk of injury and against material
damage. The meaning of each of the symbols is explained below.
Danger
This symbol indicates a condition that, if ignored or applied incorrectly,
creates the risk of death or serious personal injury.
Warning
This symbol indicates a condition that, if ignored or applied incorrectly,
could possibly create the risk of death or serious personal injury.
Caution
This symbol indicates a condition that, if ignored or applied incorrectly,
could possibly create the risk of personal injury or material damage.
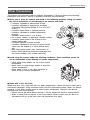
Icon Examples
A triangle indicates a situation against which you need to exercise caution. The
example shown here indicates you should take precaution against electric shock.
A circle with a line through it indicates information about an action that you should
not perform. The specific action is indicated by the figure inside the circle. The
example shown here means disassembly is prohibited.
A black circle indicates information about an action that you must perform. The
specific action is indicated by the figure inside the circle. The example shown here
indicates you must unplug the power cord from the power outlet.
Warning
● Smoke, odor, heat, loud noise, and
other abnormalities
1.
2.
3.
Should you ever notice smoke,
strange odor, or loud noise being
emitted by the camera or any other
abnormality, immediately stop using it.
Continued use creates the risk of fire
and electric shock. Immediately
perform the following steps.
Turn off power.
If you are using the AC adaptor, unplug
it from the power outlet. If you are using
a battery, remove it from the camera
taking care to avoid burn injury to your
hands.
Contact your original dealer or authorized
CASIO service center.
● Disposal by burning
Never try to dispose of the camera
by burning it. Doing so can cause an
explosion, which creates the risk of
fire and personal injury.
E-2
● Bright light sources
Never use the camera to look directly
into the sun or another source of
very bright light. Doing so creates the
risk of eye damage.
● When in motion
Never try to use the camera for
recording or look at its monitor screen
while operating an automobile or any
other type of vehicle, while walking,
or while otherwise in motion. Doing
so creates the risk of accident and
personal injury.
● Using flash
Never fire the flash in an area where
there is the possibility of flammable or
explosive gas in the air. Doing so
creates the risk of fire and explosion.
Never fire the flash while it is pointed
at a person operating a motor vehicle.
Doing so can cause momentary loss
of vision and create the risk of
accident.
Safety Precautions
● AC adaptor
Misuse of the AC adaptor creates the
risk of fire and electric shock. Make
sure that you always observe the
following precautions.
• Use only the AC adaptor that is
specified for the stand and cradle.
• Never try to use the supplied AC
adaptor to power any other type of
device.
• Make sure that you use a power
source with the same voltage as
that specified for the AC adaptor.
• Do not overload a power outlet.
Misuse of the power cord creates the
risk of personal injury, fire and electric
shock. Make sure that you always
observe the following precautions.
• Never place heavy objects on top of
the power cord, and do not expose
it to heat.
• Never try to modify the power cord
in any way, and do not subject it to
excessive bending.
• Never twist or pull on the power cord.
• Should the electrical cord or plug
become damaged, contact your
original dealer or authorized CASIO
service center.
Never touch the AC adaptor while
your hands are wet. Water creates
the risk of electric shock.
Never allow the AC adaptor to
become wet. Water creates the risk of
fire and electric shock.
Never place a vase or any other
container of liquid on top of the AC
adaptor. Water creates the risk of fire
and electric shock.
● Water and foreign matter
Water, other liquid, or foreign matter
(metal, etc.) getting into the stand or
camera creates the risk of fire and
electric shock. Be especially careful
when using the camera in the rain or
snow, at the seashore, near water, or
in a bathroom. Should anything get
inside the camera, immediately
perform the following steps.
1. Turn off power.
2. If you are using the AC adaptor, unplug it
from the power outlet. If you are using a
battery, remove it from the camera taking
care to avoid burn injury to your hands.
3. Contact your original dealer or authorized
CASIO service center.
● Disassembly and modification
Never try to take the stand or camera
apart or modify it in any way. Doing
so creates the risk of electric shock
and burn injury. Be sure to leave all
internal inspection, adjustment, and
repair up to your original dealer or
authorized CASIO service center.
● Dropping and impact
Continued use of the camera after it
has been damaged by dropping or
other mistreatment creates the risk of
fire and electric shock. Immediately
perform the following steps.
1. Turn off the stand and camera.
2. Unplug the stand and cradle.
• If you are using the AC adaptor, unplug
it from the power outlet. If you are
using a battery, remove it from the
camera taking care to avoid burn injury
to your hands.
3. Contact your original dealer or authorized
CASIO service center.
● Chargeable battery
Use only the specified charger unit to
charge the battery. Use of another
type of charger creates the risk of
battery overheating, fire, and
explosion.
Never allow the battery to become
wet. Liquid creates the risk of
damage to the battery, reduction of its
performance, and shortening of its life.
The battery is specially designed for
use with a CASIO digital camera.
Trying to use it for another type of
application creates the risk of damage
to the battery, reduction of its
performance, and shortening of its life.
Make sure that you always observe
the following precautions when using
the battery. Failure to do so creates
the risk of battery overheating, fire,
and explosion.
• Never use or store the battery near
fire.
• Never expose the battery to heat or
throw it into fire.
• Take care that the battery is oriented
correctly when you charge it.
E-3
Safety Precautions
• Never carry or store the battery
together with conductive objects
(necklaces, pencil lead, etc.)
• Never try to take the battery apart
or modify it, never pierce it or
subject it to strong impact (by hitting
it with a hammer or stepping on it),
and never apply solder to the
battery. Never put the battery inside
of a microwave oven, dryer, highpressure container, etc.
Should a battery start to leak, emit a
strange odor, emit heat, change color,
change shape, or exhibit any other
abnormal behavior while it is being
used, charged, or stored, immediately
remove it from the camera or charger
unit and keep it away from fire.
Never use or leave the battery in
direct sunlight, inside of a closed
vehicle on a hot day, or in any other
area where it is very hot. Such
conditions create the risk of damage
to the battery, reduction of its
performance, and shortening of its life.
Caution
● AC adaptor
Misuse of the AC adaptor creates the
risk of fire and electric shock. Make
sure that you always observe the
following precautions.
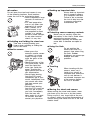
• Never cover the AC
adaptor with a blanket
while it is in use or
locate it next to a
heater. Such conditions
can interfere with heat
radiation, and cause
heat to build up in the
area of the AC adaptor.
• Never pull on the power
cord when unplugging
the AC adaptor. Grasp
the plug unit.
• Insert the plug into the
power outlet as far as it
will go.
• Unplug the AC adaptor before
leaving on a trip or otherwise
leaving it unattended for a long
period.
E-4
• Unplug the AC adaptor at least
once a year and clean any dust
built up around the prongs of the
plug.
● Chargeable battery
Stop charging after the stipulated
charging time, even if the battery is
not fully charged. Charging too long
creates the risk of battery overheating,
fire, and explosion.
Battery fluid getting into your eyes
creates the risk of eye damage.
Immediately flush your eyes with
water and then contact your physician.
Be sure to read all of the applicable
camera and charger unit user
documentation before using or
charging the battery.
Keep the battery out of the reach of
small children. Even while using the
battery, take steps to ensure that
children to not remove it from the
camera or charger unit.
Fluid leaking from the battery and
getting onto your skin or clothing
creates the risk of skin inflammation.
Immediately rinse the area with water.
● Connectors
Attach only the specified bundled
accessories to the connectors of the
stand and camera. Connecting
anything else creates the risk of fire
and electric shock.
● Unstable locations
Never place or leave the stand and
camera on a high shelf, or on an
unstable or uneven surface. The stand
and camera can fall from such a
location, creating the risk of personal
injury.
Safety Precautions
● Location
Do not leave the stand and camera in any
of the following locations. Such locations
create the risk of fire and electric shock.
• Areas subjected to large
amounts of moisture or
dust
• In a food preparation
area or any other area
exposed to oil smoke
• Near a heater, on a
heated carpet, in an
area exposed to direct
sunlight, in a vehicle
parked in direct sunlight,
or any other location
where it is very hot
● Unfolding and folding the stand arm
Take care to avoid pinching your
fingers when unfolding or folding the
arm of the stand.
● Backing up important data
Always back up important
data in camera memory
to a computer hard disk.
Failure to do so creates
the risk of data loss due
to camera malfunction,
maintenance, etc.
● Protecting camera memory contents
Make sure you carefully follow the
instructions in the User’s Guide when
replacing the camera battery.
Incorrectly replacing the battery can
cause data to become corrupted or
lost.
● Using the flash
Do not position the
camera too close to a
person’s face when firing
the flash. Sudden
brightness can cause eye
damage and other
problems.
● Monitor screen
• Never press the
camera’s monitor screen
or subject it to strong
impact. Doing so can
crack the glass of the
LCD panel.
• Should the glass of the
LCD panel crack, never
touch the liquid that
leaks from inside the
panel. Touching the
liquid creates the risk of
skin inflammation.
• Should liquid leaking
from the LCD panel
accidentally get in your
mouth, immediately rinse
your mouth with water
and then contact your
physician.
• Should liquid leaking
from the LCD panel get
into your eye or onto
your skin, immediately
flush the area with
clean water for at least
15 minutes, and then
contact your physician.
● Traveling
When traveling with the
camera, never use it
inside of an aircraft or
anywhere else where the
use of such devices is
not allowed. Improper use
of the camera creates
the risk of accident.
● Moving the stand and camera
When moving the stand and camera, never
pick them up by the arm or by the camera.
Doing so puts a very large load on the arm
or camera, which can cause disconnection of
internal wiring and create the risk of fire and
electric shock.
E-5
Operating Precautions
Operating Precautions
PJ Document Stage
z
z
Never write on the document stage and take care to guard against scratching or
otherwise damaging it. Writing or other marks on the document stage can interfere with
projection in the Document Camera Mode and scanning in the Scanner Mode.
External Light
Room illumination, sunlight, or light from some other source shining onto the document
stage during a Document Camera Mode or Scanner Mode image recording operation can
cause white out and other image abnormalities.
PJ Camera
z
z
z
z
z
z
z
z
z
E-6
Never subject the camera to strong impact. Doing so creates the risk of malfunction.
When mounting the camera onto the camera holder, make sure that it is connected
correctly and securely. Incorrectly attaching the camera can cause it to fall, resulting in
malfunction. Take care to avoid dropping the camera when removing it from the stand.
To protect against accidentally dropping the camera, make sure to have the strap around
your fingers when removing the camera from the stand.
Never apply too much force when cleaning the surface of the lens. Doing so can scratch
the lens surface and cause malfunction.
Fingerprints, dust, or any other soiling of the lens can interfere with proper image
recording. Never touch the lens with your fingers. You can blow dust particles from the
lens surface with a lens blower. Next, wipe the surface of the lens with a soft lens cloth.
All of the battery operation times shown in the camera manual indicate reference values
for how long it should take until the camera shuts down under continuous operation when
powered by the specified special battery under standard temperature (23ºC/73ºF). They do
not guarantee that you will be able to achieve the specified battery operation times during
normal use. Note that battery operation time is greatly affected by temperature, the
amount of time the battery spent in storage and the storage conditions, and other factors.
Leaving the camera turned on runs down the battery, which will cause the low power
alert to appear. Be sure to turn off the camera when you are not using it.
The low battery warning indicator will appear just before the camera powers down. Charge
the battery as soon as possible when the indicator appears. Continued use of a low
battery can cause it to leak, or can result in corrupted image data.
The camera becomes warm to the touch during use. This is normal and does not indicate
malfunction.
Operating Precautions
Other Precautions
The camera and stand are made of precision components. Failure to observe the following
precautions can result in inability to correctly save data and malfunction.
● Never use or store the camera and stand in the following locations. Doing so creates
the risk of malfunction of and damage to the camera and stand.
• Locations subjected to electrostatic charge
• Locations subjected to temperature extremes
(Operating Temperature Range: 5ºC to 35ºC/41ºF
to 95ºF)
• Locations where there is extreme moisture
• Locations subjected to sudden temperature
changes
• Locations where there is a lot of dust
• On a shaky, uneven, or otherwise unstable surface
• Locations where there is the chance of the
camera getting wet
• Locations exposed to direct sunlight
• Locations subjected to vibration or impact (Avoid
areas near the engine of a motor vehicle, boat,
etc.)
• Near high-voltage power lines, transformers, or
motors (which generate electrical interference that
can cause problems with system operation)
● Avoid using the system under the following conditions. Such conditions create the
risk of malfunction of and damage to system components.
• Never place heavy objects on any of the system
components.
• Never insert or allow foreign objects to drop into
system components.
• Never place a vase or any other container of
water on top of system components.
● Clean with a soft, dry cloth.
When very dirty, use a soft cloth that has been dampened in a weak solution of water and a
mild neutral detergent. Wring all excess water from the cloth before wiping. Never use thinner,
benzene, or any other volatile agent to clean system components. Doing so can remove
markings and stain case finishes.
• Always fold up the stand before moving it. Do not subject the stand to strong impact.
• When it comes time to dispose of the stand and/or camera, make sure you do so in
accordance with all of the local rules and regulations that apply.
U
E-7
Contents
Contents
Safety Precautions.............................................................................................. E-2
Operating Precautions ........................................................................................ E-6
Multi PJ Camera System Features ..................................................................... E-9
Multi PJ Camera System User Documentation ................................................ E-10
Unpacking ......................................................................................................... E-11
Using the CASIO CD-ROM............................................................................... E-12
Multi PJ Camera System .................................................................................. E-14
General Guide (PJ Camera Stand)................................................................... E-15
Setting Up the Multi PJ Camera System .......................................................... E-17
PJ Camera Software Overview and Basic Operations ..................................... E-26
PJ Camera Overview ........................................................................................ E-36
Troubleshooting ................................................................................................ E-39
Product Specifications (PJ Camera Stand) ...................................................... E-40
Minimum Computer System Requirements ...................................................... E-40
E-8
Multi PJ Camera System Features
Multi PJ Camera System Features
The Multi PJ Camera System is a presentation tool that lets you record images of document,
whiteboard contents, and even objects for projection and storage on your computer.
Real-time projection of documents and objects
Simply place a document onto the PJ Camera Stand and the PJ Camera automatically records it
and projects a clear, high-resolution image.
Automatic image correction
Contour extraction and other enhancements are applied automatically to optimize projection of
document images.
Projected image buffering
Projected images are stored temporarily in a buffer, which means you can scroll between them
quickly and easily. Buffered images can be saved to permanent files for later recall whenever you
need them.
Projection Area Capture
Projection Area Capture lets you extract figures and text that are written into an image projected
onto a whiteboard, and then combine the handwriting with the original projected image. The resulting
combined image is clearer and easier to read than a simple snapshot of whiteboard contents.
Camera unit (PJ Camera) can be removed from the PJ Camera Stand and
used as a normal digital camera.
The PJ Camera’s 3X optical zoom, high-resolution 4-megapixel imaging, macro mode, and business
mode provides you with many of the capabilities of today’s compact digital cameras. You can take
the PJ Camera along anywhere to record images for your presentations.
Presentations using image files in PJ Camera memory or on a computer’s
hard disk
Image files in PJ Camera memory or on a computer’s hard disk can be projected during a
presentation. All operations can be performed from the computer.
Conventions Used in this Manual
z
z
z
The term “PJ Camera” refers to the camera unit of the Multi PJ Camera System.
The term “CASIO CD-ROM” refers to the CD-ROM that comes with the MULTI PJ CAMERA
System.
PJ Camera Software is basically software for projecting images from a projector. Because of
this, the term “projection” is used in this manual to refer to operations that actually cause the
image to fill the computer screen (without actually projecting it).
E-9
Multi PJ Camera System User Documentation
Multi PJ Camera System User Documentation
The Multi PJ Camera System comes with the following user documentation.
User Documentation Title
Description
Startup Mode*
MULTI PJ CAMERA/
Multifunctional Camera
System YC-400 User’s Guide
(This Manual)
This manual explains basic operation of the Multi
PJ Camera System. Reading this manual will
provide you with an understanding of the overall
concept of the Multi PJ Camera System, and
basic information you need to know before setting
up and actually projecting document images.
Multi PJ
Camera User’s Guide
(CASIO CD-ROM)
This manual explains how to use the PJ Camera
unit in a stand-alone configuration, and how to
use its cradle.
–
PJ Camera Software User’s
Guide (CASIO CD-ROM)
This manual provides detailed explanations about
the features and functions, and operational
procedures of the PJ Camera Software that
controls the Multi PJ Camera System.
Multi PJ/
Business
Document
PJ Camera Software
README File
(CASIO CD-ROM)
Be sure to read this file before installing the PJ
Camera Software on a computer. It includes the
latest installation precautions, information on how
to uninstall the software, and other supplementary
information.
Multi PJ/
Business
Document
* PJ Camera Software has two startup modes: the Multi PJ startup mode and the Business
Document startup mode. The functions available to you depends on which startup mode is
currently selected. This column indicates which startup mode to which each type of user
documentation applies. For more information about the PJ Camera Software startup mode, see
“Starting Up PJ Camera Software” (page E-26).
z In addition to the above, the CASIO CD-ROM also includes user documentation for Photo
Loader and Photohands. To view the user documentation (PDF format files) on the CD-ROM,
insert the CD-ROM into your computer’s CD-ROM drive.
z “Using the CASIO CD-ROM” (page E-12) of this manual also includes information about
installing PJ Camera Software on a computer. Make sure that you have completed all of the
required installation operations before reading the PJ Camera Software User’s Guide.
E-10
Unpacking
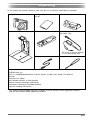
Unpacking
As you unpack this product, check to make sure that all of the items listed below are present.
PJ Digital Camera
Rechargeable Lithium Battery
(NP-20)
USB Cradle
PHOTO
CHAR
GE
PJ Camera Stand
Camera Bracket
USB
AC Adaptor (AD-A50150S) and
AC Power Cord
The shape of the plug depends
on your geographical area.
USB Cable
Strap
Carrying Bag
CD-ROM Discs (2)*
MULTI PJ CAMERA/Multifunctional Camera System YC-400 User’s Guide (This Manual)
Warranty
“Read this first” Sheet
Serial Number Stickers (2) with Barcode
Software License Agreement (USB driver)
Precautions Concernig the Bundled Software
Important Handling Precautions!
* This product comes bundled with two CD-ROMs: one that contains CASIO application software,
and one that contains Kodak application software.
E-11
Using the CASIO CD-ROM
Using the CASIO CD-ROM
This section explains how to install the PJ Camera Software from the CASIO CD-ROM that comes
bundled with this product. It also tells you how to view the contents of the PDF file user
documentation that is also included on the CD-ROM.
PJ Camera Software
You should install PJ Camera Software on your computer before trying to connect the PJ Camera
Stand and the projector to it.
z
Minimum Computer System Requirements
PJ Camera Software is designed to run under Windows only. For details about the required
computer system, see “Minimum Computer System Requirements” on page E-40.
z
Uninstalling PJ Camera Software
See the PJ Camera Software README file on the CASIO CD-ROM for details on uninstalling
PJ Camera Software.
z Selecting a language other than Japanese for installation always installs the English version of
PJ Camera Software.
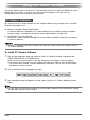
To install PJ Camera Software
1.
Start up the computer where you want to install PJ Camera Software, and place the
CASIO CD-ROM into its CD-ROM drive.
z This should cause the installer to start up automatically and display a menu of options.
z If the menu does not appear on your display automatically, navigate to the CD-ROM drive
that contains the CD-ROM, and then double-click “menu.exe”. This will start up the installer
and display a menu of options.
2.
3.
Click on the tab for the language you want.
After reading the text that appears on the screen, click the PJ Camera Software install
button.
z You can also use the above procedure to install the other software on the CD-ROM by clicking
the applicable software name in step 3.
E-12
Using the CASIO CD-ROM
User Documentation (PDF)
To read the contents of the PDF format user documentation files, you need to have Adobe®
Reader® installed on your computer. If your computer does not already have Adobe Reader installed,
please install it.
You can download a copy of Adobe Reader for free from the following website:
URL http://www.adobe.com/
Viewing PDF Format User Documentation
Perform the procedure under “To install PJ Camera Software” on page E-12. In step 3, click the
button for the type of user documentation you want to view.
z This starts up Adobe Reader and displays the contents of the User’s Guide.
E-13
Multi PJ Camera System
Multi PJ Camera System
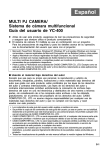
The following shows the basic configuration of the Multi PJ Camera System.
PJ Camera
Computer
Projector
RGB
USB
PJ Camera Stand
PJ Camera Software
PJ Camera
The PJ Camera is a versatile digital camera that you can use to record the image of paper
documents or of objects, which can then be projected with the projector. PJ Camera operations are
controlled mainly using PJ Camera Software. You can also remove the PJ Camera from the PJ
Camera Stand for use as a compact digital camera. You can project the images you record and
use them in presentations.
PJ Camera Stand
The PJ Camera Stand holds the PJ Camera during recording of paper documents or objects.
Simply place a document onto the stand, and the PJ camera automatically records its image and
stores it on the computer disk. The high-resolution image can then be projected using the projector.
PJ Camera Software
PJ Camera Software is a computer application that controls the Multi PJ Camera System. PJ
Camera Software comes with a powerful collection of features and functions to suit just about any
presentation needs imaginable, including: playlist capabilities, paper document projection, whiteboard
content recording, and much more.
Projector
The Multi PJ Camera System supports the use of a projector that can be connected to a computer.
E-14
General Guide (PJ Camera Stand)
General Guide (PJ Camera Stand)
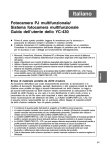
The PJ Camera Stand can be folded into a compact configuration for transport or storage. The
following shows the PJ Camera Stand in its unfolded configuration, with the PJ Camera mounted.
2
1
5
3
6
7
8
9
bk
bl
4
z For information about unfolding and refolding the PJ Camera Stand, and about mounting the PJ
Camera onto the stand, see “Setting Up the PJ Camera Stand” (page E-17).
E-15
General Guide (PJ Camera Stand)
1 PJ Camera
2 Camera holder
Attach the PJ Camera to the PJ Camera Stand here.
DISP
PLAY
REC
MENU
Strap holder
Insert the PJ Camera strap into
the holder.
[CAMERA RELEASE]
Slide the release when removing
the PJ Camera from the stand.
View from above
* You must install the camera bracket on the PJ Camera before you can attach it to the
camera holder. See page E-19 for more information.
3 Arm
Unfold the arm to configure the PJ Camera Stand for operation. You can leave the PJ Camera
mounted on the stand when you fold it up for transport.
4 Document stage
Place document pages or other objects when using a projector or when recording image data.
z Never write on the document stage and take care to guard against scratching or otherwise
damaging it. Writing or other marks on the document stage can interfere with projection in the
Document Camera Mode and scanning in the Scanner Mode.
5 Light (white LED)
This light provides illumination in a dark room, etc.
6 [LIGHT] button
Turns the light on and off.
7 [CHARGE] indicator
Lights when the PJ Camera battery is charging while the camera is attached to the camera
holder.
8 [POWER] indicator
Lights when the PJ Camera is turned on while it is attached to the camera holder.
9 [
] (power) button
Turns the PJ Camera on and off while it is mounted on the PJ Camera Stand.
bk USB port
For connection to a USB port of a computer.
bl DC power terminal
Connect the bundled AC adaptor here.
E-16
Setting Up the Multi PJ Camera System
Setting Up the Multi PJ Camera System
This section explains how to set up the Multi PJ Camera System for operation.
Setting Up the PJ Camera Stand
Unfolding the PJ Camera Stand
The PJ Camera Stand can be folded into a compact configuration for transport or storage. Use the
following procedure to unfold the stand for use.
1.
With the folded PJ Camera Stand placed on a flat, stable surface, raise the arm unit until
it is at a right angle to the stage unit.
z This will cause the arm unit to lock securely into place.
z Never try to force the stage unit and arm unit to open more than about 90 degrees. Doing
so can damage the stand.
E-17
Setting Up the Multi PJ Camera System
2.
Open the side panels of the document stage.
3.
Unfold the camera holder from the arm unit.
z Open the upper section of the arm unit until it snaps securely into place.
z The camera holder should be parallel with the document stage.
E-18
Setting Up the Multi PJ Camera System
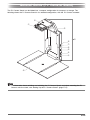
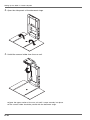
Mounting the PJ Camera onto the PJ Camera Stand
z Before using the PJ Camera for the first time, be sure to read “PJ Camera Overview” (page E36). Also you will need to charge the PJ Camera’s battery and configure certain settings before
using the PJ Camera.
1.
Make sure the PJ Camera is turned off.
2.
Attach the camera bracket to the bottom of the PJ Camera.
3.
Attach the PJ Camera to the PJ Camera Stand camera holder.
z Use a coin or some similar object to securely tighten the camera bracket screw.
z Make sure the lens side of the camera is facing downwards, towards the document stage.
z Press the PJ Camera against the camera holder until it clicks securely into place.
z Insert the PJ Camera strap into the strap holder.
z Make sure the PJ Camera is
attached securely to the camera
holder. Incorrectly attaching the
camera can cause it to fall,
resulting in damage and
malfunction.
E-19
Setting Up the Multi PJ Camera System
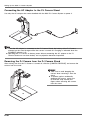
Connecting the AC Adaptor to the PJ Camera Stand
Use only the AC adaptor that comes bundled with the Multi PJ Camera System to power it.
z When the AC adaptor is connected to the PJ Camera Stand, the battery of the PJ Camera
mounted on the stand charges while the camera is turned off. Charging is indicated when the
[CHARGE] indicator is lit.
z Operating the PJ Camera on battery power without connecting the AC adaptor to the PJ
Camera Stand can run down battery and so projection becomes impossible.
Removing the PJ Camera from the PJ Camera Stand
After making sure that the PJ Camera is turned off, slide the [CAMERA RELEASE] and remove the
camera from the stand.
1
E-20
2
z Take care to avoid dropping the
camera when removing it from the
stand.
z To protect against accidentally
dropping the camera, make sure
to have the strap around your
fingers when removing the camera
from the stand.
Setting Up the Multi PJ Camera System
Folding Up the PJ Camera Stand
Perform the steps below to fold up the PJ Camera Stand for transport or storage. Note that you
can fold up the PJ Camera Stand without removing the PJ Camera.
1.
Make sure the PJ Camera is turned off, and that the stand light is off. Disconnect the
USB cable and AC adaptor from the PJ Camera Stand.
z Folding up the PJ Camera Stand while the lens of the PJ camera is extended can damage
the camera.
2.
3.
Remove the PJ Camera from the PJ Camera Stand, if you want.
Fold the camera holder and the upper section of the arm unit into the lower section of
the arm unit.
z Take care to avoid impact to the PJ Camera when folding the arm with the camera installed.
Be sure to fold the upper section of the arm unit first.
4.
Close the side panels of the document stage.
5.
Fold the arm unit onto the document stage.
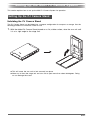
Installing PJ Camera Software on a Computer
Before connecting the PJ Camera Stand and a projector to your computer, you need to install PJ
Camera Software from the CASIO CD-ROM that comes bundled with the Multi PJ Camera System.
For more information, see “Using the CASIO CD-ROM” on page E-12.
E-21
Setting Up the Multi PJ Camera System
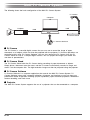
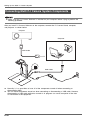
Connecting Multi PJ Camera System Components
z Make sure that PJ Camera Software is installed on your computer before trying to perform the
following procedure.
After you install PJ Camera Software on the computer, connect the PJ Camera Stand, computer,
and projector as shown below.
Projector
Computer
RGB Cable
USB Cable
z
z
Normally, it is a good idea to have all of the components turned off when connecting or
disconnecting them.
You can leave components turned on when connecting or disconnecting a USB cable. However,
disconnecting a USB cable while data transfer is in progress can cause corruption of the data
or malfunction of the equipment.
E-22
Setting Up the Multi PJ Camera System
Testing the Multi PJ Camera System
After installing PJ Camera Software and connecting all of the components, you can perform the
following steps to test the Multi PJ Camera System for proper operation.
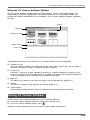
1.
Start up the computer.
z After the computer starts up, check to make sure that the PJ Camera Software icon is in the
Windows taskbar.
PJ Camera Software icon
z Configure your computer monitor’s resolution setting for XGA (1024 × 768) or SVGA (800 ×
600). Using any other resolution setting will cause an error message to appear when you try
to start up PJ Camera Software.
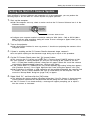
2.
Turn on the projector.
3.
If there is anything on the PJ Camera Stand’s document stage, remove it.
4.
On the PJ Camera Stand, press the [
5.
z After the projector finishes its warm up process, it should start projecting the contents of the
computer screen.
z Do not place anything on the document stage during up to step 6 of this procedure.
] (power) button.
z This turns on the PJ Camera and causes the PJ Camera Stand [POWER] indicator to light.
z If your computer is running Windows XP and you are starting up the system for the first
time, a “Found New Hardware Wizard” dialog box will appear. Select the “Install the software
automatically (Recommended)” check box, and then click [Next].
z If the “CASIO MULTI PJ CAMERA has not passed Windows logo testing” dialog box appears,
click [Continue Anyway]. If the “Digital Signature Not Found” dialog box appears, click [Yes].
z After installation is complete, a USB connection will be established between the computer and
PJ Camera, and PJ Camera Software will start up automatically on the computer. This will
cause the “Startup Mode” dialog box (page E-26) to appear.
Select “Multi PJ”, and then click the [OK] button.
z This displays the camera position adjustment dialog box. If the PJ Camera is aimed correctly,
camera position adjustment will be performed and the dialog box will close automatically.
z If the PJ Camera is not aimed correctly, a message will appear prompting you to adjust it.
Aim the camera as instructed.
E-23
Setting Up the Multi PJ Camera System
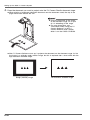
6.
Place the document you want to project onto the PJ Camera Stand’s document stage.
z When placing a landscape orientation document onto the document stand, the top of the
page should face towards the arm.
z Place the document in the center
of the document stage, so no part
of it is extending off the stage.
z For more information, see
“Precautions when Using the PJ
Camera Software” in the PJ
Camera Software User’s Guide,
which is on the CASIO CD-ROM.
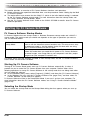
z After PJ Camera Software starts up, it projects the document on the document stage. At first
the image is a relatively rough monitor image, but this is replaced after a short while with the
high-resolution recorded image.
Rough (monitor) image
E-24
Full-resolution recorded image
Setting Up the Multi PJ Camera System
7.
Replace the document on the document stage with the next one you want to project.
z The currently projected image is replaced by the new image.
Current document camera image
New document camera image
z A copy of each image you project is stored automatically in a folder on your computer’s hard
disk, where it remains until you quit PJ Camera Software. This makes it possible to scroll
back and re-display a previous image in your presentation, without re-recording that image.
8.
To scroll back to a previous image, move the mouse pointer to the top center of your
computer screen.
z This will cause the PJ Camera Software operation bar to appear.
9.
On the operation bar, select [Back] on the [View] menu.
z This displays the full-resolution recorded version of the previously projected image.
10. This completes the Multi PJ Camera System test.
To quit PJ Camera Software, display the operation bar and then select [Exit] on the [File]
menu.
z This exits PJ Camera Software and automatically turns off the PJ Camera.
z Pressing the [
] (power) button in step 10 of the above procedure will turn off the PJ
Camera without quitting PJ Camera Software.
z See the PJ Camera Software User’s Guide for other operations you can perform with PJ
Camera Software.
E-25
PJ Camera Software Overview and Basic Operations
PJ Camera Software Overview and Basic Operations
This section provides an overview of PJ Camera Software functions and operations.
z Before performing the operations described here, use the procedures under “Setting Up the Multi
PJ Camera System”.
z The explanations here assume that the “Multi PJ” (which is the initial default setting) is selected
for the PJ Camera Software startup mode. For more information about the startup mode, see
“PJ Camera Software Startup Modes” below.
z See the PJ Camera Software User’s Guide on the CASIO CD-ROM for details about PJ Camera
Software operations.
Starting Up PJ Camera Software
PJ Camera Software Startup Modes
PJ Camera Software has two startup modes: a Business Document startup mode and a Multi PJ
startup mode. The startup mode you should use depends on the type of operations you want to
use, as described below.
Business Document
Startup Mode:
Multi PJ Startup Mode:
This startup mode simplifies PJ Camera Software operation for those who
want to use the document camera functions only. This easy-to-use, easyto-understand mode is also the perfect choice for those who are using
the PJ Camera Software for the first time.
This startup mode enables all of the PJ Camera Software’s functions.
Select this mode when you need the full power of PJ Camera Software
to record images, save image files to your computer’s hard disk, project
images from your computer’s hard disk, etc.
For details about using the functions available in each startup mode, see the “PJ Camera Software
User’s Guide” on the CASIO CD-ROM.
Starting Up PJ Camera Software
Turning on PJ Camera Stand power starts up PJ Camera Software automatically. It makes it
possible for you to control the PJ Camera System from your computer. Perform either of the
following operations to startup PJ Camera Software in the startup mode that was being used when
you last exited the software.
z On the Windows [Start] menu, select [Programs], [CASIO], and then click [PJ Camera Software].
z In the Windows task tray, click the PJ Camera Software icon (page E-23), and then select “PJ
Camera Software” on the menu that appears.
PJ Camera Software will be in the Presentation Mode if you start it up from your computer. For
more information about the PJ Camera Software modes, see “Using PJ Camera Software Modes”
(page E-28).
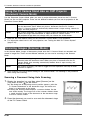
Selecting the Startup Mode
You can select the startup mode on the Startup Mode dialog box that appears when you start up
PJ Camera Software.
E-26
PJ Camera Software Overview and Basic Operations
Select the button next to the startup
mode you want to use by clicking it.
{
Clicking the [OK] button starts up PJ Camera Software in the startup mode that is currently
selected on the dialog box.
z To change the startup mode after PJ Camera Software is already running, display the operation
bar. Next, click [Tools] and then [Operating Environment]. For details, see “Operating
Environment Settings” in the “PJ Camera Software User’s Guide” on the CASIO CD-ROM.
z If you select the “Don’t show this dialog box again” check box and then click [OK], the Startup
Mode dialog box will not appear any more when you start up PJ Camera Software.
Operation Bar
In some cases, you will not see a window or even a menu bar on you computer screen while PJ
Camera Software is running. In such a case, you can display the PJ Camera Software operation
bar by moving your mouse pointer to the top center of the computer screen. The operation bar
combines a menu bar and tool bar, as shown below.
Menu bar
Operation Bar
Toolbar
z
Menu bar
This bar contains various menus for performing PJ Camera Software operations.
z
Toolbar
This bar contains buttons for performing PJ Camera Software operations. These buttons provide
one-click access to frequently used menu commands.
z In some modes, a PJ Camera Software window remains on the screen with a menu bar and
toolbar continuously displayed at the top. You do not need to use the operation bar to perform
menu and toolbar operations in this case.
E-27
PJ Camera Software Overview and Basic Operations
PJ Camera Software Modes and Windows
Using PJ Camera Software Modes
PJ Camera Software has five modes, which are described below.
Mode Name
Description
Document Camera Mode
Use this mode to record the image of a paper document or object
placed on the PJ Camera Stand with the PJ Camera, and project the
resulting image.
Scanner Mode
With this mode, you can place a document on the PJ Camera Stand
and record its image with the PJ Camera.
PC Image Mode
Use this mode for conducting a presentation using images stored on
the computer’s hard disk.
Camera Image Mode
Use this mode for conducting a presentation using images stored in
camera memory.
Presentation Mode
Use this mode to conduct a presentation using images created using
PowerPoint or other applications. You can use the PJ Camera
Software’s Projection Area Capture* and Board Area Capture* functions
in this mode.
* For more information, see “Using Projection Area Capture and Board Area Capture” (page E-33).
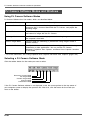
Selecting a PJ Camera Software Mode
Click the toolbar button for the mode you want to select.
Document Camera
PC Image
Camera Image
Scanner
Presentation
Mode
Mode
Mode
Mode
Mode
If the PJ Camera Software window is not displayed, move the mouse pointer to the top center of
your computer screen to display the operation bar. After that, click the button for the mode you
want on the toolbar.
E-28
PJ Camera Software Overview and Basic Operations
Using the PJ Camera Software Window
The PJ Camera Software window remains on your computer screen in the Scanner Mode, PC
Image Mode, and Camera Image Mode. The following shows the PC Image Mode window, and
indicates the window components that are included in all PJ Camera Software windows, regardless
of mode.
Toolbar
Menu bar
Preview list area
Playlist toolbar
Playlist area
The following explains the main functions of PJ Camera Software window components.
z
Preview list area
This area shows thumbnails of images that can be used in the current mode. You can select a
thumbnail to project its image or to add the image to a playlist.
z
Playlist area
A playlist is a group of images selected for playback in a specific sequence. A playlist can be
saved to a playlist file for later recall when it is needed. The playlist area shows the thumbnails
of all of the images that are included in the currently open playlist.
z
Menu bar
The menu bar is identical to the one that appears on the operation bar (page E-27).
z
Toolbar
The toolbar is identical to the operation bar toolbar (page E-27).
z
Playlist toolbar
These buttons provide one-click access to frequently used [Playlist] menu commands.
Exiting PJ Camera Software
Perform either of the following operations to exit PJ Camera Software.
z
z
On the PJ Camera Software menu bar, select [File] and then [Exit].
On the PJ Camera Software toolbar, click
.
Quitting PJ Camera Software also will turn off PJ Camera power automatically.
E-29
PJ Camera Software Overview and Basic Operations
Using the PJ Camera Stand Like an OHP Projector
(Document Camera Mode)
Use the Document Camera Mode when you want to project documents placed on the PJ Camera
Stand, just like an OHP projector. There are two different methods you can use for projection in the
Document Camera Mode.
Auto
With auto recording, projection starts automatically when you place a document
onto the document stand. When you place a document onto the PJ Camera
Stand, PJ Camera Software automatically detects when it stops moving, records its
image, and then projects it.
Manual
With manual recording, you need to manually trigger the operation that records and
projects the image of the document or object on the PJ Camera Stand.
The projected image does not change until you release the shutter button.
z
z
Note that the initial default setting for the Document Camera Mode is auto projection.
For information about how to use auto projection, see “Testing the Multi PJ Camera System”
(page E-23).
Scanning Images (Scanner Mode)
In the Scanner Mode, images of documents placed onto the PJ Camera Stand are recorded and
stored in image files. There are two different methods you can use for scanning in the Scanner
Mode.
Auto
With auto scanning, image recording starts automatically when you place a
document onto the document stand. When you place a document onto the PJ
Camera Stand, auto scanning automatically detects when it stops moving, and
records its image.
Manual
With manual scanning, you need to trigger the scan operation manually for each
document or object.
z
Auto scanning is the initial default setting for the Scanner Mode. The following is the procedure
when using auto scanning.
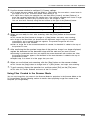
Scanning a Document Using Auto Scanning
1.
Display the operation bar, and then select [Scanner] on the
[File] menu or click
on the toolbar.
z If the dialog box for adjusting camera position appears, point the
PJ Camera downwards at the document stage, and make sure
there is no document on the stage.
z Entering the Scanner Mode displays a scanner window, like the
one shown nearby. The image area of the scanner window shows
a rough (monitor) image of the document on the document stage
of the PJ Camera Stand.
2.
Place the document you want to scan onto the document stage
of the PJ Camera Stand.
E-30
PJ Camera Software Overview and Basic Operations
3.
4.
Use the scanner window to configure PJ Camera settings.
z To change the zoom setting, click the [Wide] or [Tele] button. You can select a zoom factor in
the range of 1X to 3X. The initial default zoom setting is 1X.
z To adjust focus, display the operation bar and then select [Camera] and then [Refocus], or
press the computer keyboard’s [F2] function key. If the currently selected zoom factor is larger
than 1.8X when you press the [F2] function key, it will change to 1.8X.
You can also focus manually using the four buttons to the right of the [Refocus] button.
To do this:
Click this button:
Make a relatively large change in the focus setting
[<<] or [>>]
Make a fine adjustment of the focus setting
[<] or [>]
When you are ready to start auto scanning, click the [Start] button on the scanner
window.
z This causes the [Start] button to change to a [Stop] button, and starts auto scanning.
z An image of the document you placed onto the document stage in step 2 is recorded
automatically, and a preview image box appears. The preview image box will close
automatically after a few seconds.
z After an image file of the scanned document is created, its thumbnail is added at the top of
the preview list area.
5.
After confirming that the preview image box of the previous image is no longer displayed,
replace the document on the document stage with the next one you want to scan.
z Scanning is performed each time you replace the current document with another one. After
the preview image box appears, the thumbnail of the new document is added to the top of
the preview list area.
z Repeat step 5 to record all of the pages that you want.
6.
When you are finished auto scanning, click the [Stop] button on the scanner window.
7.
To quit scanning, display the operation bar and then select [Exit] on the [File] menu.
z This causes the [Stop] button to change back to a [Start] button, and stops auto scanning.
z This exits PJ Camera Software and turns off the PJ Camera.
Using Files Created in the Scanner Mode
You can use image files you create in the Scanner Mode for projection in the Scanner Mode or the
PC Image Mode. See the following section for details about projecting image files stored on the
computer (PC Image Mode).
E-31
PJ Camera Software Overview and Basic Operations
Projecting Image Files Stored on the Computer
(PC Image Mode)
With the PC Image Mode, you can create a projector presentation using image files recorded in the
Scanner Mode and saved on your computer’s hard disk.
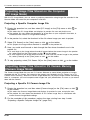
Projecting a Specific Computer Image File
1.
Display the operation bar, and then select [PC Image] on the [File] menu or click
the toolbar.
on
z This enters the PC Image Mode and displays its preview list area and playlist area.
z The preview list area shows the thumbnails of image files on your computer’s hard disk, in
accordance with current PC Image Mode settings.
2.
In the preview list, select the thumbnail of the file whose image you want to project.
3.
Select [Full Screen] on the [View] menu or click
4.
on the toolbar.
z This projects the image whose thumbnail is selected in the preview list.
Here, you could scroll forward or back through the files whose thumbnails are in the
preview list.
z To scroll back to the image whose thumbnail comes before the current image in the preview
list, select [Back] on the [View] menu or click
on the toolbar.
z To scroll forward to the image whose thumbnail comes after the current image in the preview
list, select [Forward] on the [View] menu or click
on the toolbar.
5.
To stop projecting, select [Full Screen Off] on the [View] menu or click
on the toolbar.
Projecting Image Files Stored in PJ Camera Memory
(Camera Image Mode)
The Camera Image Mode lets you use PJ Camera Software to control direct projection of images
recorded with the PJ Camera and stored on the memory card loaded in the PJ Camera (or in PJ
Camera built-in memory). Since the Camera Image Mode lets you project images without transferring
them to a computer, you can incorporate new images into your presentations as soon as you record
them with the camera.
Projecting a Specific PJ Camera Image File
1.
Display the operation bar, and then select [Camera Image] on the [File] menu or click
on the toolbar.
z This enters the Camera Image Mode and displays its preview list area and playlist area.
z The preview list area shows the thumbnails of PJ Camera image files, in accordance with
current Camera Image Mode settings.
2.
For the remainder of this procedure, perform the steps starting from step 2 under
“Projecting a Specific Computer Image File” (page E-32).
E-32
PJ Camera Software Overview and Basic Operations
Using a Playlist to Project Images
With a playlist, you can prepare your presentation by specifying which images you want to appear
as well as the sequence they should appear. After creating a playlist, you can save it to a file for
later recall when you need it. When you recall a playlist and play it, its images are projected in the
sequence they are arranged in the playlist. You can create and play playlists in the Scanner Mode,
PC Image Mode, and Camera Image Mode.
For full details about creating playlists and using playlists for projection, see the PJ Camera
Software User’s Guide.
Using the Presentation Mode
The Presentation Mode lets you keep PJ Camera Software running in the background when
projecting with Microsoft PowerPoint or some other software. This makes PJ Camera Software
instantly available during the presentation whenever you need it.
Entering the Presentation Mode
Display the operation bar, and then select [Presentation] on the [File] menu or click
toolbar.
on the
Functions Available in the Presentation Mode
You can use Projection Area Capture and Board Area Capture in the Presentation Mode. See the
following section for more information about Projection Area Capture and Board Area Capture.
Using Projection Area Capture and Board Area Capture
Projection Area Capture and Board Area Capture can be performed in all modes except for the
Document Camera Mode and the Scanner Mode.
z
Projection Area Capture
Projection Area Capture extracts text and graphics that are handwritten within the projection
image area on the whiteboard. It then combines this with the original projection image, providing
a clear view of both the projection image and the handwritten information.
• Projection Area Capture does not record handwritten text and graphics that are on the
whiteboard outside of the projection image area.
• Use Projection Area Capture when the handwritten text and graphics you want to record are
located within the projection area.
z
Board Area Capture
Board Area Capture extracts the entire whiteboard area, including the projected image as well
as handwritten text and graphics both inside and outside the projection area, and stores it as
an image.
• Use Board Area Capture when the handwritten text and graphics you want to record are
located outside of the projection area.
• The whiteboard area is extracted and repositioned so it is straight. You can also correct the
brightness of the image to make text more legible.
E-33
PJ Camera Software Overview and Basic Operations
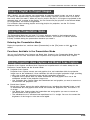
Performing a Projection Area Capture Operation
Use the following procedure in the PC Image Mode, Camera Image Mode, or Presentation Mode
after text and/or graphics have been handwritten into a projected image.
1.
Display the operation bar, and then select [Projection Area Capture] on the [File] menu or
click
on the toolbar.
z This displays the Projection Area Capture dialog box.
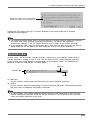
2.
3.
4.
Point the PJ Camera at the
whiteboard.
Recording area
Point the camera at
the whiteboard so it
is at an angle that
is within the
allowable range.
While watching the PJ Camera’s
monitor screen, use the camera’s
zoom buttons to compose the image.
After the image is composed the way
you want, click the [Shutter] button
on the Projection Area Capture
dialog box.
z The extracted whiteboard contents
produced by Projection Area Capture
is combined with the original
projection image, and the result is
stored as an image file.
E-34
Image projection area
PJ Camera Software Overview and Basic Operations
Projection Area Capture Image Files
Image files created with Projection Area Capture are saved in the folder at the directory path shown
below.
Folder:
C:\CASIO\PJ_System\Projection_Area_Capture
File Name:
File names are generated automatically in accordance with the recording date.
Example: 20040218T104525.JPG
(Year: 2004; Month: 2; Day: 18; Time: 10:45:25)
Image Resolution: XGA (1024 × 768)
800 × 600 when an SVGA computer screen is being used.
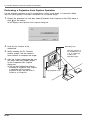
Performing a Board Area Capture Operation
Use the following procedure in the PC Image Mode, Camera Image Mode, or Presentation Mode
while an image is being projected onto a whiteboard.
1.
Display the operation bar, and then click [Camera] on the [File] menu or click
toolbar.
on the
z This displays the Board Area Capture dialog box.
2.
3.
Point the PJ Camera at the
whiteboard.
Recording area
Point the camera at
the whiteboard so it
is at an angle that
is within the
allowable range.
While watching the PJ Camera’s
monitor screen, use the camera’s
zoom buttons to compose the image.
z Zoom the image until the projection
area on the whiteboard fills the
monitor screen as much as possible.
4.
After the image is composed the way
you want, click the [Shutter] button
on the Board Area Capture dialog
box.
z This records the image on the
whiteboard and stores it as an image
file.
Image projection area
Board Area Capture Image Files
Image files created with Board Area Capture are saved in the folder at the directory path shown
below.
Folder:
C:\CASIO\PJ_System\Board_Area_Capture
File Name:
File names are generated automatically in accordance with the recording date.
Example: 20040218T104525.JPG
(Year: 2004; Month: 2; Day: 18; Time: 10:45:25)
Image Resolution: In accordance with PJ Camera setup.
E-35
PJ Camera Overview
PJ Camera Overview
The PJ Camera can also be used as a stand-alone digital camera. This section provides an
overview of PJ Camera operations. See the Camera User’s Guide on the CASIO CD-ROM for
details about PJ Camera operations.
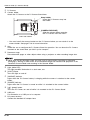
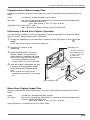
First, charge the battery!
1.
Load the battery.
1
2
3
Stopper
2.
Place the camera onto the USB cradle to charge the battery.
z It takes about two hours to achieve a full charge.
z Make sure the PJ Camera is not mounted on the USB cradle whenever plugging the AC
adaptor into a power outlet and when unplugging it.
1
E-36
PJ Camera Overview
2
3
z If the camera bracket is
attached to the camera,
remove it before mounting
the camera onto the cradle.
Store the camera bracket in
the carrying bag to ensure
that it does not become
soiled with dirt, dust, etc.
PLAY
REC
MEN
U
SET
DISP
PHOTO
CHARG
E
USB
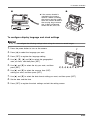
To configure display language and clock settings
z Be sure to configure the following settings before using the camera to record images.
1.
Press the power button to turn on the camera.
2.
Press [S] to select the language you want.
3.
Press [SET] to register the language setting.
1
PLAY
REC
MENU
4.
5.
6.
Use [S], [T], [W], and [X] to select the geographical
area you want, and then press [SET].
Use [S] and [T] to select the city you want, and then
press [SET].
SET
DISP
2, 3, 4, 5, 6, 7, 8, 9
Use [S] and [T] to select the summer time (DST)
setting you want, and then press [SET].
7.
Use [S] and [T] to select the date format setting you want, and then press [SET].
8.
Set the date and the time.
9.
Press [SET] to register the clock settings and exit the setting screen.
E-37
PJ Camera Overview
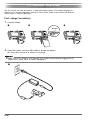
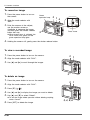
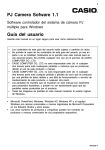
To record an image
1.
2.
3.
Press the power button to turn on
the camera.
Green
operation lamp
Align the mode selector with
“REC”.
2 1
4
IN
1 / 1000
F2.6
03/12
03
12/24
24
12:58
12
58
PLAY
REC
Point the camera at the subject,
use the monitor screen or
viewfinder to compose the image,
and then press the shutter release
button half way.
MENU
SET
3
z When proper focus is achieved, the
focus frame turns green and the
green operation lamp lights.
4.
99
1600 1200
NORMAL
Focus frame
DISP
Holding the camera still, gently press the shutter release button.
To view a recorded image
1.
Press the power button to turn on the camera.
2.
Align the mode selector with “PLAY”.
3.
Use [W] and [X] to scroll through the images.
2 1
PLAY
REC
MENU
SET
DISP
3
To delete an image
1.
Press the power button to turn on the camera.
2.
Align the mode selector with “PLAY”.
3.
Press [T] (
4.
Use [W] and [X] to display the image you want to delete.
5.
Use [S] and [T] to select “Delete”.
6.
).
2 1
PLAY
REC
MENU
SET
z To exit the image delete operation without deleting anything,
select “Cancel”.
Press [SET] to delete the image.
E-38
DISP
3, 4, 5, 6
Troubleshooting
Troubleshooting
The following explains what you should do when you experience problems with using the Multi PJ
Camera System.
z For information about the messages that appear on the PJ Camera monitor screen and other
troubleshooting procedures, see the “Reference” section of the Camera User’s Guide.
z You can find more troubleshooting information in the FAQ of PJ Camera Software help.
Problem
Nothing works.
Cause and Required Action
The USB cable, AC adaptor, and/or power cord is not connected
correctly.
J Check each connection and make sure it is correct and secure.
The computer is not turned on.
J Start up the computer.
The software or driver is not installed correctly.
J Correctly install the software and driver.
No image is projected.
There is something wrong with the system setup.
J Check the following.
• Is the AC power cord plugged into an electrical outlet?
• Is the AC power cord connected to the AC adaptor?
• Is the AC adaptor DC plug connected securely to the [DC-IN]
terminal of the PJ Camera Stand?
• Is the [
] (power) button turned on?
• Is the USB cable connected securely to the USB port of the PJ
Camera Stand?
• Is PJ Camera Software installed on your computer?
PJ Camera Software will
not start up.
The computer does not conform to the necessary system requirements.
J Check the “Minimum Computer System Requirements” on page E-40.
Failure to record camera
images properly in the
Document Camera Mode.
The document stage is not set up correctly.
J Use the procedure under “Setting Up the PJ Camera Stand” on page
E-17 to set up the document stage correctly.
Light shining in a
camera image in the
Document Camera Mode.
Fluorescent lighting or sunlight is shining onto the document stage.
J Take the action required to keep the unwanted light from shining onto
the document stage.
The projected image is
dark.
Insufficient illumination when recording the image.
J Provide more illumination.
E-39
Product Specifications (PJ Camera Stand)
* For PJ Camera specifications, see the PJ Camera User’s Guide on the CASIO CD-ROM.
Product Specifications (PJ Camera Stand)
Power Requirements:
100V to 240V AC, 50/60Hz
Rated Voltage:
5.0V
Power Consumption:
5.2W
Connection Terminal:
USB (1.1)
×
1
Approximate Dimensions: 168(W) × 43(H) × 285(D) mm (excluding projections)
(6.6 × 1.7 × 11.2 inches)
During Use: 327(W) × 391(H) × 264(D) mm
(12.9 × 15.4 × 10.4 inches)
Approximate Weight:
1.6kg (3.53 lbs)
Minimum Computer System Requirements
Minimum Computer System Requirements
The following are the minimum system requirements for a computer to run PJ Camera Software.
Operating System
Microsoft® Windows® XP, 2000 Professional, or Me
Computer
IBM PC/AT or compatible that conforms to the following conditions.
• Windows XP, 2000 Professional, or Me pre-installed
• 800 MHz Pentium® or higher CPU
• USB port
Memory
At least 64MB
Hard Disk
At least 15MB available for software installation, and at least 500MB additional disk space for
running the software
Display
Color monitor (16-bit color or greater, Full Color recommended) with a resolution of 1024
dots or 800 × 600 dots, that supports connection to your computer and operation under
Windows XP, 2000 Professional, or Me.
×
768
Pointing Device
Mouse or compatible device that supports operation under Windows XP, 2000 Professional, or Me
Keyboard
CD-ROM Drive
* In addition to the above, the system should conform to the recommendations of the operating
system being used.
* Normal operation may not be possible under certain hardware configurations.
* Operation is not supported on a computer running Windows 3.1, 95, 98, 98SE, or NT, on a
Macintosh running a MacOS.
* Operation on a computer upgraded to Windows XP, 2000 Professional, or Me from another
operating system is not supported.
E-40