1
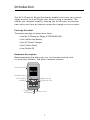
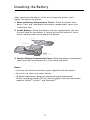
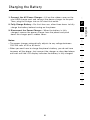
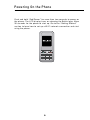
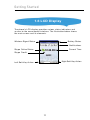
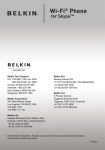
Wi-Fi® Phone
for Skype
TM
User Manual
F1PP000GN-SK
Table of Contents
1. Introduction . . . . . . . . . . . . . . . . . . . . . . . . . . . . . . . . . . . . . . 1
Package Checklist . . . . . . . . . . . . . . . . . . . . . . . . . . . . . . . . 1
Hardware Description . . . . . . . . . . . . . . . . . . . . . . . . . . . . . . 1
AC Power Charger . . . . . . . . . . . . . . . . . . . . . . . . . . . . . . . . 2
2. Installing the Battery . . . . . . . . . . . . . . . . . . . . . . . . . . . . . . . 3
3. Charging the Battery . . . . . . . . . . . . . . . . . . . . . . . . . . . . . . . 4
4. Powering On the Phone . . . . . . . . . . . . . . . . . . . . . . . . . . . . . 5
5. Getting Started. . . . . . . . . . . . . . . . . . . . . . . . . . . . . . . . . . . . 6
6. Contacts . . . . . . . . . . . . . . . . . . . . . . . . . . . . . . . . . . . . . . . . 15
7. Make and Receive Calls . . . . . . . . . . . . . . . . . . . . . . . . . . . . 22
8. Connect to Networks . . . . . . . . . . . . . . . . . . . . . . . . . . . . . . 29
9. Personal Settings . . . . . . . . . . . . . . . . . . . . . . . . . . . . . . . . . 34
10. General Settings. . . . . . . . . . . . . . . . . . . . . . . . . . . . . . . . . 42
11. Appendix A: Specifications . . . . . . . . . . . . . . . . . . . . . . . . . 47
12. Compliances . . . . . . . . . . . . . . . . . . . . . . . . . . . . . . . . . . . . 49
Introduction
The Wi-Fi Phone for Skype (the phone) enables you to use your normal
Skype account to make Skype calls without using a computer. This
affords you complete mobility, allowing you to talk from any location
from which you have an Internet connection through an access point.
Package Checklist
The phone package includes these items:
• One Wi-Fi Phone for Skype (F1PP000GN-SK)
• One Lithium-Ion Battery
• One AC Power Charger
• Quick Start Guide
• User Guide CD
Hardware Description
Before preparing the phone for use, first become familiar with
its main keys, buttons, and other hardware features.
�������������
��������������
�������������
��������
�����������
���������
��������������
�������������
������������
1
Introduction
2. Right Soft Key—Selects the option at the bottom right corner
of the screen.
3. End/Power Key—Ends an active call.
1
2
• In OFF mode, turns the power on when held more than
2 seconds.
3
• In ON mode, turns the phone off when held for more than
4 seconds.
4
• In ON, press for two seconds to access the power-key menu.
4. Headset Jack—Jack for a headset connection (2.5mm mono/mic).
5
5. USB/Power Charge Port—Power-charger connection
for charging the battery.
6
6. Alphanumeric Keypad—Includes 0–9, A–Z, *, and # keys.
• The [a/A *] key selects upper- or lowercase characters,
numbers, or hexadecimal characters.
• The [ 1 ] key selects common punctuation marks during
text input.
• The [ # ] key selects special characters and symbols during
text input.
7. Send Key—Calls a selected contact.
8. Left Soft Key—Selects the option at the bottom left corner
of the screen.
9. Volume Button—Adjusts volume of the speaker.
7
8
9
10
11
12
AC Power Charger
The phone charges its installed battery when connected to the AC
power charger, when the charger is connected to a power source
such as a wall outlet. The power charger automatically adjusts to any
voltage between 100–240 volts at 50 or 60 hertz. No voltage-range
settings are required.
2
13
section
1. Navigation Key—Four-direction user-interface navigation key.
Installing the Battery
After unpacking the phone, install and charge the battery pack
before turning on the phone.
1. Remove Battery-Compartment Cover—Place the phone face
down. Push and slide down the battery-compartment cover until
it becomes free.
2. Install Battery—Place the battery into the compartment. Be sure
the text label on the battery is facing out and the battery’s three
metal contacts point to the top of the phone.
�����
�������
����������
3. Replace Battery-Compartment Cover—Slide the battery-compartment
cover back onto the phone until it clicks firmly into place.
Notes:
• Use only the lithium-ion battery pack supplied with the phone.
• Do not try to install any other battery.
• To obtain replacement batteries, please purchase replacement
lithium-ion battery model: NP-60, used for digital cameras/camcorders
made by Fujifilm®, Pentax®, and Panasonic®.
3
Charging the Battery
1. Connect the AC Power Charger—Lift up the rubber cover on the
mini-USB charger port and connect the power charger to the port.
Then, plug the charger into an AC electrical outlet.
3. Disconnect the Power Charger—When the battery is fully
charged, remove the power charger from the phone and push
down the charger port’s rubber cover.
Notes:
• The power charger automatically adjusts to any voltage between
100–240 volts at 50 or 60 hertz.
• When you next have to charge the phone’s battery, you do not have
to power off the phone. Just connect the charger as described above
and wait until the LCD display indicates the battery is fully charged.
2
3
4
5
6
7
8
9
10
11
12
4
section
2. Fully Charge Battery—For first-time use, allow three hours to fully
charge the battery before turning on the phone.
1
Powering On the Phone
Push and hold “End/Power” for more than two seconds to power on
the phone. The LCD display turns on showing the Belkin logo. Allow
30 seconds for the phone to start up. Go to the “Getting Started”
section to learn how to set up a Wi-Fi-network connection and start
using the phone.
5
Getting Started
1. Getting Started
1
2
3
You can configure the phone to connect to specific wireless networks
or search for “open” networks. Wireless-network information is stored
in the phone’s memory as “Preferred Networks”. These are searched
for each time the phone is powered on.
4
5
When powering on the phone for the first time, there are no Preferred
Networks in the phone’s memory. You need to select a wireless
network and sign in to your Skype account before you can start
making calls.
6
1.1 First-Time Startup
8
You must complete the following steps the first time you use your phone.
7
9
10
1. Select a language.
11
12
13
2. Read and accept the Skype Agreement.
Be sure to scroll down and read the entire
agreement before accepting.
6
section
The phone requires a wireless connection to a Wi-Fi access point
in order to make Skype calls.
Getting Started
1.2 Connect to a Network
After you have selected a language and accepted the Skype
agreement, your phone searches for available networks. This
also occurs whenever you power on the phone.
1. The Phone scans for available wireless networks.
2. Select a network.
Notes:
• If a network requires a security key, the phone prompts you for the key.
• Use the *a/A button to change to lowercase, uppercase, or numeric
entry when entering a network key.
• The access-key information is stored in the phone’s memory as
a “Preferred Network” and will be used the next time the phone
is powered on.
• Normally, you need to be within 300 feet (90m) of the wireless
access point to connect successfully.
7
Getting Started
1.3 Create a New Skype Account
After you have successfully accessed a wireless network, you can
sign in to Skype. If you do not have an existing Skype account, then:
1
2
3
4
5
6
7
2. Create a Skype name.
8
9
3. Create a password.
10
11
12
4. Sign in.
13
Notes:
• Use the *a/A button to change to lowercase, uppercase, or numeric
entry when entering your Skype name and password.
• Skype names can be 6–30 characters. You can use any mix of
upper- and lowercase characters, numbers, and punctuation
marks. You cannot use spaces or start your name with a number
or punctuation mark. If the name is already in use, you will be
prompted to try another name.
8
section
1. Create a new account.
Getting Started
• Passwords can be 4–20 characters. You can use any mix of
upper- and lowercase characters, numbers, and punctuation
marks. You cannot use spaces, start your name with a number
or punctuation mark, or use your Skype name as a password.
1.4 Sign In to Skype
When you have a Skype account, you can sign in to Skype.
1. Sign in to Skype.
2. Enter your Skype name.
3. Enter your password.
Notes:
• Use the *a/A button to change to lowercase, uppercase,
or numeric entry when entering your password.
• You can choose to automatically sign in with your Skype
name and password on subsequent sign-ins.
• On initial startup, it may take a few minutes to upload a large
Contact list.
9
Getting Started
1.5 Skype Features
After you have created your Skype account, you can call other
people with Skype accounts for free. Skype also offers additional
features, including:
SkypeOut allows you to place calls to
traditional landline and mobile phones.
SkypeIn ™
SkypeIn is a subscription feature that
provides you with a traditional phone number
for receiving Skype calls on your phone from
traditional landlines and mobile phones.
Skype
Voicemail ™
Skype Voicemail TM allows you to send and
receive voicemail messages and record a
greeting.
All of these features are available at www.skype.com.
2
3
4
5
6
7
8
9
10
11
12
13
10
section
SkypeOut ™
1
Getting Started
1.6 LCD Display
The phone’s LCD display provides various status indicators and
access to the menu-based interface. The illustration below shows
the main screen and its elements.
Battery Status
Wireless-Signal Status
Notifications
Skype Online Status
Current Time
Skype Credit
Right Soft Key Action
Left Soft Key Action
11
Getting Started
Wireless-Signal
Status
Indicates the strength of the wireless-network signal.
No detectable signal
Weak wireless signal
Good wireless signal
Strong wireless signal
Battery Status
2
3
Indicates the status of the battery.
4
Low level
Fully charged
Charging
Displays notification icons.
5
6
7
Missed call
New voicemail
Authorization request
Silent mode is active
Keypad locked
Skype credit is close to expiry
Headset attached
Skype Online
Status
Indicates your current Skype online status.
8
9
10
11
Online
Offline (not signed in)
Do not Disturb. Indicates you are busy.
Skype Me. Available for calls from anyone.
Invisible. Still online, but unseen by others.
Away. Away for a while.
Not available. Not available for calls.
Current Time
The currently set time.
Skype Credit
Your current Skype-credit balance.
Left Soft Key
Action
The action that happens when you press the left soft key.
Typically, the left soft key selects the current menu item
or confirms a setting. From the main screen, it provides
access to the user menu.
Right Soft Key
Action
The action that happens when you press the right soft key.
Typically, the right soft key cancels the last action or returns
to the previous screen. From the main screen, it provides
access to your list of contacts once signed in.
12
12
13
section
Partially charged
Notifications
1
Getting Started
1.7 Main Menu
The main menu provides easy access to all of your Skype and phone
settings. The menus are easy to navigate using the 4-way navigation
key. Just move the navigation key up or down to highlight a menu
item, then push down on the key to select the item.
The following table outlines the main-menu items.
Connect
(Shown when not
connected to a network)
Allows you to connect to a network.
Sign In
(Shown when not
connected to a network)
Allows you to sign in to Skype.
Contacts
Lists your contacts and their current
Skype status once you are signed in.
History
Lists your missed calls, incoming
and outgoing calls, voicemail, and
authorizations.
Status
Displays your Skype
connection status.
Add contact
Adds a Skype or SkypeOut
number to your Contact list.
Search
Allows user to search for a particular
Skype account using either Skype
name or email address.
Services
Sets up Skype credit, SkypeIn,
and voicemail.
Settings
Provides access to Skype, wireless
network, and phone settings that
can be viewed or changed.
Note:
• When you are not connected to Skype or to an access point, the
only menu option is “Settings”. “Connect/Sign In” is the “Right Soft
Key” option when you are not connected
13
Getting Started
1.8 Power-Key Menu
Access the power-key menu by pressing “End/Power” for more than
two seconds and then releasing it. Be sure not to press the key for
more than four seconds—this immediately switches the phone OFF.
The following table outlines the main-menu items.
2
3
4
5
6
7
Sign In
(Shown when not
connected to a network)
Allows you to connect to a network
and sign in to Skype.
Switch off
Powers off the phone.
Silent
Sets the ringtone volume to off.
Change Status
Allows user to change the login status.
My profile
Allows you to change your
Skype-profile information.
Sign In/Out
Signs in or out of Skype.
Find/View Networks
Displays a list of detected
wireless networks.
12
Network Status
Displays wireless-network-connection
information.
13
14
8
9
10
11
section
The items listed in the power-key menu depend on your current
network connection and Skype sign-in status. If you are not
connected to a network and not signed in to Skype, only a few
menu items are displayed. If you are connected and signed in,
all of the items are displayed.
1
Contacts
2. Contacts
Your Contact list displays all of the names to which you can make
calls. If you have an existing Skype account, your Contact list is
automatically downloaded when you sign in. If you are new to Skype
and have just created an account, your Contact list will be empty. You
will need to add contacts to your list.
Skype protects the privacy of users by requiring authorization on
names that you wish to add to your Contact list. When you add a
name to your list, an authorization request is sent to the user. The
user can accept or deny the request. When a request is accepted, you
can see when the contact is online and make calls to him or her. You
can also view his or her personal-profile details.
15
Contacts
2.1 Add a Skype Contact
To add a Skype contact, select “Menu”, then:
1
2
3
4
1. Select “Add Contact”.
5
7
2. Select “Skype”.
8
9
3. Enter the Skype name or full name.
10
11
12
4. Select “OK”.
13
Note:
• After you select “OK” in step 4, an authorization request is sent
to the contact. When it has been sent, a confirmation message is
displayed. The name is added to your Contact list, but is grayed
out, pending authorization by the contact.
16
section
6
Contacts
2.2 Add a SkypeOut Contact
To add a SkypeOut contact, select “Menu”, then:
1. Select “Add Contact”.
2. Select “SkypeOut number”.
3. Enter contact’s name.
4. Enter full phone number.
5. The number is added to your contact list.
17
Contacts
Notes:
• SkypeOut allows you to make calls to traditional landline and mobile
phones. Go to www.skype.com to learn more about SkypeOut.
• SkypeOut numbers (even local numbers) must be entered in the
following format: “00” + “country code” + “area code” + “number”.
You can also use “+” or “011” before the country code. For
example: “+1 555 555 1234”.
• Use the *a/A button to change to lowercase, uppercase, or numeric
entry when entering a contact name and phone number.
1
2
3
4
5
6
7
8
9
10
11
12
13
18
section
• Please note that emergency numbers cannot be called
with SkypeOut.
Contacts
2.3 Search for Contacts
To search for contacts, select “Menu”, then:
1. Select “Search”.
2. Enter the Skype name or full name.
3. Select a name.
4. Select “Options” then select “Add to Contacts”.
Notes:
• Other options available during a search include:
More results—Displays the next 20 names in the list.
Search again—Repeats the search.
Call—Calls the selected name.
View profile—Displays the selected name’s profile.
• You can stop a search at any time by pressing “Stop”.
19
Contacts
2.4 Advanced Options
Advanced options allow you to perform actions related to your
contacts. To use advanced options while in your Contact list,
select “Options”, then:
1. Select “Advanced”.
1
2
3
4
5
7
2. Select an option.
8
9
Options:
• Rename — Changes the name of the contact in your Contact list.
• Remove — Removes the contact from your Contact list.
• Block/Unblock — Blocks or unblocks the contact. When a contact
is blocked, you will always appear offline to him or her and he or
she will not be able to contact you.
• Request Authorization — Sends a new authorization request to the
contact if a previous request was not accepted.
• Call — Calls to the selected contact.
• Send Voicemail — Connects to the voicemail of the
selected contact.
20
10
11
12
13
section
6
Contacts
3. Make and Receive Calls
This chapter tells you how to make and receive calls on your phone.
It also provides information on using voicemail and call history.
The procedures for making and receiving calls apply to any type of
call—Skype-to-Skype calls, directly dialed calls, SkypeOut calls you
receive or send, and SkypeIn calls you receive.
3.1 Make a Call to a Contact
To make a Skype or SkypeOut call to a contact, select “Contacts”, then:
1. Select a contact and then press
on the Phone.
2. Wait for the call to connect, ring, and be answered.
3. Press
to end.
Options (during a call):
• Hold — Places the call on hold.
• Mute/Unmute — Turns the sound off and on.
• Hang Up — Ends the call.
21
Make and Receive Calls
1
3.2 Dial a Direct Call
2
3
To call a number directly:
4
1. Dial the number and then press
.
5
6
3. Press
to end.
7
8
9
Notes:
• SkypeOut allows you to make calls to traditional landline and mobile
phones. Go to www.skype.com to learn more about SkypeOut.
10
• SkypeOut numbers (even local numbers) must be entered in the
following format: “00” + “country code” + “area code” + “number”.
You can also use “+” or “011” before the country code. For
example: “+1 555 555 1234”.
11
• Use the *a/A button to change to lowercase, uppercase, or numeric
entry when dialing a phone number.
Options (during a call):
• Hold — Places the call on hold.
• Mute/Unmute — Turns the sound off and on.
• Hang Up — Ends the call.
22
12
13
section
2. Wait for the call to connect,
ring, and be answered.
Make and Receive Calls
3.3 Receive a Call
When someone calls you, the ringtone sounds and the incoming-call
message is displayed. To receive a Skype or SkypeIn call:
1. Press
2. Press
to receive the call.
to end.
Options (during a call):
• Hold — Places the call on hold.
• Mute/Unmute — Turns the sound off and on.
• Hang Up — Ends the call.
23
Make and Receive Calls
3.4 Divert a Call
You can divert calls to another phone or to your voicemail.
To divert calls, select “Menu”, then:
1
2
3
4
1. Select “Settings”.
5
6
7
8
9
3. Select “Call forwarding”.
10
11
12
4. Select “Yes”.
13
5. Enter the number.
24
section
2. Select “Call divert”.
Make and Receive Calls
Notes:
• You can select the “Forward To” option to change or delete the
number you specified in step 5. User can also select this option to
forward to another Skype name. Please note that the phone will only
“forward” calls when the phone is turned off.
• After you enter a number, the number is saved in the phone’s
memory until you change it. This means that you can turn off call
forwarding, and when you turn it on again, the number is available
to set for forwarding.
• You can choose to forward to a phone number, your voicemail, or both.
• SkypeOut numbers (even local numbers) must be entered in the
following format: “00” + “country code” + “area code” + “number”.
You can also use “+” or “011” before the country code. For
example: “+1 555 555 1234”.
• Use the *a/A button to change to lowercase, uppercase, or numeric
entry when dialing a phone number.
25
Make and Receive Calls
3.5 Send Voicemail
You can send voicemail to contacts who have Skype Voicemail TM.
To send a voicemail, select “Contacts”, then:
1
2
3
4
1. Select a contact.
5
6
7
8
9
3. Record your voicemail. Select “End” when you
have finished.
10
11
12
4. After the voicemail is sent, a message is displayed.
13
26
section
2. Select “Options” and then select “Send voicemail”.
Make and Receive Calls
3.6 Listen to Voicemail
If you have subscribed to a Skype Voicemail TM account, to listen
to your voicemail, select “Menu”, then:
1. Select “History”.
2. Select “Voicemail”.
3. Select an available voicemail to which to listen.
3.7 Record a Voicemail Greeting
To record a greeting for your Skype Voicemail TM, select “Menu”, then:
1. Select “Settings”.
2. Select “Call divert”.
3. Record your voicemail greeting.
27
Make and Receive Calls
3.8 History
Your phone stores a history of missed, incoming, and outgoing calls,
as well as voicemail and authentications. To view your history, select
“Menu”, then:
1. Select “History”.
1
2
3
4
5
6
2. Select the history you want to view.
8
9
Note:
10
• When you are viewing a history, such as missed calls, you
can select “Options” to perform actions such as “Call”,
“Send voicemail”, “Delete”, and so on.
11
12
13
28
section
7
Connect to Networks
4. Connect to Networks
When you power on your phone, it searches for wireless networks in
range. This chapter tells you how to manually configure the settings
your phone uses to search and connect to wireless networks.
4.1 Wireless Networks
To search for wireless networks, select “Menu”, then:
1. Select “Settings”.
2. Select “Network”.
3. Select “Networks in Range”.
4. Select a network.
29
Connect to Networks
Notes:
• Networks that display the
icon require a network-access key.
1
• If no networks are found, an error message is displayed.
Try changing your location and then search again.
2
• You can also search for networks from the power-key menu.
3
“Un-broadcast” or “Hidden” networks can be
manually entered by selecting “Add network
manually” from the “Options” soft-key menu located
at the bottom of the “Select network” list.
4.2 Preferred Networks
1. Select “Settings”.
5
6
7
8
9
10
2. Select “Network”.
11
12
13
3. Select “Preferred networks”.
4. Select a network and then select “Options”.
30
section
To work with your preferred networks, select “Menu”, then:
4
Connect to Networks
Preferred-Network Options:
• Add current—Adds the network that is currently connected to
your preferred list. This is a good way to add open networks
you may frequent.
• Add network manually—Adds a new network to your preferred list.
You must manually define the network name, security options,
and other settings.
• Move up/to top/down—Moves the selected preferred network up
or down in the list, or to the top of the list.
• Configure network—Lists settings for the selected network. You
can view settings for the network, including the network name,
connection type, network key, IP address, data rate, and other
settings. Some settings may be changed.
• Remove network—Deletes the selected network from your preferred list.
• Remove all networks—Deletes all networks from your preferred list.
4.3 Auto-Connect to Open Networks
You can set the phone to automatically find and connect to open
public networks (this is the default setting). Select “Menu”, then:
1. Select “Settings”.
2. Select “Network”.
31
Connect to Networks
1
3. Select “Auto-connect”.
2
3
4
4. Select “Yes” to auto-connect. Select “No”
to turn off auto-connect.
5
6
4.4 Define a New Network
7
9
10
1. Select “Settings”.
11
12
2. Select “Network”.
3. Select “Preferred networks”.
32
13
section
8
You can manually define a new wireless network to which to
connect. Select “Menu”, then:
Personal
Settings
Connect to
Networks
4. Select “Options”.
5. Select “Add network manually”.
6. Enter a network name and press “OK”.
7. Configure the settings of the new network.
33
Personal Settings
5. Personal Settings
This chapter tells you how to define your personal settings, including
your personal-profile details, password, privacy settings, and
notification settings.
5.1 Profile
Your Skype profile displays details about you that other Skype users can
see. While the details in your profile are optional, you may want to define
(at least) your country and city details to help confirm your identity.
To set your profile details, select “Menu”, then:
1
2
3
4
5
6
7
8
10
11
2. Select “My profile”.
12
13
3. Select “Details shown to all”.
34
section
9
1. Select “Status”.
Personal Settings
4. Select the profile detail you want to change.
Notes:
• Select “Private details” in step 3 to change your email address.
• Use the *a/A button to change to lowercase, uppercase, or numeric
entry when entering your profile details.
• Use the left soft key to edit details.
35
Personal Settings
5.2 Change Status
You can view and change the status of account-login details that other
Skype users can see.
1
2
3
4
5
1. Select “Status”.
6
7
2. Select “Change status”.
8
3. Select from the following account-status options.
10
11
Skype Online
Status
Indicates your current Skype online status.
12
13
Online
Offline (not signed in)
Do not Disturb. Indicates you are busy.
Skype Me. Available for calls from anyone.
Invisible. Still online, but unseen by others.
Away. Away for a while.
Not available. Not available for calls.
36
section
9
Personal Settings
5.3 Mood Messages
You can view and change your mood-message details that other Skype
users can see.
1. Select “Status”.
2. Select “Mood message”.
3. Enter your preferred mood message.
37
Personal Settings
5.4 Sign Out
You can sign out from your Skype account following the
procedure below.
1
2
3
4
5
1. Select “Status”.
6
7
2. Select “Sign out”.
8
10
3. Click “Sign out”.
11
12
13
38
section
9
Personal Settings
5.5 Password
To change your password, select “Menu”, then:
1. Select “Settings”.
2. Select “General”.
3. Select “Change password”.
4. Enter your old password.
5. Enter your new password.
39
Personal Settings
Notes:
• Use the *a/A button to change to lowercase, uppercase, or numeric
entry when entering your Skype name and password.
• Passwords can be 4–20 characters. You can use any mix of
upper- and lowercase characters, numbers, and punctuation
marks. You cannot use spaces. Start your name with a number or
punctuation mark, or use your Skype name as a password.
1
2
3
4
5
5.6 Privacy
Skype not only protects your privacy by showing your online presence
only to your contacts, it offers additional privacy settings that allow you
to restrict calls to only those that you want to receive.
1. Select “Settings”.
7
8
9
10
11
12
2. Select “Privacy”.
13
3. Select “Calls”.
40
section
To change your privacy settings, select “Menu”, then:
6
Personal Settings
4. Select a privacy setting.
Note:
• Select “SkypeIn calls” in step 3 to change your privacy settings for
SkypeIn calls.
41
General Settings
6. General Settings
This chapter tells you how to define general phone settings, such as the
displayed language, display settings, time, and date. You can display the
phone-settings information.
6.1 Language
To change your language settings, select “Menu”, then:
1
2
3
4
5
6
7
1. Select “Settings”.
8
9
10
11
12
3. Select “Language”.
4. Select a language.
42
13
section
2. Select “General”.
General Settings
Note:
• After you select a language, a message appears advising that
you must power off the Phone and power it back up again for the
change to take effect.
6.2 Display
To change your display settings, select “Menu”, then:
1. Select “Settings”.
2. Select “Phone settings”.
3. Select the setting you want to change.
Note:
• Use the navigation key left or right to change the brightness
and contrast, or up and down to change the time-out setting.
43
General Settings
6.3 Tones
To change the tone settings, select “Menu”, then:
1
2
3
4
1. Select “Settings”.
5
6
7
2. Select “Tones”.
8
9
10
11
Tone Settings:
• Incoming call alert—Set this as “Ringing”, “Ring once”,
“Beep once”, or “Off”.
12
• Ringing tone—Select the ringtone from the displayed list.
13
• Ringing volume—Set the volume level of the ringing tone.
Use the navigation key left or right to change the volume.
• Vibrating alert—Select “Always”, “When silent”, or “Never”.
• Notification tones—Set this as “Beep”, “Vibrating”, or “Silent”.
• Keypad tones—Set this as either “On” or “Off”.
44
section
3. Select a setting.
General Settings
6.4 Time and Date
To change the time and date settings, select “Menu”, then:
1. Select “Settings”.
2. Select “Time and Date”.
3. Select the setting you want to change.
Note:
• Use the navigation key left and right or up and down to change
the settings.
45
General Settings
6.5 Phone Information
To display phone information, select “Menu”, then:
1
2
3
4
1. Select “Settings”.
5
6
2. Select “Information”.
7
8
9
10
11
Note:
• You can reset all the phone’s settings from the
“Settings > General > reset” menu.
12
13
46
section
3. Scroll to view information.
Appendix A: Specifications
Battery Life
Use Time: 3 hours
Standby Time: 50 hours
LiIon 3.7V minimum 1100mAh
Physical Size
4.53 x 1.93 x 0.71 in. (115 x 49 x 18mm)
Temperature
Operating: 32° to 104° F (0° to 40° C)
Storage: -4° to 158° F (-20° to 70° C)
Humidity
10% to 85% (non-condensing)
Maximum 802.11b/g Channels
FCC/IC: 1–11
ETSI: 1–13
France: 10–13
MKK: 1–14
Operating Frequency
2.4–2.4835GHz (US, Canada, ETSI)
2.4–2.497GHz (Japan)
Data Rate
802.11g: 6-, 9-, 11-, 12-, 18-, 24-, 36-, 48-, 54Mbps (automatic fallback)
802.11b: 1-, 2-, 5.5-, 11Mbps (automatic fallback)
Modulation Type
802.11g: CCK, BPSK, QPSK, OFDM
802.11b: CCK, BPSK, QPSK
RF Output Power
802.11b: 16 dBm
802.11g: 12 dBm
Antenna Gain
5.5 dBi
47
Appendix A: Specifications
1
Emissions
FCC Part 15B Class B
VCCI Class B
EN61000-3-2
EN61000-3-3
2
3
Radio-Signal Certification
FCC Part 15C
EN 300-328
EN 301 489-1
EN 301 489-17
ARIB STD-T66
ARIB STD-33
DGT LP0002
4
5
6
Temperature
IEC 68-2-14
7
Vibration
IEC 68-2-36, IEC 68-2-6
8
Shock
IEC 68-2-29
9
10
Safety
UL/cUL (UL 60950-1)
IEC 60950-1 (CB)
11
12
Standards
IEEE 802.11b/g
13
48
section
Drop
IEC 68-2-32
Compliances
Federal Communication Commission Interference Statement
This equipment has been tested and found to comply with the limits
for a Class B digital device, pursuant to Part 15 of the FCC Rules.
These limits are designed to provide reasonable protection against
harmful interference in a residential installation. This equipment
generates, uses, and can radiate radio frequency energy and, if not
installed and used in accordance with the instructions, may cause
harmful interference to radio communications. However, there is no
guarantee that interference will not occur in a particular installation.
If this equipment does cause harmful interference to radio or
television reception, which can be determined by turning the
equipment off and on, the user is encouraged to try to correct the
interference by one of the following measures:
• Reorient or relocate the receiving antenna
• Increase the separation between the equipment and receiver
• Connect the equipment into an outlet on a circuit different from
that to which the receiver is connected
• Consult the dealer or an experienced radio/TV technician for help
This device complies with Part 15 of the FCC Rules. Operation is
subject to the following two conditions: (1) This device may not cause
harmful interference, and (2) this device must accept any interference
received, including interference that may cause undesired operation.
FCC Caution: Any changes or modifications not expressly approved
by the party responsible for compliance could void the user’s
authority to operate this equipment.
IMPORTANT NOTE:
FCC Radiation Exposure Statement
This equipment complies with FCC radiation exposure limits set forth
for an uncontrolled environment. End users must follow the specific
operating instructions for satisfying RF exposure compliance. This
transmitter must not be co-located or operating in conjunction with
any other antenna or transmitter. IEEE 802.11b or 802.11g operation of
this product in the USA is firmware-limited to channels 1 through 11.
Japan VCCI Class B
49
Compliances
EC Conformance Declaration
Marking by the above symbol indicates compliance with the Essential
Requirements of the R&TTE Directive of the European Union (1999/5/EC).
This equipment meets the following conformance standards:
• EN 60950-1 (IEC 60950-1) - Product Safety
• EN 300 328 - Technical requirements for 2.4GHz radio equipment
• EN 301 489-1, EN 301 489-17 - EMC requirements for radio equipment
This device is intended for use in the following European Community
countries: Requirements for indoor vs. outdoor operation, license
requirements, and allowed channels of operation apply in some
countries as described below:
1
2
3
4
5
• In Italy the end-user must apply for a license from the national
spectrum authority to operate this device outdoors.
6
• In Belgium outdoor operation is only permitted using
the 2.46–2.4835GHz band: Channel 13.
7
• In France outdoor operation is only permitted using
the 2.4–2.454GHz band: Channels 1–7.
8
• Austria • Belgium • Denmark
9
• Finland • France • Germany
10
• Norway • Spain • Sweden
• Switzerland • United Kingdom • Portugal
• Greece • Ireland • Iceland
11
12
50
section
• Italy • Luxembourg • Netherlands
Wi-Fi® Phone
for Skype
Belkin Tech Support
US: 800-223-5546, ext. 2263
310-898-1100, ext. 2263
UK: 0845 607 77 87
Australia: 1800 235 546
New Zealand: 0800 235 546
Singapore: 800 616 1790
Europe: www.belkin.com/support
Belkin International, Inc.
501 West Walnut Street
Los Angeles, CA 90220, USA
310-898-1100
310-898-1111 fax
TM
Belkin B.V.
Boeing Avenue 333
1119 PH Schiphol-Rijk, The Netherlands
+31 (0) 20 654 7300
+31 (0) 20 654 7349 fax
Belkin Ltd.
4 Pioneer Avenue
Tuggerah Business Park
Tuggerah, NSW 2259, Australia
+61 (0) 2 4350 4600
+61 (0) 2 4350 4700 fax
Belkin Ltd.
Express Business Park, Shipton Way
Rushden, NN10 6GL, United Kingdom
+44 (0) 1933 35 2000
+44 (0) 1933 31 2000 fax
© 2007 Belkin International, Inc. All rights reserved. All trade names are registered trademarks of
respective manufacturers listed.
P75237-A