1
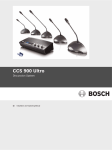
CCS 800 Ultro
Installation and Operating Manual
en
Discussion System
Manuel d’installation et d’utilisation
fr
Système de Discussion
Installations- und Bedienungshandbuch
zh-t
de
Diskussionssystem
Manual de instalación y funcionamiento
zh-s
es
th
nl
ja
it
Sistema de Conferencias
Installatie- en gebruikshandleiding
Discussiesysteem
Installazione e Manuale operativo
Sistema audio congressuale
Page
en.............................................................................................3
Prior to installing or operating this product always read
the Safety Instructions which are available as a separate
document.
fr ............................................................................................24
Avant d 'installer ou d'utiliser ce produit, lisez toujours
les Instructions de sécurité disponibles dans un document distinct.
de .........................................................................................46
Lesen Sie vor Installation oder Inbetriebnahme dieses
Produkts in jedem Fall die Sicherheitshinweise, die als
gesondertes Dokument vorliegen.
es........................................................................... 68
Antes de la instalación o utilización de este producto lea
las Instrucciones de seguridad disponibles en un documento independiente.
nl ............................................................................ 90
Lees voor installatie of gebruik van dit product eerst de
Veiligheidsvoorschriften die in een apart document
staan.
it ............................................................................112
Prima di installare o mettere in funzione questo prodotto, leggere sempre le Istruzioni di sicurezza, che vengono fornite in un documento separato.
zh-t...................................................................... 134
zh-s.....................................................................155
th.......................................................................... 176
ja ..........................................................................198
CCS 800 Ultro | Installation and Operating Manual
1
About this manual
en | 5
2
Introduction
This "Instructions For Use" manual provides all the
information required to install and operate the CCS 800
Ultro Discussion System.
The CCS 800 Ultro Discussion System is a discussion
system for use in meeting and conference venues with a
limited number of participants.
Conventions
A CCS 800 Ultro Discussion System consists of:
• One Control and Power Supply Unit (CPSU).
• Maximum 50 units of which one or more chairman
unit(s).
• Extension cables if required (5m or 10m).
• Peripheral audio and/or telecommunication
equipment.
Warning
Warnings draw attention to instructions that
must be followed to prevent personal injury.
Caution
Cautions draw attention to instructions that
must be followed to prevent damage to the
equipment.
Note
Notes draw attention to special instruction tips
or other useful information.
The CPSU is the heart of the discussion system which
controls the microphones of the chairman and delegate
units as well as providing facilities for audio inputs and
outputs. It also supplies the power for the CPSU itself,
chairman unit(s) and delegate unit(s).
With the use of Digital Acoustic Feedback Suppression
the loudspeaker volume can be increased significantly
before feedback appears. Digital Acoustic Feedback
Suppression is only available in LBB 3310/10.
A delegate unit enables participants to actively join in
a discussion (i.e. speaking and listening) by means of a
microphone, controlled by an on/off button and
a built-in loudspeaker or external headphone.
A chairman unit has the same function as a delegate
unit with the addition of a 'Priority' button, that enables
its operator to control the debate by temporary or
permanently overruling and muting all active
microphones, depending on an internal setting in the
chairman unit.
Bosch Security Systems | 2003-06 | 3922 988 54284
CCS 800 Ultro | Installation and Operating Manual
3
Control and power supply
unit (CPSU)
CCS
800 UL
TRO
2
3
4
1
2
3
1
4
4
3
5
6
7
2
1
0
8
10
4
3
9
5
6
7
2
1
0
8
10
9
1
2 3
Microphone
Trunk in/out
Recorder
4
Line
5 6
Telephone
Insertion
In
Gain
Out
Gain
Digital Acoustic
Feedback Suppression
90-260 V~
7
8
9
11
13
14
10 12
en | 6
4 Speaker volume control of all connected delegate
and chairman units.
5 Volume control of the speaker or headphone of the
CPSU.
6 Headphone connection with 3.5 mm stereo jackplug
socket.
7 Trunk output 1 and 2. For loopthrough connection of
the delegate and chairman units. To each output a
maximum of 25 units can be connected.
The maximum length of cable between the outputs
of the CPSU and the last unit in the system is
100 m (328 ft).
8 Microphone input with gain adjustment for external
microphone. The external microphone will be
muted when the priority button on the chairman unit
is pressed.
9 Recorder input with gain control and recorder
output connection.
10 Line input and output for connecting a PA-system or
other audio equipment.
11 Telephone coupler input and output for connecting a
remote participant.
Figure 3.1
1 Mains On/Off switch.
2 Power On LED indicator (green).
3 Microphone-mode switch.
Open mode with auto switch-off. To select
the maximum number of delegate microphones
to be activated simultaneously (1, 2, 3 or 4).
The microphone automatically switches off if
the speaker does not speak for 30 seconds.
The microphone can manually be switched off
by pushing the button on the delegate unit.
Open mode. To select the maximum number
of delegate microphones to be activated
simultaneously (1, 2, 3 or 4). The microphone
must be switched on or off manually by pushing
the button on the delegate unit.
Override mode. Only one delegate
microphone can be activated. If a new delegate
presses his microphone button, the microphone
unit of the current speaker will be switched off.
Chairman only mode. Only the chairman
units can be activated.
Test mode. For proper installation check.
All the light-rings and LED's of the connected
units will lit, if properly connected.
Bosch Security Systems | 2003-06 | 3922 988 54284
Note
The telephone input signal to the CPSU is not
added to the telephone output signal from the
CPSU to prevent line echo due to feedback.
12 Insertion connection. To connect an external audio
equalizer for speech quality improvement under
difficult acoustic conditions (1 = without equalizer,
0 = insertion connection is internally open,
providing means to connect an external equalizer in
the path from microphone signals to delegate/
chairman loudspeakers).
Note
Position "1" required for internal loop-through
of the microphone signals to the delegate/ chairman unit loudspeakers.
13 Digital Acoustic Feedback Suppression (DAFS)
switch to activate or deactivate the DAFS.
CCS 800 Ultro | Installation and Operating Manual
14 Mains input connection. Use the included mains
cord to connect the CPSU to the mains socket.
In some countries it may be necessary to replace the
supplied mains cable by a local one. Brown = live,
blue = neutral and green/yellow = earth.
(Replacement and colour indication not applicable
to mains cords for North America).
4
Delegate and Chairman unit
en | 7
9 Chairman Priority button. When pressed emits
chime tone, overrules/mutes all active microphones
of delegate units in the system and keeps the
chairman's microphone on for as long as the button
is pressed (setting can be changed in the chairman
unit).
In systems with several chairman units these settings
are independently selectable for each chairman unit.
5
Installation
1
A
4 8 3 7
Warning
The CPSU must be earthed via the mains supply for safety reasons and to ensure the specified audio performance of the system. Do not
open the CPSU and/or delegate/chairman
units, no user serviceable parts inside.
B
2
5
6
9
8
Figure 4.1
5.1 Connecting the delegate and
chairman units
The chairman unit (B) has the same function as a
Delegate unit (A) with the exception of a 'priority'
button.
Trunk in/out
1
Microphone
Recorder
Line
Telephone
Insertion
In
Gain
Out
Gain
Digital Acoustic
Feedback Suppression
90-260 V~
1 Microphone with red illuminated indicator ring,
lights when the microphone is ON.
2 Two 3.5 mm stereo headphone sockets, one at each
side, for headphone or recorder connection.
Insertion of a headphone jack in one or both sockets
automatically mutes the unit's loudspeaker.
3 Built-in loudspeaker, automatically muted when the
microphone is on.
4 Red (LED) indicator above the microphone push
button, for microphone ON indication.
5 7-pole circular female socket for loopthrough
connection to the next unit.
6 2m flying lead connection cable with sturdy
moulded 7-pole circular male connector for
connection to the previous unit or CPSU.
7 Rotary volume control for headphones only.
8 Microphone ON/OFF push-button.
Bosch Security Systems | 2003-06 | 3922 988 54284
4
3
3
1
1
2
2
2
2
3...25
3...25
Figure 5.1
Connect the delegate (2) and chairman (3) units to the
trunk connectors of the CPSU (1). Use an extension
cable (4) if necessary.
CCS 800 Ultro | Installation and Operating Manual
en | 8
5.2 Connecting up to 150 units
CCS 800 Ultro can be used with up to 150 units by
adding maximum 2 additional control units acting as
power supply units only. The system is controlled by the
master LBB 3310. The cables necessary for these
connections can be delivered by your local dealer.
max. 6 x 25 units
CCS
800 ULT
RO
2
3
4
1
2
3
1
4
4
3
5
6
7
2
1
0
8
10
4
3
9
5
6
7
2
1
0
8
10
9
CCS
800 ULT
RO
2
3
4
1
2
3
1
4
4
3
5
6
7
2
1
0
8
10
4
3
9
5
6
7
2
1
0
8
10
9
CCS
800 ULT
RO
2
3
4
1
2
3
1
4
4
3
5
6
7
2
1
0
8
10
4
3
9
5
6
7
2
1
0
8
10
9
Figure 5.2
5.3 Locking the extension cable
5.4 Connecting an external
microphone
Trunk in/out
Microphone
1
Recorder
Line
Telephone
Insertion
In
Gain
Gain
Out
Digital Acoustic
Feedback Suppression
90-260 V~
3
Figure 5.3
2
Cable locking clamps can be used in combination with
the extension cables to prevent accidental
disconnection.
Figure 5.4
Put the external microphone (2) connector in the
microphone input of the CPSU (1).
Adjust the sensitivity by use of the gain control (3).
Use only microphones with balanced output.
The microphone input provides a 12V phantom power
supply.
Bosch Security Systems | 2003-06 | 3922 988 54284
CCS 800 Ultro | Installation and Operating Manual
5.5 Connecting a wireless
microphone
Trunk in/out
Microphone
Recorder
Line
Telephone
en | 9
Connect the cabling of the tape recorder (2) to the
recorder input and output of the CPSU (1). Use the gain
control (3) to adjust the sensitivity of the recorder input
of the CPSU.
Insertion
In
Gain
Out
Gain
Digital Acoustic
Feedback Suppression
90-260 V~
5.7 Connecting a PA-system or
other external equipment
1
Recorder
Line
Telephone
Insertion
In
rece
iver
Gain
Out
Gain
Figure 5.5
Connecting a wireless microphone to the external
microphone input is possible with the included 50dB
attenuator. This way of connection allows interruption
of the wireless microphone by the chairman's priority
button.
Recorder
Line
Telephone
Insertion
In
Out
Gain Gain
3
RECORD
PLAY
In
3
Figure 5.7
Connect a PA-system (3) or other devices (2) to the inand output of the CPSU (1).
Connect audio sources to the line input, a PA amplifier
or other sound-processing devices to the line output.
5.6 Recording/play back the
conversation
1
2
Out
2
Figure 5.6
Bosch Security Systems | 2003-06 | 3922 988 54284
CCS 800 Ultro | Installation and Operating Manual
5.8 Connecting a telephone coupler
1
Recorder
Line
en | 10
5.9 Connecting an equalizer
1
Telephone Insertion
Recorder
Line
Telephone
Insertion
In
In
Gain
Gain
Out
Gain
Out
Gain
3
4
2
2
3
4
Figure 5.8
Figure 5.9
Connect the telephone coupler (2) to the telephone
input and output of the CPSU (1). The telephone
coupler is further connected to the telephone wall
socket (4) and a telephone (3) for dialing.
Put the insertion switch (3) in position "0" and connect
the cabling (2) of the (mono) equalizer (4) to the
insertion input and output of the CPSU (1). Switch (3)
must be in position "1" (loop through) if the insertion
input/output is not used.
A connection to a telephone network must always be
made via a telephone coupler that provides adequate
isolation between the telephone network (PBX) and the
CCS 800 Ultro system. The telephone coupler shall also
meet all relevant requirements for this type of
communication equipment as imposed by law and/or
responsible telecommunication organisations in the
country of use.
5.10 Mains connection
Trunk in/out
1
Microphone
Recorder
Line
Telephone
Insertion
In
Gain
Out
Gain
2
Digital Acoustic
Feedback Suppression
90-260 V~
CCS 800 ULTRO
3
4
1
4
2
2
3
1
4
6
4
8
10
5
6
3
7
9
1
0
Caution
Never try to make a direct connection between
the telephone network and the CCS 800 Ultro
discussion system.
5
3
2
7
2
8
9
1
0
10
5
3
4
Figure 5.10
Use the supplied mains cord set (5) to connect the
CPSU (1) to the mains supply (2). Press the on/off
switch (3) to power up the system, the power on LED (4)
will lit.
Bosch Security Systems | 2003-06 | 3922 988 54284
CCS 800 Ultro | Installation and Operating Manual
6
en | 11
Operation
6.1 Testing the connection of the
delegate and chairman units
3
CCS 800 ULTRO
3
4
1
4
2
2
3
1
4
5
6
4
3
7
1
9
2
8
0
10
5
4
1
2
2
3
1
4
6
3
7
1
9
2
8
0
10
Figure 6.1
Put the mode selector in the test position, all light-ring
indicators and LEDs of the delegate and chairman units
must lit if properly connected.
6.2 Using the microphone button of
the delegate unit
Figure 6.2
Depending on the position of the microphone mode
switch on the CPSU, pressing the microphone button on
a delegate unit will activate the delegate microphone.
Pressing again switches the microphone off.
Bosch Security Systems | 2003-06 | 3922 988 54284
CCS 800 Ultro | Installation and Operating Manual
en | 12
6.3 Using the microphone button of
the chairman unit
1...4
1...4
Figure 6.3
Pressing the microphone button on a chairman unit
always activates the chairman microphone, independent
of the selected microphone mode.
Chairman units don't switch off automatically.
6.5 Priority mode settings in
chairman unit
0
I
I
0
6.4 Using the priority button
1
A
1
2
B
Figure 6.5
A
1
2
B
Figure 6.4
Pressing the priority button of the chairman unit "B"
may be indicated by a chime tone and will deactivate all
active delegate units "A" and activates the chairman
microphone. Release of the button will either leave the
delegate units deactivated or activates them again
(depending on priority mode settings).
Bosch Security Systems | 2003-06 | 3922 988 54284
Remove the cable relief bracket (1) to set the chime and
microphone switches in the required position at priority.
0 = : no chime at priority
1 = : (default) chime at priority
0 = : delegate microphones permanently OFF at
priority
1 = : (default) microphones temporary OFF at
priority
CCS 800 Ultro | Installation and Operating Manual
en | 13
6.6 Open mode
Select the max. number ( 1, 2, 3 or 4) of delegate
microphones which can be active at the same time.
Note
Chairmen can always switch on and off their
microphones and are not included in the max.
number.
4
3
1
2
2
3
1
4
CCS 800 ULTRO
3
4
1
4
2
2
3
1
4
5
4
5
6
3
7
7
2
8
9
1
0
1...4
6
3
2
8
9
1
0
10
10
1...4
Figure 6.6
themselves at the same time. If the speaker is silent for
approximately 30 sec. the active microphone switches
off automatically.
6.7 Open mode with auto switch-off
Select the max. number (1, 2, 3 or 4) of delegate
microphones which can be activated by the delegates
3
CCS 800 ULTRO
3
4
1
4
2
2
3
1
4
5
4
8
1...4
Figure 6.7
Bosch Security Systems | 2003-06 | 3922 988 54284
10
5
6
3
7
9
1
0
1...4
6
3
2
7
2
8
9
1
0
10
4
1
2
2
3
1
4
CCS 800 Ultro | Installation and Operating Manual
en | 14
6.8 Override mode
3
4
1
2
2
3
1
4
CCS 800 ULTRO
3
4
1
4
2
2
3
1
4
6
4
5
7
2
8
8
9
1
0
10
A
Each time a delegate presses the microphone button on
a delegate unit, it will override the currently active
delegate unit. So only one delegate microphone is active
at the same time. Chairman microphones can always be
switched on.
6.9 Chairman only mode
3
4
1
2
2
3
1
4
CCS 800 ULTRO
3
1
4
2
2
3
1
4
6
3
4
8
9
1
10
5
6
3
7
2
0
A
5
7
2
8
9
1
0
10
B
Figure 6.8
4
6
3
7
9
1
0
A
5
3
2
10
B
Figure 6.9
Only the chairman units (B) can be activated. Delegates
(A) can not switch on their microphone.
Bosch Security Systems | 2003-06 | 3922 988 54284
A
B
CCS 800 Ultro | Installation and Operating Manual
en | 15
6.10 Volume control of the delegate
and chairman units
4
5
6
3
7
2
CCS 800 ULTRO
3
4
1
4
2
2
3
1
4
5
4
5
6
3
4
8
9
1
5
0
6
3
7
2
0
8
9
1
0
10
4
9
0
6
7
2
8
1
5
3
7
2
8
9
1
0
10
1
10
7
2
10
6
3
8
9
1
2
10
1
2
Figure 6.10
Turn the volume control (1) to set the volume of the
loudspeakers of the delegate and chairman units (2).
Adjust for maximum level without feedback. In the fully
counterclockwise position all loudspeakers are muted.
6.11 Using Digital Acoustic
Feedback Suppression (DAFS)
Trunk in/out
Microphone
Recorder
Line
Telephone
Insertion
In
Gain
Gain
Out
Digital Acoustic
Feedback Suppression
90-260 V~
1
Figure 6.11
Put the Digital Acoustic Feedback Suppression switch
(1) in position "0" and adjust the loudspeakers for
maximum level without feedback. Switch Digital
Acoustic Feedback Suppression on by changing the
switch (1) to position "1". Then set the loudspeaker
volume to the required level, but increasing the volume
level more than 2 or 3 steps is not recommended.
Bosch Security Systems | 2003-06 | 3922 988 54284
Note
With the use of Digital Acoustic Feedback
Suppression the loudspeaker volume can be
increased significantly before acoustic feedback
appears. The maximum achievable volume gain
depends on the acoustical environment and
positioning of the units. Artefacts may occur
during microphone switching at very high
volume levels. In general the achievable
increased volume gain is 4 - 6 dB.
The Digital Acoustic Feedback Suppression is
optimised for speech.
CCS 800 Ultro | Installation and Operating Manual
en | 16
6.12 Monitoring volume control
5
4
6
3
7
2
9
1
CCS 800 ULTRO
3
4
1
4
2
2
3
1
4
5
6
3
4
2
8
9
1
10
5
0
6
3
7
0
CCS
8
2
8
9
1
0
10
CCS
800 UL
TRO
2
3
4
10
7
800 UL
TRO
1
2
2
3
1
3
4
1
2
3
1
4
4
3
5
4
6
7
2
1
0
4
3
5
6
7
2
8
10
4
3
9
1
0
5
6
7
2
1
0
8
10
10
4
3
9
9
5
6
7
2
1
0
8
8
10
9
Figure 6.12
Use the built-in loudspeaker or a headphone to monitor
the discussion. Adjust the volume using the monitoring
volume control. The maximum level is controlled by
the setting of the volume control for delegate and
chairman units.
6.13 Using a headphone
CCS 800 ULTRO
3
4
1
4
2
2
3
1
4
5
6
3
4
8
9
1
0
10
2
5
6
3
7
2
7
2
8
9
1
0
10
1
Figure 6.13
Use the rotary volume control (1) to adjust the volume
of the headphones connected to the left and/or right
side of the units. Inserting a headphone jack mutes the
loudspeaker.
The maximum level depends on the setting of the
volume control (2) on the CPSU.
Bosch Security Systems | 2003-06 | 3922 988 54284
CCS 800 Ultro | Installation and Operating Manual
7
Troubleshooting
Temporary no microphone reaction, and no sound or
distorted sound from unit loudspeakers
en | 17
Part of system not working
•
•
•
•
Possible cause
Trunk-line overload.
Solution
Reduce load on the trunklines by reducing the
number of units, and/or the length of the trunk
cables.
No sound via delegate/chairman loudspeakers
•
Acoustic Feedback
•
•
•
•
•
•
•
Possible cause
Loudspeaker volume too loud.
Solution
- Reduce gain using volume control for delegate/
chairman unit loudspeakers on CPSU.
- If available, switch on Digital Acoustic Feedback
Suppression.
Possible cause
Distance between units too small (microphone to
loudspeaker of other units).
Solution
- Increase distance between units.
- If available, switch on Digital Acoustic Feedback
Suppression.
Possible cause
Too close to microphone units, when using open
headphones.
Solution
- Increase the distance between headphone and
microphone or disconnect headphones when not
in use.
- If available, switch on Digital Acoustic Feedback
Suppression.
Bosch Security Systems | 2003-06 | 3922 988 54284
Possible cause
Interrupted trunk-line cabling.
Solution
Check the trunk-line cabling connections between
the units and the CPSU, also use the test function on
the CPSU.
•
•
•
Possible cause
Insertion switch in wrong position.
Solution
Check if insertion switch at the rear of the CPSU is
in position "1".
Possible cause
Volume control position.
Solution
Check if the volume control for delegate/chairman
loudspeakers on the CPSU is not in the fully counter
clockwise position.
Possible cause
Microphone active or headphone connected.
Note
Units with active microphone or connected
headphone(s) have their loudspeakers switched
off.
CCS 800 Ultro | Installation and Operating Manual
8
Technical data
8.1 System Electrical and ElectroAcoustical Characteristics
8.1.1 The CPSU
Mains voltage:
100 - 240 Vac, ± 10%, 50/60 Hz
Current consumption: max. 0.9 A (100 Vac) - 0.3 A
(240 Vac)
DC supply to
contribution units:
24V +/- 1V (current limited)
Line, telephone coupler and insertion in/outputs
(unbalanced)
Input sensitivity:
-14 dBV/ +11dBV
(nominal/maximum)
Input impedance:
33 kΩ
Output level:
-14 dBV/ +11dBV
(nominal/maximum)
Output impedance:
500 Ω
Recorder in/output (unbalanced) - mono
Input sensitivity:
- 20 dBV/ + 5 dBV
(nominal/maximum)
Input sensitivity
adjustment:
+0 / -20 dB
Input impedance:
47 kΩ (for L and R channel)
Output level:
- 20 dBV/ + 5 dBV
(nominal/maximum)
Output impedance:
500 Ω
External microphone input (balanced)
Input sensitivity:
- 56 dBV
(- 6 dBV via included adapter).
Input sensitivity
adjustment:
+6 dB / -6 dB
Phantom supply:
12V +/- 1V, 2 x 680 Ω (+/-2%).
(Phantom supply is not available
when using the included
adapter).
Bosch Security Systems | 2003-06 | 3922 988 54284
en | 18
Monitor loudspeaker
Output level at 0.5 m: 72 dB SPL/ 82 dB SPL
(nominal/maximum)
Frequency response: 320 Hz ... 10 kHz
(-10 dB, ref. 1kHz)
Impedance:
25 Ω
Volume control:
50 dB attenuation range
Monitor headphone
Output level:
Output impedance:
Output connection:
Allowed impedance:
Volume control:
-8 dBV/ +2 dBV
(nominal/maximum)
22 Ω
stereo jack socket (mono output)
any impedance
50 dB attenuation range
Loudspeaker volume control
For delegate and
chairman units:
mute (50 dB att.) + 10 steps of
1.9 dB
Limiter threshold level
To unit loudspeaker
/headphone:
10 dB above nominal level
Gain reduction due to NOM
(Number of Open
Microphones):
√NOM +/- 1 dB
Auto microphone switch-off function selectable on
the Control and Power Supply Unit
After approximately 30 sec. not speaking (sound level
below 64 dB SPL) the microphone is automatically
switched off
System limits
Number of delegate/chairman units connected to CPSU
Maximum in total:
50
Maximum per
trunk output:
25
Maximum trunk length
using CCS 800 Ultro
standard cabling:
100 m (328 ft)
CCS 800 Ultro | Installation and Operating Manual
en | 19
8.1.2 Combined Units
8.3 General Data
Delegate microphones with transmission links to
delegate headphones and auxiliary outputs.
8.3.1 System Environmental Conditions
General
Frequency response:
Temperature range
Storage and transport: -20 to +70°C (-4 to +158°F)
Operational:
+5 to +45°C (+41 to 113°F)
125 Hz - 12.5 kHz tolerances
acc. to IEC 914 standard
Total harmonic distortion at overload
at nominal input
level (85 dB SPL):
< 0.5%
at max. input
level (110 dB SPL):
< 3%
8.2 Mechanical Data
8.2.1 Control and Power Supply Unit
Mounting:
free standing on a table top or
mounted in a 19" rack (requires
3HU (Height Units) with bracket
set LBB 3311/00). Information
about how to make the necessary
brackets for table flush mounting
is included.
Dimensions(HxWxD): 84 x 361 x 143 mm (with 5.5
mm feet)
3.4 x 14.2 x 5.6 in (with 0.22 in
feet).
Weight:
/00 version 1.5 kg (3.3 lb)
/10 version 1.7 kg (3.7 lb)
8.2.2Delegate/Chairman Units
Dimensions (w x d x h)
without mic.:
124 x 172 x 63 mm
(4.9 x 6.8 x 2.5 in)
Length of mic. from
mounting surface:
/00 version, 313 mm (12.3 in)
/50 version, 488 mm (19.2 in)
Weight:
0.9 kg (2.0 lb)
Bosch Security Systems | 2003-06 | 3922 988 54284
Ambient humidity
Operational:
Storage and transport:
Air pressure:
Safety:
Resistance to shock,
vibration, bump
and transport:
EMC emission:
EMC immunity:
EMC approvals:
ESD:
Mains harmonics:
Transport:
20% - 95% RH
0% - 99% RH
600 mBar - 1100 mBar
acc. to EN 60065 and acc. to
UL6500
acc. to IEC68, 5G acceleration
acc. to EN 55103-1 and FCC
rules (part 15), class A
acc. to EN 55103-2
affixed with the CE mark EC
directive 89/336 EEC
acc. to IEC 801-2 and 801-4
EN 61000-3-2 and EN61000-3-3
UN-D 1400
CCS 800 Ultro | Installation and Operating Manual
8.3.2Equipment Range
Control and power
supply unit:
LBB 3310/00
LBB 3310/10 (with Digital
Acoustic Feedback Suppression)
19" rack mounting set: LBB 3311/00
Bracket for flush
mounting:
can be made locally according to
the illustration in 9 Appendix
Delegate unit(s):
LBB 3330/00
LBB 3330/50
(with long microphone)
Chairman unit(s) :
LBB 3331/00
LBB 3331/50
(with long microphone)
Installation cable with
connectors
LBB 3316/00 (100 m)
Extension cables :
LBB 3316/05 (5m)
LBB 3316/10 (10m)
Cable locking clamps :LBB 4117/00 (set of 25 pieces)
Transport suitcase for
10 delegate/chairman
units with standard
microphone:
LBB 3312/00
Transport suitcase for
one CPSU, 6 delegate/
chairman units with
standard and/or long
microphone and some
extension cables:
LBB 3312/10
Bosch Security Systems | 2003-06 | 3922 988 54284
en | 20
CCS 800 Ultro | Installation and Operating Manual
9
en | 21
Appendix
9.1 Pin Configuration
CCS 800 ULTRO
3
4
1
4
2
2
3
1
4
Microphone
Recorder
Line
Telephone
6
4
5
6
3
7
8
9
1
0
Trunk in/out
5
3
2
7
2
8
9
1
0
10
10
Insertion
In
Gain
Out
Gain
Digital Acoustic
Feedback Suppression
90-260 V~
7
2
6
1 3
3
5
2
A
4
2
1
B
1
C
1
2
3
D
123
E
A
Figure 9.1
9.1.1 Trunk Connections (A)
9.1.2 External Microphone (XLR) (B)
1
2
3
4
5
6
7
1 GND
2 Signal +
3 Signal -
Audio contribution line
GND
Audio distribution line
Control line 1
Control line 2
V+ supply
V- supply
(0V, phantom supply)
(+12V, phantom supply)
(+12V, phantom supply)
phantom supply acc. to
DIN45596
9.1.3 CINCH Connector (C)
1 Signal +
2 Screen
9.1.4 Mains Connector (D)
1 Mains
2 Earth
3 Mains
Bosch Security Systems | 2003-06 | 3922 988 54284
CCS 800 Ultro | Installation and Operating Manual
9.1.5 Headphone Jack-plug (3.5mm) (E)
1 Tip
2 Ring
3 Sleeve
- Signal +
- Signal - Electrical earth/screen
9.1.6 Mounting of connectors,
LBB 3316/00
Yellow
en | 22
9.2 Mounting Instructions
The CPSU can be attached in three different ways:
• In a 19" rack making use of the 19" rack mounting
set LBB 3311/00. Place a blank 1HU panel above the
CPSU to have sufficient space for cable connections.
• Mounted into a table using the flush mount bracket.
• On a table. Therefore drill four holes in the table and
fasten the CPSU with four M3 screws (B).
The delegate and chairman units can only be attached
on a table. Therefore drill two holes in the table and
fasten the unit with two M3 screws (A).
Drain
Shield
Shield
CC
S 80
0U
LTR
O
Green
2
5
4
3
1
7
6
Violet
5 2 4
3
1
7 6
Blue
Red
Figure 9.3
White
4+0.5
0 (4x)
Ø3.5 (2x)
95.8
Figure 9.2
34
342.5
A
B
Figure 9.4
Bosch Security Systems | 2003-06 | 3922 988 54284
CCS 800 Ultro | Installation and Operating Manual
en | 23
9.3 Bracket for Flush Mounting
The drawing below gives the necessary information how
to make a bracket for flush mounting the CPSU into a
table.
2+0.2
52
0.5
90˚
ø8.6(4x)
3.7 (2x)
4.6 (2x)
130
50.3
234.5
135
95.8
175
2.5 (6X)
R=2 +0.5
0
(4x)
4+0.5
0 (4x)
Figure 9.5
Bosch Security Systems | 2003-06 | 3922 988 54284
461
342.5
421
328.5
362+0.5
0
7
59.3
49.5
20
6
47.8
64
29.5
For more information please visit www.boschsecuritysystems.com
© 2003 Bosch Security Systems B.V.
Data subject to change without notice
June 03 | 3922 988 54284