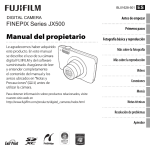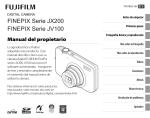
1
Start Here
Easy Setup Instructions
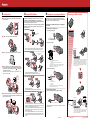
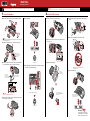
Unpack the Machine
• Please confirm the included items against the illustration printed on the lid of the packing box.
QT5-0849-V03
1 Prepare the Machine
Important
When cleaning the exterior of the machine, use a soft cloth to wipe it gently. For details, refer to “Cleaning Your Machine” in the User’s Guide.
2 Install the FINE Cartridge
a Open the Printer Cover and remove the protective materials.
a Lift the Printer Cover until it locks into place.
e Press [ON/OFF].
d Insert the FINE Cartridge slightly slanted into the Cartridge
Holder.
e Push up the FINE Cartridge until it clicks into place.
Note
The actual protective materials may differ in shape, quantity, and position from the ones
shown in the illustration above.
b When the Printer Cover is opened, the Cartridge Holder will
move to the left.
b Connect the Handset to the jack, and place it in its cradle.
There is a groove
on the bottom of the
machine to hold the
handset cord.
c Connect the telephone line and any necessary external device.
Press [Start/Copy].
c Prepare the FINE Cartridge.
For more details, see “Step 5” on the back of this sheet.
f Use [{] or [}] on the Operation Panel to select the language
for the LCD, then press [Start/Copy].
DO NOT put the head of the FINE Cartridge downward
into the Cartridge Holder.
Remove the
FINE Cartridge
from its package.
You can connect
an external device
(telephone or answering
machine) if necessary.
f Close the Printer Cover.
Connect the telephone
line cord to the wall jack.
Important
Be sure to use supplied telephone line cable.
Press [{] or [}] to select the language.
Remove the protective tape.
When doing so, DO NOT TOUCH
the metallic areas.
d Plug the power cord into the back of the machine and connect
Wait until the preparation
operation is completed: this takes
about one to two minutes.
the other end to a power outlet.
DO NO TOUCH.
Press [Start/Copy].
Turn Over
For the instructions for Loading Paper,
Setting RECEIVE Mode, Connecting the
Machine, and Replacing the Cartridge.
3 Loading Paper
4 Setting RECEIVE Mode
5 Examples of Connecting the Machine
a Open the Document Cover and extend the Paper Support to
Press [Receive Mode/Resolution] to change the receive mode.
For details on ANS.MACHINE MODE, refer to “Receiving
Documents with an Answering Machine: ANS.MACHINE MODE”
in “Receiving Faxes” of the User’s Guide.
For details on DRPD, refer to “Receiving with a DRPD (Distinctive
Ring Pattern Detection) service: DRPD” in “Receiving Faxes” of
the User’s Guide.
Typical examples of connecting the machine are described
below. The machine cannot send/receive faxes if the connection
is incorrect. Connect the machine correctly.
support the paper.
●
MANUAL Mode
Replacing the FINE Cartridge
The following are examples of the type of connecting that
can be made.
●
Connecting to the Telephone Line
● Connecting to an Analog Line
Pick up the Handset to
answer the call.
b Squeeze, then slide the Paper Guide to the left.
(A)
(A) Telephone line (analog)
● Connecting to an ADSL
Press [Start/Copy].
Rings for every call, regardless of whether the call is a fax call or a voice
call. For a fax call, you have to manually activate reception of the fax.
c Tap the edge of the stack on a flat surface to even the stack.
●
The LED lights up.
(C)
(B)
FAX/TEL Mode
Receives documents
automatically.
(D)
(E)
(B) Asymmetric Digital Subscriber Line
(C) Splitter
(D) ADSL modem (splitter may be built-in to the modem)
(E) Computer
For details on ADSL connection and settings, see the manual supplied with
your ADSL modem. The illustrated connection is an example and is not
guaranteed to suit every connecting condition.
d Insert the stack face up into the Multi-Purpose Tray
, and
align the right edge of the stack with the right side of the Multisnugly against
Purpose Tray. Then slide the Paper Guide
the left edge of the stack.
When the ink level is low, the LED lights up. In this state the FAX will
receive documents to memory (up to 30 transactions or 120 pages
(FAX-JX200/JX201: 60 pages)). To print all unprinted documents
in memory select <PRINT ALL NEW RX> from the <MEMORY
REFERENCE> menu. After printing, delete unnecessary faxes from
the memory. Refer to “Documents Stored in Memory” in “Receiving
Faxes” of the User’s Guide.
● Connecting to an ISDN Line
Pick up the Handset to
answer the call.
Be careful not to press the Paper Guide strongly against the stack, or the
paper will not be fed properly.
Automatically switches between fax and voice calls.
Receives documents automatically and rings for voice calls.
●
(G)
FAX ONLY Mode
(F)
(H)
Press [MENU].
(I)
(F)
(G)
(H)
(I)
ISDN line
Terminal adapter, etc.
Analog port
Computer
For details on ISDN connection and settings, see the manuals supplied
with your terminal adapter or dial-up router.
Answers all calls as fax calls.
Receives documents automatically and disconnects voice calls.
●
TAM Mode (FAX-JX500/FAX-JX300 only)
●
Connecting External Devices
● Connecting a Telephone or Answering Machine Directly
e Adjust the Document Guide to the width of the document, and
gently insert the top of the document face up into the Document
Tray until you hear a beep.
The TAM Lamp lights up.
The LED blinks.
(J)
Record an outgoing message.
Press [TAM] to set TAM MODE. The fax receives documents automatically.
To hear the recorded messages, press [Play]. Refer to “Playing Telephone
Messages” in “Using TAM Mode” of the User’s Guide.
You may change the number of times the phone rings before the answering
machine answers a call. Refer to “Setting TOLL SAVER” in “Using TAM
Mode” of the User’s Guide.
If the LCD displays “TAM MEMORY FULL” when you turn the answering
system on, please delete some of the messages stored in memory. Refer
to “Deleting a Document from Memory” in “Receiving Faxes” of the User’s
Guide.
(J) Telephone or Answering machine
Replace the FINE
Cartridge.
Take off the protective tape on the back of the machine when you connect
an external device.
When the ink is empty, the LED blinks. When this occurs, you cannot
print out any documents in memory. Replace the FINE Cartridge
with new one. Refer to “Replacing a FINE Cartridge” in “Routine
Maintenance” of the User’s Guide.
XXXXXXXX
© CANON INC. 2007
PRINTED IN THAILAND