1
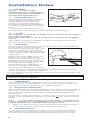
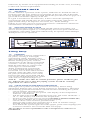
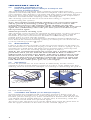
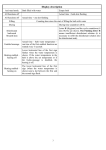
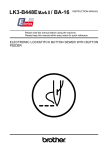
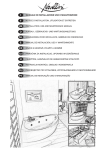
WHISPER AIRPOOL™
WHISPER WHIRLPOOL™
WHISPER COMBIPOOL™
WHISPER COMBIPOOL PLUS™
Fitting • Use
NOTE:
Please keep these instructions in a safe
place for future reference.
2
Installation Notes
1.
FITTING
NOTE: A system bath is
installed at a greater height than a
‘normal’ bath due to the addition
of frame and adjustable legs.
1.1 UNPACKING (figure 1)
To prevent damage during transport
and installation, the edges of the
system baths are provided with
protective tape before the bath is
enveloped in shrink-rap and packed
in a sturdy cardboard box or wooden
crate.
1
Unpack the system bath and remove
the tape. Make sure the bath is undamaged before installing it.
1.2
LIFTING
In moving the system bath, it should only be picked up by the edges of
the bath or the frame.
Never lift up the unit by the air pump, by the pump or by the piping
system!
The producer assumes no liability for damage resulting from incorrect
transport or incorrect handling.
1.3 POSITIONING
Remove any unwanted matter from the place where the system bath will
be placed (dust, cement remnants,
etc.) before positioning the bath. This
will prevent damage to the system
which could be caused by sucking up
/ attracting dirt, dust, etc. through the
system parts.
Position the system bath at the place
where it is to be installed. Use a
spirit level to make sure everything is
perfectly horizontal. The spirit level
should be set on the edge of the bath,
not on the bottom! (figure 2).
Check that all legs stand firmly on
the floor. If needed, adjust them.
2
All electrical equipment, e.g. supply
switch, wiring, etc., should be installed a minimum of 20 mm from the
supporting surface beneath the appliance.
Unit is supplied with approximate 1.8 metres of 3-core electrical flex cable
for installation.
NOTE: If your system BATH is supplied with a HEATER then a 15
amp power point is required.
1.4
CONNECTING THE WATER SUPPLY AND DRAIN/OVERFLOW
COMBINATION
Connect the pre-assembled drain/overflow combination to the drain
and then check for watertightness. Connection of the water supply and
drainage may only be carried out by a qualified person.
1.5 ELECTRICAL CONNECTION
The installation of electrical equipment and any repairs of such equipment
must only be done by a recognized installer. The electrical installation
and connection must be in accordance with the National Regulatory
requirements.
Connect the system to the mains. As soon as the system is connected, the
display of the temperature indicator will indicate . The system is ready
for use.
N.B.:
If you switch off the power to the system, you should wait
at least 10 seconds before switching the power back on again so as to
prevent malfunctions. This allows the system to re-set.
1.
Means for disconnection must be incorporated in the fixed wiring in
accordance with the wiring rules, via three pin plug set.
1.6 EARTHING FACILITY
On the system’s frame there is a connection for the potential bonding.
This and all metal components which are not part of the system must
be connected to the equipotential bonding that must be present in the
3
bathroom, by means of an equipotential bonding of 4 mm2 wire, according
to the local current requirements.
IMPORTANT NOTE
1.7 AIR SUPPLY
For the effective operation of the system, sufficient air should be able to
be drawn into the unit. If this is not possible (at the rear side of the bath,
for example), the housing of the bath should be provided with air gaps or a
grid with a minimum capacity of 40 cm2.
If a grid is mounted in the bathroom, it has to meet the splashproof
requirements and should only be removable using tools. The grid or air
gaps should always be kept free of towels, etc., while bathing.
Failure to provide a service access panel and air ventialation violates the
manufacturers instalation requirements.
1.8 SUPPORT/CASING ACCESS
The technical parts of the system bath should remain accessible via a
service access panel (figure 3). Consequently the access panel should be
completely removable. This panel should only be opened whilst Whisper
Whirlpool is not in operation.
3
Tiling Strip
1.9 FINISHING
You should use a silicon compound in
the joints, creating a watertight,
permanently elastic finishing joint.
This joint allows the material to settle.
Before making the joint, read the
instructions on the silicon compound
container - the use of tileing strip to
flash the bath edge to contact with
wall edges is recommended.
When installing the system bath
in a niche and/or finishing with a
horizontal row of tiles which extend
partially under the edge of the bath,
the joint (a minimum of 4 to 5 mm)
between the edge of the bath and the
row of tiles should likewise be sealed
with silicon compound (figure 4).
4
NOTE: Make sure that no cement particles, pieces of silicon glue
etc. fall into the jets or into the piping system. It will be virtually
impossible to remove them!
1.10 CHECK PRIOR TO BUILDING & SHEETING IN
Although your system was fully tested in the factory before being
dispatched, damage may occur during transport or installation. Therefore
the following procedure should be carried out after installing the system:
-
Check whether the bath is clean
Switch on the power to the system. The display of the temperature
indicator will indicate .
Fill the bath with water to well above the jets. The water should be ±
38 °C. The display will indicate the temperature
Switch on the system (see the section INSTRUCTIONS FOR USE)
Now check whether the system functions properly
Check all the water seals for possible leaks
Then put the system into operation for at least 10 minutes and go
through all the functions at least once
Now check the system again for leaks (pipes, joints and couplings) for
at least 10 minutes. Do not let the bath run empty!
The producer is not responsible for the consequences of incorrect
installation.
4
Consumer Information
2.
INSTRUCTIONS FOR USE
Your system bath is made of high-quality synthetic material. Coloured
throughout, and it has a hard, smooth surface.
Please note:
-
2.1.
This appliance is not intended for use by persons with reduced
physical, sensory or mental capabilities, or lack of experience or
knowledge, unless they have been given supervision or instruction
concerning use of the appliance by a person responsible for their
safety.
People who have difficulty with walking or have another handicap
must be extra careful when getting in and out!
Children should be supervised to ensure that they do not play with the
appliance.
Fill the bath with water to 75mm above the jets.
REMOTE CONTROL
Temperature indicator
When there is no water in the bath, the display of the temperature indicator
will indicate . When the bath is filled with water, the temperature of the
water will appear on the temperature indicator, thanks to a sensor at the
base of the side of the bath. The indicator is also a receiver. It displays
the selected massage functions and information about the progress of the
cleaning cycle (blow-drying).
The display will start to flash if the water temperature exceeds 40 °C.
2.2
LEGEND
Transmission indicator
(lights up when a symbol is touched)
Controlable turbulence
Controlable air intensity
Air massage
On/off
No function
Water massage + venturi air
Water massage / Water massage + air / OFF
Lighting
On/off
System / cleaning cycle
On/off
5
2.3.
OVERVIEW FUNCTIONS RIM CONTROL
REMOTE CONTROL
LEGEND
WHISPER
AIRPOOL
●
WHISPER
WHIRLPOOL
●
WHISPER
COMBIPOOL
WHISPER
COMBIPOOL PLUS
●
●
●
●
●
●
●
●
●
●
●
●
●
●
●
●
●
●
●
Back/feet jets
(Standard for Whisper Combipool Plus)
The jets can be adjusted manually, in three positions: ‘booster’, ‘bubbling’
and ‘closed’. For the functions ‘booster’ and ‘bubbling’ you can switch
on only water or water + air, while the air (optional) is continuously
adjustable. In the ‘closed’ position you switch off the water, thus
increasing the supply from the other jets.
Heater
(Optional for Whisper Whirlpool, Whisper Combipool and Whisper Combipool Plus)
The heater will switch on automatically when the water massage is on
and switch off automatically when the water massage is off. The heater is
supplied with a thermostat that regulates the temperature of the bath water
on approx. 38˚C (factory setting). Don’t use salt and extremely dirty water
in the bath, to avoid problems with the heater.
6
IMPORTANT NOTE
2.4.
HYGIENIC CLEANING CYCLE
(Only on Whisper Airpool, Whisper Combipool and
Whisper Combipool Plus)
The system bath is equipped with a cleaning system that goes into
operation automatically after the bath has emptied. After the waiting period
of 12 minutes, the cleaning cycle starts and lasts nearly 6 minutes. During
the cycle the system pipes are blown dry. The display of the temperature
indicator will indicate the elapsing of the cleaning time.
The cleaning cycle will also be activated after taking a ’regular’ bath
(without using the system).
Note: The waiting period and the cleaning cycle can be interrupted
and by-passed by touching symbol on the remote control. The
system then returns to the stand-by mode. Waiting period and
cleaning cycle are also interrupted and by-passed when the water level
again rises (sufficiently) above the jets. The system can then be put
into operation again.
Manual operation cleaning cycle
The cleaning cycle can also be operated by hand when you have not used
the bath. This can be done by touching symbol once. This could be
desirable if you have showered in the bath or if something else has
caused water to come into the system.
During the cleaning cycle the discharge should be opened. Should you
have started the manual cleaning cycle by accident you can deactivate the
cycle by touching symbol again.
2.5. MAINTENANCE
Little or no dirt at all can lodge on the non-porous surface of the bath, so
that maintenance is limited to wiping it with a wet cloth or sponge. If you
use bath-oil or bath-foam, the bath can be cleaned with a soft soap and
clean water. Never use scouring agents (figures 5 and 6)!
NOTE: We recommend rinsing the system once a month with soda, in
particular when you use bath oil. This should be done as follows:
Fill the bath to normal water height. Add approx. 500 grams of soda
dissolved in warm water. Run the system for 10 minutes. Switch off
the system and wait for 10 minutes. Switch the system on again and
run the system for another 10 minutes. Let the water run out of the
bath. Rinse the visible parts (jets, etc.) thoroughly.
2.6. AIR SUPPLY
It must be possible for air to be drawn in sufficiently for the correct
operation of the system bath by means of a grill or vents. Make sure that
nothing, such as a towel for example, is covering or obstructing the grill or
5
6
the vent whilst bathing.
2.7 CLEANING THE DRAIN (not for Whisper Airpool)
System baths are equipped with a specially protective drain cover. If
the openings in the drain cover close up during use, e.g., through dirt or
because you are sitting on it, water circulation is deactivated. In this case
you should switch off the bath for 1 minute and, if necessary, clean the
drain. Then set the bath into operation again.
To remove dirt, the drain cover can be lifted away from the drain hole so
that the upper chamber of the drain can be cleaned (figure 7).
7
7
2.8. DISASSEMBLY OF THE JETS
The jets can be dismantled if desired.
In case your bath is provided with back/feet jets, (see figures 8 and 9).
Remove the safety ring from the jet. Then remove the jet.
In case your bath is provided with side jets, (see figures 10 and 11).
8
9
10
11
In case your bath is provided with bottom jets (AIRSTONE’S) and remove
for cleaning. You can turn them loose by using the key supplied (figure
12).
NOTE:
The AIRSTONE’S are dishwasher safe.
12
8
2.9 REPLACING THE BATTERY IN THE REMOTE CONTROL
When the remote control batteries begin to fail, the distance at which the
receiver responds to signals from the remote control becomes increasingly
smaller. The remote control will indicate on the screen that the batteries are
almost empty. To replace the batteries, remove the cover on the front of the
remote control by using a coin to loosen the screw on the cap (turning anticlockwise). After replacing the batteries, retighten the screw on the cover
(figure 13). Do this with care and do not damage the sealing ring. Suitable
batteries (AAA type) for the remote control are the following: Alkaline 1.5
V; Duracell AAA, or similar brands.
13
2.10 REPLACING A HALOGEN LAMP
(if the underwater lighting is fitted)
In case your bath is provided with Quaryl Unique lighting (figure 14a +
14b) you can disassemble it, with the key supplied.
Before replacing a halogen lamp
switch off the power to the system
by means of the cut-off switch.
To replace a halogen bulb, the
following procedure should be
followed.
1.
2.
3.
4.
Remove ring 1 by turning it to
the left.
Remove the flange and glass.
Change the lamp. Take care:
never touch the halogen bulb
with the bare fingers.
Repeat the above actions (1, 2)
in reverse order.
14a
Note:
Spotlights have a
20 Watt, 12 Volt lamps. These
lamps are available from your
electrician and at specialised
lighting shops.
2.11 QUARYL®
Quaryl® baths easily withstand
all normal non-abrasive cleaning
detergents used in the household
without the surface of the Quaryl®
bath being affected.
14b
2.12 MOVING
If you move house, please pass on this document to the new owners of
the system bath. We will be pleased to send you our latest literature under
these circumstances.
9
Technical Handling
Specifications
3. TECHNICAL SPECIFICATIONS
1.
ELECTRICAL SYSTEM
-
Degree of protection IPX5
Class I
Power supply 230 V, 50 Hz
Total absorbed power
Whisper Airpool 0,15 kW,
Whisper Whirlpool 2,3 kW,
Whisper Combipool 2,4 kW
Whisper Combipool Plus 2,4kW
2.
AIR PUMP (Whisper Airpool, Whisper Whirlpool, Whisper Combipool, Whisper
Combipool Plus)
-
220 / 230 V, 30 W
3.
PUMP (Whisper Whirlpool, Whisper Combipool, Whisper Combipool Plus)
-
230 V, 50 Hz, 0,85 kW
Internal thermal safety
4.
HEATER
-
230 V, 50 Hz, 1,5 kW
Internal thermal safety
5.
MINIMUM LEVEL SAFETY
-
Also overheating protection for the pump and heater
Built in as a standard feature
Electronically controlled
6.
CONTROL UNIT HANDHELD REMOTE OR
RIM MOUNTED CONTROL
-
Controlled by a microprocessor
Power supply with a safety transformer
7.
QUALITY CONTROL
-The system is thoroughly tested in the factory before delivery
-The entire system complies with the EMC and safety standards
The producer reserves the right to implement changes and improvements
in the production of system baths without prior announcement.
Warranty Statement
The Whisper Whirlpool systems have a 18-month limited warranty from
the date of purchase. Villeroy & Boch Quaryl baths come with a 10-year
warranty. This warranty covers: factory faults, changes in colour and/or
cracks resulting from material ageing and distortions caused by hot water.
The guarantee is only valid if the product was installed in accordance with
our installation/maintenance terms and conditions, and with exception
of necessary drainage/overflow provision, has not been provided with
a system developed or fitted by third parties and has not been subjected
to modification (e.g. the drilling of holes) which are not indicated in the
installation provisions accompanying the product. To claim against the
guarantee please contact your dealer.
Consequential damages and the cost of building-in or removing
elements are not covered by the guarantee.
10
11
Information:
Argent Australia Pty. Ltd.
18 Wandoo Street (PO Box 2093)
Fortitude Valley Qld 4006
Australia
Toll Free Number: 1300 364 748
Website: www.argentaust.com.au
12