1
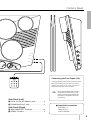
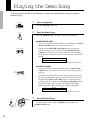
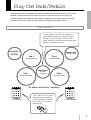
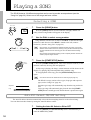
ENGLISH
Owner’s Manual
Bedienungsanleitung
Mode d’emploi
Manual de instrucciones
2
ESPAÑOL
FRANÇAIS
DEUTSCH
DIGITAL
SPECIAL MESSAGE SECTION
This product utilizes batteries or an external power supply (adaptor). DO
NOT connect this product to any power supply or adaptor other than one
described in the manual, on the name plate, or specifically recommended
by Yamaha.
This product should be used only with the components supplied or; a cart,
rack, or stand that is recommended by Yamaha. If a cart, etc., is used,
please observe all safety markings and instructions that accompany the
accessory product.
Battery Notice:
This product MAY contain a small non-rechargeable battery which (if
applicable) is soldered in place. The average life span of this type of
battery is approximately five years. When replacement becomes necessary, contact a qualified service representative to perform the replacement.
SPECIFICATIONS SUBJECT TO CHANGE:
This product may also use “household” type batteries. Some of these
may be rechargeable. Make sure that the battery being charged is a
rechargeable type and that the charger is intended for the battery being
charged.
The information contained in this manual is believed to be correct at the
time of printing. However, Yamaha reserves the right to change or modify
any of the specifications without notice or obligation to update existing
units.
When installing batteries, do not mix batteries with new, or with batteries
of a different type. Batteries MUST be installed correctly. Mismatches or
incorrect installation may result in overheating and battery case rupture.
This product, either alone or in combination with an amplifier and headphones or speaker/s, may be capable of producing sound levels that could
cause permanent hearing loss. DO NOT operate for long periods of time
at a high volume level or at a level that is uncomfortable. If you experience
any hearing loss or ringing in the ears, you should consult an audiologist.
IMPORTANT: The louder the sound, the shorter the time period before
damage occurs.
NOTICE:
Service charges incurred due to a lack of knowledge relating to how a
function or effect works (when the unit is operating as designed) are not
covered by the manufacturer’s warranty, and are therefore the owners
responsibility. Please study this manual carefully and consult your dealer
before requesting service.
ENVIRONMENTAL ISSUES:
Yamaha strives to produce products that are both user safe and environmentally friendly. We sincerely believe that our products and the production methods used to produce them, meet these goals. In keeping with
both the letter and the spirit of the law, we want you to be aware of the
following:
Warning:
Do not attempt to disassemble, or incinerate any battery. Keep all batteries away from children. Dispose of used batteries promptly and as regulated by the laws in your area. Note: Check with any retailer of household
type batteries in your area for battery disposal information.
Disposal Notice:
Should this product become damaged beyond repair, or for some reason
its useful life is considered to be at an end, please observe all local, state,
and federal regulations that relate to the disposal of products that contain
lead, batteries, plastics, etc. If your dealer is unable to assist you, please
contact Yamaha directly.
NAME PLATE LOCATION:
The name plate is located on the bottom of the product. The model
number, serial number, power requirements, etc., are located on this
plate. You should record the model number, serial number, and the date
of purchase in the spaces provided below and retain this manual as a
permanent record of your purchase.
Model
Serial No.
Purchase Date
PLEASE KEEP THIS MANUAL
92-BP
FCC INFORMATION (U.S.A.)
This product, when installed as indicated in the instructions contained in
this manual, meets FCC requirements. Modifications not expressly approved by Yamaha may void your authority, granted by the FCC, to use the
product.
Compliance with FCC regulations does not guarantee that interference will
not occur in all installations. If this product is found to be the source of
interference, which can be determined by turning the unit “OFF” and “ON”,
please try to eliminate the problem by using one of the following measures:
IMPORTANT:
• Relocate either this product or the device that is being affected by the
interference.
IMPORTANT NOTICE: DO NOT MODIFY THIS UNIT!
When connecting this product to accessories and/or another product use
only high quality shielded cables. Cable/s supplied with this product MUST
be used. Follow all installation instructions. Failure to follow instructions
could void your FCC authorization to use this product in the USA.
NOTE:
This product has been tested and found to comply with the requirements
listed in FCC Regulations, Part 15 for Class “B” digital devices. Compliance
with these requirements provides a reasonable level of assurance that your
use of this product in a residential environment will not result in harmful
interference with other electronic devices. This equipment generates/uses
radio frequencies and, if not installed and used according to the instructions
found in the users manual, may cause interference harmful to the operation
of other electronic devices.
The serial number of this product may be found on the bottom
of the unit. You should note this serial number in the space
provided below and retain this manual as a permanent record of
your purchase to aid identification in the event of theft.
Model No.
Serial No.
DD-50
• Utilize power outlets that are on different branch (circuit breaker or fuse)
circuits or install AC line filter/s.
• In the case of radio or TV interference, relocate/reorient the antenna. If
the antenna lead-in is 300 ohm ribbon lead, change the lead-in to coaxial type cable.
If these corrective measures do not produce satisfactory results, please
contact the local retailer authorized to distribute this type of product. If you
can not locate the appropriate retailer, please contact Yamaha Corporation
of America, Electronic Service Division, 6600 Orangethorpe Ave, Buena
Park, CA90620
• This applies only to products distributed by Yamaha Corporation of
America.
Entsorgung leerer Batterien (nur innerhalb Deutschlands)
Leisten Sie einen Beitrag zum Umweltschutz. Verbrauchte
Batterien oder Akkumulatoren dürfen nicht in den Hausmüll. Sie
können bei einer Sammelstelle für Altbatterien bzw. Sondermüll
abgegeben werden. Informieren Sie sich bei Ihrer Kommune.
○ ○ ○ ○ ○ ○ ○ ○ ○ ○ ○ ○ ○ ○ ○
Congratulations!
○ ○ ○ ○ ○ ○ ○ ○ ○ ○ ○ ○ ○ ○ ○
Thank you for purchasing the Yamaha DD-50. The DD-50 has been developed to
act and play like a drum set but with greater ease. Before you use the instrument, we recommend you to read through this manual.
○ ○ ○ ○ ○ ○ ○
Taking Care of Your DD-50
○ ○ ○ ○ ○ ○ ○
Your DD-50 will give you years of playing pleasure if you follow the simple rules given below:
■ Location
Do not expose the instrument to the following
conditions to avoid deformation, discoloration, or
more serious damage.
● Direct sunlight (e.g. near a window).
● High temperatures (e.g. near a heat source,
outside, or in a car during the daytime).
● Excessive humidity.
● Excessive dust.
● Strong vibration.
■ Power Supply
● Turn the power switch OFF when the instrument is not in use.
● An AC adaptor, if used (the DD-50 runs from
either batteries or an optional AC adaptor),
should be unplugged from the AC outlet if
the instrument is not to be used for an extended period of time.
● Unplug the AC adaptor during electric
storms.
● Avoid plugging the AC adaptor into the same
AC outlet as appliances with high power
consumption, such as electric heaters or
ovens. Also avoid using multi-plug adaptors
since these can result in reduced sound
quality, operation errors, and possibly damage.
■ Turn Power OFF When Making
Connections
● To avoid damage to the instrument and other
devices to which it is connected, turn the
power switches of all related devices OFF
prior to connecting or disconnecting cables.
■ Handling and Transport
● Always unplug cables by gripping the plug
firmly, not by pulling on the cable.
● Disconnect all cables before moving the
instrument.
● Physical shocks caused by dropping, bumping, or placing heavy objects on the instrument can result in scratches and more serious
damage.
■ Cleaning
● Clean the cabinet and panel with a dry soft
cloth.
● A slightly damp cloth may be used to remove
stubborn grime and dirt.
● Never use cleaners such as alcohol or thinner.
● Avoid placing vinyl objects on top of the
instrument (vinyl can stick to and discolor the
surface).
■ Electrical Interference
● This instrument contains digital circuitry and
may cause interference if placed too close to
radio or television receivers. If this occurs,
move the instrument further away from the
affected equipment.
■ Data Backup
● Custom data and some settings (see page 21)
will be retained in memory even if the power
switch is turned OFF as long as an AC power
adaptor is connected or batteries are installed.
■ Service and Modification
● The DD-50 contains no user serviceable parts.
Opening it or tampering with it in anyway can
lead to irreparable damage and possibly
electric shock. Refer all servicing to qualified
YAMAHA personnel.
● Never apply excessive force to the controls,
connectors or other parts of the instrument.
YAMAHA is not responsible for damage caused by improper handling or operation.
1
○ ○ ○ ○ ○ ○ ○ ○
Table of Contents
Setting up the DD-50
3
Power Supply ................................................ 3
When Using headphones
(About the PHONES/AUX OUT jack) ............ 3
Control Panel
4
Connecting the foot pedals 1/2 ..................... 5
Supplied Accessories ................................... 5
Playing the Demo Song
6
● MASTER VOLUME ....................................... 6
● SONG VOLUME ........................................... 6
Play the Pads/Pedals
7
Pad Names ................................................... 7
Assigning a Drum Kit to the
Pads and Pedals ........................................... 8
Assigning a Voice to Individual
Pads and Pedals (“CU” Custom Kit) ............. 8
REVERB ON/OFF ........................................ 9
● Select the REVERB Depth ............................ 9
CLICK ON/OFF ............................................. 9
Playing a SONG
12
TRACK ON/OFF ......................................... 12
TAP START ................................................. 12
BREAK ........................................................ 13
A-B REPEAT ............................................... 14
● Cancel the Repeat Points ............................ 14
2
15
RECORD .................................................... 15
Playback ..................................................... 15
Using the MIDI/Utility Mode
16
What is MIDI? ............................................. 16
What you can do with MIDI ......................... 16
Enter/Exit the MIDI/Utility Mode .................. 17
Setting the Clock ......................................... 17
Local ON/OFF ............................................. 18
Setting the MIDI Transmit Channel ............. 18
Setting the MIDI Note Number .................... 20
Initialize
21
● Data Backup .............................................. 21
Troubleshooting
22
Data
23
10
Selecting a SONG ...................................... 10
Auto Kit Select ON/OFF Setting .................. 10
Adjusting the TEMPO ................................. 11
Play along with a SONG
Try Recording
○ ○ ○ ○ ○ ○ ○ ○
Drum Voice List ........................................... 23
Drum Kit List ............................................... 24
Song List ..................................................... 26
Drum Map ................................................... 27
Specifications .............................................. 28
MIDI Implementation Chart ......................... 29
Setting up the DD-50
Power Supply
Your DD-50 will run either from batteries or an optional power adaptor. Follow the instructions below
according to the power source you intend to use.
Connect the optional power adaptor (Yamaha
PA-3 or PA-3B) to the DC IN 10-12V jack located
on the unit’s left side panel, and plug the AC power
adaptor into an AC power outlet.
PA-3/
PA-3B
1
Open the battery compartment cover on the
underside of the DD-50.
2
Insert six “C” size, R14, SUM-2 or equivalent
batteries. When inserting the batteries, be
careful to follow the polarity markings in the
illustration.
3
Close the battery compartment cover securely.
AC power socket
OPEN
DC IN 10 - 12V
Installing Batteries
• Do not attempt to use an AC adaptor other than the
PA-3 or PA-3B. Use of an incompatible adaptor may
result in the instrument becoming hot or, irreparable
damage to the DD-50. It may also result in fire. If the
instrument is damaged due to use of an incompatible
adaptor, YAMAHA is not responsible for the damage.
When Using Headphones
(About the PHONES/AUX OUT Jack)
An optional set of stereo headphones (such as
the Yamaha HPE-150 or HPE-3) can be connected
to the PHONES/AUX OUT jack located on the
side panel. When a pair of headphones is connected to the jack, the DD-50’s internal speakers
will switch off automatically, perfect for private
practice or late night playing. If you want to use an
external sound system, the headphone jack can
also be used to connect the DD-50 to a stereo
system or mixing console. (Use a standard plug n
pin plug adaptor to connect the DD-50 to a stereo
system.)
* Turn the power OFF on all equipment before
making any connections.
OPEN
Using an AC-Adaptor (sold separately)
• Power will be automatically drawn from the AC
adaptor if an optional AC adaptor is connected while
batteries are installed in the instrument.
• It is recommended that you replace worn batteries as
soon as possible. When battery voltage drops, the
DD-50’s display will dim and/or the sound will become
distorted. When this occurs, replace the batteries with
a complete set of six new batteries of the same type.
• NEVER mix old and new batteries, different types of
batteries (alkaline, magnesium, etc.), batteries by
different makers, or batteries from the same maker
but of different types.
Misuse may cause the instrument to become hot,
result in fire, or battery leakage.
• Also, to prevent damage due to battery leakage,
remove all of the batteries from the instrument when it
is not to be used for an extended period of time.
Batteries left in an unused instrument will also loose
their power over time.
3
Control Panel
&
*
DC IN 10 - 12V
(
PHONES /
AUX OUT
3 4 5 6
2
PAD
KIT
SONG
SONG
VOLUME
POWER
OFF
1
Front Panel
○
○
○
○
○
○
○
○
○
○
○
○
○
○
○
○
○
MASTER VOLUME REVERB DRUM 1 DRUM 2
8
9
TEMPO
BEAT
88
BASS BACKING CLICK
0
Page
1 POWER ON/OFF Switch ............................... 6
2 SONG VOLUME buttons ............................... 6
3 PAD ASSIGN button ................................ 8, 19
4 KIT ASSIGN button ................................. 8, 20
5 SONG button ............................................... 10
6 TEMPO button ............................................. 11
7 Display ........................................................... 8
8 MASTER VOLUME buttons ........................... 6
9 REVERB button ............................................. 9
0 Track buttons
DRUM 1 button ...................................... 12, 17
DRUM 2 button ...................................... 12, 18
BASS button ................................................ 12
BACKING button .................................... 11, 12
4
ON
7
PRESET TEMPO
ASSIGN
! CLICK button ................................................. 9
@ DIAL ............................................................... 8
# START/STOP button .................................... 10
$ BREAK/TAP START button .................... 12, 13
% A-B REPEAT button ..................................... 14
^ DEMO button ................................................. 6
& Drum Pads (x 7) ............................................ 7
!
Control Panel
)
MIDI IN
MIDI OUT
PEDAL 1
RE
START/
STOP
@
#
A-B
REPEAT
%
q
PEDAL 2
C.
BREAK/
TAPSTART
$
DEMO
DD-50
^
Connecting the Foot Pedals (1/2)
The supplied foot pedals can be connected to the
DD-50 to similarly play the drum set’s hi-hat
pedal or bass drum voices or they can also be
assigned to play other voices as well.
• Do not press the pedal while connecting
it to the DD-50 or while turning on the
power. (Connecting in this manner with
the power on, the pedal’s function may
be reversed.)
Side Panel (Left)
* DC IN 10-12V (AC Adaptor) Jack .................. 3
( PHONES/AUX OUT Jack .............................. 3
Side Panel (Right)
) MIDI IN/MIDI OUT Terminals ....................... 16
q PEDAL 1/2 Jacks ........................................... 5
● Supplied Accessories
Foot Pedal x 2
Drum Stick x 2
Owner’s Manual
5
Playing the Demo Song
To give you idea of the DD-50’s possibilities, it comes with a demonstration song. To playback
the demo song:
1
POWER
OFF
ON
Turn on the power
Turn the [POWER] switch ON.
2
DEMO
Start the Demo Song
Press the [DEMO] button, the demo song will start playback.
● MASTER VOLUME
The overall volume level of the DD-50 is controlled by two [MASTER VOLUME] buttons (10 volume levels L0-L9).
Press the large [MASTER VOLUME] button to increase the
overall volume by one level. Press the small [MASTER VOLUME] button to decrease the overall volume one level. Holding
down either of the buttons increases or decreases the volume level
rapidly.
MASTER VOLUME
Small
Large
L0
Small
< L5 >
< Volume Level >
L9
Large
*When the MASTER VOLUME is set to L0, the song’s volume is silenced.
● SONG VOLUME
The song’s volume level is controlled by the two [SONG VOLUME] buttons (10 volume levels L0-L9). (Demo Song, Song see
page 10)
SONG
VOLUME
Small
Large
The SONG VOLUME can be used to adjust the balance between
the song accompaniment and your own performance on the pads.
Press the large [SONG VOLUME] button to increase the song
volume by one level. Press the small [SONG VOLUME] button to
decrease the song volume by one level. Holding either of the
buttons increases or decreases the song volume level rapidly.
L0
Small
< L5 >
< Volume Level >
L9
Large
* When the SONG VOLUME is set to L0, the song’s volume is silenced.
RE
DEMO
C.
START/
STOP
A-B
REPEAT
6
BREAK/
TAPSTART
3
Stop the Demo Song
To stop playback, press either the [DEMO] button again or the
[START/STOP] button.
Play the Pads/Pedals
Strike the pad with the supplied drum sticks to play the drum voices. Drum Kit “00” is automatically chosen whenever the power is turned on (see the “Drum Kit List” page 24).
Striking the pads with different force results in relatively loud or soft sounds accordingly.
Loudness of the sound may vary according to which part of the pad is struck.
Pad Names
A hi-hat sound is assigned to the Small Pad 3
(Drum Kit 00). Striking the Small Pad 3while
pressing on Pedal 2 produces a closed hi-hat
sound. Striking the pad without pressing the pedal
produces an open hi-hat sound.
Small Pad 1
Small Pad 2
38: Crash
Cymbal (High)
39: Ride Cymbal
Pad 2
Pad 3
16: High Tom (High)
18: Mid Tom (High)
Small Pad 3
34: Hi-Hat
Close/Open
Pad 1
8: Snare Drum (High)
Pad 4
20: Low Tom (High)
Ex. shown, Drum Kit 00 : Standard 1
Pedal 2
34: Hi-Hat Pedal
The bass drum voice is controlled by pressing Foot Pedal 1.
Use Foot Pedal 2 to control the
Hi-hat. (This is in the case of
Drum Kit 00.)
Pedal 1
1: Bass Drum (Mid)
7
Play the Pads/Pedals
Assigning a Drum Kit to the Pads and Pedals
The DD-50 allows you to choose from 20 different Drum Kits (00-19 : see the “Drum Kit List”
page 24) quickly and easily. 20 of the kits have preset voice combinations that will be set to the pads
and pedals when the kit is selected. Select some different kits and try playing them.
The DD-50 also has one Custom Drum Kit allowing you to assign the desired voices to the seven
pads or two pedals (see “Assigning a Voice to Individual Pads and Pedals” below).
1
ASSIGN
Press the [KIT ASSIGN] button
BEAT
PAD
KIT
10
Pressing the [KIT ASSIGN] button, the button’s lamp will light and
the currently selected Drum Kit number appears on the display.
2
Select a Drum Kit Number
Turn the DIAL to select a Drum Kit number. Drum Kit numbers will
increase as the DIAL is turned to the right (clockwise), and decrease as
the DIAL is turned to the left (counter-clockwise).
00 19 CU
• Drum Kit number 00 is normally selected when the power is turned ON. However, if Auto Kit Select is set to OFF, the last Drum Kit selected before turning the
power OFF, is automatically selected when the power is turned ON. (See “Auto
Kit Select ON/OFF Setting” on page 11)
• The “CU” Drum Kit is the Custom Kit. Changes made to any one of the preset
drum kits will be saved here. (See “Assigning a Voice to Individual Pads and
Pedals” below.)
Assigning a Voice to Individual Pads and Pedals
(“CU” Custom Kit)
The DD-50 contains a total of 75 high quality drum sounds (see the “Drum Voice List” page 23)
that can be assigned to each of the 7 drum pads and 2 foot pedals. Try assigning some different voices
to the “CU” Custom Drum Kit.
• Any change made to one of the preset drum kits will automatically be saved in the
“CU” Custom Drum Kit.
• Both the Custom and “00” drum kit contents are the same until modified (see the
“Drum Kit List” page 24).
ASSIGN
PAD
KIT
BEAT
1
25
BEAT
10
8
Press the [PAD ASSIGN] button
Press the [PAD ASSIGN] button, Pad 1’s currently assigned voice
number is shown in the display.
2
Select a Pad/Pedal
Strike any pad one time (or press a pedal), that pad’s/pedal’s currently
assigned voice number is shown in the display.
Play the Pads/Pedals
3
Select a Voice Number
You can select the voice by repeatedly striking the pad, repeatedly
pressing the pedal (while listening to the voice) or by turning the DIAL.
● Striking the pad or pressing the pedal to select a voice.
First, select a pad or pedal by striking or pressing it once. After the
pad/pedal has been selected, every time the pad is struck or a pedal
is pressed, voice numbers will increase by a value of one (1).
0 1 . . .73 74 @
● Using the DIAL to select a voice.
Turn the DIAL to the right (clockwise), and voice numbers will
increase. Turn the DIAL to the left (counter-clockwise), and voice
numbers will decrease.
0 1 . . .73 74 @
4
PRESET TEMPO
SONG
Play the Pads and Pedals
After assigning a voice to the desired pad/pedal, press the [SONG]
button. You can now play the voice you have assigned to the pad/pedal.
TEMPO
Repeat the previous steps for any or all of the DD-50’s pads and pedals
and try playing your own original drum kit.
REVERB ON/OFF
REVERB
Different depths of the DD-50’s reverb effect can be selected to add to
the DD-50’s overall sound.
To turn on the reverb effect, press the [REVERB] button. To turn off
the reverb effect, press the [REVERB] button again.
● Select the REVERB Depth
REVERB
BEAT
r1
When the reverb has been turned on, press and hold the [REVERB]
button, turn the DIAL to select one of the three reverb depths that
appear in the display. [r1], [r2], [r3].
Selecting [r3] adds the most reverb depth to the effect.
• REVERB Depth data is not transmitted or received via MIDI.
CLICK ON/OFF
CLICK
The DD-50’s CLICK feature produces a metronome click to make the
tempo easier to follow and improve your timing while playing the pads.
To hear the metronome click, press the [CLICK] button. To turn the
click off, press the button once again.
9
Playing a SONG
The DD-50 features 100 different songs that can be used to provide accompaniment (see the
“Song List” page 26). Select one of the songs and have a listen.
Selecting a SONG
PRESET TEMPO
SONG
BEAT
TEMPO
1
10
Press the [SONG] button
Press the [SONG] button, its LED indicator will light, and the currently selected song number will appear in the display.
2
Use the DIAL to select a song number
Song numbers will increase in value as the DIAL is turned to the right
(clockwise) and decrease as the DIAL is turned to the left (counterclockwise). (See the “Song List” on page 26)
00
01 . . .99
RE
3
C.
START/
STOP
• Song number “00” is automatically selected whenever the power is turned ON.
• With the Auto Kit Select turned on, selecting a song will also automatically select
the best suited Drum Kit for that song (see “Auto Kit Select ON/OFF Setting”
below).
• Song numbers are arranged according to their complexity. Smaller numbers are
easier to play than larger numbers.
CU
BREAK/
TAPSTART
Press the [START/STOP] button
Press the [START/STOP] button, after a two-measure count-in (or one
measure count-in), the song will start playback.
A-B
REPEAT
As the song is playing, the Song’s current measure will be shown in the
display. Try playing the pads and pedals along with the song.
To stop playback of the song, press the [START/STOP] button once
again.
• You can also use the TAP START function to start songs (see page 12).
The DD-50’s songs consists of two types, loop type and sequence
type (see the “Song List” page 26).
Sequence type songs will automatically stop when the song reaches its
end.
Loop type songs will continuously play from the time the [START/
STOP] button is initially pressed, until the button is pressed once again.
Sequence
Loop
Auto Kit Select ON/OFF Setting
The Auto Kit Select function automatically selects the best matching drum kit to the selected song.
You can deactivate this feature by setting the Auto Kit Select to OFF.
1
Setting the Auto Kit Select to ON or OFF
Press the [DEMO] and [START/STOP] buttons simultaneously to
enter the MIDI/Utility Mode .
10
Playing a SONG
BACKING
BEAT
on
2
Select ON or OFF
Press the [BACKING] button and the current ON/OFF setting will
appear in the display. Turn the DIAL to the right (clockwise) to activate
the Auto Kit Select (on). Turn to the left (counter-clockwise) to deactivate
the Auto Kit Select (oF).
BEAT
oF
3
Exit the Auto Kit Select
Press the [DEMO] and [START/STOP] buttons simultaneously once
again to exit the MIDI/Utility Mode .
• The Auto Kit Select is automatically set to “OFF” when the MIDI Transmit Note is
changed to another channel.
Adjusting the TEMPO
The song tempo can be set anywhere from 40 to 280 beats per minute. As tempo numbers increase,
the tempo will become faster.
PRESET TEMPO
SONG
BEAT
TEMPO
1
50
Press the [TEMPO] button, the current tempo value (40-280) appears
in the display.
2
40
41
7
, 9
,
PRESET TEMPO
SONG
TEMPO
Press the [TEMPO] button
Tempo
Display
Comment
q=90
q=110
q=250
90
1
, 0
5
, 0
,
—
100th digit (1) is shown as a single dot
100th digit (2) is shown as two dots
Set the Tempo
Use the DIAL to select the TEMPO. Turn the DIAL to the right
(clockwise) to increase Tempo values, turn to the left (counter-clockwise)
to decrease Tempo values. (Tempo values will cycle to 40 or 280 then stop.)
8
, 0
,
3
Exit the Tempo setting mode
Press the [SONG] button to exit from the Tempo setting mode.
• When both the SONG and TEMPO buttons are pressed simultaneously, the
preset tempo of the currently selected song will automatically applied.
BEAT
90
● About the Beat Indicator
During song playback, the two beat lamps in the display will flash
in a specific pattern to assist you in keeping the beat.
q= 90 beats per minute.
1st beat 2nd beat 3rd beat 4th beat
9
, 0
,
9,0
9,0
9,0
11
Play along with a SONG
Use the pads and pedals to play along with a song accompaniment.
• The DD-50 can play a total of 28 notes simultaneously. That includes notes
produced by song accompaniment, pads, foot pedals, and note data received
through the MIDI IN jack.
TRACK ON/OFF
The DD-50’s song accompaniment consists of 4 tracks; Drum 1/2, Bass, and Backing tracks.
DRUM 1
DRUM 2
BASS
BACKING
DRUM 1 DRUM 2
BASS
Main Drum track
Main Percussion track
Bass track
Main Backing Track
Pressing a Track button ([DRUM 1], [DRUM 2], [BASS], [BACKING]) will mute (turn off the sound) the corresponding track and its
indicator lamp will turn off.
BACKING
Muting DRUM 1 and DRUM 2 tracks allows you to practice your
playing technique in Karaoke style (Minus One).
TAP START
The TAP START function allows you to set the song’s overall tempo as well as start the accompaniment. The accompaniment will playback at the tempo with which the pads are struck or the pedals are
pressed.
1
RE
Press the [BREAK/TAP START] button
C.
Press the [BREAK/TAP START] button when the song stops, its
indicator will flash and the DD-50 is in Tap Start standby mode.
BREAK/
TAPSTART
START/
STOP
A-B
REPEAT
To cancel the Tap Start mode, simply press the [BREAK/TAP
START] button once again (the indicator will turn off).
2
Tap Start
In the case of a song in 4/4, strike any pad or press any pedal four
times, the accompaniment will start at the desired tempo.
• The number of times needed to strike the pad will change according to the
following time signatures; 5/4, 5 times; 4/4, 4 times; 3/4, 3 times; 6/8, 2 times.
RE
C.
START/
STOP
A-B
REPEAT
12
BREAK/
TAPSTART
3
Stop the Song Playback
To stop playback, press the [START/STOP] button.
Play along with a SONG
BREAK
With the BREAK function, you can liven up songs by adding your own solos or fills, whenever you
want. Striking a pad while in the BREAK mode, the song’s accompaniment will be muted until the end
of the measure you have finished your fill or solo in.
1
RE
During song playback, press the BREAK/TAP START button
C.
BREAK/
TAPSTART
START/
STOP
During song playback, press the [BREAK/TAP START] button, its
indicator will flash and the DD-50 is in BREAK standby mode.
A-B
REPEAT
To cancel the Break mode, simply press the [BREAK/TAP START]
button once again (its indicator will turn off).
2
Break
Strike any pad and the accompaniment will mute until the end of the
measure you played in. You can play a drum fill or drum solo during this
break.
RE
C.
START/
STOP
A-B
REPEAT
BREAK/
TAPSTART
3
Exit the BREAK mode
The DD-50 returns to the BREAK standby mode when the BREAK
measure is completed.
To exit the BREAK mode, press the [BREAK/TAP START] button.
The BREAK mode is also exited when the song is stopped.
13
Play along with a SONG
A-B REPEAT
If you want to practice a particular section of a song, you can specify that section’s “A” (start
repeat) and “B” (end repeat) points. The accompaniment will continuously repeat between points
“A” and “B” allowing you to practice between those points for as long as you like.
1
RE
C.
BREAK/
TAPSTART
START/
STOP
To set the “A” (start repeat) point
BEAT
When the song playback has reached the start of the section you want
to practice, press the [A-B REPEAT] button and the “A” repeat point is
set. An “A” will appear in the display.
A
A-B
REPEAT
2
To set the “B” (end repeat) point
RE
C.
BREAK/
TAPSTART
START/
STOP
When the song playback has reached the end point of the section you
want to practice, press the [A-B REPEAT] button once again and the A
to B repeat points are set, “b” appears in the display. “Ab” will appear in
the display and after a one measure count-in the repeat playback will
start. The current measure number will appear in the display during the
repeat playback.
BEAT
Ab
A-B
REPEAT
• The A-B REPEAT start and end points can only be set in measure steps.
• Songs consist of two types; loop type and sequence type (see the “Song List” on
page 26). When setting the A-B points for sequence songs, set both points
before the end of the song. The set “A” point will be canceled if the “B” point is
not set before the end of the song.
3
RE
C.
START/
STOP
BREAK/
TAPSTART
BEAT
Ab
A-B
REPEAT
Stop the A-B REPEAT mode
Press the [START/STOP] button and the song accompaniment will stop.
“Ab” will appear in the display indicating the A-B REPEAT mode is
still engaged.
Press the [START/STOP] button once again and the accompaniment
will again repeat between the set points.
• In the case of a loop type song, it is possible, for example, to set the “A” point at
measure 10 and set the “B” point at measure 3 (after the song has looped back
to the beginning).
B
A
3
10
• Selecting another song will cancel any previously set A-B REPEAT points.
RE
C.
START/
STOP
A-B
REPEAT
14
BREAK/
TAPSTART
● Cancel the Repeat Points
To cancel the A-B REPEAT, press the [A-B REPEAT] button
during playback or while playback is stopped, the A-B REPEAT
mode will be canceled (the A-B REPEAT points will also be
canceled) and normal playback of the accompaniment will continue.
Try Recording
The DD-50’s Custom Song feature (song number “CU”) allows you to record and playback
one original song (600 notes approximately).
● Data that can be recorded in the Custom Song Mode.
• Drum pad and pedal data.
• Song data (the number cannot be changed while in the RECORD Mode).
• Track ON/OFF settings.
• Tempo setting (The tempo cannot be changed while in the RECORD mode).
• Song Volume setting.
• Reverb ON/OFF setting.
• Break ON/OFF setting.
* MIDI data cannot be recorded to the memory.
RECORD
1
Prepare to Record
Select the desired song, drum kit, tempo, track on/off setting, and
reverb settings.
2
Start Recording
RE
C.
START/
STOP
BREAK/
TAPSTART
Press both the [START/STOP] and [BREAK/TAP START] buttons
simultaneously, after a count-in (the indicator will flash) recording will start.
BEAT
oo
A-B
REPEAT
• Data will not be recorded during the 2 measure count-in.
• Press the BREAK/TAP START button during the 2 measure count-in to enter Tap
Start Record Standby mode (see page 12).
• Press the CLICK button to cancel the metronome during recording.
3
RE
C.
START/
STOP
BREAK/
TAPSTART
A-B
REPEAT
Stop Recording
To stop recording, press the [START/STOP] button.
• Any previously recorded data will be replaced with new data.
• If the memory becomes full while recording is in progress, “FL” will appear in the
display and recording will automatically stop.
Playback
The recorded Custom Song (song number “CU”) can be played back in the same manner as any
song (song numbers “00”-”99”).
BEAT
CU
Song number “CU” follows Song number “99” (or prior to “00”).
• The A-B REPEAT mode (see 14 page) cannot be used in the Custom Song Mode.
15
Using the MIDI/Utility Mode
The MIDI IN and MIDI OUT terminals, located on the DD-50’s right side panel, offer broadened musical possibilities through use of MIDI. But, what is MIDI? What can you do with
MIDI? How can you use MIDI with the DD-50? Here are a few examples.
What is MIDI?
MIDI stands for Musical Instrument Digital Interface. MIDI is a world wide standard that
makes it possible for various electronic musical instruments and other devices, such as computers, to
“communicate” with each other. For example, by connecting a MIDI tone generator to the DD-50’s
MIDI OUT terminal, you can play the tone generator’s voices from the DD-50’s pads and pedals.
The DD-50 is equipped with two types of MIDI terminals, both are
located on the right side panel.
● MIDI IN
Data transmitted from other MIDI instruments via MIDI, is received at this terminal.
MIDI OUT
MIDI IN
● MIDI OUT
Data produced by the DD-50, is transmitted to other MIDI instruments via MIDI from this terminal.
• Use a MIDI cable (option), obtainable at your local music dealer, when making
MIDI connections.
• Never use MIDI cables longer than 15 meters in length. (Cables longer than 15
meters can pick up “noise” which can cause data errors.)
What you can do with MIDI
DD-50
MIDI Keyboard’s
MIDI OUT
MIDI IN
DD-50
MIDI OUT
Sequencer
MIDI IN
Yamaha
MIDI Data Filer
MDF2 etc.
DD-50
MIDI Keyboard
MIDI OUT
MIDI IN
DD-50
Sequencer
MIDI OUT
MIDI IN
16
● Connect the DD-50’s MIDI OUT jack to a MIDI keyboard’s
(or tone generator’s) MIDI IN jack.
This setup allows you to use the DD-50’s pads to control another
MIDI instrument. Playing the DD-50’s pads will result in the other
MIDI instrument’s voice sounding simultaneously, creating a
thicker overall sound.
● Connect the DD-50’s MIDI OUT jack to a MIDI sequencer’s MIDI IN terminal.
Data produced by the DD-50 (Key ON and Velocity data) can be
recorded to a MIDI sequencer. Data can also be recorded to computers or other sequencers as well.
● Connect the DD-50’s MIDI IN terminal to a MIDI keyboard’s MIDI OUT terminal.
In this setup the DD-50 can be used as a tone generator and its
voices can be played from a MIDI keyboard. Using a keyboard as a
controller, it is possible to play DD-50 voices that are not assigned
to the pads/pedals.
● Connect the DD-50’s MIDI IN terminal to a MIDI sequencer’s MIDI OUT terminal.
The sequencer’s data can be used to drive the DD-50’s sounds.
Using the MIDI/Utility Mode
Enter/Exit the MIDI/Utility Mode
RE
C.
To enter the MIDI mode, press the [START/STOP] and [DEMO]
buttons simultaneously, an “mm” will appear in the display to indicate the
MIDI mode.
BREAK/
TAPSTART
START/
STOP
DEMO
A-B
REPEAT
• Pads and pedals do not sound while in the MIDI/Utility mode.
BEAT
mm
To exit the MIDI mode, once again press the [START/STOP] and
[DEMO] buttons simultaneously, the MIDI mode will be exited and the
DD-50 will return to its normal play mode.
Setting the Clock
Connecting the DD-50, by MIDI cable, to an external MIDI device, such as a sequencer, time based
functions (song playback, etc.) must be controlled by the internal clock (I) or an external clock (E).
When the internal clock (I) is enabled, timing will be controlled by the DD-50’s internal clock. When
an external clock (E) selected, time based functions will be controlled by the sequencer’s or computer’s clock.
● I (Internal)
The DD-50’s clock is used as the timing clock.
● E (External)
The external clock is used as the timing clock (If the clock is set to
external without being connected to another MIDI device, the DD50’s Song Play or Demo functions will not respond).
DRUM 1
BEAT
1
I
Display the clock setting
After entering the MIDI/Utility mode, press the [DRUM 1] button to
see the current setting for the MIDI clock.
2
Set the Clock to External or Internal
BEAT
E
To set the clock to “E” (external), turn the DIAL to the right (clockwise). To set the clock to “I” (internal), turn the DIAL to the left (counterclockwise).
3
Exit the MIDI/Utility mode
After the clock is set, exit the MIDI/Utility mode.
• The default MIDI clock setting is “I” (internal).
17
Using the MIDI/Utility Mode
Local ON/OFF
Setting the Local ON/OFF determines whether or not the internal voices respond to the notes you
play on the DD-50’s pads. Setting this to OFF disconnects the DD-50’s pads from the voices. However, data produced by the DD-50 is transmitted via the MIDI OUT terminal.
● on (Local ON)
The internal voices will be played and controlled by the DD-50 and
its pads. Data received via MIDI will also be played by the DD-50.
● oF (Local OFF)
Striking the pads will not produce any sound from the voices.
However, data received via MIDI will be played by the DD-50.
1
DRUM 2
Display the Local On/Off Setting
BEAT
on
After entering the MIDI/Utility mode, press the [DRUM 2] button and
the current Local ON /OFF setting will appear in the display.
2
Set the Local On/Off
BEAT
To set to “on” (Local ON), turn the DIAL to the right (clockwise), to
set to “oF”(Local OFF), turn the DIAL to the left (counter-clockwise).
oF
3
Exit the MIDI/Utility mode
After setting the Local ON/OFF, exit the MIDI/Utility mode.
• Regardless of the Local ON/OFF setting, the DD-50’s performance data
(including demo song data) is always sent to the MIDI OUT terminals for
transmission to external MIDI devices.
• The default Local ON/OFF setting is ON (Local ON).
Setting the MIDI Transmit Channel
Each of the pads/pedals (a total of 9) can be assigned to transmit on any of the 16 MIDI channels,
or turned off (indicated as “oF” in the display). Also, song transmit channels are as shown below:
Pad/Pedal
Drum (Song)
Bass (Song)
Backing (Song)
Pad/Pedal
(Custom Song)
18
Transmit Channel
1-16
9, 10
11 (fixed)
12-15 (fixed)
Default
10
9
—
—
10, 16
16
Using the MIDI/Utility Mode
1
ASSIGN
PAD
BEAT
KIT
10
Display the MIDI Transmit Channel Number
After entering the MIDI/Utility mode, press the [PAD ASSIGN]
button and the current Pad 1 transmit channel will be displayed.
2
BEAT
Select a pad to be assigned a MIDI Transmit Number
To select the pad you want to assign a MIDI transmit channel to, strike
the pad. That pad’s currently selected MIDI transmit channel will appear in
the display.
10
3
Set the MIDI Transmit Channel Number
Turning the DIAL to the right (clockwise), MIDI transmit channel
numbers will increase.
• You can also select the MIDI transmit channel by striking the pad. Every time the
pad is struck the MIDI transmit channel number will increase by 1.
4
Exit the MIDI/Utility mode
After all pads/pedals have been assigned MIDI transmit channels, exit
the MIDI/Utility mode.
• For further information on what type of data is transmitted via MIDI, see the “MIDI
Implementation Chart” (page 29), and try out the DD-50’s advanced MIDI features.
■ Setting the MIDI Transmit Channel . Drum (Song)
Song performance data is transmitted on channel 9. You can change this transmit channel to channel 10 by using the procedure below:
> First enter the MIDI/Utility mode by pressing both the [START/
STOP] and [DEMO] buttons simultaneously. Press the [SONG]
button and the currently selected transmit channel will be displayed.
BEAT
10
BEAT
9
BEAT
10
> Turning the DIAL, you can select either channel 9 or channel 10.
After making a selection, exit the MIDI/Utility mode by pressing
both the [START/STOP] and [DEMO] buttons simultaneously
once again.
Depending upon the setting of the Drum’s (Song) MIDI Transmit Channel, the
MIDI Transmit Channel for the Pads/Pedals (Custom Song) will automatically
change as follows:
Display
9
10
Drum (Song)
Pad/Pedal
(Costom Song)
9
10
16
10
19
Using the MIDI/Utility Mode
Setting the MIDI Note Number
Each pad and pedal (9 total) can be assigned a specific MIDI note number anywhere from C-2 to G8.
1
ASSIGN
BEAT
PAD
KIT
After entering the MIDI/Utility mode, press the [KIT ASSIGN]
button, the MIDI note number currently assigned to Pad 1 will appear in
the display.
E1
BEAT
Display the MIDI Note Number
2
A1
Select the pad to be assigned a MIDI Note Number
Strike any pad to see the currently assigned MIDI note number in the
display.
# (Sharp)
—(Minus)
BEAT
Sharp notes are indicated by a dot on the upper left side of the display,
minus values are indicated by a dot on the upper right side of the display.
C2
3
Assign a MIDI Note Number
To select the desired MIDI note number, turn the DIAL to the right
(clockwise) and the MIDI note numbers will increase. Turn the DIAL to
the left (counter-clockwise) and MIDI note numbers will decrease.
• You can also select the MIDI note number by striking the pad. Every time the pad
is struck, the value will increase by one.
4
Exit the MIDI/Utility mode
After each pad is assigned a MIDI note number, exit the MIDI/Utility
mode.
• For information on transmit notes and voices, refer to the DD-50 “Drum Map”
(note - voice, list) on page 27.
• When the Pad Assign or Kit Assign is set, the MIDI Note Number will be applied
to the preset value. If the Auto Kit Select is set to ON and another Song is
selected, the MIDI Note Number will be applied to the preset value. Auto Kit
Select is automatically turned off when a MIDI Note Number is changed.
20
Initialize
The DD-50’s Custom Song, Custom Kit, and Panel Setting data are backed up so long as
power is supplied to the DD-50 by means of batteries or an AC adaptor. Initialize is the term
which refers to this data being restored to its original factory settings. To initialize the DD-50,
follow the procedure below.
POWER
OFF
ON
> Turn the [POWER] switch OFF.
DEMO
POWER
OFF
> While holding the [DEMO] button, turn the [POWER] switch
ON. The DD-50 will be initialized to its factory settings. “Cr”
will appear in the display when the initialization process is
complete.
ON
BEAT
Cr
● Data Backup
The following data will remain in memory, as long
as batteries are installed or an AC adaptor is connected, even if the power is turned off.
* Custom Song
* Custom Kit
* Reverb Depth
* Auto Kit Selection
* MIDI Transmit Channel for the PAD
* MIDI Note Number for the PAD
21
Troubleshooting
In many cases, problems or malfunctions that occur during use can be remedied easily.
Please check the following list before deciding that your DD-50 is damaged.
If the suggested remedy is ineffective, take the DD-50 to an authorized Yamaha dealer for
proper diagnosis and repair. Do not attempt to repair this digital instrument by yourself as
serious damage may occur.
Problem
Cause/Solution
A buzz or click occurs momentarily when the DD-50
is turned ON or OFF
This is a normal power surge noise that occurs
when the POWER switch is operated
The LED display is completely dark. When the pads
are struck, the display is dark and returns to “00”.
The batteries are low and should be replaced with a
complete set of six new batteries immediately. Or,
the optional AC adaptor PA-3 or PA-3B should be
used to power the DD-50 (see page 3).
No sound comes from the speakers.
• The volume is set too low. Adjust the volume (see
page 6).
• A plug is inserted into the PHONES/AUX. OUT
jack and should be taken out (see page 3).
• The LOCAL ON/OFF is set to OFF. Set the LOCAL
ON/OFF to ON (see page 18).
• You are in the MIDI/Utility mode. Exit the MIDI/
Utility mode (see page 17).
Striking two pads simultaneously results in one of
the pads not sounding.
Refer to “Adjusting the Pad’s Sensitivity” to resolve
the problem (see page 30).
Striking a pad results in other pads also sounding,
though they were not struck.
22
The selected voice does not sound when the pad is
struck.
The desired voice has not been assigned to the pad.
Use the PAD ASSIGN function to program the
desired voice to the appropriate pad (see page 8).
The custom pad voice assignments have disappeared or defaulted.
The batteries are low and should be replaced with a
complete set of six new batteries. Or, an optional AC
adaptor (PA-3 or PA-3B) should be used to power
the DD-50 (see page 3).
The song or Demo does not start playback.
The MIDI clock has been set to “E” (external).
Change the MIDI clock setting to “I” (internal)
(see page 17).
“Cr” appears in the display when the POWER switch
is turned ON, and backed up data has been erased.
Backed up data is initialized if batteries are not
installed or AC adaptor is disconnected while the
POWER is turned OFF (see page 21).
Data/Verzeichnisse und Spezifikationen/Données/Datos
Drum Voice List / Drum Voice-Verzeichnis / Liste des voix de batterie /
Lista de voces de batería
Pad assign No.
0
1
2
3
4
5
6
7
8
9
10
11
12
13
14
15
16
17
18
19
20
21
22
23
24
25
26
27
28
29
30
31
32
33
34
35
36
Voice Name
Bass Drum Lo
Bass Drum Mid
Bass Drum Hi
Bass Drum Rock
Bass Drum Dance
Bass Drum Jazz
Snare Drum Light
Snare Drum Lo
Snare Drum Hi
Snare Drum Rock Mid
Snare Drum Rock Hi
Snare Drum Dance
Snare Drum Jazz
Side Stick
Open Rim Shot
Sticks
High Tom-H
High Tom-L
Mid Tom-H
Mid Tom-L
Low Tom-H
Low Tom-L
Rock H.Tom-H
Rock H.Tom-L
Rock M.Tom-H
Rock M.Tom-L
Rock L. Tom-H
Rock L. Tom-L
Jazz H. Tom-H
Jazz H. Tom-L
Jazz M. Tom-H
Jazz M. Tom-L
Jazz L. Tom-H
Jazz L. Tom-L
*Hi-Hat Closed/Open
*Rock HH Closed/Open
*Dance HH Closed /Open
37
38
39
40
41
42
43
44
45
46
47
48
49
50
51
52
53
54
55
56
57
58
59
60
61
62
63
64
65
66
67
68
69
70
71
72
73
74
Crash Cymbal-L
Crash Cymbal-H
Ride Cymbal
Ride Cymbal Cup
Chinese Cymbal
Splash Cymbal
Hand Clap
Finger Snap
Tambourine
Rock Tambourine
Cowbell
Rock Cowbell
Dance Cowbell
Latin Cowbell
Conga H Mute
Conga H Open
Conga L
Conga Muffled
Bongo H
Bongo L
Timbale H
Timbale L
Cascala
Agogo H
Agogo L
Cabasa-1
Cabasa-2
Shaker
Rock Shaker
Claves
Triangle Mute
Triangle Open
Guiro Short
Guiro Long
Cuica Mute
Cuica Open
Surdo Mute
Surdo Open
* By assigning Closed and Open Hi-Hat voices to both the Pad and Pedal, those voices can be controlled with the foot pedal as follows:
• Strike the pad while pressing the Foot Pedal, the “Closed” Hi-Hat voice will sound.
• Strike the pad without pressing the Foot Pedal, the “Open” Hi-Hat voice will sound.
• Press the Foot Pedal without striking the pad, the Hi-Hat “Pedal” voice will sound.
* Durch Zuordnen derselben Hi-Hat-Voice (HH Closed/Open) zu sowohl einem Pad und einem Pedal ist folgende Steuerung mit
dem Pedal möglich:
• Beim Anschlagen des Pads mit Pedalbetätigung wird der Klang eines geschlossenen “Closed” Hi-Hat erzeugt.
• Beim Anschlagen des Pads ohne Pedalbetätigung wird der Klang eines offenen “Open” Hi-Hat erzeugt.
• Betätigen Sie das Pedal, ohne das Pad anzuschlagen. Die Hi-Hat “Pedal” Voice erklingt dabei.
* En affectant les voix de cymbale charleston fermée et ouverte (Closed and Open Hit-Hat) au pad et à la pédale, ces voix
peuvent être contrôlées par la pédale, comme suit.
• Frappez le pad tout en appuyant sur la pédale et le son de la cymbale charleston fermée (“Closed”) sortira.
• Frappez le pad sans appuyer tout en appuyant sur la pédale et le son de cymbale charleston ouverteÅ (“Open”) sortira.
• Appuyez sur la pédale sans frapper le pad, pour entendre la voix “Pédale” charleston.
* Asignando voces de platillos abiertos y cerrados a los pulsadores y los pedales, podrá controlar tales voces con los pedales de
la forma siguiente:
• Si golpea el pulsador manteniendo pisado el pedal, sonará la voz de platillos cerrados (“Closed”).
• Si golpea el pulsador sin pisar1 el pedal, sonará la voz de platillos abiertos (“Open”).
• Pise el pedal sin golpear el pulsador: sonará la voz de “Pedal” de los platillos.
23
Data / Verzeichnisse und Spezifikationen / Données / Datos
Small Pad 2
Small Pad 1
Pad 3
Pad 2
Pad 1
Pad 4
Small Pad 3
Pedal 1
Pedal 2
Drum Kit List / Drum Kit-Verzeichnis / Liste des kits de batterie / Lista
No.
24
Kit Name
Pad 1
Pad 2
Pad 3
Pad 4
0
Standard 1
8
Snare Drum Hi
16
High Tom-H
18
Mid Tom-H
20
Low Tom-H
1
Standard 2
7
Snare Drum Lo
17
High Tom-L
19
Mid Tom-L
21
Low Tom-L
2
Standard 3
6
Snare Drum Light
16
High Tom-H
18
Mid Tom-H
20
Low Tom-H
3
Standard 4
8
Snare Drum Hi
16
High Tom-H
18
Mid Tom-H
20
Low Tom-H
4
Standard 5
14
Open Rim Shot
17
High Tom-L
19
Mid Tom-L
21
Low Tom-L
5
Standard 6
13
Side Stick
16
High Tom-H
18
Mid Tom-H
20
Low Tom-H
6
Hard Rock 1
10
Snare Drum
Rock Hi
22
Rock H.Tom-H
24
Rock M.Tom-H
26
Rock L.Tom-H
7
Hard Rock 2
9
Snare Drum
Rock Mid
23
Rock H.Tom-L
25
Rock M.Tom-L
27
Rock L.Tom-L
8
Dance 1
11
Snare Drum Dance
16
High Tom-H
18
Mid Tom-H
20
Low Tom-H
9
Dance 2
6
Snare Drum Light
17
High Tom-L
19
Mid Tom-L
21
Low Tom-L
10
Samba Perc.
73
Surdo Mute
60
Agogo H
61
Agogo L
74
Surdo Open
11
Timbales
58
Timbale L
42
Splash Cymbal
59
Cascala
57
Timbale H
12
Conga
54
Conga Muffled
51
Conga H Mute
52
Conga H Open
53
Conga L
13
Jazz 1
12
Snare Drum Jazz
28
Jazz H.Tom-H
30
Jazz M.Tom-H
32
Jazz L.Tom-H
14
Jazz 2
7
Snare Drum Lo
29
Jazz H.Tom-L
31
Jazz M.Tom-L
33
Jazz L.Tom-L
15
Jazz 3
12
Snare Drum Jazz
28
Jazz H.Tom-H
39
Ride Cymbal
32
Jazz L.Tom-H
16
Twin Bass Drum
8
Snare Drum Hi
23
Rock H.Tom-L
25
Rock M.Tom-L
27
Rock L.Tom-L
17
Rock Perc.
58
Timbale L
46
Rock
Tambourine
65
Rock Shaker
57
Timbale H
18
Ballad Perc.
67
Triangle Mute
66
Claves
45
Tambourine
68
Triangle Open
19
Cymbal
14
Open Rim Shot
38
Crash Cymbal-H
39
Ride Cymbal
37
Crash Cymbal-L
Data / Verzeichnisse und Spezifikationen / Données / Datos
de juegos de batería
Small Pad 1
Small Pad 2
Small Pad 3
Pedal 1
Pedal 2
38
Crash Cymbal-H
39
Ride Cymbal
34
HH Open/Closed
(Pedal 2 Off/On)
1
Bass Drum Mid
34
HH Pedal
34
HH Open/Closed
(Pedal 2 Off/On)
37
Crash Cymbal-L
47
Cowbell
2
Bass Drum Hi
34
HH Pedal
38
Crash Cymbal-H
39
Ride Cymbal
35
Rock HH Open/Closed
(Pedal 2 Off/On)
0
Bass Drum Lo
35
Rock HH Pedal
34
HH Open/Closed
(Pedal 2 Off/On)
38
Crash Cymal-H
13
Side Stick
1
Bass Drum Mid
34
HH Pedal
38
Crash Cymbal-H
40
Ride Cymbal Cup
34
HH Open/Closed
(Pedal 2 Off/On)
1
Bass Drum Mid
34
HH Pedal
42
Splash Cymbal
39
Ride Cymbal
34
HH Open/Closed
(Pedal 2 Off/On)
0
Bass Drum Lo
34
HH Pedal
35
Rock HH Open/Closed
(Pedal 2 Off/On)
38
Crash Cymbal-H
48
Rock Cowbell
3
Bass Drum Rock
35
Rock HH Pedal
38
Crash Cymbal-H
40
Ride Cymbal Cup
35
Rock HH Open/Closed
(Pedal 2 Off/On)
3
Bass Drum Rock
35
Rock HH Pedal
36
Dance HH Open/Closed
(Pedal 2 Off/On)
42
Splash Cymbal
49
Dance Cowbell
4
Bass Drum Dance
36
Dance HH Pedal
41
Chinese Cymbal
39
Ride Cymbal
36
Dance HH Open/Closed
(Pedal 2 Off/On)
0
Bass Drum Lo
36
Dance HH Pedal
71
Cuica Mute
72
Cuica Open
63
Cabasa-2
48
Rock Cowbell
45
Tambourine
37
Crash Cymal-L
38
Crash Cymbal-H
50
Latin Cowbell
50
Latin Cowbell
66
Claves
55
Bongo H
56
Bongo L
57
Timbale H
50
Latin Cowbell
47
Cowbell
38
Crash Cymbal-H
39
Ride Cymbal
34
HH Open/Closed
(Pedal 2 Off/On)
5
Bass Drum Jazz
34
HH Pedal
42
Splash Cymbal
39
Ride Cymbal
34
HH Open/Closed
(Pedal 2 Off/On)
0
Bass Drum Lo
34
HH Pedal
34
HH Open/Closed
(Pedal 2 Off/On)
38
CrashCymbal-H
13
Side Stick
5
Bass Drum Jazz
34
HH Pedal
38
Crash Cymbal-H
37
CrashCymal-L
34
HH Open/Closed
(Pedal 2 Off/On)
1
Bass Drum Mid
1
Bass Drum Mid
38
Crash Cymbal-H
41
Chinese Cymbal
42
Splash Cymbal
48
Rock Cowbell
43
Hand Clap
64
Shaker
62
Cabasa-1
42
Splash Cymbal
47
Cowbell
44
Finger Snap
34
HH Open/Closed
(Pedal 2 Off/On)
40
Ride Cymbal Cup
42
Splash Cymbal
2
Bass Drum Hi
34
HH Pedal
25
Data / Verzeichnisse und Spezifikationen / Données / Datos
Song List / Song-Verzeichnis / Liste des morceaux / Lista de canciones
No
49
Bossa Nova
50
51
Samba
Salsa
52
53
Latin Rock
Cha Cha
54
55
Mambo
Rhumba
56
00
01
02
03
8 Beat 3
8 Beat 4
04
05
8 Beat 5
8 Beat 6
06
07
8 Beat 7
8 Beat 8
57
Afro Cuban
Swing
Swing 1
08
09
8 Beat 9
8 Beat 10
58
59
Swing 2
Swing 3
10
11
60
Swing 4
Others
Swing Waltz
12
13
8 Beat 11
8 Beat 12
16 Beat
16 Beat 1
16 Beat 2
62
63
Waltz
3/4 Ballad
14
15
16 Beat 3
16 Beat 4
64
65
Swing Blues
Blues
16
17
16 Beat 5
16 Beat 6
66
67
6/8
5/4
18
19
16 Beat 7
16 Beat 8
68
69
20
21
16 Beat 9
16 Beat 10
22
23
16 Beat 11
16 Beat 12
24
25
26
16 Beat 13
16 Beat 14
Dance
Dance 1
27
28
Dance 2
Dance 3
29
30
Dance 4
Shuffle
Shuffle 1
31
32
Shuffle 2
Shuffle 3
33
34
Shuffle 4
Shuffle 5
35
36
Shuffle 6
Shuffle 7
37
38
61
70
71
March 1
March 2
8 Beat
8 Beat Simple
8 Beat Rock 1
72
73
8 Beat Rock 2
Pop Ballad 1
74
75
Pop Ballad 2
Hard Rock 1
76
77
Hard Rock 2
Hard Rock 3
78
79
Dance Pop 1
Dance Pop 2
80
81
82
83
84
85
39
40
Shuffle 8
Shuffle 9
Slow Rock
Slow Rock 1
Slow Rock 2
41
42
Slow Rock 3
Slow Rock 4
90
91
43
Slow Rock 5
Bounce
Bounce 1
92
93
44
45
46
47
48
26
Song Name
8 Beat
8 Beat 1
8 Beat 2
Bounce 2
Bounce 3
Latin
Reggae 1
Reggae 2
86
87
R&B
16 Beat
16 Beat Simple
Fusion 1
Fusion 2
Funk
Funk 1
Funk 2
Suffle
Shuffle 1
Shuffle 2
88
89
Shuffle 3
Slow Rock Simple
16 Beat Shuffe
16 Beat Triplet
Others
Pop Reggae
Bossa Nova
94
95
Samba
Latin
96
97
Salsa
5/4 Organ
98
99
Fast Swing
Big Band
* Song No. 0-69 : Loop Type (Short)
Song No. 70-99 : Sequence Type (Long)
* Songs 0 bis 69
: Loop (kurz)
Songs 70 bis 99 : Sequence (lang)
* Morceaux n° 0 à 69
Morceaux n° 70 à 99
* N.° de canción 9-69
N.° de canción 70-99
(largo)
: en boucle (court)
: en séquence (long)
: Tipo bucle (corto)
: Tipo de secuencia
Data / Verzeichnisse und Spezifikationen / Données / Datos
Drum Map / Drum-Notenzurdnung / Topographie de batterie / Mapa de la batería
Bank MSB#
Program #
Note#
Note
13
C# -1
14
D -1
15
D# -1
16
E -1
17
F -1
18
F# -1
19
G -1
20
G# -1
21
A -1
22
A# -1
23
B -1
24
C 0
25
C# 0
26
D 0
27
D# 0
28
E 0
29
F 0
30
F# 0
31
G 0
32
G# 0
33
A 0
34
A# 0
35
B 0
36
C 1
37
C# 1
38
D 1
39
D# 1
40
E 1
41
F 1
42
F# 1
43
G 1
44
G# 1
45
A 1
46
A# 1
47
B 1
48
C 2
49
C# 2
50
D 2
51
D# 2
52
E 2
53
F 2
54
F# 2
55
G 2
56
G# 2
57
A 2
58
A# 2
59
B 2
60
C 3
61
C# 3
62
D 3
63
D# 3
64
E 3
65
F 3
66
F# 3
67
G 3
68
G# 3
69
A 3
70
A# 3
71
B 3
72
C 4
73
C# 4
74
D 4
75
D# 4
76
E 4
77
F 4
78
F# 4
79
G 4
80
G# 4
81
A 4
82
A# 4
83
B 4
84
C 5
85
C# 5
86
D 5
87
D# 5
88
E 5
127
0
Standard Rock Kit
Surdo Mute
Surdo Open
Finger Snap
Snare Drum Light
Sticks
Bass Drum Lo
Open Rim Shot
Bass Drum Mid
Bass Drum Hi
Side Stick
Snare Drum Lo
Hand Clap
Snare Drum Hi
Low Tom-L
Hi-Hat Closed
Low Tom-H
Hi-Hat Pedal
Mid Tom-L
Hi-Hat Open
Mid Tom-H
High Tom-L
Crash Cymbal-L
High Tom-H
Ride Cymbal
Chinese Cymbal
Ride Cymbal Cup
Tambourine
Splash Cymbal
Cowbell
Crash Cymbal-H
Ride Cymbal Cup
Bongo H
Bongo L
Conga H Mute
Conga H Open
Conga L
Timbale H
Timbale L
Agogo H
Agogo L
Cabasa-1
Shaker
Guiro Short
Guiro Long
Claves
Cuica Mute
Cuica Open
Triangle Mute
Triangle Open
Cabasa-2
Conga Muffled
Latin Cowbell
Cascala
<—— : The same voice as indicated
in the columm to the left
: No sound
127
16
Hard Rock Kit
<——
<——
<——
<——
<——
<——
<——
<——
<——
<——
<——
<——
<——
<——
<——
<——
<——
<——
<——
<——
<——
<——
<——
Bass Drum Rock
<——
Snare Drum Rock Mid
<——
Snare Drum Rock Hi
Rock L. Tom-L
Rock HH Closed
Rock L. Tom-H
Rock HH Pedal
Rock M.Tom-L
Rock HH Open
Rock M.Tom-H
Rock H.Tom-L
<——
Rock H.Tom-H
<——
<——
<——
Rock Tambourine
<——
Rock Cowbell
<——
<——
<——
<——
<——
<——
<——
<——
<——
<——
<——
<——
<——
Rock Shaker
<——
<——
<——
<——
<——
<——
<——
<——
<——
<——
<——
<——
<——
<——
<——
<——
<——
<——
<—— : Wie in der linken
Spalte
: Kein Klang
127
25
Dance Kit
<——
<——
<——
<——
<——
<——
<——
<——
<——
<——
<——
<——
<——
<——
<——
<——
<——
<——
<——
<——
<——
<——
<——
Bass Drum Dance
<——
Snare Drum Dance
<——
Snare Drum Hi
Low Tom. L
Dance HH Closed
Low Tom. H
Dance HH Pedal
Mid Tom. L
Dance HH Open
Mid Tom. H
High Tom. L
<——
High Tom. H
<——
<——
<——
Tombourine
<——
Dance Cowbell
<——
<——
<——
<——
<——
<——
<——
<——
<——
<——
<——
<——
<——
Shaker
<——
<——
<——
<——
<——
<——
<——
<——
<——
<——
<——
<——
<——
<——
<——
<——
<——
<——
<—— : La même voix, comme indiqué
dans la colonne à gauche.
: Aucune sonorité
127
32
Jazz Kit
<——
<——
<——
<——
<——
<——
<——
<——
<——
<——
<——
<——
<——
<——
<——
<——
<——
<——
<——
<——
<——
<——
<——
Bass Drum Jazz
<——
Snare Drum Jazz
<——
Snare Drum Hi
Jazz L. Tom-L
Hi-Hat Closed
Jazz L. Tom-H
Hi-Hat Pedal
Jazz M. Tom-L
Hi-Hat Open
Jazz M. Tom-H
Jazz H. Tom-L
<——
Jazz H. Tom-H
<——
<——
<——
Tombourine
<——
Cowbell
<——
<——
<——
<——
<——
<——
<——
<——
<——
<——
<——
<——
<——
Shaker
<——
<——
<——
<——
<——
<——
<——
<——
<——
<——
<——
<——
<——
<——
<——
<——
<——
<——
<—— : La misma voz que la indicada
en la columna de la izquierda
: Sin sonido
27
Data / Verzeichnisse und Spezifikationen / Données / Datos
Specifications / Technische Daten / Spécifications / Especificaciones
Drum Pads
7 pads (125mm x 4, 88mm x 3), Touch Sensitive
Maximum Polyphony
28
Drum Kits
20 Preset + 1 Custom
Songs
100
Tracks
4 (DRUM 1/DRUM 2/BASS/BACKING)
Custom Song
1 Song (approximately 600 notes)
Drum Voices
75
Auxiliary Functions
Track ON/OFF, TAP START, BREAK, A-B REPEAT, DEMO
Panel Controls
POWER ON/OFF, SONG VOLUME (large, small), PAD ASSIGN,
KIT ASSIGN, SONG, TEMPO, MASTER VOLUME (large, small), REVERB,
TRACK (DRUM 1/DRUM 2/BASS/BACKING), CLICK, DIAL, START/STOP,
BREAK/TAP START, A-B REPEAT, DEMO
LED Display
Song/Drum Kit/Tempo etc.
Connectors
DC IN10-12 V
PHONES/AUX OUT
MIDI IN/OUT
PEDAL 1/2
Main Amplifier
3W + 3W (EIAJ)
Speaker
10 cm x 2
Power Source
Six “C” size, SUM-2, R-14, or equivalent batteries (sold separately)
DC 10-12V (Yamaha PA-3, PA-3B sold separately)
Dimensions (WxDxH)
552 x 348 x 136 (21” 3/4 x 13” 2/3 x 5” 3/8)
Weight
3.0 kg (6 Ibs. 10 oz)
Supplied Accessories
Drum stick x 2, Foot Pedal x 2, Owner’s Manual
Optional Accessories
Headphones
HPE-150, HPE-3
AC Power Adaptor
PA-3, PA3B
Foot Switch
FC4, FC5
* Specifications subject to change without notice.
* Änderungen ohne Vorankündigung vorbehalten.
* Sous toute réserve de modification des caractéristiques sans préavis.
* Especificaciones sujetas a cambios sin previo aviso.
28
MIDI Implementation Chart / Implementierungstabelle /
Table d'implémentation / Gráfico de implementación
[Digital Percussion]
Model: DD-50
Date: 1996. 3. 1
Version: 1.0
MIDI Implementation Chart
Function
Transmitted
Recognized
Remarks
Basic
Channel
Default
Changed
1~16 CH
1~16 CH
1~16 CH
1~16 CH
Mode
Default
Messages
Altered
Mode 3
X
*****************
Mode 3
X
X
: True voice
0~127
*****************
13~96
13~96
Velocity
Note on
Note off
O 9nH, v=1~127
X 9nH, v=0
O 9nH, v=1~127
X 9nH, v=0
After
Touch
key’s
Ch’s
X
X
X
X
O
O
O
O
O
O
O (*1)
O
O
O
X
X
O
X
X
O
O
O
O
O
O
O
O
O
O
O
O
O
Bank select MSB, LSB
Modulation depth
Data entry MSB, LSB
Volume
Pan
Expression
Sustain
Ambience depth
RPN data increment
RPN data decrement
RPN LSB, MSB
All sound off
Reset all controllers
Program
Change : True #
O
*****************
O
0~127
System Exclusive
X
X
System
: Song Position
: Song Select
Common : Tune
X
X
X
X
X
X
System : Clock
Real Time : Commands
O
O
O
O (*2)
Aux
X
X
O
X
X
X
O
X
Note
Number
Pitch Bender
Control Change
0, 32
1
6, 38
7
10
11
64
91
96
97
100, 101
120
121
: Local ON/OFF
: All Notes Off
Messages : Active Sense
: Reset
Mode 1: OMNI ON, POLY
Mode 3: OMNI OFF, POLY
Mode 2: OMNI ON, MONO
Mode 4: OMNI OFF, MONO
*1 Value of Pan for each drum pad and foot pedal is not transmitted via MIDI.
*1 Pan-Werte der einzelnen Pads und Pedale werden nicht über MIDI übertragen.
*1 La valeur de Pan pour chaque pad de batterie et pour la pédale n’est pas transmise via MIDI.
*1 El valor del efecto panorámico (Pan) para cada pulsador y pedal de batería no se transmite a través de MIDI.
*2 The DD-50 can accept Start/Stop signals, received via MIDI, by setting the MIDI clock to “External”.
*2 Das DD-50 spricht auf über MIDI empfangene Start/Stop-Signale an, wenn es auf externen MIDI-Taktgeber (“E”) gestellt ist.
*2 Le DD-50 peut accepter les signaux Start/Stop reçus via MIDI, en réglant l’horloge MIDI sur “External (E)”.
*2 El DD-50 puede aceptar señales de inicio/parada recibidas a través de MIDI, ajustando el reloj MIDI a “Externo (E)”.
O: Yes
X: No
29
Adjusting the Pad’s Sensitivity
The factory default setting for pad sensitivity should provide you with trouble-free use. However, it is possible to
adjust the pad’s sensitivity (0-3, factory default = 2) if you are experiencing one of the problems shown below.
• Striking two pads simultaneously results in one of the pads not sounding.
→ Set the pad sensitivity level to 3. When two pads are simultaneously struck with this setting, both pads will sound
together. However, if you strike the pads with too much force, the voice of a pad that is not struck may also
sound.
• Striking a pad results in other pads also sounding, though they were not struck.
→ Set the pad sensitivity level to 1. With this setting, pads that are not struck will become harder to sound.
However, if you strike two pads simultaneously without enough force, one of the struck pads may not sound.
→ By setting the pad sensitivity level to 0, pads that are not struck will be even harder to sound.
Setting Procedure
1Press the [START/STOP] and [DEMO] buttons simultaneously, “mm” will
appear in the display.
2Press the large [SONG VOLUME] button to enter the pad sensitivity mode.
The currently selected pad sensitivity setting will appear in the display.
SONG
VOLUME
3Turn the DIAL to set the pad sensitivity level (0-3).
4Once again, press the [START/STOP] and [DEMO] buttons simultaneously
to exit the pad sensitivity mode and complete the setting procedure.
• The pad sensitivity setting is
retained in memory, even if the
power is switched off, as long as
batteries are installed or the power
adaptor is connected to an AC
outlet. If batteries are not installed
and the power adaptor is not
connected to an AC outlet, the
sensitivity setting will return to its
factory default setting (2).
Einstellen der Pad-Empfindlichkeit
Die werkseitige Standardeinstellung für die Pad-Empfindlichkeit sorgt im Normalfall für problemlosen Spieleinsatz.
Sollte jedoch eines der im folgenden angeführten Probleme auftreten, können Sie die Pad-Empfindlichkeit (0 bis 3,
Standardeinstellung = 2) höher oder niedriger einstellen.
• Beim gleichzeitigen Anschlagen von zwei Pads erzeugt eines keinen Ton.
→ Stellen Sie die Pad-Empfindlichkeit auf “3” ein. Wenn Sie bei dieser Einstellung zwei Pads anschlagen, erzeugen
beide Ton. Bei zu starkem Anschlagen kann es jedoch vorkommen, das auch andere Pads “mitschwingen”.
• Beim Anschlagen eines Pads erzeugen andere Pads Ton, obwohl sie nicht berührt wurden.
→ Stellen Sie die Pad-Empfindlichkeit auf “1” ein. Bei dieser Einstellung reagieren die Pads weniger empfindlich.
Wenn jedoch zwei Pads gleichzeitig mit zu wenig Kraft angeschlagen werden, klingt eines davon unter
Umständen nicht.
→ Wenn die Pad-Empfindlichkeit auf “0” eingestellt wird, schwingen andere Pads nur bei extremer Anschlagstärke mit.
Einstellvorgang
1Die Tasten [START/STOP] und [DEMO] gleichzeitig drücken. “mm” wird
auf dem Display angezeigt.
2Die größere [SONG VOLUME]-Taste drücken, um auf Einstellmodus für
Pad-Empfindlichkeit zu schalten. Die aktuelle Einstellung wird auf dem
Display angezeigt.
SONG
VOLUME
3Am Wählrad drehen, um die gewünschte Empfindlichkeit einzustellen.
4Erneut die Tasten [START/STOP] und [DEMO] gleichzeitig drücken, um
den Einstellmodus für Pad-Empfindlichkeit zu verlassen und den
Einstellvorgang zu beenden.
30
• Die Pad-Empfindlichkeitseinstellung
bleibt auch beim Ausschalten des
Instruments gespeichert, solange
Batterien eingelegt sind oder ein
Netzadapter angeschlossen ist.
Wenn keine Batterien eingelegt sind
und der Netzadapter nicht
angeschlossen ist, wird die
Empfindlichkeit auf die werkseitige
Standardeinstellung (2)
zurückgesetzt.
Réglage de la sensibilité des pads
Le réglage par défaut en usine de la sensibilité des pads devrait vous permettre une utilisation sans problème.
Cependant, il est possible de régler la sensibilité des pads (de 0 à 3, 2 étant le défaut) au cas où vous seriez confronté
à l’un des problèmes mentionnés ci-dessous.
• En frappant sur deux pads en même temps, vous n’entendez qu’un des pads.
→ Réglez le niveau de sensibilité de pad sur 3. Lorsque vous frappez sur deux pads en même temps avec ce réglage,
les deux pads résonnent ensemble. Cependant, si vous frappez sur les pads avec une force trop grande, vous
pouvez aussi entendre la voix d’un pad que vous n’avez pas touché.
• Le fait de frapper un pad fait aussi résonner d’autres pads, même si vous ne les avez pas touchés.
→ Réglez le niveau de sensibilité de pad sur 1. Avec ce réglage, les pads qui ne sont pas frappés ont plus de mal à
résonner. Cependant, si vous frappez sur les pads avec une force insuffisante, l’un des pads frappés peut ne pas
résonner.
→ En réglant le niveau de sensibilité de pad sur 0, les pads que vous n’aurez pas touché résonneront encore moins.
Procédure de réglage
1Appuyez en même temps sur les boutons [START/STOP] et [DEMO], pour
faire apparaître “mm” sur l’écran.
2Appuyez sur le gros bouton [SONG VOLUME] pour entrer le mode de
sensibilité de pad. Le réglage de sensibilité du pad actuellement sélectionné
apparaît sur l’écran.
SONG
VOLUME
3Tournez la molette DIAL pour fixer le niveau de sensibilité du pad (0 à 3).
4Une fois de plus, appuyez en même temps sur les boutons [START/STOP]
et [DEMO] pour sortir du mode de sensibilité de pad et terminer la
procédure de réglage.
• Le réglage de sensibilité de pad
reste mémorisé, même quand
l’alimentation est coupée, aussi
longtemps que les piles sont en
place ou que l’adaptateur secteur
est branché dans une prise murale.
Quand il n’y a plus de piles dans
l’appareil et que l’adaptateur
secteur est déconnecté à la prise
murale, le réglage de sensibilité
revient au réglage par défaut en
usine (2).
Ajuste de la sensibilidad de los pulsadores
El ajuste de fábrica para la sensibilidad de los pulsadores debe proporcionar un funcionamiento sin problemas. Sin
embargo, es posible ajustar la sensibilidad de los pulsadores (0-3, ajuste de fábrica = 2) si le ocurre alguno de los
problemas que se mencionan a continuación.
• Cuando se accionan dos pulsadores simultáneamente, uno de los pulsadores no suena.
→ Ajuste el nivel de sensibilidad de los pulsadores a 3. Cuando se accionan dos pulsadores simultáneamente con
este ajuste, ambos pulsadores sonarán al mismo tiempo. Sin embargo, si acciona los pulsadores con demasiada
fuerza, la voz de un pulsador que no se ha accionado también puede sonar.
• Al accionar un pulsador, también suenan otros pulsadores, aunque no hayan sido accionados.
→ Ajuste el nivel de sensibilidad a 1. Con este ajuste, será más difícil que suenen los pulsadores que no han sido
accionados. Sin embargo, si acciona dos pulsadores simultáneamente sin suficiente fuerza, es posible que no
suene uno de los pulsadores.
→ Ajustando el nivel de sensibilidad de los pulsadores a 0, todavía será más difícil que suenen los pulsadores que
no se accionan.
Procedimiento de ajuste
1Presione simultáneamente los botones [START/STOP] y [DEMO], y “mm”
aparecerá en el visualizador.
2Presione el botón grande [SONG VOLUME] para entrar en el modo de
sensibilidad de los pulsadores. El ajuste de la sensibilidad de los pulsadores
actualmente seleccionado aparecerá en el visualizador.
SONG
VOLUME
3Gire el DIAL para ajustar el nivel de sensibilidad de los pulsadores (0-3).
4Presione otra vez simultáneamente los botones [START/STOP] y [DEMO]
para salir del modo de sensibilidad de los pulsadores y completar este
procedimiento de ajuste.
• El ajuste de la sensibilidad de los
pulsadores se retienen en la
memoria, incluso cuando se
desconecta la alimentación,
siempre y cuando haya pilas
instaladas o el adaptador de CA
esté enchufado a la toma de
corriente. Si las pilas no están
instaladas y el adaptador de
alimentación no está enchufado a
una toma de corriente, el ajuste
retornará al ajuste de fábrica (2).
31
For details of products, please contact your nearest Yamaha or the
authorized distributor listed below.
Pour plus de détails sur les produits, veuillez-vous adresser à Yamaha
ou au distributeur le plus proche de vous figurant dans la liste suivante.
NORTH AMERICA
CANADA
Yamaha Canada Music Ltd.
135 Milner Avenue, Scarborough, Ontario,
M1S 3R1, Canada
Tel: 416-298-1311
U.S.A.
Yamaha Corporation of America
6600 Orangethorpe Ave., Buena Park, Calif. 90620,
U.S.A.
Tel: 714-522-9011
MIDDLE & SOUTH AMERICA
MEXICO
Die Einzelheiten zu Produkten sind bei Ihrer unten aufgeführten Niederlassung und bei Yamaha Vertragshändlern in den jeweiligen
Bestimmungsländern erhältlich.
Para detalles sobre productos, contacte su tienda Yamaha más cercana
o el distribuidor autorizado que se lista debajo.
ASIA
ITALY
Yamaha Musica Italia S.P.A.,
Home Keyboard Division
Viale Italia 88, 20020 Lainate (Milano), Italy
Tel: 02-935-771
SPAIN
Yamaha-Hazen Electronica Musical, S.A.
Jorge Juan 30, 28001, Madrid, Spain
Tel: 91-577-7270
PORTUGAL
Valentim de Carvalho CI SA
Estrada de Porto Salvo, Paço de Arcos 2780 Oeiras,
Portugal
Tel: 01-443-3398/4030/1823
GREECE
Yamaha De Mexico S.A. De C.V.,
Departamento de ventas
Javier Rojo Gomez No.1149, Col. Gpe Del
Moral, Deleg. Iztapalapa, 09300 Mexico, D.F.
Tel: 686-00-33
BRASIL
Yamaha Musical Do Brasil LTDA.
Ave. Reboucas 2636, São Paulo, Brasil
Tel: 011-853-1377
PANAMA
Philippe Nakas S.A.
Navarinou Street 13, P.Code 10680, Athens, Greece
Tel: 01-364-7111
SWEDEN
Yamaha Scandinavia AB
J. A. Wettergrens Gata 1
Box 30053
S-400 43 Göteborg, Sweden
Tel: 031 89 34 00
DENMARK
Yamaha De Panama S.A.
Edificio Interseco, Calle Elvira Mendez no.10,
Piso 3, Oficina #105, Ciudad de Panama, Panama
Tel: 507-69-5311
OTHER LATIN AMERICAN COUNTRIES
AND CARIBBEAN COUNTRIES
Yamaha Music Latin America Corp.
6101 Blue Lagoon Drive, Miami, Florida 33126,
U.S.A.
Tel: 305-261-4111
EUROPE
THE UNITED KINGDOM
Yamaha-Kemble Music (U.K.) Ltd.
Sherbourne Drive, Tilbrook, Milton Keynes,
MK7 8BL, England
Tel: 01908-366700
IRELAND
Danfay Ltd.
61D, Sallynoggin Road, Dun Laoghaire, Co. Dublin
Tel: 01-2859177
GERMANY/SWITZERLAND
Yamaha Europa GmbH.
Siemensstraße 22-34, 25462 Rellingen, F.R. of
Germany
Tel: 04101-3030
YS Copenhagen Liaison Office
Generatorvej 8B
DK-2730 Herlev, Denmark
Tel: 44 92 49 00
FINLAND
Warner Music Finland OY/Fazer Music
Aleksanterinkatu 11, P.O. Box 260
SF-00101 Helsinki, Finland
Tel: 0435 011
NORWAY
Narud Yamaha AS
Grini Næringspark 17
N-1345 Østerås, Norway
Tel: 67 14 47 90
ICELAND
Skifan HF
Skeifan 17 P.O. Box 8120
IS-128 Reykjavik, Iceland
Tel: 525 5000
OTHER EUROPEAN COUNTRIES
Yamaha Europa GmbH.
Siemensstraße 22-34, 25462 Rellingen, F.R. of
Germany
Tel: 04101-3030
AFRICA
AUSTRIA
Yamaha Music Austria
Schleiergasse 20, A-1100 Wien Austria
Tel: 0222-60203900
THE NETHERLANDS
Yamaha Corporation,
International Marketing Division
Nakazawa-cho 10-1, Hamamatsu, Japan 430
Tel: 053-460-2312
Yamaha Music Belgium
Keiberg Imperiastraat 8, 1930 Zaventem, Belgium
Tel: 02-7258220
FRANCE
Yamaha Musique France,
Division Claviers
BP 70-77312 Marne-la-Valée Cedex 2, France
Tel: 01-64-61-4000
Tom Lee Music Co., Ltd.
11/F., Silvercord Tower 1, 30 Canton Road,
Tsimshatsui, Kowloon, Hong Kong
Tel: 730-1098
INDONESIA
PT. Yamaha Music Indonesia (Distributor)
PT. Nusantik
Gedung Yamaha Music Center, Jalan Jend. Gatot
Subroto Kav. 4, Jakarta 12930, Indonesia
Tel: 21-520-2577
KOREA
Cosmos Corporation
#131-31, Neung-Dong, Sungdong-Ku, Seoul
Korea
Tel: 02-466-0021~5
MALAYSIA
Yamaha Music Malaysia, Sdn., Bhd.
16-28, Jalan SS 2/72, Petaling Jaya, Selangor,
Malaysia
Tel: 3-717-8977
PHILIPPINES
Yupangco Music Corporation
339 Gil J. Puyat Avenue, P.O. Box 885 MCPO,
Makati, Metro Manila, Philippines
Tel: 819-7551
SINGAPORE
Yamaha Music Asia Pte., Ltd.
Blk 17A Toa Payoh #01-190 Lorong 7
Singapore 1231
Tel: 354-0133
TAIWAN
Kung Hsue She Trading Co., Ltd.
No. 322, Section 1, Fu Hsing S. Road,
Taipei 106, Taiwan. R.O.C.
Tel: 02-709-1266
THAILAND
Siam Music Yamaha Co., Ltd.
865 Phornprapha Building, Rama I Road,
Patumwan, Bangkok 10330, Thailand
Tel: 2-215-3443
THE PEOPLE’S REPUBLIC OF CHINA
AND OTHER ASIAN COUNTRIES
Yamaha Corporation,
International Marketing Division
Nakazawa-cho 10-1, Hamamatsu, Japan 430
Tel: 053-460-2317
OCEANIA
AUSTRALIA
Yamaha Music Australia Pty. Ltd.
17-33 Market Street, South Melbourne, Vic. 3205,
Australia
Tel: 3-699-2388
NEW ZEALAND
Yamaha Music Nederland
Kanaalweg 18G, 3526KL, Utrecht, The Netherlands
Tel: 030-2828411
BELGIUM
HONG KONG
MIDDLE EAST
TURKEY/CYPRUS
Yamaha Musique France, Division Export
BP 70-77312 Marne-la-Valée Cedex 2, France
Tel: 01-64-61-4000
OTHER COUNTRIES
Yamaha Corporation,
International Marketing Division
Nakazawa-cho 10-1, Hamamatsu, Japan 430
Tel: 053-460-2312
HEAD OFFICE
Yamaha Corporation, Electronic Musical Instrument Division
[PK] 7
Nakazawa-cho 10-1, Hamamatsu, Japan 430
Tel: 053-460-3273
Music Houses of N.Z. Ltd.
146/148 Captain Springs Road, Te Papapa,
Auckland, New Zealand
Tel: 9-634-0099
COUNTRIES AND TRUST
TERRITORIES IN PACIFIC OCEAN
Yamaha Corporation,
International Marketing Division
Nakazawa-cho 10-1, Hamamatsu, Japan 430
Tel: 053-460-2317
M.D.G., EMI Division © 1996 Yamaha Corporation
VU54270 Printed in Malaysia