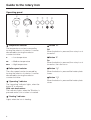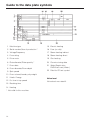
1
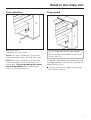
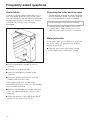
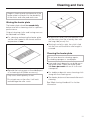
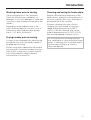
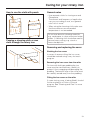
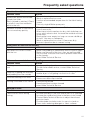
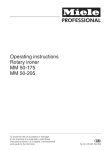
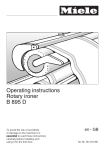
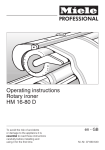
Operating instructions
Rotary iron
HM 5316
To prevent accidents
and machine damage
read these instructions
before
installation or use.
UV
M.-Nr. 06 858 370
Contents
IMPORTANT SAFETY INSTRUCTIONS . . . . . . . . . . . . . . . . . . . . . . . . . . . . . . . . . . . . . . . . . . . 3
Guide to the rotary iron . . . . . . . . . . . . . . . . . . . . . . . . . . . . . . . . . . . . . . . . . . . . . . . . . . . . . . . 5
Operating panel . . . . . . . . . . . . . . . . . . . . . . . . . . . . . . . . . . . . . . . . . . . . . . . . . . . . . . . . . . . . . . 6
Foot control bar . . . . . . . . . . . . . . . . . . . . . . . . . . . . . . . . . . . . . . . . . . . . . . . . . . . . . . . . . . . . . . 7
Finger guard. . . . . . . . . . . . . . . . . . . . . . . . . . . . . . . . . . . . . . . . . . . . . . . . . . . . . . . . . . . . . . . . . 7
Use. . . . . . . . . . . . . . . . . . . . . . . . . . . . . . . . . . . . . . . . . . . . . . . . . . . . . . . . . . . . . . . . . . . . . . . . 8
Correct dampness . . . . . . . . . . . . . . . . . . . . . . . . . . . . . . . . . . . . . . . . . . . . . . . . . . . . . . . . . . . . 8
Preparing the laundry. . . . . . . . . . . . . . . . . . . . . . . . . . . . . . . . . . . . . . . . . . . . . . . . . . . . . . . . . . 8
Ironing tips . . . . . . . . . . . . . . . . . . . . . . . . . . . . . . . . . . . . . . . . . . . . . . . . . . . . . . . . . . . . . . . . . . 8
Ironing laundry . . . . . . . . . . . . . . . . . . . . . . . . . . . . . . . . . . . . . . . . . . . . . . . . . . . . . . . . . . . . . . . 9
Steaming laundry . . . . . . . . . . . . . . . . . . . . . . . . . . . . . . . . . . . . . . . . . . . . . . . . . . . . . . . . . . . . . 9
To feed thicker items . . . . . . . . . . . . . . . . . . . . . . . . . . . . . . . . . . . . . . . . . . . . . . . . . . . . . . . . . . 9
After ironing . . . . . . . . . . . . . . . . . . . . . . . . . . . . . . . . . . . . . . . . . . . . . . . . . . . . . . . . . . . . . . . . . 9
Frequently asked questions . . . . . . . . . . . . . . . . . . . . . . . . . . . . . . . . . . . . . . . . . . . . . . . . . . 10
Power failure. . . . . . . . . . . . . . . . . . . . . . . . . . . . . . . . . . . . . . . . . . . . . . . . . . . . . . . . . . . . . . . . 10
Protecting the roller and iron cover . . . . . . . . . . . . . . . . . . . . . . . . . . . . . . . . . . . . . . . . . . . . . . 10
Motor protection . . . . . . . . . . . . . . . . . . . . . . . . . . . . . . . . . . . . . . . . . . . . . . . . . . . . . . . . . . . . . 10
Cleaning and Care . . . . . . . . . . . . . . . . . . . . . . . . . . . . . . . . . . . . . . . . . . . . . . . . . . . . . . . . . . 11
Waxing the heater plate . . . . . . . . . . . . . . . . . . . . . . . . . . . . . . . . . . . . . . . . . . . . . . . . . . . . . . . 11
Cleaning the heater plate . . . . . . . . . . . . . . . . . . . . . . . . . . . . . . . . . . . . . . . . . . . . . . . . . . . . . . 11
After sales service . . . . . . . . . . . . . . . . . . . . . . . . . . . . . . . . . . . . . . . . . . . . . . . . . . . . . . . . . . 13
Guide to the data plate symbols . . . . . . . . . . . . . . . . . . . . . . . . . . . . . . . . . . . . . . . . . . . . . . . 14
Miele Ironing Handbook. . . . . . . . . . . . . . . . . . . . . . . . . . . . . . . . . . . . . . . . . . . . . . . . . . . . . . 15
Introduction. . . . . . . . . . . . . . . . . . . . . . . . . . . . . . . . . . . . . . . . . . . . . . . . . . . . . . . . . . . . . . . . 16
Caring for your rotary iron. . . . . . . . . . . . . . . . . . . . . . . . . . . . . . . . . . . . . . . . . . . . . . . . . . . . 18
Frequently asked questions . . . . . . . . . . . . . . . . . . . . . . . . . . . . . . . . . . . . . . . . . . . . . . . . . . 20
Installation instructions . . . . . . . . . . . . . . . . . . . . . . . . . . . . . . . . . . . . . . . . . . . . . . . . . . . . . . 23
Installation site . . . . . . . . . . . . . . . . . . . . . . . . . . . . . . . . . . . . . . . . . . . . . . . . . . . . . . . . . . . . . . 24
Installation . . . . . . . . . . . . . . . . . . . . . . . . . . . . . . . . . . . . . . . . . . . . . . . . . . . . . . . . . . . . . . . . . 24
Air extraction . . . . . . . . . . . . . . . . . . . . . . . . . . . . . . . . . . . . . . . . . . . . . . . . . . . . . . . . . . . . . . . 24
Condensate trap . . . . . . . . . . . . . . . . . . . . . . . . . . . . . . . . . . . . . . . . . . . . . . . . . . . . . . . . . . . . 24
Electrical connection . . . . . . . . . . . . . . . . . . . . . . . . . . . . . . . . . . . . . . . . . . . . . . . . . . . . . . . . . 25
Help to protect the environment . . . . . . . . . . . . . . . . . . . . . . . . . . . . . . . . . . . . . . . . . . . . . . . 26
2
IMPORTANT SAFETY INSTRUCTIONS
Read all instructions before installation or
use. To prevent injury and machine
damage.
Electrical safety
Be certain this appliance is properly
installed and grounded by an authorized
technician. To guarantee the electrical safety
of this appliance, continuity must exist
between the appliance and an effective
grounding system. It is imperative that this
basic safety requirement be met and tested.
Consult a qualified electrician if in doubt.
The manufacturer cannot be held
responsible for damage which is the direct
or indirect result of incorrect installation or
connection.
Use
This rotary iron is only intended for
ironing fabrics washed in water. Check
the fabric care labels to be sure the
materials can be ironed.
Only allow trained personnel to operate
the machine.
Do not let children play in, on or near the
rotary iron. Do not let them play with the
controls or operate the unit.
Be aware of loose fitting or hanging
garments when using the rotary iron.
Sleeves, apron ties, bracelets, etc. could be
caught by the roller.
Danger of burns when the heater plate is
touched. Do not smooth an item between
the heater plate and roller.
When ironing double layered items, do
not reach between the layers to
straighten out the fabric. Burns could result if
you cannot extract your hands before the
laundry is pulled into the rotary iron.
Do not reach into pockets when the open
side faces the hot heater plate.
Smooth creases on the feed board not
right in front of the hot heater plate. Feed
pillow cases and duvet covers into the rotary
iron with the open end first.
Test the finger guard before each use to
avoid injury.
Before switching into reverse, assure that
no harm can be done to oneself.
Do not place laundry on top of the heater
plate. Danger of fire!
Keep a fire extinguisher close to the
machine in case laundry catches fire.
Do not operate the rotary iron in a room
where cleaning machines operate with
solvents containing CFC.
The rotary iron should only be used in a
room with a relatively low humidity level.
3
IMPORTANT SAFETY INSTRUCTIONS
Do not damage, remove or bypass any
of the safety features and controls of the
rotary iron.
Do not operate a machine with an
electrical fault until repaired.
Repairs to electrical appliances should
only be carried out by an authorized
technician in accordance with local and
national safety regulations. Repairs and
other work by unqualified persons could be
dangerous. The manufacturer cannot be
held responsible for unauthorized work.
Faulty components must only be
replaced with genuine Miele spare parts.
Only genuine Miele spare parts can
guarantee the safe operation of this
machine.
Before installation or service, disconnect
the power supply to the work area by
removing the fuse or "tripping" the circuit
breaker to the unit.
Any removable outer panels must be in
place, and all moving or electrical parts
shielded before the machine is operated.
Ensure that any person operating this
machine is familiar with these safety
instructions.
Turn the machine off before greasing any
parts.
Regard the national and local codes and
standards.
4
Using accessories
Only use genuine Miele accessories. If
other parts are used, guarantee,
performance and product liability claims
may become void.
SAVE THESE INSTRUCTIONS
Guide to the rotary iron
1 Heater plate with finger guard
2 Roller
3 Feed board
4 Operating panel
5 Laundry container
6 Cover for emergency handle insert
7 Emergency handle
8 Ironing table
9 Exhaust connector
10 Foot control bar
5
Guide to the rotary iron
Operating panel
Temperature selector
The temperature can be increased by
turning the selector clockwise. It can be
decreased by turning the selector
counterclockwise.
ß
= Low temperature
ßß
= Medium temperature
ßßß
= High temperature
Roller speed selector
The roller speed can be increased by
turning the selector clockwise. It can be
decreased by turning the selector
counterclockwise.
"Operating" indicator
The "operating" indicator lights, when the
button "I" is pressed.
With coin mechanism:
The indicator lights, when the "I" button is
pressed and a coin or token is inserted.
"Heating" indicator
Lights when the iron is heating.
6
Button "0"
Off
When the button is pressed, the rotary iron is
turned off.
Button "I"
On
When the button is pressed, the rotary iron is
turned on, the roller turns.
Button "O"
When the button is pressed the heater plate
lowers.
Button "P"
When the button is pressed the heater plate
raises.
Guide to the rotary iron
Foot control bar
1st Switch point
Steaming, the roller stops
2nd Switch point and button "O" pressed:
The heater plate lowers and the roller turns.
2nd Switch point and button "P" pressed:
The heater plate rises and the roller turns
backwards. Only for removing the ironing
cover and padding. (See "Cleaning and
Care" for more information.)
Finger guard
,The finger guard is a safety feature
which must be checked before each use
of the rotary iron.
If fingertips get between the feed board and
the finger guard 1, the roller will stop and the
heater plate will rise.
^ Turn the rotary iron on again by pressing
the "I" button and "O".
7
Use
Correct dampness
Ironing tips
For best results, the residual moisture of the
laundry should be 25%.
– To avoid creasing stop the roller, pull the
item back slightly and smooth out. If
necessary, dampen again with a wet cloth
or spray bottle.
Laundry which contains more than 50%
synthetic fibers must not be ironed in this
machine. The synthetics might melt at the
high temperatures. Laundry with less
synthetics can be ironed at a low
temperature.
Preparing the laundry
^ Sort the laundry according to how much
heat is required for ironing.
^ Check the fabric care label for the correct
ironing temperature of the laundry.
Care
symbol
Fabric
J
Dot
symbol
Temp.
Do not iron
G
Polyester /
Rayon
ß
cool iron
(low temp.)
H
Silk /
Woolens
ßß
medium
hot iron
(medium
temp.)
I
Cottons /
Linen
ßßß
hot iron
(high
temp.)
^ Start ironing at a low setting and gradually
increase the temperature according to the
fabric being ironed.
^ If decreasing the temperature is
necessary, it is only reached, once the
"Heating" indicator lights again.
8
– If possible, always use the whole length of
the roller, otherwise it will lose its elasticity.
– For small items such as handkerchiefs,
alternate between the right and left hand
sides of the roller.
– Iron starched items last to avoid any
starch transfer to other items.
– Items with buttons, zippers or holes should
be ironed face down on to the roller so
that they are pressed into the cushioned
surface.
– Cover zippers, metal buttons, and metal
hooks with a cloth to protect the heater
plate.
– Buttons, zippers and trim that is not heat
resistant or very large buttons should not
be ironed. They may damage the heater
plate.
Caution!
Before using for the first time clean the
heater plate by ironing an old cloth over
the whole roller length.
Use
Ironing laundry
Steaming laundry
^ Turn the unit on at the wall switch.
^ To steam laundry, press the foot pedal
down to the 1st switch point.
^ Ironing with coin mechanism:
Insert coins or token.
^ Press "I" to turn the iron on.
^ Select the temperature depending on the
laundry with the temperature selector.
^ Press the "O" button.
The heater plate lowers when a temperature
of about 140°F (60°C) is reached.
^ Select a roller speed depending on
dampness and type of laundry.
^ Test the finger guard for proper operation.
The roller stops.
To feed thicker items
^ Press the foot pedal down to the 2nd
switch point.
The heater plate raises off the roller.
^ Release the foot pedal and the roller turns
again.
,The ironed laundry can be very hot
when coming right off the rotary iron.
Wear gloves if necessary.
,The finger guard is a safety feature
which must be checked each time the
rotary iron is used.
Let the laundry completely cool before
packing or stacking. Hot laundry can
combust. Danger of fire!
Once the "Heating" indicator goes out, the
rotary iron is ready for operation.
^ Insert the prepared laundry by feeding it
over the feed board.
^ Smooth the items during ironing from the
middle to the edges.
^ Use the whole roller width to iron small
laundry items, alternating items from left to
right.
If decreasing the temperature is necessary,
it is only reached, after the "Heating"
indicator lights again.
Ironing with coin mechanism:
Once the preprogrammed running time has
counted down, the heater plate raises and
the roller stops turning.
To increase the durability of the roller
motor and the ironing cover raise the
heater plate and lower the temperature
during breaks.
After ironing
To dry the roller cover, turn the heat off and
let the rotary iron run for 5 minutes with the
heater plate lowered.
^ Press the "P" button to raise the heater
plate.
^ Turn the rotary iron off by pressing the "0"
button.
^ Turn the unit off at the main power switch.
9
Frequently asked questions
Power failure
Protecting the roller and iron cover
If there is a power failure when the iron is in
use, the heater plate will stay on the roller.
The item being ironed will then be held there
possibly becoming scorched. If no laundry
is ironed the ironing cover could be
damaged.
– During breaks and after ironing the heater
plate should be raised. The roller and the
iron cover durability will be increased.
Avoid running the iron without laundry.
– Use the whole roller width to iron small
laundry items. When used only on one
side the roller and iron cover is strained.
Motor protection
If the motor gets too hot due to an overload,
the motor shuts off automatically and the
heater plate raises.
^ After the motor has sufficiently cooled,
press the I button and restart ironing.
^ Pull the emergency handle 1 from its
bracket.
^ Turn the cover 2 to the side.
^ Insert the emergency handle in the
opening.
^ Turn the handle clockwise to raise the
heater plate from the roller.
If the heater plate was raised and a
noticeable resistance is felt, turn the handle
twice counterclockwise.
^ Remove the emergency handle after use
from the opening and put it back in the
bracket.
^ When the power is restored, press the "I"
button to turn the rotary iron on.
10
Cleaning and Care
Regular cleaning and maintenance of the
heater plate is essential for the durability
of the motor and roller pad and cover.
Waxing the heater plate
The heater plate should be waxed daily
before use with a cleaning cloth for optimum
performance.
Original cleaning cloths and ironing wax can
be obtained from Miele.
^ For cleaning and waxing the heater plate,
set the roller speed to the lowest and the
temperature to ßßß.
^ Wrap the two ends over and feed the cloth
into the rotary iron like a laundry item with
the long side (arrow) first.
^ Starting from left to right, the cloth is fed
into the iron until the entire roller length is
covered.
Cleaning the heater plate
Do not use abrasive cleaning agents,
scrubbing sponges or sand paper.
^ Sprinkle the ironing wax on the middle part
of a cleaning cloth (Miele accessory).
Only use a small quantity of wax.
Do not get wax on the roller, it will melt
and damage the roller cover.
^ Lime and starch deposits can build up on
the heater plate. Clean the heater plate
1-3 times per week with an oil cloth and
cleanpaste.
^ For stubborn deposits use a cleaning cloth
along with the cleaning mat.
^ The heater plate must be waxed after each
cleaning.
See "Miele Ironing Handbook" for further
information.
11
Cleaning and Care
Discoloration of the ironing cover
Applying an ironing cover
A slight to heavily brown coloration of the
ironing cover is normal.
^ Raise the heater plate and turn the rotary
iron off.
To avoid the cover from turning black:
^ Lay the ironing cover on the roller
(parallel).
– Always use the complete roller width.
– Space out smaller items, alternating from
left to right.
– Raise the heater plate and lower the
temperature during breaks.
Washing the ironing cover
The ironing cover should not be washed if
only slightly discolored (yellowing normal).
^ A heavily soiled cover can be washed at a
hot temperature 203°F (95°C), spun and
returned to the roller while still damp.
^ Before removing the ironing cover to clean
or replace it, turn the rotary iron off, let the
heater plate cool and remove the feed
board.
^ Unhook the laundry pick-off units off the
roller one after another.
^ Turn the rotary iron on "I" and raise the
heater plate "P".
^ Press the foot pipe to the 2nd switch point
and remove the ironing cover while the
roller turns backwards.
^ Turn the rotary iron on "I" and lower the
heater plate "O". The ironing cover is
pulled in.
^ Steel wool bits will fall on the ironing table
when removing or replacing the ironing
cover. Clean them immediately.
A repadding is necessary if an air gap is
visible between the lower edge of the heater
plate and the roller (laundry outlet).
To replace or renew the roller padding call
Technical Service.
Laundry pick-off unit
Clean the tips of the laundry pick-off unit’s to
remove dirt and starch every 2-3 months or
as needed.
^ Pull the laundry unit out and clean with
warm water.
Maintenance
Call Technical Service for the following
maintenance.
^ When the roller needs repadding, check
and grease the swivel joints.
^ Check and replace the carbon brushes.
12
After sales service
In the event of a problem, please contact the
Miele Technical Service Department at the
phone number on the back of this booklet.
When contacting Technical Service please
quote the model (M.-Nr.) and serial number
(Fabr.-Nr.) of the machine. These can be
found on the silver data plate.
Only use original Miele spare parts for
maintenance or repairs on this machine.
13
Guide to the data plate symbols
1 Machine type
15 Electric heating
2 Serial number/Year of production *
16 Fuse (on site)
3 Voltage/Frequency
17 Steam heating indirect
4 Fuse rating
18 Steam heating direct
5 Drive motor
19 Gas heating
6 Plate diameter/Plate quantity *
20 Commissioning date
7 Drum data
21 Water-Registration
DVGW-test cert (Water)
8 Drum diameter/Drum depth
9 Spin speed
22 Field for CE test symbol
10 Drum volume/Laundry dry weight
11 Kinetic Energy
Noise level
12 Ex. time to top speed
Noise level was rated A.
13 Breaking time
14 Heating
* Not valid for this machine.
14
Miele Ironing Handbook
Introduction
General notes on ironing
Fabrics suitable for ironing
Correctly ironed laundry will be smooth,
crease-free and not misshapen. However, in
order to achieve this, the correct
combination of mechanical energy, heat and
steam is required.
Different types of fabric react differently to
being ironed. Cottons and linens expand
when wet, and ironing at a high temperature
and pressure will make these fabrics
smooth, shiny and dry.
Mechanical energy is achieved by
producing the right amount of pressure and
contact between the iron and the item
passing through it.
Synthetic fabrics are sensitive to heat and
melt at high temperatures. Manufacturers
state the fibers used in the textiles on the
care label, e.g. 65% cotton and 35%
polyester.
Heat is needed to create steam, which helps
make the fabric more pliable and easier to
iron. To avoid damage to fabrics, the
temperature must be right for the type of
fabric being ironed.
Steam occurs when damp items are ironed
at temperatures in excess of 212°F (100°C).
When water changes to steam, it expands
rapidly to heat and penetrate the fabric. As
the moisture evaporates, a film of steam is
created which helps the fabric glide through
the rotary iron.
Most care labels also carry washing
instructions, in the form on international
laundry care symbols. These symbols tell
you whether or not the items can be ironed,
and at which temperature setting.
Care
symbol
Fabric
J
Dot
symbol
Temp.
Do not iron
G
Polyester /
Rayon
ß
cool iron
(low temp.)
H
Silk /
Woolens
ßß
medium
hot iron
(medium
temp.)
I
Cottons /
Linen
ßßß
hot iron
(high
temp.)
How fabrics should be ironed
^ Buttons, zippers and ties should face the
roller covering as they are fed into the iron
to prevent them from damaging the heater
plate.
Do not iron items with fringe, thin ties or
straps. These could get tangled in the
roller and cause a fault. Heat-sensitive
items may be ironed at a higher
temperature if a damp linen or cotton
cloth is placed between the item and the
heater plate.
16
Introduction
Washing items prior to ironing
Cleaning and caring for heater plate
The washing process is very important.
Follow the manufacturers guidelines on
detergent. It too much detergent is used and
is not fully rinsed, residues can be left on the
laundry.
Regular cleaning and maintenance of the
heater plate is essential for the protection of
the motor and the roller cover, and helps to
prolong the life of the machine.
Depending on the hardness level of the
water, limescale deposits can also occur in
areas with a water hardness level greater
than 4 (~21° dH or 3.8 mmol/l).
Drying laundry prior to ironing
For items to be completely dry after passing
through the iron once, the laundry needs to
be dried before ironing.
Good ironing results depend on the residual
moisture level. A minimum residual moisture
level of 25% is necessary to obtain a good
finish. Starched items need a residual
moisture level of at least 40%.
A Nomex cleaning cloth with a Scotch
cleaning mat can be used at maximum
speed and temperatures up to 284°F
(140°C). A Scotch cleaning strip can be
used at temperatures up to 212°F (100°C).
Wax must be applied to reduce friction.
Do not use abrasive cleaning materials,
e.g. sand paper, to clean aluminum heater
plates. A cleaning cloth should be used to
remove heavy soiling, e.g. starch or
limescale deposits.
17
Caring for your rotary iron
Accessories for cleaning
Waxing and cleaning
Nomex cleaning cloth
max. 284°F (140°C)
For daily removal of residue and starch from
the roller.
At the end of the workday or as needed
(to clean light deposits): apply a small
quantity of Cleanpaste with a clean wax
cloth. This will loosen any minor soiling
overnight, and help prevent the build-up of
deposits on the rotary iron. For best results,
use the whole width of the iron.
Cleaning mat, round-grained
max. 284°F (140°C)
For daily removal of residue and starch from
the roller.
Accessories for waxing
Wax cloth with pouch
max. 392°F (200°C)
For smooth ironing it may be necessary to
wax the heater plate. Mostly used in
commercial settings where the iron is used
40 hrs per week.
Wax
1.1 lb (0.5 kg)
Cleanpaste
6.6 lb (3 kg)
Use as needed. If items being pressed are
heavily starched or if pressing starched
items 8 hrs per day the iron may need to be
cleaned using Cleanpaste once per week. If
heavy starch is not used Cleanpaste may
not be needed. Use a different wax cloth
to apply Cleanpaste, do not use the same
cloth that has been used for wax.
^ Using a spatula, spread the Cleanpaste
about 1 ¼ to 2 inches (3-5 cm) wide inside
the cloth pouch.
^ Close the pouch, and pass the cloth
through the machine.
At the beginning of each working day:
pass a cleaning cloth through the machine.
This will remove any loosened deposits from
the day before. For best results, use the
whole width of the iron.
If needed, use a wax cloth with ironing wax.
Only use a small quantity of wax in the
morning. The iron can be used as required
without adding any more wax.
^ Place some granular wax in the pouch of
the wax cloth.
^ Close the pouch and feed the cloth
through the iron with the non-rubber side
facing the heater plate.
^ Run the machine on the ßßß setting.
Use the wax sparingly to avoid the ironing
cloth from becoming too smooth.
18
Caring for your rotary iron
How to use the cloth with pouch
General notes
– Use separate cloths for ironing wax and
Cleanpaste.
The amount and frequency of application
can vary according to use, as a general
rule "Less is more".
– When using the cleaning cloth make sure
that the maximum recommended
temperature is not exceeded.
Passing a cleaning cloth or wax
cloth through the rotary iron
Do not use abrasive cleaning materials,
e.g. sand paper, to clean aluminum heater
plates. A cleaning cloth should be used to
remove heavy soiling, e.g. starch or
limescale deposits.
Removing and replacing the cover
Washing the iron cover
In cases of severe soiling, the iron cover
should be washed using a very hot wash
program.
Removing the iron cover from the roller
On irons with leaf-type padding the iron
cover must be removed very carefully to
prevent it from snagging and damaging the
padding. The bottom layer of the cover must
be carefully eased away from the padding.
Fitting the iron cover on the roller
If a new ironing cover is being fitted it should
first be washed in a Cotton or Normal
program. See "Cleaning and Care" for more
information.
19
Frequently asked questions
Creases and wrinkles
Possible cause
Starch deposits
Solution
– Adjust the quantity of detergent to the water hardness in
your area.
– If necessary, install a water softener
– Clean the heater plate
– Adjust the quantity of detergent
– Ensure a sufficient number of rinses are carried out
– Clean the heater plate
– Clean the heater plate
Too much residual moisture
– Dry the wash until it has reached the recommended
Limescale deposits
Detergent deposits
residual moisture level.
– Reduce the roller speed
Not enough residual moisture
– Dampen the laundry until it contains 25% residual
moisture.
– Wash or replace the cover
The iron cover is too smooth
– Clean the heater plate
– Reset the throttle valve (tighten as much as possible)
The exhaust duct is faulty
– Check the ducting and the condensate trap in the ducting
(roller is too cold or damp)
Contact Miele Technical Service
– Have the padding adjusted
Too much padding
Contact Miele Technical Service
– Have the temperature control, heater elements,
Temperature too high/too low
thermostat and limiter tested.
Contact Miele Technical Service
The laundry or the cleaning cloth go through at an angle
Possible cause
Solution
Machine is not leveled correctly – Have the machine checked for correct installation
Contact Miele Technical Service
– Use the full width of the iron evenly
Ironing in once place has
caused padding to become
uneven
– Adjust the padding as necessary
Padding is uneven
Contact Miele Technical Service
Uneven contact due to deposits – Clean the heater plate
on the heater plate
– Have the pressure checked
Pressure is uneven
Contact Miele Technical Service
– Have the exhaust ducting checked
Padding has deteriorated
– Replace padding (contact Miele Technical Service)
around the exhaust ducting
– After use, turn off the heat and run the iron for 5 minutes
to dry out the padding, see "Use - After Ironing".
20
Frequently asked questions
Discoloration of the iron cover
Possible cause
Solution
Brown/Dark yellow: Normal due – Clean the heater plate
– Wash or replace the iron cover
to heat from roller
Black (striped or patches): Fibers – Use the recommended temperature for the fabric being
ironed
or plastics may have melted or
Use only original Miele spare parts
–
burnt to the iron
Jet-black on ends of roller which
has occurred very quickly.
– Check the air supply to the room. Get fresh air into the
room if necessary.
– When items to be ironed are too dry, static build-up can
occur which attracts dust. Increase the residual moisture
in the wash.
– Running the ironer empty too long can cause a build-up
of static. Use wax or cleanpaste.
– Wash or replace the iron cover if it becomes dirty
– Incorrect operation due to uneven ironing
Water marks or stains on the laundry
Possible cause
Solution
– Make sure padding is fitted evenly with no holes or gaps
Item does not come in contact
– Make sure the ends of the iron cover are well brushed
with the iron
out to ensure a smooth finish and to prevent water marks
on the laundry
Contact Miele Technical Service
Water marks or rust stains on the padding
Possible cause
Solution
Padding was not ironed dry after – Iron the padding dry after use
– Throttle valve needs service, contact Miele Technical
use
Service.
Damp air is getting into the roller – Check the air supply to ensure that damp air, e.g. from a
tumble dryer, is not getting into the iron or roller
and padding from the outside
– Check venting direction
Extraction ducting is too short
– Have a non-return flap installed
Ducting is blocked or too narrow – Have ducting tested
– Have the exhaust system cleaned
Contact Miele Technical Service
Build-up of static
Possible cause
Solution
– Increase humidity in the room where the iron is operated
Fabrics attract static during
– Increase the residual moisture in the items to be ironed
ironing
– Contact Miele Technical Service to adjust the exhaust
emission levels
– Provide rubber insulation mats for users to stand on
– Use a static reducing detergent or fabric softener
21
22
Installation Instructions
Installation instructions
Condensate trap
The rotary iron should be installed by a
Miele trained installer.
Installation site
,Do not operate the rotary iron in a
room where cleaning machines are
operated with solvents containing CFC.
These vapors could damage the machine.
The machine does not require any special
anchorage or base installation.
^ Select a location which has sufficient light
for comfortable operation.
Installation
^ Level the rotary iron with the 4 height
adjustable feet. Hold the level on the front
and side columns.
Air extraction
^ The on-site ducting must not be connected
to a chimney which is used by gas, solid
fuel or oil fire boilers. It must be kept
separate from any dryer exhaust system.
^ The warm, moist exhaust should be
discharged outside by the shortest route
possible.
^ To ensure optimum air flow, the ducting
should contain as few bends as possible
and airtight connections.
^ Cover the open end at the outside with a
weather hood.
24
A condensate trap must be installed at the
lowest point to prevent condensation from
collecting in the duct.
Installation instructions
Electrical connection
,All electrical work must be performed
by a qualified service technician in
accordance with all applicable codes and
standards.
^ Regard the data plate, wiring diagram,
conversion and installation plan.
The wiring diagram is located under the
cover of the right side column.
The machine is supplied for 230V, 60 Hz,
3AC.
^ If converted to another voltage, mark it
with D on the data plate.
,Caution! The heater plate rises as
soon as the machine is connected to the
mains.
25
Help to protect the environment
Disposal of the packing materials
Disposal of an old appliance
The packing materials protect the appliance
during shipping. They have been designed
to be biodegradable and recyclable.
Old appliances may contain materials that
can be recycled. Please contact your local
recycling center about the possibility of
recycling these materials.
To prevent suffocation, ensure that any
plastic wrappings, bags, etc. are disposed
of safely and kept out of the reach of
children.
26
Ensure that the appliance presents no
danger to children while being stored for
disposal. Before discarding an old
appliance, unplug it from the outlet, cut off
its power cord and remove any doors to
prevent hazards.
All rights reserved / 1806
06 858 370 / 00