1
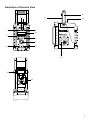
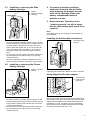
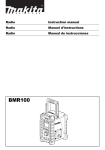
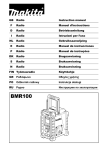
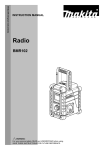
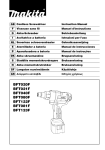
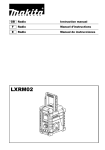
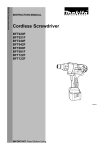
ENGLISH (Original instructions)
Job Site DAB Radio
BMR101
INSTRUCTION MANUAL
IMPORTANT: Read Before Using.
ENGLISH (Original instructions)
Symbols
The following show the symbols used for the equipment.
Be sure that you understand their meaning before use.
.............................. Read instruction manual.
.......... Always recycle batteries
Li-ion
IMPORTANT SAFETY
INSTRUCTIONS
WARNING:
When using Job Site DAB radio, basic safety precautions
should always be followed to reduce the risk of fire,
electric shock, and personal injury, including the following:
GENERAL SAFETY RULES
1. Before using Job Site DAB radio, read all instructions
and cautionary markings of (1) Job Site DAB radio, (2)
battery charger, and (3) battery.
2. Clean only with dry cloth.
3. Do not block any ventilation opening. Install in
accordance with the manufacturer’s instruction.
4. Do not install near any heat sources such as radiators,
heat registers, stoves, or other apparatus (including
amplifiers) that produce heat.
5. Only use attachments/accessories specified by the
manufacturer.
6. Unplug this apparatus during lighting storms or when
unused for long periods of time.
7. Avoid body contact with grounded surfaces such as
pipes, radiators, ranges and refrigerators. There is an
increased risk of electric shock if your body is
grounded.
BATTERY CARTRIDGE SAFETY
RULES
1. Battery pack must be recharged only with the
specified charger for the battery. A charger that may
be suitable for one type of battery may create a risk of
fire when used with another battery.
2. Use the battery operated radio only with specially
designated battery packs. Use of any other battery
packs may create a risk of fire.
3. Do not disassemble battery cartridge.
4. If operating time has become excessively shorter, stop
operating immediately. It may result in a risk of
overheating, possible burns and even an explosion.
5. Do not short the battery packs:
(1) Do not touch the terminals with any conductive
material.
(2) Do not expose battery cartridge to water or rain.
A battery short can cause a large current flow,
overheating, possible burns or a fire, and even a
breakdown.
2
(3)
When battery pack is not in use, keep it away
from other metal objects such as: paper clips,
coins, keys, nails, screws, or other small metal
objects that can make a connection from one
terminal to another. Shorting the battery
terminals together may cause sparks, burns, or
fire.
6. Do not store the battery operated radio and battery
packs in locations where the temperature may reach
or exceed 50°C (122°F).
7. Do not incinerate the battery packs even if it is
severely damaged or is completely worn out. The
battery packs can explode in a fire.
8. Be careful not to drop or strike battery.
9. Do not use with damaged battery. If appliance is not
working as it should, has been dropped, damaged, left
outdoors, or dropped into water, return it to a service
center.
10. If electrolyte gets into your eyes, rinse them out with
clear water and seek medical attention right away. It
may result in loss of your eyesight.
11. Under abusive conditions, liquid may be ejected from
the battery, avoid contact. If contact accidentally
occurs, flush with water. If liquid contacts eyes,
additionally seek medical help. Liquid ejected from the
battery may cause irritation or burns.
Tips for maintaining maximum battery life
1. Never recharge a fully charged battery cartridge.
Overcharging shortens the battery service life.
2. Charge the battery cartridge with room temperature at
10°C - 40°C (50°F - 104°F). Let a hot battery cartridge
cool down before charging it.
3. Charge the Nickel Metal Hydride battery cartridge
when you do not use it for more than six months.
SAVE THESE INSTRUCTIONS.
Features:
• DAB/FM PLL synthesized
• Large LCD display with illumination
• Manual/Preset/Scan tuning
• Rotary tuning and volume control
• Five preset stations each band
• Stereo speaker for rich sound performance
• Ultra rugged design
• Water resistant to JIS 4
Powered by both Makita battery pack and supplied power
adaptor.
Illustration of General View
12
2 3
11
14
4
1
10
5
6
7
8
9
13
15
16
3
Battery Installation
Controls:
1. Power button
2. Band button
3. Advanced setting button
4. Info button
5. Preset buttons
6. Auto tune button
7. Volume/Tuning Control/Select knob/button
8. DC IN socket
9. AUX IN1 socket
10. LCD display
11. Soft bended rod antenna
12. Handle
13. Speaker
14. Battery compartment locker
15. AUX IN2 socket
16. Industrial Rechargeable Battery Connect Terminals
1. Pull out the battery compartment
locker to release the battery
compartment.
2. Insert the battery pack to power radio.
The suitable battery packs for this
radio are listed as below.
2
1. Battery
compartment
(covering main
battery pack and
back up
batteries)
2. Battery
compartment
locker
1
Cluster Battery:
9.6V:
9135/9134/9122/PA09/9120
12V:
1235/1234/1222/PA12/1220
14.4V: 1435/1434/1422/PA14/1420
18V:
1835/1834/1822/PA18
Slide Battery:
9.6V:
BH9033/BH9033A/BH9020/BH9020A
12V:
BH1233/BH1233C/BH1220/BH1220C
14.4V: BH1433/BH1420/BL1430/BL1415
18V:
BL1830/BL1815
24V:
BH2433/BH2420
The following tables indicate the operating time on a single charge.
Battery
Capacity
Battery Cartridge - Voltage
9.6V
12V
14.4V
18V
24V
PA18
BL1815
–
Approx.
3.5 hour
1.3 Ah
PA09
9120
PA12
1220
PA14
1420
BL1415
2.0 Ah
9122
BH9020
BH9020A
1222
BH1220
BH1220C
1422
BH1420
1822
BH2420
Approx.
5.5 hour
2.6 Ah
9134
1234
1434
1834
–
Approx.
7.0 hour
3.0 Ah
9135
1235
1435
BL1430
1835
BL1830
–
Approx.
8.5 hour
3.3 Ah
BH9033
BH9033A
BH1233
BH1233C
BH1433
–
BH2433
Approx.
9.0 hour
Operating time may differ by the type of battery, charging or operating conditions.
4
Operating time
(At Max.
Volume)
3-1. Installing or removing the Slide
battery cartridge
1. Button
2. Battery cartridge
3. Red part
3
1
4. To remove the battery cartridge,
withdraw it from the Job site radio
while pressing the buttons on both
sides of the cartridge. Return the
battery compartment locker in
position to close.
5. Reduced power, distortion and a
“stuttering sound” are all the signs
that the main battery pack needs to be
replaced.
2
Note:
The battery pack can’t be charged via the supplied AC
power adaptor.
Installing the Soft bended rod antenna
• To insert the battery cartridge, align the tongue on the
battery cartridge with the groove in the housing and slip
it into the position. Always insert it all the way until it
locks in place with a little click. If you can see the red
part on the upper side of the button, it is not locked
completely. Insert it fully until the red part cannot be
seen.
• Do not use force when inserting the battery cartridge. If
the cartridge does not slide in easily, it is not being
inserted correctly.
• To remove the battery cartridge, withdraw it from the
tool while sliding the button on the front of the cartridge.
1. Soft bended rod
antenna
1
3-2. Installing or removing the Cluster
battery cartridge
1. Battery cartridge
2. Button
Install the Soft bended rod antenna as show in the figure.
Using Supplied AC power adaptor
1
1
2
• To insert the battery cartridge, align the tongue on the
battery cartridge with the groove in the housing and slip
it into position. Always insert it all the way until it locks
in place with a little click.
• Do not use force when inserting the battery cartridge. If
the cartridge does not slide in easily, it is not being
inserted correctly.
1. DC IN socket
2. Input terminal
(AUX IN1)
2
Remove the rubber protector and insert the adaptor plug
into the DC socket on the front side of the radio. Plug the
adaptor into a standard mains socket outlet. Whenever
the adaptor is in use, the battery pack is automatically
disconnected. The AC adaptor should be disconnected
from the main supply when not in use.
5
Operating the radio
This radio equips with three tuning methods - Scan tuning,
Manual tuning and Memory presets recall.
Selecting a station - DAB
1. Press the Power button to switch on your radio.
2. Select the DAB mode by pressing the Band button.
3. Press the Advanced setting button and rotate the
Volume/Tuning Control/Select knob/button to scroll
through the list of available stations.
4. Press and release the Volume/Tuning Control/Select
knob/button to select the station. The display will show
“Tuning...” while your radio is finding the new station.
5. Adjust the desired volume setting by rotating the
Volume/Tuning Control/Select knob/button.
Display modes - DAB
Your radio has a range of display options in the DAB
mode:
1. Press the Info button to cycle through the various
options as shown in the following letters. (a. to h.)
a. Station name
Indicates the station name
being listened to.
b. Program type
Indicates the type of station
being listened to e.g. Pop,
Classic, News, etc.
c. Multiplex name
Indicates the name of the
DAB multiplex to which the
current station belongs.
d. Time & date
Indicates the current time and
date.
e. Frequency and channel
Indicates the frequency and
channel number for the
currently tuned DAB station.
f. Bit rate/Audio type
Indicates the digital audio bit
rate and audio type for the
currently tuned DAB station.
g. Signal strength
Indicates the signal strength
for the currently tuned DAB
station.
Finding new stations - DAB
From time to time, new DAB radio stations may become
available. Or you may have moved to a different part of
the country. In this case you may need to activate your
radio to scan for new stations.
In order that the radio may find the available stations it is
recommended to carry out a full scan of the entire DAB
Band III frequencies.
1. Press and release the Auto Tune button.
2. Your radio will perform a full scan of the DAB
frequencies. As new stations are found, the station
counter on the right side in the display will increase
and stations will be added to the list.
Manual tuning - DAB
Manual tuning allows you to tune your radio to a particular
DAB frequency in Band III. This function can also be used
6
to assist the positioning of the antenna or the radio so as
to optimize reception for a specific channel or frequency.
1. Press the Advanced setting button and rotate the
Volume/Tuning Control/Select knob/button until the
display shows “Manual tune.” Press and release the
Volume/Tuning Control/Select knob/button to enter the
manual tuning mode.
2. Rotate the Volume/Tuning Control/Select knob/button
to select the desired DAB channel. Press and release
the Volume/Tuning Control/Select knob/button to tune
to the chosen frequency.
Dynamic Range Control (DRC) - DAB
The DRC facility can make quieter sounds easier to hear
when your radio is used in a noisy environment.
There are three levels of compression:
DRC 0
No compression applied
DRC 1/2
Medium compression applied
DRC 1
Maximum compression applied
1. Press the Power button to switch on your radio.
2. Press the Band button to select the DAB band.
3. Press the Advanced setting button and rotate the
Volume/Tuning Control/Select knob/button until “DRC
value” appears on the display. Then press and release
the Volume/Tuning Control/Select knob/button. The
display will show the current DRC value.
4. Rotate the Volume/Tuning Control/Select knob/button
to select the desired DRC setting.
5. Press and release the Volume/Tuning Control/Select
knob/button to confirm the setting. The display’s
condition will return to be normal.
Station order setup - DAB
Your radio has 3 station order settings from which you can
choose. The station order settings are alphanumeric,
ensemble and valid station.
1. Press and release the Advanced setting button.
2. Rotate the Volume/Tuning Control/Select knob/button
until “Station order” appears on the display, then press
and release the Volume/Tuning Control/Select knob/
button to enter the setting.
Alphanumeric
Rotate the Volume/Tuning Control/Select knob/button until
“Alphanumeric” appears on the display. Your radio will
now select stations in alphanumeric order A...Z 0...9.
Ensemble stations
Rotate the Volume/Tuning Control/Select knob/button until
“Ensemble” appears on the display. Your radio will now
organize the station list by DAB multiplex.
Valid stations
Rotate the Volume/Tuning Control/Select knob/button until
“Valid” appears on the display. The display will show only
those which signals the radio can find.
Scan Tuning - FM
1. Press and release the Power button to turn on the
radio.
2. Select the desired waveband by pressing the Band
button. Make sure the soft bended rod antenna has
been well placed for best FM reception. Try to avoid
operating the radio next to a computer screen and
other equipment which will cause interference to the
radio.
3. Press and release the Auto Tune button and the radio
will search and stop automatically when it finds a radio
station. The radio will continue searching for the next
available station unless the operator presses the Auto
tune button to stop the scanning.
4. Rotate the Volume/Tuning Control/Select knob/button
to get the desired sound level. The LCD display will
show sound level changes.
Note:
Before operating the Tuning/Volume Control/Select
knob/button, press the Tuning/Volume control knob/
button to shift from the tuning control mode.
5. To turn off the radio, press and release the Power
button.
Manual Tuning - FM
1. Press and release the Power button to turn on the
radio.
2. Select the desired waveband by pressing the Band
button. Adjust the antenna as described above.
3. A single clockwise rotation of the Tuning/Volume
Control/Select knob/button will change the frequency
in the following increment:
FM: 50 or 100 kHz
Note:
If the radio is in the volume control status, press and
release the Tuning/Volume Control/Select knob/button
to shift to the tuning control mode.
4. Keep rotating the Volume/Tuning Control/Select knob/
button until the desired frequency is shown on the
display.
5. Rotate the Volume/Tuning Control/Select knob/button
to get the desired sound level.
6. To turn off the radio, press and release the Power
button.
Display modes - FM
Your radio has a range of display options for FM radio
mode.
1. Repeat pressing and releasing the Info button to cycle
through the different options.
a. Program station
Indicates the name of the
station being listened to.
b. Radio text
Indicates text messages such
as new items, etc.
c. Program type
Indicates the type of station
being listened to such as Pop,
Classic, News, etc.
d. Time & date
Indicates the current time and
date.
e. Frequency
Indicates the frequency of the
FM signal.
Storing stations in preset memories (DAB
and FM)
There are five memory presets for each waveband.
1. Press and release the Power button to turn on the
radio.
2. Tune to the desired station using one of the methods
previously described.
3. Press and hold down the desired Preset button until
the radio beeps. The preset number will appear in the
display and the station will be stored in the selected
preset button.
4. Repeat this procedure for the remaining presets.
5. Stations stored in the preset memories can be
overwritten by following procedures described above.
Recall stations from the preset memories
(DAB and FM)
1. Press and release the Power button to turn on the
radio.
2. Select the desired waveband.
3. Press the desired Preset button momentarily, the
preset number and station frequency will appear in the
display.
Brightness control
The backlight of the display can be adjusted.
1. Press and release the Advanced setting button.
2. Rotate the Volume/Tuning Control/Select knob/button
to scroll through the Advanced setting until the display
shows “Backlight.” Press and release the Volume/
Tuning Control/Select knob/button to enter the setting.
3. Rotate the Volume/Tuning Control/Select knob/button
to choose for enabling or disabling the backlight
function, then press and release the Volume/Tuning
Control/Select knob/button to confirm the setting.
System reset
If your radio fails to work correctly, or some digits on the
display are missing or incomplete, carry out the following
procedure.
1. Press and release the Advanced setting button.
2. Rotate the Volume/Tuning Control/Select knob/button
until “Factory reset” appears on the display. Press and
release the Volume/Tuning Control/Select knob/button
to enter the setting.
3. Rotate the Volume/Tuning Control/Select knob/button
to choose “Yes” or “No.” Select “Yes” by pressing the
Volume/Tuning Control/Select knob/button and a full
reset will be performed.
How to play other audios
CAUTION:
Unplug this apparatus before connecting other
audios.
• There are the two AUX sockets. The AUX 1 is located
on the front panel, and the AUX 2 is located on the
battery compartment.
• Connect a stereo or mono source (i.e. iPod, MP3, or
CD player) to the AUX IN with an audio cord.
7
• Repeat pressing and releasing the BAND button until
“AU1” or “AU2” is displayed, then the AUX function is
activated.
MAINTENANCE
CAUTION
• Never use gasoline, benzene, thinner, alcohol or the
like. Discoloration, deformation or cracks may result.
Specifications:
Power Requirements
AC power adaptor
DC 12V 1A, center pin positive
Battery
Cluster battery: 9.6 - 18V
Slide battery: 9.6 - 24V
Frequency coverage
FM 87.50 - 108 MHz
Channel block
DAB (Band III): 5A ~ 13F
Circuit feature
Loudspeaker
Output Power
3 inches 8 ohm
9.6V: 0.8W x 2, 12V: 1.2W x 2
14.4V: 2W x 2, 18V: 3W x 2
24V: 5W x 2
Input terminal
3.5 mm dia. (AUX IN1/AUX IN2)
Antenna system
DAB/FM: soft bended rod
antenna
Dimensions (W x H x D) in mm
263 x 305 x 166
Weight
4.2 kg (without battery)
Makita Corporation
Anjo, Aichi, Japan
BMR101-ENEU-0910
ALA
8
www.makita.com