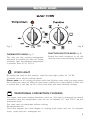
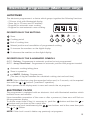
1
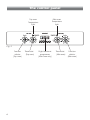
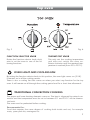
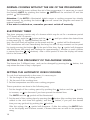
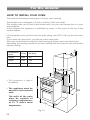
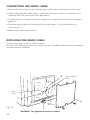
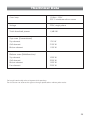
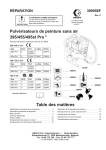
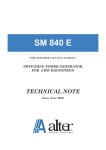
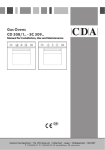
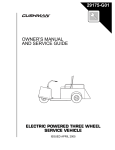
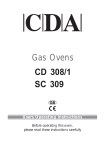
Users Operating Instructions
Before operating this oven,
please read these instructions carefully
KEEP IN A SAFE PLACE
ESM 495 ST
double oven
Dear Customer
Thank you for choosing one of our appliances which has been carefully designed
and built by our specialist staff and thoroughly tested to satisfy all your cooking
requirement.
We suggest that you read this Instruction Booklet so that you will understand fully
how to operate the appliances.
Please keep the booklet handy. You may wish to refer to it at a later date.
De Longhi
Contents
Model ESM 495ST
Page Number
Important precautions and recommendations . . . . . . . . . . . . . . . . . . . . . 3
Use and Care . . . . . . . . . . . . . . . . . . . . . . . . . . . . . . . . . . . . . . . . . . . . . 4
The control panel . . . . . . . . . . . . . . . . . . . . . . . . . . . . . . . . . . . . . . . . . . 6
Top oven . . . . . . . . . . . . . . . . . . . . . . . . . . . . . . . . . . . . . . . . . . . . . . . . . 7
Bottom oven . . . . . . . . . . . . . . . . . . . . . . . . . . . . . . . . . . . . . . . . . . . . . . 9
Electronic programmer (Main oven only) . . . . . . . . . . . . . . . . . . . . . . . . 13
Cleaning and maintenance: . . . . . . . . . . . . . . . . . . . . . . . . . . . . . . . . . . 16
Important notes . . . . . . . . . . . . . . . . . . . . . . . . . . . . . . . . . . . . . . . . . . . 18
Do’s and do not’s . . . . . . . . . . . . . . . . . . . . . . . . . . . . . . . . . . . . . . . . . . 19
For the installer
How to install your oven . . . . . . . . . . . . . . . . . . . . . . . . . . . . . . . . . . . . . . . . . . .20
Installation . . . . . . . . . . . . . . . . . . . . . . . . . . . . . . . . . . . . . . . . . . . . . . . . . . . . . . .21
Technical Data . . . . . . . . . . . . . . . . . . . . . . . . . . . . . . . . . . . . . . . . . . . . . . . . . . . 23
Before use
Please ensure that all packing has been removed from the appliance before switching on.
2
IMPORTANT PRECAUTIONS AND RECOMMENDATIONS
After having unpacked the appliance, check to ensure that it is not damaged.
If you have any doubts do not use it and contact the store from where you purchase it.
Packing materials (i.e. plastic bags, polystyrene foam, nails, packing straps, etc.) should
not be left around within easy reach of children, as they may cause serious injuries.
– Do not attempt to modify the technical characteristics of the appliance as it may
become dangerous to use.
– Do not carry out cleaning or maintenance operations on the appliance without having previously disconnected it from the electric power supply.
– Before disposing of any unwanted appliances it is recommended that all potentially
hazardous parts be made harmless.
WARNING:
– This appliance should only be installed by an authorised person of suitable qualification.
– This appliance must be used only for the task it has explicitly been designed for, that
is for cooking foodstuffs. Any other form of usage is to be considered as inappropriate and therefore dangerous.
– Do NOT place combustible materials or products on or in, this appliance at any time.
IMPORTANT PRECAUTIONS AND RECOMMENDATIONS FOR
USE OF ELECTRICAL APPLIANCES
When using any electrical appliance some important rules must always be followed.
In particular:
– Never touch the appliance with wet hands or feet;
– do not operate the appliance barefooted;
– This appliance should only be used by responsible adults.
The manufacturer cannot be held responsible for any damages caused by improper,
incorrect or irresponsible use of the appliance.
CE Declaration of conformity
✓ This oven is intended to come into contact with food products and conforms with
European Directive 89/109/EEC.
✓ This oven has been designed for use only as a cooking appliance. Any other use
(e.g. heating rooms) should be considered incorrect and therefore dangerous.
✓ This oven has been designed, constructed and put on to the market in conformity
with:
- Safety requirements of the "Low Voltage" Directive 73/23/EEC;
- Protection requirements of the "EMC" Directive 89/336/EEC;
- Requirements of Directive 93/68/EEC.
3
Use and Care
CAUTION:
– This appliance must be used only for the task it has explicitly been designed for, that
is for cooking foodstuffs. Any other form of usage is to be considered as inappropriate and therefore dangerous.
– Do NOT place combustible materials or products on this appliance at any time.
USING THE TOP AND THE BOTTOM OVEN FOR THE FIRST TIME
You are advised to carry out the following operations:
– Position the wire racks on the oven walls (Figure 1 and 2).
– Slide into the guides, the shelf and the tray etc. (Figure 3).
–
Fig. 1
To eliminate traces of grease from the
heating elements, switch the ovens
on, to the maximum temperature in
this ways:
For 60 minutes in the
position, for
30 minutes in the
position (bottom oven only), and for another 15
minutes in the
position.
– Switch off the electrical supply to the
appliance then clean the inside of the
two ovens when cool with a cloth
soaked in water and neutral detergent and dry thoroughly.
Fig. 2
Fig. 3
4
TOP OVEN GENERAL FEATURES
This is a conventional oven with 2 cooking positions, thermostatically controlled, obtained
by 3 heating elements (top, bottom and grill).
TOP OVEN OPERATING PRINCIPLES
Heating and cooking in the CONVENTIONAL oven are obtained in two following ways:
a.
by normal convection
The heat is produced by the upper and lower heating elements.
b.
by radiation
The heat is radiated by the infra red grill element.
BOTTOM OVEN GENERAL FEATURES
This is a MULTI-FUNCTION oven. As its name indicates, this is an oven that presents
particular features from an operational point of view. In fact, it is possible to insert 7
different programs to satisfy every cooking need. The 7 positions, thermostatically
controlled, are obtained by 4 heating elements (top, bottom, grill and circular).
BOTTOM OVEN OPERATING PRINCIPLES
Heating and cooking in the MULTI-FUNCTION oven are obtained in the following
ways:
a.
by normal convection
The heat is produced by the upper and lower heating elements.
b.
by forced convection
A fan sucks in the air contained in the oven, which circulates it through the
circular heating element and then forced back into the oven by the fan. Before
the hot air is sucked back again to repeat the described cycle, it envelops the
food in the oven, provoking a complete and rapid cooking.
It is possible to cook several dishes simultaneously.
c.
by semi-forced convection
The heat produced by the upper and lower heating elements is distributed
throughout the oven by the fan.
d.
by radiation
The heat is radiated by the infra red grill element.
e.
by radiation and ventilation
The heat from the infra red grill element is distributed throughout the oven by
the fan.
f.
by ventilation
The food is defrosted by using the fan only function without heat.
5
The control panel
Main oven
Temperature
light
Top oven
Temperature
light
A
U
T
O
Fig. 4
Function
selector
(Top oven)
6
Thermostat
(Top oven)
Digital electronic
programmer
(Main oven only)
Thermostat
(Main oven)
Function
selector
(Main oven)
Top oven
Fig. 5
Fig. 6
FUNCTION SELECTOR KNOB
THERMOSTAT KNOB
Rotate the function selector knob clockwise to set the oven to one of the following functions.
This only sets the cooking temperature
and does not switch the oven on.
Rotate clockwise until the required temperature is reached (from 50 to 250°C).
OVEN LIGHT AND COOLING FAN
By setting the function selector knob to this position, the oven light comes on (15 W).
It remains on in all the cooking modes.
There is also a cooling fan that comes on when you select any function for the top
oven. It will remain on all through the cooking period and for a short time afterwards
TRADITIONAL CONVECTION COOKING
The upper and lower heating elements come on. The heat is dispersed by natural convection and the temperature must be set to between 50° and 250°C via the thermostat knob.
The oven must be preheated before cooking.
Recommended for:
Food that requires the same degree of cooking both inside and out, for example
roasts, spare pork ribs, meringues etc.
7
GRILLING
The infrared grill comes on. The heat is dispersed by radiation.
Use with the thermostat knob set to 200°C max and the oven door closed.
For cooking hints, see the below chapter “GRILLING and AU GRATIN”.
Recommended for:
Intense grilling, browning, cooking au gratin and toasting etc.
It is recommended that you do not grill for longer than 30 minutes at any
one time.
Caution: The oven door becomes very hot during operation. Keep children
well out of reach.
Always grill with the oven door closed
COOKING IN A CONVENTIONAL TOP OVEN
– The oven has two heating elements, one in the base and one in the roof of the
oven. Hot air rises, so the top of the oven is always the hottest. The temperature in
the middle of the oven is maintained at the temperature set by the thermostat control
knob, and is slightly hotter above and cooler below.
– In a conventional oven, dishes requiring different temperatures can be cooked in the
oven at the same time - e.g. roast beef and Yorkshire pudding.
– Always pre-heat a conventional oven before use. The oven indicator light will go out
when the required temperature is reached. Do not open the oven door during cooking unless absolutely necessary.
– IMPORTANT: Drip trays, baking trays etc. must not be left on the base of the oven
as this could damage the appliance.
GRILLING AND “AU GRATIN”
Switch the grill on by setting the function selector knob to the required position
and the thermostat knob to position 200°C max.
Leave to warm up for approximately 5 minutes with the door closed.
Place the food inside positioning the grill pan as near as possible to the grill.
Always grill with the oven door closed.
It is recommended that you do not grill for longer than 30 minutes at any one
time.
Remember to keep children away from the appliance when you use the grill
or oven, since these parts become very hot.
8
Bottom oven
Fig. 7
Fig. 8
THERMOSTAT KNOB (fig. 7)
FUNCTION SELECTOR KNOB (fig. 8)
This only sets the cooking temperature
and does not switch the oven on. Rotate
clockwise until the required temperature
is reached (from 50 to 250°C).
Rotate the knob clockwise to set the
oven for one of the following functions.
OVEN LIGHT
By setting the knob to this position, only the oven light comes on (15 W).
It remains on in all the cooking modes.
Please note: on all cooking positions with heat (bottom oven only) you may notice
the cooling fan come on after you have been cooking for a short period of time, this
is normal and it will stay on for a short time after you have finished cooking.
TRADITIONAL CONVECTION COOKING
The upper and lower heating elements come on. The heat is dispersed by natural
convection and the temperature must be set to between 50° and 250°C via the
thermostat knob.
The oven must be preheated before cooking.
Recommended for:
Food that requires the same degree of cooking both inside and out, for example
roasts, spare pork ribs, meringues etc.
9
GRILLING
The infrared grill comes on. The heat is dispersed by radiation.
Use with the thermostat knob set to 200°C max and the oven door closed.
For cooking hints, see the chapter “GRILLING and AU GRATIN”.
Recommended for:
Intense grilling, browning, cooking au gratin and toasting etc.
It is recommended that you do not grill for longer than 30 minutes at any
one time.
Caution: The oven door becomes very hot during operation. Keep children
well out of reach.
Always grill with the oven door closed
DEFROSTING FROZEN FOODS
Only the oven fan comes on. Use with the thermostat knob set to the off position
“●” - other positions have no effect. The food is thawed by ventilation without heating.
Recommended for:
Quick thawing of frozen foods; one kg requires approximately 1 hour.
Thawing times vary according to the quantity and type of food to be thawed.
HOT AIR COOKING
The circular element and fan come on. The heat is dispersed by forced convection and
the temperature can be regulated between 50° and 250°C via the thermostat knob.
The oven does not require preheating.
Recommended for:
Food which has to be well-cooked outside and soft or rosy inside, for example
lasagne, lamb, roast beef, whole fish etc.
VENTILATED GRILL COOKING
The infrared grill and the fan come on. The heat is dispersed mainly by radiation and
the fan then distributes it all over the oven. Use with the door closed. The temperature
can be regulated via the thermostat knob to between 50° and 175°C max.
The oven must be preheated for approximately 5 minutes. For cooking hints, see the
chapter “GRILLING AND COOKING AU GRATIN.
Recommended for:
Grilling where quick browning on the outside is required to keep the juices in.
For example: veal steaks, chops, hamburgers etc.
It is recommended that you do not grill for longer than 30 minutes at any
one time.
Caution: The oven door becomes very hot during operation. Keep children
well out of reach.
10
MAINTAINING TEMPERATURE AFTER COOKING OR
SLOWLY HEATING FOODS
The upper element, the circular element and the fan come on.
The heat is dispersed by forced convection with greater intensity in the upper part.
The temperature can be set to between 50° and 150°C via the thermostat knob.
Recommended for:
Keeping food warm after any type of cooking. Slow heating of cooked food.
CONVECTION COOKING WITH VENTILATION
The upper and lower heating elements come on and the fan.
The heat coming from above and below is dispersed by convection with ventilation.
The temperature can be set to between 50° and 250°C via the thermostat knob.
Recommended for:
Voluminous dishes and large quantities which require the same degree of cooking
both inside and out, for example rolled roasts, turkey, roast legs, cakes etc.
Bottom oven Cooking advice
STERILIZATION
Sterilization of foods to be conserved, in full and hermetically sealed jars, is done in the
following way:
a.
b.
c.
d.
Set the function selector switch to position
.
Set the thermostat knob to position 185 °C and preheat the oven.
Fill the grill pan with hot water.
Place the jars in the grill pan making sure they do not touch each other and the
door and set the thermostat knob to position 135 °C.
When sterilization has begun, that is, when the contents of the jars start to bubble,
turn off the oven and leave to cool.
REGENERATION
Set the function selector switch to position
and the thermostat knob to position
150° C.
Bread becomes fragrant again if wet with a few drops of water and put into the oven
for about 10 minutes.
11
SIMULTANEOUS COOKING OF DIFFERENT FOODS
The MULTI-FUNCTION oven set on position
consents a simultaneous heterogeneous cooking of different foods. Different foods such as fish, cake and meat can be
cooked together without mixing the smells and flavors together. This is possible since
the fats and vapors are oxidized while passing through the electrical element and therefore are not deposited onto the foods.
The only precaution to follow are:
– The cooking temperatures of the different foods must be as close to as possible, with
a maximum difference of 20° - 25 °C.
– The introduction of the different dishes in the oven must be done at different times in
relation to the cooking times of each one.
The time and energy saved with this type of cooking is obvious.
GRILLING AND “AU GRATIN”
Grilling may be done by selecting grill plus fan setting
with the function selector
switch, because the hot air completely envelops the food that is to be cooked.
Set the thermostat to position 175 °C and after having preheated the oven, simply
place the food on the grill pan grid.
Close the door and let the oven operate with the thermostat on position 175 °C, until
grilling is done.
Adding a few dabs of butter before the end of the cooking time gives the golden “au
gratin” effect.
Always grill with the oven door closed.
It is recommended that you do not grill for longer than 30 minutes at any
one time.
Caution: The oven door becomes very hot during operation. Keep children
well out of reach.
GRILLING NOTE
Always grill with the oven door closed.
It is recommended that you do not grill for longer than 30 minutes at any one time.
To avoid possible smoking during grilling, it is advisable to add a little water to the grill pan.
The water can be topped up during grilling as evaporation takes place.
DO NOT grill food containing fats without using the grid.
DO NOT cover the grill pan grid with aluminium foil, as this can stop fats draining away
and could possibly cause the fat to catch fire.
12
Electronic programmer (Main oven only)
AUTOTIMER
The electronic programmer is a device which groups together the following functions:
– 24 hours clock with illuminated display
– Timer (up to 23 hours and 59 minutes)
– Program for automatic oven cooking
A
– Program for semi-automatic oven cooking.
U
T
O
DESCRIPTION OF THE BUTTONS:
Timer
Cooking period
End of cooking time
Fig. 9
Manual position and cancellation of programmed cooking
To increase the numbers on the digital display.
To decrease the numbers on the digital display.
DESCRIPTION OF THE ILLUMINATED SYMBOLS:
AUTO - flashing - Programmer in automatic position but not programmed
AUTO - always illuminated - Programmer in automatic position with program inserted.
Automatic cooking taking place
Timer in operation
and AUTO - flashing - Program error.
(The time of day lies between the calculated cooking start and end time).
NOTE: Select a function using the respective button and, in 5 seconds, set the required
time with the
/
buttons (“one-hand” operation).
After a power cut the display resets to zero and cancels the set programs.
ELECTRONIC CLOCK
The programmer is equipped with an electronic clock with illuminated numbers which
indicates hours and minutes.
Upon immediate connection of the oven or after a power-cut, three zeros will flash on
the programmer display.
To set the correct time of day it is necessary to push the
button and then the
or
button until you have set the correct time.
In another way push simultaneously the
two buttons and at the same time push
the
or
button.
NOTE: If the clock is reset it deletes any previously set programs.
13
NORMAL COOKING WITHOUT THE USE OF THE PROGRAMMER
To manually use the oven, without the aid of the programmer, it is necessary to cancel
the flashing AUTO by pushing the button
(AUTO will be switched off and the
symbol
will illuminate).
Attention: If the AUTO is illuminated (which means a cooking program has already
been inserted), by pushing the button
you will cancel the program and revert to
manual operation.
If the oven is switched on, remember you must switch off manually.
ELECTRONIC TIMER
The timer program consists only of a buzzer which may be set for a maximum period
of 23 hours and 59 minutes.
To set the time, push the
button and the
or
until you obtain the desired time
in the panel (fig. 9). Having finished the setting, the clock hour will appear on the panel and the
symbol will be illuminated.
The countdown will start immediately and may be seen at any moment on the panel
by simply pressing the button
. At the end of the time, the
symbol will disappear
and the buzzer will sound and continue for approximatley 7 minutes or until a button
is pressed (not the
/
buttons). After a short period of time the display will revert
back to the time of day.
SETTING THE FREQUENCY OF THE AUDIBLE SIGNAL
The buzzer has 3 different tones and can be changed by pressing the
only when the time of day is displayed.
button, but
SETTING THE AUTOMATIC OVEN COOKING
To cook food automatically in the oven, it is necessary to:
1. Set the length of the cooking period
2. Set the end of the cooking time
3. Set the temperature and the oven cooking program.
These operations are done in the following way:
1. Set the length of the cooking period by pushing the
button and the
button
to increase, or
to decrease if you have passed the desired time.
The AUTO and the
symbol will be illuminated.
2. Set the end of the cooking time by pressing the
button (the cooking time already
added to the clock time will appear), and the
button; if you pass the desired
time you may get back by pushing the
button.
After this setting, the
symbol will disappear. If after this setting, the AUTO flashes on the display and a buzzer sounds, it means there was an error in the programming,
14
that is that the cooking cycle has been superimposed on the clock. In this case,
modify the end of cooking time or the cooking period itself by following again the
above mentioned instructions.
3. Set the temperature and the cooking program by using the function selector and
thermostat knobs of the oven (see specific chapters).
Now the oven is programmed and everything will work automatically, that is the oven
will turn on at the right moment and end the cooking at the selected time.
During cooking, the
symbol remains illuminated.
By pushing the
button you can see the time that remains until the end of cooking.
The cooking program may be cancelled at any time by pushing
.
At the end of the cooking period the oven will turn off automatically, the
symbol
will disappear, AUTO will flash and a buzzer will sound, which can be turned off by
pushing any of the buttons, except the
/
buttons.
Turn the function selector and thermostat knobs to zero and put the programmer onto
“manual” by pressing the
button.
Attention: After a power cut the clock resets to zero and cancels the set programs.
After a power-cut, three zeros will flash on the display.
SETTING THE SEMI-AUTOMATIC OVEN COOKING
This is used to automatically switch off the oven after the desired cooking period has
elapsed.
Set the length of the cooking period by pushing the
button and the
button to
increase, or
to decrease if you have passed the desired time.
AUTO and the
symbol will be illuminated.
Then set the temperature and the cooking program using the oven function selector
and thermostat knobs (see specific chapters).
The oven is switched on and it will be switched off automatically at the end of the
desired time.
During cooking, the
symbol remains illuminated and by pressing the button
you can see the remaining cooking time.
The cooking program can be cancelled at any time by pushing the
button.
At the end of the period, the oven and the
symbol will disappear, AUTO will flash
and a buzzer will sound; and can be stopped by pushing any of the buttons, except
the
/
buttons.
Turn the function selector and thermostat knobs to zero and set the programmer onto
“manual” by pressing the
button.
15
Cleaning and Maintenance
Cleaning
GENERAL
After use allow the oven to cool and whilst the oven is still “warm” it should be
wiped with a damp cloth using warm soapy water. With regular cleaning the
oven will remain in good condition.
It is advisable to disconnect the electrical supply to the oven before cleaning is
undertaken.
Do not use a steam cleaner because the moisture can get into the appliance
and make it unsafe.
ENAMEL PARTS
In order to maintain the condition of the enamel parts, clean and wipe frequently
with hot soapy water. Any obstinate marks can be removed using a paste or
cream cleaner or a well moistened soap impregnated steel wool pad. Rub gently
so as not to damage the surface.
Never use abrasive powders.
Never permit vinegar, coffee, milk, salt water or tomato juice to remain in contact
with the enamel parts as they may stain or discolour the surface.
If any cleaners such as a spray or a stick are used on enamel they must have the
VEDC (Vitreous Enamel Development Council) seal of approval and the
manufacturers instructions must be followed.
STAINLESS STEEL SURFACES
CAUTION
The STAINLESS STEEL surfaces used in this oven are protected with a Special
Lacquer to reduce finger-print marks.
To avoid damaging this lacquer, do not clean the stainless steel with abrasive
cleaners or abrasive cloths or scouring pads.
ONLY SOAP/WARM WATER MUST BE USED TO CLEAN THE STAINLESS
STEEL SURFACES.
16
Fig. 10
REMOVAL OF THE INNER
GLASS DOOR PANEL
The inner glass door panel can easily be
removed for cleaning by unscrewing the
two screws (Figure 10).
During re-assembly, ensure that the inner
glass is correctly aligned and do not over
tighten the screws.
Fig. 11
REMOVING THE OVEN DOOR
Please operate as follows:
– Open the door completely.
– Push down the lever “L” and, keeping it in
this position, slowly close the door in order
to lock the hinge (Fig. 11).
– Grip the door (as indicated in fig. 12) and,
while closing it, release the two hinges as
shown in fig. 13.
L
Fig. 12
Fig. 13
REASSEMBLING THE OVEN
DOOR
– Grip the door with your hands placed near
the hinges and raise the levers “H” with
your forefingers (fig. 13).
– Insert the hinges in position until the notch
on lever “H” is firmly hooked on the
bottom of the hinge aperture.
– Open the door completely to release levers
“L”.
– If the door is out of line or does not close
properly the hinges are not sitting properly.
Start again from figure 11.
H
17
Important notes
Installation, and any demonstration, information or adjustments are not included in
the warranty.
We recommend that the installation is carried out by qualified personnel.
To replace the interior oven lamp, unscrew the glass guard and make sure that
the new lamp has identical specifications, i.e. 15 Watts, 300°Centigrade. Be sure to
switch off the electrical supply.
AFTER SALES SERVICE
Should you require to book a service call.
Please Telephone 0870 5425425.
For product information and advice.
Please Telephone 0113 2793520.
Attention
The appliance gets very hot,
mainly around the cooking
areas. It is very important that
children are not left alone in the
kitchen when you are cooking.
18
Do’s and do not’s
DO’S AND DO NOT’S
• Do always grill with the oven door closed.
• Do always remove the detachable handle when using the grill pan.
• Do read the user instructions carefully before using the oven for first time.
• Do allow the oven to heat for one and a half hours, before using for the first time, in
order to expel any smell from the new oven insulation, without the introduction of
food.
• Do clean your oven regularly.
• Do remove spills as soon as they occur.
• Do always use oven gloves when removing food shelves and trays from the oven.
• Do not allow children near the oven when in use.
• Do not allow fat or oils to build up in the oven trays, grill pan or oven base.
• Do not place cooking utensils or plates directly onto the oven base.
• Do not grill food containing fat without using the grid.
• Do not cover the grilling grid with aluminium-foil.
• Do not use the oven tray for roasting.
• Do not clean the oven without first turning off the electricity supply and allow to
cool.
• Do not place hot enamel parts in water. Leave them to cool first.
• Do not allow vinegar, coffee, milk, saltwater, lemon or tomato juice to remain in contact with enamel parts.
• Do not use abrasive cleaners or powders that will scratch the surface of the enamel.
• Do not attempt to repair the internal workings of your oven.
• Do not grill with the oven door open as damage to the front panel and control
knobs will result.
FOR YOUR SAFETY
The product should only be used for its intended purpose which is for the cooking of
domestic foodstuffs.
Under no circumstances should any external covers be removed for servicing or maintenance except by suitably qualified personnel.
19
For the installer
HOW TO INSTALL YOUR OVEN
You need the following housing area to fit your oven correctly.
The double oven is designed to fit into a cabinet of 600 mm width.
The double oven can be built in the kitchen units, but you must ensure that it is properly ventilated.
In the diagram the appliance is ventilated by means of the space in the top of the
kitchen cabinet.
Lift the appliance into position onto the shelf, taking care NOT to lift it by the door handles.
If you lower the oven doors, you will see some screw holes.
The oven should then be secured to the housing by fitting screws into these holes.
Remember the housing should not be free standing but be secured to the wall and/or
adjacent fittings.
50
Dimensions
(mm)
Oven
Housing
Height
888
877
Width
594
560
Depth
560
555 min.
560
555
✓ This appliance is type X
888
✓ The appliance must be
877
installation.
housed in heat resistant
units.
The walls of the units
must be capable of
resisting temperatures
of 75 °C above room
temperature.
n.
mi
0
54
594
20
Fig. 14
20
5
55
Installation
CAUTION:
• This appliance must be installed according to these instructions.
ELECTRICAL REQUIREMENTS
WARNING -THIS APPLIANCE MUST BE EARTHED
• This appliance must be installed by a qualified electrician and in accordance with the
latest I.E.E. regulations.
• The appliance must be installed to a suitable double pole switch with a minimum
opening between the contacts of 3mm, and no further than 2 metres from the appliance.
• The appliance must be connected to the mains supply checking that the voltage corresponds to the value given on the rating plate and that the electrical cable's cross
sectional area can withstand the load as specified on the rating plate.
• The electrical connections must be carried out before the appliance is fitted into the
furniture.
• The power cable must be of sufficient length to enable it to be connected to the
oven when the oven is placed in front of the housing unit.
• The mains supply cable must not come into contact with any hot surfaces/parts and
the cable must be positioned so that it does not exceed 75 DEG C at any point.
N.B. For connection to the mains, do not use adapters, reducers or branching
devices as they can cause overheating and burning.
A 30 amp supply is required for connection of this appliance.
Always make sure that the electrical supply is of adequate size.
21
CONNECTING THE MAINS CABLE
• Remove the two screws that hold the main's cable cover A to the back of the oven.
• Open completely the cable clamp C and insert the main's cable of a minimum cross
sectional area of 6 mm sq into the cable save P.
• Connect the live, neautral and earth conductors to the terminal block B according to
figure 15.
• Feed the mains cable and secure with the cable clamp C to the mains block as
shown in fig 15.
• Replace the main's cable cover A.
REPLACING THE MAINS CABLE
Use the same type of mains cable as above.
All electrical connections must be carried out by a qualified electrician in accordance
with the relivent standards.
B
Green &Yellow
(Earth)
L N
Red
(Live)
C
A
Black
(Neutral)
Fig. 15
P
WARNING This appliance must be earthed
22
Thechnical Data
Oven lamp
15 Watt - 230V
300°C miniature edison screw
Voltage
230V, single phase
Total absorbed power
4,68 kW
Top oven (Conventional)
Top element
Grill element
Botton element
700 W
2100 W
1100 W
Bottom oven (Multifunction)
Top element
Grill element
Botton element
Fan element
1000 W
2000 W
1400 W
2500 W
De Longhi continually strive to improve their products.
For this reason we reserve the right to change specifications without prior notice.
23
Rif. 1572.8
codice 1101980 ß8