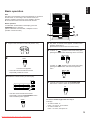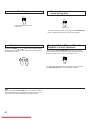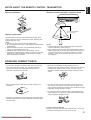
1
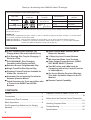
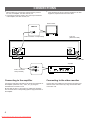
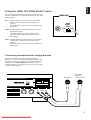
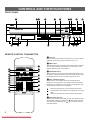
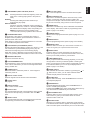
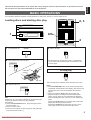
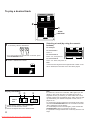
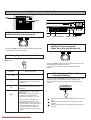
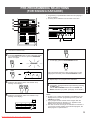
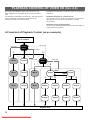
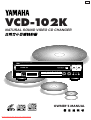
RLT
VCD-102K
NATURAL SOUND VIDEO CD CHANGER
NATURAL SOUND VIDEO CD CHANGER
PLAY/SELECT
VIDEO CD
STOP/RETURN
MPX KARAOKE
KEY CONTROL
DISC SKIP
ECHO
SKIP/SEARCH
PREV
NEXT
LEVEL
OPEN/CLOSE
PLAYXCHANGE
MIC 1
MIC 2
KEY CONTROL
POWER
+10
1
2
3
4
5
6
7
8
9
0
MIN
MAX
MIN
MAX
OWNER’S MANUAL
GRAPHICS
Downloaded From Disc-Player.com Yamaha Manuals
Thank you for selecting this YAMAHA Video CD changer.
This unit can play discs of the following types only.
Type of disc
Mark printed
on the disc
Type of signal
recorded
Sound
+
Picture (Movie)
Video CD
CD
(including CD-G)
GRAPHICS
Sound
only
Sound
+
Still picture
Size (Dimension)
Maximum possible
play time
12 cm
74 minutes
8 cm (Single type)
20 minutes
12 cm
74 minutes
8 cm (Single type)
20 minutes
Never attempt to load a disc other than above into the unit because it may cause a damage to this unit and/or other units
connected to this unit.
VIDEO CD
Video CDs are classified into two types, version 1.1 and 2.0. This unit can play not only discs of version 1.1, but also version
2.0 on which a Playback Control can be made.
Video CD, version 1.1: With the same operation as compact discs, you can enjoy sounds and pictures (movies).
Video CD, version 2.0: In addition to a normal play which is the same as discs of version 1.1, you can make a Playback
Control. (For details on Playback Control, refer to page 18.)
FEATURES
● 5-Disc Carousel Auto-Changer (for
Playing Video CDs and Compact Discs)
● Audio Output Mode Selector (MPX)
Button for Karaoke
● Full Opening Disc Tray for Changing 5
Discs at a Time
● 13 Step Key Level Control Buttons
● PLAYXCHANGE; Disc Changing
Capability while Playing Another
● Video Output Format Selector (VIDEO
OUT MODE SELECT) Switch
● Random Access Programmable Play
● Two MIC Jacks and a Mini-Jack for
Connecting with a Key Control Function
of a Microphone
● Single Track/Full Disc Repeat Play
● Playback Control Function Available for
Video CDs, Version 2.0
● Automatic Pause Inserting Function for
Karaoke (Karaoke Mode)
● Quick Overview of a Track and a Disc with
a Touch of the DIGEST and INTRO
Buttons
● Mic Level and Echo Level Controls
● On Screen Display Function (Displays
This Unit’s Operation Status on the TV
Monitor)
● Remote Control Capability
CONTENTS
Caution ............................................................3
Connections ....................................................4
Controls and Their Functions ..........................6
Basic Operations .............................................9
Pre-Programming Selections (for Singing
Karaoke) ........................................................15
Playback Control of Video CD (Ver. 2.0)
......................................................................18
Notes about the Remote Control Transmitter
......................................................................21
Handling Compact Discs ...............................21
Troubleshooting .............................................22
Specifications ................................................22
2
Downloaded From Disc-Player.com Yamaha Manuals
1
To ensure the finest performance, please read this manual
carefully. Keep it in a safe place for future reference.
2
Install your unit in a cool, dry, clean place – away from
windows, heat sources, and too much vibration, dust,
moisture or cold. Avoid sources of hum (transformers,
motors). To prevent fire or electrical shock, do not expose
to rain or water.
WARNING
To reduce the risk of fire or electric shock, do not expose this
unit to rain or moisture.
To avoid electrical shock, do not open the cabinet. Refer
servicing to qualified personnel only.
3
Do not operate the unit upside-down. It may overheat,
possibly causing damage.
4
Never open the cabinet. If a foreign object drops into the
unit, contact your dealer.
DANGER
Invisible laser radiation when open and interlock failed or
defeated.
Avoid direct exposure to beam.
5
This player should not be placed on appliances, such as
amplifiers, that produce heat, or placed in a cabinet that
impedes the flow or air. This may result in a failure in this
player. Install the player in a well ventilated place. In
addition, do not place objects on the player.
CAUTION
Use of controls or adjustments or performance of
procedures other than those specified herein may result in
hazardous radiation exposure.
6
Do not use force on switches, knobs or cords. When
moving the set, first turn the unit off. Then gently
disconnect the power plug and the cords connecting to
other equipment. Never pull the cord itself.
7
Do not attempt to clean the unit with chemical solvents;
this might damage the finish. Use a clean, dry cloth.
8
Be sure to read the “TROUBLESHOOTING” section on
common operating errors before concluding that your unit
is faulty.
9
English
CAUTION: READ THIS BEFORE OPERATING YOUR UNIT.
CLASS 1 LASER PRODUCT
This compact disc player is
classified as a CLASS 1 LASER
product.
The CLASS 1 LASER
PRODUCT label is located on
the rear exterior. (China and
Singapore models)
Laser component in this product is capable of emitting
radiation exceeding the limit for Class 1.
To prevent lightning damage, unplug the power cord and
remove the antenna cable during electrical storms.
10 The generated digital signals may interfere with other
equipment such as tuners or receivers. Move the system
farther away from such equipment if interference is
observed.
11 Voltage selector (General model only)
The voltage selector (on the rear panel of this unit)
must be correctly set to the voltage used locally
before making any connection to the AC power
supply.
This unit is designed for home use only. Do not use this
unit for business purposes.
NOTE:
Please check the copyright laws in your country before
recording from records, compact discs, radio, etc.
Recording of copyrighted material may infringe copyright
laws.
CAUTION
As the laser beam used in this compact disc player is harmful
to the eyes, do not attempt to disassemble the cabinet. Refer
servicing to qualified personnel only.
Laser Diode Properties
• Material: GaAlAs
• Wavelength: 780nm
• Emission Duration: continuous
• Laser Output: max. 44.6µW*
* This output is the value measured at a distance of about
200mm from the objective lens surface on the Optical Pickup Block.
CAUTION FOR CARRYING THIS UNIT
Be sure not to carry or tip the unit with discs remaining in it.
CAUTION FOR MOVING THIS UNIT
When moving this unit, first remove all discs from the disc
tray and close the tray by pressing the OPEN/CLOSE
button, and then switch off the power after you confirm that
the display indicates as follows.
DISC
MUSIC
Never switch off the power if the display is not pictured as
above, otherwise the unit will break down during moving
because the internal mechanism is not locked.
3
Downloaded From Disc-Player.com Yamaha Manuals
CONNECTIONS
●
●
Before making any connections, switch OFF the power to
this unit, the amplifier, the video monitor, etc.
Connections should be made to the correct input terminals
of the amplifier, the video monitor, etc.
●
If the placement of this unit causes interference to other
equipment, separate them from each other.
Video monitor
VIDEO IN
This unit
(General model)
Video connection cord (included)
LINE OUT
VIDEO OUT
VOLTAGE SELECTOR
12
0V
0V
220V
MODE
SELECT
AUTO
R
PAL
11
L
240V
NTSC
To AC outlet
Amplifier
Audio connection
cord (included)
CD
Connecting to the amplifier
Connecting to the video monitor
Connect the LINE OUT terminals to the audio input terminals of
the amplifier (marked as “CD”, “AUX”, etc.) by using the
included audio connection cord.
Be sure that the left (“L”) and right (“R”) LINE OUT terminals
are connected to the corresponding (left and right) terminals of
the amplifier.
Connect this unit’s VIDEO OUT terminal to the video input
terminal of the video monitor by using the included video
connection cord.
4
Downloaded From Disc-Player.com Yamaha Manuals
English
Setting the VIDEO OUT MODE SELECT switch
This unit is designed for use with the NTSC and PAL television
formats. Set this switch to the position for the format your video
monitor employs.
PAL:
VIDEO OUT
Outputs signals in the PAL format no matter which
format (PAL or NTSC) the currently playing disc
employs.
Set to this position if your video monitor employs the
PAL format.
MODE
SELECT
AUTO
PAL
NTSC
AUTO: Outputs signals in the same format as the currently
playing disc employs.
Set to this position if your video monitor can be
switched in between the PAL and NTSC formats
automatically.
NTSC: Outputs signals in the NTSC format no matter which
format (PAL or NTSC) the currently playing disc
employs.
Set to this position if your video monitor employs the
NTSC format.
Connecting microphones for singing Karaoke
One or two microphones can be connected to this unit.
Moreover, if you have a Yamaha microphone which has a key
control function, connect the mini-plug connector cable of the
microphone to the KEY CONTROL jack of this unit. This
connection allows you to change key of source sound by using
controls on the microphone.
Microphone
PLAY/SELECT
STOP/RETURN
DISC SKIP
ECHO
SKIP/SEARCH
PREV
NEXT
LEVEL
Microphone
(with a key
control function)
OPEN/CLOSE
PLAYXCHANGE
MIC 1
MIC 2
KEY CONTROL
6
7
8
9
0
MIN
MAX
MIN
MAX
5
Downloaded From Disc-Player.com Yamaha Manuals
CONTROLS AND THEIR FUNCTIONS
FRONT PANEL
1
23
4
5
6
78
9
0
NATURAL SOUND VIDEO CD CHANGER
OPEN/CLOSE
PLAY/SELECT
VIDEO CD
STOP/RETURN
MPX KARAOKE
KEY CONTROL
DISC SKIP
ECHO
SKIP/SEARCH
PREV
NEXT
MIC 1
LEVEL
MIC 2
KEY CONTROL
POWER
+10
1
2
3
4
5
6
7
8
9
0
MIN
A
PLAYXCHANGE
B
C
D
MAX
E
MIN
MAX
F
G H
REMOTE CONTROL TRANSMITTER
1 Disc tray
Up to 5 discs can be loaded on the disc tray. Five disc-setting
positions on the disc tray are numbered from 1 to 5.
2 MPX button
2
KEY CONTROL
4
3
I
J
K
L
M
N
O
P
Q
KARAOKE
OPEN/CLOSE
9
R
MPX
ON SCREEN
PROG
CANCEL
ENTER
S/F REP
+10
1
2
3
4
5
6
7
8
9
0
DIGEST
INTRO
DISC SKIP
TIME INDEX
SEARCH
INDEX
PREV SKIP NEXT
SLOW
PAUSE
STOP
RETURN
PLAY/REPEAT
SELECT
S
D
5
6
8
7
Whenever this button is pressed, audio output mode changes.
The currently selected audio output mode is shown on the
display. (Refer to page 14 for details.)
3 KARAOKE button
When this button is pressed so that “KARAOKE” lights up on
the display, a pause is inserted each time a play of track ends.
Pressing this button once more will cancel this function.
4 KEY CONTROL buttons
These buttons are available when the Karaoke mode is
selected or a microphone is connected to this unit. Pressing
these buttons changes key of the track currently playing. The
current key level is shown on the display.
: Whenever pressed, key of the track becomes lower.
: Pressing this button restores the original key level of the
track.
: Whenever pressed, key of the track becomes higher.
5 DISC SKIP button(s)
Whenever this button is pressed, the disc tray rotates and the
selected disc changes. Pressing the
side rotates the disc
tray clockwise and pressing the
side rotates the disc tray
counterclockwise.
6
Downloaded From Disc-Player.com Yamaha Manuals
English
6 SKIP/SEARCH (PREV and NEXT) buttons
G MIC (1 and 2) jacks
One or two microphones can be connected to these jacks.
SKIP:
Pressing this button locates the beginning of the next
track (or the currently playing track or the previous
track).
SEARCH:
Pressing and holding this button advances (or
reverses) the play rapidly.
PREV and NEXT:
Functions only when a Playback Control operation is
made on a Video CD, version 2.0. Pressing the NEXT
side selects the next display mode, and pressing the
PREV side restores the previous display mode.
* For some discs, this key operation will not function.
7 STOP/RETURN button
Stops playing a disc during a normal disc play. During a
Playback Control operation, press this button to return to a
previous screen menu mode.
When playing a Video CD, pressing this button for 2 seconds
or more calls a Playback Control mode.
8 PLAY/SELECT (PLAY/REPEAT) button
Pressing this button starts playing a Video CD, version 1.1 and
CD. If this button is pressed while playing a disc, play will
restart from the beginning of the track currently playing.
When this unit is in a Playback Control mode for Video CDs,
version 2.0, pressing this button selects a screen menu mode.
9 OPEN/CLOSE button
Opens and closes the disc tray.
0 PLAYXCHANGE button
Press this button to open and close the disc tray while playing
a disc. This is useful when you want to exchange discs while
playing another disc.
A POWER switch
Press this switch to switch the power on. Press it again to
switch the power off.
H KEY CONTROL jack
If you have a Yamaha microphone which has a key control
function, connect the mini-plug connector cable of the
microphone to this jack. This connection allows you to change
key of source sound by using controls on the microphone.
I PROG button
This button is available only when “KARAOKE” is illuminated
on the display. This button is used for programming tracks.
(Refer to page 15 for details.)
J CANCEL button
Used to cancel a programmed track. (Refer to page 16–17 for
details.)
K ENTER button
Used for programming tracks. (Refer to page 15 for details.)
L DIGEST button
Press this button to watch up to nine scenes of a track on a
Video CD. It gives you a quick overview of the track.
M INTRO button
Press this button to watch the beginning of all tracks on a
Video CD. It gives you a quick overview of what’s on the disc,
so that you can easily search for your favorites.
N TIME INDEX buttons
When you press these buttons during playback, you can skip
through tracks to locate your desired position. Pressing the
button once moves the location forward or backward. Pressing
it several times allows you to move by the displayed time.
(Refer to page 12 for details.)
O INDEX buttons
If the selected disc has index numbers, by pressing the
button once or more, you can select a desired index
number and play the disc from that point.
or
B Remote control sensor
Receives signals from the remote control transmitter.
P SLOW button
C Display panel
Plays a Video CD slowly. Press the PLAY button to return to
normal-speed playback.
See page 8.
D Numeric buttons
Used to select a track number.
E ECHO control
This control adjusts the level of echo applied to sound signals
input from the microphone(s) connected to this unit’s MIC
jacks.
F LEVEL control
This control adjusts the level of sound signals input from the
microphone(s) connected to this unit’s MIC jacks.
Q PAUSE button
Suspends playback temporarily. Press the PLAY button to
return to normal-speed playback.
Pressing the PAUSE button during pause plays frames one by
one: this function is available only for Video CDs.
R ON SCREEN button
Press this button to turn on and off the status screen on the
video monitor. It gives you information about the current
operation status of this unit.
S S/F REP button
Whenever you press this button, repeat play mode changes.
The selected mode indication appears on the display for singletrack or full-disc repeat. It also allows you to turn off the mode.
7
Downloaded From Disc-Player.com Yamaha Manuals
DISPLAY PANEL
1
2
3 4
KARAOKE
VIDEO CD
PBC PROG
AUTO
NTSC PAL
8
DISC
5
6
MUSIC
9
L
R
7
VC
0
1 VIDEO CD indicator
Lights up when the selected disc is a Video CD.
7 Time display
2 KARAOKE indicator
Lights up when the KARAOKE function is turned on by
pressing the KARAOKE button, and goes off if the KARAOKE
button is pressed once more.
8 PBC (Playback Control) indicator
Shows elapsed time of the track currently playing, program
number and so on.
Lights up when this unit is in a Playback Control mode for
playing a Video CD, version 2.0.
3 PROG indicator
Lights up when this unit is in the program play mode.
9 Video signal output mode indicators
4 Disc number indicator (DISC)
Shows the disc number of selected disc.
0 Key level indicator
5 Track number indicator (MUSIC)
Shows the selected track number.
6 Audio output mode indicators
The current audio output mode selected by pressing the MPX
button is shown by these indicators. (Refer to page 14 for
details.)
8
Downloaded From Disc-Player.com Yamaha Manuals
Show the current position of the VIDEO OUT MODE SELECT
switch on the rear panel and the format of video output signal.
Shows the key level of the source currently playing in 13 steps.
: Lights up when the current key level is lower than the
original level of the track.
: Lights up when the current key level is the original level
of the track.
: Lights up when the current key level is higher than the
original level of the track.
English
This manual mainly describes how to operate this unit by using the remote control transmitter. To operate this unit from
the front panel, use the same named buttons on the front panel.
BASIC OPERATIONS
For information about the Playback Control operation for Video CDs, version 2.0, refer to pages 18–20.
Loading discs and starting disc play
KEY CONTROL
KARAOKE
OPEN/CLOSE
MPX
2, 3
ON SCREEN
NATURAL SOUND VIDEO CD CHANGER
PROG
CANCEL
ENTER
S/F REP
+10
1
VIDEO CD
2
3
4
5
6
7
8
9
0
DIGEST
INTRO
MPX KARAOKE
1
POWER
+10
1
STOP/
RETURN
DISC SKIP
TIME INDEX
SEARCH
INDEX
PREV SKIP NEXT
SLOW
PAUSE
STOP
RETURN
1 Turn the power on.
PLAY/REPEAT
SELECT
4
4 Start a disc play.
POWER
PLAY/REPEAT
SELECT
2 Open the disc tray and load discs.
Play will begin from the first track of Disc 1 automatically.
* If you want to play a desired track on another disc, see
the next page.
OPEN/CLOSE
To stop play
Label side
upward.
STOP
RETURN
Disc tray
This unit stops at the beginning of the first track on the disc.
3 Close the disc tray.
OPEN/CLOSE
Note
Additionally, you can close the disc tray by the following ways.
If the tray is closed by these ways, play will begin
automatically.
● Press the PLAY/SELECT button. (Play will begin from the
first track of Disc 1.)
● Press a numeric button.
● Press the front edge of the disc tray gently. (Play will begin
from the first track of Disc 1.)
Notes
● If the STOP/RETURN button is not pressed (except when
“KARAOKE” is illuminated on the display), play will not stop
until the last track on the last-numbered disc has been
played.
● When you press the STOP button during Video CD
playback except in the Playback Control and Karaoke
modes, the unit stops five seconds before the playback
ends and displays the time. The unit is in the resume play
mode.
Pressing the PLAY button in the resume play mode starts
playing from the last playback position.
Pressing the STOP button again when the unit is in the
resume play mode cancels the resume play mode.
9
Downloaded From Disc-Player.com Yamaha Manuals
To play a desired track
KEY CONTROL
KARAOKE
OPEN/CLOSE
MPX
ON SCREEN
PROG
CANCEL
ENTER
S/F REP
+10
2
1
2
3
4
5
6
7
8
9
0
DIGEST
INTRO
DISC SKIP
TIME INDEX
SEARCH
INDEX
PREV SKIP NEXT
SLOW
PAUSE
STOP
RETURN
1
STOP/
RETURN
PLAY/REPEAT
SELECT
Selecting a track (by using the numeric
buttons)
1 If necessary, select a desired disc.
KARAOKE
DISC SKIP
ON SCREEN
PROG
To select track 5
Press “5”.
* If you want to play from the first track on the disc, press
the PLAY/REPEAT button.
+10
1
2
3
4
5
6
7
8
9
0
Display information
DISC
➁
➂
MUSIC
VIDEO CD
AUTO
NTSC PAL
➀
➁
➂
To select track 12
Press “+10”, then press “2”.
CANCEL
ENTER
S/F REP
+10
1
2
3
4
5
6
7
8
9
0
DIGEST
INTRO
DISC SKIP
To select track 26
Press “+10” twice, then press “6”.
2 Select a desired track number.
➀
MPX
For example:
Shows the tray number of the selected disc.
Shows the selected track number.
Shows the elapsed time of the selected track.
10
Downloaded From Disc-Player.com Yamaha Manuals
Note
If a track number higher than the highest track number on the
disc is selected, the last track on the disc will be played.
Note
If a Video CD, version 2.0 is selected, “PBC” lights up on the
display. In this mode, disc play is controlled by the rule of
Playback Control. (If, however, you select a disc and a track
number continuously as explained above, “PBC” does not light
up automatically.) For details of Playback Control, refer to
pages 18–20.
To cancel this mode and restore the normal play mode, press
and hold the STOP/RETURN button for more than 2 seconds.
“PBC” disappears from the display.
To call the Playback Control mode again, press and hold the
STOP/RETURN button for more than 2 seconds.
It is possible to change between the modes only when the unit
stops.
To advance or reverse play rapidly
(Manual search)
To advance rapidly
PLAY/REPEAT
SEARCH
SELECT
(press and hold)
To reverse rapidly
SEARCH
To skip to the beginning of a desired
track
(press and hold)
•
●
To play from the beginning of the track following the one
currently playing
PREV SKIP NEXT
•
•
●
To play from the beginning of the track currently playing
The sound can be heard (although slightly garbled) during
manual search in either direction. This is convenient for
locating a precise position within a track, or for reviewing the
contents quickly.
Manual search can also be performed while disc play is
paused, though no sound will be heard.
When using the SKIP/SEARCH button on the front panel:
Be careful not to release the button just after it is pressed,
otherwise the play is skipped to the beginning of the next
track or returned to the beginning of the current track.
PREV SKIP NEXT
To suspend playback temporarily
●
To play from the beginning of the track before the one
currently playing
PAUSE
PREV SKIP NEXT
(twice)
Notes
• These operations can also be performed when the unit is in
the pause or stop mode.
• When using the SKIP buttons on the remote control
transmitter:
If a button is pressed and held, the track number is
continuously changed to higher numbers (or lower
numbers).
When using the SKIP/SEARCH button on the front panel:
Be careful not to press and hold the button, otherwise the
selected track is played forward (or backward) rapidly.
Notes
● Pressing the PAUSE button during pause plays frames one
by one. This function is available only for Video CDs.
● To resume playback, press the PLAY button.
● When a Video CD is played, you can make fine adjustments
to the paused position pressing the PAUSE button several
times. You can also switch to slow playback with the SLOW
button.
● If playback pauses for 10 minutes, the operation stops
automatically to protect the internal mechanism.
11
Downloaded From Disc-Player.com Yamaha Manuals
English
To replay from the beginning of the
track currently playing
To repeat playback
Pressing the S/F REP button allows you to play any desired
track or disc repeatedly.
To get a quick overview of a track
or a disc (for Video CDs only)
To watch scenes of a track on a Video CD
DIGEST
S/F REP
Whenever you press the button, the repeat play mode
indication appears on the display as follows:
To watch the beginning of all tracks on a Video
CD
INTRO
Display indication
Repeat play mode
Single repeat mode for playing a
track repeatedly
Full repeat mode for playing all
tracks on a disc repeatedly
You can watch up to nine screens at a time on the video
monitor.
Off (no repeat)
Notes
● The single repeat mode overrides the program play mode.
Programmed playback cannot resume until this repeat mode
is turned off.
● These repeat modes can work when playing all types of
CDs, Video CDs, version 1.1 and Video CDs, version 2.0.
However, they cannot work when playing Video CDs,
version 2.0 in the Playback Control mode.
Notes
● This button can work only for playing a Video CD.
● These DIGEST and INTRO operations repeat endlessly until
you stop playback.
● The monitor can show up to nine screens at a time. The
number of screens varies from disc to disc. There may be a
case that the monitor can show one screen only as follows:
To skip through tracks forward or
backward
Pressing the TIME INDEX
or
button once allows you to
skip through the track backward or forward respectively by the
time shown on the display.
To cancel DIGEST and INTRO operations
Press the STOP button.
TIME INDEX
To play a Video CD slowly
When you press a button several times in a short period of
time, the time to skip changes on the display. Releasing the
button moves the position by the displayed time before or
after. The skip operation varies as follows:
● While you are playing a Video CD or CD, you can skip
forward or backward through the entire disc.
● While you are playing programmed tracks in the Karaoke
mode, the skip is made forward or backward through the
entire disc including unprogrammed tracks.
● While you are playing a Video CD, version 2.0 in the
Playback Control mode, you can skip forward or backward
through the selected track.
12
Downloaded From Disc-Player.com Yamaha Manuals
SLOW
Notes
● This button can work only when playing a Video CD.
● To return to normal-speed playback, press the PLAY button.
Pressing the ON SCREEN button once shows the status
screen on the video monitor. You can easily monitor the
operations of this unit such as play, search, and stop. Pressing
the button again cancels this function.
ON SCREEN
KARAOKE
KARAOKE
•
•
Note
This function is not available for CDs.
English
To enter the KARAOKE mode
To monitor the operation status
•
A pause is inserted each time a play of track ends. To begin
playing the next track, press the PLAY/REPEAT button.
While this unit is paused, “ : ” flashes on and off on the time
display.
In this mode, you can program tracks for singing Karaoke.
See page 15–17 for details.
Some adjustments can be made on this unit for enjoying
Karaoke. See page 14 for details.
Notes
If “PBC” is illuminated on the display, pressing the KARAOKE
button to enter the Karaoke mode will cancel the Playback
Control mode (turn “PBC” off) and stop this unit.
• If the pause mode is engaged for 10 minutes, the unit is
stopped automatically to protect the internal mechanism.
•
Exchanging discs while playing
another disc
During play, you can open the disc tray by pressing the
PLAYXCHANGE button without interrupting disc play. In this
case, pressing the DISC SKIP button has no effect.
To cancel this function
Press the KARAOKE button again. “KARAOKE” disappears
from the display.
PLAYXCHANGE
Note
You can load or replace discs on the tray when the disc tray is
opening, however, never load a disc on the recess hidden
inside the unit. In doing so, the disc and the unit may be
damaged, because the recess already has a disc, which is
being played.
13
Downloaded From Disc-Player.com Yamaha Manuals
Adjustments for enjoying Karaoke
KEY
CONTROL
KEY CONTROL
KARAOKE
OPEN/CLOSE
MPX
MPX
ON SCREEN
PROG
CANCEL
ENTER
S/F REP
PLAY/SELECT
OPEN/CLOSE
+10
STOP/RETURN
1
2
3
4
5
6
7
8
9
0
MPX KARAOKE
KEY CONTROL
DISC SKIP
ECHO
SKIP/SEARCH
PREV
NEXT
PLAYXCHANGE
MIC 1
LEVEL
MIC 2
KEY CONTROL
+10
1
2
3
4
5
6
7
8
9
0
MIN
Adjusting the level of sound signals
input from the microphone(s)
MPX
KEY CONTROL
MAX
ECHO
MIN
MAX
LEVEL
LEVEL
MIN
MAX
Turning the LEVEL control clockwise increases the level, and
counterclockwise decreases the level.
Adjusting the level of echo
applied to sound signals
input from the microphone(s)
ECHO
Changing audio output mode
You can select any of four audio output modes by pressing the
MPX button.
MIN
MAX
MPX
Turning the ECHO control clockwise increases the level, and
counterclockwise decreases the level.
If you need no echo effect, set this control to the “MIN”
position.
Display
indication
Audio output mode
Normal stereo output
L
R
L
Sound from the left channel only is
output from both the left and right
speakers.
R
Sound from the right channel only is
output from both the left and right
speakers.
VC
Adjusting key of the track
currently playing
Pressing the KEY CONTROL buttons change key of the track
currently playing. The current key level is shown on the
display. Whenever a track changes, its original key level is
restored.
KEY CONTROL
Sound of vocals on the source is
attenuated.
Note: There may be a case that
vocals cannot be attenuated
effectively according to a source.
In this mode, if a microphone is
connected to this unit, the “VC”
indication blinks. When you sing to
the microphone, vocal sound on the
source is attenuated. When the
microphone does not sense your
vocal, vocal sound on the source is
output.
14
Downloaded From Disc-Player.com Yamaha Manuals
: Whenever pressed, key of the track becomes lower in 6
steps.
: Pressing this button restores the original key level of
the track.
: Whenever pressed, key of the track becomes higher in
6 steps.
English
PRE-PROGRAMMING SELECTIONS
(FOR SINGING KARAOKE)
●
●
9
2
3
5
KEY CONTROL
KARAOKE
OPEN/CLOSE
9
6
MPX
ON SCREEN
PROG
CANCEL
Programming is possible either while the unit is playing a
disc or stopped.
As many as 10 selections can be stored at one time.
ENTER
S/F REP
+10
1
2
3
4
5
6
7
8
9
0
DIGEST
INTRO
PLAY/SELECT
STOP/RETURN
4
DISC SKIP
DISC SKIP
SEARCH
INDEX
PREV SKIP NEXT
8
9
PAUSE
STOP
RETURN
7
PLAY/REPEAT
SELECT
1 Load discs on the disc tray.
2 Press
the KARAOKE button so that “KARAOKE” lights
up on the display. To cancel it, press the KARAOKE
MIC 1
LEVEL
MIC 2
0
MIN
SLOW
PLAYXCHANGE
KEY CONTROL
7
TIME INDEX
ECHO
SKIP/SEARCH
PREV
NEXT
OPEN/CLOSE
MAX
MIN
MAX
9
6
ENTER
button once again.
7 To start play, press the PLAY/REPEAT button.
KARAOKE
KARAOKE
PLAY/REPEAT
SELECT
3
Flashes.
PROG
DISC
MUSIC
L
R
* This unit pauses whenever a play of track ends. To start
playing the next track, press the PLAY/REPEAT button.
8 Repeat step 3–6 to program more selections.
4 Select
the disc (before “DISC” and “MUSIC” stop
flashing on the display).
DISC SKIP
9 Ifthenecessary,
change the audio output mode by pressing
MPX button.
Use the KEY CONTROL buttons and the LEVEL and
ECHO controls as you prefer. (See page 14 for details.)
5 Select
the track (before “DISC” and “MUSIC” stop
flashing on the display).
+10
1
2
3
4
5
6
7
8
9
0
Notes
● In step 4 or 5, if “DISC” and “MUSIC” stop flashing on the
display before you finish programming a track, press the
PROG button again.
● If you program a track number which is higher than the
highest track number on the disc, “E rr” appears on the
display and it cannot be programmed.
● This unit can store as many as 10 selections at one time. If
you program a track number as the eleventh program, the
tenth program is replaced with it.
15
Downloaded From Disc-Player.com Yamaha Manuals
Display information during programming
KARAOKE
VIDEO CD
PROG
AUTO
DISC
MUSIC
L
➀
Shows the program number for the track to be programmed
next.
Shows the selected disc and track number.
➁
R
➀
KARAOKE
VIDEO CD
PROG
AUTO
DISC
MUSIC
L
R
➁
KEY CONTROL
KARAOKE
OPEN/CLOSE
MPX
ON SCREEN
1, 3
Numeric
buttons
PROG
CANCEL
ENTER
S/F REP
+10
1
2
3
4
5
6
7
8
9
0
DIGEST
INTRO
DISC SKIP
TIME INDEX
SEARCH
INDEX
PREV SKIP NEXT
SLOW
PAUSE
STOP
RETURN
DISC SKIP
2
PLAY/REPEAT
SELECT
To check program data
1
CANCEL
3 When the check is completed;
CANCEL
The disc number, the track number and the program
number of the last selection will flash on the display.
2
PREV SKIP NEXT
To correct the selection currently playing
There are two methods, as described below.
1) Select the track to replace the one currently playing by using
the DISC SKIP button and the numeric buttons.
2) Select the track to replace the one currently playing by using
the DISC SKIP button and the SKIP buttons.
Each time the SKIP
button is pressed, the disc
numbers, the track numbers and sequential order of the
programmed tracks can be checked one after another.
The display of the track number can be returned
(sequentially in reverse order) by pressing the SKIP
button.
16
Downloaded From Disc-Player.com Yamaha Manuals
KARAOKE
English
KEY CONTROL
OPEN/CLOSE
MPX
ON SCREEN
1
PROG
CANCEL
ENTER
S/F REP
+10
1
2
3
4
5
6
7
8
9
0
DIGEST
INTRO
DISC SKIP
TIME INDEX
SEARCH
INDEX
PREV SKIP NEXT
SLOW
PAUSE
STOP
RETURN
To cancel a programmed selection
1
CANCEL
The disc number and the track number of the last
selection will flash on the display.
2
3
2
PLAY/REPEAT
SELECT
To cancel the selection you are currently
programming
There are two methods, as described below.
1) Press the CANCEL button instead of the ENTER button
after the track number is selected.
2) If about 30 seconds pass with no operation after the track
number is selected, the track will not be programmed.
To cancel all program data
Switch off the power.
PREV SKIP NEXT
Display the disc number and the track number to be
canceled.
3
ENTER
Press once while the number is flashing.
Notes
● The SEARCH buttons can be used during play to search all
tracks including tracks not programmed.
●
When programs consist of tracks from more than one disc, if
you change a disc by using the PLAYXCHANGE button, the
programmed track on the removed disc is replaced by the
same numbered track on the new disc.
If the same number of the programmed track does not exist
on the new disc, the program will substitute the highestnumbered track on the new disc.
EXAMPLE:
Program
Disc 1, Track 5
Disc 2, Track 8
Disc 4, Track 12
Swap disc 4 (new disc has 9 tracks only)
Disc 1, Track 5
Disc 2, Track 8
Disc 4, Track 9
17
Downloaded From Disc-Player.com Yamaha Manuals
PLAYBACK CONTROL OF VIDEO CD (Ver. 2.0)
Playback Control provides you with two types of new playback
enjoyment.
This function is available for Video CDs, version 2.0 only.
“PBC” will light up on the display when a version 2.0 disc is
used.
The Playback Control differs with each disc. This section gives
a basic explanation of Playback Control. Refer to the
instruction manual for the disc for details.
Playback selection on a screen menu
You can select pictures, music and information to play back by
selecting items on a screen menu. (Similar to having a
conversation.)
Playback of high quality pictures
You can enjoy watching pictures which are four times higher in
quality than moving pictures.
A Flowchart of Playback Control (as an example)
Mode just after the
disc is selected
RETURN
1
Movie
RETURN
Screen
menu
RETURN
2
Picture
3
RETURN
Screen
menu
RETURN
2
1
NEXT
Movie
Movie
Picture
Picture
Movie
Movie
Picture
Downloaded From Disc-Player.com Yamaha Manuals
Picture
1
2
3
4
Picture
Picture
Picture
Picture
Picture
Picture
Picture
Picture
Playback ends.
18
PREV
English
Basic operation
KEY CONTROL
Note
Disc play in the Playback Control mode depends on the data of
the disc used. So, according to the contents of disc, the
following operating method may not be applied to the disc.
Be sure to refer to the instruction manual for the disc.
Before operation
If “KARAOKE” is illuminated on the display, press the
KARAOKE button to cancel it.
(When “KARAOKE” is illuminated, a Playback Control
operation cannot be made.)
KARAOKE
MPX
ON SCREEN
PROG
CANCEL
ENTER
S/F REP
+10
3
6
1 Stop this unit and select a Video CD (version. 2.0).
OPEN/CLOSE
1
2
3
4
5
6
7
8
9
0
DIGEST
INTRO
DISC SKIP
TIME INDEX
SEARCH
INDEX
PREV SKIP NEXT
SLOW
PAUSE
STOP
RETURN
PLAY/REPEAT
SELECT
1
5
2, 3
4 Play
starts, or another menu appears. If another menu
appears, repeat step 3.
(Some discs have more than one screen menu.)
DISC SKIP
5 Ifpressing
“NEXT” or “
” appears on the screen during play,
the NEXT button will change to the next menu.
PREV SKIP NEXT
2
PLAY/REPEAT
SELECT
If “PREV” or “
” appears on the screen during play,
pressing the PREV button will restore the previous
menu.
A screen menu appears.
* Some discs show several short movies
sequentially instead of a menu.
PREV SKIP NEXT
3 Select the number of item you want to play.
+10
1
2
3
4
5
6
7
8
9
0
6 Ifbutton
the play has finished, press the STOP/RETURN
once or more to return to a previous mode.
STOP
RETURN
* If the disc shows several short movies
sequentially, press the PLAY/REPEAT button
when a desired picture appears.
PLAY/REPEAT
SELECT
To select a number higher than 9 in step 3
Example)
• To select number 15
Press “+10” and “5” in succession.
• To select number 26
Press “+10” twice, then press “6”.
19
Downloaded From Disc-Player.com Yamaha Manuals
To stop play
To return to a previous screen
mode during play
STOP
RETURN
STOP
RETURN
Press and hold for more than
2 seconds.
Press once.
* To return to the first screen mode, press the STOP/RETURN
button repeatedly until the first screen mode appears.
If the disc has index numbers
Pressing the INDEX
or
button once or more searches
for and select any index number. Play starts from the point of
selected index number.
To play a Video CD (ver. 2.0) without
Playback Control operation
Press and hold the STOP/RETURN button for more than 2
seconds when this unit is stopped. “PBC” disappears from the
display, and this unit turns into a normal play mode.
STOP
INDEX
RETURN
To restore the Playback Control mode again, press and hold
the STOP/RETURN button for more than 2 seconds.
Note
When you press the DISC SKIP button or a numeric button to
select a desired track in the Playback Control mode, the unit
cancels the mode and starts playing the selected track.
20
Downloaded From Disc-Player.com Yamaha Manuals
Battery installation
English
NOTES ABOUT THE REMOTE CONTROL TRANSMITTER
Remote control transmitter operation range
1
3
Remote control
sensor
2
Within approximately
6 m (19.7 feet)
Battery replacement
If you find that the remote control transmitter must be used
closer to the main unit, the batteries are weak. Replace both
batteries with new ones.
Notes
● Use only AA, R6, UM-3 batteries for replacement.
● Be sure polarities are correct. (See illustration inside battery
compartment.)
● Remove batteries if remote control transmitter will not be
used for an extended period of time.
● If batteries leak, dispose of them immediately. Avoid
touching the leaked material or letting it come in contact with
clothing, etc. Clean the battery compartment thoroughly
before installing new batteries.
30°
30°
Notes
● There should be no large obstacles between the remote
control transmitter and the main unit.
● If the remote control sensor is directly illuminated by strong
lighting (especially an inverter type of fluorescent lamp etc.),
it might cause the remote control transmitter to not work
correctly. In this case, reposition the main unit to avoid
direct lighting.
HANDLING COMPACT DISCS
•
To remove a disc from its storage case, open the case and
then press down at the center; with a finger through the
center hole and the outer edges held as shown in the
illustration, lift the disc out carefully.
•
Discs are not affected by small particles of dust or
fingerprints on their playing surface, but even so they should
be kept clean. Wipe by using a clean, dry cloth. Do not
wipe with a circular motion; wipe straight outward from the
center.
,,,
, ,
•
•
Always handle the disc with care so that its surface is not
scratched.
Discs are not subjected to wear during play, but disc surface
damage when the disc is being handled can adversely affect
the disc’s play.
•
Do not try to clean the disc’s surface by using any type of
disc cleaner, record spray, anti-static spray or liquid, or any
other chemical-based liquid, because such substances might
irreparably damage the disc’s surface.
•
Do not expose discs to direct sunlight, high temperature or
high humidity for a long period of time, because these might
warp or otherwise damage the disc.
No!
To play a 8-cm (3-inch) CD
Place it in the inner recessed area of the disc tray. Do not put
a normal (12-cm/5-inch) CD on top of a 8-cm CD.
21
Downloaded From Disc-Player.com Yamaha Manuals
TROUBLESHOOTING
If the unit fails to operate normally, check the following points to determine whether the fault can be corrected by the simple
measures suggested. If it cannot be corrected, or if the fault is not listed in the SYMPTOM column, disconnect the power cord and
contact your authorized YAMAHA dealer or service center for help.
SYMPTOM
PROBABLE CAUSE
REMEDY
This unit does not switch ON when the
POWER switch is pressed.
The power cord is not connected or not
completely connected.
Securely connect the power cord.
It happens that this unit does not work
normally.
There is an influence of strong external noise
(lightning, excessive static electricity, etc.) or a
misoperation on this unit while using this unit.
Turn the power to this unit off and disconnect
the AC power cord from the AC outlet. After
about 30 seconds have passed, connect the
power and operate this unit again.
The disc tray does not close completely.
A foreign object is obstructing the tray.
Carefully check the disc tray and remove the
foreign object.
Play does not begin.
The disc is damaged.
Check the disc carefully; replace it if
necessary.
There is moisture on the laser pickup.
Wait 20 to 30 minutes after switching the unit
ON before trying to play a disc.
The disc has been loaded upside down.
Reload the disc with the label side up.
The disc is dirty.
Clean the disc.
Play is delayed, or begins at the wrong
place.
The disc may be scratched or damaged.
Check the disc carefully; replace it if
necessary.
A disc cannot be played normally, or there
is a noise during play.
A nonstandardized disc is played.
Play another disc.
No sound or no picture.
Improper output cable connections.
Connect the cables properly. If the problem
persists, the cables may be defective.
Improper amplifier operation.
Set the amplifier controls to the correct input
selection.
No picture.
The setting of the VIDEO OUT MODE
SELECT switch is improper.
Set the VIDEO OUT MODE SELECT switch to
another proper position.
Sound and picture “skip”.
This unit is being subjected to vibrations or
impacts.
Relocate this unit.
The disc is dirty.
Clean the disc.
Sound “hums”.
Improper cable connections.
Securely connect the audio cables. If the
problem persists, the cables may be defective.
Noise from a nearby tuner.
The tuner is too close to this unit.
Move the tuner and this unit farther apart.
Noise from inside of the disc tray.
The disc may be warped.
Replace the disc.
The remote control transmitter does not
work.
The batteries of this remote control transmitter
are too weak.
Replace the batteries with new ones.
Direct sunlight or lighting (of an inverter type
of fluorescent lamp etc.) is striking the remote
control sensor of the main unit.
Change position of the main unit.
SPECIFICATIONS
Audio (analog) output level (only when playing CD)
1 kHz, 0 dB................................................................ 2 ± 0.5V
Signal to noise ratio (only when playing CD)
........................................................................ 100 dB or more
Dynamic range (only when playing CD)
.......................................................................... 96 dB or more
Harmonic distortion + noise
1 kHz ............................................................. 0.0035% or less
Frequency response
2 Hz–20 kHz ............................................................... ±0.5 dB
Video output
75Ω, Negative sync. .............................................. 1 terminal
Video output level ........................................................ 1 Vp-p
Mic input ....................................................................... 2 jacks
Signal processing
KEY CONTROL, ECHO ................................................ Digital
Power requirements
China model ................................................. AC 220V, 50 Hz
Singapore model.......................................... AC 230V, 50 Hz
General model.................... AC 110/120/220/240V, 50/60 Hz
Power consumption ........................................................ 25W
Dimensions (W x H x D) ......................... 435 x 116 x 403 mm
Weight ............................................................................... 6 kg
Accessories ................................... Audio connection cord x 1
Video connection cord x 1
Remote control transmitter
Batteries (size AA, R6, UM-3)
Please note that all specifications are subject to change
without notice.
22
Downloaded From Disc-Player.com Yamaha Manuals
YAMAHA
YAMAHA
YAMAHA
YAMAHA
YAMAHA
YAMAHA
YAMAHA
ELECTRONICS CORPORATION, USA 6660 ORANGETHORPE AVE., BUENA PARK, CALIF. 90620, U.S.A.
CANADA MUSIC LTD. 135 MILNER AVE., SCARBOROUGH, ONTARIO M1S 3R1, CANADA
ELECTRONIK EUROPA G.m.b.H. SIEMENSSTR. 22-34, 25462 RELLINGEN BEI HAMBURG, F.R. OF GERMANY
ELECTRONIQUE FRANCE S.A. RUE AMBROISE CROIZAT BP70 CROISSY-BEAUBOURG 77312 MARNE-LA-VALLEE CEDEX02, FRANCE
ELECTRONICS (UK) LTD. YAMAHA HOUSE, 200 RICKMANSWORTH ROAD WATFORD, HERTS WD1 7JS, ENGLAND
SCANDINAVIA A.B. J A WETTERGRENS GATA 1, BOX 30053, 400 43 VÄSTRA FRÖLUNDA, SWEDEN
MUSIC AUSTRALIA PTY, LTD. 17-33 MARKET ST., SOUTH MELBOURNE, 3205 VIC., AUSTRALIA
Downloaded From Disc-Player.com Yamaha Manuals