1
McAfee Quarantine Manager 6.0
User Guide
®
™
COPYRIGHT
Copyright © 2008 McAfee, Inc. All Rights Reserved.
No part of this publication may be reproduced, transmitted, transcribed, stored in a retrieval system, or translated into any language
in any form or by any means without the written permission of McAfee, Inc., or its suppliers or affiliate companies.
TRADEMARK ATTRIBUTIONS
AVERT, EPO, EPOLICY ORCHESTRATOR, FLASHBOX, FOUNDSTONE, GROUPSHIELD, HERCULES, INTRUSHIELD, INTRUSION
INTELLIGENCE, LINUXSHIELD, MANAGED MAIL PROTECTION, MAX (MCAFEE SECURITYALLIANCE EXCHANGE), MCAFEE, MCAFEE.COM,
NETSHIELD, PORTALSHIELD, PREVENTSYS, PROTECTION-IN-DEPTH STRATEGY, PROTECTIONPILOT, SECURE MESSAGING SERVICE,
SECURITYALLIANCE, SITEADVISOR, THREATSCAN, TOTAL PROTECTION, VIREX, VIRUSSCAN, WEBSHIELD are registered trademarks
or trademarks of McAfee, Inc. and/or its affiliates in the US and/or other countries. McAfee Red in connection with security is distinctive
of McAfee brand products. All other registered and unregistered trademarks herein are the sole property of their respective owners.
LICENSE INFORMATION
License Agreement
NOTICE TO ALL USERS: CAREFULLY READ THE APPROPRIATE LEGAL AGREEMENT CORRESPONDING TO THE LICENSE YOU
PURCHASED, WHICH SETS FORTH THE GENERAL TERMS AND CONDITIONS FOR THE USE OF THE LICENSED SOFTWARE. IF YOU DO
NOT KNOW WHICH TYPE OF LICENSE YOU HAVE ACQUIRED, PLEASE CONSULT THE SALES AND OTHER RELATED LICENSE GRANTOR
PURCHASE ORDER DOCUMENTS THAT ACCOMPANIES YOUR SOFTWARE PACKAGING OR THAT YOU HAVE RECEIVED SEPARATELY AS
PART OF THE PURCHASE (AS A BOOKLET, A FILE ON THE PRODUCT CD, OR A FILE AVAILABLE ON THE WEBSITE FROM WHICH YOU
DOWNLOADED THE SOFTWARE PACKAGE). IF YOU DO NOT AGREE TO ALL OF THE TERMS SET FORTH IN THE AGREEMENT, DO NOT
INSTALL THE SOFTWARE. IF APPLICABLE, YOU MAY RETURN THE PRODUCT TO MCAFEE OR THE PLACE OF PURCHASE FOR A FULL
REFUND.
License Attributions
Refer to the product Release Notes.
Issued September 2008 / McAfee Quarantine Manager software version 6.0
™
Contents
1
2
Introducing McAfee Quarantine Manager
5
Product features and how they work . . . . . . . . . . . . . . . . . . . . . . . . . . . . . . . . . . .
New features in this release . . . . . . . . . . . . . . . . . . . . . . . . . . . . . . . . . . . . . . . . . .
Using this guide . . . . . . . . . . . . . . . . . . . . . . . . . . . . . . . . . . . . . . . . . . . . . . . . . . .
Audience . . . . . . . . . . . . . . . . . . . . . . . . . . . . . . . . . . . . . . . . . . . . . . . . . . . . .
Conventions . . . . . . . . . . . . . . . . . . . . . . . . . . . . . . . . . . . . . . . . . . . . . . . . . . .
Getting product information . . . . . . . . . . . . . . . . . . . . . . . . . . . . . . . . . . . . . . . . . .
Standard documentation . . . . . . . . . . . . . . . . . . . . . . . . . . . . . . . . . . . . . . . . .
5
6
6
7
7
8
8
Pre-Installation Information and Tasks
9
Pre-Installation scenarios . . . . . . . . . . . . . . . . . . . . . . . . . . . . . . . . . . . . . . . . . . . . 9
System requirements . . . . . . . . . . . . . . . . . . . . . . . . . . . . . . . . . . . . . . . . . . . . . . .10
Migrating the database to version 6.0 . . . . . . . . . . . . . . . . . . . . . . . . . . . . . . . . . .10
3
Quick Setup
13
4
Installing the Software
15
Accessing the software . . . . . . . . . . . . . . . . . . . . . . . . . . . . . . . . . . . . . . . . . . . . .15
What is included with the software? . . . . . . . . . . . . . . . . . . . . . . . . . . . . . . . .15
Installing MySQL for McAfee Quarantine Manager 6.0 . . . . . . . . . . . . . . . . . . . . .16
Installing McAfee Quarantine Manager version 6.0 . . . . . . . . . . . . . . . . . . . . . . . .17
Configuring your MySQL database . . . . . . . . . . . . . . . . . . . . . . . . . . . . . . . . . . . .18
Configuring your Microsoft SQL Server database . . . . . . . . . . . . . . . . . . . . . . . . .18
Installing McAfee Quarantine Manager 6.0 DB Suite utility . . . . . . . . . . . . . . . . . .19
Testing your installation . . . . . . . . . . . . . . . . . . . . . . . . . . . . . . . . . . . . . . . . . . . . 20
Uninstalling McAfee Quarantine Manager . . . . . . . . . . . . . . . . . . . . . . . . . . . . . . 20
5
6
Integrating with ePolicy Orchestrator 4.0
23
Before you begin . . . . . . . . . . . . . . . . . . . . . . . . . . . . . . . . . . . . . . . . . . . . . .
ePolicy Orchestrator agent . . . . . . . . . . . . . . . . . . . . . . . . . . . . . . . . . . . . . .
Installation . . . . . . . . . . . . . . . . . . . . . . . . . . . . . . . . . . . . . . . . . . . . . . . . . . . . . .
Checking in the McAfee Quarantine Manager package . . . . . . . . . . . . . . . . .
Installing McAfee Quarantine Manager on the client computer . . . . . . . . . .
Checking in the MySQL for McAfee Quarantine Manager package . . . . . . .
Installing MySQL for McAfee Quarantine Manager on the client computer .
Adding extensions . . . . . . . . . . . . . . . . . . . . . . . . . . . . . . . . . . . . . . . . . . . . .
Configuring policies for McAfee Quarantine Manager . . . . . . . . . . . . . . . . . . . . .
Introducing ePolicy Orchestrator 4.0 dashboard . . . . . . . . . . . . . . . . . . . . . . . . .
Reporting . . . . . . . . . . . . . . . . . . . . . . . . . . . . . . . . . . . . . . . . . . . . . . . . . . . . . . .
Systems . . . . . . . . . . . . . . . . . . . . . . . . . . . . . . . . . . . . . . . . . . . . . . . . . . . . . . . .
Uninstalling the McAfee Quarantine Manager . . . . . . . . . . . . . . . . . . . . . . . . . . .
23
23
25
25
25
26
26
27
28
29
30
31
32
Types of Interfaces
35
Interface for administrators . . . . . . . . . . . . . . . . . . . . . . . . . . . . . . . . . . . . . . . . . 35
Interface for users . . . . . . . . . . . . . . . . . . . . . . . . . . . . . . . . . . . . . . . . . . . . . . . . 36
7
Getting Started with the Interface for administrators
39
Viewing the dashboard . . . . . . . . . . . . . . . . . . . . . . . . . . . . . . . . . . . . . . . . . . . . . 40
1
®
™
McAfee Quarantine Manager 6.0 User Guide
8
Contents
Statistics . . . . . . . . . . . . . . . . . . . . . . . . . . . . . . . . . . . . . . . . . . . . . . . . . . . .
Connected McAfee Products . . . . . . . . . . . . . . . . . . . . . . . . . . . . . . . . . . . . .
QuickSearch . . . . . . . . . . . . . . . . . . . . . . . . . . . . . . . . . . . . . . . . . . . . . . . . . .
Product Information . . . . . . . . . . . . . . . . . . . . . . . . . . . . . . . . . . . . . . . . . . . .
Viewing graphical reports . . . . . . . . . . . . . . . . . . . . . . . . . . . . . . . . . . . . . . . . . . .
40
41
41
42
42
Managing Quarantined Items
45
Searching a quarantined item . . . . . . . . . . . . . . . . . . . . . . . . . . . . . . . . . . . . . . . . 46
Viewing search results . . . . . . . . . . . . . . . . . . . . . . . . . . . . . . . . . . . . . . . . . . . . . 46
9
Managing Blacklists and Whitelists
49
Organizing blacklists and whitelists . . . . . . . . . . . . . . . . . . . . . . . . . . . . . . . . . . . 50
Importing blacklists and whitelists . . . . . . . . . . . . . . . . . . . . . . . . . . . . . . . . . . . . 51
Exporting blacklists and whitelists . . . . . . . . . . . . . . . . . . . . . . . . . . . . . . . . . . . . 52
10
Managing User Submissions
53
Searching user submissions . . . . . . . . . . . . . . . . . . . . . . . . . . . . . . . . . . . . . . . . . 54
Viewing search results . . . . . . . . . . . . . . . . . . . . . . . . . . . . . . . . . . . . . . . . . . . . . 54
11
12
13
Managing Settings and Diagnostics
57
Managing users . . . . . . . . . . . . . . . . . . . . . . . . . . . . . . . . . . . . . . . . . . . . . . . . . .
General . . . . . . . . . . . . . . . . . . . . . . . . . . . . . . . . . . . . . . . . . . . . . . . . . . . . .
Account management . . . . . . . . . . . . . . . . . . . . . . . . . . . . . . . . . . . . . . . . . .
User synchronization . . . . . . . . . . . . . . . . . . . . . . . . . . . . . . . . . . . . . . . . . . .
Configuring and scheduling email digests . . . . . . . . . . . . . . . . . . . . . . . . . . . . . .
Digest scheduler . . . . . . . . . . . . . . . . . . . . . . . . . . . . . . . . . . . . . . . . . . . . . .
User-based digest . . . . . . . . . . . . . . . . . . . . . . . . . . . . . . . . . . . . . . . . . . . . .
Digest mail . . . . . . . . . . . . . . . . . . . . . . . . . . . . . . . . . . . . . . . . . . . . . . . . . . .
Digest response . . . . . . . . . . . . . . . . . . . . . . . . . . . . . . . . . . . . . . . . . . . . . . .
Managing the database . . . . . . . . . . . . . . . . . . . . . . . . . . . . . . . . . . . . . . . . . . . .
General . . . . . . . . . . . . . . . . . . . . . . . . . . . . . . . . . . . . . . . . . . . . . . . . . . . . .
Purge of Old Items . . . . . . . . . . . . . . . . . . . . . . . . . . . . . . . . . . . . . . . . . . . .
User-based Purge . . . . . . . . . . . . . . . . . . . . . . . . . . . . . . . . . . . . . . . . . . . . . .
Viewing the product log . . . . . . . . . . . . . . . . . . . . . . . . . . . . . . . . . . . . . . . . . . . .
Configuring diagnostics . . . . . . . . . . . . . . . . . . . . . . . . . . . . . . . . . . . . . . . . . . . .
Logging . . . . . . . . . . . . . . . . . . . . . . . . . . . . . . . . . . . . . . . . . . . . . . . . . . . . .
Product Log . . . . . . . . . . . . . . . . . . . . . . . . . . . . . . . . . . . . . . . . . . . . . . . . . .
Debug Tracing . . . . . . . . . . . . . . . . . . . . . . . . . . . . . . . . . . . . . . . . . . . . . . . .
Error Reporting . . . . . . . . . . . . . . . . . . . . . . . . . . . . . . . . . . . . . . . . . . . . . . .
Configuring communications . . . . . . . . . . . . . . . . . . . . . . . . . . . . . . . . . . . . . . . .
Default configuration . . . . . . . . . . . . . . . . . . . . . . . . . . . . . . . . . . . . . . . . . . .
Advanced configuration . . . . . . . . . . . . . . . . . . . . . . . . . . . . . . . . . . . . . . . . .
Managing Advanced Settings . . . . . . . . . . . . . . . . . . . . . . . . . . . . . . . . . . . . . . . .
ePolicy Orchestrator related settings . . . . . . . . . . . . . . . . . . . . . . . . . . . . . . .
Submission to McAfee Labs settings . . . . . . . . . . . . . . . . . . . . . . . . . . . . . .
Database downtime notification settings . . . . . . . . . . . . . . . . . . . . . . . . . . .
Miscellaneous settings . . . . . . . . . . . . . . . . . . . . . . . . . . . . . . . . . . . . . . . . .
Custom email . . . . . . . . . . . . . . . . . . . . . . . . . . . . . . . . . . . . . . . . . . . . . . . . .
58
58
59
59
60
60
61
61
62
62
63
63
63
64
64
65
65
65
66
66
67
67
67
68
68
68
69
69
Managing administrators
71
Adding an Alias/Domain administrator . . . . . . . . . . . . . . . . . . . . . . . . . . . . . . . . .
Managing domains . . . . . . . . . . . . . . . . . . . . . . . . . . . . . . . . . . . . . . . . . . . . . . . .
Adding/Importing domains . . . . . . . . . . . . . . . . . . . . . . . . . . . . . . . . . . . . . . .
Modifying my account . . . . . . . . . . . . . . . . . . . . . . . . . . . . . . . . . . . . . . . . . .
Viewing assigned domains . . . . . . . . . . . . . . . . . . . . . . . . . . . . . . . . . . . . . .
71
72
72
73
73
Getting Started with the Interface for Users
75
Searching a quarantined item . . . . . . . . . . . . . . . . . . . . . . . . . . . . . . . . . . . . . . . . .76
Viewing search results . . . . . . . . . . . . . . . . . . . . . . . . . . . . . . . . . . . . . . . . . . . . . .76
Submitting a spam sample . . . . . . . . . . . . . . . . . . . . . . . . . . . . . . . . . . . . . . . . . . 77
2
®
™
McAfee Quarantine Manager 6.0 User Guide
Contents
Managing your account . . . . . . . . . . . . . . . . . . . . . . . . . . . . . . . . . . . . . . . . . . . . 78
14
15
About DB Suite Utility
83
Configuring the source database settings . . . . . . . . . . . . . . . . . . . . . . . . . . . . . .
Converting the database . . . . . . . . . . . . . . . . . . . . . . . . . . . . . . . . . . . . . . . . . . .
Creating McAfee Quarantine Manager user accounts . . . . . . . . . . . . . . . . . . . . .
Maintaining the database users . . . . . . . . . . . . . . . . . . . . . . . . . . . . . . . . . . . . . .
Archiving or Retrieving the existing MySQL database . . . . . . . . . . . . . . . . . . . . .
83
84
84
86
87
Frequently Asked Questions
89
Index
93
3
®
™
McAfee Quarantine Manager 6.0 User Guide
Contents
4
1
Introducing McAfee Quarantine
Manager
®
McAfee Quarantine Manager consolidates the quarantine and anti-spam management
functionality of multiple McAfee products. It provides a central point to analyze and act
upon emails and files that have been quarantined. Items are quarantined because they
are spam, phish, viruses, potentially unwanted programs or unwanted content.
While McAfee Quarantine Manager is effective in managing unsolicited bulk email or
spam. No anti-spam filter is capable of detecting all spam that flows through a network.
Occasionally some emails are misidentified.
Administrators and users increasingly want to tune anti-spam products to suit their
own environments and increase the effectiveness of their spam filtering. McAfee
Quarantine Manager allows you to do this.
This chapter introduces McAfee Quarantine Manager 6.0 and provides the following
information:
Product features and how they work
New features in this release
Using this guide
Getting product information
Product features and how they work
The McAfee Quarantine Manager allows you to:
Manage quarantined items whether they are spam, phish or other undesirable
items.
Create administrator accounts to manage data related to specific domains.
Store the quarantined items using MySQL or Microsoft SQL 2005 database.
Manage and configure settings remotely using the ePolicy Orchestrator version 4.0
management software.
Log on to McAfee Quarantine Manager using Active Directory or Lotus Domino
credentials.
Maintain your McAfee Quarantine Manager account.
5
®
™
McAfee Quarantine Manager 6.0 User Guide
Introducing McAfee Quarantine Manager
New features in this release
Manage user or global blacklist and whitelist.
Carry out quarantine tasks such as releasing messages or submitting samples to
McAfee AVERT Labs.
Configure the storage and aging of quarantined items (overriding user settings).
Manage users, email digests, database, and product logs.
Manage logging, debug tracing, product log, and error reporting service.
Release email that has been incorrectly quarantined as spam, phish, unwanted
content or potentially unwanted program.
Reassign quarantined items of one user to another.
Synchronize users with LDAP servers such as Active Directory or Lotus Domino.
View digests of quarantined messages. The users can use the resulting lists to
release messages that are not spam and to create or modify their individual
blacklists and whitelists.
New features in this release
Support for Microsoft SQL Server 2005.
Support for Microsoft Windows 2008 server.
Manageability through McAfee ePolicy Orchestrator 4.0.
Automatic synchronization with LDAP servers such as Active Directory or Lotus
Domino.
Improved domain-based quarantine.
Improved performance and usability for digest mails.
Quick access to top 10 reports.
DB Suite utility to convert from MySQL database to Microsoft SQL Server 2005
database and vice-versa, maintain the MySQL database, migrate and backup the
MySQL database, configure the database and create bulk end-user accounts.
Using this guide
™
This guide describes the sequential process of installing McAfee Quarantine Manager
version 6.0. Topics covered are:
Pre-Installation Information and Tasks — Pre-installation scenarios and system
requirements.
Quick Setup — The quickest way to install and begin using the McAfee Quarantine
Manager version 6.0 software.
Installing the Software — Accessing and installing Quarantine Manager.
6
1
®
™
McAfee Quarantine Manager 6.0 User Guide
Introducing McAfee Quarantine Manager
Using this guide
Integrating with ePolicy Orchestrator 4.0 — Testing the McAfee Quarantine
Manager integration with ePolicy Orchestrator version 4.0.
Types of Interfaces — Descriptions of the types of interfaces: Interface for
administrators and Interface for users.
Getting Started with the Interface for administrators — Using McAfee Quarantine
Manager, getting detailed information about the dashboard, quarantined items,
blacklist and whitelists, user submissions, settings & diagnostics, and administrator
management.
Getting Started with the Interface for Users — Using McAfee Quarantine Manager
User UI and getting detailed information about the spam, phish, potentially
unwanted program, unwanted content, submit spam sample, and your account.
About DB Suite Utility — Using the DB Suite utility, convert from MySQL database
to Microsoft SQL Server 2005 database and vice-versa, maintain the MySQL
database, migrate and backup the MySQL database, configure the database and
create bulk end-user accounts.
Audience
This information is intended for network administrators who are responsible for their
company’s anti-virus and security program.
Conventions
This guide uses the following conventions:
Bold
Condensed
All words from the interface, including options, menus, buttons, and dialog
box names.
Example:
Type the User name and Password of the appropriate account.
Courier
The path of a folder or program; text that represents something the user
types exactly (for example, a command at the system prompt).
Examples:
The default location for the program is:
C:\Program Files\McAfee\EPO\3.6.0
Run this command on the client computer:
scan --help
Italic
For emphasis or when introducing a new term; for names of product
documentation and topics (headings) within the material.
Example:
Refer to the VirusScan Enterprise Product Guide for more information.
Blue
A web address (URL) and/or a live link.
Example:
Visit the McAfee web site at:
http://www.mcafee.com
<TERM>
Angle brackets enclose a generic term.
Example:
In the console tree, right-click <SERVER>.
7
1
®
™
McAfee Quarantine Manager 6.0 User Guide
Introducing McAfee Quarantine Manager
Getting product information
Note: Supplemental information; for example, another method of
executing the same command.
Note
Tip: Suggestions for best practices and recommendations from McAfee for
threat prevention, performance and efficiency.
Tip
Caution: Important advice to protect your computer system, enterprise,
software installation or data.
Caution
Warning
Warning: Important advice to protect a user from bodily harm when using
a hardware product.
Getting product information
Unless otherwise noted, product documentation comes as Adobe Acrobat .PDF files,
available on the product CD or from the McAfee download site.
Standard documentation
User Guide — System requirements and instructions for installing and starting the
software. Getting started with the product and its features, detailed instructions for
configuring the software, information on deployment, recurring tasks, and operating
procedures.
Help — High-level and detailed information accessed from the software application:
Help menu and/or Help button for page-level help; right-click option for What’s This?
help.
Release Notes — ReadMe. Product information, resolved issues, any known issues,
and last-minute additions or changes to the product or its documentation.
8
1
2
Pre-Installation Information and
Tasks
The pre-installation chapter provides information that is important to consider before
installing McAfee Quarantine Manager version 6.0.
Topics covered are:
Pre-Installation scenarios
System requirements
Migrating the database from previous version to version 6.0
Pre-Installation scenarios
®
You must log on to Microsoft Windows as an administrator. This gives you relevant
rights and permissions to install Quarantine Manager software.
Before installing McAfee Quarantine Manager version 6.0 review this important
information:
Manually uninstall any older versions of the McAfee Quarantine Manager software.
Do not install McAfee Quarantine Manager on the same server as ePolicy
Orchestrator.
9
®
™
McAfee Quarantine Manager 6.0 User Guide
Pre-Installation Information and Tasks
System requirements
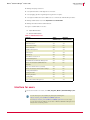
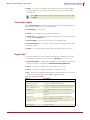
System requirements
Before you install McAfee Quarantine Manager, ensure that your server meets these
minimum requirements.
Table 2-1 Minimum System Requirements
Processor
Intel Pentium 4, 2.8GHz, 400MHz front-side bus
Memory
2GB RAM
Hard disk space
160GB with NTFS file system
Operating system
Windows 2003 Standard/Enterprise Server SP2 (32-bit or 64-bit)
Windows 2003 Standard/Enterprise Server R2 (32-bit or 64-bit)
Windows 2008 Standard/Enterprise/Datacenter Server (32-bit or
64-bit)
Note: For Windows requirements, refer to the service pack release
notes.
Windows Components
Required
Internet Information Service 6.0 (IIS) or later
Browsers Supported
Microsoft Internet Explorer version 6.0 or later
Firefox version 2.0
Network Requirement
10/100/1000Mbps Ethernet card
Supported Databases
MySQL Server version 5.0 (packaged with this release)
Microsoft SQL Server 2005 Standard/Enterprise SP2 (32-bit or
64-bit)
Secure Content Management version 4.5 or later
Supported McAfee
Product(s)
®
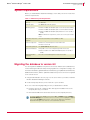
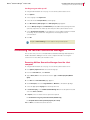
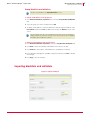
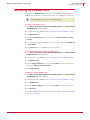
Migrating the database to version 6.0
You can migrate the database from previous versions (4.1 Patch 1/4.1.1/5.0 Patch 1) to
version 6.0 using the DB Suite utility. During migration the configuration settings, user
information and aliases, global blacklists and whitelists, group blacklists and whitelists,
dashboard information, and the quarantined data of the previous version are migrated
to the current version.
1 Using an administrative account, log on to the server where you want to install the
McAfee Quarantine Manager software.
2 Create a temporary directory on the network or your local drive.
3 Do one of the following depending on how you obtained the software:
Note
Insert the CD into the computers drive and copy the installation files to the
temporary directory you created.
Download the ZIP archive and extract the files to the temporary directory.
If you are migrating the database from version 4.1.1 or 5.0 Patch 1, stop the McAfee
Quarantine Manager service from the services console. If you are migrating the database
from version 4.1 Patch 1 to this version, remove the IP address of the McAfee
Quarantine Manager server from the connected McAfee products.
10
2
®
™
McAfee Quarantine Manager 6.0 User Guide
Pre-Installation Information and Tasks
Migrating the database to version 6.0
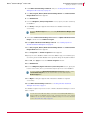
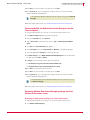
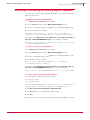
4 Install McAfee Quarantine Manager 6.0 DB Suite utility. See Installing McAfee Quarantine
Manager 6.0 DB Suite utility on page 19.
5 Click Start | Programs | McAfee | McAfee Quarantine Manager DB Suite. The McAfee Quarantine
Manager DB Suite 6.0 window appears.
6 Click DB Maintenance.
7 From the DB Migration | Backup existing database section, specify a location to backup
the database.
8 Click Backup. A dialog box appears that indicates the database is backed up
successfully.
Backup the McAfeeConfig.xml file before uninstalling McAfee Quarantine Manager version
Note
4.1/4.1.1.
9 Uninstall the McAfee Quarantine Manager version 4.x / 5.x and MySQL for McAfee Quarantine
Manager software from the Add/Remove Programs.
10 Install MySQL for McAfee Quarantine Manager version 6.0. See Installing MySQL for
McAfee Quarantine Manager 6.0 on page 16.
11 Click Start | Programs | McAfee | McAfee Quarantine Manager DB Suite. The McAfee Quarantine
Manager DB Suite 6.0 window appears.
12 Click Configure DB. The Database configuration window appears.
13 Specify the source database details such as the database type, server address, port,
user name, password and database name specified during the MySQL installation.
14 Click Test, then Apply and close the Database configuration window.
15 Click DB Maintenance.
16 From the DB Migration | Migrate to latest version | Choose backup folder section, specify the
location of the folder, where you have backed up the previous version database.
Note
If you are migrating the McAfee Quarantine Manager version 4.1/4.1.1 database, under
Choose McAfeeConfig.xml specify the location where you have backed up the
McAfeeConfig.xml file.
17 Click Migrate. A dialog box appears that indicated the database is migrated
successfully.
18 Install McAfee Quarantine Manager version 6.0. See Installing McAfee Quarantine
Manager version 6.0 on page 17.
The database migration of previous version of McAfee Quarantine Manager to version
6.0 is complete.
Note
You can also use the DB Suite utility to convert the version 6.0 MySQL database to
Microsoft SQL Server database and vice-versa, create bulk end-user accounts, manage
database user accounts and configure the database settings. To know more about the
tool see About DB Suite Utility on page 83.
11
2
®
™
McAfee Quarantine Manager 6.0 User Guide
Pre-Installation Information and Tasks
Migrating the database to version 6.0
12
2
3
Quick Setup
This chapter provides the quickest way to install and begin using the McAfee
Quarantine Manager version 6.0 software. Setting up McAfee Quarantine Manager
version 6.0 includes the following steps:
1 Installing MySQL for McAfee Quarantine Manager 6.0 on page 16
2 Installing McAfee Quarantine Manager version 6.0 on page 17
3 Getting Started with the Interface for administrators on page 39
13
®
™
McAfee Quarantine Manager 6.0 User Guide
Quick Setup
14
3
4
Installing the Software
Installing McAfee Quarantine Manager software consists of these topics:
Accessing the software
What’s included in the software?
Installing MySQL for McAfee Quarantine Manager 6.0
Installing McAfee Quarantine Manager version 6.0 server
Configuring your MySQL database
Configuring your Microsoft SQL Server database
Installing McAfee Quarantine Manager 6.0 DB Suite utility
Testing your installation
Uninstalling McAfee Quarantine Manager
Accessing the software
McAfee distributes Quarantine Manager in two ways:
As an archived file that you download from the McAfee website or from other
electronic services.
On the Total Virus Defense (TVD), the Active Virus Defense (AVD) or the suite CDs.
Once you have downloaded the archive file or placed the TVD or AVD installation CD in
your CD-ROM drive, the installation steps you follow are the same for each type of
distribution.
Note
To install, manage, remove or upgrade McAfee Quarantine Manager version 6.0, you
must have a user account with administrative rights.
What is included with the software?
McAfee Quarantine Manager includes these components that you can install together
or separately.
McAfee Quarantine Manager version 6.0 (MQM60Server.ZIP)
15
®
™
McAfee Quarantine Manager 6.0 User Guide
Installing the Software
Installing MySQL for McAfee Quarantine Manager 6.0
MySQL for McAfee Quarantine Manager 6.0 (MQM60MySQL.ZIP)
McAfee Quarantine Manager DB Suite (MQMDBSuite.ZIP)
ePolicy Orchestrator package (MQM6POLICIES.ZIP and MQM6REPORTS.ZIP)
Installing MySQL for McAfee Quarantine Manager 6.0
If you want to deploy MySQL for McAfee Quarantine Manager 6.0 using ePolicy
Orchestrator 4.0, see Checking in the MySQL for McAfee Quarantine Manager package
Note
on page 26.
1 Using an administrative account, log on to the server where you want to install the
software.
2 Create a temporary directory on the network or your local drive.
3 Do one of the following, depending on how you obtained the software:
Insert the CD into the computers drive and copy the installation files to the
temporary directory.
Download the ZIP archive and extract the files to the temporary directory.
4 Using Windows Explorer, navigate to the folder where you copied the installation
files. Open the MQM60MySQL folder and double-click SETUP.EXE. The MySQL for McAfee
Quarantine Manager 6.0 Setup dialog box appears.
5 Click Next. The End User License Agreement dialog box appears.
6 Click I accept the terms in the license agreement, then click Next to display the Destination
Folder dialog box.
7 Click Browse to select an installation folder or accept the default.
Note
The database will be installed in the folder mentioned above. McAfee recommends you
to select a folder or partition with sufficient amount of disk space.
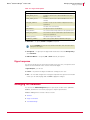
8 Click Next. The Database Server Settings dialog box appears. Specify the following
configuration for MySQL for McAfee Quarantine Manager:
Table 4-1 Database Server Settings
Parameter
Default values
Username
The default user name is root.
Password
The default password is root.
Database name
The default database name is mqm.
Port
The default port number is 3306.
Super administrator Username
The default user name is super@mqm.com.
Super administrator Password
The default password is super123.
Note
The password must be alpha-numeric and at least eight characters long. The characters
allowed are a-z A-Z 0-9 ! + * - , { } ( ) # $ @ ?. The password cannot contain a blank
space.
16
4
®
™
McAfee Quarantine Manager 6.0 User Guide
Installing the Software
Installing McAfee Quarantine Manager version 6.0
9 Click Next. The Ready to Install the Application dialog box appears.
10 Click Next to display the Updating System dialog box. A progress bar indicates the
features being copied and installed.
11 Click Finish to complete the installation.
Installing McAfee Quarantine Manager version 6.0
If you want to deploy McAfee Quarantine Manager 6.0 using ePolicy Orchestrator 4.0, see
Checking in the McAfee Quarantine Manager package on page 25.
Note
1 Using an administrative account, log on to the server where you want to install the
software.
2 Create a temporary directory on the network or your local drive.
3 Do one of the following, depending on how you obtained the software:
Note
Insert the CD into the computers drive and copy the installation files to the
temporary directory.
Download the ZIP archive and extract the files to the temporary directory.
Install MySql for McAfee Quarantine Manager 6.0 / Microsoft SQL Server 2005 before
installing McAfee Quarantine Manager version 6.0 software.
4 Using Windows Explorer, navigate to the folder where you copied the installation
files. Open the MQM60Server folder and double-click SETUP.EXE. The McAfee Quarantine
Manager 6.0 Setup dialog box appears.
5 Click Next. The End User License Agreement dialog box appears.
6 Click I accept the terms in the license agreement, then click Next to display the Destination
Folder dialog box.
7 Click Browse to select an installation folder or accept the default.
Note
MySQL for McAfee Quarantine Manager 6.0 / Microsoft SQL Server 2005 and McAfee
Quarantine Manager version 6.0 can also be installed on two different computers.
8 Click Next. The Server Settings dialog box appears. Specify the Port number for the
McAfee Quarantine Manager web-based user interface hosted in IIS. The default
port number is 80.
9 Click Next. The Ready to Install the Application dialog box appears.
10 Click Next to display the Updating System dialog box. A progress bar indicates the
features being copied and installed.
11 Click Finish to complete the installation, then click Yes to restart the computer.
17
4
®
™
McAfee Quarantine Manager 6.0 User Guide
Installing the Software
Configuring your MySQL database
Configuring your MySQL database
This section tells you how to configure your MySQL version 5.0 database with McAfee
Quarantine Manager.
Use this task to configure your MySQL database:
1 Click Start | Programs | McAfee | Quarantine Manager | DB Management UI.
You can also configure your database by clicking Configure Database from the
administrator logon page. You might be prompted to type your administrator credentials
to access the DB Management page, if you are accessing this page from another
computer.
Note
2 In the Database Configuration page, select the Database Type as MySQL and specify the
IP address or host name of the database server, user name and password of the
database server, database name, and database port number.
3 If you want to create a new schema in the database to be used with McAfee
Quarantine Manager, select Create McAfee Quarantine Manager schema.
4 Type the email address and password of the super administrator.
5 Click Test. A dialog box appears that indicates the database is configured
successfully.
6 Click Apply.
Configuring your Microsoft SQL Server database
McAfee Quarantine Manager version 6.0 extends support to Microsoft SQL server
2005 in addition to the MySQL version 5.0 database. This section tells you how to
configure your Microsoft SQL Server 2005 with McAfee Quarantine Manager.
Before you configure your SQL Server database:
Enable Mixed mode authentication on the SQL Server.
Create a database user with Server Role as sysadmin.
Create a blank database that has to be used with McAfee Quarantine Manager
and assign the user created above as the owner of this database.
Install Microsoft SQL Server Native Client on the McAfee Quarantine Manager server.
Use this task to configure your Microsoft SQL database:
1 Click Start | Programs | McAfee | Quarantine Manager | DB Management UI.
Note
You can also configure your database by clicking Configure Database from the
administrator logon page. You might be prompted to type your administrator credentials
to access the DB Management page, if you are accessing this page from another
computer.
18
4
®
™
McAfee Quarantine Manager 6.0 User Guide
Installing the Software
Installing McAfee Quarantine Manager 6.0 DB Suite utility
2 In the Database Configuration page, select the Database Type as SQL Server and specify
the IP address or host name of the database server, user name and password to
access the database, and database name of the newly created blank database.
3 Select Create McAfee Quarantine Manager schema. This will create a new schema in the
database to be used with McAfee Quarantine Manager.
4 Type the email address and password of the super administrator.
5 Click Test. A dialog box appears that indicates the database is configured
successfully.
6 Click Apply.
Installing McAfee Quarantine Manager 6.0 DB Suite
utility
1 Using an administrative account, log on to the server where you want to install the
software.
2 Create a temporary directory on the network or your local drive.
3 Do one of the following, depending on how you obtained the software:
Insert the CD into the computers drive and copy the installation files to the
temporary directory.
Download the ZIP archive and extract the files to the temporary directory.
4 Using Windows Explorer, navigate to the folder where you copied the installation
files. Open the MQM60DBSuite folder and double-click SETUP.EXE. The McAfee
Quarantine Manager DB Suite 6.0 Setup dialog box appears.
5 Click Next. The End User License Agreement dialog box appears.
6 Click I accept the terms in the license agreement, then click Next to display the Destination
Folder dialog box.
7 Click Browse to select an installation folder or accept the default.
8 Click Next. The Ready to Install the Application dialog box appears.
9 Click Next to display the Updating System dialog box. A progress bar indicates the
features being copied and installed.
10 Click Finish to complete the installation.
19
4
®
™
McAfee Quarantine Manager 6.0 User Guide
Installing the Software
Testing your installation
Testing your installation
When you have completed installation of McAfee Quarantine Manager, McAfee
recommends testing the installation to ensure that the software is installed properly
and can quarantine viruses, spam, phish, potentially unwanted programs, and
unwanted content within email messages.
Note
Make sure that the IP address of the McAfee Quarantine Manager server is specified
in the connected McAfee product.
Testing McAfee Quarantine Manager
1 Click Start | Programs | McAfee | Quarantine Manager | Administrator UI.
2 Log on using the Super Administrator account that you specified during installation
of the software. You must be able to log on successfully.
3 From the left pane, click Dashboard | Connected McAfee Products, then click Test to verify
the connection between McAfee Quarantine Manager and the McAfee product.
4 Click Quarantined Items. You will find items quarantined by the connected McAfee
product(s) listed in View Results.
5 Click Admin Management | Manage Domains, specify the domain name (for example,
xyz.com) and click Add, then click Apply.
6 From the left pane, click Quarantined Items | Spam to view the quarantined emails for
that domain.
Uninstalling McAfee Quarantine Manager
To remove McAfee Quarantine Manager, use the Windows Add/Remove Programs
feature (recommended) or use the McAfee Quarantine Manager setup program.
Note
Uninstall McAfee Quarantine Manager before uninstalling MySQL for McAfee Quarantine
Manager.
Removing McAfee Quarantine Manager
1 Using an administrative account, log on to the computer where McAfee Quarantine
Manager is installed.
2 Click Start | Settings | Control Panel.
3 Double-click Add/Remove Programs. The Add/Remove Program Properties dialog box
appears.
4 Select McAfee Quarantine Manager from the list, then click Remove.
5 To remove all the quarantined data from McAfee Quarantine Manager’s database,
select Also Remove MQM Data, then click Next.
20
4
®
™
McAfee Quarantine Manager 6.0 User Guide
Installing the Software
Uninstalling McAfee Quarantine Manager
Removing MySQL for McAfee Quarantine Manager
Use the DB Suite utility to back up the database.
Note
1 Using an administrative account, log on to the computer where MySQL for McAfee
Quarantine Manager is installed.
2 Click Start | Settings | Control Panel.
3 Double-click Add/Remove Programs. The Add/Remove Program Properties dialog box
appears.
4 Select MySQL for McAfee Quarantine Manager from the list, then click Remove.
Removing McAfee Quarantine Manager 6.0 DB Suite utility
1 Using an administrative account, log on to the computer where MySQL for McAfee
Quarantine Manager is installed.
2 Click Start | Settings | Control Panel.
3 Double-click Add/Remove Programs. The Add/Remove Program Properties dialog box
appears.
4 Select McAfee Quarantine Manager DB Suite from the list, then click Remove.
21
4
®
™
McAfee Quarantine Manager 6.0 User Guide
Installing the Software
Uninstalling McAfee Quarantine Manager
22
4
5
Integrating with ePolicy
Orchestrator 4.0
This chapter describes how to configure McAfee Quarantine Manager using McAfee
ePolicy Orchestrator management software version 4.0. To use this chapter
effectively, you need to be familiar with ePolicy Orchestrator 4.0.
ePolicy Orchestrator 4.0 provides a scalable platform for centralized policy
management and enforcement on your security products and systems on which they
reside. It also provides comprehensive reporting and product deployment capabilities,
all through a single point of control.
This guide does not provide detailed information about installing or using ePolicy
Orchestrator software. See the ePolicy Orchestrator 4.0 Product Guide.
Note
Before you begin
Before you can use the ePolicy Orchestrator software to manage McAfee Quarantine
Manager, install the ePolicy Orchestrator agent on the computer.
1 Create a temporary directory on the network or your local drive.
2 Depending on how you obtained the software, do one of the following:
Insert the CD into the computer’s drive and copy the installation ZIP files into the
temporary directory you created.
Download the ZIP files to the temporary directory.
ePolicy Orchestrator agent
ePolicy Orchestrator agent is a distributed component of ePolicy Orchestrator that
must be installed on each computer on the network. The agent collects and sends
information between the ePolicy Orchestrator server, repositories and manages
McAfee Quarantine Manager installations across the network.
Adding systems and deploying agents to the ePolicy Orchestrator
server
1 Using an administrative account, log on to the ePolicy Orchestrator server.
2 Click New Systems. The New Systems page appears.
23
®
™
McAfee Quarantine Manager 6.0 User Guide
Integrating with ePolicy Orchestrator 4.0
3 In How to add systems, select Deploy agents and add systems to the current group (My
Organization).
Note
To add systems without deploying agents, select Add systems to the current group (My
Organization), but do not deploy agents option. To deploy agent at a later time, perform
steps under the topic Deploying an ePolicy Orchestrator agent on page 24.
4 In Systems to add, click Browse to locate the system(s) you wish to add. The Browse for
Systems page appears.
5 Select a Domain from the drop-down list, which has the system(s) you want to add.
6 Under Systems in Selected Domain, select the desired system(s).
To select all the systems in a domain, click Select all in this page.
Note
7 Click OK to return to the New Systems page.
8 Select an appropriate Agent version from the drop-down list and specify the Installation
options and Installation path as required.
9 Enter the credentials (Domain, User, and Password) for agent installation, then click OK.
Deploying an ePolicy Orchestrator agent
1 Using an administrative account, log on to the ePolicy Orchestrator server.
2 Click Systems.
3 Select a group in the System Tree.
4 Select the desired Computer Name(s) of that group.
5 Click Deploy Agents. The Deploy McAfee Security Agent page appears showing the Target
systems.
6 Select an Agent version to be installed on the selected systems.
Note
Agent versions available in the drop-down list, depend on which agent, the installation
packages are checked-in.
7 Select the desired Installation options and an Installation path where you want to install
the agent.
8 In Credentials for agent installation, specify Domain, User, Password of the user account
with which you want to install the agent on selected systems and click OK.
24
5
®
™
McAfee Quarantine Manager 6.0 User Guide
Integrating with ePolicy Orchestrator 4.0
Installation
Installation
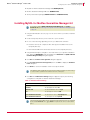
Checking in the McAfee Quarantine Manager package
You can check in the McAfee Quarantine Manager software package from the Master
Repository page. Master Repository is the central location for all McAfee updates
residing on the ePolicy Orchestrator server. It retrieves user-specified updates from
McAfee site or user-defined source sites.
1 Using an administrative account, log on to the ePolicy Orchestrator server.
2 Click Software | Check In Package. The Package page appears.
3 Select the Package type as Product or Update (.ZIP) and browse in File path to locate
MQM60Server.ZIP saved in the McAfee Quarantine Manager folder.
4 Click Next. The Package Options page appears with the Package info.
5 Select the Branch as Current.
6 Click Save.
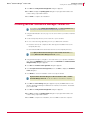
Installing McAfee Quarantine Manager on the client computer
1 Using an administrative account, log on to the ePolicy Orchestrator server.
2 Click Systems | System Tree and select a desired group.
3 From the Client Tasks tab, click New Task.
4 Type a Name, Notes for the task and select the Type as Product Deployment (McAfee
Agent).
5 Click Next. The Client Task Builder page appears.
6 Under Description, select the Target Platforms as Windows to install the package.
7 Select an appropriate Language from the drop-down list.
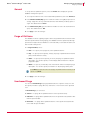
8 In Products to deploy, select McAfee Quarantine Manager 6.0 from the drop-down list and
select the Action as Install. You can also specify command-line arguments to custom
install McAfee Quarantine Manager on the client computer without the default
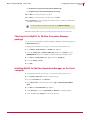
values. Separate multiple parameters with a space. For example:
INSTALLDIR="C:\MQM" REBOOTREQUIRED=1
Table 5-1 Use these command-line arguments for the installer:
Parameter
Example
Description
INSTALLDIR
INSTALLDIR="C:\MQM"
Installs McAfee Quarantine
Manager in the specified folder
location.
REBOOTREQUIRED
REBOOTREQUIRED=1
Restarts the client computer
after installation.
9 In Options, select or deselect these options as required:
25
5
®
™
McAfee Quarantine Manager 6.0 User Guide
Integrating with ePolicy Orchestrator 4.0
Installation
Run this task at every policy enforcement interval (Windows only)
Run update after successful product deployment (4.0 or above)
10 Click Next to schedule this task as needed.
11 Click Next to view a summary of the task, then click Save.
12 In the Systems tab, select a group and a computer where you want to install McAfee
Quarantine Manager 6.0.
You can select all the computers in a group by clicking Select all in the page.
Note
13 Send an agent wake-up call. (see Sending an agent wake-up call on page 32).
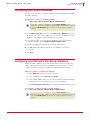
Checking in the MySQL for McAfee Quarantine Manager
package
You can check in the MySQL for McAfee Quarantine Manager software package from
the Master Repository page.
1 Using an administrative account, log on to the ePolicy Orchestrator server.
2 Go to Software | Check In Package. The Package page appears.
3 Select the Package type as Product or Update (.ZIP) and browse in File path to locate
MQM60MySQL.ZIP saved in the MySQL for McAfee Quarantine Manager folder.
4 Click Next. The Package Options page appears with the Package info.
5 Select the Branch as Current.
6 Click Save.
Installing MySQL for McAfee Quarantine Manager on the client
computer
1 Using an administrative account, log on to the ePolicy Orchestrator server.
2 Go to Systems | System Tree and select a desired group.
3 From the Client Tasks tab, click New Task.
4 Type a Name, Notes for the task and select the Type as Product Deployment (McAfee
Agent).
5 Click Next. The Client Task Builder page appears.
6 Under Description, select the Target Platforms as Windows to install the package.
7 Select an appropriate Language from the drop-down list.
26
5
®
™
McAfee Quarantine Manager 6.0 User Guide
Integrating with ePolicy Orchestrator 4.0
Installation
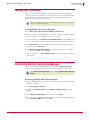
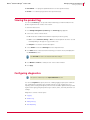
8 In Products to deploy, select MySQL for McAfee Quarantine Manager 6.0 from the drop-down
list and select the Action as Install. You can also specify command-line arguments to
custom install MySQL for McAfee Quarantine Manager on the client computer
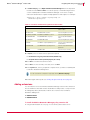
without the default values. Separate multiple parameters with a space. For example:
INSTALLDIR="C:\MySQL" SUPERID="superduper@mqm.com"
SUPERIDPWD="superduper123"
Table 5-2 Use these command-line arguments for the installer:
Parameter
Example
Description
INSTALLDIR
INSTALLDIR="C:\MySQL"
Installs MySQL in the specified
folder location.
MYSQLUSER
MYSQLUSER="root123"
Sets the MySQL user name.
MYSQLPASSWORD
MYSQLPASSWORD="root123"
Sets the MySQL password.
MYSQLDBNAME
MYSQLDBNAME="mymqm"
Sets the MySQL database
name.
MYSQLPORT
MYSQLPORT=3361
Sets the MySQL port number.
SUPERID
SUPERID="superduper@mqm.com"
Sets the super administrator
email address.
SUPERIDPWD
SUPERIDPWD="superduper123"
Sets the super administrator
password.
IISPORT
IISPORT=302
Sets the IIS port number.
9 In Options, select or deselect these options as required:
Run this task at every policy enforcement interval (Windows only)
Run update after successful product deployment (4.0 or above)
10 Click Next to schedule this task as needed.
11 Click Next to view a summary of the task, then click Save.
12 In the Systems tab, select a group and a computer where you want to install MySQL
for McAfee Quarantine Manager 6.0.
You can select all the computers in a group by clicking Select all in the page.
Note
13 Send an agent wake-up call. (see Sending an agent wake-up call on page 32).
Adding extensions
You can install or remove the McAfee Quarantine Manager extension files. Extension
files are in ZIP file format and must be installed before that product or component can
be managed by ePolicy Orchestrator 4.0. The two extension files for McAfee
Quarantine Manager are:
MQM6POLICIES.ZIP
MQM6REPORTS.ZIP
To install the McAfee Quarantine Manager policy extension file
1 Using an administrative account, log on to the ePolicy Orchestrator server.
27
5
®
™
McAfee Quarantine Manager 6.0 User Guide
Integrating with ePolicy Orchestrator 4.0
Configuring policies for McAfee Quarantine Manager
2 Click Configuration | Extensions | Install Extension. The Install Extension dialog box appears.
3 Click Browse, select the extension file MQM6POLICIES.ZIP and click OK.
To enforce different policies on different servers:
Note
If you are managing more than one McAfee Quarantine Manager server using ePolicy
Orchestrator, you must have a separate database configuration policy assigned for each
of the servers. This avoids conflicts between the servers trying to connect to the same
database.
1 Create a New Policy for Database Configuration and type a policy name.
2 Change the database connectivity details and click Save.
3 From Systems Tree, select the target McAfee Quarantine Manager server and click
Assign Policy.
4 Select the product as McAfee Quarantine Manager 6.0 and the Category as Database
Configuration.
5 Select the newly created policy and click Save.
6 Send an agent wake-up call.
7 Repeat the steps 1 to 6 to enforce different policies on different servers.
Note
To enforce Settings and Diagnostics policy on the server, repeat Steps 1 to 6. In Step
4, select Category as Setting and Diagnostics.
To install the McAfee Quarantine Manager report extension file
1 Using an administrative account, log on to the ePolicy Orchestrator server.
2 Click Configuration | Extensions | Install Extension. The Install Extension dialog box appears.
3 Click Browse, select the extension file MQM6REPORTS.ZIP and click OK.
Configuring policies for McAfee Quarantine Manager
You can create, edit, delete or assign a policy to a specific group in the System Tree.
Creating a new policy
1 Using an administrative account, log on to the ePolicy Orchestrator server.
2 Click Systems | System Tree and select a desired group.
3 From Policies, select McAfee Quarantine Manager 6.0 from the drop-down list. A list of
policies managed by the chosen managed product appears in the lower pane.
4 Locate a policy category, then click Edit Assignment. The Policy assignment for: My
Organization| Lost & Found | (chosen group) page appears.
5 Click Create new policy. The Create a new policy dialog box appears.
28
5
®
™
McAfee Quarantine Manager 6.0 User Guide
Integrating with ePolicy Orchestrator 4.0
Introducing ePolicy Orchestrator 4.0 dashboard
6 Select McAfee Default or My Default as desired.
The McAfee Default policies are read-only and cannot be edited, renamed, or deleted.
Note
7 Type a New policy name.
8 Click OK, then Save.
Enforcing Policies
You can enforce a policy to multiple managed systems within a group.
1 Using an administrative account, log on to the ePolicy Orchestrator server.
2 Click Systems | System Tree and select a group.
3 Select the desired system(s).
4 Click Assign Policy. The Assigning Policy for <n> system page appears.
5 Select McAfee Quarantine Manager 6.0, Category, and Policy from the drop-down list, then
click Save.
6 Select the systems again.
7 Send an agent wake-up call.(see Sending an agent wake-up call on page 32).
Note
You can create and enforce McAfee Quarantine Manager policies and view reports only
after adding the McAfee Quarantine Manager extension files.
Introducing ePolicy Orchestrator 4.0 dashboard
Dashboards are a collection of preconfigured user-selected monitors that provide
current data about your detections.
The ePolicy Orchestrator dashboard consists of a collection of named dashboard
monitors. Depending on the permissions assigned to your user account, you can create
a new dashboard, manage existing dashboards, select active dashboards, and edit
dashboard preferences.
Note
Once you install the McAfee Quarantine Manager report extension file, by default a
dashboard will be created with the name “MQM”.
Creating a new dashboard
1 Using an administrative account, log on to the ePolicy Orchestrator server.
2 Click Dashboards | Options | New DashBoard. The New DashBoard page appears.
3 Type a Dashboard Name and select a desired Dashboard Size from the drop-down list.
4 Click New Monitor.
5 Select the Category as Queries and a desired McAfee Quarantine Manager related
query from the Monitor drop-down list.
29
5
®
™
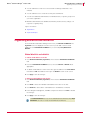
McAfee Quarantine Manager 6.0 User Guide
Integrating with ePolicy Orchestrator 4.0
Reporting
6 Click OK.
7 Repeat step 4 and 5 for the remaining monitors.
8 Click Save. The Make Active dialog box appears.
9 Click Yes to add this new dashboard to your active set.
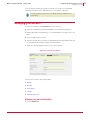
Table 5-3 Dashboard Options
Options
Description
Dashboard Name
Specifies the name of the dashboard you select.
Dashboard Size
Specifies the dimensions (by number of dashboard
monitors) of the selected dashboard.
Created by
Specifies the user name who created the selected
dashboard.
Last modified by
Specifies the user name, date and time stamp of the last
modification made to the selected dashboard.
Edit
Takes you to the Edit Dashboard page where you can
make changes to the dashboard’s name and size.
Delete
Deletes the selected dashboard.
Duplicate
Creates and saves a copy of the selected dashboard. This
allows you to create and edit similar dashboards without
having to create one from scratch.
Make Public
Adds the selected private dashboard to the Public
Dashboards list, making it available to all users with
permissions, to use public dashboards.
Make Active
Adds the selected dashboard to the Dashboards tab for
easy access.
Reporting
Reports are predefined queries which inquires the ePolicy Orchestrator database and
generates a graphical output.
ePolicy Orchestrator 4.0 has its own querying and reporting capabilities. McAfee
includes a set of default queries on the left pane. However, you can create a new query
and edit and manage all queries.
Note
To generate ePolicy Orchestrator reports, enable Generate ePO Events and restart the
McAfee Quarantine Manager service on the McAfee Quarantine Manager server. See
ePolicy Orchestrator related settings on page 68.
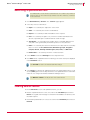
Running a query
1 Using an administrative account, log on to the ePolicy Orchestrator server.
2 Click Reporting. A list of queries appears on the left pane.
3 Select a McAfee Quarantine Manager related query.
4 Click Run. The graphical output is displayed.
30
5
®
™
McAfee Quarantine Manager 6.0 User Guide
Integrating with ePolicy Orchestrator 4.0
Systems
Creating a new query
If the pre-defined query on the left side does not serve your purpose, ePolicy
Orchestrator enables you to create your own query.
1 Using an administrative account, log on to the ePolicy Orchestrator server.
2 Click Reporting | New Query. The Result Type page appears.
3 On the left pane, select a desired data type that the query must retrieve and click
Next. The Chart page appears.
4 Select display chart/table, configure it as needed, then click Next. The Columns page
appears allowing you to select columns for the chart/table.
5 Select a columns from the Available Columns pane and click Next. The Filter page
appears.
6 Specify criteria by selecting properties and operators to limit the data retrieved by
the query.
7 Click Run, then Save. The Save Query page appears.
8 Enter a Name and Notes for the query (if required), then click Save.
Table 5-4 Reporting Options
Options
Description
Delete
Deletes a selected query.
Edit
Launches the Query Builder page loaded with the details of the selected
query, where you can edit any details of the selected query.
Make Public
Moves the selected query from the My Queries list to the Public Queries
list, making it available to all users with permissions.
Duplicate
Creates and saves a copy of the selected query.
Export
Exports the selected query to an XML file that can be imported to any
ePolicy Orchestrator server.
Run
Runs the selected query and displays its result.
More Actions |
View Query SQL
Takes you to the View Query SQL page, where you can view and copy the
SQL script of the selected query.
Import Query
Launches a dialog box that allows you to browse to an exported query
file. When you import a query file, the server adds it to My Queries list.
Systems
All systems in the network are managed in the Systems tab. The System Tree contains all
systems that are managed by the ePolicy Orchestrator server. It is the primary interface
for managing policies and tasks on these systems. You can organize or sort these
systems into logical groups in the System Tree.
My Organization is the root of the System Tree. It includes a Lost&Found group that stores
systems whose locations cannot be determined by the server. Depending on the
methods you use to create and maintain the System Tree segments (systems), the
server uses different characteristics to place the systems in the System Tree.
Note
For information on adding a new system, refer to the ePolicy Orchestrator 4.0 Product
Guide.
31
5
®
™
McAfee Quarantine Manager 6.0 User Guide
Integrating with ePolicy Orchestrator 4.0
Uninstalling the McAfee Quarantine Manager
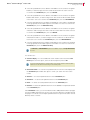
Sending an agent wake-up call
1 Using an administrative account, log on to the ePolicy Orchestrator server.
2 Click Systems.
3 Select a group in the System Tree.
4 Select the desired Computer Name(s) of that group.
5 Click More Actions | Wake Up Agent. The Wake Up Agents page appears.
6 Select a Wake-up call type and a Randomization period (0-60 minutes) during which the
system(s) respond to the wake-up call sent by the ePolicy Orchestrator server.
7 Select Get full product properties for the agent(s) to send complete properties instead
of sending only those that have changed since the last agent-to-server
communication.
8 Click OK.
Navigate to Server Task Log to see the status of the agent wake-up call.
Note
Uninstalling the McAfee Quarantine Manager
This section tells you how to uninstall McAfee Quarantine Manager and MySQL for
McAfee Quarantine Manager from the client computers and also removing the
extensions from the ePolicy Orchestrator server.
Removing McAfee Quarantine Manager from the client
computer
1 Using an administrative account, log on to the ePolicy Orchestrator server.
2 Click Systems | System Tree and select a desired group.
3 From the Client Tasks tab, click New Task.
4 Type a Name, Notes for the task and select the Type as Product Deployment (McAfee
Agent).
5 Click Next. The Client Task Builder page appears.
6 Under Description, select the Target Platforms as Windows to uninstall the package.
7 Select an appropriate Language from the drop-down list.
8 In Products to deploy, select McAfee Quarantine Manager 6.0 from the drop-down list and
select the Action as Remove.
9 In Options, select or deselect these options as required:
Run this task at every policy enforcement interval (Windows only)
Run update after successful product deployment (4.0 or above)
10 Click Next to schedule this task as desired.
32
5
®
™
McAfee Quarantine Manager 6.0 User Guide
Integrating with ePolicy Orchestrator 4.0
Uninstalling the McAfee Quarantine Manager
11 Click Next to view a summary of the task, then click Save.
12 In the Systems tab, select a group and a computer where you want to uninstall
McAfee Quarantine Manager 6.0.
To uninstall McAfee Quarantine Manager from all computers in a group, click Select all
in the page.
Note
13 Send an agent wake-up call. (see Sending an agent wake-up call on page 32).
Removing MySQL for McAfee Quarantine Manager from the
client computer
1 Using an administrative account, log on to the ePolicy Orchestrator server.
2 Click Systems | System Tree and select a desired group.
3 From the Client Tasks tab, click New Task.
4 Type a Name, Notes for the task and select the Type as Product Deployment (McAfee
Agent).
5 Click Next. The Client Task Builder page appears.
6 Under Description, select the Target Platforms as Windows to uninstall the package.
7 Select an appropriate Language from the drop-down list.
8 In Products to deploy, select MySQL for McAfee Quarantine Manager 6.0 from the drop-down
list and select the Action as Remove.
9 In Options, select or deselect these options as required:
Run this task at every policy enforcement interval (Windows only)
Run update after successful product deployment (4.0 or above)
10 Click Next to schedule this task as desired.
11 Click Next to view a summary of the task, then click Save.
12 In the Systems tab, select a group and a computer where you want to uninstall
McAfee Quarantine Manager 6.0.
Note
To uninstall MySQL for McAfee Quarantine Manager from all computers in a group,
click Select all in the page.
13 Send an agent wake-up call. (see Sending an agent wake-up call on page 32).
Removing McAfee Quarantine Manager package from the
ePolicy Orchestrator server
Removing the deployment package from ePolicy Orchestrator
1 Using an administrative account, log on to the ePolicy Orchestrator server.
2 Click Software | Master Repository.
33
5
®
™
McAfee Quarantine Manager 6.0 User Guide
Integrating with ePolicy Orchestrator 4.0
Uninstalling the McAfee Quarantine Manager
3 Click the Delete link of the McAfee Quarantine Manager package.
4 To remove the MySQL for McAfee Quarantine Manager package, repeat Steps 2 and 3,
then delete the link of MySQL for McAfee Quarantine Manager.
Removing the policy extension
1 Using an administrative account, log on to the ePolicy Orchestrator server.
2 Click Configuration.
3 Select the extension file McAfee Quarantine Manager and click Remove.
4 Select Force removal, bypassing any checks or errors.
5 Click OK.
Removing the report extension
1 Using an administrative account, log on to the ePolicy Orchestrator server.
2 Click Configuration.
3 Select the extension file McAfee Quarantine Manager Reports and click Remove.
4 Select Force removal, bypassing any checks or errors.
5 Click OK.
34
5
6
Types of Interfaces
McAfee Quarantine Manager 6.0 has two types of user interface:
Interface for administrators
Interface for users
Interface for administrators
To access the administrators’ user interface, click Start | Programs | McAfee | Quarantine
Manager | Administrator UI.
You can also log on to the administrator user interface, by clicking the following link:
Note
http://<computer_name>/MQMAdminUI/0409/LogOn.html
Use https://<computer_name>/MQMAdminUI/0409/LogOn.html for secure logon.
You can also use the IP address or host name of McAfee Quarantine Manager server
instead of the <computer_name>.
McAfee Quarantine Manager allows administrators to:
View quarantine statistics and generate simple and advanced graphical reports, that
include details of the quantities and types of items quarantined during various time
periods.
Search for and view quarantined items, including items that have been specifically
identified as spam, phish, viruses, potentially unwanted programs or unwanted
content.
Note
The Super Administrator can view quarantined items of all the domains, but the Domain
Administrator can view only the quarantined items of their corresponding domains.
Manage Global blacklists and whitelists and Group blacklists and whitelists.
Import and export the configuration of the settings in the software.
Manage user submissions like items submitted as spam and non-spam, and
submitted for release.
Set the authentication, access user accounts, ePolicy Orchestrator manageability,
and restore default settings.
35
®
™
McAfee Quarantine Manager 6.0 User Guide
Types of Interfaces
Interface for users
Manage the purge old items.
Set up and schedule email digests for end users.
Set up logging, product log, debug tracing, and error reports.
Set up port numbers and server addresses to communicate with McAfee products.
Manage administrator users like Super Admin and Domain Admin.
Manage domains and their administrators.
The types of administrator roles are:
Super Administrator
Domain Administrator
Table 6-1 Administrator roles
Actions
Super
Administrator
Domain
Administrator
Maximum Item Age
Yes
Yes
Visible Detections
Yes
Yes
Authentication Mode
Yes
No
Restore Defaults
Yes
Yes
Database Management
Yes
Yes
Email Digests
Yes
Yes
Product Log
Yes
Yes
SMTP Mail Server and Port
Yes
Yes
Domain Management
Yes
Yes
Global Blacklist and Whitelist Management
Yes
No
McAfee Product(s) Group Blacklists and
Whitelists
Yes
No
Diagnostics and Product Log Settings
Yes
No
McAfee Product(s) Communication Settings
Yes
No
Creating Administrators
Yes
No
Creating Domains
Yes
No
Assigning Domains
Yes
No
Creating Alias
Yes
Yes
ePolicy Orchestrator Management
Yes
Yes
Interface for users
To access the interface for users, click Start | Programs | McAfee | Quarantine Manager | User
UI.
You can also log on to the interface, by clicking the following link:
Note
http://<computer_name>/MQMUserUI/0409/LogOn.html
Use https://<computer_name>/MQMUserUI/0409/LogOn.html for secure logon.
You can also use the IP address or host name of McAfee Quarantine Manager server
instead of the <computer_name>.
36
6
®
™
McAfee Quarantine Manager 6.0 User Guide
Types of Interfaces
Interface for users
McAfee Quarantine Manager allows users to:
Maintain their McAfee Quarantine Manager account.
View and maintain a personal blacklist and whitelist.
Forward any messages incorrectly identified as spam or phish or that contain
potentially unwanted programs or unwanted content to the administrator for
release.
Submit missed spam messages to McAfee Labs for testing, so that similar
messages can be recognized and quarantined.
Note
To know more about the interface for users, see Getting Started with the Interface for
Users on page 75.
37
6
®
™
McAfee Quarantine Manager 6.0 User Guide
Types of Interfaces
Interface for users
38
6
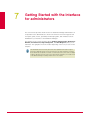
7
Getting Started with the Interface
for administrators
The user interface provides critical function for Quarantine Manager administrators. It
is important for the administrators to know how well their server is being protected
from spam, phish, viruses, potentially unwanted programs, and unwanted content.
Dashboard is your interface to the Quarantine Manager.
The left pane of the console has links, namely Dashboard, Quarantined Items, Blacklists and
Whitelists, User Submissions, Settings and Diagnostics, and Admin Management, that you can
administer. The right pane shows information depending on the item you select in the
left pane.
Note
The dashboard shows how many items have been quarantined in total for a given
period. The graphical reports show how many items are still in quarantine, including
those that have been split into more than one item because they were sent to multiple
recipients. Because items are removed or deleted from quarantine, the results shown
on the dashboard might not always match those in the reports.
39
®
™
McAfee Quarantine Manager 6.0 User Guide
Getting Started with the Interface for administrators
Viewing the dashboard
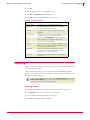
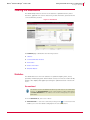
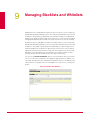
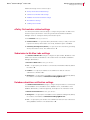
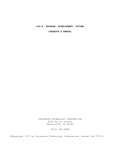
Viewing the dashboard
The dashboard provides an overview of the statistics of quarantined items, latest
detections, graphical view of these detections, product information, quicksearch and
connected McAfee products.
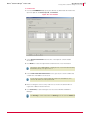
Figure 7-1 Dashboard
The Dashboard page is divided into the following sections:
Statistics
Connected McAfee Products
QuickSearch
Product Information
Graphical Reports
Statistics
The dashboard screen shows the statistics for quarantined spam, phish, viruses,
potentially unwanted programs and unwanted content, as well as an overall total. By
default, it also displays a bar graph representing the quarantined items in the last 24
hours.
Quarantined
Note
The statistics shown in the Quarantined tab changes with respect to the administrator
logged on. The Super Administrator has the combined statistics of all the administrators.
The Domain Administrator has the statistics of the domains managed by the respective
administrator.
From the Quarantined tab, select one of these:
<Select Detections> — Select the counters by clicking on the
icon of an item. This
enables you to view the statistics and graph of the selected counters.
40
7
®
™
McAfee Quarantine Manager 6.0 User Guide
Getting Started with the Interface for administrators
Viewing the dashboard
Magnify Graph — To specify the magnification percentage of the Detections graph. This
helps you to view an enlarged graph.
Reset — To clear the statistics of quarantined items.
Caution
Clicking Reset clears all the statistics of the corresponding administrator. These
changes are also reflected in the Super Administrator account.
Refresh — To refresh and update the statistics counter with the latest number of
quarantined items. To modify the dashboard refresh interval, see Miscellaneous
settings on page 69.
Domain(s) — To view the statistics of quarantined items for the selected domain.
or Display pie chart icon
as required, to view the
Click the Display bar graph icon
graphical display of detections. You can select the Time Range from the drop-down list
to view these graphs. The options for the time range are:
Last 24 Hours
Last 7 Days
Last 30 Days
In the False Detections section, you can use:
Spam False Positive — To view the number of items detected as false positives. This
is an email that triggers sufficient rules to be identified as spam, which contains
content that is generally not considered to be spam.
Spam False Negative — To view the number of items detected as false negatives. This
is an email that does not trigger sufficient rules to be identified as spam, which
contains content that is generally considered to be spam.
Connected McAfee Products
The Connected McAfee Products pane shows all products connected to McAfee
Quarantine Manager, and gives their Product name, Version number, IP Address, and Callback
Port they use to communicate with McAfee Quarantine Manager.
The pane also contains a Test button. Select a product and click Test if you need to check
for network problems. Test checks whether the McAfee Quarantine Manager server is
communicating with the connected McAfee products.
QuickSearch
The QuickSearch tab provides a quick search facility on the dashboard, so that you can
quickly perform a search task without having to navigate to another page.
To perform a quick search:
1 Click Dashboard. The Statistics page appears.
2 Click QuickSearch tab.
3 From Time Span, select a date to view the quarantined items or detections made
(including today's date).
4 Select Domain to search by the quarantined items from a particular domain.
41
7
®
™
McAfee Quarantine Manager 6.0 User Guide
Getting Started with the Interface for administrators
Viewing graphical reports
5 Type the sender, recipient or subject for the quarantined item, then click Search.
Product Information
The Product Information tab shows the version of McAfee Quarantine Manager you are
running, and lists the Service Packs and HotFixes installed.
Viewing graphical reports
The Graphical Reports section gives an explicit view of quarantined items in a graph. You
can also find each detection by setting filters to specify the types of detections that are
of interest.
Graphical Reports has two tabs:
Default
Advanced
Viewing default graphical reports
1 Click Dashboard | Graphical Reports. The Graphical Reports page appears with the Default
tab.
2 From Time Span, select Today to view only today's quarantined items or <Last 7 to 60>
days for detections made in the specified time span (including today's date).
3 From Type, select the type of quarantined item to be viewed such as spam, phish,
viruses, unwanted content or potentially unwanted programs.
4 From Filter, select any of these:
Top 10 spam rule triggers
Top 10 phish rule triggers
Top 10 unwanted content rule triggers
Top 10 Infected Files
Top 10 Viruses
Top 10 Unwanted Programs
Top 10 recipients
Top 10 senders
Top 10 senders (outbound)
5 Click Search.
Viewing advanced graphical reports
In Advanced Reports, you can set filters to narrow your search criteria.
1 Click Dashboard | Graphical Reports. The Graphical Reports page appears.
42
7
®
™
McAfee Quarantine Manager 6.0 User Guide
Getting Started with the Interface for administrators
Viewing graphical reports
2 Click Advanced tab.
3 Select up to three filters from this list:
Subject
Recipient
Reason
Ticket Number
Detection Name
Score
4 Select All Dates or a desired Date Range from the drop-down lists.
5 Select Bar Graph or Pie Chart as required.
6 If you select Pie Chart, select to Query on, from the drop-down list.
Recipient
Sender
Filename
Detection Name
Subject
Reason
Rule Name
Policy Name
Score
7 In Maximum Results, specify the maximum number of segments you want to appear
in the pie chart. For example, if you are interested only in seeing the three most
frequently assigned spam scores, type 3.
Query on and Maximum Results are available only for pie chart.
Note
8 Click Search.
Click Clear Filter to return to the default filter values.
Note
43
7
®
™
McAfee Quarantine Manager 6.0 User Guide
Getting Started with the Interface for administrators
Viewing graphical reports
44
7
8
Managing Quarantined Items
Quarantined Items is used to view information about emails that contains spam, phish,
viruses, potentially unwanted programs, unwanted content, and all items. You can use
up to three search filters to narrow your search.
Topics covered are:
Searching a quarantined item
Viewing search results
Spam
Spam is an unwanted email message, specifically unsolicited bulk messages.
Phish
Phish is a method of fraudulently obtaining personal information (such as passwords,
social security numbers, and credit card details) by sending spoofed email messages
that look like they came from trusted sources such as legitimate companies or banks.
Typically, phishing email messages request that recipients click a link in the email to
verify or update the contact details or credit card information.
Viruses
A virus is a program or code that replicates itself, multiplies, and infects another useful
program, boot sector, partition sector or document that supports macros, by inserting
itself or attaching itself to that medium. Most viruses replicate and many do a large
amount of damage to the system.
Potentially unwanted programs
Potentially Unwanted Programs (PUPs) are software programs written by legitimate
companies which, if installed, may alter the security state or the privacy posture of a
computer.
Unwanted content
Any content that is filtered by the scanner is called unwanted content. You can use
Unwanted Content to view emails/attachments that contain unwanted content.
45
®
™
McAfee Quarantine Manager 6.0 User Guide
Managing Quarantined Items
Searching a quarantined item
Searching a quarantined item
Use wildcards like “*” and ‘?’ in the search field. Use “*” to match to any number of
characters and use “?”to match a single character. Use “\\” to match any ‘\’ character
in the search field.
Note
1 Click Quarantined Items | <All Items>. The <All Items> page appears.
2 Select any of these search filters:
Subject — To search by the subject line of the email.
Sender — To search by the sender’s email address.
Recipient — To search by a valid email address of the recipient.
Score — To search by the spam score, which is a number that indicates the
amount of potential spam contained within an email message.
Ticket Number — To search by ticket number, which is a 16-digit alpha numeric
entry that is auto-generated by the McAfee product for every detection.
Reason — To search by the reason for which the item is detected. The secondary
filters for reason are Virus, Banned Content, Banned File Type, Spam, Encrypted or
Corrupted, Unknown, Potentially Unwanted Program, Phish, Packer, and Mail Format.
Detection Name — To search by the name of a detected item.
3 Select All Dates or a desired Date Range from the drop-down lists.
4 Click Search. A list of quarantined items matching your search criteria, are displayed
in the View Results section.
Click Clear Filter to return to the default search filter settings.
Note
5 Select Domain to search by the quarantined items from a particular domain. You can
use the (Others) option from the drop-down list to view quarantined items of domains
which are not configured in McAfee Quarantine Manager server.
Click Maximize or Restore to modify the size of the search window.
Note
Viewing search results
From the View Results section of all quarantined items, you can:
Release a quarantined item. Select a record from the View Results pane and click
Release. The original email message is released from the database for delivery to the
intended recipient.
Download a quarantined item. Select a record from the View Results pane and click
Download.
46
8
®
™
McAfee Quarantine Manager 6.0 User Guide
Managing Quarantined Items
Viewing search results
Select the quarantined items to add the email address of the sender to the global
blacklist, so that messages from this sender are blocked in the future. Select a
record from the View Results pane, then click Blacklist.
Select the quarantined items to add the email address of the sender to the global
blacklist and delete it, so that messages from this sender are blocked and deleted
in the future. Select a record from the View Results pane, then click Blacklist&Delete.
Select the quarantined items to add the email address of the sender to the blacklist
for the group that the intended recipient is a member of. Select a record from the
View Results pane, then click Blacklist for Group.
Select the quarantined items to add the email address of the sender to the global
whitelist so that messages from this sender are not blocked in the future. Select a
record from the View Results pane, then click Whitelist.
Select the quarantined items to add the email address of the sender to the global
whitelist and release it, so that messages from the sender are not blocked in the
future.Select a record from the View Results pane, then click Whitelist&Release.
Select the quarantined items to add the email address of the sender to the whitelist
for the group that the intended recipient is a member of. Select a record from the
View Results pane, then click Whitelist for Group.
Note
The Blacklist and Blacklist&Delete option are available only for the Super Administrator
account.
You can also use:
Columns to display — To select additional column headers to be listed in the View
Results pane. Click this option, select the desired options, and click OK.
Note
You must select at least one column header. You can also click the desired column
header to sort the items in ascending or descending order.
Search within results — To search for a quarantined item from the results displayed in
the View Results pane. Enable this option to refine your search from the search
results.
Select All — To select all quarantined items in the View Results pane.
Select None — To deselect all quarantined items in the View Results pane.
Delete — To delete selected quarantined items in the View Results pane.
Delete All — To delete all quarantined items from the database for a particular domain
in the View Results pane.
In the View Results section, you can view between 10 to 100 quarantined items per page
from the available drop-down list. Use the next or previous buttons to navigate through
the pages. You can also select multiple quarantined items to perform an action such as
blacklist, delete or release.
47
8
®
™
McAfee Quarantine Manager 6.0 User Guide
Managing Quarantined Items
Viewing search results
48
8
9
Managing Blacklists and Whitelists
A blacklist is a list of email addresses that a user does not want to receive emails from.
With McAfee Quarantine Manager, users can create a personal blacklist, which is used
in addition to the global or group blacklists you maintain. Messages from blacklisted
addresses are always treated as spam. Every email sent to a user is matched against
the appropriate blacklists and, if a match is found, they will not receive the message.
A whitelist is a list of email addresses that a user always wants to receive emails from.
With McAfee Quarantine Manager, users can create a personal whitelist, which is used
in addition to any global or group whitelists maintained by you. All messages from a
whitelisted address are treated as non-spam. Every email sent to a user is matched
against the whitelist and, if a match is found, they will normally receive the message.
Messages from email addresses in the whitelist are not subject to phish or spam
scanning, though they are still subjected to other types of scanning.
You can use the Blacklists and Whitelists option to view and edit the lists for a selected
user or you can look at a summary of the global lists and group lists. In addition, you
can import and export any user’s blacklists and whitelists from or to an XML file, and
can also define user groups as lists of email addresses or references to existing user
groups.
Figure 9-1 Blacklist and Whitelists
49
®
™
McAfee Quarantine Manager 6.0 User Guide
Managing Blacklists and Whitelists
Organizing blacklists and whitelists
You can submit the sender of a selected email for adding to a blacklist or to a
whitelist.
You can submit a user’s contact list to their personal whitelist.
You can store blacklists and whitelists for individual users, for specific groups or for
your entire organization.
Blacklists and whitelists are distributed to McAfee products as they change or in
response to regular polling.
Topics covered are:
Organization
Import and Export
Organizing blacklists and whitelists
From the McAfee Quarantine Manager main menu, click Blacklists and Whitelists. The
Organization screen is displayed. From this screen you can add or remove email
addresses from Global Blacklist and Whitelist or you can modify Group Blacklists and
Whitelists.
Global blacklist and whitelist
To add an email address to the list:
1 Click Blacklists and Whitelists | Organization, then select the Global Blacklist and Whitelist
tab.
2 From the Global Blacklist and Whitelist screen, select the Blacklist or Whitelist tab as
appropriate.
3 To add an email address to either of the lists, type the address in the Email Address
field and click Add. The address shows up in the Members column of the screen.
4 Click Apply to save the changes.
To delete an email address from the list:
1 Click Blacklists and Whitelists | Organization, then select the Global Blacklist and Whitelist
tab.
2 Click Delete to delete an individual email address from either of the lists.
3 Click Delete All to delete all the email addresses in the blacklist or whitelist.
4 In the dialog box that appears, click OK to complete the deletion or Cancel to discard
the changes.
5 Click Apply to save the changes.
Note
The Domain Administrator can only view the Global Blacklist and Whitelist. Only a Super
Administrator can delete or modify the Global Blacklist and Whitelist.
50
9
®
™
McAfee Quarantine Manager 6.0 User Guide
Managing Blacklists and Whitelists
Importing blacklists and whitelists
Group blacklists and whitelists
This tab is only available for the Super Administrator account.
Note
To add an email address to the groups list:
1 Click Blacklists and Whitelists | Organization, then select the Group Blacklists and Whitelists
tab.
2 Select the group you wish to modify and click Edit.
3 To add an email address to either the blacklist or whitelist, type the address in the
Email Address field and click Add. The address shows up in the Members column of the
screen.
Note
The group policies from the connected McAfee products are sent to the quarantine
manager software at certain time intervals, hence the group names are not displayed
immediately after installing the software.
To delete an email address from the groups list:
1 Click Blacklists and Whitelists | Organization, select the Group Blacklists and Whitelists tab.
2 Click Delete to delete an individual email address from either of the lists.
3 Click Delete All to delete all the email addresses in the blacklist or whitelist.
4 In the dialog box that appears, click OK to complete the deletion or Cancel to discard
the changes.
5 Click Apply to save the changes.
Importing blacklists and whitelists
Figure 9-2 Import and Export
51
9
®
™
McAfee Quarantine Manager 6.0 User Guide
Managing Blacklists and Whitelists
Exporting blacklists and whitelists
You can import users’ existing blacklists and whitelists from McAfee products. For
example, once you install the software you can import users’ personal blacklists and
whitelists, so that user’s can make use of them in McAfee Quarantine Manager. You
can also import the global blacklists and whitelists.
To import a User/Global Blacklist and Whitelist file:
1 From the McAfee Quarantine Manager main menu, click Blacklists and Whitelists |
Import and Export.
2 From the Import BW List section, use the Browse field to locate the configuration file
you want to import.
3 Select Merge User List to merge the blacklist and whitelist with the existing list.
4 Click Import User List or Import Global List as required.
The Import Global List option is only available for the Super Administrator account.
Note
Exporting blacklists and whitelists
You can export users’ existing McAfee Quarantine Manager personal blacklists and
whitelists or the global blacklists and whitelists, saving them as.XML files for future
use.
To export the User Blacklist and Whitelist file:
You can use this to export the User Blacklist and Whitelist of this system and save it to
a location where it can be imported by other systems or used by this system for future
use.
1 From the Export section, click Export User List.
2 Specify the location where to save the file.
3 Click Save.
The default name of the User Blacklist and Whitelist file is McAfeeBWList.xml.
Note
To export the Global Blacklist and Whitelist file:
You can use this to export the Global Blacklist and Whitelist of this system and save it
to a location where it can be imported by other systems or used by this system for
future use.
1 From the Export section, click Export Global List.
2 Specify the location where to save the file.
3 Click Save.
The default name of the Global Blacklist and Whitelist file is McAfeeGlobalBWList.xml.
Note
52
9
10
Managing User Submissions
Users can identify spam, phish, and other unwanted messages that have appeared in
their Inboxes, as well as messages that have been incorrectly quarantined, and can
submit them to you for release. McAfee Quarantine Manager users can release items
they believe should not be considered as spam. Any other type of quarantined items
must be submitted to you if the user believes they should be released from quarantine.
Only you can decide what to do with these items.
The User Submissions option shows lists of items that users have submitted, and allows
you to view the subject of each mail, as well as the email address of the user who
submitted it (this is the intended recipient, not the person the message was originally
sent by). You can select multiple items for deletion or for release.
Any items submitted as spam or non-spam are sent to all connected McAfee products.
Any items that are released are sent back to the McAfee product that they came from,
and are then usually sent on to the intended recipients. Items can also be downloaded
in case they need to be resent manually later.
Note
Only items submitted as spam or non-spam are sent to a specific user group. Only
items sent to members of that user group are checked to see if they match that
particular type of spam/non-spam in future.
Quarantined items stay in the lists they have been submitted to, in case you need to
carry out more than one action on them. They are only removed from the lists once you
select to remove them.
You can use the User Submissions option to search for and act on messages submitted
by users as having been falsely identified as spam, submitted as spam or submitted as
being suitable for release (that is, the user believes they are not spam or other type of
undesirable object).
53
®
™
McAfee Quarantine Manager 6.0 User Guide
Managing User Submissions
Searching user submissions
Searching user submissions
Use wildcards like “*” and ‘?’ in the search field. Use “*” to match to any number of
characters and use “?”to match a single character. Use “\\” to match any ‘\’ character
in the search field.
Note
1 Click User Submissions | Submitted <as Spam / as Non-Spam / for Release>.
2 Select up to three of these search filters:
Subject — To search by the subject line of the email.
Sender — To search by the sender’s email address.
Recipient — To search by a valid email address of the recipient.
Score — To search by the spam score, which is a number that indicates the
amount of potential spam contained within an email message.
Ticket Number — To search by ticket number, which is a 16-digit alpha numeric
entry that is auto-generated by the McAfee product for every detection.
Reason — To search by the reason the item is to be detected. The secondary
filters for Reason are Virus, Banned Content, Banned File Type, Spam, Encrypted or
Corrupted, Unknown, Potentially Unwanted Program, Phish, Packer and Mail Format.
Detection Name — To search by the name of a detected item.
3 Select All Dates or a desired Date Range from the drop-down lists.
4 Click Search. A list of user-submitted spam items matching your search criteria are
displayed in the View Results section.
Click Clear Filter to return to the default search filter settings.
Note
5 From the drop-down lists, select Domain to search by the submitted items from a
particular domain.
Click Maximize or Restore to modify the size of the search window.
Note
Viewing search results
From the View Results section of all the user submissions, you can:
Remove the selected items from the submission queue. The items are not added
to the Bayesian learning database. Select a record from the View Results pane and
click Remove from Queue.
Release a quarantined item. Select a record from the View Results pane and click
Release. The original email message is released from the database for delivery to the
intended recipient.
54
10
®
™
McAfee Quarantine Manager 6.0 User Guide
Managing User Submissions
Viewing search results
Select quarantined items to submit to McAfee labs for sample analysis. Select a
record from the View Results pane, click Submit to McAfee Labs.
Note
This helps in refining the scanner rules and recognizing future detections. For
immediate action on a sample, you can either blacklist or whitelist the sender.
Select quarantined items to add the sender’s email address to the global blacklist,
so that messages from this sender are blocked in future. Select a record from the
View Results pane, click Blacklist.
Select quarantined items to add the sender’s email address to the global blacklist
and delete it, so that messages from this sender are blocked in future. Select a
record from the View Results pane, click Blacklist&Delete.
Note
The Blacklist and Black&Delete option are available only for the Super Administrator
account.
You can also use:
Columns to display — To select additional column headers to be listed in the View
Results pane. Click this option, select the desired options, and click OK.
Note
You must select at least one column header. You can also click on the desired column
header to sort the items in ascending or descending order.
Search within results — To search for a quarantined item from the results displayed in
the View Results pane. Enable this option to refine your search from the search
results.
Select All — To select all the listed items in the View Results pane.
Select None — To deselect all the listed items in the View Results pane.
Delete — To delete the selected listed items in the View Results pane.
Delete All — To delete all the listed items from the database for a particular domain
in the View Results pane.
In the View Results section, you can view between 10 to 100 quarantined items per page
from the available drop-down list. Use the next or previous buttons to navigate through
the pages. You can also select multiple quarantined items to perform an action such as
blacklist, delete or release.
55
10
®
™
McAfee Quarantine Manager 6.0 User Guide
Managing User Submissions
Viewing search results
56
10
11
Managing Settings and Diagnostics
You can use the Settings and Diagnostics option for a number of tasks involving users,
email digests, databases, product logs, and McAfee products. You can also carry out
these diagnostic operations:
For users, you can select the type of detection to be carried out on users’ mailboxes,
and can specify how long quarantined items will be held for before being purged. In
addition, you can authenticate, and if necessary, delete or reset a user’s account.
You can also synchronize users with the LDAP servers, so that users created in the
LDAP server are automatically added to the McAfee Quarantine Manager server.
For email digests you can define the subject line, the email address of the sender,
the name or IP address, and port number of the mail server to send the digests
from. You can also configure the contents of the email digest and schedule email
digest “mail shots” to all users or to specific users.
For database management, you can specify the location of the database, and
schedule compaction tasks like purge and optimization.
You can access the product log to view the database compactions and any start
up/shut down information.
The diagnostics panel allows you to set the product log level, to enable debug
logging at three different levels, and to configure the McAfee Error Reporting
Service (Talkback).
For communications, you can configure the port that you want to use to receive
communications, set the number of listening threads, and enable or disable McAfee
product communications. When disabled, all incoming items are rejected and an
appropriate error message is returned to the communicating McAfee product.
The advanced settings page allows you to configure, ePolicy Orchestrator related
settings, submit to McAfee labs settings, database downtime notification settings,
session timeout settings and custom email notification settings.
Settings and Diagnostics consists of these topics:
Managing users
Email Digests
Database Management
Product Log
Diagnostics
57
®
™
McAfee Quarantine Manager 6.0 User Guide
Managing Settings and Diagnostics
Managing users
Communications
Advanced Settings
Managing users
With the User Management option, you can specify how users are authenticated,
determine what types of quarantined items they are allowed to see, and specify how
long those items are kept. You can authenticate users, set their access parameters, as
well as manage their accounts.
User Management consists of these sections:
General
Account Management
User Synchronization
General
To authenticate users or to set up various quarantine options, select the General tab to
display the general user management options.
1 In the Maximum Item Age (days) field, type the number of days that quarantined items
will be stored.
2 In the Visible Detections field, select the type of items that users can view, for
example Spam or Phish.
3 In the Authentication field, specify whether the user must be authenticated using
existing organization accounts (Windows Authentication for Active Directory) or whether a
new McAfee Quarantine Manager accounts needs to be setup or using Lotus Domino
account.
4 In the Restore Defaults field, click Restore to restore the settings back to the original
configurations.
5 Click Apply to save the changes.
The general settings used are:
Maximum Item Age (days) — To specify the maximum number of days an item will be
stored. Users will not be allowed to set a maximum item age any larger than the
value entered. Type a value between 1 and 100. The default value is 14 days.
Visible Detections — To specify the detection types that users can view. The
detections are spam, phish, PUPs and unwanted content.
Active Directory — To authenticate using existing active directory organization
accounts.
This option is only available for the Super Administrator account.
Note
58
11
®
™
McAfee Quarantine Manager 6.0 User Guide
Managing Settings and Diagnostics
Managing users
Quarantine Manager Accounts — To authenticate using existing quarantine manager
user specific account.
Lotus Domino — To authenticate using existing lotus domino server specific account.
Specify the IP address of the lotus domino server in the Server field.
Restore — To restore the default configuration of this administrator.
Account management
You can use Account Management to view or delete individual accounts, change or reset
a user’s password, add email addresses to a user’s blacklist and/or whitelist, delete
email addresses from a user’s blacklist and/or whitelist, setup or delete email aliases
for a user, modify email addresses from a user’s blacklist and/or whitelist, specify
whether or not a user receives email digests.
1 In Find a Quarantine Manager user, search alphabetically by clicking on a letter or type
the email address, then click Search.
2 To view all email addresses, click All.
A list of user email addresses matching your search criteria are displayed in the View
Results pane.
From the View Results pane of account management, you can select:
Delete — To delete the selected email address.
Modify — To modify account settings of the selected email address.
Note
You can also double-click the email address to modify the account settings. See
Managing your account on page 78.
User synchronization
You can use User Synchronization to synchronize the user accounts between an LDAP
server and the McAfee Quarantine Manager server. You can configure the settings and
also schedule when to run the synchronization task. Whenever a new user joins the
organization and a user account is created in the LDAP server, the user is automatically
added to the McAfee Quarantine Manager server during user synchronization.
In the Settings section, you can select:
Server Type — To specify the type of LDAP server for synchronizing users. You can
use either Active Directory or Lotus Domino.
Server — To specify the server name or the IP address of the LDAP server.
Port — To specify the port number used to communicate with the LDAP server. The
default value is 3268 for Active Directory and 389 for Lotus Domino.
User name — To specify any existing user of the LDAP server with at least read-only
access to the server.
Password — To specify the password of the existing user to access the LDAP server.
Search DN — To limit the search to an organizational unit in the LDAP server. You can
leave this field blank, to search the entire directory.
59
11
®
™
McAfee Quarantine Manager 6.0 User Guide
Managing Settings and Diagnostics
Configuring and scheduling email digests
Delete users not found in the LDAP server - To delete the user accounts that are not found
in the LDAP server, from the McAfee Quarantine Manager database.
In Scheduler section, you can select:
Never — To specify never to synchronize users.
Days — To specify how frequently, in days, the user synchronization task should take
place, and at what time of day.
Weeks — To specify how frequently, in weeks, the user synchronization task should
take place. You can also specify on which day(s) and at what time of day the user
synchronization task should take place.
Months — To specify on what day of the month and in which month(s) the user
synchronization task should take place. You can also specify at what time of day the
user synchronization task should take place.
Note
From the When section, specify the time when the user synchronization task must start,
for all options except Never.
Configuring and scheduling email digests
McAfee Quarantine Manager offers per user quarantine that can be managed through
automated digests (listings of items that are quarantined). You can schedule the
release of digests at certain times of the day, week or month, and can instigate the
writing and sending of those digests at the specified time. The digests contain lists of
quarantined messages, and allow users to request the release of quarantined
messages, to delete messages, and to manage their personal whitelists and blacklists.
Email Digests consists of these sections:
Digest Scheduler
User-based Digest
Digest Mail
Digest Response
Digest scheduler
You can use digest scheduler to send users information about the quarantined items,
blacklist and whitelist, etc., at a scheduled time. Digest mails are sent to all users of
the domains that are managed by this administrator.
In How often section, you can select:
Never — To specify never send any digest mails to the user.
Days — To specify how frequently, in days, the digest mails should be sent, and at
what time of day.
Weeks — To specify how frequently, in weeks, the digest mails should be sent. You
can also specify on which day(s) and at what time of day the digest mails should be
sent.
60
11
®
™
McAfee Quarantine Manager 6.0 User Guide
Managing Settings and Diagnostics
Configuring and scheduling email digests
Months — To specify on what day of the month and in which month(s) the digest
mails should be sent. You can also specify at what time of day the digest mails
should be sent.
From the When section, specify the time when the digest should be sent, for all options
except Never.
Note
User-based digest
You can User-based Digest to specific user(s), information about the quarantined items,
blacklist and whitelist, and so on, at a scheduled time.
In User-based Digest, you can select:
All Users — To send digest emails to all the existing users.
Selected Users — To send digest emails to the specified user(s). You can specify the
user(s) in the Email address field.
Send current digest — To send user the latest or current digest email.
Resend previous digest — To send user the previous digest email without the current
digest information.
Run Now — To start the task immediately and send digest emails to the user(s).
Digest mail
You can use digest mail to tell users which items have been quarantined. This is the
text used in the message sent to the user. In the Digest Mail tab, you can select:
Sender's Email Address — To specify the email address of the quarantine manager. By
default, the sender's email address is McAfeeQuarantineManager@McAfee.dom.
Subject — To specify the subject in the digest mail sent to the user.
Preview — To preview the digest email before sending it to the user.
Edit — To view and configure the digest mail as required. This opens a new window
where you can edit the page and click Save to apply the changes.
Table 11-1 Digest email options
Option
Description
%FULL_SPAM_LIST%
The full list of quarantined spam items.
%FULL_PHISH_LIST%
The full list of quarantined phish items.
%FULL_PUP_LIST%
The full list of quarantined potentially unwanted programs.
%FULL_CONTENT_LIST%
The full list of quarantined items with unwanted content.
%SPAM_LIST%
The list of spam quarantined since the last digest was
generated.
%PHISH_LIST%
The list of phish quarantined since the last digest was
generated.
%PUP_LIST%
The list of potentially unwanted programs quarantined
since the last digest was generated.
%CONTENT_LIST%
The list of unwanted content items quarantined since the
last digest was generated.
%BLACK_LIST%
The user’s blacklist.
61
11
®
™
McAfee Quarantine Manager 6.0 User Guide
Managing Settings and Diagnostics
Managing the database
Table 11-1 Digest email options
Option
Description
%WHITE_LIST%
The user’s whitelist.
%ADD_BLACK_LIST%
A textbox to allow users to add email addresses to their
blacklist.
%ADD_WHITE_LIST%
A textbox to allow users to add email addresses to their
whitelist.
%SET_EXP_DELAY%
A textbox used to set the number of days that items are
quarantined.
%UI%
The URL of the user interface.
%RECIPIENT%
The digest recipient's email address.
%EXP_DELAY%
The current number of days that items are quarantined for.
%MAX_EXP_DELAY%
The number of days the administrator specified that items
were to be quarantined.
%DIGEST_DATE%
The date the digest was created.
%PRODUCT_NAME%
Name of the product (McAfee Quarantine Manager).
Mail Format — To specify text/html or text/plain as required.
If you set text/plain, the users can only view the information, and cannot take action
directly from the digest.
Note
Send digest as — To specify if the digest mail needs to be sent as the Message body or
as an Attachment.
HTML Form Method — To specify GET or POST method, as required.
Digest response
You can use this as the text used in the message sent to the user, in response to their
request for actions based on the content of the email digest.
In Digest Response, you can use:
Preview — To preview the digest email before sending it to the user.
Edit — To view and configure the message as required. This opens a new window
where you can edit the page and click Save to apply the changes.
Managing the database
You can use the Database Management option to specify the location of the quarantine
database, and when it is necessary to purge it to improve performance.
Database Management consists of these sections:
General
Purge of Old Items
User-based Purge
62
11
®
™
McAfee Quarantine Manager 6.0 User Guide
Managing Settings and Diagnostics
Managing the database
General
To set up various quarantine options, select the General tab to display the general
database management options.
1 To set up the maximum size of items that will be quarantined, select the General tab.
2 In the Maximum Item Size (MB), type the maximum number of megabytes per item for
storage. Larger files are rejected and returned to their McAfee product(s) point of
origin. The default value is 100MB.
3 In the Maximum Query Size, type the maximum number of rows to be returned from a
query. The default value is 1000.
4 Click Apply to save the changes.
Purge of Old Items
The database must be regularly purged to delete any quarantined items that are older
than the specified limits. During a purge, the database remains operational, although
performance may be affected. McAfee recommends that you schedule this task to run
after normal working hours.
1 In Purge of Old Items, select:
Never — To specify never purge any old or quarantined items.
Days — To specify how frequently, in days, the purge of quarantined items takes
place, and at what time of day.
Weeks — To specify how frequently, in weeks, the purge of quarantined items
takes place. You can also specify on which day(s) and at what time of day the
purge takes place.
Note
Months — To specify on what day of the month and in which month(s) the purge
takes place. You can also specify at what time of day the purge takes place.
Under When, specify the time when the purging of quarantined items must start, for all
options except Never.
2 Click Apply to save the changes.
User-based Purge
You can use User-based Purge to purge quarantined items of specific user(s). You can
also specify whether to purge all items, older items or newer items of the specified
user.
In User-based Purge, you can select:
All Items — To purge all the quarantined items of the specified user(s).
Older Items — To purge all the quarantined items of the specified user(s) that are older
than the specified date.
Newer Items — To purge all the quarantined items of the specified user(s) that are
newer than the specified date.
63
11
®
™
McAfee Quarantine Manager 6.0 User Guide
Managing Settings and Diagnostics
Viewing the product log
Email Address — To purge the quarantined items for the specified user(s).
Run Now — To start the purge task for the specified user(s).
Viewing the product log
You can use Product Log to set up search filters that help you find information in the
product log and view the results of the search.
To search for detections:
1 Click Settings and Diagnostics | Product Log. The Product Log page appears.
2 Select one to three of these filters:
ID — Enter the number which identifies a specific product log entry.
Level — Select Information, Warning or Error from the drop-down list in the second
field depending on the type of log you want to see.
Description — Select the relevant description.
3 Select All Dates or a desired Date Range from the drop-down lists.
4 Click Search. A list of detected items matching your search criteria, is displayed in
the View Results section.
Click Clear Filter to return to the default search filter settings.
Note
5 Click Maximize or Restore to modify the size of the search window.
6 Click Apply.
Configuring diagnostics
This option is enabled only for the Super Administrator account.
Note
You can use Diagnostics to specify the level of debug logging required, the maximum
size of debug files, and where they must be saved. You can configure the error
reporting service settings and specify which events should be captured in the product
log and event log by giving the product log's location, name, size limits, and time-out
settings.
Diagnostics consists of these topics:
Logging
Product Log
Debug Tracing
Error Reporting
64
11
®
™
McAfee Quarantine Manager 6.0 User Guide
Managing Settings and Diagnostics
Configuring diagnostics
Logging
In the Logging tab, you can specify the types of events to be logged.
1 Under Product Log, select Information to Product Log, Warnings to Product Log, and Errors
to Product Log to include these events in the product log.
2 Under Windows Event Log, select Information to Windows Event Log, Warnings to Windows
Event Log, and Errors to Windows Event Log to include these events into the event log.
Product Log
In the Product Log tab, you can specify the location and size limit for a product log.
1 In Location, specify a location for the product log. Use the first field to indicate the
type of location you type in the second field. For example, if you select (Full Path) in
the first field, the full path name in the second field. If you select a location, specify
the file name, or subdirectory path and file name.
(Full Path)
<Desktop>\
<Install Folder>\
<System Drive>\
<Program Files>\
<Windows Folder>\
2 Select Default to use the default location for the product log.
3 In Maximum File Size (MB), specify the maximum size (in megabytes) of the product log
file. When the file reaches this size, logging continues but the oldest entries are
overwritten. The default value is 100MB.
4 Select No limit to specify no size limit for the product log file. Logging continues until
it reaches the maximum size of the file.
5 Click Apply.
Debug Tracing
In the Debug Tracing tab, you can specify the level, maximum file size and location of the
debug files.
1 Click Settings and Diagnostics | Diagnostics. The Diagnostics page appears.
2 In the Debug Tracing tab, from the Level drop-down list, specify the type of information
that should be captured in the debug log. You can select:
High — To collect a large number of log entries.
Medium — To collect a medium number of log entries.
Low — To collect a low number of log entries.
None — To disable debug logging.
65
11
®
™
McAfee Quarantine Manager 6.0 User Guide
Managing Settings and Diagnostics
Configuring communications
3 In Maximum File Size (MB), specify the maximum size (in megabytes) of the debug log
file. When the file reaches this size, logging continues but the oldest entries are
overwritten. The default value is 100MB.
4 Select No limit to specify no size limit of the debug log file. Logging continues until it
reaches the maximum size of the file.
5 Select Specify location for debug files to specify a location for debug files. Select any
location from the drop-down list and specify the location accordingly:
(Full Path)
<Desktop>\
<Install Folder>\
<System Drive>\
<Program Files>\
<Windows Folder>\
Avoid using debug logging indiscriminately because it fills up the hard disk space and
affects the overall performance of the server. It must be enabled for a limited duration,
according to an authorized McAfee support engineer.
Note
Error Reporting
In Error reporting tab, you can enable or disable the error reporting options like errors and
exceptions.
1 In the Error Reporting Service tab, use Enable to enable or disable the error reporting
service.
2 Select Catch exceptions to capture information about exceptional events, such as
system crashes.
3 Select Report exceptions on screen to specify whether exceptions must be reported to
the administrator.
Configuring communications
Using the Communications option, you can enable or disable communications, specify
which port to use to receive communications, set the number of listening threads,
specify the maximum number of times the system will try to connect to an
unresponsive product, and define the minimum intervals between blacklist and
whitelist changes being communicated, as well as between quarantined items being
sent to McAfee Labs.
Note
If communications are disabled, all incoming items are rejected, and an appropriate
error message is returned to the sending McAfee product.
Communications consists of these topics:
Default configuration
Advanced configuration
66
11
®
™
McAfee Quarantine Manager 6.0 User Guide
Managing Settings and Diagnostics
Managing Advanced Settings
Default configuration
You can use the Default tab to configure the McAfee product(s) port number and the
mail server address.
1 In Port Number, specify the McAfee Quarantine Manager port on which to receive
communications from McAfee products. McAfee Quarantine Manager service
needs to be restarted and all connected McAfee product(s) must be reconnected if
this value is modified.
This option is enabled only for the Super Administrator account.
Note
2 In the Mail Server section, in the Address field, specify the IP Address or DNS Host
Name of the mail server for sign up and user digest emails.
3 In the Mail Server section, in the Port Number field, specify the port number to use for
the outgoing SMTP communication.
4 Click Apply to save the changes.
Advanced configuration
You can use the Advanced tab to configure the advanced options of the communication
settings.
This option is enabled only for the Super Administrator account.
Note
1 In Thread Pool Size, specify the number of threads needed for incoming quarantined
items. The default value is 25.
2 In Maximum Communication Retry, specify the number of times McAfee Quarantine
Manager should try to re-establish communication with the McAfee products when
attempting to send configuration or quarantine information. The default value is 3.
3 In Configuration Push Interval (seconds), specify the minimum interval allowed between
sending McAfee products updates to blacklists, whitelists and user groups. The
default value is 14400.
4 In Item Push Interval (seconds), specify the minimum interval between sending
quarantine updates to McAfee products. The default value is 5.
5 Click Apply to save the changes.
Managing Advanced Settings
Using the Settings and Diagnostics | Advanced Settings option, you can configure the
generation of ePolicy Orchestrator events, submissions to McAfee labs settings,
database downtime notifications settings, miscellaneous settings such as
administrator interface / user interface session timeout, and dashboard refresh
intervals. You can also send custom notification emails to all users or only to users with
quarantined items.
67
11
®
™
McAfee Quarantine Manager 6.0 User Guide
Managing Settings and Diagnostics
Managing Advanced Settings
Advanced Settings consists of these topics:
ePolicy Orchestrator related settings
Submission to McAfee Labs settings
Database Downtime Notification settings
Miscellaneous settings
Sending Custom emails
ePolicy Orchestrator related settings
Use ePolicy Orchestrator related settings to configure the generation of ePO events
and the frequency at which the events are generated at the McAfee Quarantine
Manager server for creating the ePolicy Orchestrator reports.
In the ePO Related section, you can use:
Generate ePO Events — To generate ePolicy Orchestrator events, so that you can view
reports in the ePolicy Orchestrator console. By, default this option is disabled.
ePO Event(s) Generating Interval (minutes) — To specify the time interval for generating
ePolicy Orchestrator events. The default value is 10.
Submission to McAfee Labs settings
Use Submission to McAfee Labs settings to configure the port number, IP address of the
SMTP server and the email address of the sender which is the McAfee Quarantine
Manager administrator.
In Submission to McAfee Labs section, you can use:
Port — To specify the port number to communicate with McAfee Labs. By default
the value is 25.
IP Address — To specify the address of the SMTP server that can route the
submissions to McAfee Labs.
Message From — To specify the email address of the quarantine manager. By default,
the sender's email address is McAfeeQuarantineManager@McAfee.dom.
Database downtime notification settings
Use Database Downtime Notification settings to configure the port number to communicate
with the database server, IP address of the database server, email address of the
database administrator, email message body, and subject of the notification email.
In Database Downtime Notification section, you can use:
Message From — To specify the email address of the quarantine manager. By default,
the sender's email address is McAfeeQuarantineManager@McAfee.dom.
Port — To specify the port number of the SMTP server that can route notifications
during database downtime. The default value is 25.
68
11
®
™
McAfee Quarantine Manager 6.0 User Guide
Managing Settings and Diagnostics
Managing Advanced Settings
IP Address — To specify the IP address of the SMTP server that can route the
notifications during database downtime.
Administrator ID — To specify the email address of the database administrator or
McAfee Quarantine Manager administrator intended to receive the notification
during database downtime.
Subject — To specify the subject of the notification email sent to the user, during
database downtime.
Message Body — To specify the message that the database is down and inaccessible
in the notification email.
Miscellaneous settings
Use Miscellaneous settings to configure the session timeout of administrator/user
interface and the dashboard refresh intervals. You can use:
Admin UI Session TimeOut (seconds) — To specify the number of seconds that the
administrator interface can remain idle before the server terminates it automatically.
The default value is 600.
User UI Session TimeOut (seconds) — To specify the number of seconds that the user
interface can remain idle before the server terminates it automatically. The default
value is 600.
Dashboard Refresh Interval (seconds) — To specify the time interval after which the
dashboard counters refresh automatically. The default value is 60.
Custom email
Use Custom Email tab to send custom notification emails to all registered users or only
to registered users with quarantined items. You can use:
All Users — To send custom emails to all registered users.
All Users with Quarantined Items — To send custom emails only to registered users with
quarantined items.
Sender's Email Address — To specify the email address of the Quarantine Manager. By
default, the sender's email address is McAfeeQuarantineManager@McAfee.dom.
Subject — To specify the subject in the custom email sent to the user.
Message — To view and edit the custom email message as required.
Send — To send the custom email to selected users.
69
11
®
™
McAfee Quarantine Manager 6.0 User Guide
Managing Settings and Diagnostics
Managing Advanced Settings
70
11
12
Managing administrators
With Admin Management you can add a new administrator, add an alias administrator,
manage available administrators, delete administrators, create or modify domain
administrators, add or import domains and modify the accounts.
Managing administrators consists of these topics:
Adding an Alias/Domain administrator
Managing Domains
Adding an Alias/Domain administrator
You can add a domain administrator to manage specific domains and its users. You can
also create an alias administrator account for an existing Super administrator or Domain
administrator. The alias administrator can perform the same actions as other
administrator accounts.
To create a new Domain administrator:
1 Log on to an administrator account.
2 In Admin Management | Manage Admins, click Add Domain Admin.
3 Type the domain administrator description, email account and password
information.
4 Click Apply to save the changes. The newly created domain administrator account is
listed for the Administrator Type selected as Domain Admin.
To create an alias Super/Domain administrator:
1 Log on to an administrator account for which you need to create an alias account.
2 In Admin Management | Manage Admins, click Add Alias.
3 Type the alias administrator description, email account and password information.
4 Click Apply to save the changes. The newly created super/domain administrator
account is listed for the Administrator Type selected as <Super Admin/Domain Admin>.
You can use the following fields:
Administrators Type — To select the types of administrator accounts from the list:
Super Admin and Domain Admin.
71
®
™
McAfee Quarantine Manager 6.0 User Guide
Managing administrators
Managing domains
Add Alias — To add an alias administrator account to the current administrator.
Add Domain Admin— To add a Domain administrator.
Administrators List — To view the list of available administrator users. This depends
on the user logged on. You can modify or delete an existing user with the available
options.
To save the settings, you need to click Apply after deleting the user.
Note
Admin Description — To specify a description for the administrator.
Admin account — To specify a valid account name of the user.
Password — To specify a password for the administrator user.
Confirm Password — To retype the password.
The password must be alpha-numeric and at least eight characters long.
Note
Managing domains
You can use the Manage Domains section to add or modify domains, import multiple
domains from a CSV file, select and assign administrators for domains, and delete
existing domains.
Adding/Importing domains
You can quarantine items specific to the domains created. This helps you to search or
view quarantined items from a specific domain. You can add domains individually or
import multiple domains from a file.
To add a new domain:
1 Log on to an administrator account.
2 In Admin Management | Manage Domains, select Add Domain.
3 Specify the name of the domain in the Domain Name field, and the SMTP servers IP
address in the SMTP Server Address field.
4 Click Add. The domain is listed in the Managed Domains List.
5 Click Apply to save the changes.
To import domains:
1 Log on to an administrator account.
2 In Admin Management | Manage Domains, select Import Domains.
3 Click Browse, to search for the .CSV file with the domains listed in one column and IP
address in the other column.
4 Click Import. The domains are listed in the Managed Domains List.
72
12
®
™
McAfee Quarantine Manager 6.0 User Guide
Managing administrators
Managing domains
5 Click Apply to save the changes.
Modifying my account
1 Log on to an administrator account.
2 In Admin Management | Manage Admins, click Modify for the desired domain in the Managed
Administrators List section.
3 Edit the administrator description, email account or password information.
4 Click Apply to save the changes.
Viewing assigned domains
To view assigned domains / select a domain administrator:
1 Log on to an administrator account.
2 In Admin Management | Manage Domains, click Select Admin in the Managed Domains List
section.
3 Select the administrator account to use as the administrator of the domain from the
Administrators List option, then click Assign.
Note
To remove an administrator account for the domain you selected, click Remove Admin
from the Administrators List option, then click Assign.
4 Click Apply to save the changes.
You can use the following fields:
Add Domain — To add one domain to the managed domains list.
Import Domains — To import multiple domains from a .CSV file, where the domains are
listed in one column and IP Address in the other column. Select Import Domains, click
Browse to search for the file and click Import. The domains listed in the CSV file will
be added to the Managed Domains List.
Domain Name — To specify a valid domain name.
SMTP Server Address — To specify a valid domain name.
Add — To add the domain name specified to the list of customer domains.
Managed Domains List — To view the list of available domains. This list depends on the
user logged on. Delete an existing domain using the
option.
To save the settings, you need to click Apply after deleting the domain.
Note
Selected Domain — To view the domain selected.
Administrators List — To list the administrator accounts to be used as the
administrator of the domain.
Assign — To assign the administrative privileges to the selected administrator
account.
73
12
®
™
McAfee Quarantine Manager 6.0 User Guide
Managing administrators
Managing domains
Cancel — To cancel all the changes made, and return to the previous page.
74
12
13
Getting Started with the Interface
for Users
When you begin using McAfee Quarantine Manager, there are two ways the server can
verify your identity:
If your organization uses a Microsoft Exchange or Lotus mail server, and your
administrator has enabled Active Directory authentication, you can log on to McAfee
Quarantine Manager with the user name and password of the Active Directory
account.
If your organization uses a Lotus Domino server, and your administrator has enabled
Lotus Domino LDAP authentication, you can log on to McAfee Quarantine Manager
with a user name and password of the Lotus Domino account.
Logging on to the User UI:
To access the User UI, click Start | Programs | McAfee | Quarantine Manager | User UI.
You can also log on to the interface for users, by clicking the link:
Note
http://<computer_name>/MQMUserUI/0409/LogOn.html
Use https://<computer_name>/MQMUserUI/0409/LogOn.html for secure logon.
You can also use the IP address or host name of McAfee Quarantine Manager server
instead of the <computer_name>.
Signing up to McAfee Quarantine Manager:
If you are using McAfee Quarantine Manager for the first time and your administrator
has not enabled Active Directory / Domino LDAP authentication, the Log on to McAfee
Quarantine Manager dialog box appears.
1 Click New user? Click here to register. The User Registration dialog box appears.
2 Type your Email Address, then click Register. A confirmation message appears, telling
you that an account has been created, and a default password has been sent to your
email address. Click OK.
3 To complete the process, click Click here to return to the Login page and use the default
password to log on to McAfee Quarantine Manager.
Topics covered are:
Searching a quarantined item
Viewing search results
Submit Spam Sample
75
®
™
McAfee Quarantine Manager 6.0 User Guide
Getting Started with the Interface for Users
Searching a quarantined item
Managing Your Account
Searching a quarantined item
Use wildcards like “*” and ‘?’ in the search field. Use “*” to match to any number of
characters and use “?”to match a single character. Use “\\” to match any ‘\’ character
in the search field.
Note
The main menu is used to view information about emails that contain spam, phish,
potentially unwanted programs, and unwanted content. You can use up to three search
filters to narrow your search.
To search for a quarantined item such as spam, phish, potentially unwanted programs,
unwanted content or all items:
1 Click Quarantined Items | <All Items>. The <All Items> page appears.
2 Select any of these search filters:
Subject — To search by the subject line of the email.
Sender — To search by the sender’s email address.
Ticket Number — To search by ticket number, which is a 16-digit alpha numeric
entry that is auto-generated by the McAfee product for every detection.
Reason — To search by the reason for which the item is detected. The secondary
filters for reason are Virus, Banned Content, Banned File Type, Spam, Encrypted or
Corrupted, Unknown, Potentially Unwanted Program, Phish, Packer, and Mail Format.
3 Select All Dates or a desired Date Range from the drop-down lists.
Click Maximize or Restore to modify the size of the search window.
Note
4 Click Search. A list of files containing the quarantined items is displayed in the View
Results section.
Viewing search results
From the View Results section of all the quarantined items, you can:
Release a quarantined item. Select a record from the View Results pane and click
Release. The original email message is released from the database for delivery to the
intended recipient.
Submit a quarantined item to the Bayesian learning database, so that similar
messages are not treated as spam. Select a record from the View Results pane and
click Submit as Non-Spam.
Select a quarantined item to add the sender’s email address to the user’s whitelist
so that future messages from this sender are not blocked. Select a record from the
View Results pane and click Whitelist.
76
13
®
™
McAfee Quarantine Manager 6.0 User Guide
Getting Started with the Interface for Users
Submitting a spam sample
Select the quarantined items to add the sender’s email address to the global
whitelist and release it, so that future messages from this sender are not blocked.
Select a record from the View Results pane and click Whitelist&Release.
Select the quarantined items to add the sender’s email address to the global
blacklist, so that future messages from this sender are blocked. Select a record from
the View Results pane and click Blacklist.
Select the quarantined items to add the sender’s email address to the global
blacklist and delete it, so that future messages from this sender are blocked. Select
a record from the View Results pane and click Blacklist&Delete.
You can also use:
Columns to display — to select additional column headers to be listed in the View
Results pane. Click this option, select the desired options, and click OK.
Note
You must select at least one column header. You can also click on column header to
sort the items in ascending or descending order.
Select All — to select all the quarantined items in the View Results pane.
Select None — to deselect all the quarantined items in the View Results pane.
Delete — to delete the selected quarantined items in the View Results pane.
Delete All — to delete all the quarantined items of the user from the database.
In the View Results section, you can view between 10 to 100 quarantined items per page
from the available drop-down list. Use the next or previous buttons to navigate through
the pages. You can also select multiple quarantined items to perform an action such as
blacklist, delete or release.
Submitting a spam sample
This database is used to analyze the content of both “good” and “bad” email
messages (spam, phish and so on) submitted to it. McAfee products use this database
to help correctly identify message traits based on actual content. Therefore, the more
messages that are submitted for correction by administrators and users, the more
information the database has to work on, and the better the filtering will be in future.
If a message in your Inbox should have been quarantined as spam, and you use Outlook
Express or another mail client that saves messages in the MIME format, you can
submit the email directly from McAfee Quarantine Manager as a spam sample to your
administrator. They will decide whether to send it to McAfee Labs.
To submit a spam sample:
1 Click Submit Spam Sample, type the location of the file in the Submit Spam Sample field,
or click Browse... to locate the *.eml file.
From Outlook Express, save the spam as an .eml file.
Note
2 Click Submit to submit the located email message from disk, to McAfee Labs.
77
13
®
™
McAfee Quarantine Manager 6.0 User Guide
Getting Started with the Interface for Users
Managing your account
If you use Microsoft Outlook to handle your email, you can also use the McAfee
Customer Submission Tool to add addresses to your whitelist or blacklist.
Note
For further information, please refer to the McAfee Customer Submission Tool
documentation.
Managing your account
From the user interface, click Your Account. You can use this to:
Maintain your blacklist and whitelist by adding or removing email addresses.
Add any alternative email addresses, so your quarantined items can be seen in one
place.
Set a new password for yourself.
Specify how many days you want to keep quarantined items, although this limit may
be overridden by the limit specified by your administrator.
Assign the existing quarantined items of one user to another.
Figure 13-1 User account settings
Your account consists of the following tabs:
Blacklist
Whitelist
Email Aliases
Settings
Email Reassignment
Maintain your personal blacklist
1 Click the Blacklist tab.
78
13
®
™
McAfee Quarantine Manager 6.0 User Guide
Getting Started with the Interface for Users
Managing your account
2 To add an email address to the list, type the address in the Email Address field and
click Add. The address shows up in the Members column of the screen, and
in the
Delete column.
3 Click Apply to save the changes.
4 To delete an individual email address from the blacklist, click
.
5 To delete all email addresses in the blacklist, click Delete All.
6 In the dialog box that appears, click OK to complete the deletion or Cancel to discard
the changes.
7 Click Apply to save the changes.
Maintain your personal whitelist
1 Click the Whitelist tab.
2 To add an email address to the list, type the address in the Email Address field and
click Add. The address shows up in the Members column of the screen, and
in the
Delete column.
3 Click Apply to save the changes.
4 To delete an individual email address from the whitelist, click
.
5 To delete all email addresses in the whitelist, click Delete All.
6 In the dialog box that appears, click OK to complete the deletion or Cancel to discard
the changes.
7 Click Apply to save the changes.
Managing your email alias
If your administrator has not enabled Active Directory authentication, you can configure
one or more email aliases. These are used if you have more than one email address.
For example, the company you work for changes your email address, and your old
email address also remains active.
If you add the old address as an alias, quarantined emails destined for either address
can be found in the same place. When you add a new alias, an activation code is sent
to the alias address. The changes are shown as pending activation and do not become
operational until you supply the activation code.
Note
If your administrator has enabled Active Directory authentication, you can view any
email aliases that exist for you in the active directory server, but you cannot make any
changes to them, nor can you add any new aliases.
1 Click the Email Aliases tab.
2 Under Name, type the email alias you want to add, then click Add. The alias appears
in the list, and you are prompted for an activation code.
3 Apply the changes to send the activation code to your email address.
4 Under Enter the activation code here, type the activation code that was sent to you, then
click Activate.
79
13
®
™
McAfee Quarantine Manager 6.0 User Guide
Getting Started with the Interface for Users
Managing your account
5 Click OK.
in the Delete column next to the alias you want to
6 To delete an email alias, click
delete.
7 Click OK, then Apply to save the changes.
Changing your password
Note
You cannot change the password if the authentication mode is set as Active Directory
or Lotus Domino.
1 Click the Settings tab.
2 Under New password, type your new password.
The password must be alpha numeric and at least eight characters long.
Note
3 Under Confirm new password, retype the new password.
You cannot cut-and-paste the text from the New password field.
Note
4 Click Apply to save the changes.
Changing the configuration settings
1 Click the Settings tab.
2 Under Maximum Item Age (days), type the number of days that you want to keep
quarantined items before being deleted, or select the Default checkbox. By default,
the value is 14.
Note
If you select a time that is longer than that set by your administrator, McAfee
Quarantine Manager defaults to the value specified by the administrator.
3 Select I want to receive Digest Reports on quarantine activity to ensure that you receive
email digests about whether items sent to you have been quarantined.
4 Select Send a digest even when there are no quarantined items if you want to receive
digests when there is no quarantine activity to report.
5 Click Apply to save the changes.
80
13
®
™
McAfee Quarantine Manager 6.0 User Guide
Getting Started with the Interface for Users
Managing your account
Reassigning users
Only the administrator has privileges to modify the reassigned users. End-users can
only view the reassigned user list.
Note
You can use the Email Reassignment tab to assign the existing quarantined items of one
user to another.
Reassigning users must be done before deleting a user from the Active Directory
server.
Note
1 Click the Email Reassignment tab.
2 Specify the email address of the user to reassign the existing quarantined items.
3 Click Reassign Mails.
Enable Save Reassignment to permanently assign the user to view the quarantined
items of the reassigned user. This will delete the reassigned user account from
the database. After reassignment, the user can view all the existing and future
quarantined items of the user listed in reassigned user list.
Disable Save Reassignment to assign the reassigned user's existing quarantined
items to the user. This will not delete the reassigned user account and
quarantined items in future can be viewed by the reassigned user.
4 Click Apply to save the changes.
81
13
®
™
McAfee Quarantine Manager 6.0 User Guide
Getting Started with the Interface for Users
Managing your account
82
13
14
About DB Suite Utility
The McAfee Quarantine Manager DB Suite utility helps you to convert the database
from MySQL to Microsoft SQL server and vice-versa, configure the source database
settings, migrate older versions of the database to the newer version and create bulk
user accounts.
The topics covered are:
Configuring the source database settings
Converting the database
Creating McAfee Quarantine Manager user accounts
Maintaining the database users
Archiving or Retrieving the existing MySQL database
Configuring the source database settings
Note
Make sure to configure the source database first before performing any other tasks
such as creating user accounts, creating database users or migrating the database using
the DB Suite utility.
In McAfee Quarantine Manager DB Suite 6.0 utility, you can use the Configure DB option
to configure the source database settings such as specifying the source database type,
server address, port number, user name and password of the source database and the
source database name.
To configure the source database:
1 Click Start | Programs | McAfee | McAfee Quarantine Manager DB Suite. The McAfee Quarantine
Manager DB Suite 6.0 window appears.
2 Click Configure DB. The Database configuration window appears.
3 Specify the source database details such as the database type, server address, port,
user name, password and database name.
4 Click Test. When a dialog box appears, click OK.
5 Click Save to apply the database configuration settings.
83
®
™
McAfee Quarantine Manager 6.0 User Guide
About DB Suite Utility
Converting the database
Converting the database
You can use the DB Conversion tab to convert from one database to another, such as
converting a MySQL database to Microsoft SQL Server database or vice-versa to store
the quarantined items in the destination database.
To convert a database:
1 Click Start | Programs | McAfee | McAfee Quarantine Manager DB Suite. The McAfee Quarantine
Manager DB Suite 6.0 window appears.
2 Configure the source database. See, Configuring the source database settings.
3 Click DB Conversion.
4 Specify the destination database details such as DB Type, Server Name, Port, DB Name,
User Name and Password.
5 Click Show Tables to select tables to be included in the destination database.
Note
Before starting the database conversion process, make sure to stop the McAfee
Quarantine Manager service from the Services console.
6 Click Start to start the conversion process.
Note
Click Show details to view the status of the conversion process. The Conversion Log has
all the logs regarding the conversion process which can copied to a separate text file.
7 When a dialog box appears specifying that the database was converted
successfully, click OK.
Creating McAfee Quarantine Manager user accounts
You can use the Create MQM users tab to create bulk McAfee Quarantine Manager
end-user accounts. Use a text file or a CSV file with the lists of end-user accounts to
be used with McAfee Quarantine Manager. The password and logon information is
sent to the user’s email address once the user is created.
84
14
®
™
McAfee Quarantine Manager 6.0 User Guide
About DB Suite Utility
Creating McAfee Quarantine Manager user accounts
To create users:
1 From the Create MQM users tab, specify the delimiter to differentiate the fields in the
input file. Options are Comma, Pipe, Tab, and Semicolon.
Figure 14-1 User creation
2 Select Input file contains header if the first line of the input file contains header
information.
3 Click Browse to locate the input file that contains the list of user information.
Note
The input file can be a .txt or .csv file, containing the list of user information like Name,
Email address, Group, User type and so on.
4 In the Column number that contains user list section, specify the column number that
contains the email address of the users.
Note
You can also click on the column header that contains the email address of the
end-users. By default, the value specified is 0.
5 Before creating the user accounts, make sure to check if the domain name is
registered or added in the domains list.
6 Click Create Users, to start creating the user accounts in McAfee Quarantine
Manager.
Click Clear Log to clear the status field. Click Save Log to save the text in the Status field.
Note
85
14
®
™
McAfee Quarantine Manager 6.0 User Guide
About DB Suite Utility
Maintaining the database users
Maintaining the database users
You can use the DB Maintenance tab to create or delete database users, change the
database users password and migrate the previous version database to version 6.0.
This tab is applicable only if you are using MySQL database.
Note
To create a new database user:
1 Click Start | Programs | McAfee | McAfee Quarantine Manager DB Suite. The McAfee Quarantine
Manager DB Suite 6.0 window appears.
2 Configure the source database. Refer, Configuring the source database settings.
3 Click DB Maintenance.
4 From the Create Database user section, specify the User Name, Password and Re-type
password.
5 Select the privileges for the database user. The available options are Read-Only user
and Administrator.
6 Click Create User. The new database user is now created.
To change the password of an existing database user:
1 Click Start | Programs | McAfee | McAfee Quarantine Manager DB Suite. The McAfee Quarantine
Manager DB Suite 6.0 window appears.
2 Configure the source database. Refer, Configuring the source database settings.
3 Click DB Maintenance.
4 From the Manage existing user section, select a User Name from the drop-down list,
specify the Password and Re-type password.
5 Click Change Password.
To delete an existing database user:
1 Click Start | Programs | McAfee | McAfee Quarantine Manager DB Suite. The McAfee Quarantine
Manager DB Suite 6.0 window appears.
2 Configure the source database. Refer, Configuring the source database settings.
3 Click DB Maintenance.
4 From the Manage existing user section, select a User Name from the drop-down list.
5 Click Delete User.
To migrate the database from older versions to version 6.0, see Migrating the database
to version 6.0 on page 10.
86
14
®
™
McAfee Quarantine Manager 6.0 User Guide
About DB Suite Utility
Archiving or Retrieving the existing MySQL database
Archiving or Retrieving the existing MySQL database
You can archive or retrieve the existing MySQL database only using command line
arguments given below:
To backup or archive the existing database:
1 Click Start | Run, type services.msc, then click OK.
2 From the Services window, stop the McAfee Quarantine Manager service.
3 From the command prompt, go to the bin directory of MySQL installation folder.
4 Execute the following command:
mysqldump --complete-insert -n --add-drop-table -R <Database> -u
<DatabaseUser> -p<DatabaseUserPassword> -r "<CompletePathofBackupFile>"
For example: If the Database name is mqm, Database user is root, password is calangute, and
backup file is C:\Backups\MQM\MQM60Backup.sql, use the following command:
mysqldump --complete-insert -n --add-drop-table -R mqm -u root -pcalangute
-r "C:\Backups\MQM\MQM60Backup.sql"
To retrieve or restore the existing database:
1 Click Start | Run, type services.msc, then click OK.
2 From the Services window, stop the McAfee Quarantine Manager service.
3 From the command prompt, go to the bin directory of MySQL installation folder.
4 Execute the following command:
mysql -e "source <CompletePathofBackupFile>" -u <DatabaseUser>
-p<DatabaseUserPassword> <Database>
For example: If the Database name is mqmv6, Database user is scott, password is tiger, and
backup file is C:\Backups\MQM\MQM60Backup.sql, use the following command:
mysql -e "source C:\Backups\MQM\MQM60Backup.sql" -u scott -ptiger mqmv6
To schedule a task to backup the existing database
1 Create a batch file with the following information:
md c:\backups\%DATE%\
cd c:\backups\%DATE%\
<InstallPath>\bin\mysqldump.exe --complete-insert -n --add-drop-table -R
<database-name> -u <username> -p<password> -r "MQM60Backup.sql"
2 Click Start | Control Panel | Scheduled Tasks | Add Scheduled Task.
3 Click Next and browse for the batch file created in Step 1.
4 Click Next.
5 Follow the on-screen instructions to schedule the task and complete the wizard.
87
14
®
™
McAfee Quarantine Manager 6.0 User Guide
About DB Suite Utility
Archiving or Retrieving the existing MySQL database
88
14
15
Frequently Asked Questions
Where can I find out more about the effect of a virus?
Visit our website. See the Virus Information Library in http://vil.nai.com.
What should I do if I find a new virus?
If you suspect you have a file that contains a virus and the anti-virus software engine
does not recognize it, please send us a sample. For information, See WebImmune in
https://www.webimmune.net/default.asp.
How do I contact Technical Support?
See http://www.mcafee.com/us/support/ for details.
Before calling the technical support, try to have the following information ready:
The version of the operating system.
The type of computer on which McAfee Quarantine Manager is installed —
manufacturer and model.
Any additional hardware that is installed.
The browser being used and its version.
A diagnostic report.
What is the recommended screen resolution for McAfee Quarantine Manager?
McAfee Quarantine Manager is best when viewed with a minimum of 1024 x 768 pixels
screen resolution or more (for example: 1280 x 1024 pixels).
Is there any tool to integrate McAfee Quarantine Manager and Outlook?
Yes. It’s known as McAfee Customer Submission Tool (MCST).
What is the recommended time-interval for sending an email digest?
Once in a week. See Configuring and scheduling email digests on page 60.
How do I change the sender address in the email digests?
Click Settings and Diagnostics | Email Digests | Digest Mail, and type the desired sender email
address in the Sender/Subject field.
How do I set the authentication mode to Active Directory or Lotus Domino?
Click Settings and Diagnostics | User Management | General, and set the authentication to
Active Directory or Lotus Domino. See Managing users on page 58.
89
®
™
McAfee Quarantine Manager 6.0 User Guide
Frequently Asked Questions
Which versions of McAfee Quarantine Manager can be upgraded or migrated to
this version?
You can migrate from version 4.1 Patch 1, 4.1.1, and 5.0 Patch 1 to this version. See
Migrating the database to version 6.0 on page 10.
How long does it take to convert data from MySQL database to Microsoft SQL
server database?
It takes approximately one hour to convert 45GB data. See Converting the database on
page 84.
When should I reassign users?
Reassign users if a user is leaving the organization or the user account is being deleted
from the LDAP server. See Reassigning users on page 81.
How do I optimize or shrink the MySQL database?
Currently the Optimization feature is not provided in this version of McAfee Quarantine
Manager. However if you want to optimize the database, follow the steps given below:
a From the command prompt, go to the bin directory of MySQL installation folder.
b Execute the following command to log on to the MySQL database:
mysql --user=<database user name> --password=<database password>
<database name>
For example:
mysql --user=scott --password=tiger mqm
where the database user name is scott, password is tiger and the database is mqm.
c Execute the following command to optimize the database:
call pOptimize();
d Once the optimization is complete the MySQL prompt appears.
e Execute the following command to exit the MySQL database:
quit
How do I fine tune my MySQL database to improve the performance of McAfee
Quarantine Manager?
a Go to the <MySQL> installation folder and edit the my.ini file.
b Modify the following parameters with the values specified below:
Innodb_buffer_pool_size = 1G
Innodb_Log_File_Size = 512M
Innodb_Thread_Concurrency = 512
c From the services console, restart the MySQL for McAfee Quarantine Manager service.
How do I fine tune my Microsoft SQL Server 2005 database to improve the
performance of McAfee Quarantine Manager?
a Open SQL Server Management Studio.
b Right-click the database mqm and click Properties.
90
15
®
™
McAfee Quarantine Manager 6.0 User Guide
Frequently Asked Questions
c Click Files on the left pane and modify the following parameters on the right pane:
Initial size for Data file = (~30GB)
Autogrowth for Data file= 1GB
Initial size for log file= 1GB
Autogrowth for Log file = 512MB
d Click Options on the left pane and change the Recovery model to Simple on the right
pane.
e Right-click Database Instance and click Properties.
f
Click Advanced on the left pane and change the Network Packet Size to 32767 on the
right pane.
g Close SQL Server Management Studio.
91
15
®
™
McAfee Quarantine Manager 6.0 User Guide
Frequently Asked Questions
92
15
Index
A
group 51
about
import 51
database users 86
organize 50
DB Suite utility 83
dbsuite 83
access
quick 6
account
active directory 58
add
administrator 71
alias 71
blacklist 50
domains 72
extensions 27
policy extension 27
configuration 80
password 80
client computer 25, 26
columns 47
assign 73
response 62
schedule 60
before 18
communications 66
Microsoft SQL Server 18
MySQL 18
source database 83
SQL Server 18
connected 41
connected McAfee products 41
contact 89
user-based 61
digest mail 61
options 61
Digest Response tab 62
digests 57
domains 72
assigned 73
downtime 69
conventions used in the guide 7
E
convert 84
edit
database 84
digest 62
MySQL 84
email digests 60
SQL 84
emails 69
create
custom 69
database user 86
B
end-users 84
backup 87
query 31
database 87
format 62
preview 62
configure
audience 7
authentication 18
digest
communications 66
assigned 73
authenticate 58, 59
diagnostics 57, 64
command-line 25, 27
super 36
archive file 15
deselect 47
clear 41
domain 36
archive 87
accounts 59
deploy 24
MySQL 26
administrators 35
wake-up call 29, 32
delete 47
delete all 47
check in 25
administrator roles 36
agent 23
debug log 64
change
whitelist 50
Advanced Reports tab 42
create user accounts 85
C
modify 73
accounts 59
shrink 90
enforce
policies 29
ePolicy Orchestrator 23
criteria 46
adding systems 23
bar graph 43
CSV file 73
agent 23
before
custom notification 69
check in 25
technical support 89
blacklist 49
Blacklist&Delete 47
global 50
personal 78
blacklists
export 52
dashboard 29
D
deploy 24
dashboard 40
ePolicy Orchestrator 29
database
query 30
reports 30
error report 66
downtime 69
events 68
fine tune 90
exceptions
restore 87
93
®
™
McAfee Quarantine Manager 6.0 User Guide
report 66
Index
O
default 42
export 52
optimize 90
requirements 10
extension
organize 50
reset 41
overview
resources, for product information 8
policy 27
report 28
dashboard 40
restore 58
false negatives 41
parameters 25, 27
retrieve 87
false positives 41
password 80
fine tune
phish 45
S
pie chart 43
sample 77
policies 29
schedule
F
database 87
P
database 90
G
generate
ePolicy Orchestrator events 68
configure 28
preview
import 52
administrator 73
product information, where to find 8
McAfee Quarantine Manager 17
product log 64
MySQL 16
PUPs 45
testing 20
purge 63
integrate
timeout 69
Settings and Diagnostics 57
blacklist 47
blacklist for group 47
blacklist&delete 47
download 46
L
release 46
LDAP server 59
search 46
log on
whitelist 47
shrink 90
signing up 75
Simple Reports 42
spam 45
spam scores 43
Statistics 40
statistics 40
submit
whitelist and release 47
administrators 35
setup
quick 13
quarantined item 45
users 36
send 29
agent wake-up call 32
Q
administrators 35
domain 46
session
user-based 63
interfaces 35
users 36, 75
within results 47, 55
select
digest 62
Product Log 64
users 75
user submissions 54
Product Information tab 42
DB Suite 19
interface
quarantined item 46
port 67
identify 53
ePolicy Orchestrator 23
search 45, 76
create 28
preinstall 9
install
synchronize 60
enforce 29
I
domains 72
digests 60
policy
reports 68
graphical reports 42
roles 36
queries 30
spam sample 77
submitted
release 53
quick search 41
M
magnify 41
manage
account 78
spam 53
R
supported
reassign 81, 90
databases 10
users 81
database 62
refresh 41
digests 60
remove
operating system 10
synchronize 57
users 59
domains 72
client computer 32
email alias 79
mysql 21
users 58
policy 34
Talkback 57
maximum item age 58
quarantine manager 20
migrate 10
report 34
miscellaneous 69
modify
accounts 59
T
Technical Support 89
test 20
connected McAfee products 41
report
time span 42
errors 66
timeout 69
reports
types
advanced 42
administrators 36
94
®
™
McAfee Quarantine Manager 6.0 User Guide
Index
U
uninstall
McAfee Quarantine Manager 20
unwanted content 45
user interface 35
user-based
digest 61
purge 63
users 36
Using 17, 19
V
view
product log 64
search results 46
view results 76
virus 45
W
WebImmune 89
whitelist 47, 49
global 50
personal 79
release 47
Whitelist for Group 47
Whitelist&Release 47
whitelists
export 52
group 51
import 51
organize 50
wildcards 46
95
Copyright © 2008 McAfee, Inc. All Rights Reserved.
mcafee.com