1
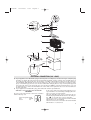
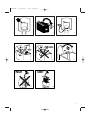
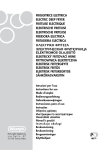
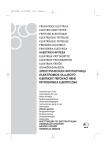
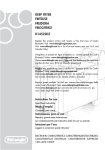
A5-278IDL
10-12-2003
13:51
Pagina 1
FRIGGITRICE ELETTRICA
ELECTRIC DEEP FRYER
FRITEUSE ELECTRIQUE
ELEKTRISCHE FRITEUSE
ELEKTRISCHE FRITEUSE
FREIDORA ELECTRICA
FRITADEIRA ELECTRICA
H§EKTPIKH ºPITEZA
ELEKTRISK FRITYRGRYTE
ELEKTRISK FRITUREGRYDE
ELEKTRISK FRITÖS
SÄHKÖRASVAKEITIN
ùãÖäíêàóÖëäÄü îêàíûêçàñÄ
ELEKTROMOS OLAJSÜTŐ
ELEKTRICK¯ FRITOVACÍ HRNE
FRYTKOWNICA ELEKTRYCZNA
Istruzioni per l’uso
Instructions for use
Mode d’emploi
Bedienungsanleitung
Gebruiksaanwijzingen
Instrucciones para el uso
Instruções
O‰ËÁ›Â˜ ¯Ú‹Û˘
Brugsanvisninger
Bruksanvisning
Bruksanvisningar
Käyttöohje
àçëíêìäñàà èé ùäëèãìÄíÄñàà
HASZNÁLATI UTASÍTÁS
NÁVOD K POUÎITÍ
INSTRUKCJA OBS¸UGI
A5-278IDL
10-12-2003
13:51
Pagina 2
A
Q
R
O
P
B
C
N
M
D
E
L
F
K
G
I
J
H
ELECTRICAL CONNECTION (U.K. ONLY)
A) If your appliance comes fitted with a plug, it will incorporate a 13 Amp fuse. If it does not fit your socket, the plug
should be cut off from the mains lead, and on appropriate plug fitted, as below. warning: Very carefully dispose of
the cut off plug after removing the fuse: do not insert in a 13 Amp socket elsewhere in the house as this could cause
a shock hazard. With alternative plugs not incorporating a fuse, the circuit must be protected by a 15 Amp fuse. If the
plug is a moulded-on type, the fuse cover must be re-fitted when changing the fuse using a 13 Amp Asta approved
fuse to BS 1362. In the event of losing the fuse cover, the plug must NOT be used until a replacement fuse cover can
be obtained from your nearest electrical dealer. The colour of the correct replacement fuse cover is that as marked on
the base of the plug.
B) If your appliance is not fitted with a plug, please follow the instructins provided below:
WARNING - THIS APPLIANCE MUST BE EARTHED
IMPORTANT
The wires in the mains lead are coloured in accordance
with the following code:
E
Green and yellow Earth
Blue
Neutral
Brown
Live
L
N
As the colours of the wires in the mains lead may not correspond with the coloured markings identifying the terminals in your plug, proceed as follows:
The green and yellow wire must be connected to the terminal in the plug marked with the letter E or the earth symbol
or coloured green or green and yellow.
The blue wire must be connected to the terminal marked
with the letter N or coloured black.
The brown wire must be connected to the terminal marked
with the letter L or coloured red.
2
A5-278IDL
10-12-2003
13:51
Pagina 3
1
2
3
NO!
MAX
level
5
4
NO!
6
OK!
7
8
3
A5-278IDL
10-12-2003
13:51
Pagina 8
GB
READ THIS INSTRUCTION BOOKLET CAREFULLY
BEFORE INSTALLING AND USING THE APPLIANCE.
THIS IS THE ONLY WAY TO ENSURE THE BEST
RESULTS AND MAXIMUM SAFETY FOR THE USER.
DESCRIPTION OF THE APPLIANCE:
A.
B.
C.
D.
E.
F.
G.
H.
I.
J.
K.
L.
M.
N.
O.
P.
Q.
R.
Thermostat knob for setting the temperature
Oil temperature light (red, green)
Safety micro-switch
MIN– MAX level indicators
Basket support
Viewing window (if present)
Filter (if present)
Casing
Handles
Slots for fitting the control unit
Cover with handle
Removable bowl
Basket with folding handle
Electrical heating element
Cable compartment
Guides for attaching the control unit
Thermal safety device reset
Control unit
IMPORTANT WARNINGS:
• This appliance has been designed to fry foods exclusively for household use; it must not be used for other
purposes and must not be modified or tampered with
in any way.
• Do not turn the appliance on if it is damaged (e.g.
after having been dropped) or if operating problems
arise. Contact a service centre authorised by the
manufacturer.
• Before using the appliance check that the mains voltage corresponds to the value specified on the
appliance rating plate.
• Only connect the appliance to power points with a
minimum rating of 10A that are properly earthed.
• The power cable for this appliance must not be replaced by the user, in that this operation requires the use
of special tools. In the event of damage, only contact
a service centre authorised by the manufacturer.
• Do not remove the plug by tugging the power cable:
always use the plug itself.
• The power cable must not be placed near or against
the hot parts of the appliance, sources of heat or
sharp edges.
• Do not position the appliance near sources of heat or
where water may be present.
• Serious burns may be caused by the deep fryer falling. Do not leave the cable hanging from the edge of
the surface the deep fryer rests on, where it may be
8
within the reach of a child or represent an obstacle to
the user. Do not use extension cords.
• During operation the appliance is hot; as a consequence, only use the handles and knobs.
DO NOT LEAVE THE APPLIANCE WITHIN THE
REACH OF CHILDREN.
• Do not move the deep
fryer when the oil is hot, as
this risks causing serious
burns. The appliance must
only be moved when cold,
using the handles.
• The deep fryer must be
operated only after having
correctly filled it with oil or
liquefied fat; if heated
when empty, a thermal
safety device is activated
to stop operation.
• Always respect the MIN
and MAX levels indicated
inside the removable container.
• The safety micro-switch ensures that the heating element operates only if the control unit is correctly positioned.
• Always keep the appliance disconnected during cleaning operations and when not in use.
• Never immerse the control unit, the cable and the
electrical plug in water or other liquids.
• The appliance is not intended for use by young
children or infirm persons without supervision.
• Young children should be supervised to ensure
that they do not play with the appliance.
• The oil and fat are inflammable; if these substances
catch fire, immediately disconnect the appliance from
the power point and dampen the fire using the lid or
a blanket. Never use water to extinguish the flames.
• When removing the bowl, always wait for the oil or
fat to cool completely.
• Keep these instructions.
@@@
;;;
QQQ
;;;
QQQ
@@@
@@@
;;;
QQQ
@@@
;;;
QQQ
THERMAL SAFETY DEVICE
The appliance is fitted with a thermal safety device that
stops the appliance from heating in the event of incorrect use or irregular operation. Once the appliance has
cooled, using a toothpick or similar, delicately press the
safety device reset button “Q” marked RESET (see Fig.
1). If the appliance does not start operating again, contact a service centre authorised by the manufacturer.
A5-278IDL
10-12-2003
13:51
Pagina 9
OPERATING INSTRUCTIONS
END OF FRYING TIME
Before using the deep fryer for the first time, carefully
clean, using warm water and dishwashing detergent,
the basket, the bowl and the cover. The control unit,
power cable and heating element may be cleaned using
a damp cloth. Check that water does not enter into the
control unit and that there is no residual water in the bottom of the removable bowl. Carefully dry all the parts.
Check that the control unit is properly fastened to the
deep fryer body. The safety micro-switch “C” will not
allow the appliance to be operated if the control unit “R”
is not correctly positioned in the casing “H”.
The deep fryer is now ready for use.
• When the set cooking time has elapsed, lift the basket
“M” and check that the food has been cooked to the
required colour.
• If the food is completely cooked, turn the appliance
off by moving the thermostat knob “A” to the “•”
position. The indicator light is green.
• Unplug from the mains socket.
• Allow the excess oil to drain by hooking the basket
“M” onto the support “E” on the bowl.
• N.B. If cooking requires two phases or more than one
cooking cycle is to be performed, at the end of the first
phase, hook the basket "M" to the basket support "E"
and wait until the light becomes green, indicating that
the oil is again at the set temperature. Then slowly
place the basket “M” in the oil a second time.
FILLING WITH OIL OR FAT
• Remove the cover “K”, lifting it by the handle. Turn the
folding handle of the basket until it locks into place
(pos. 2, Fig. 2). Remove the basket “M” by lifting it
upwards.
• Remove the length of cable required to connect the
appliance to the mains, from the cable compartment
“O” (see Fig. 3).
• If oil is used, pour it into the bowl “L” until reaching
the maximum level indicated (see Fig. 4). Never
exceed this limit, as oil may overflow from the container. The level of oil must always be between the maximum and minimum limits, “D” (3 or 4 litres max.
depending on version). For best results, use good
quality peanut oil.
• If lumps of fat are used, cut the lumps into pieces and
melt them in another container, then pour the liquefied fat into the deep fryer bowl. Never melt the fat in
the basket or on the deep fryer heating element (see
Fig. 5).
• Close the cover “K”.
PREHEATING
• Place the food to be fried in the basket “M”, without
overfilling (1 kg max. for the 3 litre version and 1.3
kg for the 4 litre version). Check that the handle of the
basket is correctly positioned (pos. 2 in Fig. 2).
• Move the thermostat knob “A” (see Fig. 6) to the
required temperature (see cooking table). The indicator light "B" changes from green to red.
• When the set temperature is reached, the indicator
light "B" becomes green.
STARTING FRYING
• As soon as the indicator light "B" is green, lower the
basket "M" into the oil very slowly to avoid the hot oil
splashing or overflowing.
• A significant amount of steam will be released: this is
completely normal.
COOKING HINTS
HOW LONG THE OIL OR FAT LASTS
The level of oil or fat must never fall below the minimum.
Every now and then it must be completely changed. The
life of the oil or fat depends on what foods are being
fried. Food coated in breadcrumbs, for example, dirties
the oil more than simple frying. As for any deep fryer,
the oil deteriorates after being heated a number of
times! Therefore, even if used correctly, it should be
completely changed on a regular basis.
CORRECT FRYING
The recommended temperature should be followed for
all recipes. If the temperature is too low, the oil will be
absorbed. If the temperature is too high, a crust will
form immediately and the inside of the food will not be
cooked.
The food being fried must only be immersed in the oil
when the oil has reached the correct temperature, that
is when the light “B” has turned off.
Never overfill the basket, as this may cause a sudden
drop in the temperature of the oil and thus greasier and
less uniform frying.
Check that the food is sliced into thin, even pieces. If the
slices are too thick, the food will not be well cooked inside, despite its appearance, while even slices will be perfectly cooked at the same time.
Carefully dry the food before immersing it in the oil or
fat, to avoid oil being sprayed; furthermore, wet food
will be less crisp after cooking (especially potatoes).
Foods with a high water content (fish, meat, vegetables)
should be crumbed before frying, making sure the
excess flour or breadcrumbs are removed before
immersing the food in the oil.
9
A5-278IDL
10-12-2003
13:51
Pagina 10
FRYING NON-FROZEN FOOD
When referring to the following table, please keep in mind that the cooking times and temperatures are approximate, and must be adjusted according to the quantity of food and personal tastes.
Food
Fresh potato chips Half portion
Full portion
Max quantity. (g.)
Temperature (°C)
800
170
1300 (4 litre version)
170
1000 (3 litre version)
170
Time (minutes)
phase1
8 - 10
phase 2 1-2
phase 1 11 – 13
phase 2 2-4
phase 1 11 – 13
phase 2 2-4
9 - 11
10-12
10-12
8 - 10
6-8
Fish
Calamari
Canestrelli
Sardines
Prawns
Tongue-fish
600
600
600
600
500
140
140
140
140
140
Meat
Pork cutlets
Chicken cutlets
Meatballs
500
500
700
160
160
160
8-9
8 - 10
8 - 10
Vegetables
Artichokes
Cauliflower
Mushrooms
Aubergines
Courgettes
400
600
500
200
500
150
150
150
150
150
15-17
10-11
8 - 10
9 - 11
13-15
FRYING FROZEN FOODS
Frozen foods are stored at very low temperatures. Consequently, they significantly lower the temperature of the liquid
used for cooking.
For best results, never exceed the maximum recommended quantity of food when frying.
Frozen foods are often covered with a layer of ice; this ice should be removed before cooking. Immerse the basket
in the oil very slowly to prevent the oil from boiling over.
The cooking times are approximate and must be adjusted according to the initial temperature of the food being fried
and the temperatures indicated on the packaging of the food.
Food
Max quantity. (g.)
Temperature (°C)
Time (minutes)
Pre-cooked frozen potato chips
Potato croquettes
Fish
Fish-fingers
Fish fillets
Meat Chicken cutlets
600
700
500
500
300
180
180
180
180
180
9 - 11
9 - 11
7-8
6-7
5-6
10
A5-278IDL
10-12-2003
13:51
Pagina 11
CLEANING
Before cleaning, make sure that the power plug is
disconnected.
Never immerse the deep fryer in water and never place
it under running tap water (see Fig. 7). The infiltration of
water into the control unit may cause electrocution.
Check that the oil has cooled down, and then remove
the control unit and drain the oil. Remove the deposits
from the bowl using a sponge or absorbent paper.
Except for the control unit, power cable and heating element, all the other parts can be cleaned with warm
water and dishwashing detergent (see Fig. 8000).
Never use abrasive sponges, to avoid damaging the
deep fryer.
When this procedure has been completed, carefully
dry all parts, to prevent hot oil from spraying out
during operation.
OPERATING FAULTS
FAULT
Bad smell
The oil
overflows
CAUSE
REMEDY
The oil has deteriorated.
The cooking liquid is unsuitable.
Replace the oil or fat.
Use high quality peanut or vegetable oil.
The oil has deteriorated and causes too
much foam.
You have immersed food which is not
sufficiently dry in the hot oil.
The basket has been immersed too
quickly. The oil level in the deep fryer is
over the maximum limit.
Replace the oil or fat.
Dry the food well.
Immerse it slowly.
Reduce the amount of oil in the
fryer bowl.
Food does not brown during cooking
Oil temperature is too low.
The basket is over loaded
Select a higher temperature.
Reduce a food quantity.
The oil does not heat up
The deep fryer has previously been used
without oil in the fryer bowl, causing the
thermal safety device to break.
Contact the Service Centre (the
device must be replaced).
11